


 Loading...
G
CDX-497/397
COMPACT DISC PLAYER
LECTEUR COMPACT DISQUE
OWNER’S MANUAL MODE D’EMPLOI BEDIENUNGSANLEITUNG BRUKSANVISNING MANUALE DI ISTRUZIONI MANUAL DE INSTRUCCIONES
GEBRUIKSAANWIJZING
ИНСТРУКЦИЯ ПО ЭКСПЛУАТАЦИИ

CAUTION: Read this before operating your unit.
1To assure the finest performance, please read this manual carefully. Keep it in a safe place for future reference.
2Install this sound system in a well ventilated, cool, dry, clean place with at least 10 cm on the top, 10 cm on the left and right, and 10 cm at the back of CDX-497/CDX-397 — away from direct sunlight, heat sources, vibration, dust, moisture, and/or cold.
3Locate this unit away from other electrical appliances, motors, or transformers to avoid humming sounds.
4Do not expose this unit to sudden temperature changes from cold to hot, and do not locate this unit in an environment with high humidity (i.e. a room with a humidifier) to prevent condensation inside this unit, which may cause an electrical shock, fire, damage to this unit, and/or personal injury.
5Avoid installing this unit where foreign object may fall onto this unit and/or this unit may be exposed to liquid dripping or splashing. On the top of this unit, do not place:
-Other components, as they may cause damage and/or discoloration on the surface of this unit.
-Burning objects (i.e. candles), as they may cause fire, damage to this unit, and/or personal injury.
-Containers with liquid in them, as they may fall and liquid may cause electrical shock to the user and/or damage to this unit.
6Do not cover this unit with a newspaper, tablecloth, curtain, etc. in order not to obstruct heat radiation. If the temperature inside this unit rises, it may cause fire, damage to this unit, and/or personal injury.
7Do not plug in this unit to a wall outlet until all connections are complete.
8Do not operate this unit upside-down. It may overheat, possibly causing damage.
9Do not use force on switches, knobs and/or cords.
10When disconnecting the power cable from the wall outlet, grasp the plug; do not pull the cable.
11Do not clean this unit with chemical solvents; this might damage the finish. Use a clean, dry cloth.
12Only voltage specified on this unit must be used. Using this unit with a higher voltage than specified is dangerous and may cause fire, damage to this unit, and/or personal injury. YAMAHA will not be held responsible for any damage resulting from use of this unit with a voltage other than specified.
13Do not attempt to modify or fix this unit. Contact qualified YAMAHA service personnel when any service is needed. The cabinet should never be opened for any reasons.
14When not planning to use this unit for long periods of time (i.e. vacation), disconnect the AC power plug from the wall outlet.
15Be sure to read the “TROUBLESHOOTING” section on common operating errors before concluding that this unit is faulty.
16Before moving the unit, first remove the disc from the unit, press POWER to turn the unit off, and then disconnect the AC power plug from the wall outlet.
17Condensation will form when the surrounding temperature changes suddenly. Disconnect the power cable from the outlet, then leave the unit alone.
18When using the unit for a long time, the unit may become warm. Turn the power off, then leave the unit alone for cooling.
19Install this unit near the wall outlet and where the AC power plug can be reached easily.
As long as this unit is connected to the AC wall outlet, it is not disconnected from the AC power source even if you turn off this unit by POWER.
DANGER
When this unit is plugged to the wall outlet, do not place your eyes close to the opening of the disc tray and other openings to look into inside.
WARNING
TO REDUCE THE RISK OF FIRE OR ELECTRIC SHOCK, DO NOT EXPOSE THIS APPLIANCE TO RAIN OR MOISTURE.
Laser component in this product is capable of emitting radiation exceeding the limit for Class 1.
For U.K. customers
If the socket outlets in the home are not suitable for the plug supplied with this appliance, it should be cut off and an appropriate 3 pin plug fitted. For details, refer to the instructions described below.
Note:
The plug severed from the mains lead must be destroyed, as a plug with bared flexible cord is hazardous if engaged in a live socket outlet.
SPECIAL INSTRUCTIONS FOR U.K. MODEL
IMPORTANT:
THE WIRES IN MAINS LEAD ARE COLOURED IN ACCORDANCE WITH THE FOLLOWING CODE:
Blue: NEUTRAL
Brown: LIVE
As the colours of the wires in the mains lead of this apparatus may not correspond with the coloured markings identifying the terminals in your plug, proceed as follows:
The wire which is coloured BLUE must be connected to the terminal which is marked with the letter N or coloured BLACK. The wire which is coloured BROWN must be connected to the terminal which is marked with the letter L or coloured RED. Making sure that neither core is connected to the earth terminal of the three pin plug.
i En |
i |

CONTENTS
FEATURES ...................................................... |
2 |
SUPPORTED DISC TYPES ............................. |
2 |
UNPACKING .................................................... |
3 |
NOTES ABOUT THE REMOTE |
|
CONTROL ....................................................... |
3 |
CONNECTIONS.............................................. |
4 |
IDENTIFICATION OF COMPONENTS ........... |
5 |
Front panel ................................................... |
5 |
Display ......................................................... |
5 |
Remote control ............................................. |
6 |
BASIC OPERATION ....................................... |
7 |
To pause playback ....................................... |
8 |
To stop playback .......................................... |
8 |
To turn off the power .................................... |
8 |
To play back the desired track ..................... |
8 |
To search an folder/file |
|
on an MP3 or WMA disc (CDX-497 only) ..... |
8 |
To skip to the beginning of the desired |
|
track (Skip search) ....................................... |
9 |
To advance or reverse playback rapidly |
|
(Manual search) ........................................... |
9 |
Changing display ....................................... |
10 |
Changing brightness of the display ............ |
11 |
Automatic spacing ...................................... |
11 |
Adjusting the output level |
|
(CDX-497 only) ......................................... |
11 |
RANDOM-SEQUENCE PLAY ...................... |
12 |
REPEAT PLAY .............................................. |
12 |
Repeat a selected item .............................. |
12 |
Repeat A-B ................................................. |
13 |
PROGRAM PLAY ......................................... |
14 |
INDEX SEARCH ........................................... |
15 |
TRACK PROGRAMMING FOR |
|
RECORDING TO TAPE ................................. |
16 |
Automatic tape-programming |
|
(for Audio CD) ............................................ |
16 |
Manual tape-programming |
|
(for Audio CD) ............................................ |
18 |
Random sequential tape-programming |
|
(for Audio CD) ............................................ |
19 |
Automatic searching for the |
|
peak level on a disc (for Audio CD) ............ |
20 |
CD SYNCHRONIZED RECORDING ............ |
21 |
NOTES ABOUT DISCS ................................. |
22 |
Discs playable with this unit ....................... |
22 |
Notes about handling compact discs ......... |
22 |
TROUBLESHOOTING .................................. |
23 |
SPECIFICATIONS ........................................ |
24 |
English
1 En
Thank you for selecting this YAMAHA compact disc player.
FEATURES
CD-R,CD-RW Disc Playability
(For details, refer to page 22.)
CD-TEXT Data Display capability
Program Play
Random-Sequence Play
Single Track/Entire Disc Repeat Play
Automatic Spacing Function
Track Programming Function Useful for Recording Tracks Fitted onto Any Length of Tape
Automatic Peak Level Search Function
CD Synchronized Recording
Adjustable Display Brightness
Remote Control Capability
Optical Digital Output
(CDX-497 only)
Coaxial Digital Output
MP3, WMA Disc Playability
SUPPORTED DISC TYPES
You can enjoy music discs with this unit. Since some disc operations of this unit are limited to specific disc types, the supported disc types are indicated using the icons shown below. Each icon means that the operation is limited to the corresponding disc type. For information on supported disc standards and disc usage notes, refer to “NOTES ABOUT
DISCS” (page 22). Operations with no icon indicated are available for all disc types.
|
Music CD |
MP3,WMA (CDX-497 only) |
|||
|
|
|
|
|
|
|
Audio CD |
|
|
MP3, WMA |
|
|
|
|
|
|
|
About MP3 and WMA discs
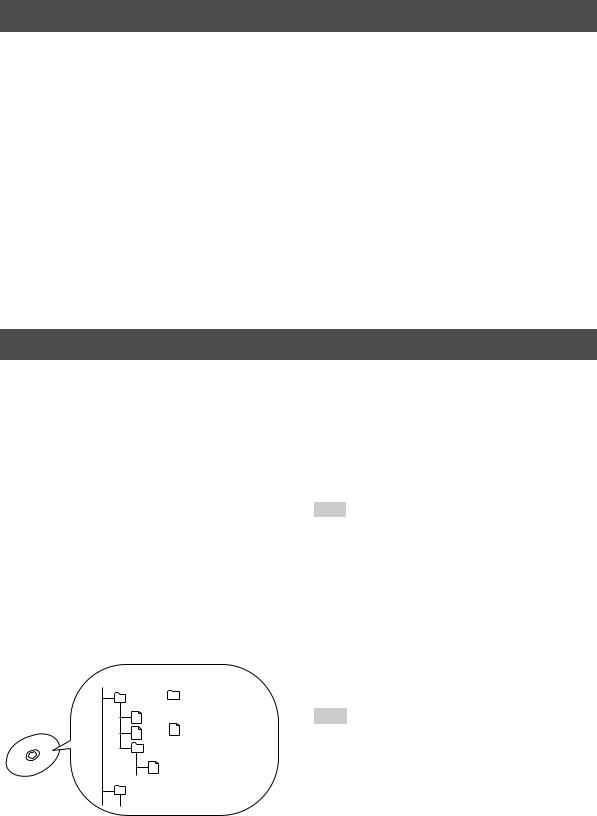
You can play back MP3 and WMA files recorded on a CD- R or CD-RW with similar uses as a music CD. This unit regards folders in the disc as albums, and files as tracks (as shown below).
Root
Album (Folder)
Track (File)
What is MP3?
“MP3 (MPEG-1 Audio Layer-3)” is a standard technology and format for compressing an audio sequence into a smallsized file. However, the original level of sound quality is preserved during playback. Some MP3 discs have the ID3 tag information.
* ID3 tag means the metadata recorded on the MP3 disc such as the song title, artist name, etc.
Notes
●Depending on recording conditions such as recording software settings, this unit may not be able to play back the disc or play back files in the order they were recorded.
●This unit is compatible with a bit rate range of 32, 64, 96, 128, 160, 192, 256 or 320 kbps and variable bit encoded MP3 files.
●This unit is compatible with a sampling frequency of 44.1, or 48 kHz.
●The disc must be ISO9660 compatible.
What is WMA?
“WMA (Windows Media Audio)” is a Microsoft file format for encoding digital audio files similar to MP3 though can compress files at a higher rate than MP3.
Notes
●This unit is compatible with a bit rate range of 192 kbps or less and variable bit encoded WMA files.
●This unit is compatible with a sampling frequency of 44.1 kHz.
●The disc must be ISO9660 compatible.
●Copyright-protected WMA files can not be played back with this unit.
2 En

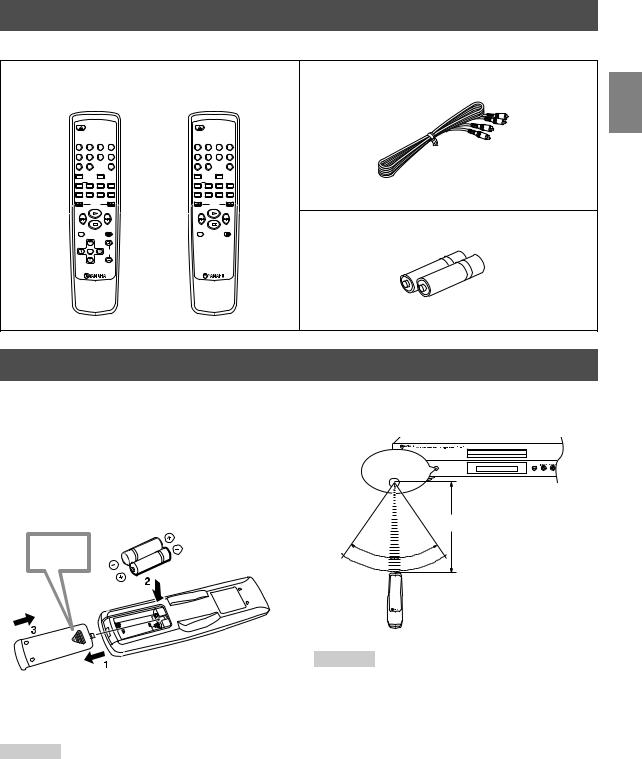
UNPACKING
Carefully remove this unit and accessories from the box. You should find the unit itself and the following accessories.
Remote control |
|
|
|
|
|
|
Audio pin cable |
(CDX-497) |
(CDX-397) |
||||||
|
OPEN/CLOSE |
|
|
OPEN/CLOSE |
|
||
1 |
2 |
3 |
4 |
1 |
2 |
3 |
4 |
5 |
6 |
7 |
8 |
5 |
6 |
7 |
8 |
9 |
0 |
|
INDEX |
9 |
0 |
|
INDEX |
DIMMER |
|
RANDOM |
|
DIMMER |
|
RANDOM |
|
REPEAT |
A–B |
PROGRAM |
CLEAR |
REPEAT |
A–B |
PROGRAM |
CLEAR |
SYNCHRO |
TAPE |
PEAK |
SPACE |
SYNCHRO |
TAPE |
PEAK |
SPACE |
|
SEARCH |
|
|
SEARCH |
|
||
TIME/INFO |
|
|
|
TIME/INFO |
|
|
Batteries (AAA, R03, UM-4) x 2 |
|
FOLDER |
|
|
|
|
|
|
FILE |
ENTER |
FILE |
|
|
|
|
|
|
|
|
OUTPUT |
|
|
|
|
|
|
|
LEVEL |
|
|
|
|
|
FOLDER |
|
|
|
|
|
|
NOTES ABOUT THE REMOTE CONTROL
Battery installation
1.Turn the remote control over and remove the battery compartment cover by sliding it in the direction of the arrow.
2.Insert the batteries (AAA, R03, UM-4) according to the polarity markings on the inside of the battery compartment.
3.Close the battery compartment cover.
Press %
Remote control operation range
Remote control |
sensor |
Within approximately 6 m
30° |
° |
|
30 |
||
|
English
Battery replacement
If you notice that the remote control must be used closer to the main unit, the batteries are weak. Replace both batteries with new ones.
Notes
●Use only AAA, R03, UM-4 batteries for replacement.
●Be sure the polarities are correct. (See the illustration inside the battery compartment.)
●Remove the batteries if the remote control is not used for an extended period of time.
●If batteries leak, dispose of them immediately. Avoid touching the leaked material or letting it come in contact with clothing, etc. Clean the battery compartment thoroughly before installing new batteries.
Notes
●There should be no large obstacles between the remote control and the main unit.
●If the remote control sensor is directly illuminated by strong lighting (especially an inverter type fluorescent lamp etc.), the remote control might not work properly. In this case, reposition the main unit to avoid direct lighting.
3 En
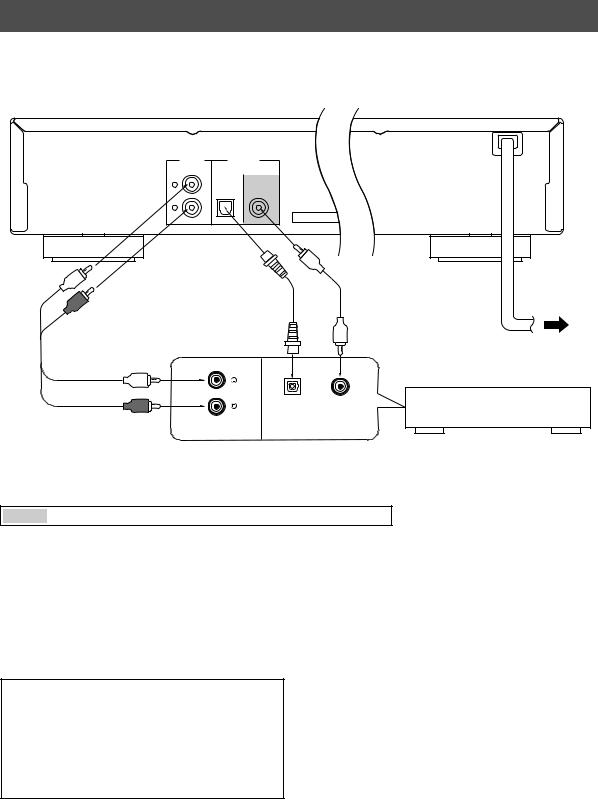
CONNECTIONS
●Before making any connection, switch OFF the power to the unit and the amplifier or other component.
●Connections should be made to the correct input terminals of the amplifier or another component.
LINE OUT |
DIGITAL OUT |
OPTICAL COAXIAL
L
R
●If the placement of this unit causes noise to another equipment, such as a tuner, separate them from each other.
Europe and U.K models
2 Optical cable |
3 Coaxial cable |
(not included) |
(not included) |
1 Audio pin cable |
To AC outlet |
(included) |
|
OPTICAL COAXIAL
Amplifier
CD |
DIGITAL IN |
The shaded part (  ) is provided for CDX-497 only.
■ To connect this unit to your amplifier, choose one of the ways listed below.
Caution Do not plug in this unit to a wall outlet until all connections are complete.
When the LINE OUT (analog) terminals of this unit are used ( 1 )
Connect these terminals to the “CD” (or “AUX”) terminals of the amplifier. For details concerning these connections, refer to the operation instructions of the amplifier being used.
*Be sure that the left (“L”) and right (“R”) of these terminals are connected to the corresponding (left and right) terminals of the amplifier or another component.
(CDX-497 only)
●The level of signals output from any of these terminals into an amplifier can be adjusted by the
OUTPUT LEVEL +/– buttons.
●When using the DIGITAL OUT (OPTICAL or COAXIAL) terminal, set the level of signals output into an amplifier to max. by using the OUTPUT LEVEL +/– buttons.
When the DIGITAL OUT (OPTICAL) terminal of this unit is used ( 2 )
●Make the connection from this terminal to the optical input terminal of an amplifier by using a commercially available optical cable.
*Use a reliable optical cable.
●This terminal can also be connected to the optical input terminal of an MD recorder etc. to record CD onto MD directly.
When the DIGITAL OUT (COAXIAL) terminal of this unit is used ( 3 )
(CDX-497 only)
Make the connection from this terminal to the digital input terminal of an amplifier by using a coaxial cable.
■ To connect this unit to the AC outlet
After you made all connections, connect the power cable of this unit to the AC outlet.
4 En

IDENTIFICATION OF COMPONENTS
( ) indicates the page number on which the controls are best described.
Front panel
The control functions on the main unit and on the remote control are virtually identical, with the exceptions below.
POWER (p. 7) |
Disc tray (p. 7) |
/ |
|
(play/pause) (p. 7) |
|
||||
|
) (open/close) (p. 7)
|
|
|
|
|
|
|
|
|
|
|
|
|
|
|
|
|
|
|
|
|
|
|
|
|
|
|
|
|
|
|
|
|
|
|
|
|
|
|
|
|
|
|
|
|
|
|
|
|
|
|
|
|
|
|
|
|
|
|
|
|
|
|
|
|
|
|
|
|
|
|
|
|
|
|
|
|
|
|
|
|
|
|
|
|
|
|
|
|
|
|
|
|
|
|
|
|
|
|
|
|
|
|
|
|
|
|
|
|
|
|
|
|
|
|
|
|
|
|
|
|
|
|
|
|
|
|
|
|
|
|
|
|
|
|
|
/ |
|
|
(p. 9) |
|
(p. 9) |
|
|
||||||
|
|
|
|
|
|
|
|
|
|
|
|
|
|
|
|
|||||||||
|
|
|
|
|
|
|
|
|
|
|
|
|
|
|
|
/ |
|
|
||||||
|
|
|
|
|
Remote control sensor (p. 3) |
|
|
|
|
|
|
|
|
|
||||||||||
|
|
|
|
|
|
|
|
|
|
|
|
|
|
|
|
|
|
|
|
|||||
|
|
|
|
|
|
|
|
|
|
|
|
|
|
|
|
|
|
|
|
|
||||
|
|
|
PHONES jack (p. 11) |
Display panel |
|
|
|
|
|
(stop) (p. 8) |
||||||||||||||
● |
/ |
|
on the main unit has both the functions of |
(play) and |
|
(pause) on the remote control. |
||||||||||||||||||
|
||||||||||||||||||||||||
|
|
|||||||||||||||||||||||
● /
/ and
and  /
/ on the main unit has both the functions of
  /
/ (skip) and
  /
/ (search) on the remote control.
The shaded part (  ) is provided for CDX-497 only.
Display
Audio CD |
|
|
|
|
|
|
|
|
|
|
|
|||
5 |
|
|
|
|
|
|
1 |
|
||||||
|
|
|
|
|
|
|
|
|
|
|
|
|
|
|
|
|
|
|
|
|
|
|
|
|
|
|
|
|
|
|
|
|
|
|
|
|
|
|
|
|
|
PROG. RANDOM ALL A |
B |
|
|
|
CD |
|
|
|
|
|
|||||||
|
|
|
|
|
|
|
|
|
|
|
|
|
||
|
|
|
|
|
|
|
|
|
|
|
|
|
||
|
|
|
|
|
|
|
|
|
|
|
|
|
|
|
3 |
2 |
|
||||||||||||
|
|
|
|
|
|
|
|
|
|
|
|
|
|
|
MP3, WMA |
(CDX-497 only) |
|
|
|
|
|
||||||||
7 |
|
|
|
|
|
|
1 |
|
||||||
|
|
|
|
|
|
|
|
|
|
|
|
|
|
|
|
|
WMA |
|
|
PROG. RANDOM ALL A |
B |
||||||||
|
MP3 |
|
|
|
|
|
||||||||
|
|
|
|
|
|
|
|
|
|
|
|
|
|
|
|
|
|
|
|
|
|
|
|
|
|
|
|
|
|
|
|
|
|
|
|
|
|
|
|
|
|
|
|
|
|
|
|
|
|
|
|
|
|
|
|
|
|
|
|
1 Lights up the icon for the selected playback mode.
2 Shows the time displays. (For details, refer to on page 10.)
3 Shows the track number selected or being played back.
4 Shows the file number.
5 Lights up when a music disc is in the disc tray.
6 Lights up when the MP3 disc is played back. 7 Lights up when the WMA disc is played back.
6 |
4 |
2 |
English
5 En
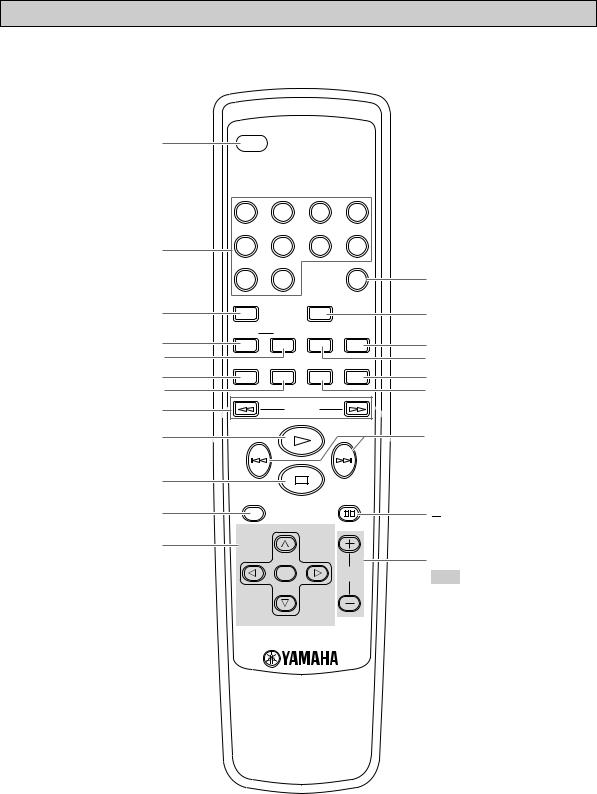
Remote control
) OPEN/CLOSE (p. 7)
Numeric buttons (p. 8)
DIMMER (p. 11)
REPEAT (p. 12)
A-B (p. 13)
SYNCHRO (p. 21)
TAPE (p. 16)
SEARCH  /
/ (p. 9)
 (play) (p. 7)

 (stop) (p. 8)
TIME/INFO(p. 10)
Cursor buttons (p. 8)
 OPEN/CLOSE
1 |
2 |
3 |
4 |
5 |
6 |
7 |
8 |
9 |
0 |
|
INDEX |
DIMMER |
|
RANDOM |
|
REPEAT |
A–B |
PROGRAM |
CLEAR |
SYNCHRO |
TAPE |
PEAK |
SPACE |
SEARCH
TIME/INFO
FOLDER
FILE ENTER FILE
OUTPUT
LEVEL
FOLDER
The shaded parts ( 
INDEX (p. 15)
RANDOM (p. 12)
CLEAR (p. 15)
PROGRAM (p. 14)
SPACE (p. 11)
PEAK (p. 20)
 /
/ (skip) (p. 9)


 (pause) (p. 8)
OUTPUT LEVEL +/– (p. 11)
Note
The initial setting of the output level is set to maximum.
) are provided for CDX-497 only.
6 En

This manual describes how to operate this unit by using the remote control.
To operate this unit from the front panel, use the corresponding buttons on the front panel.
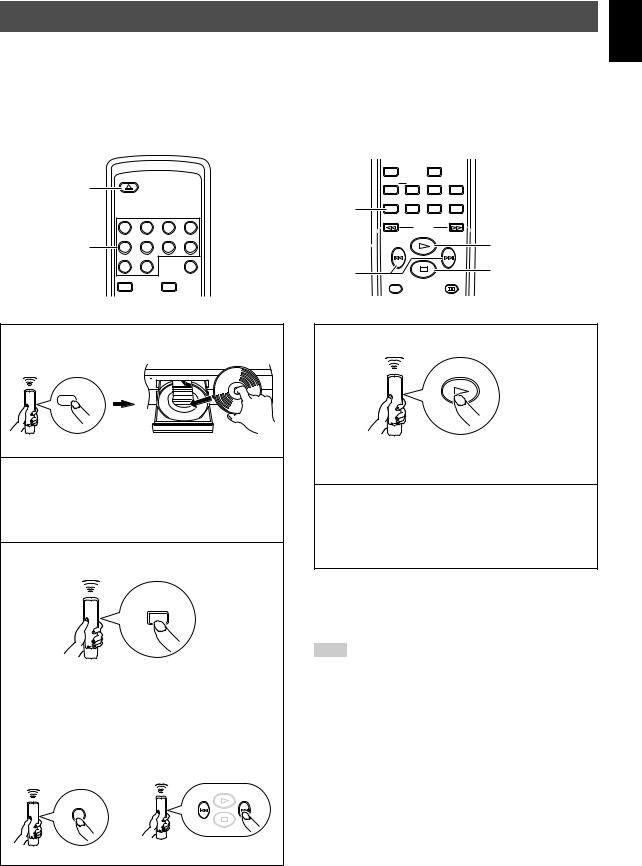
BASIC OPERATION
2, 3
 OPEN/CLOSE
1

 SEARCH

4
1 Press POWER to turn on the power. |
3 Press ) OPEN/CLOSE to close the disc tray. |
 OPEN/CLOSE
2 Press ) OPEN/CLOSE to open the disc tray, and |
4 Press to start playback. |
|
load a disc. |
Label side up. |
|
|
|
|
OPEN/CLOSE |
|
|
|
|
|
|
|
|
|
|
|
|
|
|
|
|
|
|
Disc tray |
|
|
|
|
|
|
|
|
|
||
|
|
Playback starts from the first track of the disc. |
||||
Notes
●After closing the disc tray by pressing ) OPEN/CLOSE, the display shows the following information.
Audio CD
CD
|
|
Total number |
Total recorded |
|
|
of tracks |
time of a disc |
MP3, WMA |
|
||
|
|
|
|
(CDX-497 only) |
|
|
|
●Additionally, you can close the disc tray by pressing  , a numeric button or RANDOM, or by pressing the front edge of
the disc tray gently. If the tray is closed in one of these ways, playback starts automatically; however, the display will not show the total number of tracks nor the total recorded time of the disc.
Caution
When the disc tray is open, do not touch the inside gear wheel. If you touch the gear wheel, your finger may be caught in the closing tray and injured.
Total number |
|
of files |
Gear wheel |
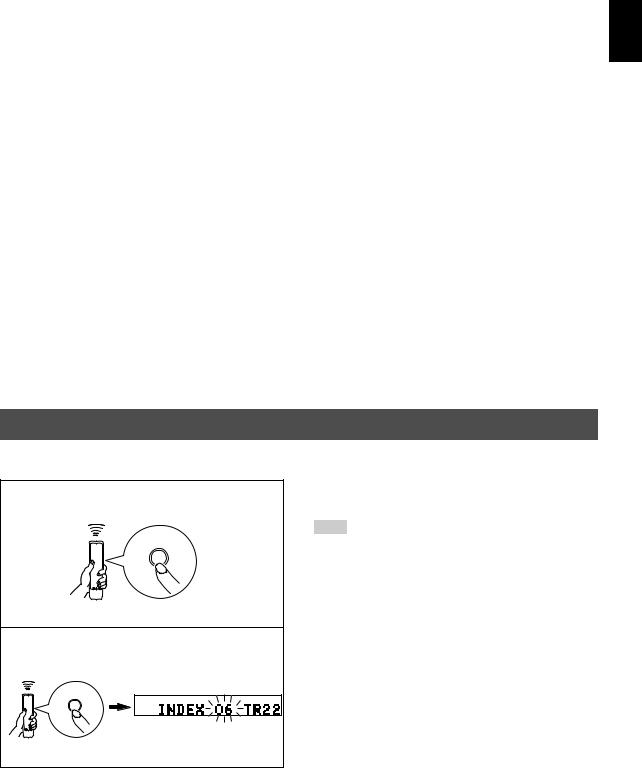
|
English
7 En
To pause playback
Press 


 .
.
To resume the playback, press 


 again (or press
  ).
).
*

 on the front panel can also be used to stop the playback temporarily or to resume the playback.
To stop playback
Press  .
.
* If you press  again, the playback starts from the first track.
To turn off the power
Press POWER again.
*If you turn on the power again with a disc still on the tray, the playback starts automatically from the first track.
To play back the desired track
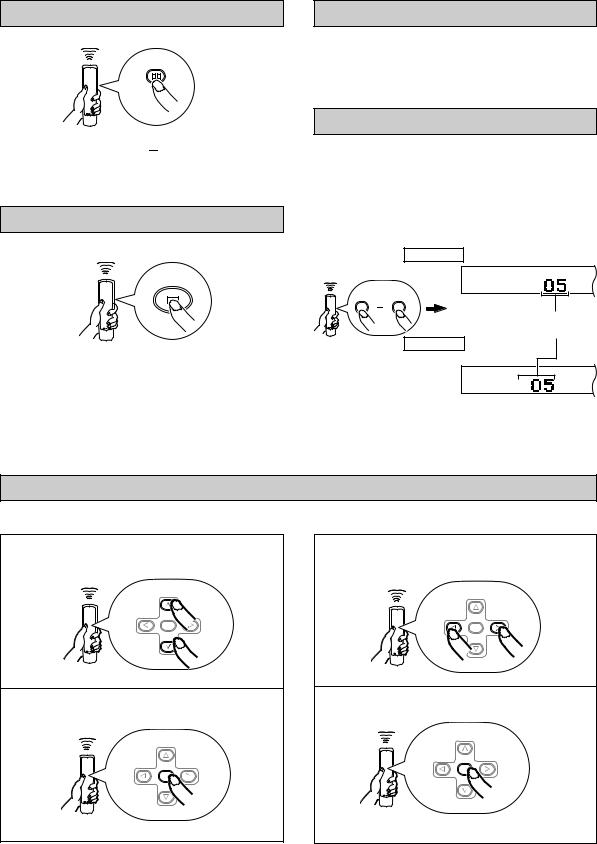
Select a desired track by using the numeric buttons. Example: To select a track number 5
Press “0” and then, press “5”.
*In case of an MP3 or WMA file which has 100 files or more, press “0” twice and then, press “5”.
*Pressing a desired track and waiting for a few second can also start playback.
Audio CD
CD
0 |
5 |
The selected track/file number is displayed
MP3, WMA (CDX-497 only)
MP3
*This display is an example of an MP3 disc.
*The file number is recognized per disc, not per folder. That is, the number assigned to each file corresponds sequence of a disc.
To search an folder/file on an MP3 or WMA disc (CDX-497 only)
You can play back the desired folder or file by using cursor buttons.
1 Press FOLDER g/h to select the desired folder.
|
FOLDER |
|
FILE |
ENTER |
FILE |
|
|
|
|
FOLDER |
|
2 Press ENTER.
FOLDER
FILE ENTER FILE
3 Press FILE q / wto select the desired file.
FOLDER
FILE ENTER FILE
FOLDER
4 Press ENTER.
FOLDER
FILE ENTER FILE
FOLDER
FOLDER
The playback starts from the selected file.
8 En
To skip to the beginning of the desired track (Skip search)
To play back from the beginning of the next track |
● These operations can also be performed when the unit is |
|||||
|
paused or stopped. |
|
|
|
||
|
● Pressing and holding |
(or |
) on the remote |
|
||
|
control skips tracks continuously toward lower (or higher) |
|||||
|
numbers. |
|
|
|
|
|
|
● These operations can also be performed using |
/ |
||||
|
and |
/ |
on the front panel. |
|
|
|
(Press once.) |
|
|
|
|
|
|
To play back from the beginning of the current track
(Press once.)
To play back from the beginning of the preceding track
(Press twice.)
English
To advance or reverse playback rapidly (Manual search)
To advance rapidly

 SEARCH

(Press and hold.)
●The sound can be heard (although slightly garbled) during manual search in either direction. This is convenient for locating a precise position within a track, or for reviewing the contents quickly.
●In case Manual search is performed, pause will be canceled.
●These operations can also be performed using  /
/ and
and  /
/ on the front panel.
To reverse rapidly

 SEARCH

(Press and hold.)
9 En

Changing display
■ When playing back an Audio CD
You can select the following displays (1 - 4) by pressing TIME/INFO. When you play back a CD-TEXT disc, the disc title, artist name, and track name (5 – 7) are also displayed.
1Elapsed time of the current track (Default)
CD
2 Remaining time of the current track
CD
TIME/INFO
3 Total recorded time of the disc
CD
4Remaining time of the disc
CD
Notes
●The text information may not be displayed with some CD-TEXT discs.
●This unit can only shows alphanumeric characters.
7Disc title
CD
6Artist name
CD
5Track name
CD
■ When playing back an MP3 or WMA
You can select the following displays (1 - 9) by pressing TIME/INFO. |
|
1Scrolling display (Default) * |
9Comment |
MP3 |
MP3 |
2Elapsed time of the current file |
8Year |
MP3 |
MP3 |
TIME/INFO |
|
3Remaining time of the current file |
7Album name |
MP3 |
MP3 |
4File name |
6Artist name |
MP3 |
MP3 |
5Song title |
|
MP3 |
|
* Scrolling display shows the song title, artist name and album name of the selected item.
Notes
●Some information of ID3 tags may not be displayed with some discs.
●This unit can only shows alphanumeric characters.
10 En
Changing brightness of the display
You can change brightness of the display |
Normal illumination |
|
in three degrees by pressing DIMMER. |
||
|
||
|
DIMMER |
|
|
Slightly dim |
|
|
Dim |
Automatic spacing
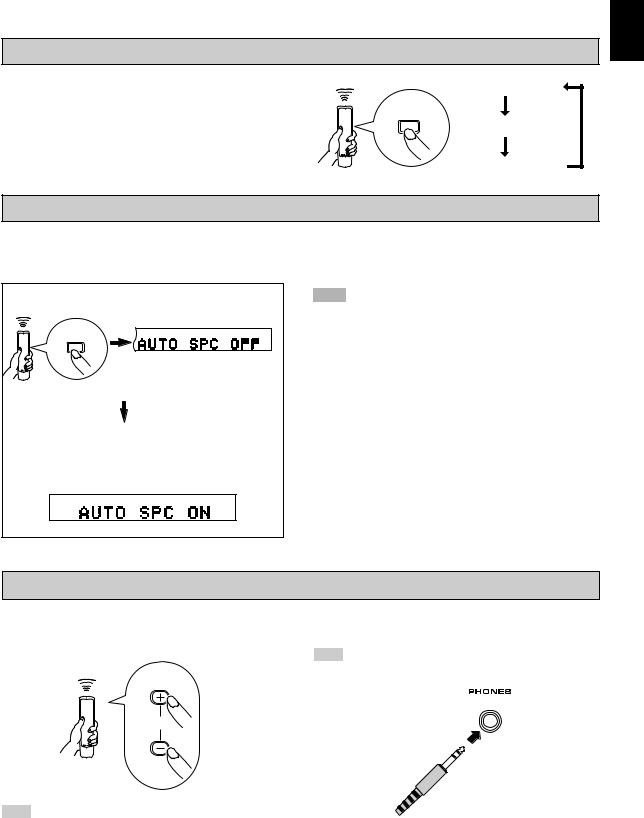
If you record a disc onto tape with an insufficient time space between tracks, the tape deck will not be able to perform blank search operations on the tape correctly. To enable a track search operation, use this function to add an interval of about 4 seconds between tracks.
Press SPACE to light up the current setting.
SPACE
Light up about 3 seconds.
While the current setting is lit up, press SPACE to change the setting between “AUTO SPACE ON” and “AUTO SPACE OFF”.
Notes
●When the automatic spacing function is in effect, the display of the total time and of the total remaining time includes each interval of the 4 seconds between tracks.
●When the automatic spacing function is in effect during the playback, “AUTO SPC 4” (the remaining seconds of the interval) appears and is counted down each time blinking at the interval between the tracks.
English
Adjusting the output level (CDX-497 only)
You can adjust the level of signals output to the amplifier by pressing OUTPUT LEVEL +/–.
OUTPUT
LEVEL
Note
While playing back an MP3/WMA disc, the level of the audio signal sent to the DIGITAL OUT (OPTICAL or COAXIAL) terminal is fixed at maximum regardless of the displayed volume level.
When you listen with headphones, connect the headphones to the PHONES jack.
Note
When starting playback, be careful of the audio output level.
11 En
RANDOM-SEQUENCE PLAY
You can play back the tracks on a disc in a random sequence.
To perform random-sequence play
Press RANDOM.
RANDOM
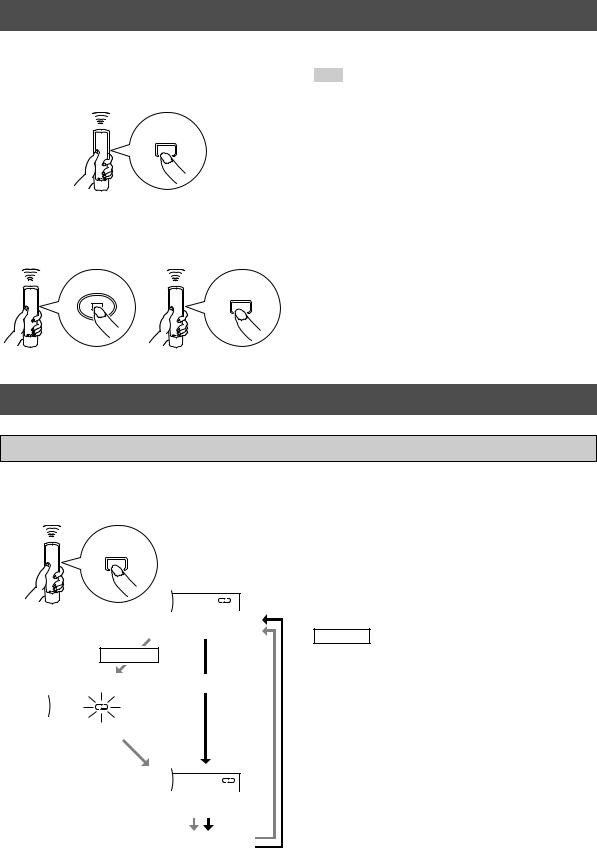
To cancel random-sequence play
Press 
 or RANDOM.
RANDOM
or
Note
If the power is switched off during random-sequence play, pressing POWER again to turn on the unit automatically restores random-sequence play.
REPEAT PLAY
Repeat a selected item
You can play back any desired track, album or the entire disc repeatedly by pressing REPEAT. The repeat playback mode changes whenever you press REPEAT.
REPEAT
(Single repeat)
MP3, WMA
Blinks. |
|
Audio CD |
|
|
|
|
|
|
(Folder repeat)
ALL
(Full repeat)
” (Single repeat)
A single track is played back repeatedly.
*This also works for program play and random-sequence play. (If repeat play is switched off, program play or randomsequence play is resumed.)
” (Folder repeat)
MP3,WMA (CDX-497 only)
* The all files in the selected folder are played back repeatedly.
ALL ” (Full repeat)
All tracks (the entire disc) are played back repeatedly.
*During program play, all programmed tracks are played back repeatedly.
*If the power is switched off during full repeat play, pressing POWER again to turn on the unit automatically restores full repeat.
(off)
12 En
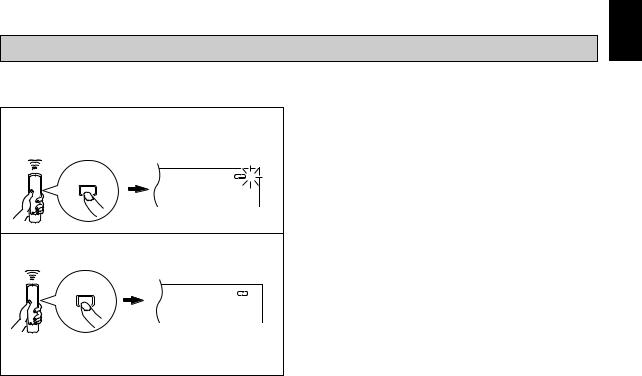
Repeat A-B
You can repeat the specified section of the disc by setting two points (start and end point).
1 Press A-B to select the start point of repeat play. |
To cancel the repeat A-B |
Press A-B repeatedly until “A”B” disappears from the |
|
|
display. |
A B
A–B
“A”” lights up and “B” blinks.
2 Press A-B to select the end point of repeat play.
A–B |
A B |
“A”B” lights up.
The selected section is played back repeatedly.
English
13 En
PROGRAM PLAY
You can enjoy listening to your favorite tracks in any desired order by programming tracks. 40 tracks can be programmed in
sequence.
3
|
|
|
|
|
SYNCHRO TAPE PEAK |
SPACE |
1 |
2 |
3 |
4 |
|
|
|
|
|
|
|
|
SEARCH |
|
5 |
6 |
7 |
8 |
|
5 |
|
9 |
0 |
|
INDEX |
|
1 |
|
DIMMER |
|
RANDOM |
|
2, 4 |
|
|
REPEAT |
A–B |
PROGRAM |
CLEAR |
TIME/INFO |
1 |
Press |
to stop the playback. |
|
2 |
Press PROGRAM. |
|
|
|
|
PROGRAM |
PROG. |
3 Program a desired track by
pressing the corresponding
6
numeric button.
Repeat this operation to program more tracks. You can select the same track again.
MP3, WMA (CDX-497 only)
The file number is recognized per disc, not per folder. That is, the number assigned to each file corresponds sequence of a disc.
4 When programming is finished,
press PROGRAM. |
PROGRAM |
|
5 Press  to start program play.
Display information in step 3
1 2
PROG.
PROG.
3
1Shows the total number of the tracks currently programmed.
2 Shows the total time of the tracks currently programmed.
3Shows the program number for the track to be programmed next.
14 En
To stop program playback
Press  . The first programmed track number is displayed.
To resume program play, press  . The playback starts from the first programmed track number.
To clear program data
There are several methods, as described below.
●Press 
 or CLEAR while the unit is stopped.
●Open the disc tray.
●Switch off the power.
To check program data
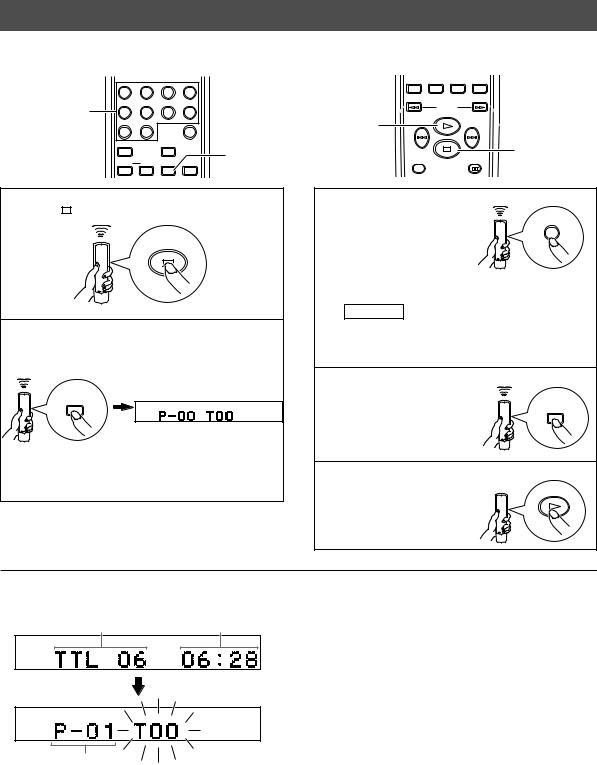
1.If during program play, press  .
.
2.Press PROGRAM.
3.Each time  is pressed, the track numbers and sequential order of the programmed tracks can be checked one after another. The display of the track number can be returned (sequentially in reverse order) by pressing
  .
.
To correct program data
1.Follow the procedure described in “To check program data”.
2.Display the track number to be corrected by pressing  /
/ .
.
3.Press a numeric button to select a desired track to replace the one displayed. The previously programmed track is cleared from the memory, and the new one is programmed.
4.Press PROGRAM to complete the correction. To start program play immediately after making the correction, press  instead of pressing PROGRAM.
English
INDEX SEARCH
If the disc includes index numbers, playback can be started from any desired index number.
1 Press INDEX.
INDEX
2 Press a numeric button to select the desired index number.
6
To cancel the index search function
Press INDEX.
Notes
●Not all discs have index numbers. In addition, among those discs which have index numbers, not all discs necessarily have more than one index number.
●The index system is a method for sub-dividing tracks into smaller divisions for easier location of those parts. The liner
notes contained in the disc case usually tell that such index numbers are included with the  mark.
mark.
●For some discs, playback may starts slightly prior to the actual designated index point.
●If the disc has no encoded index points, playback starts from the beginning of the selected track.
●The index number can be designated only while “INDEX” is illuminated.
15 En

TRACK PROGRAMMING FOR RECORDING TO TAPE
The unit can program tracks on a disc for recording onto tape. By considering the total possible recording time of the tape, the unit automatically programs tracks or help you program tracks so they fits onto the tape with the least amount of unrecorded space at each end of the tape.
Automatic tape-programming (for Audio CD)
The unit automatically programs tracks on a disc with their original order.
1 2 3 4
3 |
5 |
6 |
7 |
8 |
|
|
9 |
0 |
|
INDEX |
|
|
DIMMER |
|
RANDOM |
|
|
|
REPEAT |
A–B |
PROGRAM |
CLEAR |
|
3 |
SYNCHRO |
TAPE |
PEAK |
SPACE |
2 |
|
|
|
|

 SEARCH

1 Press 
 to stop the playback.
*The peak level search function of this unit is useful for adjusting recording level on the tape deck. (For details, refer to page 20.)
2 If desired, you can automatically insert additional time space between tracks. (For details, refer to page 11.)
SPACE
 AUTO SPC ON
3 Press TAPE to show the total possible recording time of the tape on the display.
TAPE
 “TAPE
“TAPE 46” appears.
You can select any of the four tape lengths by pressing TAPE.
|
46 |
(off) |
54 |
90 |
60 |
DIMMER RANDOM
REPEAT A–B PROGRAM CLEAR
4 SYNCHRO TAPE PEAK SPACE
SEARCH
 5, 6 1
TIME/INFO |
6 |
FOLDER |
If desired, you can also enter the total possible recording time of the tape manually.
Example: For a C-64 tape (32 minutes on each side), press “6” and “4”.
6 |
+ |
4 |
4 Press REPEAT.
REPEAT
The unit automatically programs tracks for both side
A and side B considering the total time of the tape.
5 Start recording on the tape deck, and then press  on the remote control of this unit.
6 This unit automatically pauses at the end of the side A. Turn the tape over to the side B, resume recording on the tape deck, and then press  or
or


 on the remote control of this unit to start playback.
16 En

Notes
● In step 4, you can check the program data for side A and side B after pressing REPEAT. Information for each side is displayed
for 3 seconds. 1 |
2 |
3 |
||||||||
|
|
|
|
|
|
|
|
|
|
|
|
|
|
|
|
|
|
PROG. |
|
||
|
|
|
|
|
|
|
|
|
|
|
|
|
|
|
|
|
|
|
|
|
|
1 Shows the number of programmed tracks.
2 Shows the total time of programmed tracks.
3 Shows the side of the tape.
●All tracks may not be programmed if the tape length is not enough. To program all tracks, use a tape that is longer than the actual playing time.
●You can check, cancel or correct program data. (For details, refer to page 15.)
* When checking program data, note that “Pu” appears between track numbers for side A and side B.
●Up to 40 tracks can be programmed. A pause inserted between side A and B is counted as one track.
●CD synchronized recording function can be used if your tape deck is compatible with this unit. If so, in step 5 and 6, press SYNCHRO and then press  on the remote control of this unit. Recording automatically starts. (For details, refer to page 21.)
English
17 En

Manual tape-programming (for Audio CD)
This is for recording desired tracks in any order onto a tape.
1 2 3 4
3, 5 |
5 |
6 |
7 |
8 |
|
|
9 |
0 |
|
INDEX |
|
|
DIMMER |
|
RANDOM |
|
|
|
REPEAT |
A–B |
PROGRAM |
CLEAR |
2 |
|
SYNCHRO |
TAPE |
PEAK |
SPACE |
4

 SEARCH

1 Follow steps 1 – 3 on page 16.
2 Press PROGRAM.
Blinks.
PROG.
PROGRAM
3 Use numeric buttons to select desired tracks (to be recorded on the side A) in any order.
1 |
2 |
3 |
4 |
5 |
6 |
7 |
8 |
9 |
0 |
|
|
* Programmed track numbers light up on the display.
4 When track selection for side A is finished, press
TAPE.
TAPE
PROG.
A pause is inserted.
DIMMER |
|
RANDOM |
|
|
|
REPEAT |
A–B |
PROGRAM |
CLEAR |
6 |
|
SYNCHRO |
TAPE |
PEAK |
SPACE |
||
|
 SEARCH
7, 8
TIME/INFO |
8 |
|
5 Use numeric buttons to select the track numbers (to be recorded on the side B) in any order.
1 |
2 |
3 |
4 |
5 |
6 |
7 |
8 |
9 |
0 |
|
|
6 Press PROGRAM.
7 Start recording on the tape deck, and then press  on the remote control of this unit.
8 This unit automatically pauses at the end of the side A. Turn the tape over to the side B, resume recording on the tape deck, and then press  or
or


 on the remote control of this unit to start playback.
Notes
●If, in step 3 or 5, “Err” appears on the display, the track number just selected cannot be programmed because there is not enough time remaining on the tape.
●In step 3 or 5, each time a selection is made, the track number and the remaining time of the tape is displayed, and then the display changes to indicate the next program number.
●You can check, cancel or correct program data. (For details, refer to page 15.)
*When checking program data, note that “Pu” appears between track numbers for side A and side B.
●Up to 40 tracks can be programmed. If, however, a pause is inserted, it is counted as one track.
●CD synchronized recording function can be used if your tape deck is compatible with it. If so, in step 7 and 8, press SYNCHRO and then press  on the remote control of this unit. Recording automatically starts. (For details, refer to page 21.)
18 En
Random sequential tape-programming (for Audio CD)
The unit automatically programs tracks in random sequential order for recording to tape.
DIMMER |
|
RANDOM |
|
2 |
REPEAT |
A–B |
PROGRAM |
CLEAR |
|
SYNCHRO |
TAPE |
PEAK |
SPACE |
|
 SEARCH
3, 4
TIME/INFO
1 Follow steps 1 – 3 on page 16.
2 Press RANDOM.
RANDOM
*The unit automatically programs tracks at random for both side A and side B considering the total time of the tape.
3 Start recording on the tape deck, and then press  on the remote control of this unit.
4 This unit automatically pauses at the end of the side A. Turn the tape over to the side B, resume recording on the tape deck, and then press  or
or


 on the remote control of this unit to start playback.
4
Notes
●Because programmed data changes every time RANDOM is pressed, the unrecorded space at the end of each side of the tape also varies accordingly.
●All tracks may not be programmed if the tape length is not enough. To program all tracks, use a tape that is longer than the actual playing time.
●In step 2, you can check the program data for side A and side B. Information for each side is displayed for 3 seconds.
1 2 3
PROG. RANDOM
1 Shows the number of programmed tracks.
2 Shows the total time of programmed tracks.
3 Shows the side of the tape.
●Up to 40 tracks can be programmed. A pause inserted between side A and B is counted as one track.
●CD synchronized recording function can be used if your tape deck is compatible with it. If so, in step 3 and 4, press SYNCHRO and then press  on the remote control of this unit. Recording automatically starts. (For details, refer to page 21.)
English
19 En
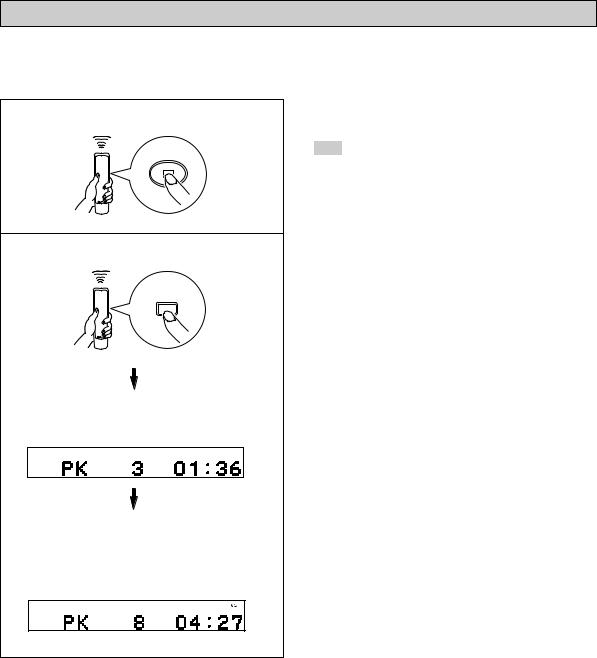
Automatic searching for the peak level on a disc (for Audio CD)
This unit automatically searches for the peak level of the disc, and play back the part repeatedly. When recording to tape, this feature is very helpful for adjusting the recording level on the tape deck.
1 Press 
 to stop the playback.
2 Press PEAK.
PEAK
“PK” lights up on the display, and the peak level search is performed on the disc.
It takes a few minutes to search for the peak level.
CD
After searching, this unit plays back the part around the peak level for about 4 seconds repeatedly. According to the peak level, adjust the recording level on your tape deck. (For details, refer to the owner's manual of the tape deck.)
To cancel the peak level search function
Press 
 .
.
Note
Even if the peak level search is performed several times on the same disc, the same part may not be always selected. That is because the unit searches for the peak level among parts of the disc that are randomly selected by the internal microcomputer.
CD
20 En
CD SYNCHRONIZED RECORDING
This unit can automatically synchronize a tape deck recording with CD play. With this function, you can record a CD on tape easily and precisely.
This recording method requires a YAMAHA tape deck compatible with this function. (Refer to the tape deck operation manual to find out whether it is compatible or not.)
*This unit and the tape deck must be placed close to each other so that both of them can simultaneously receive the signals from the remote control of this unit.
English
1 |
|
OPEN/CLOSE |
|
|
3 |
1 |
2 |
3 |
4 |
5 |
6 |
7 |
8 |
|
|
9 |
0 |
|
INDEX |
|
DIMMER |
|
RANDOM |
|
1 Press ) OPEN/CLOSE to open the disc tray, and load a disc.
 OPEN/CLOSE
2 Load a tape on the tape deck.
*The peak level search function of this unit is useful for adjusting recording level on the tape deck. (For details, refer to page 20.)
3 Press SYNCHRO.
SYNCHRO
This unit enters into the pause mode, and the tape deck enters into the REC/PAUSE mode.
*In this state, the time display on this unit blinks on and off.
If necessary, select a desired track by pressing a numeric button or  /
/ .
.
5 or
|
DIMMER |
|
RANDOM |
|
3 |
REPEAT |
A–B |
PROGRAM |
CLEAR |
SYNCHRO |
TAPE |
PEAK |
SPACE |
|
|
|
SEARCH |
4 |
|
|
|
|
|
|
3 |
|
|
|
5 |
TIME/INFO
4 Press  .
.
Both CD playback and tape deck recording start.
* CD playback starts shortly after starting the recording.
5 If you want to stop recording temporarily and restart recording from a desired track, stop this unit by pressing  , and the tape deck as well, then follow steps 3–4 again.
To cancel synchronized CD-tape recording function
Press  .
.
Notes
●To finish or stop the recording, make proper operations on the tape deck. (For details, refer to the owner’s manual of the tape deck.)
●Programmed sequence of tracks can also be recorded with this function instead of recording an entire disc. (For details, refer to pages 14–15.)
●This function can also be used together with the automatic tape-programming function. (For details, refer to pages 16–17.)
21 En

NOTES ABOUT DISCS
Discs playable with this unit
This compact disc player is designed only for playing back compact discs bearing the marks shown below. Never attempt to load any other type of disc into the unit. The unit can also play back 8-cm (3-inch) compact discs.
.... Compact discs (digital audio)
The most popular discs for commercially available audio CDs.
.... CD-R,CD-RW digital audio discs
Music CDs made by copying onto a CD- R or CD-RW (including MP3 or WMA format files).
Notes
● Be sure to use a CD-R or CD-RW disc made by a reliable manufacture.
● Be sure to use a CD-R or CD-RW disc which has at least one of the following phrases on the disc or disc case.
FOR CONSUMER FOR CONSUMER USE
FOR MUSIC USE ONLY
●Be sure to use a finalized CD-R or CDRW disc.
.... CD-TEXT discs
The discs recorded with text data such as album titles, track titles and artist names. These discs can be played back with ordinary CD players, however, the text data can be displayed only with CD players which have the ability to display such data.
Note
This compact disc player may not be able to play back some CD-RW discs or discs on which recording was not made correctly.
To prevent a malfunction of this unit:
●Do not use any nonstandard shaped disc (heart etc.) available on the market because it might damage the unit.
●Do not use a disc with tape, seals, or paste on it. If you use such a disc, a disc may get stuck in the unit, or damage to the unit may result.
Notes about handling compact discs
●Always handle the disc with care so that its surface is not scratched.
●Compact discs are not subjected to wear during playback, but damage to the disc surface when the disc is being handled can adversely affect the disc playback.
●Be sure to use a felt-tip pen or similar writing tool when writing on the label side of the disc. Do not use a ballpoint pen, pencil, or other hard-tipped writing tool, as these may damage the disc and may adversely affect the disc playback.
●Do not warp discs.
●When a disc is not currently being used, remove it from the unit and store in an appropriate case.
●When removing or storing a disc, be careful not to scratch the playing surface.
●Compact discs are not affected by small particles of dust or fingerprints on their playing surface, but even so they should be kept clean. Wipe by using a clean, dry cloth.
Do not wipe with a circular motion; wipe straight outward from the center. 
●Do not try to clean the disc’s surface by using any type of disc cleaner, record spray, anti-static spray or liquid, or any other chemical-based liquid because such substances might irreparably damage the disc’s surface.
●Do not expose discs to direct sunlight, high temperature or high humidity for a long period of time because these might warp or otherwise damage the disc.
No!
To play back an 8-cm CD
Place it in the inner recessed area of the disc tray. Do not put a normal (12-cm) CD on top of an 8-cm CD.
22 En

TROUBLESHOOTING
If the unit fails to operate normally, check the following points to determine whether the fault can be corrected by the simple measures suggested. If it cannot be corrected, or if the fault is not listed in the SYMPTOM column, disconnect the power cord and contact your authorized YAMAHA dealer or service center for help.
SYMPTOM |
PROBABLE CAUSE |
REMEDY |
|
|
|
The unit does not switch ON when |
The power cord is not connected nor |
Securely connect the power cord. |
POWER is pressed. |
completely connected. |
|
|
|
|
The disc tray does not close |
A foreign object is obstructing the tray. |
Carefully check the disc tray and |
completely. |
|
remove the foreign object. |
Playback does not start. |
The disc is damaged. |
Check the disc carefully; replace it if |
|
|
necessary. |
|
|
|
|
There is moisture on the laser pickup. |
Wait 20 to 30 minutes after switching the |
|
|
unit ON before trying to play back a disc. |
|
|
|
|
The disc is loaded upside down. |
Reload the disc with the label side up. |
|
|
|
|
The disc is dirty. |
Clean the disc. |
|
|
|
|
The CD-RW (ReWritable) disc is not |
Replace the disc with a correctly- |
|
recorded correctly. |
recorded disc playable with this unit. |
|
|
|
|
The disc is a non-standard disc not |
|
|
playable with this unit. |
|
|
|
|
Playback is delayed, or begins at |
The disc may be scratched or |
Check the disc carefully; replace it if |
the wrong place. |
damaged. |
necessary. |
|
|
|
No sound. |
Improper output cable connections. |
Connect the cables properly. If the |
|
|
problem persists, the cables may be |
|
|
defective. |
|
|
|
|
Improper amplifier operation. |
Set the amplifier controls to the correct |
|
|
input selection. |
|
|
|
|
The OUTPUT LEVEL +/– buttons are |
Adjust the volume by using the |
|
set at minimum. (CDX-497 only) |
OUTPUT LEVEL +/– buttons. (CDX- |
|
|
497 only) |
|
|
|
Sound “skips”. |
The unit is being subjected to vibrations |
Relocate the unit. |
|
or impacts. |
|
|
The disc is dirty. |
Clean the disc. |
|
|
|
Sound “hums”. |
Improper cable connections. |
Securely connect the audio cables. If |
|
|
the problem persists, the cables may be |
|
|
defective. |
|
|
|
Noise from a nearby tuner. |
The tuner is too close to the unit. |
Move the tuner and the main unit |
|
|
farther apart. |
|
|
|
Noise from inside of the disc tray. |
The disc may be warped. |
Replace the disc. |
No sound from the headphones. |
The OUTPUT LEVEL +/– buttons are |
Adjust the volume by using the |
(CDX-497 only) |
set at minimum. |
OUTPUT LEVEL +/– buttons. |
The remote control does not |
The batteries of the remote control are |
Replace the batteries with new ones. |
work. |
too weak. |
|
|
Remote control is too far away or tilted |
Use within 6 m and 60° radius. |
|
too much. |
|
|
Direct sunlight or lighting (of an inverter |
Reposition the main unit. |
|
type fluorescent lamp etc.) is striking |
|
|
the remote control sensor of the main |
|
|
unit. |
|
|
|
|
TV functions strangely when the |
Remote control is being used near TV |
Relocate the main unit away from the |
remote control is used. |
set with a remote control sensor. |
TV or cover TV’s remote control sensor. |
|
|
|
English
23 En

SPECIFICATIONS
Audio Section
Frequency response ..................... |
2 Hz – 20 kHz, ± 0.5 dB |
Harmonic distortion + noise (1 kHz) |
|
................................................................ |
0.003 % or less |
S/N ratio ...................................................... |
105 dB or more |
Dynamic range ............................................. |
95 dB or more |
Output voltage (1 kHz, 0 dB) ............................ |
2.0 ± 0.5 V |
Headphones output (0 dB) |
|
<CDX-497 only> ....................... |
660 ± 100 mV/ 32 ohms |
Laser Diode Properties |
|
Material .................................................................... |
GaAlAs |
Wavelength .............................................................. |
780 nm |
Emission Duration ............................................ |
continuous |
Laser Output ................................................ |
max. 44.6 W* |
*This output is the value measured at a distance of about
200 mm from the objective lens surface on the Optical
Pick-up Block.
General
Power requirements |
|
|
Australia model .......................................... |
240 V, 50 Hz |
|
Europe and U.K. models ..................... |
220-240 V, 50 |
Hz |
General model .................. |
110-120/220-240 V, 50/60 Hz |
|
Korea model ................................................ |
220 V, 60 |
Hz |
China model ................................................ |
220 V, 50 |
Hz |
Power consumption ................................................... |
13 W |
|
Dimensions (W x H x D) ....................... |
435 x 87 x 287 mm |
|
Weight ........................................................................ |
3.5 kg |
|
Please note that all specifications are subject to change without notice.
24 En

ATTENTION: VEUILLEZ LIRE CE QUI SUIT AVANT D’UTILISER L’APPAREIL.
1Pour utiliser l’appareil au mieux de ses possibilités, lisez attentivement ce mode d’emploi. Conservez-le soigneusement pour référence.
2Installez cet ensemble audio dans un endroit frais, bien aéré, sec et propre; ménagez un espace d’au moins 10 cm au-dessus, 10 cm à gauche et à droite et 10 cm à l’arrière du CDX-497/CDX- 397 — veillez à ce qu’il soit à l’abri de la lumière du soleil, des sources de chaleur, des vibrations, des poussières, de l’humidité et du froid.
3Placez l’appareil loin des équipements, moteurs et transformateurs électriques, pour éviter les ronflements parasites.
4N’exposez pas l’appareil à des variations brutales de température, ne le placez pas dans un environnement très humide (par exemple dans une pièce contenant un humidificateur) car cela peut entraîner la condensation d’humidité à l’intérieur de l’appareil qui elle-même peut être responsable de secousse électrique, d’incendie, de dommage à l’appareil ou de blessure corporelle.
5Evitez d’installer l’appareil dans un endroit où des objets peuvent tomber, ainsi que là où l’appareil pourrait être exposé à des éclaboussures ou des gouttes d’eau. Sur le dessus de l’appareil, ne placez pas:
-D’autres appareils qui peuvent endommager la surface de l’appareil ou provoquer sa décoloration.
-Des objets se consumant (par exemple, une bougie) qui peuvent être responsables d’incendie, de dommage à l’appareil ou de blessure corporelle.
-Des récipients contenant des liquides qui peuvent être à l’origine de secousse électrique ou de dommage à l’appareil.
6Ne couvrez pas l’appareil d’un journal, d’une nappe, d’un rideau, etc. car cela empêcherait l’évacuation de la chaleur. Toute augmentation de la température intérieure de l’appareil peut être responsable d’incendie, de dommage à l’appareil ou de blessure corporelle.
7Ne branchez pas la fiche du cordon d’alimentation de l’appareil sur une prise secteur aussi longtemps que tous les raccordements n’ont pas été effectués.
8Ne pas faire fonctionner l’appareil à l’envers. Il risquerait de chauffer et d’être endommagé.
9N’exercez aucune force excessive sur les commutateurs, les boutons et les cordons.
10Pour débrancher la fiche du cordon d’alimentation au niveau de la prise secteur, saisissez la fiche et ne tirez pas sur le cordon.
11Ne nettoyez pas l’appareil au moyen d’un solvant chimique, ce qui pourrait endommager la finition. Utilisez un chiffon sec et propre.
12N’alimentez l’appareil qu’à partir de la tension prescrite. Alimenter l’appareil sous une tension plus élevée est dangereux et peut être responsable d’incendie, de dommage à l’appareil ou de blessure corporelle. YAMAHA ne saurait être tenue responsable des dommages résultant de l’alimentation de l’appareil sous une tension autre que celle prescrite.
13Ne tentez pas de modifier ni de réparer l’appareil. Consultez le service YAMAHA compétent pour toute réparation qui serait requise. Le coffret de l’appareil ne doit jamais être ouvert, quelle que soit la raison.
14Si vous envisagez de ne pas vous servir de l’appareil pendant une longue période (par exemple, pendant les vacances), débranchez la fiche du cordon d’alimentation au niveau de la prise secteur.
15Lisez la section intitulée “EN CAS DE DIFFICULTE” où figurent une liste d’erreurs de manipulation communes avant de conclure que l’appareil présente une anomalie de fonctionnement.
16Avant de déplacer l’appareil, retirez le disque, appuyez sur POWER pour mettre l’appareil hors tension et débranchez le cordon d’alimentation de la prise murale.
17La condensation se forme lorsque la température ambiante change brusquement. En ce cas, débranchez la fiche du cordon d’alimentation et laissez l’appareil reposer.
18La température de l’appareil peut augmenter en raison d’une utilisation prolongée. En ce cas, coupez l’alimentation de l’appareil et laissez-le au repos pour qu’il refroidisse.
19Installez l’appareil près de la prise secteur et à un endroit tel que la fiche secteur soit facilement accessible.
Tant que l’appareil est raccordé à la prise secteur, il reste connecté au secteur même si vous le mettez hors tension avec POWER.
DANGER
À partir du moment où cet appareil est alimenté par le secteur, n’approchez pas vos yeux de la découpe du tiroir, ni d’ailleurs des autres découpes, dans le dessein d’examiner l’intérieur du coffret.
AVERTISSEMENT
POUR RÉDUIRE LES RISQUES D’INCENDIE OU DE SECOUSSE ÉLECTRIQUE, N’EXPOSEZ PAS CET APPAREIL À LA PLUIE OU À L’HUMIDITÉ.
Le laser de cet appareil peut émettre un rayonnement dépassant les limites de la calsse I.
Français
i Fr

TABLE DES MATIERES
CARACTERISTIQUES .................................... |
2 |
TYPES DE DISQUES PRIS EN CHARGE ...... |
2 |
DEBALLAGE ................................................... |
3 |
REMARQUES CONCERNANT LA |
|
TELECOMMANDE .......................................... |
3 |
RACCORDEMENTS ....................................... |
4 |
IDENTIFICATION DES COMPOSANTS ........ |
5 |
Panneau avant ............................................. |
5 |
Afficheur ....................................................... |
5 |
Télécommande ............................................ |
6 |
FONCTIONNEMENT DE BASE ..................... |
7 |
Pour interrompre momentanément |
|
la lecture ...................................................... |
8 |
Pour arrêter la lecture .................................. |
8 |
Pour mettre l’appareil hors tension .............. |
8 |
Pour effectuer directement la lecture |
|
d’une plage .................................................. |
8 |
Pour rechercher un dossier/fichier |
|
sur un disque MP3 ou WMA |
|
(CDX-497 seulement) .................................. |
8 |
Pour sauter jusqu’au début de la |
|
désirée (Rerherche avec saut) ..................... |
9 |
Recherche manuelle rapide en avant ou en |
|
arrière (Rerherche manuelle) ....................... |
9 |
Changement des affichages ...................... |
10 |
Modification de la luminosité de l’affichage ...... |
11 |
Insertion d’espace ...................................... |
11 |
Réglage du niveau de sortie |
|
(CDX-497 seulement) ................................ |
11 |
LECTURE EN SEQUENCE ALEATOIRE ..... |
12 |
LECTURE REPETEE ................................... |
12 |
Répéter l’élément sélectionné .................... |
12 |
Répétition A-B ............................................ |
13 |
LECTURE PROGRAMMEE .......................... |
14 |
RECHERCHE D’INDEX ................................ |
15 |
PROGRAMMATION DES PLAGES POUR |
|
ENREGISTREMENT SUR BANDE .............. |
16 |
Programmation automatique de |
|
bande (pour les CD audio) ......................... |
16 |
Programmation manuelle de bande |
|
(pour les CD audio) .................................... |
18 |
Programmation de bande par séquence |
|
aléatoire (pour les CD audio) ..................... |
19 |
Recherche automatique du niveau de |
|
crête d’un disque (pour les CD audio) ....... |
20 |
ENREGISTREMENT SYNCHRONISE D’UN |
|
DISQUE COMPACT ...................................... |
21 |
REMARQUES CONCERNANT LES |
|
DISQUES ....................................................... |
22 |
Disques pouvant être lus sur cet appareil ...... |
22 |
Remarques concernant la manipulation |
|
des disques compact ................................. |
22 |
EN CAS DE DIFFICULTE ............................. |
23 |
CARACTERISTIQUES TECHNIQUES ......... |
24 |
Français
1 Fr

Nous vous remercions d’avoir porté votre choix sur ce lecteur de disque compact YAMAHA.
CARACTERISTIQUES
Possibilité d’utiliser les disques CD-R,
CD-RW
(Pour plus de détails, se reporter à la page 22.)
Possibilité d’afficher les données CD-TEXT
Lecture programmee
Lecture en séquence aléatoire
Lecture répétée de plage unique/disque entier
Fonction d’espacement automatique
Fonction de programmation de plage utile pour enregistrer les plages comprises dans n’importe quelle longueur de bande
Fonction de recherche automatique du niveau de crête
Enregistrement synchronisé de disque compact
Luminosité d’affichage réglable
Fonctionnement par télécommande
Sortie numérique optique
(CDX-497 seulement)
Sortie numérique coaxiale
Lecture de disques MP3, WMA possible
TYPES DE DISQUES PRIS EN CHARGE
Vous pouvez écouter des disques de musique avec cet appareil. Comme certaines fonctions sont limitées à certains types de disques, les disques pris en charge sont indiqués par les icônes suivantes. Chaque icône signifie que la fonction est limitée au type de disque mentionné.
Pour le détail sur les standards des disques pris en charge et les remarques sur l’emploi de chaque type, reportez-vous à “REMARQUES SUR LES DISQUES” (page 22).
Les fonctions sans icônes ne sont disponibles pour aucun type de disque.
CD de musique |
|
MP3,WMA |
||||
(CDX-497 seulement) |
||||||
|
|
|
||||
|
|
|
|
|
|
|
|
Audio CD |
|
|
MP3, WMA |
|
|
|
|
|
|
|
|
|
À propos des disques MP3 et WMA
Vous pouvez lire les fichiers MP3 et WMA enregistrés sur un CD-R ou CD-RW à peu près de la même façon qu’un CD de musique. Cet appareil conisdère les dossiers du disque comme des albums et les fichiers comme des plages (voir ci-dessous).
Dossier principal
Album (Dossier)
Plage (Fichier)
Qu’est-ce que le format MP3 ?
Le format “MP3 (MPEG-1 Audio Layer-3)” est une technologie standardisée et un format permettant de compresser les fichiers audio en fichiers de plus petite taille, tout en préservant la qualité originale du son lors de la lecture.
* Certains disques MP3 contiennent des balises ID3.
Remarques
●Selon les conditions d’enregistrement, par exemple les réglages du logiciel d’enregistrement, certains disques ne pourront pas être lus ou bien les fichiers ne seront pas lus dans l’ordre où ils ont été enregistrés.
●Cet appareil est compatible avec les débits binaires de 32, 64, 96, 128, 160, 192, 256 ou 320 kbps et les fichiers MP3 enregistrés à débit binaire variable.
●Cet appareil est compatible avec une fréquence d’échantillonnage de 44,1 ou 48 kHz.
●Le disque doit être conforme à la norme ISO 9660.
Qu’est-ce que le format WMA ?
“WMA (Windows Media Audio)” est un format de fichier audio mis au point par Microsoft similaire au MP3, mais compressant les fichiers à un débit supérieur.
Remarques
●Cet appareil est compatible avec les débits binaires de 192 kbps et inférieurs et inférieurs et les fichiers WMA à débit binaire variable.
●Cet appareil est compatible avec la fréquence d’échantillonnage de 44,1 kHz.
●Le disque doit être conforme à la norme ISO 9660.
●Les fichiers WMA protégés contre la copie ne peuvent pas être lus sur cet appareil.
2 Fr
DEBALLAGE
Retirer soigneusement cet appareil et ses accessoires du carton d’emballage. Le carton doit contenir cet appareil et les accessoires suivants.
Télécommande
(CDX-497) |
(CDX-397) |
||||||
|
OPEN/CLOSE |
|
|
OPEN/CLOSE |
|
||
1 |
2 |
3 |
4 |
1 |
2 |
3 |
4 |
5 |
6 |
7 |
8 |
5 |
6 |
7 |
8 |
9 |
0 |
|
INDEX |
9 |
0 |
|
INDEX |
DIMMER |
|
RANDOM |
|
DIMMER |
|
RANDOM |
|
REPEAT |
A–B |
PROGRAM |
CLEAR |
REPEAT |
A–B |
PROGRAM |
CLEAR |
SYNCHRO |
TAPE |
PEAK |
SPACE |
SYNCHRO |
TAPE |
PEAK |
SPACE |
|
SEARCH |
|
|
SEARCH |
|
||
TIME/INFO |
|
|
|
TIME/INFO |
|
|
Pile (AAA, R03, UM-4) x 2 |
|
FOLDER |
|
|
|
|
|
|
FILE |
ENTER |
FILE |
|
|
|
|
|
|
|
|
OUTPUT |
|
|
|
|
|
|
|
LEVEL |
|
|
|
|
FOLDER
Français
REMARQUES CONCERNANT LA TELECOMMANDE
Mise en place des piles
1.Retourner la télécommande et retirer le couvercle du compartiment des piles en le faisant glisser dans le sens indiqué par la flèche.
2.Introduire les piles (AAA, R03, UM-4), en respectant les indications de polarité situées à l’intérieur du compartiment des piles.
3.Remettre le couvercle du compartiment en place.
Appuyez sur %
Portée de fonctionnement de la télécommande
Capteur de signaux provenant

 de la télécommande
Portée de 6 mètres environ
30° |
° |
|
30 |
||
|
Remplacement de piles
Si lorsque l’on utilise la télécommande il est nécessaire de la rapprocher de l’appareil, les piles sont sans doute déchargées. Dans ce cas, remplacer les deux piles par des neuves.
Remarques
●Si le remplacement des piles s’avère nécessaire, n’utiliser que des piles AAA, R03, UM-4.
●Veiller à ce que les polarités soient respectées. (Voir l’illustration se trouvant dans le compartiment des piles.)
●Lorsque l’on n’utilise pas la télécommande pendant un certain temps, retirer les piles de la télécommande.
●Si les piles fuient, les jeter immédiatement. Ne pas toucher l’électrolyte et veiller à ce qu’il n’entre pas en contact avec des vêtements. Nettoyer soigneusement le compartiment des piles avant de mettre en place des piles neuves.
Remarques
●En outre, veiller à ce qu’il n’y ait aucun obstacle entre la télécommande et l’appareil.
●Si le détecteur de télécommande est exposé directement à une forte lumière (provenant d’une lampe fluorescente de type inverseur, etc.), il se peut que la télécommande ne fonctionne pas correctement. Dans ce cas, changer la position de l’appareil principal de façon à éviter une exposition directe.
3 Fr
Loading...