


 Loading...
G B
CDX-596/496/396
Compact Disc Player
Lecteur Compact Disque
OWNER’S MANUAL
MODE D’EMPLOI
BEDIENUNGSANLEITUNG
BRUKSANVISNING
MANUALE DI ISTRUZIONI
MANUAL DE INSTRUCCIONES
GEBRUIKSAANWIJZING

CAUTION
Use of controls or adjustments or performance of procedures other than those specified herein may result in hazardous radiation exposure.
ATTENTION
L’emploi de commandes, de réglages ou un choix de procédures différents des spécifications de cette brochure peut entraîner une exposition à d’éventuelles radiations pouvant être dangereses.
ACHTUNG
Die Verwendung von Bedienungselementen oder
Einstellungen oder die Durchführung von Bedienungsvorgängen, die nicht in dieser Anleitung aufgeführt sind, kann zu einem Kontakt mit gefährlichen Laserstrahlen führen.
OBSERVERA
Användning av kontroller och justeringar eller genomförande av procedurer andra än de som specificeras i denna bok kan resultera i att du utsätter dig för farlig strålning.
ATTENZIONE
Uso di controlli o regolazioni o procedure non specificamente descritte può causare l’esposizione a radiazioni di livello pericoloso.
PRECAUCIÓN
El uso de los controles o los procedimientos de ajuste o utilización diferentes de los especificados en este manual pueden causar una exposición peligrosa a la radiación.
VOORZICHTIG
Gebruik van bedieningsorganen of instellingen, of uitvoeren van handelingen anders dan staan beschreven in deze handleiding kunnen leiden tot blootstelling aan gevaarlijke stralen.
VARO!
AVATTAESSA JA SUOJALUKITUS OHITETTAESSA
OLET ALTTIINA NÄKYMÄTTÖMÄLLE LASERSÄTEILYLLE. ÄLÄ KATSO SÄTEESEEN.
VARNING!
OSYNLIG LASERSTRÅLNING NÄR DENNA DEL ÄR
ÖPPNAD OCH SPÄRREN ÄR URKOPPLAD.
BETRAKTA EJ STRÅLEN.
LINE OUT |
DIGITAL AUDIO OUT |
1
OPTICAL COAXIAL
(CDX-596)
LINE OUT |
DIGITAL |
1 |
AUDIO OUT |
|
OPTICAL |
(CDX-496, CDX-396)
Varningsanvisning för laserstrålning. Placerad i apparaten.
CAUTION : INVISIBLE LASER RADIATION WHEN OPEN AND INTERLOCKS DEFEATED.
DO NOT STARE INTO BEAM OR VIEW DIRECTLY WITH OPTICAL INSTRUMENTS.
VARNING : OSYNLIG LASERSTRÅLNING NÄR DENNA DEL ÄR ÖPPNAD OCH
SPÄRRAR ÄR URKOPPLADE. STIRRA EJ IN I STRÅLEN OCH BETRAKTA EJ
STRÅLEN MED OPTISKA INSTRUMENT.
VARO! : NÄKYMÄTÖNTÄ AVATTAESSA JA SUOJALUKITUS OHITETTAESSA
OLET ALTTIINA LASERSÄTEILYLLE. ÄLÄ TUIJOTA SÄTEESEEN ÄLÄKÄ KATSO
SITÄ OPTISEN LAITTEEN LÄPI.

CAUTION: Read this before operating your unit.
cTo assure the finest performance, please read this manual carefully. Keep it in a safe place for future reference.
cInstall your unit in a well ventilated, cool, dry, clean place
— away from windows, heat sources, vibration, dust, moisture, or cold. To avoid humming sounds, locate the unit away from other electrical appliances, motors, and transformers. To prevent fire or electrical shock, do not expose to rain and water.
cBe sure to allow at least 10 cm of ventilation space at the top, on left, right, and back sides of this unit.
cDo not operate the unit upside-down. It may overheat, possibly causing damage.
cNever open the cabinet. If something drops into the set, contact your dealer.
cDo not use force on switches, knobs or cords.
cWhen not planning to use this unit for long periods of time
(i.e., vacation, etc.), disconnect the AC power plug from the wall outlet.
cGrounding or polarization — Precautions should be taken so that the grounding or polarization of the unit is not defeated.
cDo not clean the unit with chemical solvents; this might damage the finish. Use a clean, dry cloth.
cBe sure to read the “Troubleshooting” section on common operating errors before concluding that your unit is faulty.
cDo not place another component on top of this unit, as damage or discoloration on the surface of the unit may result.
cTo prevent damage by lightning, disconnect the power cord from the wall outlet during an electrical storm.
cWhen disconnecting the power cord from the wall outlet, grasp the plug; do not pull the cord.
cDo not plug the AC power plug to the wall outlet before you finish all connections.
cThe voltage to be used must be the same as that specified on this unit. Using this unit with a higher voltage than that which is specified is dangerous and may result in a fire or other type of accident causing damage. YAMAHA will not be held responsible for any damage resulting from use of this unit with a voltage other than that which is specified.
cSudden temperature changes and storage or operation in an extremely humid environment may cause condensation inside the cabinet.
CAUTION FOR MOVING THE UNIT
Before moving the unit, first remove the disc from the unit, press POWER to turn the unit off, and then disconnect the AC power plug from the wall outlet.
CAUTION
Use of controls or adjustments or performance of procedures other than those specified herein may result in hazardous radiation exposure.
This compact disc player is classified as a CLASS 1 LASER product.
The CLASS 1 LASER PRODUCT label is located on the rear exterior.
Laser component in this product is capable of emitting radiation exceeding the limit for Class 1.
SPECIAL INSTRUCTIONS FOR U.K. MODEL
IMPORTANT:
The wires in the mains lead are coloured in accordance with the following code:
Blue: NEUTRAL
Brown: LIVE
As the colours of the wires in the mains lead of this apparatus may not correspond with the coloured markings identifying the terminals in your plug, proceed as follows: The wire which is coloured BLUE must be connected to the terminal which is marked with the letter
N or coloured BLACK. The wire which is coloured BROWN must be connected to the terminal which is marked with the letter L or coloured RED. Making sure that neither core is connected to the earth terminal of the three pin plug.
For U.K. customers
If the socket outlets in the home are not suitable for the plug supplied with this appliance, it should be cut off and an appropriate 3 pin plug fitted. For details, refer to the instructions described above.
Note: The plug severed from the mains lead must be destroyed, as a plug with bared flexible cord is hazardous if engaged in a live socket outlet.
English
E-1
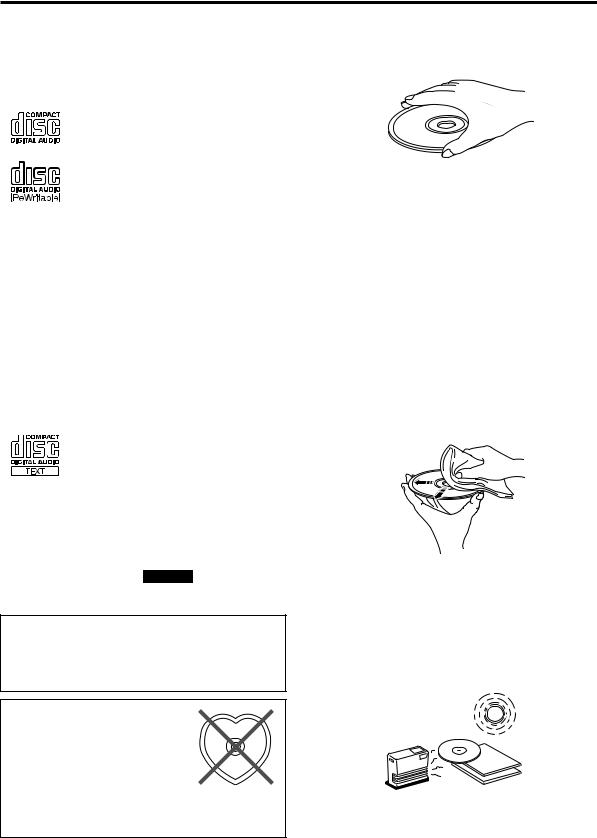
NOTES ABOUT DISCS
Discs playable with this unit
This compact disc player is designed only for playing compact discs bearing the marks shown below. Never attempt to load any other type of disc into the unit. The unit will also play 8-cm (3-inch) compact discs.
.... Compact discs (digital audio)
The most popular discs for commercially available audio CDs.

 .... CD-RW (ReWritable) digital audio
discs
The discs repeatedly recordable by using CD recorders for audio recording. Recorded CD-RW discs can be played only with CD players which have the ability to play CD-RW discs.
Notes
cBe sure to use a CD-RW disc made by a reliable manufacture.
cBe sure to use a CD-RW disc which has at least one of the following phrases on the disc or disc case.
FOR CONSUMER FOR CONSUMER USE
FOR MUSIC USE ONLY
.... CD-TEXT discs
The discs recorded with text data such as album titles, track titles and artist names. These discs can be played with ordinary
CD players, however, the text data can be displayed only with CD players which have the ability to display such data.
CDX-596 can display text data
recorded on CD-TEXT discs.
Note
This compact disc player may not be able to play some CD-RW discs or discs on which recording was not made correctly.
To prevent a malfunction of this unit:
cDo not use any nonstandard shaped disc (heart etc.) available on the
market because it might damage the unit.
cDo not use a disc with tape, seals, or paste on it. If you use such a disc, a disc may get stuck in the unit, or damage to the unit may result.
E-2
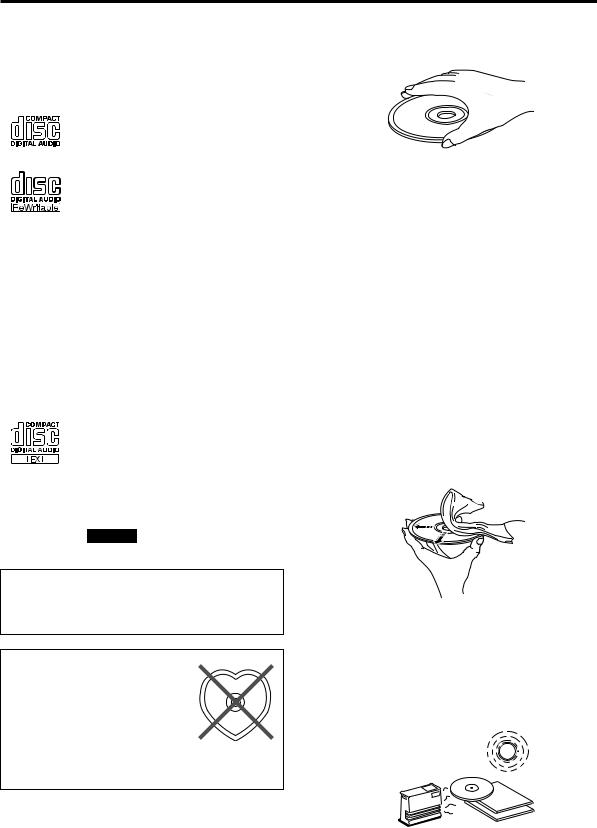
Notes about handling compact discs
cAlways handle the disc with care so that its surface is not scratched.
cCompact discs are not subjected to wear during play, but damage to the disc surface when the disc is being handled can adversely affect the disc’s play.
cBe sure to use a felt-tip pen or similar writing tool when writing on the label side of the disc. Do not use a ballpoint pen, pencil, or other hard-tipped writing tool, as these may damage the disc and may adversely affect the disc’s play.
cDo not warp discs.
cWhen a disc is not currently being used, remove it from the unit and store in an appropriate case.
cWhen removing or storing a disc, be careful not to scratch the playing surface.
cCompact discs are not affected by small particles of dust or fingerprints on their playing surface, but even so they
should be kept clean. Wipe by using a clean, dry cloth. Do not wipe with a circular motion; wipe straight outward from the center. 
cDo not try to clean the disc’s surface by using any type of disc cleaner, record spray, anti-static spray or liquid, or any other chemical-based liquid because such substances might irreparably damage the disc’s surface.
cDo not expose discs to direct sunlight, high temperature or high humidity for a long period of time because these might warp or otherwise damage the disc.
No!
To play an 8-cm CD
Place it in the inner recessed area of the disc tray. Do not put a normal (12-cm) CD on top of an 8-cm CD.

Thank you for selecting this YAMAHA compact disc player.
FEATURES
vCD-RW (ReWritable) Disc Playability
*Refer to page 2 for details.
vProgram Play
vRandom-Sequence Play
vSingle Track/Entire Disc Repeat Play
vAutomatic Spacing Function
vTrack Programming Function Useful for Recording Tracks Fitted onto Any Length of Tape
vAutomatic Peak Level Search Function
vCD Synchronized Recording
vAdjustable Display Brightness
vRemote Control Capability
vOptical Digital Output
CDX-596 only
vCoaxial Digital Output
vCD-TEXT Data Display Capability
CONTENTS
CAUTION ......................................................... |
1 |
NOTES ABOUT DISCS ................................... |
2 |
FEATURES ...................................................... |
3 |
UNPACKING .................................................... |
4 |
NOTES ABOUT THE REMOTE |
|
CONTROL ....................................................... |
4 |
CONNECTIONS .............................................. |
5 |
IDENTIFICATION OF COMPONENTS ........... |
6 |
BASIC OPERATION ....................................... |
8 |
To pause play ............................................... |
9 |
To stop play .................................................. |
9 |
To turn off the power .................................... |
9 |
To play directly from the desired track .......... |
9 |
To skip to the beginning of the desired |
|
track (SKIP SEARCH) ................................ |
10 |
To advance or reverse play rapidly |
|
(MANUAL SEARCH) .................................. |
10 |
Other useful functions ................................ |
11 |
RANDOM-SEQUENCE PLAY ...................... |
13 |
REPEAT PLAY .............................................. |
13 |
PROGRAM PLAY ......................................... |
14 |
INDEX SEARCH ........................................... |
15 |
TRACK PROGRAMMING FOR |
|
RECORDING TO TAPE ................................. |
16 |
Automatic tape-programming ..................... |
16 |
Manual tape-programming ......................... |
18 |
Random sequential tape-programming ...... |
19 |
Automatic searching for the peak level |
|
on a disc ..................................................... |
20 |
CD SYNCHRONIZED RECORDING ............ |
21 |
TROUBLESHOOTING .................................. |
22 |
SPECIFICATIONS ........................................ |
23 |
English
E-3
UNPACKING
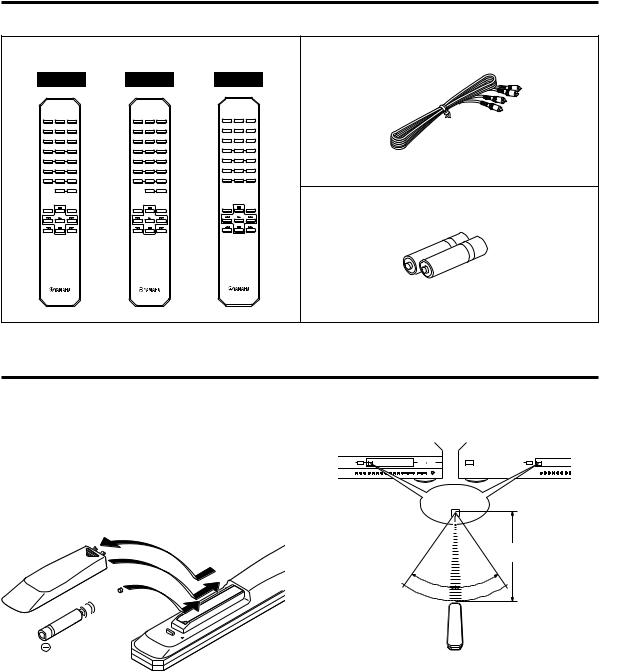
Carefully remove this unit and accessories from the box. You should find the unit itself and the following accessories.
Remote control |
|
|
|
|
|
|
RCA pin cable |
||
CDX-596 |
CDX-496 |
CDX-396 |
|
||||||
|
|
OPEN/ |
|
|
OPEN/ |
|
|
OPEN/ |
|
SYNCHRO DIMMER CLOSE |
SYNCHRO DIMMER CLOSE |
SYNCHRO DIMMER CLOSE |
|
||||||
SPACE |
TEXT/ |
PEAK |
SPACE |
TIME |
PEAK |
SPACE |
TIME |
PEAK |
|
TIME |
|
||||||||
TAPE |
CLEAR |
PROG |
TAPE |
CLEAR |
PROG |
TAPE |
CLEAR |
PROG |
|
1 |
2 |
3 |
1 |
2 |
3 |
1 |
2 |
3 |
|
4 |
5 |
6 |
4 |
5 |
6 |
4 |
5 |
6 |
|
7 |
8 |
9 |
7 |
8 |
9 |
7 |
8 |
9 |
|
0 |
+I0 |
INDEX |
0 |
+I0 |
INDEX |
0 |
+I0 |
INDEX |
|
|
– OUTPUT LEVEL + |
|
– OUTPUT LEVEL + |
|
|
|
|
||
REPEAT |
|
RANDOM |
REPEAT |
|
RANDOM |
REPEAT |
|
RANDOM |
Battery (size AA, R6, UM-3) x 2 |
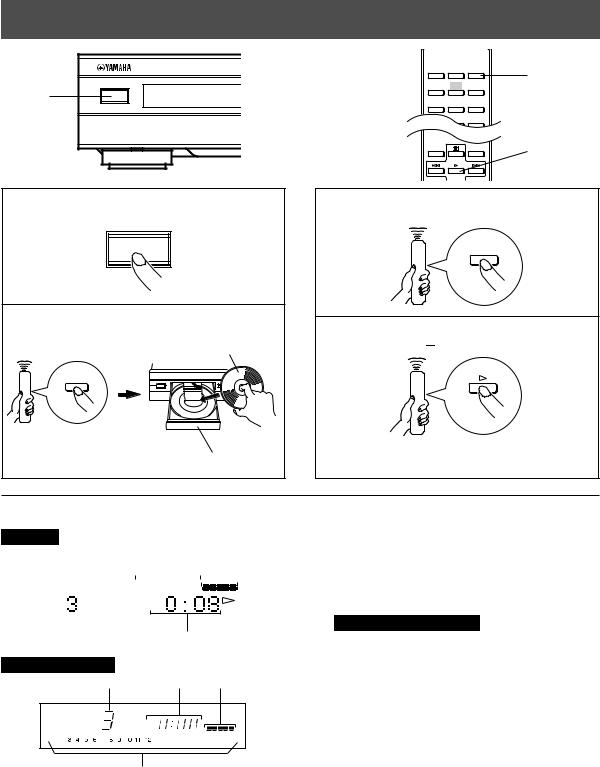
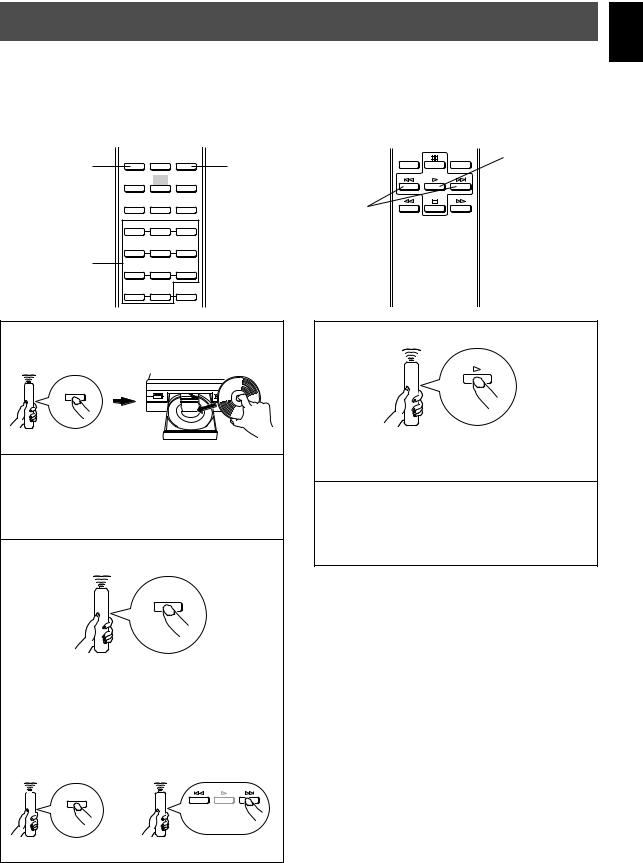
NOTES ABOUT THE REMOTE CONTROL
Battery installation
1.Turn the remote control over and remove the battery compartment cover by sliding it in the direction of the arrow.
2.Insert the batteries (AA, R6, UM-3 type) according to the polarity markings on the inside of the battery compartment.
3.Close the battery compartment cover.
Remote control operation range
|
|
|
CDX-596, CDX-496 |
|
|
|
|
|
CDX-396 |
|
|
|
|
|
|
|
|
|
||||||||||||||
|
|
|
|
|
|
|
|
|
|
|
|
|
|
|
|
|
|
|
|
|
|
|
|
|
|
|
|
|
|
|
|
|
|
|
|
|
|
|
|
|
|
|
|
|
|
|
|
|
|
|
|
|
|
|
|
|
|
|
|
|
|
|
|
|
|
|
|
|
|
|
|
|
|
|
|
|
|
|
|
|
|
|
|
|
|
|
|
|
|
|
|
|
|
|
|
|
|
|
|
|
|
|
|
|
|
|
|
|
|
|
|
|
|
|
|
|
|
|
|
|
|
|
|
|
|
|
|
|
|
|
|
|
|
|
|
|
|
|
|
|
|
|
|
|
|
|
|
|
|
|
|
|
|
|
|
|
|
|
|
|
|
|
|
|
Remote control sensor
1
3

 2
2
Within approximately 6 m
30 |
° |
° |
30 |
||
|
|
Battery replacement
If you notice that the remote control must be used closer to the main unit, the batteries are weak. Replace both batteries with new ones.
Notes
cUse only AA, R6, UM-3 batteries for replacement.
cBe sure the polarities are correct. (See the illustration inside the battery compartment.)
cRemove the batteries if the remote control will not be used for an extended period of time.
cIf batteries leak, dispose of them immediately. Avoid touching the leaked material or letting it come in contact with clothing, etc. Clean the battery compartment thoroughly before installing new batteries.
Notes
cThere should be no large obstacles between the remote control and the main unit.
cIf the remote control sensor is directly illuminated by strong lighting (especially an inverter type fluorescent lamp etc.), the remote control might not work properly. In this case, reposition the main unit to avoid direct lighting.
E-4

CONNECTIONS
c Before making any connection, switch OFF the power to |
c If the placement of this unit causes noise to another |
the unit and the amplifier or other component. |
equipment, such as a tuner, separate them from each |
c Connections should be made to the correct input |
other. |
terminals of the amplifier or another component. |
|
LINE OUT |
DIGITAL AUDIO OUT |
1
OPTICAL COAXIAL
English
3
2Connection cable
|
Optical fiber cable |
(For CDX-596 only; not included) |
To AC outlet |
1 |
(not included) |
|
|
|
|
RCA pin cable
(included)
OPTICAL COAXIAL
Amplifier
CD |
DIGITAL IN |
The shaded part (  ) is provided for CDX-596 only.
To connect this unit to your amplifier, choose one of the ways listed below.
When the LINE OUT (analog) terminals of this unit are used ( 1 )
Connect these terminals to the “CD” (or “AUX”) terminals of the amplifier. For additional details concerning these connections, refer to the operation instructions of the amplifier being used.
* Be sure that the left (“L”) and right (“R”) of these terminals are connected to the corresponding (left and right) terminals of the amplifier or another component.
cThe level of signals output from any of these terminals into an amplifier can be adjusted by using the
–OUTPUT LEVEL + buttons.
cWhen using the DIGITAL AUDIO OUT (OPTICAL or COAXIAL) terminal, set the level of signals output into an amplifier to max. by using the –OUTPUT LEVEL + buttons.
When the DIGITAL AUDIO OUT (OPTICAL) terminal of this unit is used ( 2 )
cBefore using this terminal, pull out the terminal’s cover.
cMake the connection from this terminal to the optical input terminal of an amplifier by using a commercially available optical fiber cable.
*Use an optical fiber cable that conforms to EIAJ standards. Other cables might not function correctly.
cBe sure to attach the terminal’s cover when this terminal is not being used, in order to protect the terminal from dust.
cThis terminal can also be connected to the optical input terminal of an MD recorder etc. to record CD onto MD directly.
When the DIGITAL AUDIO OUT (COAXIAL) terminal of this unit is used ( 3 ) CDX-596 only
Make the connection from this terminal to the digital input terminal of an amplifier by using a connection cable.
E-5
IDENTIFICATION OF COMPONENTS
( ) indicates the page number on which the controls are best described.
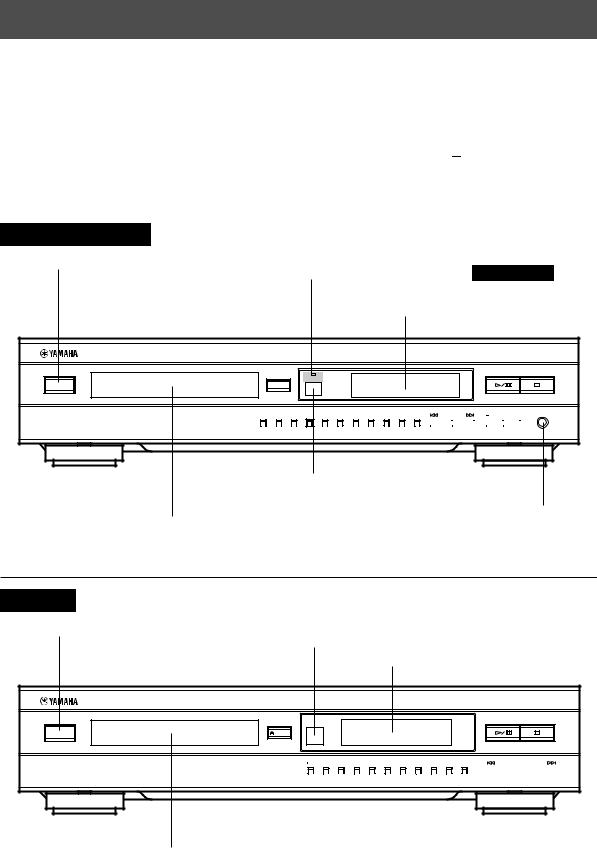
FRONT PANEL
cThe control functions on the main unit and on the remote control are virtually identical, with the exceptions below.
c /
/ 


 (play/pause) on the main unit has both the functions of
  (play) and


 (pause) on the remote control.
c SKIP/SEARCH
  on the main unit has both the functions of
  /
/ (skip) and
  /
/ (search) on the remote control.
CDX-596, CDX-496
POWER (p. 8)
AUTO DISPLAY OFF indicator CDX-596 only (p. 12)
Display panel
NATURAL SOUND COMPACT DISC PLAYER
POWER |
AUTO
DISPLAY OFF

 OPEN/CLOSE
|
10 |
1 |
2 |
3 |
4 |
5 |
6 |
7 |
8 |
9 |
0 |
|
SKIP/SEARCH |
|
|
|
PHONES |
|||||||||||
|
|
|
OUTPUT LEVEL |
|||||||||||||||||||||||||
|
|
|
|
|
|
|
|
|
|
|
|
|
|
|
|
|
|
|
|
|
|
|
|
|
|
|
|
|
Remote control sensor (p. 4)
PHONES jack (p. 12)
Disc tray (p. 8)
The shaded part (  ) is provided for CDX-596 only.
CDX-396
POWER (p. 8)
Remote control sensor (p. 4)
Display panel
NATURAL SOUND COMPACT DISC PLAYER
POWER |
OPEN/CLOSE |
10 |
1 |
2 |
3 |
4 |
5 |
6 |
7 |
8 |
9 |
0 |
|
SKIP/SEARCH |
||||||||||
|
|
|
|
|
|
|
|
|
|
|
|
|
|
|
|
|
|
|
|
|
|
|
|
|
|
|
|
|
|
|
|
|
|
|
|
|
|
|
|
|
|
|
|
|
|
Disc tray (p. 8)
E-6
( ) indicates the page number on which the controls are best described.
REMOTE CONTROL
CDX-596
TEXT/
TIME
TEXT/TIME (p. 11)
CDX-496, 396
TIME
TIME (p. 11)
OPEN/ SYNCHRO DIMMER CLOSE
SYNCHRO (p. 21)
SPACE PEAK
SPACE (p. 12)
TAPE CLEAR PROG
TAPE (p. 16)
1 2 3
4 5 6
Numeric buttons (p. 9)
7 8 9
0 |
+I0 |
INDEX |


 “pause” (p. 9)
– OUTPUT LEVEL +
REPEAT 


 RANDOM
REPEAT (p. 13)

 “stop” (p. 9)
 /
/ “search” (p. 10)
English
DIMMER (p. 12)
OPEN/CLOSE (p. 8)
PEAK (p. 20)
PROG (p. 14)
CLEAR (p. 15)
INDEX (p. 15)
CDX-596 and CDX-496 only
OUTPUT LEVEL (p. 12)
RANDOM (p. 13)
 “play” (p. 8)
 /
/ “skip” (p. 10)
The shaded parts (  ) vary between models.
E-7
This manual describes how to operate this unit by using the remote control.
To operate this unit from the front panel, use the corresponding buttons on the front panel.
BASIC OPERATION
NATURAL SOUND COMPACT DISC PLAYER
1 |
POWER |
OPEN/ SYNCHRO DIMMER CLOSE
SPACE PEAK
TAPE CLEAR PROG
2 3
REPEAT RANDOM
2, 3
4
1 Press POWER to turn on the power.
POWER |
2 Press OPEN/CLOSE to open the disc tray, and load
a disc.
Label side up.
OPEN/
CLOSE
Disc tray
Display information
CDX-596
1 |
|
|
2 |
|
|
3 |
|
||||
|
|
|
|
|
|
|
|
|
|
|
|
|
3 |
4 |
5 |
6 |
7 |
8 |
9 10 |
|
|
|
|
|
11 12 |
|
|
|
|
|
|
|
|
|
|
|
|
|
|
|
|
|
|
|
|
|
|
4
CDX-496, CDX-396
1 4 3
3 Press OPEN/CLOSE to close the disc tray.
OPEN/
CLOSE
4 Press  (or
(or 

 ) to begin play.
Play will begin from the first track of the disc.
1 Shows the track number selected or being played.
2Displays the numbers that correspond to the numbers of tracks (as high as number 20) on the disc. After each track is played, its corresponding number disappears so the number of remaining tracks (and their numbers) can be seen at a glance.
3CDX-596 and CDX-496 only
Shows the level of signals output into an amplifier or the headphone level adjusted by pressing –OUTPUT LEVEL +.
4Shows the time displays. (Refer to “Changing displays” on page 11.)
2
E-8
To play directly from the desired track
Select a desired track by using the numeric buttons.
CDX-596
English
5 |
The selected track |
|
number is displayed |
CDX-496, CDX-396
To select track number 10 or higher
Press +10 to select the first digit and then press a numeric button (1–0) to select the second digit.
Example: To select track 25
Press +10 twice, then immediately press 5 once.
+I0 |
5 |
+
*If a track number higher than the highest track number on the disc is selected, the last track on the disc will be played.
cAdditionally, you can close the disc tray by pressing 
(


 ), a numeric button or RANDOM, or by pressing the front edge of the disc tray gently. If the tray is closed in one of these ways, play will begin automatically; however, the display will not show the total number of tracks nor the total recorded time of the disc.
cCDX-596 only
If you load a CD-TEXT disc, the display also shows the disc title after showing the total number of tracks and the total recorded time of the disc.
Caution
When the disc tray is open, do not touch the inside gear wheel. If you touch the gear wheel, your finger may be caught in the closing tray and injured.
Gear wheel
E-9

To skip to the beginning of the desired track (SKIP SEARCH)
To play from the beginning of the next track
 (Press once.) To play from the beginning of the current track
(Press once.)
To play from the beginning of the preceding track
(Press twice.)
cThese operations can also be performed when the unit is paused or stopped.
cWhen using  or
or  on the remote control:
If  (or
(or  ) is pressed and held, the track number is continuously changed to higher numbers (or lower numbers).
c When using  SKIP/SEARCH
  on the front panel: Be careful not to press and hold the button, otherwise the selected track is played forward (or backward) rapidly.
To advance or reverse play rapidly (MANUAL SEARCH)
To advance rapidly |
c The sound can be heard (although slightly garbled) |
||
|
during manual search in either direction. This is |
||
|
convenient for locating a precise position within a track, or |
||
|
for reviewing the contents quickly. |
|
|
|
c Manual search can also be performed while disc play is |
||
|
paused, though no sound will be heard. |
|
|
|
c When using |
SKIP/SEARCH |
on the front |
(Press and hold.) |
panel: |
|
|
|
Be careful not to release the button just after it is |
||
pressed, otherwise the play is skipped to the beginning
To reverse rapidly
of the next track or returned to the beginning of the current track.
(Press and hold.)
E-10
Other useful functions
Changing displays
CDX-596
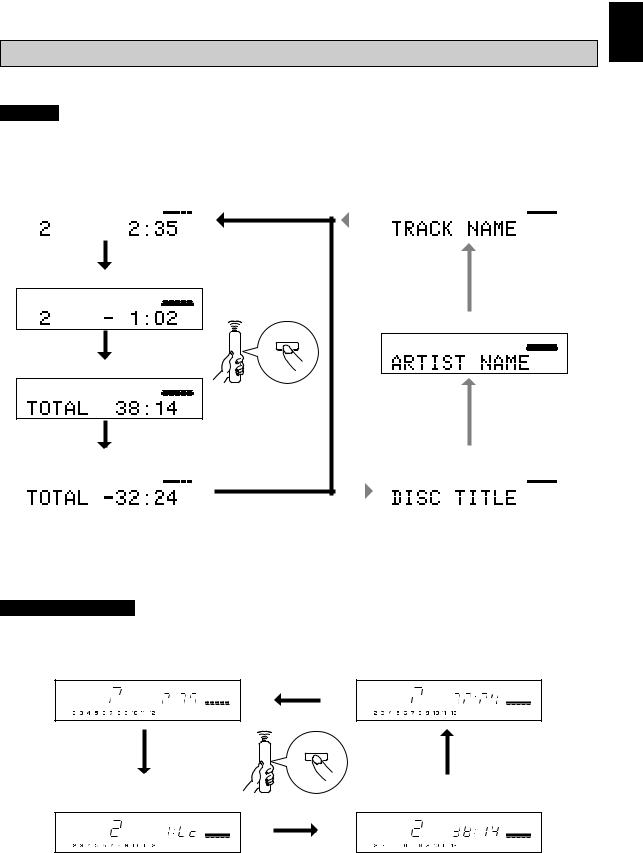
You can select any of the four time displays (1 – 4) by pressing TEXT/TIME. When you play a CD-TEXT disc, the disc title, artist name, and track name (5 – 7) are also displayed.
1 Elapsed time of the current track |
|
|
7 Track name |
|
|
|
|
|
|
|
|
|
||||||||||
|
|
|
|
|
|
|
|
|
|
|
|
|
|
|
|
|
|
|
|
|
|
|
2 |
3 |
4 |
5 |
6 |
7 |
8 |
9 10 |
|
|
|
|
2 |
3 |
4 |
5 |
6 |
7 |
8 |
9 10 |
|
|
|
11 12 |
|
|
|
|
|
|
|
|
|
|
|
|
TRACK CD-TEXT 11 12 |
|
|
|
|
|
|
|
|
|
|
|
|
|
|
|
|
|
|
|
|
|
|
|
|
|
|
|
|
|
|
|
|
|
|
|
|
|
|
|
|
|
|
|
|
|
|
|
|
|
|
|
|
|
|
|
|
|
|
|
|
|
|
|
|
|
|
|
|
|
|
|
|
|
|
|
|
|
|
English
2Remaining time of the current track
2 3 4 5 6 7 8 9 10
11 12
|
6 Artist name |
|
|
|
|
|
|
|
TEXT/ |
|
|
|
|
|
|
|
|
TIME |
2 |
3 |
4 |
5 |
6 |
7 |
8 |
9 10 |
|
||||||||
|
ARTIST CD-TEXT 11 12 |
|
|
|
|
|
|
|
3 Total disc play time
2 3 4 5 6 7 8 9 10
11 12
4 Total remaining time on the disc |
|
|
5 Disc title |
|
|
|
|
|
|
|
|
|
|||||||||||
|
|
|
|
|
|
|
|
|
|
|
|
|
|
|
|
|
|
|
|
|
|
|
|
2 |
3 |
4 |
5 |
6 |
7 |
8 |
9 10 |
|
|
|
|
|
|
2 |
3 |
4 |
5 |
6 |
7 |
8 |
9 10 |
|
|
11 12 |
|
|
|
|
|
|
|
|
|
|
|
|
TITLE |
CD-TEXT 11 12 |
|
|
|
|
|
|
|
|
|
|
|
|
|
|
|
|
|
|
|
|
|
|
|
|
|
|
|
|
|
|
|
|
|
|
|
|
|
|
|
|
|
|
|
|
|
|
|
|
|
|
|
|
|
|
|
|
|
|
|
|
|
|
|
|
|
|
|
|
|
|
|
|
|
|
|
|
|
|
|
|
|
Notes
cThe disc title, artist name, or track name may not be displayed with some CD-TEXT discs. In that case, “(NO ENTRY)” appears on the display.
cWhen playing a CD-TEXT disc, “CD-TEXT” also lights up on displays 1 – 4.
CDX-496 and CDX-396
You can select any of the four time displays by pressing TIME.
1 |
Elapsed time of the current track |
4 |
Total remaining time on the disc |
|
|
|
TOTAL |
|
|
|
REMAIN |
|
|
TIME |
|
2 |
Remaining time of the current track |
3 |
Total disc play time |
|
REMAIN |
|
TOTAL |
|
|
|
E-11

Changing brightness of the display
CDX-596
You can change the brightness of the display (or turn off the illumination) by pressing DIMMER.
During play |
During a stop or a pause |
Normal illumination |
Normal illumination |
|
DIMMER |
Dim |
Dim |
(off)* |
Dim* |
*While the display illumination is off, the AUTO DISPLAY OFF indicator on the front panel lights up.
CDX-496, CDX-396
AUTO
DISPLAY OFF
If desired, you can change brightness of the display in three degrees by pressing DIMMER.
*The AUTO DISPLAY OFF indicator lights up.
If a disc is played in this state, the display illumination will be turned off.
Normal illumination
DIMMER
Slightly dim
Dim
Automatic spacing
If you record a disc onto tape with an insufficient time space between tracks, the tape deck will not be able to perform blank search operations on the tape correctly. To prevent such a search mistake of the deck, press SPACE and light up “SPACE” on the display before recording. Spaces of about 4 seconds are inserted between the tracks.
SPACE
SPACE
Note
When the automatic spacing function is in effect, the display of the total time and of the total remaining time will include each of the 4 second intervals placed between tracks.
To cancel the automatic spacing function
Press SPACE.
SPACE
“SPACE” disappears from the display.
Adjusting the level of signals output to the amplifier and the headphone listening level
CDX-596 and CDX-496 only
You can adjust the level of signals output to the amplifier by pressing –OUTPUT LEVEL +.
– OUTPUT LEVEL +
When you listen with headphones, connect the headphones to the PHONES jack and adjust the volume by pressing –OUTPUT LEVEL +. At that time, note that this adjustment will also vary the signal level output to the amplifier.
PHONES
PHONES
E-12

RANDOM-SEQUENCE PLAY
The unit can play the tracks on a disc in a random sequence.
To perform random-sequence play
Press RANDOM.
RANDOM
Notes
cThis feature will not function while programming, or during programmed play.
cIf  (SKIP/SEARCH
  ) is pressed during randomsequence play, the next randomly programmed track will be played. If
  (
( SKIP/SEARCH) is pressed, play will return to the beginning of the current track.
c


 This indication appears while the unit is mixing up
tracks.
To cancel random-sequence play |
c Total remaining time on the disc will not be displayed during |
|
Press or RANDOM. |
random-sequence play. |
|
|
||
|
c CDX-596 and CDX-496 only |
|
RANDOM |
If the power is switched off during random-sequence play, |
|
or |
pressing POWER again to turn on the unit will automatically |
|
restore random-sequence play. |
||
|
English
REPEAT PLAY
You can play any desired track or the entire disc repeatedly by pressing REPEAT. The repeat play mode will change whenever you press REPEAT.
CDX-596
(off)
REPEAT S
REPEAT F
REPEAT
CDX-496, CDX-396
SINGLE REPEAT (S)
A single track is played repeatedly.
*This also works for programmed play and random-sequence play. (If repeat play is switched off, programmed play or random-sequence play will be resumed.)
FULL REPEAT (F)
All tracks (the entire disc) are played repeatedly.
*During programmed play, all programmed tracks are played repeatedly.
*During random-sequence play, all randomly sequenced tracks are played repeatedly in the same order.
*CDX-596 and CDX-496 only
If the power is switched off during FULL REPEAT play, pressing POWER again to turn on the unit will automatically restore FULL REPEAT play.
(off)
SINGLE
REPEAT
FULL REPEAT
E-13
PROGRAM PLAY
You can enjoy listening to your favorite tracks in any desired order by programming tracks. As many as 40 tracks can be programmed in sequence.
TAPE |
CLEAR PROG |
2, 4 |
REPEAT |
RANDOM |
|
|
|
|
|
1 |
2 |
3 |
|
3 |
4 |
5 |
6 |
|
7 |
8 |
9 |
|
|
|
0 |
+I0 |
INDEX |
1 Press |
to stop the unit. |
|
|
|
2 Press PROG.
CDX-596
PROGRAM
PROG
Blinks.
CDX-496, CDX-396
PROGRAM
TOTAL
5
1
3 Program a desired track by
6
pressing the corresponding numeric button.
Repeat this operation to program more tracks.
You can select the same track again.
4 When programming is finished,
PROG
press PROG.
5 Press  to begin play.
Blinks.
Display information during programming
CDX-596 |
1 |
|
||||||||
|
|
|
|
|
|
|
|
|
|
|
|
|
|
|
|
|
PROGRAM |
|
|
||
|
|
|
|
|
|
|
|
|
|
|
|
|
|
|
|
|
|
|
|
|
|
|
|
|
|
|
|
|
|
|
|
|
|
|
|
|
|
|
|
|
|
|
|
|
|
|
|
|
|
|
|
|
|
|
23
PROGRAM |
6 |
4
CDX-496, CDX-396 |
1 |
|
|
|
||||||||
|
|
|
|
|
|
|
||||||
|
|
|
|
|
|
|
|
|
|
|
|
|
|
PROGRAM |
|
|
|
|
|
|
|
|
|
||
|
|
|
|
|
|
|
|
|
|
|
||
|
|
|
|
|
|
TOTAL |
||||||
|
|
|
|
|
|
|
|
|
|
|
|
|
|
|
|
|
|
|
|
|
|
|
|
|
|
|
|
|
|
|
|
|
|
|
|
|
|
|
24
PROGRAM
TOTAL
1 Shows the program number for the track to be programmed next.
2 Shows the selected track number.
3 Shows only the numbers of programmed tracks.
4Shows the total time of the tracks currently programmed.
*If the total time becomes 100 minutes or more, the first digit will not be displayed.
Notes
cIf, during programming, TIME is pressed, the program number display can be changed to display the total time of the programmed tracks. To return to the previous display, press TIME once again.
c /
/ (
( SKIP/SEARCH
  ) can be used during playing, but only within the range of the programmed tracks.
c /
/ (
( SKIP/SEARCH
  ) can be used during playing to search all tracks, including unprogrammed tracks.
E-14 |
3 |
To stop program play
Press 
 . The first programmed track number will be displayed.
To resume play, press  . Play will begin from the beginning of the program.
To clear program data
There are several methods, as described below.
cPress 
 or CLEAR while the unit is stopped.
cOpen the disc tray.
cSwitch off the power.
To check program data
1.If during program play, press  .
.
2.Press PROG.
3.Each time  (SKIP/SEARCH
  ) is pressed, the track numbers and sequential order of the programmed tracks can be checked one after another. The display of the track number can be returned (sequentially in reverse order) by pressing
  (
( SKIP/SEARCH).
To correct program data
1.Follow the procedure described in “To check program data”.
2.Display the track number to be corrected by pressing
 /
/ (
( SKIP/SEARCH
  ).
).
3.Press a numeric button to select a desired track to replace the one displayed. The previously programmed track will be cleared from the memory, and the new one will be programmed.
4.Press PROG to complete the correction. To begin play immediately after making the correction, press  instead of pressing PROG.
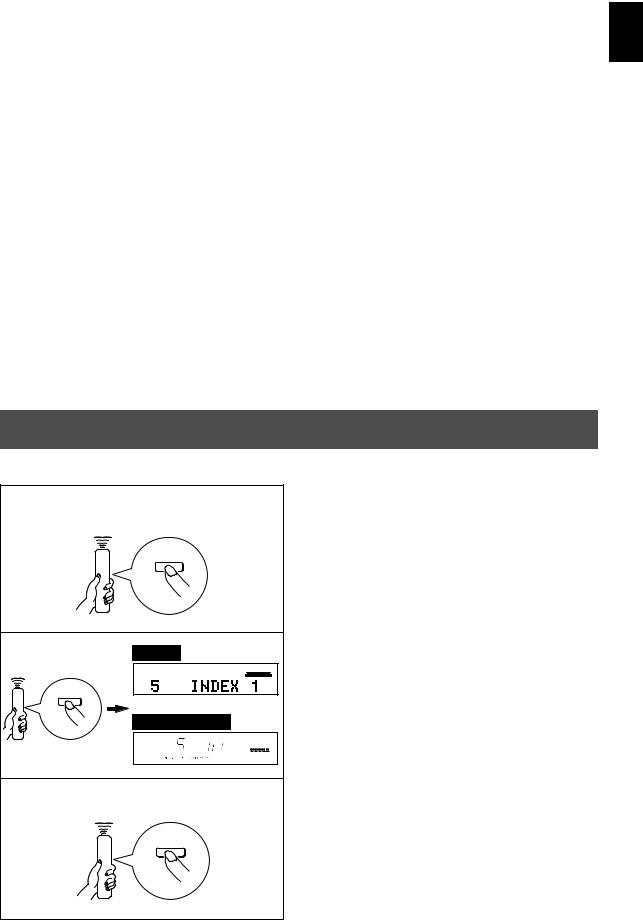
INDEX SEARCH
If the disc includes index numbers, play can be started from any desired index number.
1 Press a numeric button to select a track which has index numbers.
5
2 Press INDEX. |
CDX-596 |
|
|
|
|
|
5 |
6 |
7 |
8 |
9 10 |
|
11 12 |
|
|
|
|
INDEX |
|
|
|
|
|
|
CDX-496, CDX-396 |
|
|
||
|
INDEX |
|
|
|
|
3 Press a numeric button to select the desired index number.
To cancel the index search function
Press INDEX.
Notes
cNot all discs have index numbers. In addition, among those discs which have index numbers, not all discs necessarily have more than one index number.
cThe index system is a method for sub-dividing tracks into smaller divisions for easier location of those parts. The liner notes contained in the disc case usually tell that such index numbers are included with the  mark.
mark.
cIf an index number is selected that is higher than any index number on that disc, play will start from the last index point on the disc.
cFor some discs, play may begin slightly prior to the actual designated index point.
cIf the disc has no encoded index points, play will begin from the beginning of the selected track.
cThe index number can be designated only while “INDEX” is illuminated.
6
English
E-15

TRACK PROGRAMMING FOR RECORDING TO TAPE
The unit can program tracks on a disc for recording onto tape. By considering the tape’s total possible recording time, the unit will automatically program tracks or help you program tracks so they will fit onto the tape with the least amount of unrecorded space at each end of the tape.
m Automatic tape-programming
The unit will automatically program tracks on a disc with their original order.
TEXT/
2 |
SPACE |
TIME |
PEAK |
|
|
|
|||
3 |
TAPE |
CLEAR |
PROG |
|
1 |
2 |
3 |
|
|
|
3 |
|||
|
4 |
5 |
6 |
|
|
7 |
8 |
9 |
|
|
0 |
+I0 |
INDEX |
|
1 Press 
 to stop the unit.
*The peak level search function of this unit is useful for adjusting recording level on the tape deck. (Refer to page 20.)
2 If desired, you can automatically insert additional time space between tracks by pressing SPACE to light up “SPACE” on the display. (Refer to page 12.)
SPACE
SPACE
3 Press TAPE to show the tape’s total possible recording time on the display.
CDX-596
TAPE
“TAPE 46” turns on.
CDX-496, CDX-396
“C-46” turns on.
You can select any of the four tape lengths by pressing TAPE.
|
46 |
54 |
(off) |
|
|
60 |
90 |
4 |
REPEAT |
RANDOM |
5, 6 |
6
1
If desired, you can also enter the tape’s total possible recording time manually.
Example: For a C-64 tape (32 minutes on each side), press “6” and “4”.
6 |
4 |
+
4 Press REPEAT.
REPEAT
The unit automatically programs tracks for both side A and side B considering the tape’s total time.
5 Begin recording on the tape deck, and then press  on this unit.
6 The unit will pause at the end of side A of the tape.
Turn the tape over to side B. Resume recording, and then press  or
or 
 on this unit.
E-16

Notes
cIn step 4, you can check the program data for side A and side B.
CDX-596
12 3 4
PROGRAM |
1 |
2 |
3 |
4 |
5 |
A |
CDX-496, CDX-396
13
PROGRAM
A |
TOTAL |
4 2
1 Shows the number of tracks programmed on each side right after the programming is finished. It is then replaced by the number of the first programmed track on side A.
2 Shows the programmed track numbers on each side.
3 Shows the total time of programmed tracks on each side. 4 Shows the side of the tape.
English
cAll tracks may not be programmed if the tape’s length is not enough. To program all tracks, use a tape that is longer than the actual playing time.
cTo check, cancel or correct program data, refer to page 15.
*When checking program data, note that “PAUSE” or “Pu” appears between track numbers for side A and side B.
cUp to 40 tracks can be programmed. A pause inserted between side A and B is counted as one track.
cCD synchronized recording function can be used if your tape deck is compatible with it. If so, in step 5 and 6, press
SYNCHRO and then press  on this unit’s remote control. Recording automatically begins. (For details, refer to page 21.)
E-17

m Manual tape-programming
This is for recording desired tracks in any order onto a tape.
4
3, 5
SYNCHRO |
DIMMER |
OPEN/ |
|
|
CLOSE |
REPEAT |
RANDOM |
||
|
|
|
||
SPACE |
TEXT/ |
PEAK |
7 |
|
TIME |
|
|||
|
|
|
|
|
TAPE |
CLEAR |
PROG |
2 |
6, 7 |
1 |
2 |
3 |
|
|
4 |
5 |
6 |
|
|
7 |
8 |
9 |
|
|
0 |
+I0 |
INDEX |
1 Follow steps 1 – 3 on page 16.
2 |
Press PROG. |
CDX-596 |
Blinks. |
|
|
|
||||||
|
|
|
|
|
|
|
|
|
|
|||
|
|
|
|
|
|
|
|
|
|
|
||
|
|
PROGRAM |
1 |
2 |
3 |
4 |
5 |
6 |
7 |
8 |
9 10 |
A |
|
|
|
11 12 |
|
|
|
|
|
|
|
|
|
|
PROG |
|
|
|
|
|
|
|
|
|
|
|
|
|
Blinks. |
|
|
|
|
|
|
|
|
|
|
|
|
CDX-496, CDX-396 |
|
|
|
|||||||
|
|
PROGRAM |
|
|
|
|
|
|
|
|
|
|
|
|
A |
TOTAL |
|
|
|
|
|
|
|
|
|
|
|
|
REMAIN |
|
|
|
|
|
|
|
|
|
Blinks.
3 Use numeric buttons to select desired tracks (to be recorded on side A) in any order.
1 2 3
4 5 6
7 |
8 |
9 |
0 +I0
*Programmed track numbers light up on the display. You can select a track which can be programmed for the remaining time on side A from track numbers flashing on the display. You cannot, however, select a track number extinguished from the display.
4 When track selection for side A is finished, press
TAPE.
TAPE
A pause is inserted.
5 Use numeric buttons to select the track numbers (to be recorded on side B) in any order.
1 2 3
4 5 6
7 8 9
0 +I0
6 Begin recording on the tape deck, and then press  on this unit.
7 The unit will pause at the end of side A of the tape.
Turn the tape over to side B. Resume recording, and then press  or
or 
 on this unit.
Notes
cIf, in step 3 or 5, “ERROR” or “E rr” appears on the display, the track number just selected cannot be programmed because there is not enough time remaining on the tape. However, at this time, if any other track number is flashing continuously on the display, you can program it instead of the unprogrammable one.
cIn step 3 or 5, each time a selection is made, the track number and the tape’s remaining time will be displayed, and then the display will change to indicate the next program number.
cTo check, cancel or correct program data, refer to page 15.
*When checking program data, note that “PAUSE” or “Pu” appears between track numbers for side A and side B.
cUp to 40 tracks can be programmed. If, however, a pause is inserted, it is counted as one track.
cCD synchronized recording function can be used if your tape deck is compatible with it. If so, in step 6 and 7, press SYNCHRO and then press  on this unit’s remote control. Recording automatically begins. (For details, refer to page 21.)
E-18
m Random sequential tape-programming
The unit will automatically program tracks in random sequential order for recording to tape.
REPEAT |
RANDOM |
2 |
4
3, 4
1 |
|
Notes |
|
|
|
Follow steps 1 – 3 on page 16. |
c Because programmed data changes every time RANDOM is |
||||
pressed, the unrecorded space at the end of each side of the |
|||||
|
|
||||
2 |
|
tape also varies accordingly. |
|
|
|
Press RANDOM. |
c All tracks may not be programmed if the tape’s length is not |
||||
enough. To program all tracks, use a tape that is longer than |
|||||
|
|
||||
|
|
the actual playing time. |
|
|
|
|
RANDOM |
c In step 2, you can check the program data for side A and side |
|||
|
B. |
|
|
||
|
|
|
|
||
|
|
CDX-596 |
|
|
|
|
|
1 |
2 3 4 |
||
* The unit will automatically program tracks at random for |
PROGRAM |
2 4 6 8 |
A |
||
|
|
|
12 |
|
|
both side A and side B considering the tape’s total time.
3 |
Begin recording on the tape deck, and then press |
|
|
|
|
|
|
|
||||
|
on this unit. |
|
|
|
|
|
|
|
|
|
|
|
|
|
|
|
|
CDX-496, CDX-396 |
|
|
|
||||
|
|
|
|
|
|
|
|
|
||||
|
|
|
|
|
|
|
|
|
|
|
|
|
4 |
|
|
|
|
|
1 |
3 |
|
|
|||
The unit will pause at the end of side A of the tape. |
|
|
|
|
|
|
|
|||||
|
Turn the tape over to side B. Resume recording, |
|
|
|
PROGRAM |
|
|
|
||||
|
and then press |
or on this unit. |
|
|
|
A |
TOTAL |
|||||
|
|
|
|
|
|
|
|
|
||||
|
|
|
|
|
|
|
|
|
|
|
|
|
|
|
|
|
|
|
|
|
|
|
|
|
|
4 2
1 Shows the number of tracks programmed on each side right after the programming is finished. It is then replaced by the number of the first programmed track on side A.
2 Shows the programmed track numbers on each side.
3 Shows the total time of programmed tracks on each side. 4 Shows the side of the tape.
c Up to 40 tracks can be programmed. A pause inserted between side A and B is counted as one track.
c CD synchronized recording function can be used if your tape deck is compatible with it. If so, in step 3 and 4, press SYNCHRO and then press  on this unit’s remote control. Recording automatically begins. (For details, refer to page 21.)
English
E-19

Automatic searching for the peak level on a disc
The unit automatically searches for a part in the disc where the source level peaks and next plays that part repeatedly. When recording to tape, this feature is very helpful for adjusting the recording level on the tape deck.
1 Press 
 to stop the unit.
2 Press PEAK.
PEAK
“PEAK” lights up on the display, and the peak level search is performed on the disc.
It takes a few minutes to search for the peak level.
Next, the part where the source level peaks is repeatedly played. Adjust the recording level on the tape deck listening to this sound.
CDX-596
REPEAT |
8 |
9 10 |
|
|
|
11 12 |
|
|
|
|
|
|
|
|
|
|
|
|
|
REPEAT |
8 |
9 10 |
|
|
|
11 12 |
|
|
|
|
|
|
|
|
CDX-496, CDX-396
PEAK
REPEAT
To cancel the peak level search function
Press  . (Some other buttons can also be used.)
Notes
cEven if the peak level search is performed several times on the same disc, the same part will not be always selected. That is because the unit searches for the peak level among parts of the disc that are randomly selected by the internal microcomputer.
cIn the program play mode, this feature will function among the programmed tracks only. If program play is being performed, first press 
 , and then press PEAK. If program play is not being performed, only press PEAK.
PEAK
REPEAT
E-20
CD SYNCHRONIZED RECORDING
This unit can automatically synchronize a tape deck’s recording with CD play. With this function, you can record a CD on tape easily and precisely.
This recording method requires a YAMAHA tape deck compatible with this function. (Refer to the tape deck’s operation manual to find out whether it is compatible or not.)
*This unit and the tape deck must be placed close to each other so that both of them can simultaneously receive the signals from this unit’s remote control.
3 |
SYNCHRO |
DIMMER |
OPEN/ |
1 |
REPEAT |
RANDOM |
4 |
CLOSE |
|
||||||
SPACE |
TEXT/ |
PEAK |
|
|
|
||
|
TIME |
|
3 |
|
|
||
|
TAPE |
CLEAR |
PROG |
|
|
|
|
|
1 |
2 |
3 |
|
|
|
|
3 |
4 |
5 |
6 |
|
|
|
|
7 |
8 |
9 |
|
|
|
|
|
|
0 |
+I0 |
INDEX |
|
|
|
|
English
1 Press OPEN/CLOSE to open the disc tray, and load a disc.
OPEN/
CLOSE
2 Load a tape on the tape deck.
*The peak level search function of this unit is useful for adjusting recording level on the tape deck. (Refer to page 20.)
3 Press SYNCHRO.
SYNCHRO
This unit enters into the pause mode, and the tape deck enters into the REC/PAUSE mode.
* In this state, the time display on this unit flashes on and off.
If necessary, select a desired track by pressing a numeric button or  /
/ (
( SKIP/SEARCH
  ).
).
5
or
4 Press  .
.
Both CD play and tape deck recording begin.
* CD play begins shortly after the recording.
5 If you want to stop recording temporarily and restart recording from a desired track, stop this unit by pressing  , and the tape deck as well, then follow steps 3–4 again.
To cancel synchronized CD-tape recording function
Press 
 .
.
Notes
cTo finish or stop the recording, make proper operations on the tape deck. (For details, please refer to the owner’s manual of the tape deck.)
cProgrammed sequence of tracks can also be recorded with this function instead of recording an entire disc. (Refer to pages 14–15 for the programming procedure.)
cThis function can also be used together with the automatic tape-programming function. (Refer to pages 16–19.)
E-21

TROUBLESHOOTING
If the unit fails to operate normally, check the following points to determine whether the fault can be corrected by the simple measures suggested. If it cannot be corrected, or if the fault is not listed in the SYMPTOM column, disconnect the power cord and contact your authorized YAMAHA dealer or service center for help.
SYMPTOM |
PROBABLE CAUSE |
REMEDY |
|
|
|
The unit does not switch ON when |
The power cord is not connected nor |
Securely connect the power cord. |
POWER is pressed. |
completely connected. |
|
|
|
|
The disc tray does not close |
A foreign object is obstructing the tray. |
Carefully check the disc tray and |
completely. |
|
remove the foreign object. |
|
|
|
Play does not begin. |
The disc is damaged. |
Check the disc carefully; replace it if |
|
|
necessary. |
|
|
|
|
There is moisture on the laser pickup. |
Wait 20 to 30 minutes after switching |
|
|
the unit ON before trying to play a disc. |
|
|
|
|
The disc is loaded upside down. |
Reload the disc with the label side up. |
|
|
|
|
The disc is dirty. |
Clean the disc. |
|
|
|
|
The CD-RW (ReWritable) disc is not |
Replace the disc with a correctly- |
|
recorded correctly. |
recorded disc playable with this unit. |
|
|
|
|
The disc is a non-standard disc not |
|
|
playable with this unit. |
|
|
|
|
Play is delayed, or begins at the |
The disc may be scratched or |
Check the disc carefully; replace it if |
wrong place. |
damaged. |
necessary. |
No sound. |
Improper output cable connections. |
Connect the cables properly. If the |
|
|
problem persists, the cables may be |
|
|
defective. |
|
|
|
|
Improper amplifier operation. |
Set the amplifier controls to the correct |
|
|
input selection. |
|
|
|
|
The – OUTPUT LEVEL + buttons are |
Adjust the volume by using the |
|
set at minimum. (CDX-596 and CDX- |
– OUTPUT LEVEL + buttons. (CDX- |
|
496 only) |
596 and CDX-496 only) |
|
|
|
Sound “skips”. |
The unit is being subjected to vibrations |
Relocate the unit. |
|
or impacts. |
|
|
|
|
|
The disc is dirty. |
Clean the disc. |
|
|
|
Sound “hums”. |
Improper cable connections. |
Securely connect the audio cables. If |
|
|
the problem persists, the cables may be |
|
|
defective. |
|
|
|
Noise from a nearby tuner. |
The tuner is too close to the unit. |
Move the tuner and the main unit |
|
|
farther apart. |
|
|
|
Noise from inside of the disc tray. |
The disc may be warped. |
Replace the disc. |
No sound from the headphones. |
The – OUTPUT LEVEL + buttons are |
Adjust the volume by using the |
(CDX-596 and CDX-496 only) |
set at minimum. |
– OUTPUT LEVEL + buttons. |
The remote control does not |
The batteries of the remote control are |
Replace the batteries with new ones. |
work. |
too weak. |
|
|
Remote control is too far away or tilted |
Use within 6 m and 60° radius. |
|
too much. |
|
|
|
|
|
Direct sunlight or lighting (of an inverter |
Reposition the main unit. |
|
type flourescent lamp etc.) is striking |
|
|
the remote control sensor of the main |
|
|
unit. |
|
|
|
|
TV functions strangely when the |
Remote control is being used near TV |
Relocate the main unit away from the |
remote control is used. |
set with a remote control sensor. |
TV or cover TV’s remote control sensor. |
|
|
|
E-22

SPECIFICATIONS
Audio Section |
|
General |
|
Frequency response ...................... |
2 Hz – 20 kHz, ±0.5 dB |
Power requirements |
|
|
|
U.S.A. and Canada models |
......................... 120V, 60 Hz |
Harmonic distortion + noise (1 kHz) |
Australia model ........................................... |
240V, 50 Hz |
|
<CDX-596> ........................................... |
0.0025% or less |
Europe and U.K. models ............................. |
230V, 50 Hz |
<CDX-496, CDX-396> ............................. |
0.003% or less |
General model ................... |
110/120/220/240V, 50/60 Hz |
S/N ratio |
|
Power consumption |
|
<CDX-596> ............................................ |
115 dB or more |
<CDX-596> .............................................................. |
10W |
<CDX-496, CDX-396> ............................ |
105 dB or more |
<CDX-496, CDX-396> ................................................ |
9W |
Dynamic range |
|
Dimensions (W x H x D) ....................... |
435 x 96 x 277 mm |
<CDX-596> ............................................ |
100 dB or more |
|
|
<CDX-496, CDX-396> .............................. |
95 dB or more |
Weight ........................................................................ |
3.7 kg |
Wow & flutter .............................................. |
Unmeasurable |
Accessories ........................................... |
RCA pin cable x 1 |
|
|
|
Remote control |
Output voltage (1 kHz, 0 dB) ............................... |
2.0±0.5V |
Battery (size AA, R6, UM-3) x 2 |
|
Headphones output (–20 dB) |
|
Please note that all specifications are subject to change |
|
<CDX-596 and CDX-496 only> |
|
without notice. |
|
..................................................... |
200±40 mV/150 ohms |
|
|
English
Laser Diode Properties
Material .................................................................... |
GaAlAs |
Wavelength .............................................................. |
780 nm |
Emission Duration ............................................ |
continuous |
Laser Output ................................................ |
max. 44.6 μW* |
*This output is the value measured at a distance of about
200 mm from the objective lens surface on the Optical Pick-up Block.
E-23

PRECAUTION D’USAGE: Tenir compte des précautions ci-dessous avant de faire fonctionner l’appareil.
cPour bénéficier des meilleures performances, lire attentivement ce manuel. Le conserver en lieu sûr pour référence ultérieure.
cInstaller l’appareil dans un endroit bien ventilé, frais, sec et propre, loin des fenêtres des sources de chaleur, des vibrations, de la poussière, de l’humidité ou du froid.
Pour éviter les bourdonnements, éloigner l’appareil des appareils électroménagers, des moteurs électriques et des transformateurs. Pour prévenir tout incendie ou choc électrique, ne pas l’exposer à la pluie ou à l’eau.
cVeiller à ce qu’il existe au moins un espace de 10 en haut, à gauche, à droite et à l’arrière de l’appareil de manière que l’aération soit possible.
cNe pas faire fonctionner l’appareil à l’envers. Il pourrait surchauffer et entraîner des dégâts.
cNe démonter en aucun cas l’appareil. Si on laisse tomber quelque chose à l’intérieur, contacter son revendeur.
cNe pas forcer sur les interrupteurs, les boutons rotatifs et les câbles.
cSi l’on ne compte pas utiliser l’appareil pendant un certain temps (vacances, etc.) débrancher le cordon d’alimentation de la prise secteur.
cMise à la terre et polarisation : veiller à ne pas contrarier la mise à la terre et la polarisation de l’appareil.
cNe pas nettoyer pas l’appareil à l’aide des solvants, vous risqueriez d’endommager son revêtement. Utiliser un chiffon propre et sec.
cPrendre soin de lire la section “En cas de difficulté” portant sur les erreurs de fonctionnement courantes avant de conclure que l’appareil est en panne.
cNe pas poser d’autre module sur cet appareil, car cela pourrait endommager ou décolorer son revêtement.
cPour éviter tout dégât causé par la foudre, débrancher l’appareil du secteur en cas d’orage avec éclairs.
cPour débrancher le cordon d’alimentation de la prise secteur, le saisir par le connecteur et non par le câble.
cNe pas brancher le connecteur d’alimentation dans la prise secteur avant d’avoir effectué toutes les connexions.
cLa tension du secteur doit être la même que celle indiquée sur l’appareil. L’utilisation d’une tension plus élevée est dangereuse et peut causer un incendie ou un autre type d’accident. YAMAHA n’est pas responsable des dommages résultant d’une alimentation de l’appareil par une tension autre que celle spécifiée.
cUn changement brusque de température, le stockage ou le fonctionnement dans un endroit très humide peut entraîner une condensation à l’intérieur de l’appareil.
PRECAUTIONS EN CAS DE TRANSPORT DE L’APPAREIL
Avant de transporter l’appareil, retirer le disque de l’appareil, puis appuyer sur POWER pour mettre l’appareil hors tension et débrancher la fiche du cordon d’alimentation de la prise secteur.
ATTENTION
L’emploi de commandes, de réglages ou un choix de procédures différents des spécifications de cette brochure peut entraîner une exposition à des radiations dangereuses.
Ce lecteur de disque compact fait partie des produits laser de la CLASSE 1. La mention
CLASS 1 LASER
PRODUCT est située sur le socle de l’appareil.
Le laser de cet appareil peut émettre des radiations supérieures à la limite de la classe 1.
Français
F-1
REMARQUES CONCERNANT LES DISQUES
Disques pouvant être lus sur cet appareil
Cet appareil est destiné exclusivement à la lecture de disque compact portant les marques indiquées ci-dessous. Aucun autre disque ne doit être mis en place dans ce lecteur. L’appareil peut aussi faire la lecture de disque compact de 3 in. (8 cm).
.... Disques compacts (audionumériques)
Disques les plus couramment utilisés disponibles sur le marché.

 .... Disques audionumériques CD-RW
(réinscriptibles)
Ces disques peuvent être enregistrés plusieurs fois en utilisant des enregistreurs de disques compact pour l’enregistrement audio. Les disques CD-
RW enregistrés peuvent être lus seulement par les lecteurs de disques dotés d’une fonction de lecture des disques CD-RW.
Remarques
cVeiller à utiliser un disque CD-RW fabriqué par un fabricant bien connu.
cVeiller à utiliser un disque CD-RW portant au moins une des phrases suivantes sur le disque ou sur le boîtier du disque.
FOR CONSUMER
FOR CONSUMER USE
FOR MUSIC USE ONLY
.... Disques CD-TEXT
Disques enregistrés avec des données textuelles telles que le titre des albums, le titre des plages et le nom des artites. Ces disques peuvent être lus avec des lecteurs de disque compact ordinaires; toutefois, les données textuelles ne peuvent être affichées que sur des lecteurs de disque compact dotés d’une fonction de lecture de telles données.
Le modèle CDX-596 peut afficher les
données textuelles enregistrées sur les disques CD-TEXT.
Remarque
Il est possible que ce lecteur de disque compact ne puisse pas effectuer la lecture de certains disques CD-
RW ou de disques sur lesquels l’enregistrement n’a pas
été effectué correctement.
Pour éviter toute anomalie de fonctionnement sur cet appareil:
c Ne pas utiliser de disques de formes non standard (coeur, etc.) en vente sur le marché, car ils risquent d’abîmer l’appareil.
cNe pas utiliser de disques comportant du ruban adhésif, des joints ou de la colle. Si l’on utilise un tel disque, un disque risquera de se coincer dans l’appareil, et on risquera d’endommager l’appareil.
Remarques concernant la manipulation des disques compact
cManipuler avec soin le disque compact afin de ne pas rayer la surface le lecture.
cBien que les disques compact ne soient pas soumis à l’usure pendant la lecture, un endommagement de la surface de lecture causé par une manipulation incorrecte risque de provoquer des irrégularités dans la lecture.
cPour écrire sur la face portant l’étiquette, utiliser un feutre ou un instrument similaire. N’utiliser ni stylo à bille, ni crayon, ni aucun instrument pointu qui peuvent endommager le disque et sérieusement diminuer la lecture sur le disque.
cNe pas voiler les disques.
cLorsque le disque n’est plus utilisé, le retirer de l’appareil et le ranger dans son coffret.
cLorsqu’on retire ou qu’on met un disque en place, veiller
à ne pas rayer la surface de lecture.
cBien que de minuscules particules de poussière ou des empreintes digitales n’aient aucun effet sur la lecture, il est préférable de nettoyer la surface de lecture du disque compact. Pour ce faire, essuyer avec un chiffon propre et sec du centre vers le bord en un mouvement droit.
cNe jamais utiliser de nettoyeur pour disque ordinaire, d’atomiseurs pour disque, d’atomiseur antistatique, de liquides ni de solutions chimiques pour nettoyer la surface des disques car la surface du disque risque d’être irrémédiablement endommagée.
cEviter d’exposer les disques directement au soleil, à des températures élevées ou à une forte humidité pendant une période de temps prolongée, car cela risque de voiler les disques.
NON!
Pour lire un disque compact de 8 cm
Le placer dans le renfoncement du tiroir des disques. Ne pas mettre de disque compact de taille normale (12 cm) sur un disque compact de 8 cm.
F-2

Nous vous remercions d’avoir porté votre choix sur ce lecteur de disque compact YAMAHA.
CARACTERISTIQUES
vPossibilité d’utiliser les disques CD-RW (réinscriptibles)
*Pour plus de détails, se reporter à la page 2.
vLecture programmee
vLecture en séquence aléatoire
vLecture répétée de plage unique/disque entier
vFonction d’espacement automatique
vFonction de programmation de plage utile pour enregistrer les plages comprises dans n’importe quelle longueur de bande
vFonction de recherche automatique du niveau de crête
vEnregistrement synchronisé de disque compact
vLuminosité d’affichage réglable
vFonctionnement par télécommande
vSortie numérique optique
CDX-596 seulement
vSortie numérique coaxiale
vPossibilité d’afficher les données CDTEXT
Français
TABLE DES MATIERES
PRECAUTION D’USAGE ................................ |
1 |
REMARQUES CONCERNANT LES |
|
DISQUES ......................................................... |
2 |
CARACTERISTIQUES .................................... |
3 |
DEBALLAGE ................................................... |
4 |
REMARQUES CONCERNANT LA |
|
TELECOMMANDE .......................................... |
4 |
RACCORDEMENTS ....................................... |
5 |
IDENTIFICATION DES COMPOSANTS ........ |
6 |
FONCTIONNEMENT DE BASE ..................... |
8 |
Pour interrompre momentanément |
|
la lecture ...................................................... |
9 |
Pour arrêter la lecture .................................. |
9 |
Pour mettre l’appareil hors tension .............. |
9 |
Pour effectuer directement la lecture |
|
d’une plage .................................................. |
9 |
LECTURE EN SEQUENCE ALEATOIRE ..... |
13 |
LECTURE REPETEE ................................... |
13 |
LECTURE PROGRAMMEE .......................... |
14 |
RECHERCHE D’INDEX ................................ |
15 |
PROGRAMMATION DES PLAGES POUR |
|
ENREGISTREMENT SUR BANDE .............. |
16 |
Programmation automatique de bande ...... |
16 |
Programmation manuelle de bande ........... |
18 |
Programmation de bande par séquence |
|
aléatoire ..................................................... |
19 |
Recherche automatique du niveau de crête |
|
d’un disque ................................................. |
20 |
ENREGISTREMENT SYNCHRONISE D’UN |
|
DISQUE COMPACT ..................................... |
21 |
EN CAS DE DIFFICULTE ............................. |
22 |
CARACTERISTIQUES TECHNIQUES ......... |
23 |
Pour sauter jusqu’au début de la plage |
|
désirée (RECHERCHE AVEC SAUT) ........ |
10 |
Recherche manuelle rapide en avant ou en |
|
arrière (RECHERCHE MANUELLE) .......... |
10 |
Autres fonctions utiles ................................ |
11 |
F-3

DEBALLAGE
Retirer soigneusement cet appareil et ses accessoires du carton d’emballage. Le carton doit contenir cet appareil et les accessoires suivants.
Télécommande |
|
|
|
|
|
Câble à broche RCA |
||
CDX-596 |
CDX-496 |
CDX-396 |
||||||
|
|
OPEN/ |
|
|
OPEN/ |
|
|
OPEN/ |
SYNCHRO DIMMER CLOSE |
SYNCHRO DIMMER CLOSE |
SYNCHRO DIMMER CLOSE |
||||||
SPACE |
TEXT/ |
PEAK |
SPACE |
TIME |
PEAK |
SPACE |
TIME |
PEAK |
TIME |
||||||||
TAPE |
CLEAR |
PROG |
TAPE |
CLEAR |
PROG |
TAPE |
CLEAR |
PROG |
1 |
2 |
3 |
1 |
2 |
3 |
1 |
2 |
3 |
4 |
5 |
6 |
4 |
5 |
6 |
4 |
5 |
6 |
7 |
8 |
9 |
7 |
8 |
9 |
7 |
8 |
9 |
0 |
+I0 |
INDEX |
0 |
+I0 |
INDEX |
0 |
+I0 |
INDEX |
|
– OUTPUT LEVEL + |
|
– OUTPUT LEVEL + |
|
|
Pile (format AA, R6, UM-3) x 2 |
||
REPEAT |
|
RANDOM |
REPEAT |
|
RANDOM |
REPEAT |
|
RANDOM |
REMARQUES CONCERNANT LA TELECOMMANDE
Mise en place des piles
1.Retourner la télécommande et retirer le couvercle du compartiment des piles en le faisant glisser dans le sens indiqué par la flèche.
2.Introduire les piles (format AA, R6, UM-3), en respectant les indications de polarité situées à l’intérieur du compartiment des piles.
3.Remettre le couvercle du compartiment en place.
1
3

 2
2
Portée de fonctionnement de la télécommande
|
|
|
CDX-596, CDX-496 |
|
|
|
|
|
CDX-396 |
|
|
|
|
|
|
|
|
|
||||||||||||||
|
|
|
|
|
|
|
|
|
|
|
|
|
|
|
|
|
|
|
|
|
|
|
|
|
|
|
|
|
|
|
|
|
|
|
|
|
|
|
|
|
|
|
|
|
|
|
|
|
|
|
|
|
|
|
|
|
|
|
|
|
|
|
|
|
|
|
|
|
|
|
|
|
|
|
|
|
|
|
|
|
|
|
|
|
|
|
|
|
|
|
|
|
|
|
|
|
|
|
|
|
|
|
|
|
|
|
|
|
|
|
|
|
|
|
|
|
|
|
|
|
|
|
|
|
|
|
|
|
|
|
|
|
|
|
|
|
|
|
|
|
|
|
|
|
|
|
|
|
|
|
|
|
|
|
|
|
|
|
|
|
|
|
|
|
Capteur de signaux provenant de la télécommande
Portée de 6 mètres environ
30 |
° |
° |
30 |
||
|
|
Remplacement de piles
Si lorsque l’on utilise la télécommande il est nécessaire de la rapprocher de l’appareil, les piles sont sans doute déchargées. Dans ce cas, remplacer les deux piles par des neuves.
Remarques
cSi le remplacement des piles s’avère nécessaire, n’utiliser que des piles AA, R6, UM-3.
cVeiller à ce que les polarités soient respectées. (Voir l’illustration se trouvant dans le compartiment des piles.)
cLorsque l’on n’utilise pas la télécommande pendant un certain temps, retirer les piles de la télécommande.
cSi les piles fuient, les jeter immédiatement. Ne pas toucher l’électrolyte et veiller à ce qu’il n’entre pas en contact avec des vêtements. Nettoyer soigneusement le compartiment des piles avant de mettre en place des piles neuves.
Remarques
cEn outre, veiller à ce qu’il n’y ait aucun obstacle entre la télécommande et l’appareil.
cSi le détecteur de télécommande est exposé directement à une forte lumière (provenant d’une lampe fluorescente de type inverseur, etc.), il se peut que la télécommande ne fonctionne pas correctement. Dans ce cas, changer la position de l’appareil principal de façon à éviter une exposition directe.
F-4

RACCORDEMENTS
c Couper l’alimentation de l’appareil et de l’amplificateur ou |
c Il se peut que des parasites soient évidents si cet |
des autres composants avant d’effectuer les connexions. |
appareil est proche d’un autre élément tel qu’un tuner. |
c Lors des connexions, veiller à ce que les bornes d’entrée |
Dans une telle situation, éloigner les appareils les uns |
de l’amplificateur ou de tout autre appareil soient celles |
des autres afin d’éliminer ces parasites. |
appropriées. |
|
LINE OUT |
DIGITAL AUDIO OUT |
1
OPTICAL COAXIAL
Français
3
2Câble de connexion
|
Câble à fibre optique |
(CDX-596 seulement; non inclus) |
Vers la prise c.a. |
1 |
(non inclus) |
|
|
|
|
Câble à broche RCA
(inclus)
OPTICAL COAXIAL
CD |
DIGITAL IN |
La partie hachurée (  ) est fournie pour le modèle CDX-596 seulement.
Amplificateur
Choisir l’une des procédures suivantes pour raccorder cet appareil à l’amplificateur utilisé.
Lors de l’utilisation des bornes LINE OUT (sortie analogique) de cet appareil ( 1 )
Connecter ces bornes aux bornes “CD” (ou “AUX”) de l’amplificateur. Pour plus de détails concernant ces connexions, se reporter au mode d’emploi de l’amplificateur utilisé.
*Veiller à ce que le câble provenant des bornes de sortie gauche (“L”) et droite (“R”) LINE OUT soit connecté correctement aux bornes correspondantes (gauche et droite) de l’amplificateur ou de tout autre appareil.
CDX-596 et CDX-496 seulement
cLe niveau des signaux émis par l’une quelconque de ces bornes vers un amplificateur peut être réglé en utilisant les touches – OUTPUT LEVEL +.
cLorsqu’on utilise les bornes DIGITAL AUDIO OUT (OPTICAL ou COAXIAL), mettre le niveau de sortie des signaux vers l’amplificateur au niveau maximum au moyen de la touche – OUTPUT LEVEL +.
Lors de l’utilisation de la borne DIGITAL
AUDIO OUT/OPTICAL (sortie numérique) ( 2 )
cAvant d’utiliser cette borne, retirer le cache de la borne.
cFaire la connexion de cette borne à la borne d’entrée optique d’un amplificateur à l’aide d’un câble à fibre optique disponible sur le marché.
*Utiliser un câble à fibre optique conforme aux normes EIAJ. Les autres câbles risquent de ne pas fonctionner correctement.
cVeiller à remettre le cache de la borne lorsque cette borne n’est pas utilisée, afin de protéger la borne de la poussière.
cCette borne peut aussi être raccordée à la borne d’entrée optique d’un enregistreur de minidisc etc. pour enregistrer directement un disque compact sur un minidisc.
Lors de l’utilisation de la borne DIGITAL AUDIO OUT/COAXIAL (sortie numérique) ( 3 ) CDX-596 seulement
Faire la connexion de cette borne à la borne d’entrée numérique d’un amplificateur à l’aide du câble de connexion.
F-5
Loading...