

5.1 ACTIVE SOUND SYSTEM
5
.
1
A
C
T
I
V
E
S
O
U
N
D
S
Y
S
T
E
M
H
X
S
5
3
2
USER’S MANUAL

TABLE OF CONTENTS
TABLE OF CONTENTS...............................................................................................1
PREPARATIONS
Safety Warnings .............................................................................................................2
Precautions ....................................................................................................................2
Package Contents ..........................................................................................................6
FUNCTION OVERVIEW
Features 7
Specifications .................................................................................................................7
Subwoofer Front Panel Controls and Indicators.............................................................8
Subwoofer Rear Panel Terminals and Controls..............................................................9
Remote Control ............................................................................................................10
INSTALLATIONS
Placing the Loudspeakers ............................................................................................12
Connecting Components ..............................................................................................13
OPERATIONS
Turning On/Off the Sound System [POWER; STANDBY] ............................................14
Selecting the Sound Source [AUX/DVD; DVD IN; AUX IN]..........................................14
Turning Off the Sound Temporarily [MUTE]..................................................................15
Adjusting the Main Volume [VOLUME +/-; VOLUME / ] .........................................15
Adjusting the Subwoofer’s Channel Volume [SUB +/-].................................................15
Adjusting the Center Channel Volume [CEN +/-]..........................................................16
Adjusting the Surround Channels Volume [SURR +/-] .................................................16
Selecting the Sound Field [2.1/5.1] ..............................................................................16
Recall the Factory Original Settings [PRESET]............................................................17
TROUBLESHOOTING
Possible Reasons and Solutions ..................................................................................18
ADDENDUM
Sound Glossary ............................................................................................................19
Notes ............................................................................................................................25
.........................................................................................................................
56
1

PREPARATIONS
SAFETY WARNINGS
WARNING: TO REDUCE THE RISK OF FIRE OR ELECTRIC SHOCK, DO
NOT EXPOSE THIS APPLIANCE TO RAIN OR MOISTURE.
CAUTION: TO PREVENT ELECTRIC SHOCK, INSERT THE PLUG OF
POWER SUPPLY CORD IN THE SOCKET OF POWER LINE FIRMLY. TO
ENSURE PROPER USE OF THIS PRODUCT, PLEASE READ THIS USER'S
MANUAL CAREFULLY AND RETAIN FOR FUTURE REFERENCE.
The lightning flash with an arrowhead symbol within an equilateral triangle is
intended to alert the user to the presence of uninsulated “dangerous
voltage”within the product's enclosure that may be of sufficient magnitude to
constitute a risk of electric shock to persons.
The exclamation point within an equilateral triangle is intended to alert the user to
the presence of important operating and maintenance servicing instructions in
the literature accompanying the appliance
.
PRECAUTIONS
l On Power Supply
Ensure that the AC power supply complies with the
5.1 ACTIVE SOUND SYSTEM
AC: ~230V 50/60Hz
MODEL NO: HXS 532
Class II equipment symbol indicates that the unit has a double insulation system.
identification sticker located on the rear panel of
subwoofer
your , consult dealer or local power
in area the s
company.This operates on AC 2 0V~
50/60Hz AC 2 0V~ 50/60Hz. Do not overload wall
. If you are not sure of the type of power supply
Sound System 3
or 2
outlets, extension cords, or integral convenience
receptacles, as this may result in fire or electric shock.
()
Do not use defective power . Power should be routed so that they are not
likely to be walked on or pinched by items placed upon or against them ay
special the cables ce
they the . Do not handle the power cord with wet hands.
attention to at plugs, convenien receptacles, and the point where
are connected to System
cables cables
which are . P
2
PREPARATIONS
PRECAUTIONS
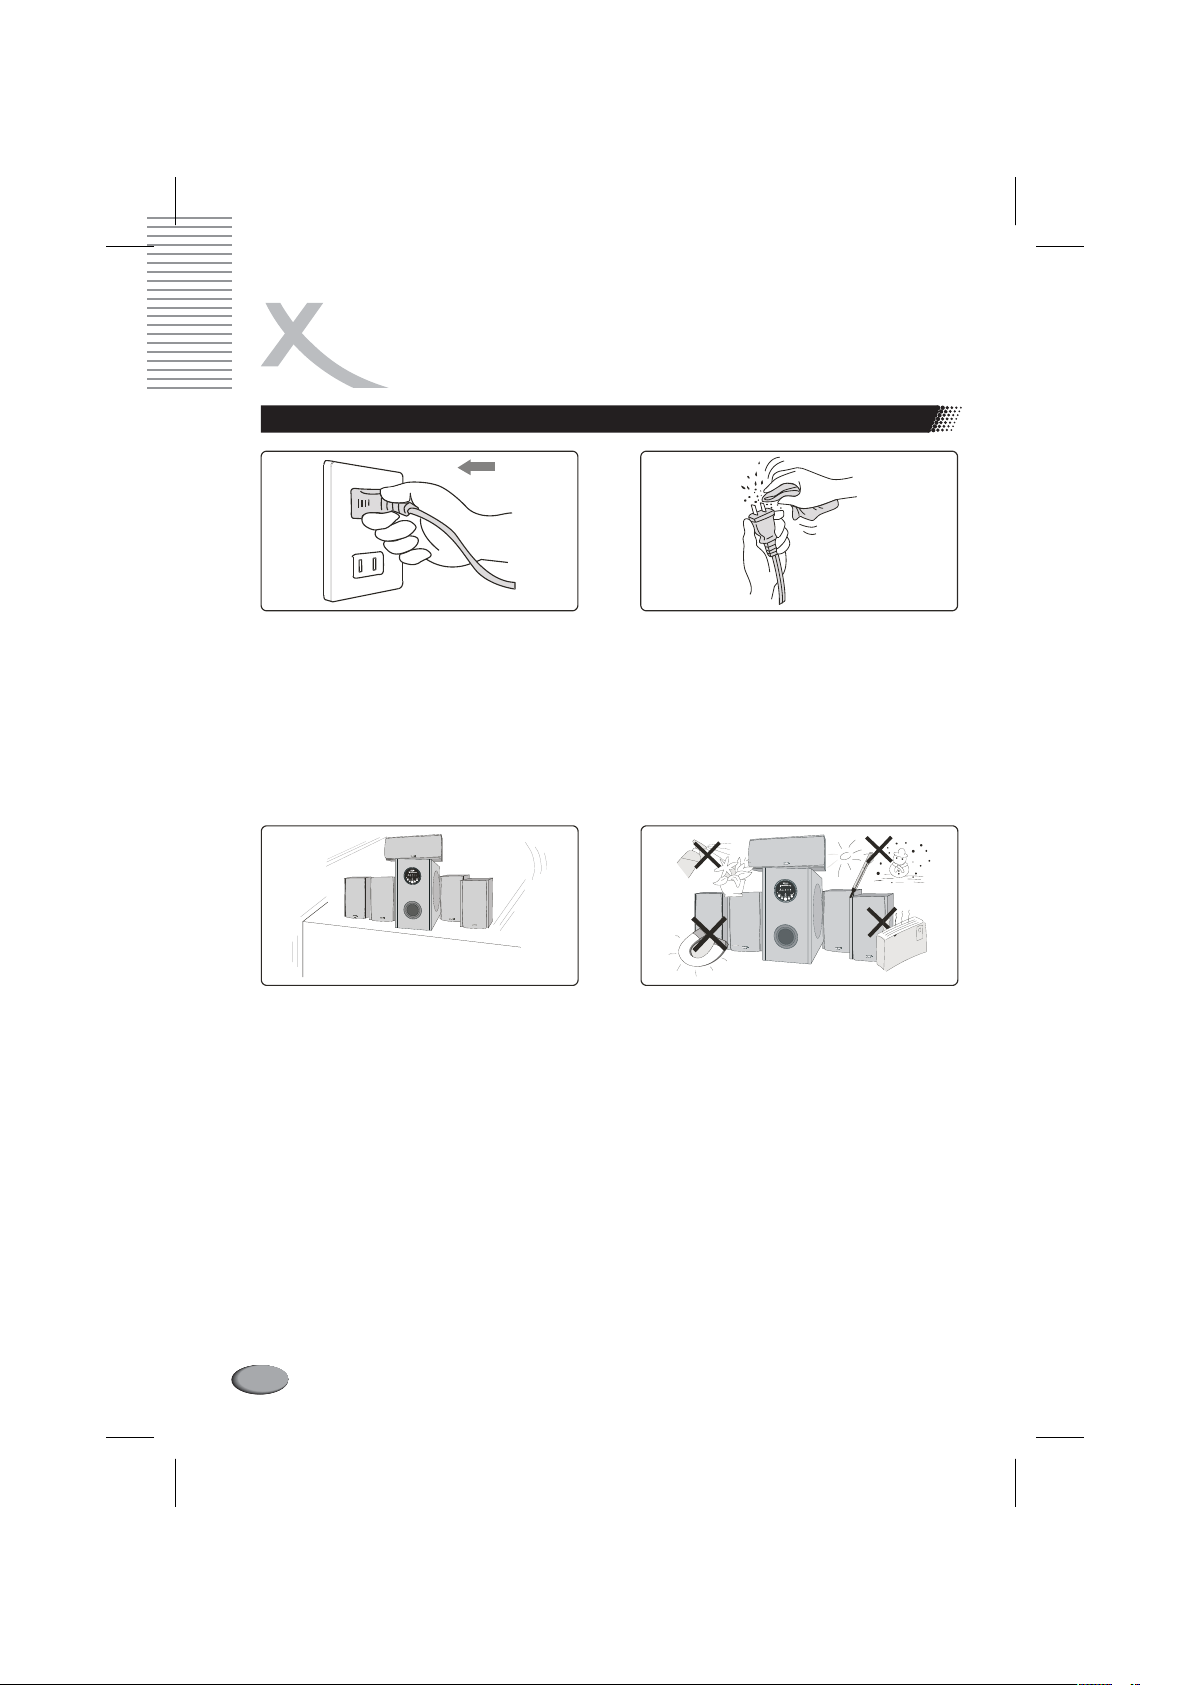
Insert the plug of the power supply cord
in the socket of the power line firmly.
A small amount of power is always consumed while the power cord is connected to the
wall outlet. When away on travel or for other reasons for an extended period of
time, disconnect the power cord plug from the wall outlet. When unplug the power cord
from the wall outlet, the plug, not the power cord.
l On Placement
Never place on an
unstable platform, stand, cart, wall
mount, shelf, or table. The
System
to persons and pets, as well as
seriously damaging the product. Select
a place which is level, dry and neither
too hot nor too cold; between 5°C and
35°C. Leave sufficient distance
between the system and the TV. Do not
use the system in a place
subject to vibration.
may fall, causing serious injury
you are
make sure you pull
Sound System
Sound
which is
Clean the power supply cord plugs
when necessary.it is
Protect the from
moisture (i.e. vases), excess heat
(e.g. fireplace) or equipment creating
strong magnetic or electric fields (i.e.
speakers). Condensation may occur if
the Sound System a
temperature. If transport the
low you
Sound System in
approximately 2 hours until the
has reached room temperature
before using.
Sound System
ive
has been stored in
winter, wait
system
the
When i Subwoofer speaker, please leave behind the rear panel
nstall the enough space
of
it for ventilation (7~10 centimeters). Do not place any sources of danger on the
Sound System etc.
(e.g. liquid filled objects, lighted candles ).
3

PRECAUTIONS
l On Operation
PREPARATIONS
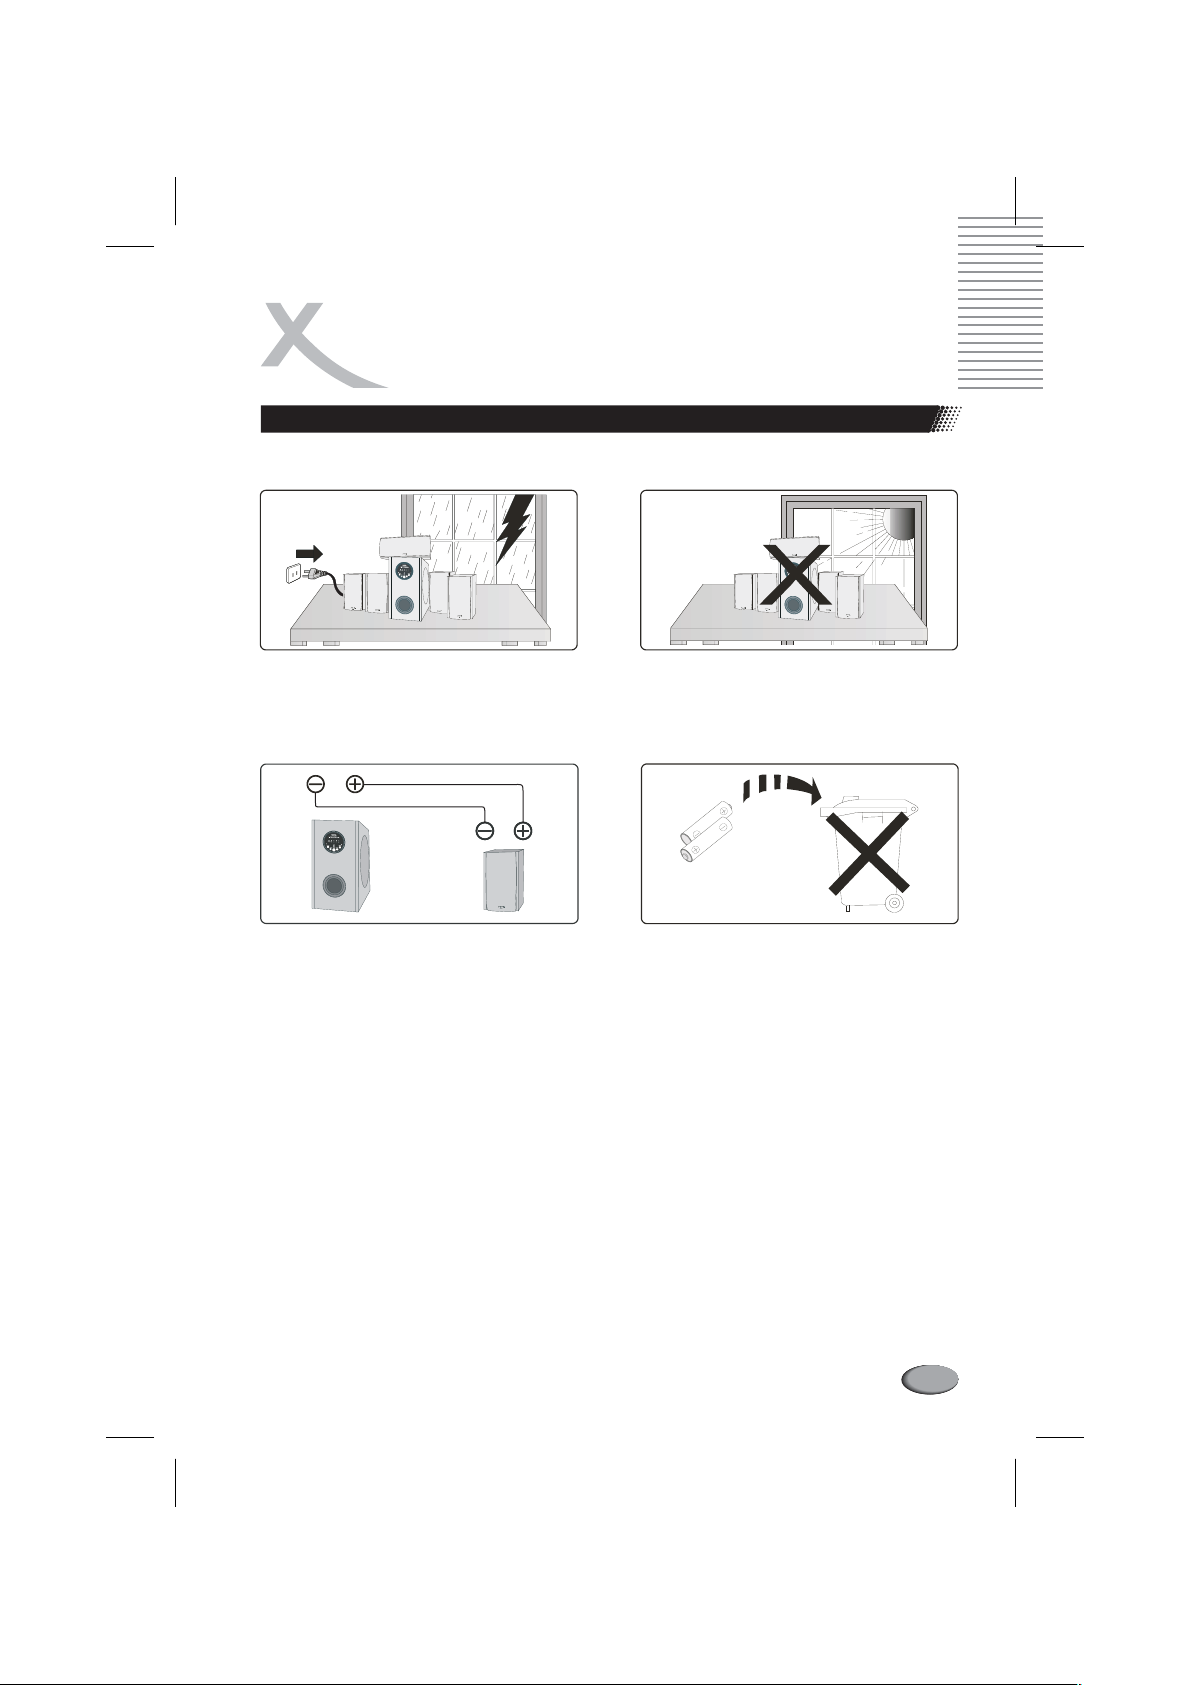
Unplug the during
lightning storms.
may cause voltage which
damage the .
The speaker cord must be correctly
connected as mark on the
panel . "+" and "- " must have correct
polarity so maximize the
inherent quality of the speaker.
Otherwise,
normally and may have unperfect effect
Do not place computer monitors, floppy disks, hard disk drives, or other magnetic
media 15 cm 6 Inches .()
Never push objects into as they may touch dangerous voltage
points or short-out parts result in fire or electric shock. Never spill
liquid on or into th product.
of is
In case
improper system
Please turn off the
then you can avoid accidents
If you don't use the ound for a long time, please
from the wall outlet to ensure the safety of the speakers and
Sound System
The lightning storms
peak could
integrated 5.1 amplifier
s
ed terminal’s
s
you can
the system could not work
.
s near the subwoofer with the distance less than
open this product and it
which may any kinds
there are some mulfunctions and problems with the sound system due to
improper use, don't dismantle the to repair or check by yourself.
system, let it be checked by specialists and turn the system again,
.
S System unplug the power supply cord
Do not expose the to
direct sunlight or other heat sources.
This lead to overheating and
may
malfunction of the .
The batteries this product contain
chemicals that are harmful
to the environment. Do not dispose of
batteries in the general household trash
box R
not used for a long time.
components
. emove batteries when the unit is
Sound System
System
for
household.
4
PREPARATIONS
PRECAUTIONS
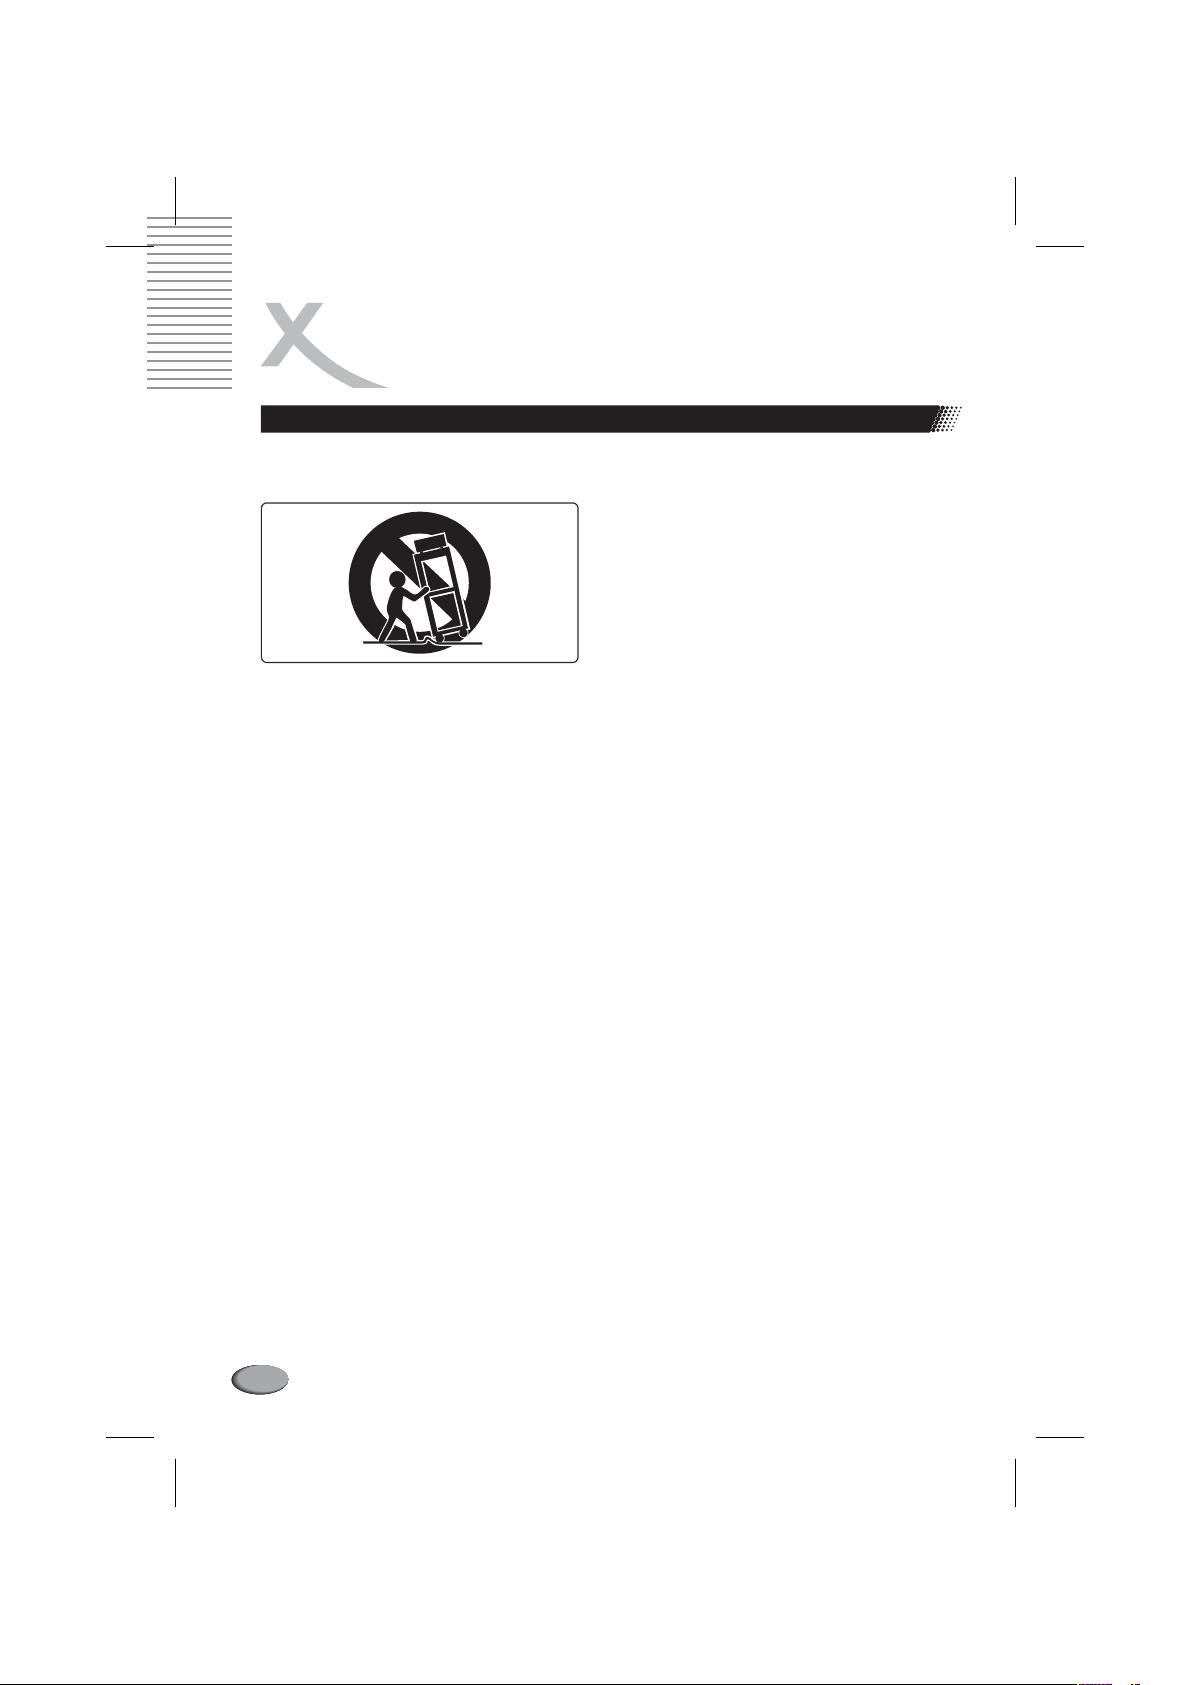
l On Transportaion
Use only with the cart, by the
manufacturer. When
carry the sound system please be
careful to e
from tip-over. Quick stops, excessive
force, and uneven surfaces may cause
the product and cart combination to
overturn.
l On Cleaning
Always unplug the from the wall electrical outlet before cleaning. When
cleaning the system, use a soft cloth and follow the relevant instructions o the us of
chemically-coated cloths. Do not use benzene, thinner or other organic solvents
including disinfectants. These may cause deformation or discoloring.
l If water gets inside the system
Turn the system off and the power cord from the wall outlet, then call
service center with water inside
l On servicing
Refer all servicing to qualified service personnel. Servicing is required when the
product's main parts ha been damaged in any way, power-supply
cord or plug is damaged, liquid has been spilled objects have fallen into the
System Sound System
normally, or has been dropped. Do not attempt to service this product yourself as
opening or removing covers may expose you to dangerous voltage or other hazards.
If replacement parts are required, be sure the service technician has used approved
replacement parts or have the same characteristics as the original part . Unauthorized
substitutions may result in fire, electric shock, or other hazards.
After g the servicing and repairs of please
technician to in proper operating condition .
, the has been exposed to rain or moisture, does not operate
completin this product, ask the service
Sound System
unplug XORO
. Using the system may cause fire or electrical shock.
ve for examples, the
, Sound
check the system whether it is or not
mov the cart to avoid injury
especially
using a cart to
,
f age
s
5
PREPARATIONS
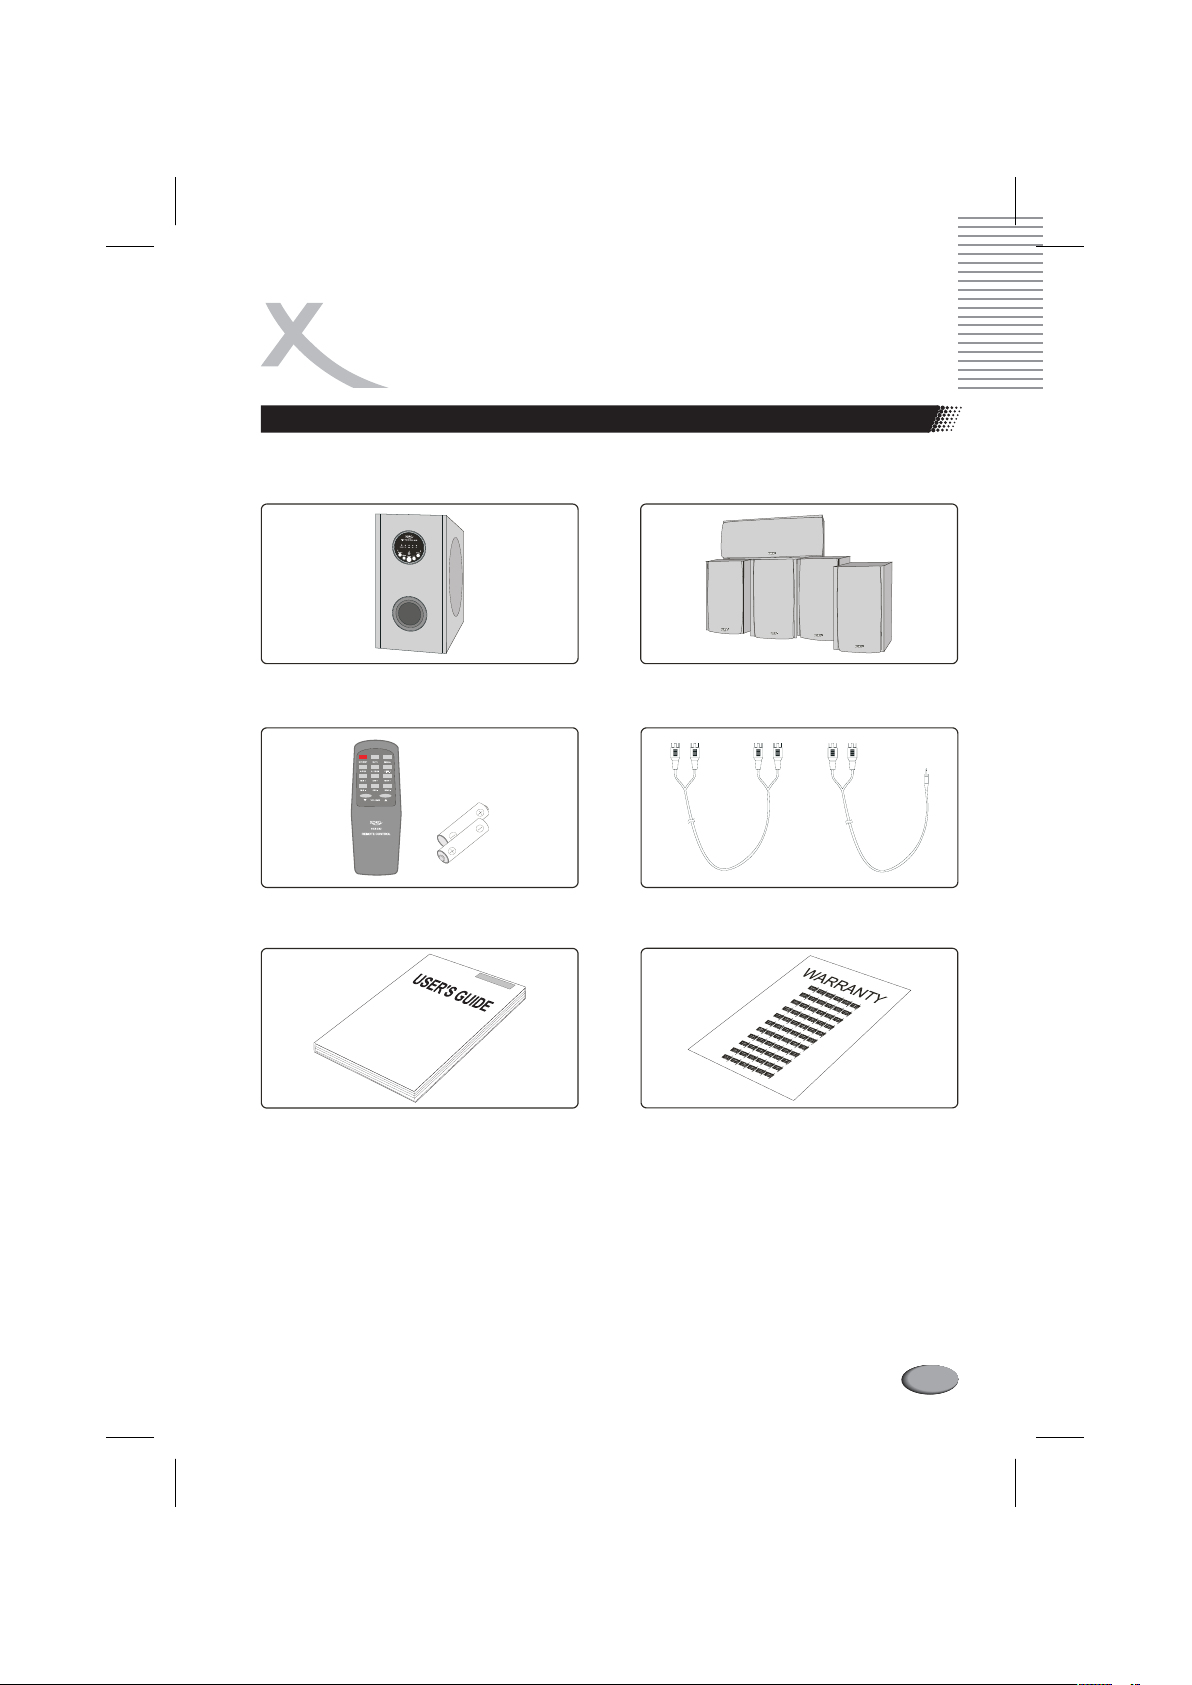
PACKAGE CONTENTS
Please verify that the following items are included in the . If
items are missing, please promptly return this unit to the for an exchange.
some dealer
1 x Subwoofer Speaker 5 x Satellite Speakers and5xSpeaker
1 x Remote Control and 2 x AAA
all Sound System package
Wires
3 x RCA-to-RCA and 1 x MiniJack-to-
batteries
RCA analog input cables
1 x User’s Manual
A quality control , this product carefully inspected before
ccording to our system will be
pack to ensure flawless appearance. After unpacking the , please
being ed product
inspect for physical damage and retain the shipping and all relevant packing
materials, repack .
In the that damage has occurred, immediately notify your dealer, so that a written
claim to cover damages can be initiated.
because this product may need being ed
case
, package
1 x Xoro Warranty Card
6

FUNCTION OVERVIEW
FEATURES
l
Integrated 5.1channel amplifier
l
1 W total output power (RMS )
80 atts , THD 10%
l
Connection toDVD player with 5.1 channel analog output
l
Connection stereo source(i.e. CD player)
l
ull functionremote control
F
l
High manufacturingquality
SPECIFICATIONS
to
l General Information
Type ........5.1Channels Active Sound System
Power Input ..............220VAC~50/60 Hz
Power Consumption ................. 180W
Gross Weight.......................34,8 kgs
Dimension (L x W x H) ......652x465x490mm
£
l Amplifier Input Parameters
Analog Inputs ............5.1and2.0line inputs
Max. Input Voltage:
Stereo Line Input (AUX IN).............350mV
5.1 Input (DVD IN) Front/Surr./Center ....300mV
5.1 Input (DVD IN) Subwoofer ..........220mV
l Amplifier Output Parameters
Total Power (RMS): THD 1%.......145W
Front Channels (RMS, measured at 1 kHz):
Surround Channels (RMS, measured at 1 kHz):
Center Channel (RMS, measured at 1 kHz):
Subwoofer Channel (RMS, measured at 100 Hz):
Signal to Noise Ratio ................. 70dB
THD(1W)...........................<1%
THD10% .....180W
THD1%.....2x14W
THD10%....2x20W
THD1%.....2x14W
THD10%....2x20W
THD1%.....2x14W
THD10%....2x20W
THD1%.....1x75W
THD10%....1x80W
³
l Amplifier Terminals
5.1 Input ...........Analog 5.1 Line Input (RCA)
2.0 Input ........Analog Stereo Line Input (RCA)
Output ............5.0Amplified Output (Spring)
Fuse Socket
Power Switch
Power Cord Input
l Front Channels Speakers
2-way vented MDF enclosure loudspeakers
Woofer ...................1xPaper cone (4")
Tweeter.....................1xMylar (0.75")
Frequency Response ...........90Hz~20kHz
Speaker Impedance (nominal) ...........4Ohm
Power Handling.................10~45Watts
Dimensions (W x H x D) .....150x260x167mm
Net Weight .......................2x2,5kgs
l Surround Channels Speakers
2-way closed MDF enclosure loudspeakers
Woofer ...................1xPaper cone (4")
Tweeter.....................1xMylar (0.75")
Frequency Response ..........100Hz~20kHz
Speaker Impedance (nominal) ...........4Ohm
Power Handling.................10~45Watts
Dimensions (W x H x D) .....150x260x167mm
Net Weight .......................2x2,7kgs
l Center Channel Speaker
2-way vented MDF enclosure loudspeaker
Woofer ...................2xPaper cone (4")
Tweeter.....................1xMylar (0.75")
Frequency Response ...........90Hz~20kHz
Speaker Impedance (nominal) ...........4Ohm
Power Handling.................10~50Watts
Dimensions (W x H x D) .....390x150x167mm
Net Weight .......................1x3,7kgs
l Subwoofer Channel Speaker
Vented MDF enclosure loudspeaker
Woofer ...................1xPaper cone (8")
Frequency Response ...........35Hz~100Hz
Speaker Impedance (nominal) ...........4Ohm
Dimensions (W x H x D) .....230x402x442mm
Net Weight ......................1x14,1 kgs
7
FUNCTION OVERVIEW
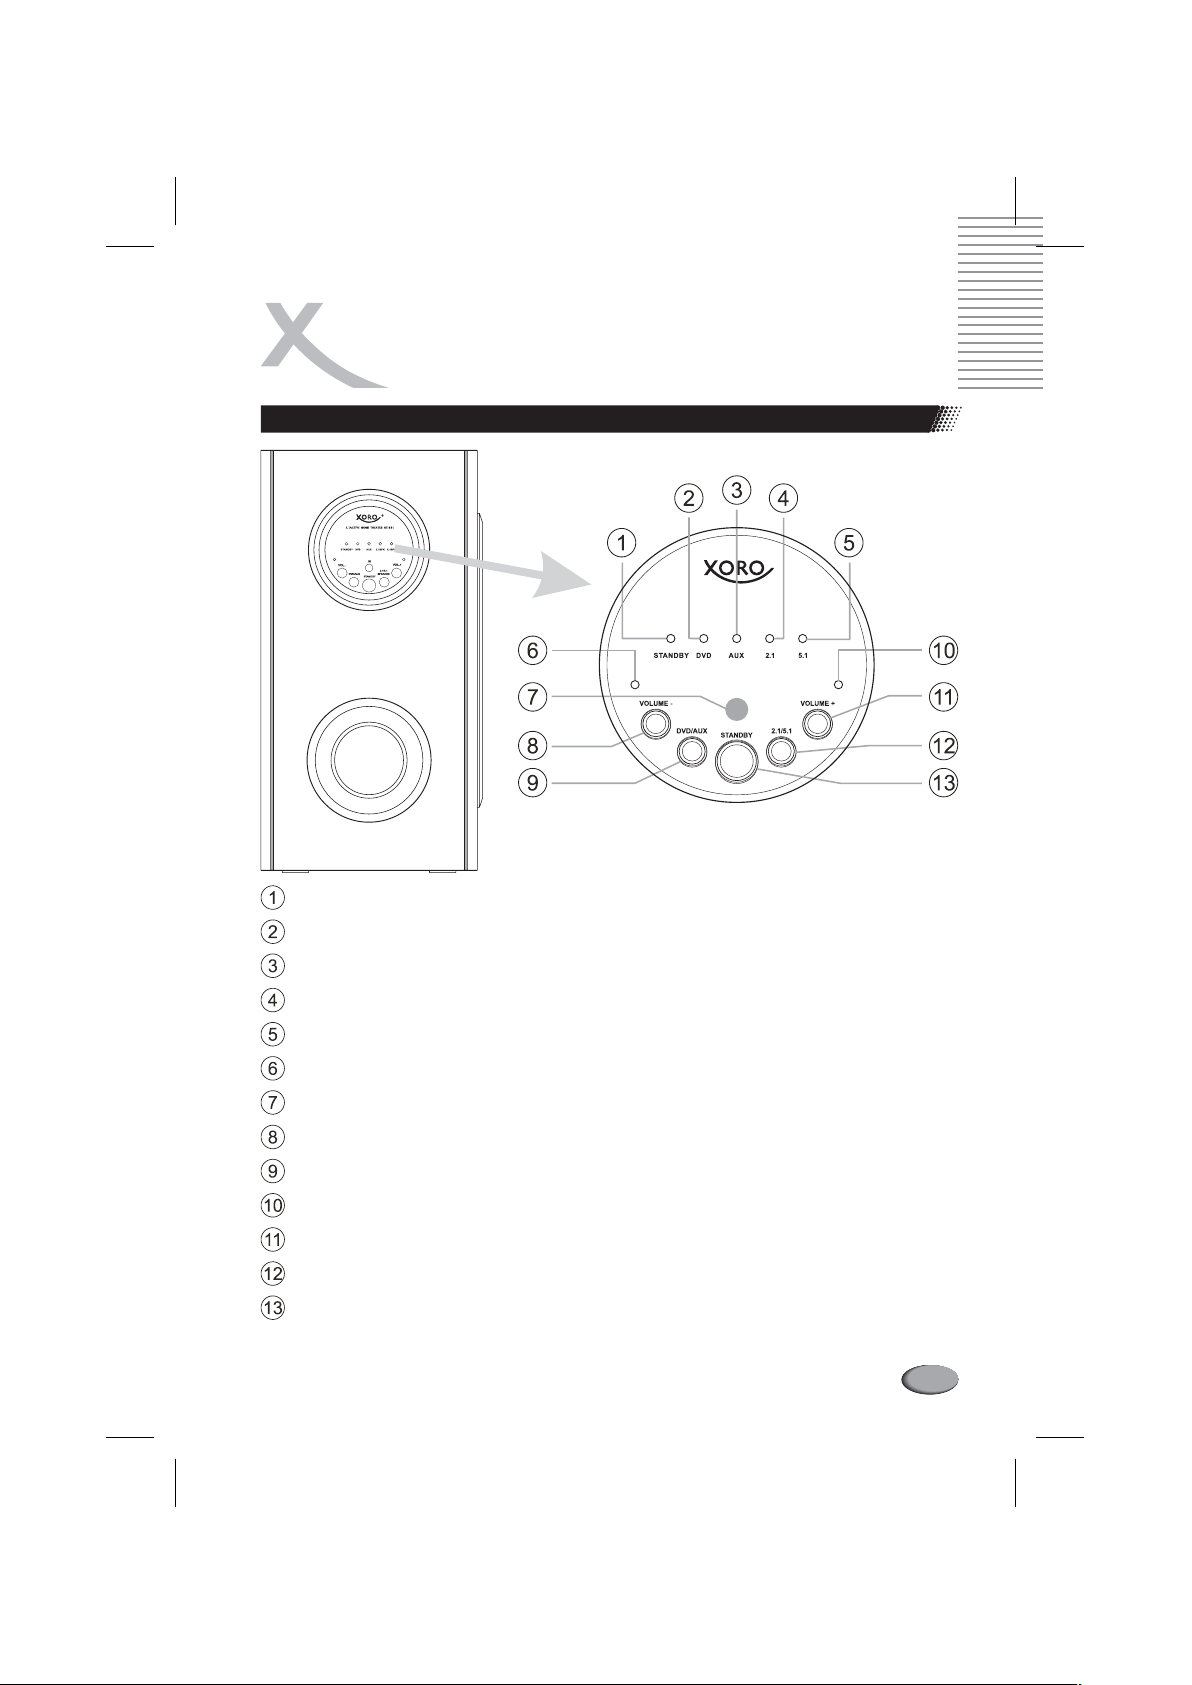
SUBWOOFER FRONT PANEL CONTROLS AND INDICATORS
5.1 ACTIVE SOUND SYSTEM HXS 532
STANDBY
DVD
AUX
2.1
indicator
5.1
indicator
VOLUME-
IR
indicator
VOLUME-
DVD/AUX
VOLUME
VOLUME
2.1/5.1
STANDBY
indicator Indicates the unit is on or in standby mode
indicator Indicates DVD 5.1 channels signal input selection
indicator input
indicator
button Press this button to decrease main volume
button Press this button to select DVD or AUX signal input
+ Indicates main volume increasing
indicator
+ button Press this button to increase main volume
button Press this button to select 2.1 or 5.1 sound field
button Press this button to turn On/Off the unit or set it
Indicates AUX Stereo signal selection
Indicates 2.1 sound field selection
Indicates 5.1 sound field selection
Indicates main volume decreasing
Infrared sensor for receiving remote control signals
in standby mode
8

FUNCTION OVERVIEW
SUBWOOFER REAR PANEL TERMINALS AND CONTROLS
MODELNO: HXS532
5.1ACTIVE SOUNDSYSTEM
AC:~230V 50/60Hz
230VAC50/60Hz
SERIALNUMBER:
AUX R/L INPUT
DVD FRONT R/L INPUT
DVD SUB / CENTER INPUT
DVD SURROUND R/L INPUT
SPEAKER OUTPUT FRONT L.
SPEAKER OUTPUT FRONT R.
9
SPEAKER OUTPUT CENTER
SPEAKER OUTPUT SURROUND L.
SPEAKER OUTPUT SURROUND R.
FUSE 1.5A/250V
POWER SWITCH
POWER CORD INPUT

FUNCTION OVERVIEW
REMOTE CONTROL
l Functions
2.1/5.1
SURR -
HXS 532
MUTE
STANDBY
AUX IN
CEN+
SUB+
SUB-
VOLUME
Mute button
Standby
On/Off
AUX signal input
selection
Center Volume Up
Subwoofer Volume Up
Subwoofer Volume Down
Main Volume Down
6
DVD IN
PRESET
2.1/5.1
SURR+
CEN-
SURR-
VOLUME5
DVD signal input
selection
Recall factory original
settings
Sound field selection
Surround Volume Up
Center Volume Down
Surround Volume Down
Main Volume UP
10
FUNCTION OVERVIEW
REMOTE CONTROL
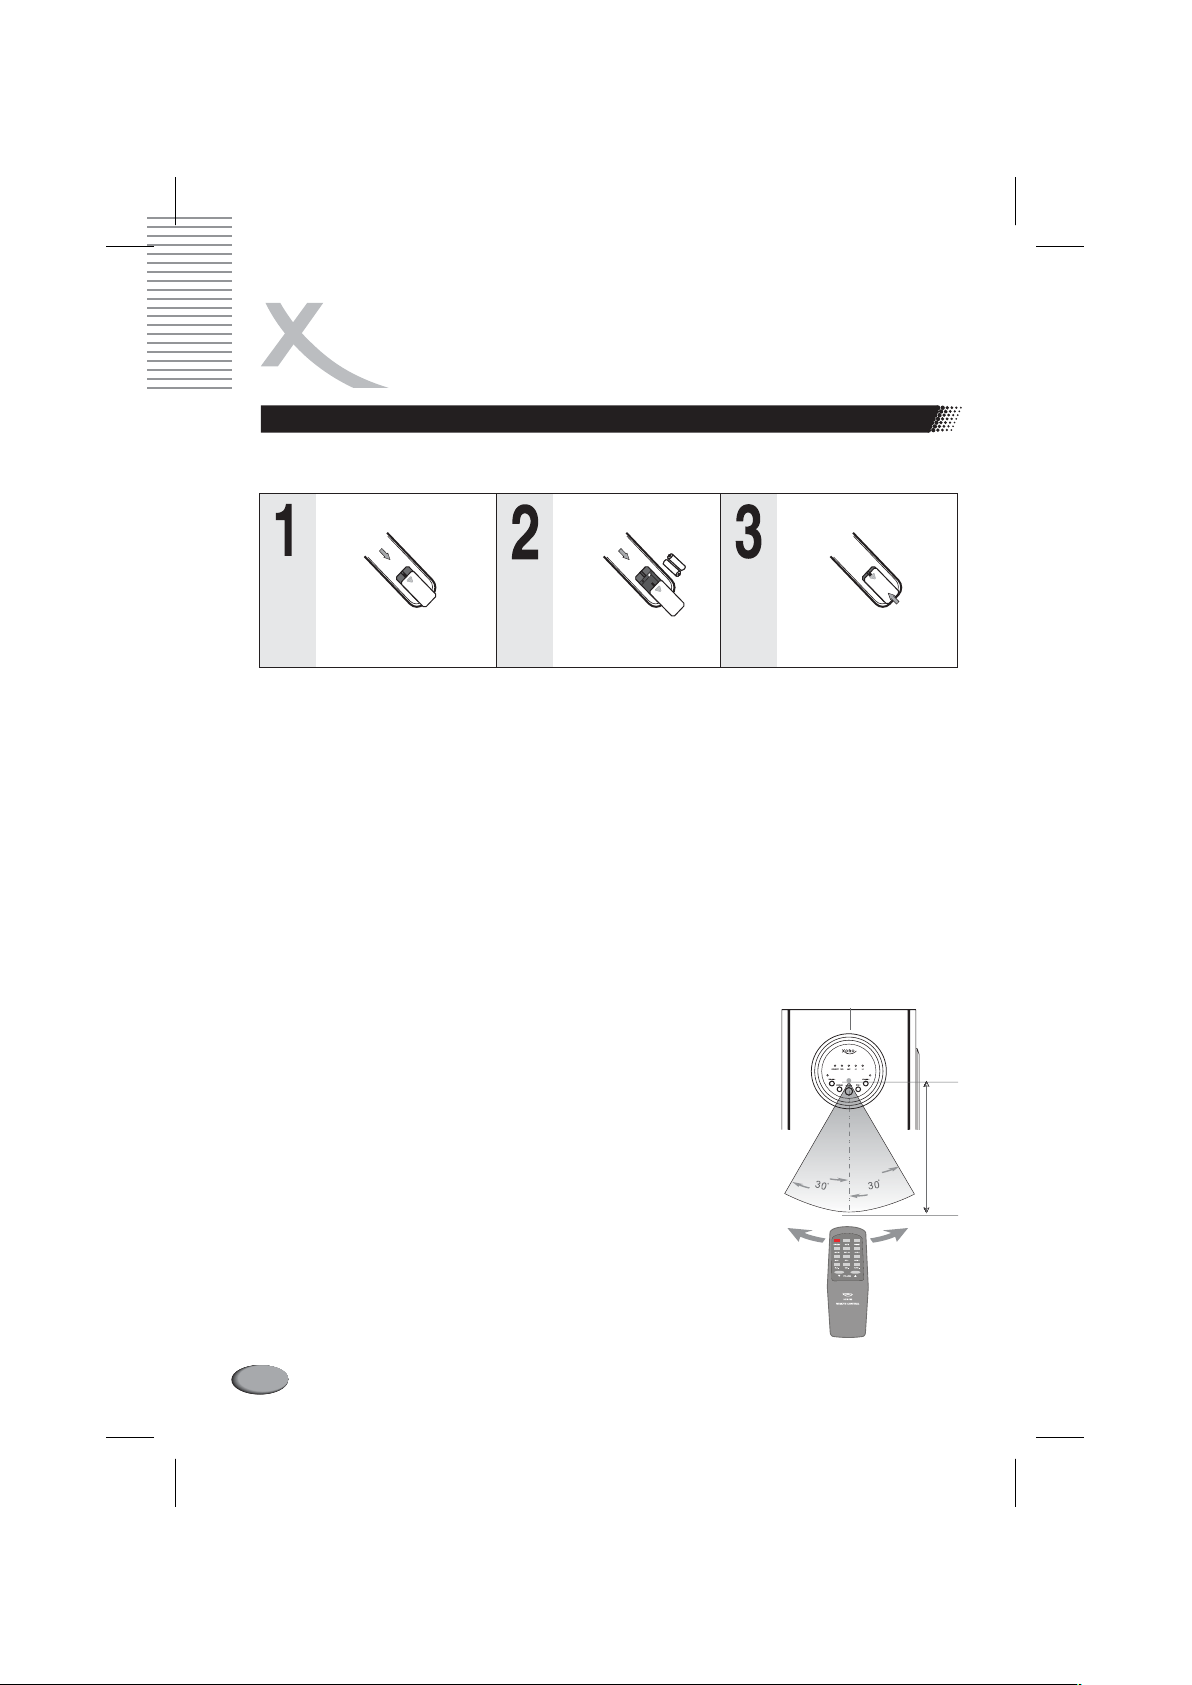
l Inserting the Batteries
Open the cover Put the batteries Close the cover
Make sure to
match - and +
l Notes on Batteries
Improper use may cause battery leakage and corrosion. Please follow the instructions
below:
1. Do not insert the batteries in the wrong directions;
2. Do not use different types of batteries together;
3. If you do not use the remote control for a long time, remove the batteries;
4. If the remote control operates not correctly, replace the batteries;
5. If battery leakage occurs, wipe the battery liquid from the battery compartment,
then insert new batteries;
6. Make sure that the used batteries are disposed properly according to you local
regulations.
l Operating Instructions
1. Direct the remote control at the infrared receiver (IR) of
the sound system’s amplifier;
2. The remote control range is +/- 30 , and maximum 7
0
meters to the subwoofer’s front panel;
3. Do not drop the remote control;
4. Do not split water or put anything wet on it;
5. Do not disassemble the remote control;
6. Do not dispose the subwoofer to strong sources of light.
This may disable the remote control;
7. Do not use other remote control near the subwoofer. This
may cause a malfunction.
8. Do not place large object between the remote control and
the infrared receiver (IR) of the sound system’s amplifier.
11
5.1ACTIVESOUND SYSTEMHXS 532
Maximum 7 m
INSTALLATIONS
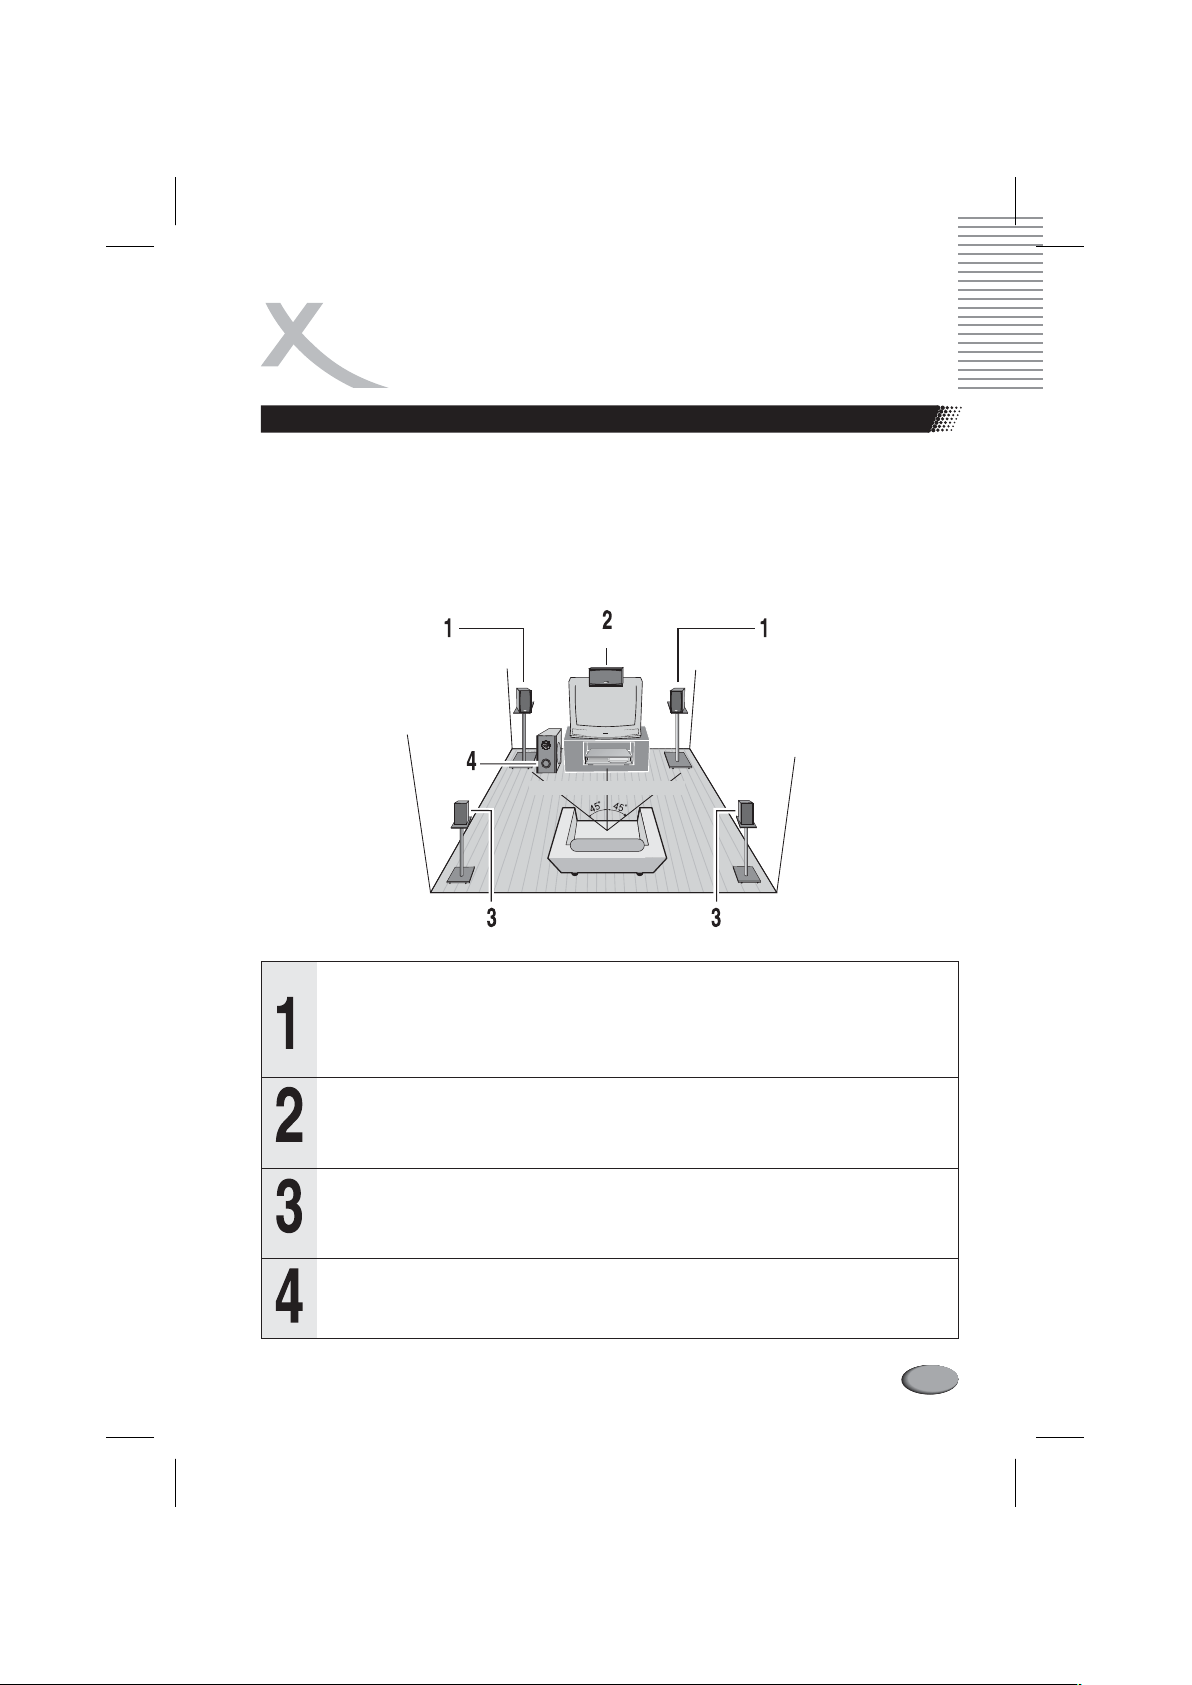
PLACING THE LOUDSPEAKERS
The listening position should be located
approximate ~
sound, all the speakers (except subwoofer ) should be placed at the
same distance from the listening position. Avoid placing speakers in the corner of
the room greatly degrades the frequency response since bounces
three surfaces and products bass signal. It is better to place the
speakers 70cm (2 3 ft) from the wall.
2.5 3 times the TV's screen size away from the TV. For best surround
loud loudspeaker
away
, which may from
wall will strength
~
Front Left Loudspeaker
Subwoofer
Loudspeaker
Surround Left Loudspeaker
Place the front left and right speakers at equal distances from the TV
at the place which has the distance of
Center Loudspeaker
5
.
1
A
C
T
I
V
E
S
O
U
N
D
S
Y
S
T
E
M
H
X
S
5
3
2
2.5 to 3 times the size of the TV screen
Surround Right Loudspeaker
Front Right Loudspeaker
loud
and at an angle of approximately 45 degrees from the listening position.
Align the front face of the front speakers with th of the center
speaker or place the slightly in front of the center
loud front loudspeakers
speaker.
loud
Place the center speaker the TV or the DVD Receiver so that the
loud on
center channel's sound is localized. It is best to install
loudspeaker loud
at the same height as the front speakers.
loud at
the center
Place the surround left and right speakers behind your listening
position. If there isn't enough room, place these speakers face
. Place them about 60 90 cm above your ear, facing slightly
face ~
loud
please loud to
downward.
Place the subwoofer on the floor near the TV
right of the TV) loudspeaker
loudspeaker (better on the
. The exact position of the subwoofer is not so
critical.
12
INSTALLATIONS
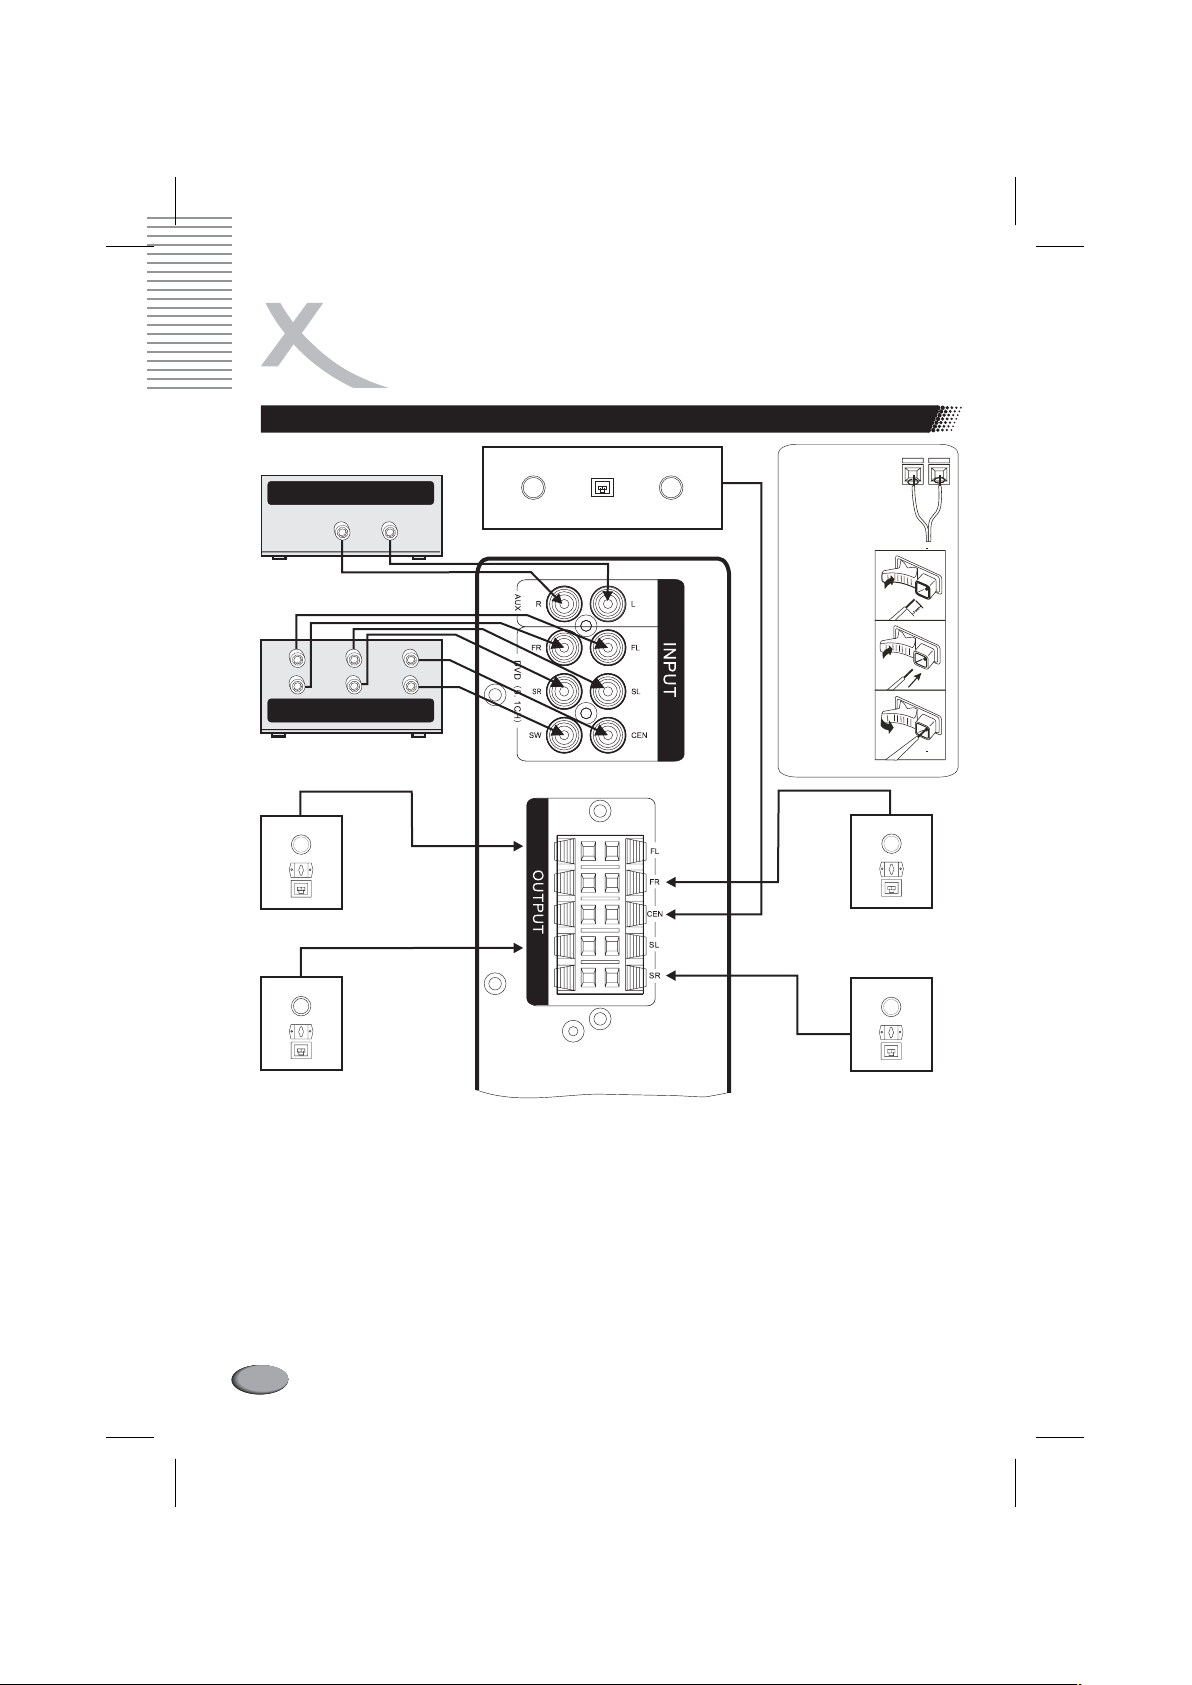
CONNECTING COMPONENTS
CD; TAPE DECK
STEREO OUPUT
R
DVD
S.L.
F.L .
S.R.
F.R .
5.1 OUPUT
Front left
CEN.
SW.
Center
L
Connection
method of
binding clip:
Open the
lock bar
Insert the
loudspeaker
wire
Release the
lock bar
Front right
m
m
7
1
2
3
Surround left
Surround right
CAUTION:
If the loudspeakers you want to are not please connect the
speakers the same speaker impedance (SPEAKER IMPEDANCE) indicated n
the .
with as i
SPECIFICATIONS of the user’s manual
connect the supplied ones,
DO NOT connect more than one speaker to one speaker terminal.
Make sure there are not short-circuits on the speaker cable and the speaker terminals,
otherwise, it may damage the amplifier.
Care must be taken in selecting a location for speaker installation on a wall. Injury to
personnel or damage to equipment may result if the speakers installed interfere with
daily activities.
13
OPERATIONS
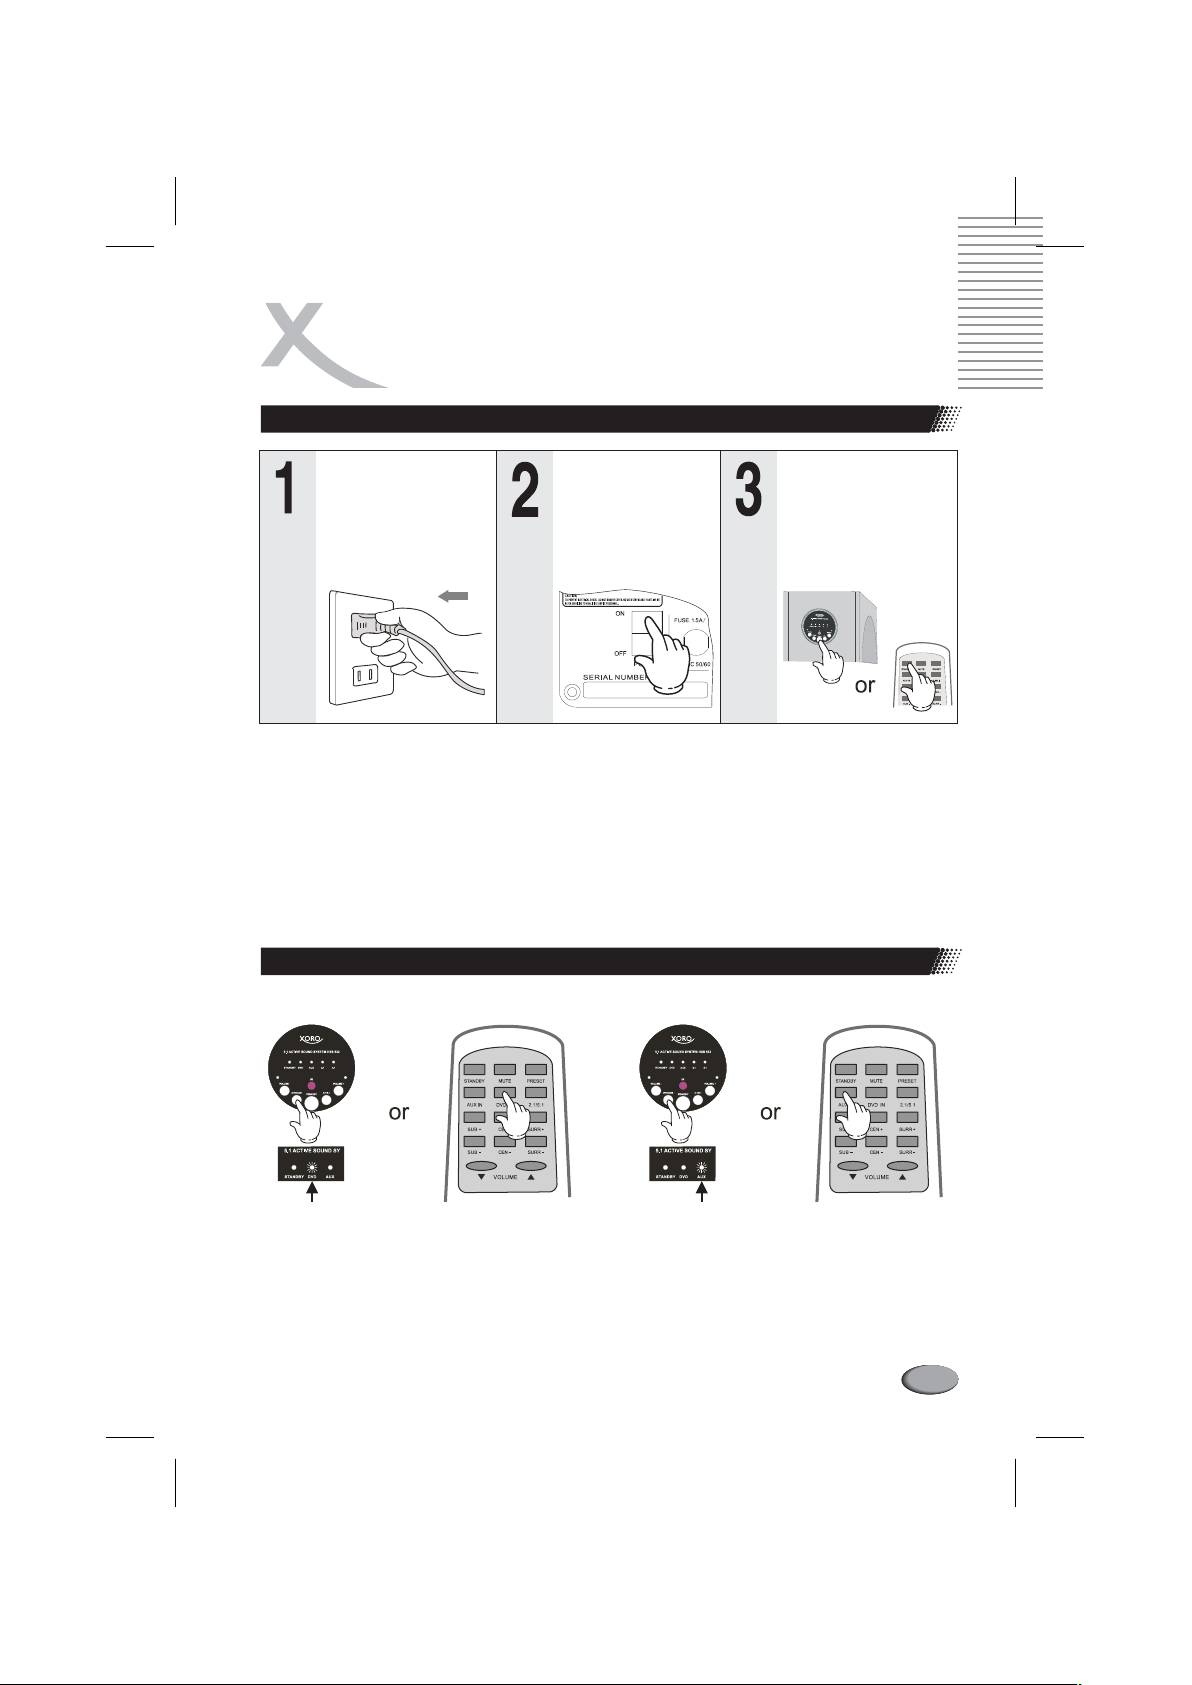
TURNING THE SOUND SYSTEM [POWER; STANDBY]ON/OFF
Connect the AC
power cord to a wall
outlet securely
Switch on the Sound System, the on the subwoofer’s front panel
will turn green, and the volume, tone, and sound will be set at the same level as the last
settings when the system is turned off.
Press the on the subwoofer’s front panel or remote control, the Sound
System will be set in standby mode, and the will flash on the
subwoofer’s front panel.
Switch the on the subwoofer’s rear panel to the OFF position to turn off
the Sound System.
STANDBY button
POWER knob
Switch the
POWER
the ON position on
the subwoofer’s
rear panel
STANDBY indicator
knob to
STANDBY indicator
Press the
STANDBY
the subwoofer’s
front panel or
remote control
button on
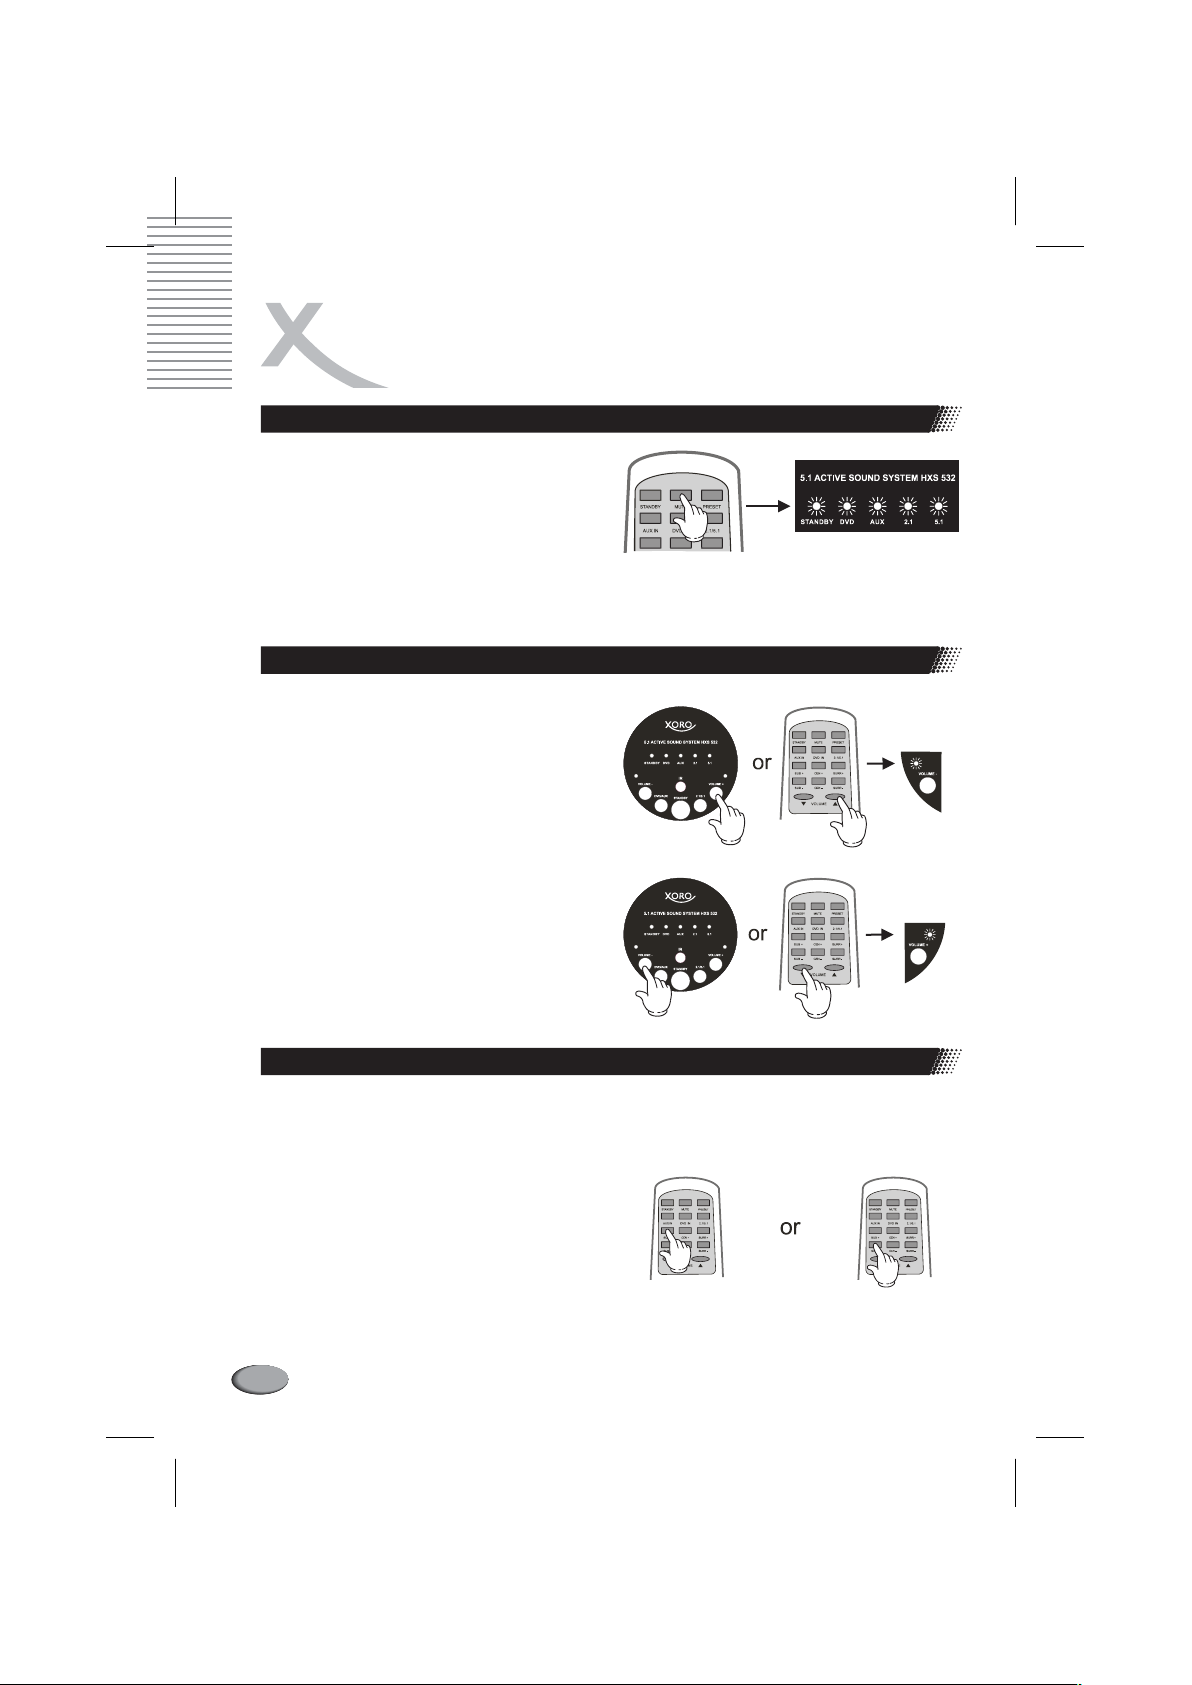
SELECTING THE SOUND SOURCE [AUX/DVD; DVD IN; AUX IN ]
l DVD input (5.1 channels)
l AUX input (Stereo)
Press continuously
DVD AUX
/ button
the
on front panel
subwoofer’s until the
DVD IN
the
be illuminated
source selecting
DVD indicator
subwoofer’s front panel.
press
r
O
button
on remote control.
on the
Press continuously
DVD AUX
/ button
the
subwoofer’s el until the
indicator
subwoofer’s front panel.
O press
r
button
on remote control.
front pan
be illuminated
IN
AUX source selecting
the
on the
on
AUX
14
OPERATIONS
TURNING OFF THE SOUND TEMPORARILY [MUTE]
Press on the remote
MUTE button
control.
To restore the sound
-
Press again.
- on the
Press
subwoofer’s front panel
56
/ buttons
E button
MUT
UME buttons
VOL +/–
ADJUSTING THE MAIN VOLUME [VOLUME +/-; VOLUME / ]56
Depending on whether you want to
increase or decrease the main volume
of the Sound System, please press
VOLUME +/- buttons
subwoofer’s front panel or
/ buttons56
followings:
- press ( )
button
- press ( )
to decrease the main volume.
When you press the
buttons VOLUME +/- indicators
on the subwoofer’s front panel will be
illuminated accordingly.
VOLUME + VOLUME
to increase the main volume;
VOLUME- VOLUME button
, the
:
VOLUME
or
on the remote control.
on the
VOLUME
on the remote control as
5
6
VOLUME +/-
In MUTE mode the
VOLUME +/- indicators
on the subwoofer’s front
panel will flash.
Increasing the main volume (-70dB ~ 0dB)
Decreasing the main volume (0dB ~ -70dB)
ADJUSTING THE SUBWOOFER CHANNEL VOLUME [SUB +/-]
Depending on whether you want to
increase or decrease the volume of the
Subwoofer’s channel, please press
SUB +/- buttons
as followings:
- press to increase the
volume;
- press to decrease the
volume.
SUB + button
SUB- button
on the remote control
Increasing the
Subwoofer’s
volume
(-70dB ~ 0dB)
15
Decreasing the
Subwoofer’s
volume
(0dB ~ -70dB)
OPERATIONS
ADJUSTING THE CENTER CHANNEL VOLUME [CEN +/-]
Depending on whether you want to
increase or decrease the volume of the
Center channel, please press
buttons
on the remote control as
CEN +/-
Increasing the
Center channel
volume
(-70dB ~ 0dB)
Decreasing the
Center channel
volume
(0dB ~ -70dB)
followings:
- press to increase the
CEN + button
volume;
- press to decrease the
CEN- button
volume.
ADJUSTING THE SURROUND CHANNELS VOLUME [SURR +/-]
Depending on whether you want to
increase or decrease the volume of the
Surround channels, please press
SURR +/- buttons
on he remote
control as followings:
- press to increase the
SURR + button
volume;
- press to decrease the
SURR- button
volume.
Increasing the
Surround
channels volume
(-70dB ~ 0dB)
Decreasing the
Surround
channels volume
(0dB ~ -70dB)
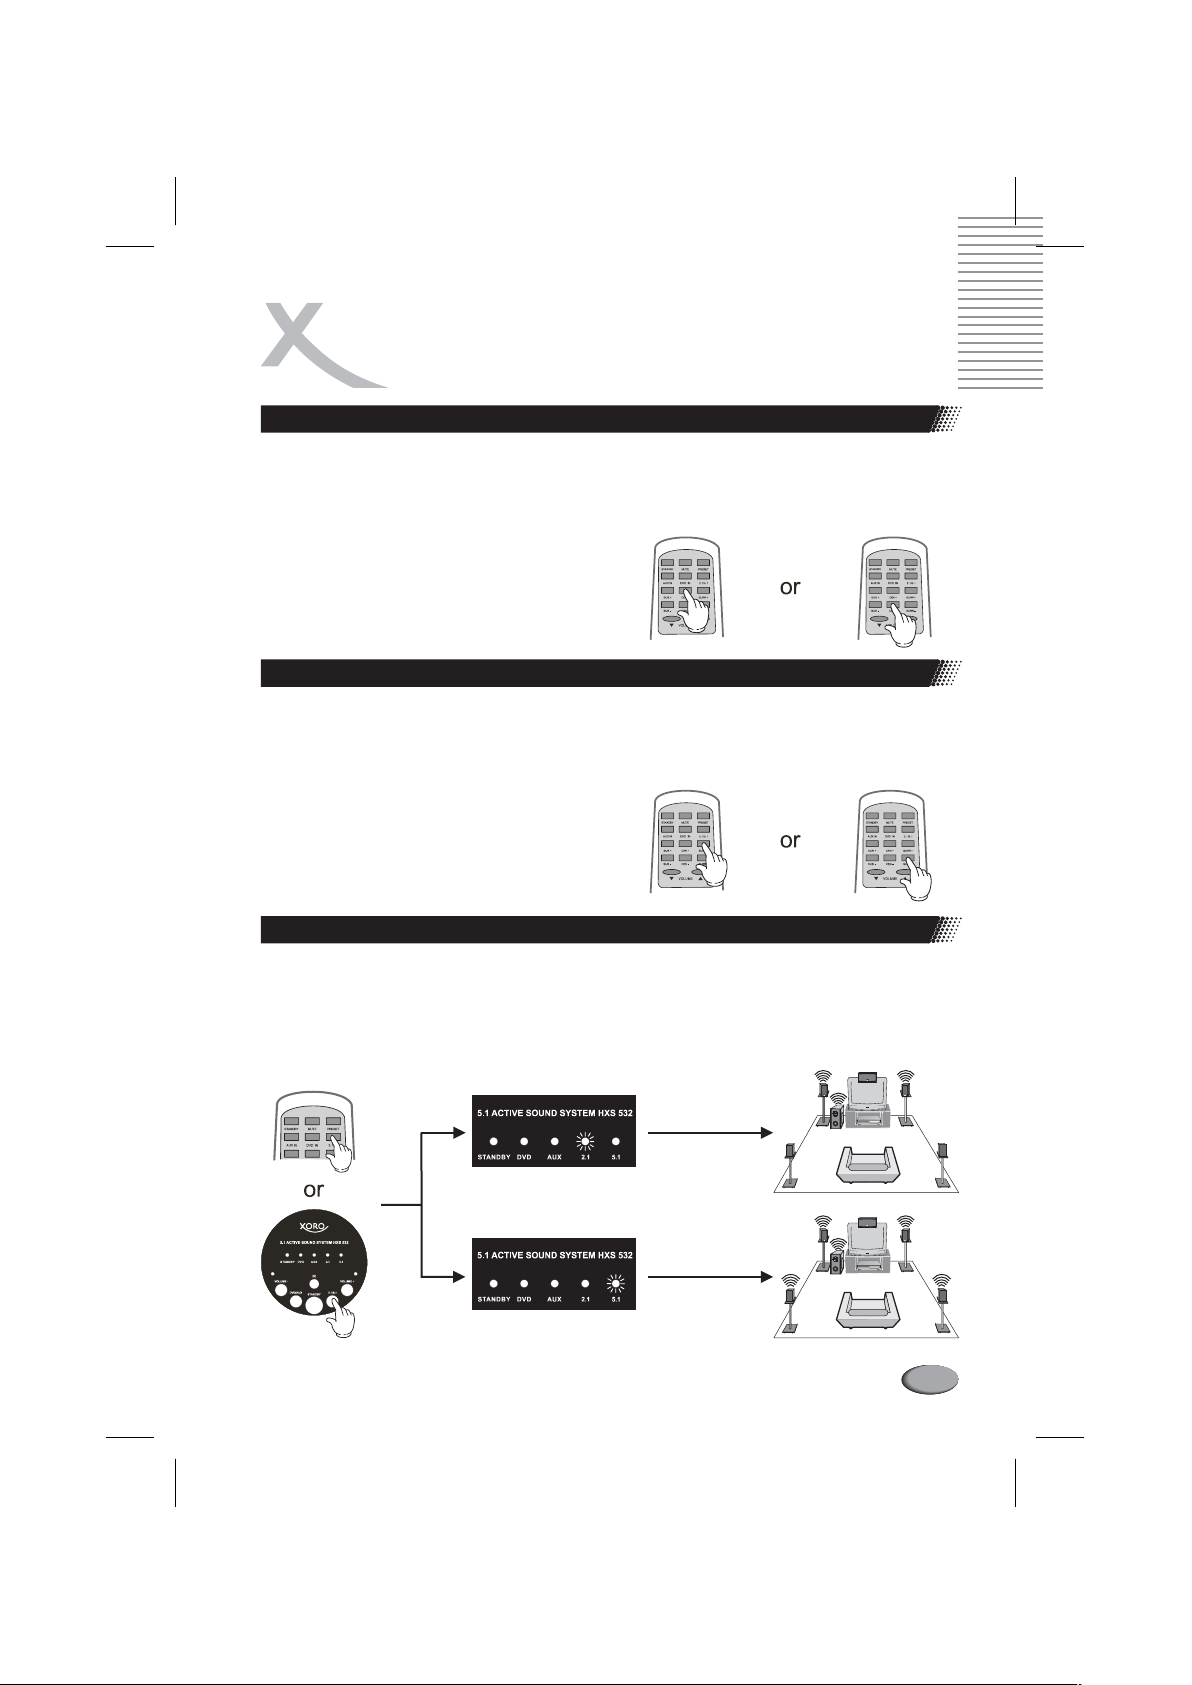
SELECTING THE SOUND FIELD [2.1/5.1]
Press the on the remote control continuously to change the sound field
reproducing by the Sound System. You can change the sound field from 2.1-channel
(L/R Front + Subwoofer) to 5.1-channel (L/R Front + L/R Surround + Center +
Subwoofer) or from 5.1-channel to 2.1-channel which is either for the stereo source
(connected to AUX input) or 5.1 source (connected to DVD input).
2.1/5.1 button
This light indicates 2.1 sound field
5
.
1
A
C
T
I
V
E
S
O
U
N
D
S
Y
S
T
E
M
H
X
S
5
3
2
This light indicates 5.1 sound field
5
.
1
A
C
T
I
V
E
S
O
U
N
D
S
Y
S
T
E
M
H
X
S
5
3
2
16
OPERATIONS
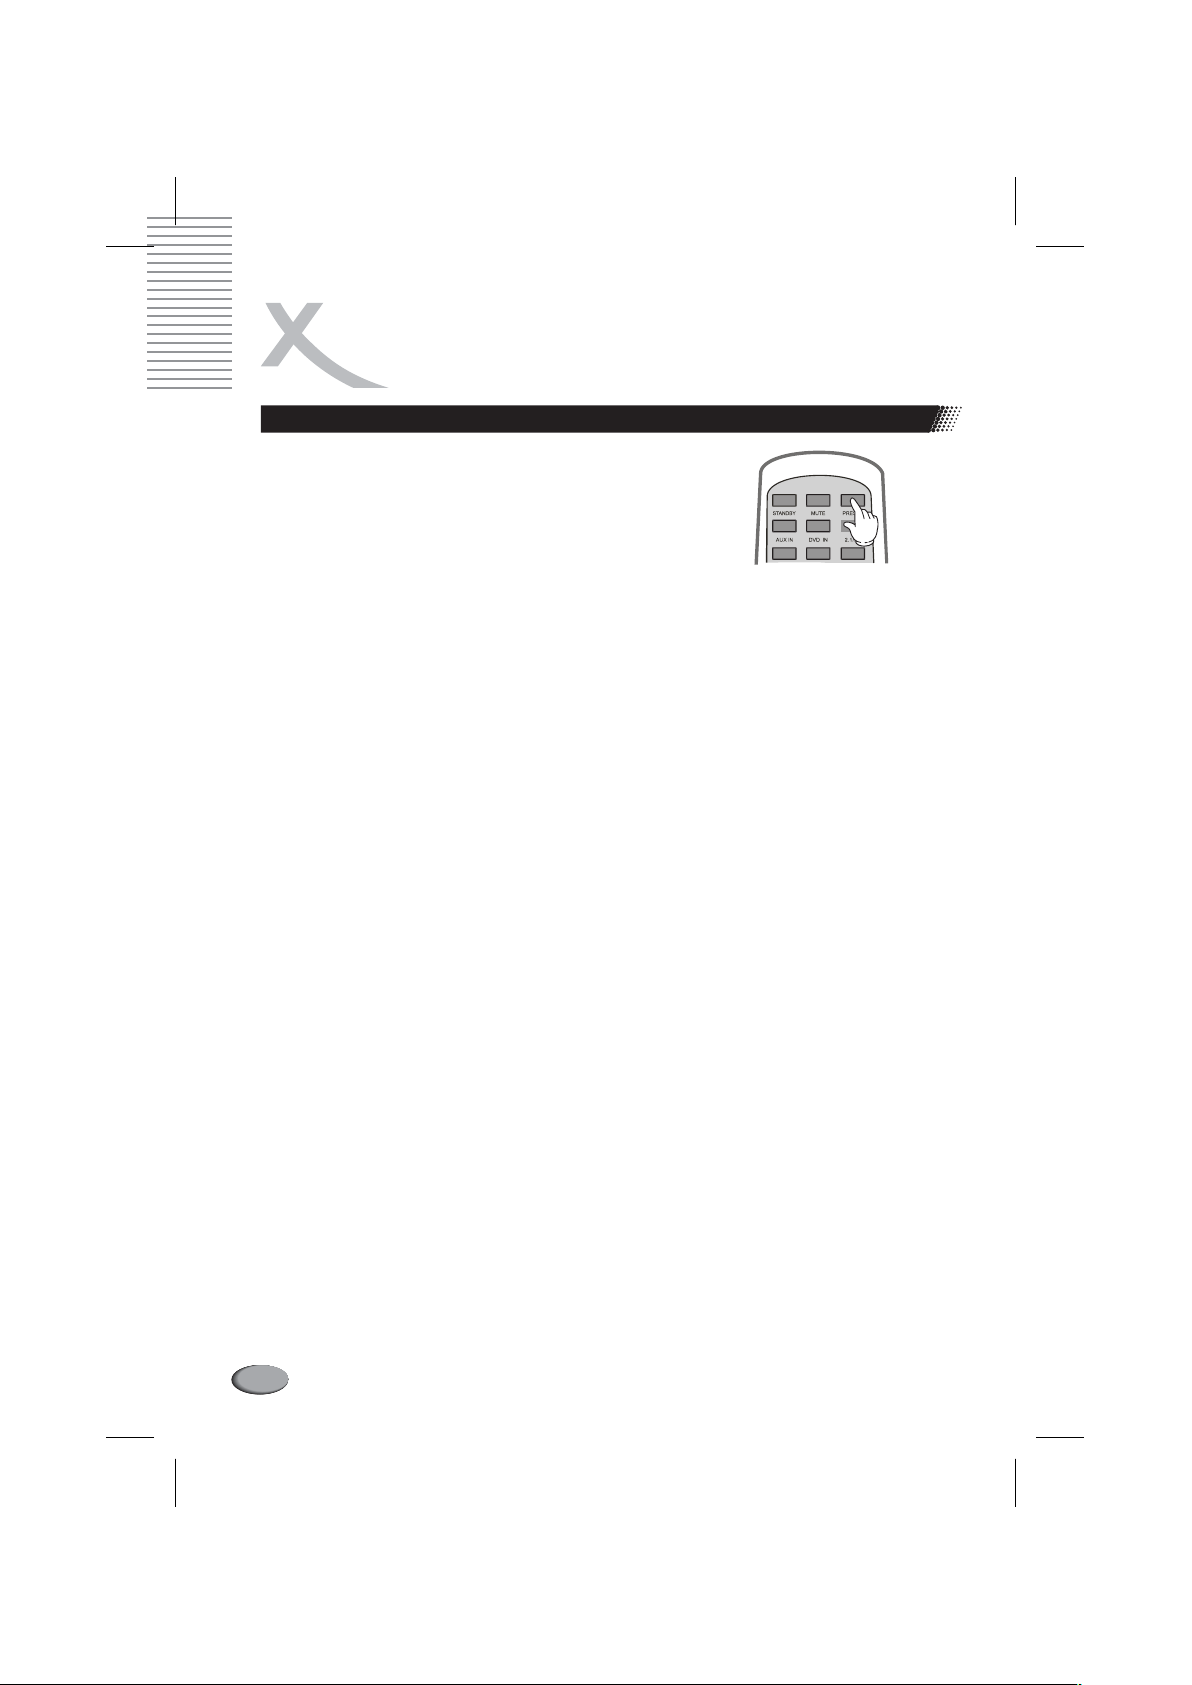
RECALL THE ORIGINAL SETTINGS [PRESET]FACTORY
Press the on the remote control to
recall the factory original settings for Main Volume,
Center Channel Volume, Surround Channels Volume,
and Subwoofer channel Volume.
After you press the , all the
channel’s volume level will be set to the factory
original level — -30dB.
PRESET button
PRESET button
17

TROUBLESHOOTING
POSSIBLE REASONS AND SOLUTIONS
SYMPTOMS
No power
No voice
Dead unit
No voice in one side
at front loudspeaker
or surround
loudspeaker
No voice in the
center loudspeaker
No voice in the
front loudspeaker
No voice in the
Surround speaker
POSSIBLE REASONS
Power plug unplugged Plug in the power plug
POWER knob is on OFF position Switch the knob to ON position
Volume button is at the lowest position
Input signal is not correctly connected Connect signal lines correctly
Input channel selection is wrong
The system is in Standby mode Press Standby button to turn it on
There is no signal input
Power line is not correctly connected
POWER knob is in OFF position
One signal line is not connected Connect signal line
One speaker line is not connected
Center channel volume is set at the
lowest level
Center speaker line is not connected Connect center speaker line
There is not center channel signal source
DVD player selects 2.1-channel output
Front channels volume is set at the
lowest level
Front speakers line is not connected Connect front loudspeakers line
Surround channels volume is set at the
lowest level
Surround speakers line is not connected Connect surround speakers line
There is not surround channels signal
source
DVD player selects 2.1-channel output
SOLUTIONS
Adjust volume level
Re-choose channel
Turn on the signal source
Connect power line correctly
Switch the knob in ON position
Connect speaker line
Adjust center channel volume
It is normal for AUX input, and for
2.1-channel sound field mode
Select 5.1-channel output
Adjust front channels volume
Adjust surround channels volume
It is normal for AUX input, and for
2.1-channel sound field mode
Select 5.1-channel output
18

ADDENDUM
SOUND GLOSSARY
A3
C
See Dolby Digital
A()
MPLIFIER AMP
A device which increases or boosts the level of an
input signal by increasing its amplitude. Amplifiers
typically increase voltage, current or both.
A
MPLIFIER CLASSES
Audio power amplifiers are classified primarily by
the design of the output stage. Classification is
based on the amount of time the output devices
operate during each cycle of signal swing. Also
defined in terms of output bias current (the amount
of current flowing in the output devices with no
signal).
Class A
Class B
Class AB
Class D
Class G
.
The key ingredient of class A
operation is that both devices are
always on. There is no condition
where one or the other is turned off.
Class A amplifiers are large, heavy
and run very hot. The positive effect
is that class A designs are inherently
the most linear, with the least amount
of distortion.
The key ingredient of class
operation is that current flow in a
specific output device is zero when
not stimulated with an input signal
Due to this operation, class B
designs show high efficiency but poor
linearity around the crossover region.
operation allows both devices to be
on at the same time (like in class A),
but just barely. The output bias is set
so that current flows in a specific
output device appreciably more than
a half cycle but less than the entire
cycle. That is, only a small amount of
current is allowed to flow through
both devices It is this combination of
good efficiency (around 50%) with
excellent linearity that makes class
AB the most popular audio amplifier
design.
operation is switching, hence the
term switching power amplifier. Here
the output devices are rapidly
switched on and off at least twice for
each cycle. Class D operation is
theoretically 100% efficient
operation involves changing the
power supply voltage from a lower
.
B
.
.
level to a higher level when larger
output swings are required. Class G is
becoming common for pro audio
designs
.
Class H
operation takes the class G design one
step further and actually modulates the
higher power supply voltage by the
input signal. This allows the power
supply to track the audio input and
provide just enough voltage for optimum
operation of the output devices. The
efficiency of class H is comparable to
class G designs.
AMPLITUDE
The 'level' (perceived as 'volume') of an electrical or
acoustic signal. Shown as the value of the vertical
axis on a typical graph of a sound wave.
BANDWIDTH
The total frequency range of any system. Usually
specified as something like: 20 20,000 Hz plus or
minus 3 d .
B
~
BAND-PASS ENCLOSURE
A multi-chambered ported system.
BAND-PASS FILTER
An electric circuit designed to pass only middle
frequencies.
BASS
Lower register of pitch; also a stringed musical
instrument designed to play low frequency sounds;
also a voice lower in pitch than a baritone.
BASS REFLEX
A type of loudspeaker that uses a port or duct to
augment the low-frequency response. Opinions vary
widely over the "best" type of bass cabinet, but much
has to do with how well a given design, such as a
bass reflex is implemented.
CENTER CHANNEL
In home theater, sound decoded from the stereo
signal sent to a speaker mounted in front of the
listener, specially designed to enhance voices and
sound effects from a movie soundtrack. Used in car
audio to help offset skewed stereo imaging due to
seating positions in the automotive environment.
CHANNEL BALANCE
In a stereo system, the level balance between left and
right channels. Properly balanced, the image should
be centered between the left-right speakers. In a
19
ADDENDUM
SOUND GLOSSARY
home-theater system, refers to achieving correct
balance between all the channels of the system.
CLIPPING
Audible distortion occurring when the peaks of an
amplifier's output are flattened ('clipped'). When the
input is too high, an amplifier has insufficient power
to accurately reproduce the output waveform.
Usually the "clipped" waveform contains an excess
of high-frequency energy. The sound becomes
hard and edgy. Hard clipping is the most frequent
cause of "burned out" tweeters. Even a lowpowered amplifier or receiver driven into clipping
can damage tweeters which would otherwise last
virtually forever.
CROSSOVER
An electronic circuit which splits an audio signal
into different frequency bands. Crossovers are
used in speakers to route the various frequency
ranges to the appropriate drivers. Additionally,
many crossovers contain various filters to stabilize
the impedance load of the speaker and or shape
the frequency response. Some crossovers contain
levels controls to attenuate various parts of the
signal.
CROSS-TALK
Unwanted breakthrough of one channel into
another. Also refers to the distortion that occurs
when some signal from a music source that you
are not listening to leaks into the circuit of the
source that you are listening to.
DAMPING
Refers to the ability of an audio component to
"stop" after the signal ends. For example, if a drum
is struck with a mallet, the sound will reach a peak
level and then decay in a certain amount of time to
no sound. An audio component that allows the
decay to drag on too long has poor damping, and
less definition than it should. An audio component
that is over damped does not allow the initial
energy to reach the full peak and cuts the decay
short. "Boomy" or "muddy" sound is often the result
of under damped systems. "Dry" or "lifeless" sound
may be the result of an over damped system.
DECIBEL (dB)
We perceive differences in volume level in a
logarithmic manner. Our ears become less
sensitive to sound as its intensity increases. 1 dB
is the minimum perceptible change in volume, 3 dB
is a moderate change in volume, and about 10 dB
is an apparent doubling of volume
hreshold of hearing 0 dB
-T : ;
.
-T : ;
hreshold of pain 130 dB
-;
Whisper: 15-25 dB
-;
Quiet background: about 35 dB
-;
Normal home or office background: 40-60 dB
-;
Normal speaking voice: 65-70 dB
-;
Orchestral climax: 105 dB
-;
Live Rock music: 120 dB+
-;
Jet aircraft: 140-180 dB
DISTORTION
Any difference, apart from level, between an original
signal and one that has been processed. Anything
that alters the musical signal. One cause may be the
overloading of the input stage of an amplifier, but
many other forms of distortion, such as harmonic
distortion are common.
OLBY IGITAL
DD
Is a five-channel system consisting of left ,
center, right left rear, right rear channels. All
processing is done in the digital domain. Unlike Dolby
Prologic in which the rear effects channels are
frequency limited to approx. 100-7000Hz, Dolby
Digital rear channels are specified to contain the full
20-20Khz frequency content. The AC3 standard also
has a separate subwoofer channel for the lowest
frequencies.
OLBY IGITAL URROUND
D D EX S
Also referred to as Dolby Digital 6.1, adds a rear
center channel to the existing left, center, right and
rear speakers. This format requires a 6.1 processor or
receiver and DVDs that are 6.1 encoded.
OLBY ROLOGIC
DP
Is a four-channel system consisting of left, center,
right and rear channel (the single rear channel is
usually played through two speakers).
OME WEETER
DT
A high frequency speaker with a dome-shaped
diaphragm.
front, and
front
DTS
Digital Theater System. A multi-channel
encoding/decoding system. Used in some movie
theaters. Also now included in some home-theater
processors. A competitor to Dolby Digital.
YNAMIC RANGE
D
The range between the loudest and the softest
sounds that are in a piece of music, or that can be
reproduced by a piece of audio equipment without
distortion (a ratio expressed in decibels). In speech,
the range rarely exceeds 40 dB; in music, it is
greatest in orchestral works, where the range may be
20

ADDENDUM
SOUND GLOSSARY
as much as 75 dB.
DYNAMICS
When used in music, refers to the expression of a
performance with varying degree of loudness and
softness.
EFFICIANCY RATING
The loudspeaker parameter that gives the level of
sound output when measured at a prescribed
distance with a standard level of electrical energy
fed into the speaker.
QUALIZER
E
Electronic set of filters used to boost or attenuate
certain frequencies.
EXTENSION
How extended a range of frequencies the device
can reproduce accurately. Bass extension refers to
how low a frequency tone will the system
reproduce, high-frequency extension refers to how
high in frequency will the system play.
ILTER
F
An electrical circuit or mechanical device that
removes or attenuates energy at certain
frequencies. An electrical circuit or mechanical
device that removes or attenuates energy at
certain frequencies.
LAT ESPONSE
FR
The faithful reproduction of an audio signal;
specifically, the variations in output level of less
than 1 dB above or below a median level over the
audio spectrum.
REE AIR ESONANCE
FR
The natural resonant frequency of a driver when
operating outside an enclosure.
REQUENCY
F
T
he number of complete cycles that a sound wave
goes through in each second. Unit used is Hertz,
abbreviated to Hz, although some countries still use
the older term 'cycles per second' (cps). Humans
perceive frequency subjectively as pitch (eg: 440Hz
= A). The range of human hearing is commonly
given as 20 20,000Hz (20Hz 20kHz).
ULL-RANGE
F
A speaker designed to reproduce all or most of the
sound spectrum.
~~
GAIN
The amount by which an amplifier increases the
power of a signal, indicated either in dB (e.g. Gain =
+12dB), or as a multiplier (e.g. Gain = x4). The
function of a volume control.
H
EADROOM
The ability of an amp to go beyond its rated power for
short durations in order to reproduce musical peaks
without distortion. This capability is often dependent
on the power supply used in the design.
H (Hz)
ERTZ
A unit of measurement denoting frequency, originally
measured as Cycles Per Second, (CPS): 20 Hz = 20
CPS. Kilohertz (kHz) are hertz measured in multiples
of 1,000.
HP F
IGH ASS ILTER
A circuit that discriminates between high and low
frequencies and allows only the high frequencies to
pass
.
HT
OME HEATER
An audio system designed to reproduce the theater
sound experience while viewing film at home. Minimally
consisting of a Dolby Pro Logic® surround sound
receiver, left and right front speakers, a center channel
speaker, and two surround speakers. These plus
optional subwoofer(s), surround speaker(s), and digital
formats such as Dolby Digital® can enhance the
viewing experience by drastically improving the sound
quality of movie soundtracks.
H
UM
Audio electronic noise that has a steady low
frequency pitch.
IMPEDANCE
I
s a measure of electrical resistance specified in
ohms. Speakers are commonly listed as 4 or 8 hm
but speakers are reactive devices and a nominal 8
ohm speaker might measure from below 4 hm to 60
O
or more hms over its frequency range. This varying
impedance curve is different for each speaker model
and makes it impossible to design a really effective
"generic" speaker level high-pass filter. Active devices
like amplifiers typically have an input impedance
between about 10,000-100,000 ohms and the
impedance is the same regardless of frequency.
IO D
NPUT VERLOAD ISTORTION
Distortion caused by too great an input signal being
sent to an amplifier or preamplifier. It is not affected
by volume control settings.
O
O
JITTER
A tendency towards lack of synchronization caused
21

ADDENDUM
SOUND GLOSSARY
by electrical changes. Technically the unexpected
(and unwanted) phase shift of digital pulses over a
transmission medium. A discrepancy between
when a digital edge transition is supposed to occur
and when it actually does occur - think of it as
nervous digital, or maybe a digital analogy to wow
and flutter.
KILOHERTZ )
One thousand hertz.
(kHz
LINE LEVEL
A signal whose voltage is between approximately
VV
0.310 olts and 10 olts across a load of 600
ohms or greater.
LOW-PASS FILTER
A circuit that allows low frequencies to pass but
rolls off the high frequencies. Most subwoofers
have low-pass filters built in and many surround
sound decoders have subwoofer outputs that have
been low-pass filtered.
LOUDNESS
Perceived volume. Loudness can be deceiving. For
example, adding distortion will make a given
volume level seem louder than it actually is.
MAXIMUM POWER RATING
A meaningless specification.
MIDBASS
Mid frequency bass, usually frequencies just above
the sub-bass range, from around 100 400 Hz or
so
~
MIDRANGE
A speaker (driver), used to reproduce the middle
range of frequencies. A midrange is combined with
a woofer for low frequencies and a tweeter for high
frequencies to form a complete, full-range system.
NONLINEARITY
What goes into a system comes out changed by its
passage through that system-in other words,
distorted. The ideal of an audio component and an
audio system is to be linear, or no distorting, with
the image on one side of the mirror identical to the
image on the other side.
OCTAVE
An octave is a doubling or halving of frequency.
20Hz-40Hz is often considered the bottom octave.
Each octave you add on the bottom requires that
your speakers move four times as much air!
OHM ( )
Ohm
A unit of electrical resistance or impedance.
OUT OF PHASE
When speakers are mounted in reverse polarity, i.e.,
one speaker is wired +/+ and -/- from the amp and the
other is wired +/-.
OVERLOAD
A condition in which a system is given too high of an
input level. A common cause of distortion or product
failure.
PASSIVE RADIATOR
A device that looks just like an ordinary driver, except
it has no magnet or voice coil. A passive radiator is
usually a highly compliant device, with a similar cone
material and surround found on regular active drivers.
The radiator must usually be at least as large (or
larger) than the driver it is aligned with. The passive
radiator is tuned to Fb and used in place of a port.
PEAK
The maximum amplitude of a voltage or current.
PEAK POWER RATING
Another meaningless specification unless references
are given.
PEAK POWER
A measure of amplifier power based on the amplitude
rise above ground plane or 0 volts.
PEAK-TO-PEAK POWER
A measure of amplifier power based on the total
amplitude between peak positive value and peak
negative value. Generally this value is twice the peak
value for a symmetrical waveform.
PHASE COHERENCE
The relationship and timing of sounds that come from
different drivers (subs, mids, tweets) mounted in
different locations.
PHASE DISTORTION
A type of audible distortion caused by time delay
between various parts of the signal.
POINT-SOURCE
Most multi-unit loudspeakers try to approximate a
point-source. Think of a pebble dropped into the
water and the expanding wave pattern away from
impact. Obviously it is difficult to integrate multiple
point-sources into a truly coherent expanding wave.
The best designs do quite well with careful driver
engineering and crossover development.
22

ADDENDUM
SOUND GLOSSARY
PORTED ENCLOSURE
A type of speaker enclosure that uses a duct or
port to improve efficiency at low frequencies.
POWER
In electricity, power (P) is the product of the voltage
(V) and the current (I). i.e. P=VI. The unit of power
is the Watt.
POWER AMPLIFIER
An amplifier without tone controls and with a higher
power output than a line amplifier or pre-amp.
Commonly used to drive loudspeakers.
PRE-AMPLIFIER
Or Pre-amp is a device that takes a source signal,
such as from a turntable, tape-deck or CD player,
and passes this signal on to a power-amplifier(s).
The pre-amp may have a number of controls such
as source selector switches, balance, volume and
possibly tone-controls.
RCA
CONNECTOR
"Phono" plugs, used primarily as low-level
connections between Phonographs/CD
players/Tuners/Recievers/Amplifiers
R
ECEIVER
An audio component that combines a pre-amplifier,
amplifier(s) and tuner in one chassis.
R (Re)
ESISTANCE
In electrical or electronic circuits, a characteristic of
a material that opposes the flow of electrons.
Speakers have resistance that opposes current.
R
ESONANT FREQUENCY
Any system has a resonance at some particular
frequency. At that frequency, even a slight amount
of energy can cause the system to vibrate. A
stretched piano string, when plucked, will vibrate
for a while at a certain fundamental frequency.
Plucked again, it will again vibrate at that same
frequency. This is its natural or resonant frequency.
While this is the basis of musical instruments, it is
undesirable in music-reproducing instruments like
audio equipment.
RMS (root-mean-square)
The square root of the mean of the sum of the
squares. Commonly used as the effective value of
measuring a sine wave's electrical power. A
standard in amplifier measurements. it is a more
realistic measure than 'peak' power or 'peak-topeak' power.
R (cut-off)
OLL-OFF
The attenuation that occurs at the lower or upper
frequency range of a driver, network, or system. The
roll-off frequency is usually defined as the frequency
where response is reduced by -3 dB.
S
ATELLITE
A satellite speaker is usually fairly small, and does not
reproduce the lowest frequencies. Usually meant to
be used with a subwoofer.
S
EALED ENCLOSURE
An air tight enclosure that completely isolates the
back wave of the driver from the front. Very tight,
defined sound (with Qtc = 0.707) with very good
transient response and power handling.
S
ENSITIVITY
A measurement of how much power is required for a
loudspeaker to achieve a certain output level. The
general standard used is on-axis SPL (Sound
Pressure Level) at 1 watt input, 1 meter distance.
S (SN)
IGNAL-TO-NOISE RATIO
The range or distance between the noise floor (the
noise level of the equipment itself) and the music
signal.
S P L (Spl)
OUND RESSURE EVEL
Given in decibels (DB) is an expression of loudness
or volume. A 10db increase in SPL represents a
doubling in volume. Live orchestral music reaches
brief peaks in the 105db range and live rock easily
goes over 120db.
SOUNDSTAGE
A listening term refers to the placement of a stereo
image in a fashion that replicates the original
performance. A realistic soundstage has proportional
width, depth and height.
SOUND WAVES
Sound waves can be thought of like the waves in
water. Frequency determines the length of the waves;
amplitude or volume determines the height of the
waves. At 20Hz, the wavelength is 56 feet long!
These long waves give bass its penetrating ability,
(why you can hear car boomers blocks away).
STANDING WAVE
A buildup of sound level at a particular frequency that
is dependent upon the dimensions of a resonant
room, car interior, or enclosure. It occurs when the
rate of energy loss equals the rate of energy input into
the system. This is what you hear when you listen into
a sea shell.
23

ADDENDUM
SOUND GLOSSARY
STEREO
From the Greek meaning solid. The purpose of
stereo is not to give you separate right and left
channels, but to provide the illusion of a threedimensional, holographic image between the
speakers.
SUBWOOFER
A speaker designed exclusively for low-frequency
reproduction. A true subwoofer should be able to at
least reach into the bottom octave (20-40Hz).
There are many "subwoofers" on the market that
would be more accurately termed "woofers".
S (suspension)
URROUNDER
The outer suspension of a speaker cone; holds the
diaphragm in place but allows it to move when
activated. Usually made of foam or rubber.
SURROUND SOUND
Sound extracted from the stereo signal sent to
smaller rear or side speakers used in a home
theater.
THX
Refers to a series of specifications for surround
sound systems. Professional THX is used in
commercial movie theaters. Home THX
specifications are not published and manufacturers
must sign non-disclosure waivers before submitting
their products for THX certification. Manufacturers
that receive certification for their products must pay
a royalty on units sold.
TOTAL HARMONIC DISTORTION
Refers to a device adding harmonics that were not in
the original signal. For example: a device that is fed a
20Hz sine wave that is also putting out 40Hz, 80Hz
etc. Not usually a factor in most modern electronics,
but still a significant design problem in loudspeakers.
TWEETER
A speaker (driver), used to reproduce the higher
range of frequencies. To form a full-range system,
a tweeter needs to be combined with a woofer, (2way system), or a woofer and midrange, (3-way
system).
VOICE COIL
The wire wound around the speaker former. The
former is mechanically connected to the speaker
cone and causes the cone to vibrate in response to
the audio current in the voice coil.
(THD)
VOLUME
Loudness of sound; a subjective sensation dependent
on the amplitude of a sound wave or electrical signal,
but not linearly related to it.
WAVELENGTH
The distance the sound wave travels to complete one
cycle. The distance between one peak or crest of a
sine wave and the next corresponding peak or crest.
The wavelength of any frequency may be found by
dividing the speed of sound by the frequency. (Speed
of sound at sea level is 331.4 meters/second or
1087.42 feet/second).
WOOFER
A speaker, (driver), used for low-frequency
reproduction. Usually larger and heavier than a
midrange or tweeter.
24

NOTES
ADDENDUM
25

NOTES
ADDENDUM
26


5.1 АКУСТИЧЕСКАЯ СИСТЕМА
СО ВСТРОЕННЫМ МНОГОКАНАЛЬНЫМ УСИЛИТЕЛЕМ
5
.
1
A
C
T
I
V
E
S
O
U
N
D
S
Y
S
T
E
M
H
X
S
5
3
2
РУКОВОДСТВО ПО ЭКСПЛУАТАЦИИ

СОДЕРЖАНИЕ
ПОДГОТОВКА
Основные требования безопасности
Меры предосторожности
Комплектация
ОСНОВНЫЕ ХАРАКТЕРИСТИКИ
Основные особенности
Кнопки и индикация на передней панели сабвуфера
Разъемы и выключатели на задней панели сабвуфера
Пульт дистанционного управления акустической системы (ПДУ)
УСТАНОВКА
Установка колонок акустической системы
Подключение внешних устройств
УПРАВЛЕНИЕ АКУСТИЧЕСКОЙ СИСТЕМОЙ
Включение/выключение питания [POWER STANDBY]
Выбор источника аудиосигнала [AUX/DVD; DVD IN; AUX IN]
Временное отключение звука [MUTE]
Регулировка общей громкости [VOLUME +/-; VOLUME ]
Регулировка громкости канала сабвуфера [SUB +/-]
Регулировка громкости центрального канала [CEN +/-]
Регулировка громкости тыловых каналов [SURR +/-]
Выбор режима звучания [2.1/5.1]
Восстановление заводских установок [PRESET]
НЕИСПРАВНОСТИ И СПОСОБЫ ИХ УСТРАНЕНИЯ
Возможные причины и способы их устранения
ПРИЛОЖЕНИЕ
Спецификация и технические параметры
Словарь терминов
............................................................................................................................30
..............................................................................30
...................................................................................................30
......................................................................................................................34
..........................................................................................35
......................................................................................................35
..................................................36
..............................................37
...............................................................................................................................40
.....................................................................40
....................................................................................41
.....................................................................42
................................................42
.............................................................................43
pq/
..................................................43
.............................................44
.................................................44
.....................................................................................44
.........................................................45
.........................................................46
............................................................46
...........................................................................................................................47
.....................................................................47
..............................................................................................................49
............................38
.....................................42
...................................43
29

ПОДГОТОВКА
ОСНОВНЫЕ ТРЕБОВАНИЯ БЕЗОПАСНОСТИ
ПРЕДОСТЕРЕЖЕНИЕ:
поражения электрическим током не допускайте использования этой
системы под дождемили в сыромместе.
ВНИМАНИЕ:
вставляйте вилку электропитания в розетку электрического
напряжения. Чтобы быть уверенным в правильной эксплуатации
системы, пожалуйста, прочтите внимательно это руководство
пользователяи сохраняйте егокак справочную информацию.
Значок молнии, помещенный внутрь равностороннего треугольника, означает
предупреждение пользователя о высоком напряжении внутри корпуса, которое может
привести к поражению электрическим током.
Значок восклицательного знака, помещенного внутрь равностороннего треугольника,
напоминает пользователю о необходимости внимательного чтения инструкции для
правильного управления акустической системой.
Во избежание поражения электрическим током плотно
Во избежание риска возникновения пожара или
МЕРЫ ПРЕДОСТОРОЖНОСТИ
l Электроснабжение
Убедитесь, что устройство снабжено наклейкой с
5.1 ACTIVE SOUND SYSTEM
AC: ~230V 50/60Hz
MODEL NO: HXS 532
Символ двух квадратиков, помещенных один в другой,- символ оборудования класса II
показывает, чтоприбор имеет двойнуюсистему изоляции.
информацией по подходящему напряжению, находящейся на
задней панели акустической системы. Если вы не уверены в
параметрах вашей электросети, проконсультируйтесь с
дилерами или с представителями компании- производителя
электроэнергии. Для данной акустической системы требуется
напряжение 230В~50/60Г или 220В~50/60Г. Не перегружайте
сетевую розетку, удлинительный шнур или в целом ваш
квартирный блок питания, так как это может стать причиной
пожара или удараэлектрическим током.
Не используйте поврежденный шнур электропитания. Шнуры электропитания следует
располагать таким образом, чтобы по ним не ходили, и не защемляли, не сдавливали их
отдельными предметами, расположенными рядом. Обратите особое внимание на соединение
шнура с вилкой электропитания, на пригодность розетки электропитания и на место их
соединения с акустической системой. Неберите шнур электропитаниямокрыми руками.
30

ПОДГОТОВКА
МЕРЫ ПРЕДОСТОРОЖНОСТИ
Вставляйте вилку шнура электропитания в
розетку электропитания плотно.
При подключенном к розетке шнуре электропитания система всегда потребляет небольшое
количество электроэнергии. Когда вы уезжаете в поездку или отсутствуете длительный период
времени по другим причинам, вынимайте вилку шнура электропитания из розетки. При
вытягивании шнура электропитания из розетки убедитесь, что вы держитесь за вилку, а не за
шнур электропитания.
l
Размещение
Никогда не размещайте акустическую
систему на неустойчивых платформе,
подставке, тележке, настенной полке или
столе. При падении аппаратура может
серьезно поранить людей или животных.
Разместите систему на плоской, ровной
поверхности. Температура в месте
установки аппаратуры должна находится в
пределах от 5 C до 35 C. Оставляйте
достаточное расстояние между системой и
телевизором. Не используйте систему в
месте, подвергающемся вибрации.
При размещении сабвуфера, пожалуйста, оставляйте достаточное количество места позади
задней панели, чтобы обеспечить надлежащий уровень вентиляции усилителя (7-10 см). Не
размещайте источники повышенной опасности на приборах акустической системы (например,
наполненные жидкостью предметы, зажженные свечии т.д.).
00
Если это необходимо, прочищайте вилку
шнура электропитания.
Предохраняйте акустическую систему от
воздействия повышенной влажности (не
ставьте горшки или вазы с цветами на
аппаратуру), чрезмерного тепла (не
размещайте рядом обогревательные
приборы) или оборудования, создающего
сильные магнитные или электрические
поля (например, громкоговорители). Если
акустическая система хранится при низких
температурах, то на ней может появиться
конденсат. Если вы перевозите
акустическую систему зимой, то перед
использованием выждите примерно 2 часа
до тех пор, пока система ни согреется до
температуры помещения.
31
ПОДГОТОВКА
МЕРЫ ПРЕДОСТОРОЖНОСТИ
l Функционирование
Отключайте акустическую систему от
электросети во время грозы. Гроза может
стать причиной скачка напряжения в
электросети, а это может нанести вред
встроенному многоканальному усилителю.
Соединительные провода акустической
системы должны подключаться с учетом
маркировки полярности выходных
разъемов на задней панели сабвуфера.
Для обеспечения нормальной работы всех
колонок необходимо соблюдать
полярность подключения “+” (золотистый
провод) и “-“(серебристый провод).
Не размещайте мониторы, дискеты, жесткие диски или другие магнитные носители вблизи
сабвуфера на расстоянииближе, чем 15см.
Никогда не вскрывайте аппаратуру и не проталкивайте предметы внутрь, так как это может
привести к контакту с деталями, находящимися под высоким напряжением, и к короткому
замыканию илипожару. Избегайте попадания жидкости на аппаратуруили внутрь нее.
В случае возникновения проблем с работой акустической системы не разбирайте и не чините
ее самостоятельно. Пожалуйста, выключите систему и доверьте ремонт ее
квалифицированным специалистам сервисногоцентра.
Если вы долгое время не используете акустическую систему, пожалуйста, вытащите шнур
электропитания из розетки. Это обеспечит безопасность динамикови вашей квартиры.
Не подвергайте акустическую систему
воздействию прямых солнечных лучей или
других источников тепла. Это может
привести к перегреву и неисправностям в
работе системы.
Батарейки для пульта дистанционного
управления содержат химические
компоненты вредные для окружающей
среды. Не бросайте батарейки в общий
мусорный ящик. Вытаскивайте батарейки,
если не используете систему длительное
время.
32

ПОДГОТОВКА
МЕРЫ ПРЕДОСТОРОЖНОСТИ
l Транспортировка
Для транспортировки используйте ручную
тележку, особенно при перевозке системы
в упаковке. Быстрая остановка,
чрезмерное усилие и неровная
поверхность может стать причиной
опрокидывания тележки с аппаратурой.
l Чистка
Перед чисткой всегда отключайте акустическую систему от электросети. При чистке системы
используйте мягкую ткань и следуйте инструкциям по применению, если используете
химический состав для пропитки ткани. Не применяйте бензин, растворитель и другие
органические растворители, содержащие дезинфицирующиесредства.
l
Если вода попала внутрь системы
Выключите систему и вытащите шнур электропитания из розетки. Затем обратитесь в
сервисный центр XORO. Дальнейшее использование системы с водой внутри может привести
к пожару или поражению электрическим током.
l
Обслуживание
Обращайтесь по поводу всех видов обслуживания к квалифицированным специалистам
сервисного центра. Сервисное обслуживание требуется, когда основные части изделия были
повреждены каким-либо способом, например, поврежден шнур электропитания или вилка
шнура, вылилась жидкость на аппаратуру, посторонние предметы попали внутрь акустической
системы, акустическая система попала под дождь или под воздействие влаги, не работает
нормально или упала. Не пытайтесь ремонтировать систему самостоятельно, вскрывая
корпус, вы можете подвергнуться воздействию высокого напряжения или другим источникам
опасности.
После завершения сервисного обслуживания и ремонта аппаратуры, пожалуйста, попросите
специалиста сервисного центра протестировать систему, чтобы убедиться, что она
действительно находится в нормальном рабочем состоянии.
33

ПОДГОТОВКА
КОМПЛЕКТАЦИЯ
Пожалуйста, проконтролируйте, чтобы все перечисленные ниже состовляющие входили в
комплект поставки акустической системы. Если что-то упущено, пожалуйста, сразу же верните
этоткомплект продавцудля замены.
1 сабвуфер
(со встроенным усилителем)
1 пульт дистанционного управления
(ПДУ) и 2 батарейки типа AAA
1 руководство пользователя
Согласно нашей системе контроля качества эта аппаратура была тщательно проверена перед
упаковкой, чтобы гарантировать безупречное ее состояние. После распаковки аппаратуры,
пожалуйста, проверьте, нет ли физических повреждений, и сохраняйте транспортнуюупаковку
и все существенные упаковочные материалы, так как в случае возврата изделия его
необходимоупаковать заново.
В случае обнаружения повреждений, сразу же оформите претензию в письменном виде и
поставьте в известность вашего продавца.
5 сателлитных колонок
и 5 кабелей для их подключения
3 шнура RCA-RCA
и 1 шнур MiniJack-RCA
1 гарантийный талон XORO
34

ОСНОВНЫЕ ХАРАКТЕРИСТИКИ
ОСНОВНЫЕ ОСОБЕННОСТИ
l
Встроенный многоканальный усилитель5.1.
l
Суммарная звуковая мощность180 Вт (RMS,THD 10%).
l
Возможность подключения к DVD проигрывателю, имеющему комплект разъемов 5.1
канального аудио выхода.
l
Возможность подключения к стерео источнику (например, CD плееру).
l
Полнофункциональный пультдистанционного управления (ПДУ).
l
Высокое качествопроизводства.
35

ОСНОВНЫЕ ХАРАКТЕРИСТИКИ
КНОПКИ И ИНДИКАЦИЯ НА ПЕРЕДНЕЙ ПАНЕЛИ САБВУФЕРА
5.1 ACTIVE SOUND SYSTEM HXS 532
1. STANDBY
2. DVD
3. AUX
4. 2.1
5. 5.1
6. VOLUME -
7. IR
8. VOLUME -
9. DVD / AUX
10. VOLUME +
11. VOLUME +
12. 2.1 / 5.1
13. STANDBY
индикатор включения питания и выключения режима энергоснабжения
индикатор выбора 5.1 канального входа(DVD)
индикатор выбора линейного стерео входа(AUX)
индикатор выбора звукового режима 2.1
индикатор выбора звукового режима 5.1
индикатор понижения общей громкости звука
инфракрасный сенсор для получения сигналов с пульта дистанционного
управления (ПДУ)
кнопка уменьшения общей громкости звука
кнопка выбора входов DVD или AUX
индикатор повышения общей громкости звука
кнопка увеличения общей громкости звука
кнопка выбора звукового режима 2.1 или 5.1
кнопка включения/выключения питания и включения режима
энергоснабжения
36

ОСНОВНЫЕ ХАРАКТЕРИСТИКИ
РАЗЪЕМЫ И ВЫКЛЮЧАТЕЛИ НА ЗАДНЕЙ ПАНЕЛИ САБВУФЕРА
MODELNO: HXS532
5.1ACTIVE SOUNDSYSTEM
AC:~230V 50/60Hz
230VAC50/60Hz
SERIALNUMBER:
1.
Разъемы линейного (AUX R/L) стерео входа [левый и правый каналы].
2.
Разъемы DVD R/L входов фронтальных каналов [левый и правый каналы].
3.
Разъемы DVD SUB/CENTER входов канала сабвуфера и центрального канала.
4.
Разъемы DVD SURROUND R/L входов тыловых каналов [левый и правый].
5.
Разъемы FRONT L. для подключения колонки фронтального левого канала.
6.
Разъемы FRONT R. для подключения колонки фронтального правого канала.
7.
Разъемы CENTER для подключения колонки центрального канала.
8.
Разъемы SURROUND L. для подключения колонки тылового левого канала.
9.
Разъемы SURROUND R. для подключения колонки тылового правого канала.
10.
Плавкий предохранитель 1.5A/250V.
11.
Переключатель питания акустической системы.
12.
Разъем для подключения сетевого шнура акустической системы.
37

ОСНОВНЫЕ ХАРАКТЕРИСТИКИ
ПУЛЬТ ДИСТАНЦИОННОГО УПРАВЛЕНИЯ (ПДУ)
Кнопки и их функции
l
2.1/5.1
SURR -
HXS 532
1. MUTE
2. STANDBY
3. AUX IN
4. CEN+
5. SUB+
6. SUB-
7. VOLUME
8. DVD IN
9. PRESET
10. 2.1 / 5.1
11. SURR+
12. CEN -
13. SURR VOLUME14.
временное отключение звука.
включение и выключение режима энергоснабжения.
выбор источника сигнала (стерео, AUX).
увеличение громкости центрального канала.
увеличение громкости канала сабвуфера.
уменьшение громкости канала сабвуфера.
уменьшение общей громкости.
q
выбор источника сигнала (5.1, DVD).
восстановление заводских настроек акустической системы.
выбор звукового режима 2.1 или 5.1.
увеличение громкости тыловых каналов.
уменьшение громкости центрального канала.
уменьшение громкости тыловых каналов.
увеличение общей громкости.
p
38

ОСНОВНЫЕ ХАРАКТЕРИСТИКИ
ПУЛЬТ ДИСТАНЦИОННОГО УПРАВЛЕНИЯ (ПДУ)
l Как вставить батарейки
Откройте крышку Вставьте батарейки,
Закройте крышку
соблюдая полярность,
маркировку “+” и “-“
l Примечания:
Ненадлежащее использование приводит к протечке и коррозии батареек.
Пожалуйста, соблюдайте следующие правила:
1. Соблюдайте полярность;
2. Не используйтевместе разные типы батареек;
3. Вынимайте батарейки, если вы длительное время не используетеПДУ;
4. Если ПДУ работает некорректно, заменитебатарейки на новые;
5. Если произошла протечка батареек, вытрите вытекший электролит в батарейном
отсеке, затем вставьте новые батарейки;
6. Убедитесь, что использованные батарейки утилизированы правильно согласно
правилам, принятымв вашем районе проживания.
l Правила работы с ПДУ
1. Направляйте ПДУ на инфракрасный сенсор (IR)
усилителяакустической системы;
2. Диапазон воздействия ПДУ + / -30 и максимум 7м от
5.1ACTIVESOUND SYSTEMHXS 532
передней панели сабвуфера;
3. Не роняйте ПДУ;
4. Избегайте попадения воды на ПДУ;
5. Не разбирайтеПДУ;
6. Не размешайте сабвуфер в пределах воздействия
сильного источника света. Это может вывести из строя
ПДУ;
7. Не используйте другие ПДУ вблизи сабвуфера. Это
может стать причиной неправильного срабатывания
аппаратуры;
8. Не размещайте крупные предметы между ПДУ и
инфракрасным сенсором (IR) усилителя акустической
системы.
39
Максимум м7

УСТАНОВКА
УСТАНОВКА КОЛОНОК АКУСТИЧЕСКОЙ СИСТЕМЫ
Слушатель должен находиться прямо напротив телевизора на расстоянии, превышающем
примерно в 2,5-3 раза размер экрана телевизора. Для лучшего звучания все колонки (за
исключением колонки центрального канала) следует расположить на таком же расстоянии от
слушателя. Не размещайте колонки в углу помещения, так как это существенно ухудшит
восприятие отраженного сигнала от поверхностей трех стен и создаст мощный басовый
(низкий) сигнал. Наилучший вариант размещенияколонок 70см отстены.
Фронтальная левая колонка
Сабвуфер
Тыловая левая колонка
Левую и правую колонки фронтальных каналов следует разместить на
одинаковом расстоянии от телевизора и под углом примерно 45 от
слушателя. Выровняйте в ряд фронтовые колонки с центральной или
поставьте фронтовые колонки чуть ближепо отношениюк центральной.
Разместите центральную колонку на телевизоре или DVD
проигрывателе так, чтобы звук от центрального канала локализовался.
Для этого лучше всего центральную колонку поместить на той же
высоте, что и фронтальные колонки.
Левую и правую колонки тыловых каналов разместите за слушателем.
Если позволяет размер помещения, пожалуйста, поместите эти колонки
лицом друг к другу. Поставьте их на расстоянии около 60-90см от ваших
ушей, наклоняя немного вниз.
Поместите сабвуфер на пол около телевизора (лучше справа от
телевизора).Точность позиции для сабвуфера не принципиальна.
Колонка
центрального канала
5
.
1
A
C
T
I
V
E
S
O
U
N
D
S
Y
S
T
E
M
H
X
S
5
3
2
Расстояние в 2.5-3 экрана телевизора
Фронтальная правая колонка
Тыловая правая колонка
40

УСТАНОВКА
ПОДКЛЮЧЕНИЕ ВНЕШНИХ УСТРОЙСТВ
Разъемы выходов стерео
L
R
CD проигрыватель
или кассетный магнитофон
S.L.
F.L .
F.R .
S.R.
CEN.
SW.
5.1 выходы
DVD проигрыватель
Фронтальная
левая
Центральная колонка
Метод
соединения
зажимной
скобы:
Откройте
стопорную
пластину
Вставьте
акустические
провода
Отпустите
стопорную
пластину
Фронтальная
правая
m
m
7
1
2
3
Тыло вая
левая
Тыло вая
правая
ВНИМАНИЕ:
Если вы планируете подключать к сабвуферу свои собственные колонки (не из комплекта
поставки), то, пожалуйста, используйте колонки только с таким же сопротивлением, как
оригинальные (сопротивление указано в разделе «Спецификации» этого Руководства
пользователя).
Не подсоединяйте более одной колонки к одному и тому же разъему.
Убедитесь, что на кабеле и разъемах нет никаких причин, могущих вызвать короткое
замыкание. Иначе, это может привести к поломке усилителя.
Особое внимание проявите при выборе места для усилителя в случае необходимости его
крепления на стене. Можно нанести вред себе и повредить аппаратуру, если установить ее в
месте активной жизнедеятельности.
41

УПРАВЛЕНИЕ АКУСТИЧЕСКОЙ СИСТЕМОЙ
ВКЛЮЧЕНИЕ И ВЫКЛЮЧЕНИЕ ПИТАНИЯ [POWER; STANDBY]
Прочно подсоедините
шнур электропитания
ACкрозетке
Включите акустическую систему и индикатор на передней панели сабвуфера
загорится зеленым, а уровень громкости, тон и порог слышимости звука будут установлены на
том же уровне, что и были, когдасистема выключалась в последний раз.
Нажмите кнопку на передней панели сабвуфера или на ПДУ, и акустическая система
перейдет в режим энергоснабжения, а индикатор на передней панели сабвуфера
мигнет.
Установите переключатель на задней панели сабвуфера в позицию (выключено), чтобы
выключить акустическую систему.
STANDBY
Установите
переключатель на
задней панели
сабвуфера в
позицию ON
(включено)
STANDBY
STANDBY
Нажмите кнопку
STANDBY
передней панели
сабвуфера или
соответствующую
кнопку на ПДУ
OFF
на
ВЫБОР ИСТОЧНИКА АУДИОСИГНАЛА [AUX/DVD; DVD IN; AUX IN ]
l
Вход DVD (5.1 каналы)
l
Вход AUX (стерео)
Нажимайте кнопку на передней
панели сабвуфера до тех пор, пока ни
загорится индикатор DVD на передней
панели сабвуфера.
Или нажмите кнопку выбора источника
аудио сигнала на ПДУ.
DVD/AUX
DVD IN
Нажимайте кнопку на передней
панели сабвуфера до тех пор, пока ни
загорится индикатор AUX на передней
панели сабвуфера.
Или нажмите кнопку выбора источника аудио
сигнала на ПДУ.
AUX IN
DVD/AUX
42
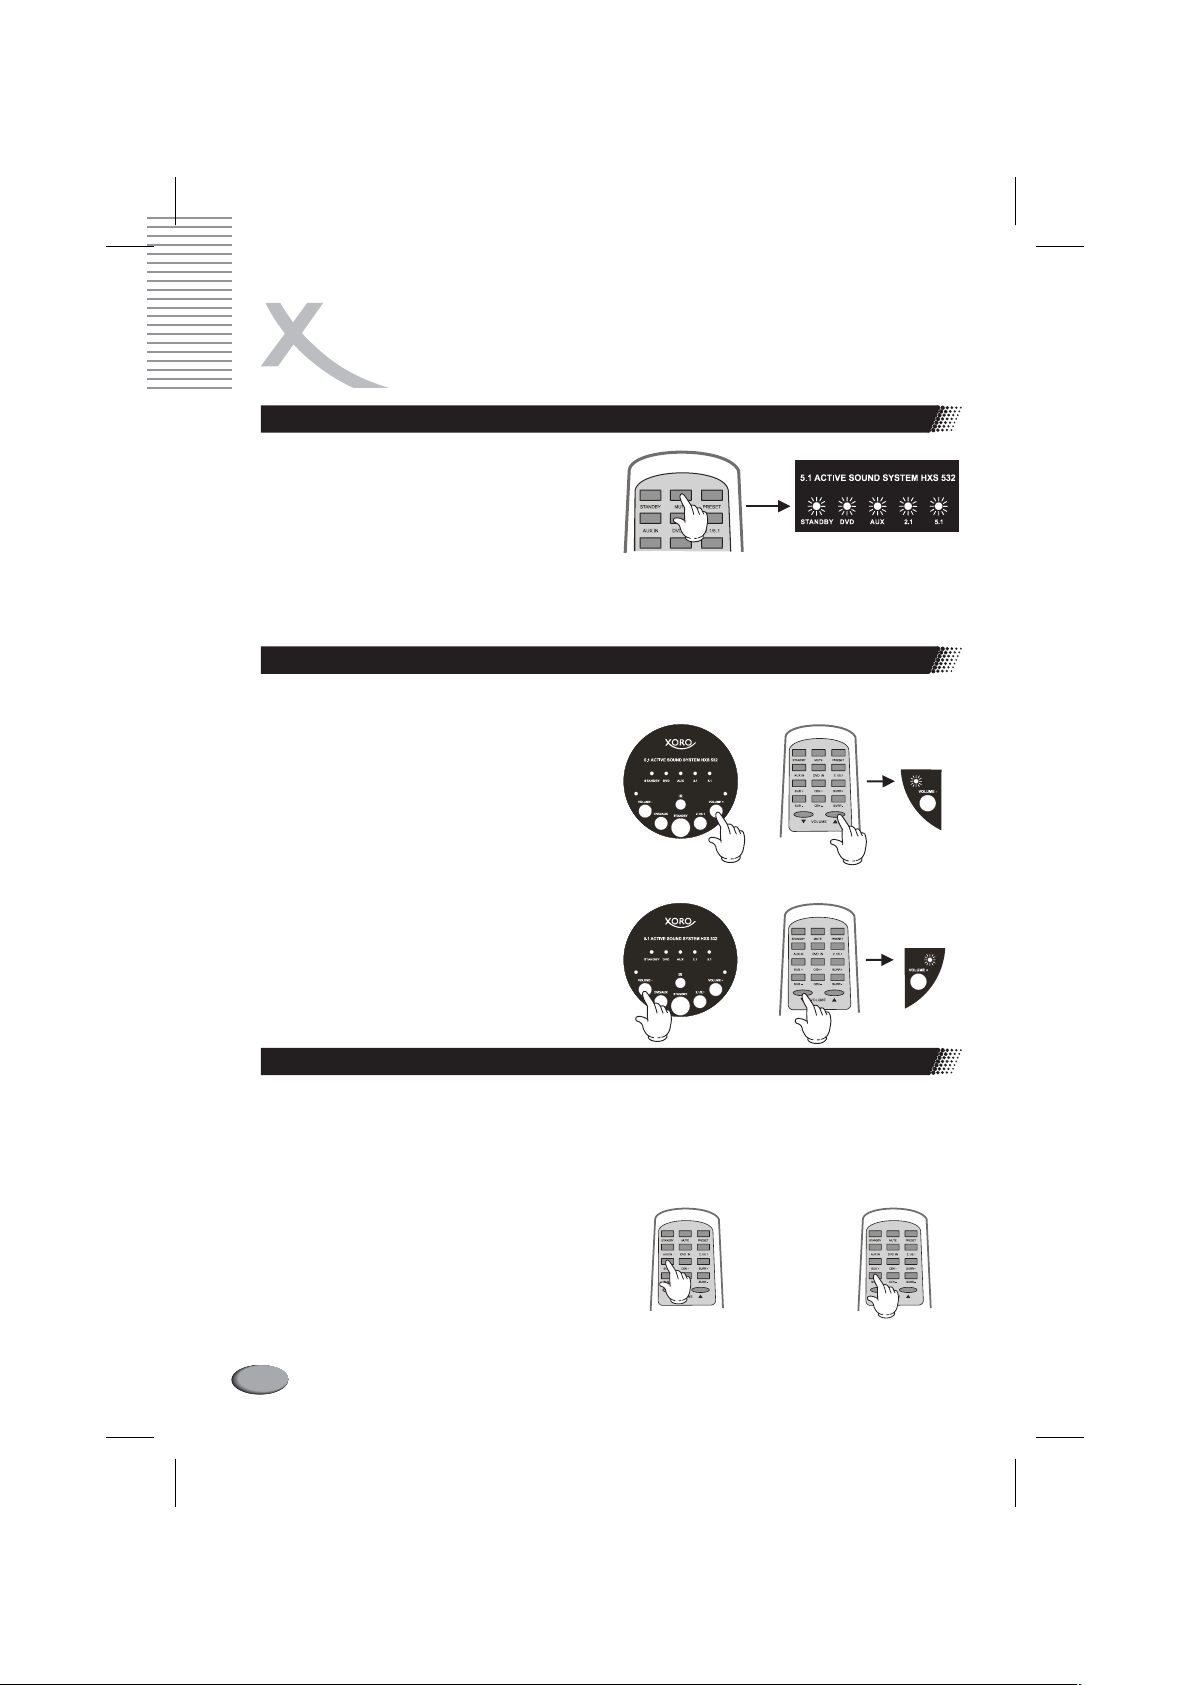
УПРАВЛЕНИЕ АКУСТИЧЕСКОЙ СИСТЕМОЙ
ВРЕМЕННОЕ ОТКЛЮЧЕНИЕ ЗВУКА [MUTE]
Нажмите кнопку на ПДУ.
Чтобы снова включить звук:
Нажмите кнопку еще раз;
l Нажмите одну из кнопок
на передней панели сабвуфера или
кнопки на ПДУ.
MUTE
MUTEl
VOLUME /pq
VOLUME+/-
В режиме
индикаторы
на передней панели
сабвуфера будут мигать.
MUTE
VOLUME+/-
РЕГУЛИРОВКА ОБЩЕЙ ГРОМКОСТИ [VOLUME +/-; VOLUME / ]
Чтобы увеличить или уменьшить общую
громкость акустической системы,
пожалуйста, ипользуйте кнопки
VOLUME+/-
сабвуфера или кнопки на
ПДУ следующим образом:
l
Нажмите кнопку
(VOLUME )
громкость;
l
Нажмите кнопку
(VOLUME )
общую громкость.
l
Когда вы будете нажимать кнопки
VOLUME+/VOLUME+/-
сабвуфера будут загораться
соответственно.
на передней панели
p
q
VOLUME /
VOLUME +
, чтобы увеличить общую
VOLUME -
, чтобы уменьшить
, то индикаторы
на передней панели
pq
Увеличение общей громкости
(-70дБ ~0дБ)
Уменьшение общей громкости
(0дБ ~ -70дБ)
pq
РЕГУЛИРОВКА ГРОМКОСТИ КАНАЛА САБВУФЕРА [SUB +/-]
Чтобы увеличить или уменьшить
громкость каналов сабвуфера,
пожалуйста, используйте кнопки
на ПДУ следующим образом:
llНажмите кнопку , чтобы
увеличить громкость;
Нажмите кнопку , чтобы
уменьшить громкость.
SUB+
SUB-
SUB+/-
Увеличение
громкости
канала
сабвуфера
(-70дБ ~0дБ)
43
Уменьшение
громкости
канала
сабвуфера
(0дБ ~ -70дБ)
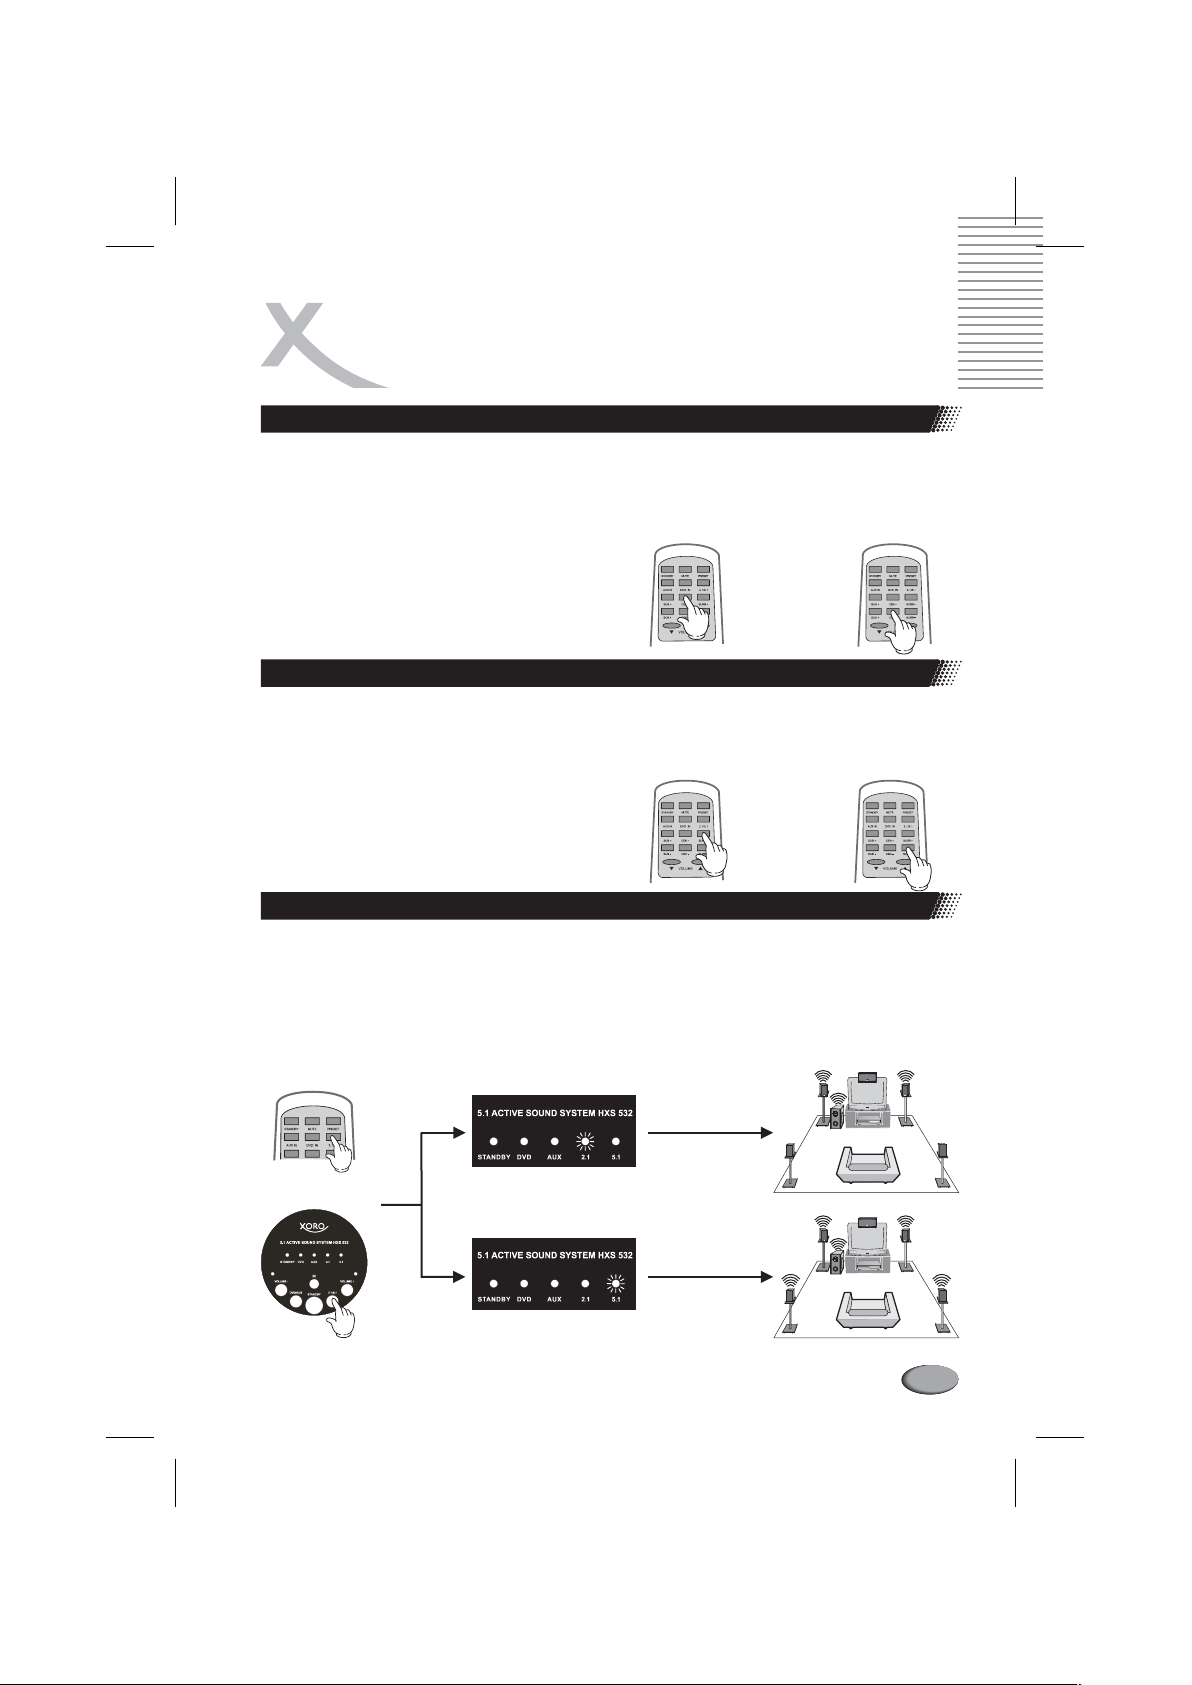
УПРАВЛЕНИЕ АКУСТИЧЕСКОЙ СИСТЕМОЙ
РЕГУЛИРОВКА ГРОМКОСТИ ЦЕНТРАЛЬНОГО КАНАЛА [CEN +/-]
Чтобы увеличить или уменьшить
громкость центрального канала,
пожалуйста, используйте кнопки
на ПДУ следующим образом:
l
Нажмите кнопку , чтобы
CEN+
CEN+/-
Увеличение
громкости
центрального
канала
(-70дБ ~0дБ)
Уменьшение
громкости
центрального
канала
(0дБ ~ -70дБ)
увеличить громкость;
Нажмите кнопку , чтобы
l
CEN-
уменьшить громкость.
РЕГУЛИРОВКА ГРОМКОСТИ ТЫЛОВЫХ КАНАЛОВ [SURR +/-]
Чтобы увеличить или уменьшить
громкость тыловых каналов, пожалуйста,
используйте кнопки на ПДУ
SURR+/-
следующим образом:
llНажмите кнопку , чтобы
SURR+
увеличить громкость;
Нажмите кнопку , чтобы
SURR-
уменьшить громкость.
Увеличение
громкости
тыловых каналов
(-70дБ ~0дБ)
Уменьшение
громкости
тыловых каналов
(0дБ ~ -70дБ)
ВЫБОР РЕЖИМА ЗВУЧАНИЯ [2.1/5.1]
Нажмите кнопку 2.1/5.1 на ПДУ несколько раз, чтобы выбрать режим звучания
акустической системы. Вы можете переключаться с режима 2.1. (левая и правая
фронтальные колонки плюс сабвуфер) на режим 5.1. (левая и правая фронтальные
колонки плюс левая и правая тыловые колонки плюс центральная колонка плюс
сабвуфер) или обратно с режима 5.1. на режим 2.1.
Режим 2.1 можетиспользоваться для воспроизведения сигнала от любого источника
(AUX илиDVD).
5
.
1
A
C
T
I
V
E
S
O
U
N
D
S
Y
S
T
E
M
H
X
S
5
3
2
Горит индикатор режима 2.1.
Горит индикатор режима .1.5
5
.
1
A
C
T
I
V
E
S
O
U
N
D
S
Y
S
T
E
M
H
X
S
5
3
2
44

УПРАВЛЕНИЕ АКУСТИЧЕСКОЙ СИСТЕМОЙ
ВОССТАНОВЛЕНИЕ ЗАВОДСКИХ УСТАНОВОК [PRESET]
Нажмите кнопку на ПДУ для восстановления
заводских установок общей громкости, громкости
центрального канала, тыловых каналов и канала
сабвуфера.
После нажатия кнопки уровень громкости всех
каналов будет установлен в соответствии с заводской
настройкой ~ -30дБ.
PRESET
PRESET
45
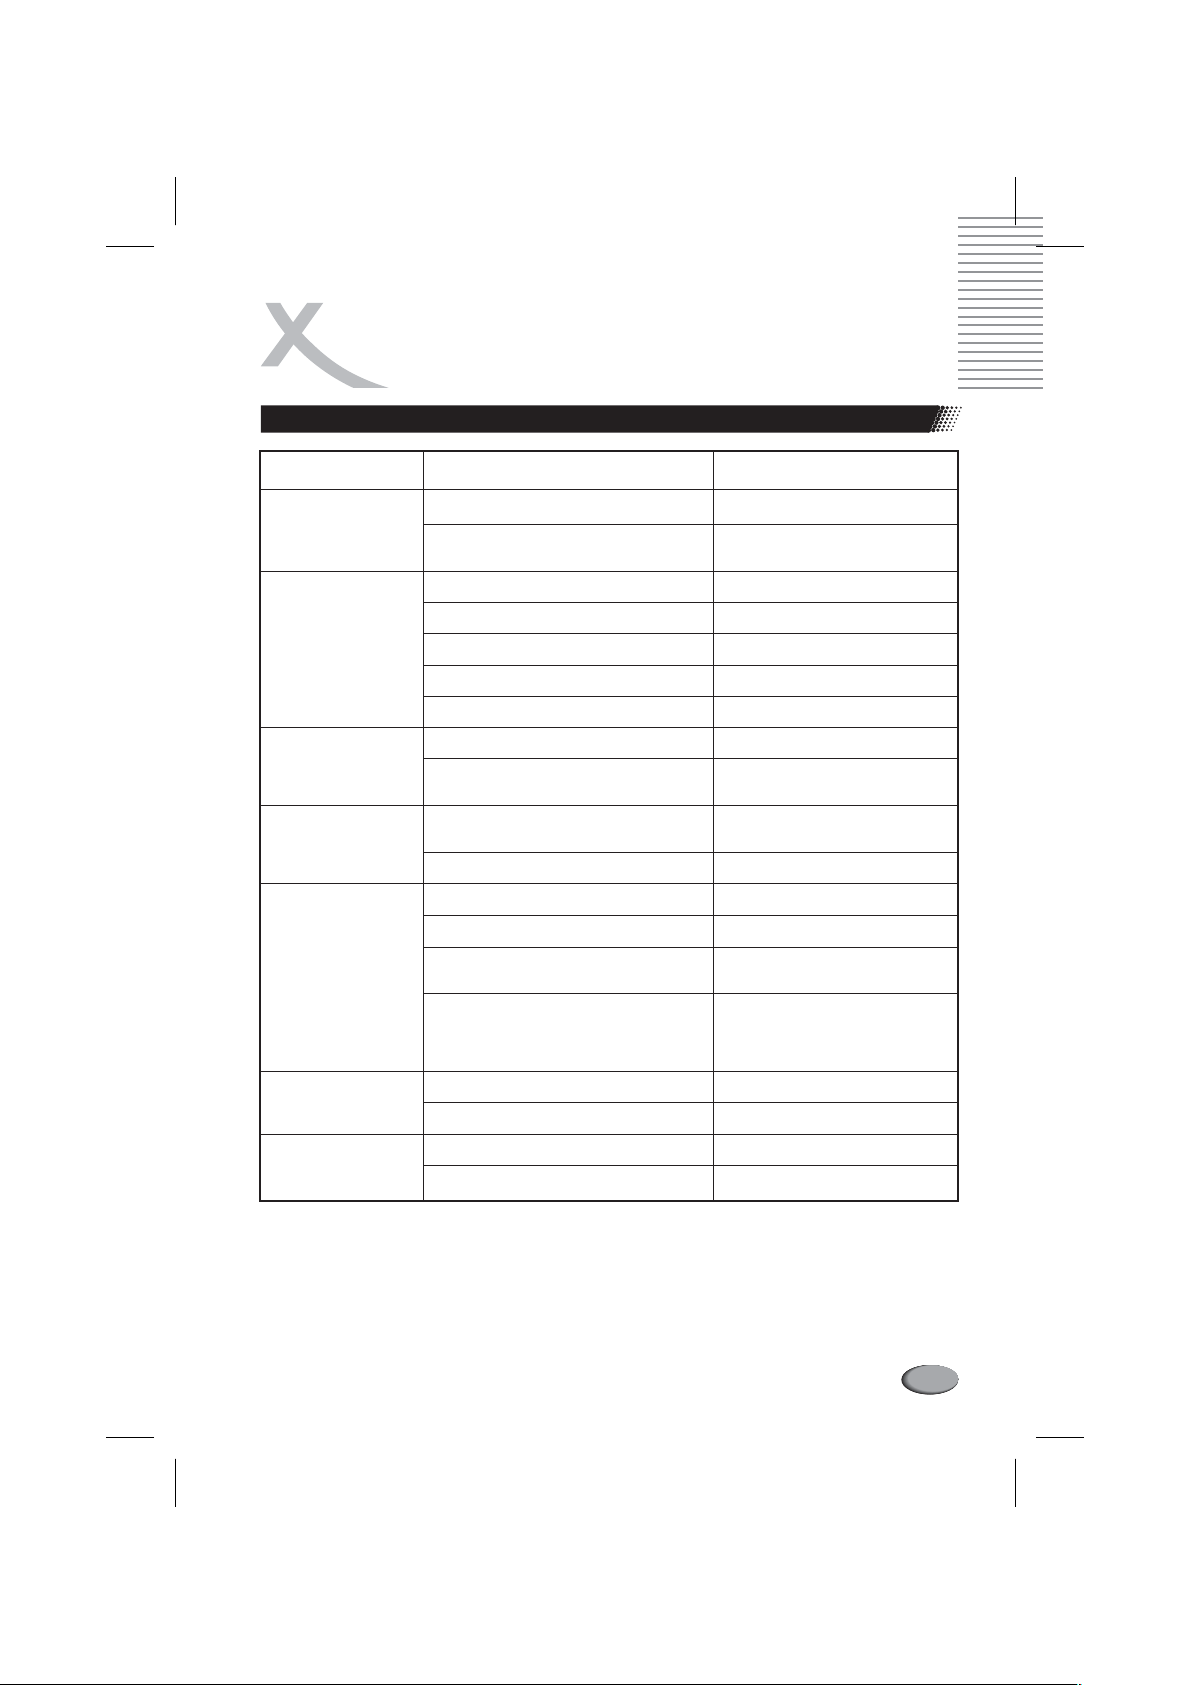
НЕИСПРАВНОСТИ
И СПОСОБЫ ИХ УСТРАНЕНИЯ
ВОЗМОЖНЫЕ ПРИЧИНЫ И СПОСОБЫ ИХ УСТРАНЕНИЯ
Неисправность
Отсутствие питания
Отсутствие звука
Система не
работает
Нетзвукаводной
из фронтальных
или тыловых
колонок
Нет звука в
центральной
колонке
Нет звука во
фронтальных
колонках
Нет звука в
тыловых колонках
Возможная причина
Сетевойшнурнеподключенк
электросети.
Переключатель POWER установлен в
положении OFF (выключено).
Уровень громкости установлен на
минимум.
Не подключен источник входного
сигнала.
Неправильно выбран источник
входного сигнала.
Система находится в режиме
Standby.
Отсутствует входной сигнал от
источника.
Сетевойшнурнеподключенк
электросети.
Переключатель POWER установлен в
положении OFF (выключено).
Нет соединения между источником
сигнала и акустической системой.
Нет соединения между колонками и
сабвуфером.
Уровень громкости центрального
канала установлен на минимум.
Не подключены провода к
центральной колонке.
На DVD проигрывателе установлен
режим воспроизведения 2.1.
Отсутствует входной сигнал для
центрального канала.
Уровень громкости фронтальных
каналов установлен на минимум.
Не подключены провода к
фронтальным колонкам.
Уровень громкости тыловых каналов
установлен на минимуме.
Не подключены провода к тыловым
колонкам.
Предпринимаемые действия
Подключите сетевой шнур к
электросети.
Установите переключатель
POWERвположениеON
(включено).
Настройте уровень громкости.
Подключите источник входного
сигнала.
Выберите подключенные
источник входного сигнала.
Нажмите кнопку Standby.
Включите питание на источнике
входного сигнала.
Подключите сетевой шнур к
электросети.
Установите переключатель
POWERвположениеON
(включено).
Проверить соединение между
источником сигнала и
акустической системой.
Проверить соединение между
колонками и сабвуфером
Настройте уровень громкости.
Подключить соответствующие
провода.
Установить режим
воспроизведения 5.1 на DVD
проигрывателе.
Это нормально при
воспроизведения сигнала от
источника, подключенного
через разъемы AUX и для
воспроизведения в режиме 2.1.
Настройте уровень громкости.
Подключить соответствующие
провода.
Настройте уровень громкости.
Подключить соответствующие
провода.
46

ПРИЛОЖЕНИЕ
СПЕЦИФИКАЦИЯ И ТЕХНИЧЕСКИЕ ПАРАМЕТРЫ
Общая информация
...............................
Тип 5.1 акустическая система со встроенным многоканальным усилителем
Напряжение питания 220 В переменный ток 50/60 Гц
Энергопотребление 180 Вт
Общий вес 34,8 кг
Размеры (ДхШхВ) 652х465х490мм
...............................................................................................................................
....................................................................
................................................................................................................
...........................................................................................
Входные параметры усилителя
Аналоговые входы 5.1 и 2.0
Максимальное входное напряжение:
Вход стерео канала (AUX IN) 350 мВ
Вход 5.1. (DVD IN). Фронт, тыл и центр................................................................................300 мВ
Вход 5.1. (DVD IN). Канал сабвуфера ..................................................................................220 мВ
Выходные параметры усилителя
Номинальная выходная мощность (RMS):
THD 1% ....................................................................................................................................145 Вт
THD 10% ..................................................................................................................................180 Вт
Фронтальные каналы (RMS, измеренная при частоте 1 кГц.):
THD 1% ................................................................................................................................2 х 14 Вт
THD 10% ..............................................................................................................................2 х 20 Вт
Тыловые каналы (RMS, измеренная при частоте 1 кГц.):
THD 1% ................................................................................................................................2 х 14 Вт
THD 10% ..............................................................................................................................2 х 20 Вт
Центральный каналы(RMS, измеренная при частоте 1 кГц.):
THD 1% ................................................................................................................................2 х 14 Вт
THD 10% ..............................................................................................................................2 х 20 Вт
Канал сабвуфера (RMS, измеренная при частоте 100 Гц.):
THD 1% ................................................................................................................................1 х 75 Вт
THD 10% ..............................................................................................................................1 х 80 Вт
Отношение сигнал/шум ...........................................................................................................70дБ
Полный коэффициент гармонических искажений:
THD (1 Вт) ..................................................................................................................................< 1%
Разъемы усилителя
Вход 5.1..............................................................................Аналоговый 5.1. линейный вход (RCA)
Вход 2.0 ........................................................................Аналоговый стерео линейный вход (RCA)
Выход .............................................................................................Усиленный выход 5.0 (зажимы)
Разъем плавкого предохранителя
Переключатель питания
Разъем для подключения кабеля питания
..............................................................................................................
................................................................................................
47

НЕИСПРАВНОСТИ
И СПОСОБЫ ИХ УСТРАНЕНИЯ
СПЕЦИФИКАЦИЯ И ТЕХНИЧЕСКИЕ ПАРАМЕТРЫ
Колонки фронтальных каналов
2-х канальный открытий громкоговоритель, изготовленный из MDF.
Низкочастотный динамик .................................................................1 х бумажная диафрагма (4”)
Высокочастотный динамик .................................................................................1 х майлар (0.75”)
Частотная характеристика ........................................................................................90 Гц ~ 20 кГц
Импеданс динамика (номинальный)........................................................................................4 Ом
Максимальная шумовая мощность .................................................................................10 ~ 45 Вт
Размеры (ДхШхВ)...........................................................................................150 х 260 х 167 мм
Вес нетто .............................................................................................................................2 х 2,5 кг
Колонки тыловых каналов
2-х канальный закрытий громкоговоритель, изготовленный из MDF.
Низкочастотный динамик .................................................................1 х бумажная диафрагма (4”)
Высокочастотный динамик .................................................................................1 х майлар (0.75”)
Частотная характеристика ......................................................................................100 Гц ~ 20 кГц
Импеданс динамика (номинальный)........................................................................................4 Ом
Максимальная шумовая мощность .................................................................................10 ~ 45 Вт
Размеры (ДхШхВ)...........................................................................................150 х 260 х 167 мм
Вес нетто .............................................................................................................................2 х 2,7 кг
Колонка центрального канала
2-х канальный открытий громкоговоритель, изготовленный из MDF.
Низкочастотный динамик .................................................................2 х бумажная диафрагма (4”)
Высокочастотный динамик .................................................................................1 х майлар (0.75”)
Частотная характеристика ........................................................................................90 Гц ~ 20 кГц
Импеданс динамика (номинальный)........................................................................................4 Ом
Максимальная шумовая мощность .................................................................................10 ~ 50 Вт
Размеры (ДхШхВ)...........................................................................................390 х 150 х 167 мм
Вес нетто .............................................................................................................................1 х 3,7 кг
Сабвуфер
Закрытый громкоговоритель, изготовленный из MDF.
Низкочастотный динамик .................................................................1 х бумажная диафрагма (8”)
Частотная характеристика........................................................................................35 Гц ~ 100 Гц
Импеданс динамика (номинальный)........................................................................................4 Ом
Максимальная шумовая мощность .................................................................................10 ~ 50 Вт
Размеры (ДхШхВ)...........................................................................................230 х 402 х 442 мм
Вес нетто ...........................................................................................................................1 х 14,1 кг
48

ПРИЛОЖЕНИЕ
СЛОВАРЬ ТЕРМИНОВ
AC3
См. Dolby Digital.
Amplifier (AMP).
Усилительмощности.
Центральный компонент системы домашнего
кинотеатра: он принимает сигналы от источников,
подключенных к нему, позволяет выбирать тот
или иной источник, регулировать уровень
громкости. Усилитель включает в себя декодер
многоканального аудиосигнала, усиливает этот
сигнал, увеличивая его амплитуду, и подает на
акустические системы домашнего кинотеатра.
Amplifier Classes.
Классификация усилителей мощности.
Усилители мощности разделяются по классам в
зависимости структуры своего выходного
каскада. Классификация основывается на
продолжительности подачи напряжения на
выходное устройство. Кроме того,
классификация может производиться в терминах
напряжения смещения, т.е. постоянного
напряжение подаваемого усилителем на
выходное устройство при отсутствии входного
сигнала.
ClassA.
Класс А.
Большинство усилителей этого класса работают
в однотактном режиме. Напряжение смещения
составляет приблизительно половину
запирающего, а амплитуда сигнала меньше или
равна напряжению смещения.
Таким образом, основным признаком класса А,
является постоянное наличие выходного
напряжения, даже при отсутствии сигнала на
входе, т.е. неэффективное использование
питания, что определяет и минимальный КПДоколо 25%. Усилители класса А чрезвычайно
большие, тяжелые и очень сильно греются при
работе. Положительной характеристикой
усилителей класса А являются очень низкие
искажения, особенно на малой громкости.
Class B.
Класс B.
В классе В напряжение смещения равно
запирающему, а амплитуда сигнала меньше или
равна напряжению смещения. В этом случае
транзистор проводит только во время
положительных полуволн сигнала. Такие
усилители обычно работают в двухтактном
режиме (когда каждая полуволна входного
сигнала проводится своим транзистором). В
отличие от класса А, постоянная составляющая
тока отсутствует, и когда на входе нет сигнала оба транзистора заперты.
Таким образом, основным признаком класса B,
является полное отсутствие выходного
напряжения, при отсутствиисигнала на входе, т.е.
эффективное использование питания и
максимальный КПД- около 75%. Однако,
искажения выходного сигнала, особенно малого
уровня, очень высоки.
ClassAB.
КлассAB.
Класс АВ (как видно из обозначения) - гибрид
классов А и В. Напряжение смещения больше
половины, но меньше целого значения
запирающего, а амплитуда сигнала не
превышает напряжение смещения. При этом
положительная полуволна сигнала проводится
полностью, а отрицательная - искажается. В итоге
при малых сигналах выходной каскад усилителя
работает фактически работает в режиме A, а в
режим B переходит при достаточно сильном
возбуждении. В отсутствие сигнала через
выходной каскад протекает некоторый ток покоя,
иногда весьма значительный. Такая схема
меньше искажает сигнал, чем схема класса В, и
имеет меньшую постоянную составляющую тока
(что существенно повышает КПДпо сравнению со
схемой класса А). К ее достоинствам можно
отнести и возможность выбора оптимального
соотношения между величиной искажений и КПД
(изменением напряжения смещения в указанных
пределах). КПД таких усилителей составляет
примерно 50% и они работают в двухтактном
режиме. Это - наиболее популярный класс
усилителейдля аудиоаппаратуры.
Class D.
Класс D.
На выходной каскад усилителя класса D
(напряжение смещения которого должно быть
больше напряжения запирания) подается
последовательность прямоугольных импульсов,
прошедших широтно-импульсную модуляцию
сигналом, который необходимо усилить. Эта
последовательность отпирает и запирает каскад,
вынуждая его работать в ключевом режиме.
Таким образом, потери в закрытом или полностью
открытом состоянии минимальны, а ток,
поступающий на выходное устройство при
отсутствии сигнала, равен нулю Значения КПД
для этого класса теоретически составляют до
100%.
49

ПРИЛОЖЕНИЕ
СЛОВАРЬ ТЕРМИНОВ
AC3
См. Dolby Digital.
Amplifier (AMP). Усилитель мощности.
Центральный компонент системы домашнего
кинотеатра: он принимает сигналы от источников,
подключенных к нему, позволяет выбирать тот
или иной источник, регулировать уровень
громкости. Усилитель включает в себя декодер
многоканального аудиосигнала, усиливает этот
сигнал, увеличивая его амплитуду, и подает на
акустические системы домашнего кинотеатра.
Amplifier Classes. Классификация усилителей
мощности.
Усилители мощности разделяются по классам в
зависимости структуры своего выходного
каскада. Классификация основывается на
продолжительности подачи напряжения на
выходное устройство. Кроме того,
классификация может производиться в терминах
напряжения смещения, т.е. постоянного
напряжение подаваемого усилителем на
выходное устройство при отсутствии входного
сигнала.
ClassA. Класс А.
Большинство усилителей этого класса работают
в однотактном режиме. Напряжение смещения
составляет приблизительно половину
запирающего, а амплитуда сигнала меньше или
равна напряжению смещения.
Таким образом, основным признаком класса А,
является постоянное наличие выходного
напряжения, даже при отсутствии сигнала на
входе, т.е. неэффективное использование
питания, что определяет и минимальный КПДоколо 25%. Усилители класса А чрезвычайно
большие, тяжелые и очень сильно греются при
работе. Положительной характеристикой
усилителей класса А являются очень низкие
искажения, особенно на малой громкости.
Class B. КлассB.
В классе В напряжение смещения равно
запирающему, а амплитуда сигнала меньше или
равна напряжению смещения. В этом случае
транзистор проводит только во время
положительных полуволн сигнала. Такие
усилители обычно работают в двухтактном
режиме (когда каждая полуволна входного
сигнала проводится своим транзистором). В
отличие от класса А, постоянная составляющая
тока отсутствует, и когда на входе нет сигнала оба транзистора заперты.
Таким образом, основным признаком класса B,
является полное отсутствие выходного
напряжения, при отсутствиисигнала на входе, т.е.
эффективное использование питания и
максимальный КПД- около 75%. Однако,
искажения выходного сигнала, особенно малого
уровня, очень высоки.
ClassAB. Класс AB.
Класс АВ (как видно из обозначения) - гибрид
классов А и В. Напряжение смещения больше
половины, но меньше целого значения
запирающего, а амплитуда сигнала не
превышает напряжение смещения. При этом
положительная полуволна сигнала проводится
полностью, а отрицательная - искажается. В итоге
при малых сигналах выходной каскад усилителя
работает фактически работает в режиме A, а в
режим B переходит при достаточно сильном
возбуждении. В отсутствие сигнала через
выходной каскад протекает некоторый ток покоя,
иногда весьма значительный. Такая схема
меньше искажает сигнал, чем схема класса В, и
имеет меньшую постоянную составляющую тока
(что существенно повышает КПДпо сравнению со
схемой класса А). К ее достоинствам можно
отнести и возможность выбора оптимального
соотношения между величиной искажений и КПД
(изменением напряжения смещения в указанных
пределах). КПД таких усилителей составляет
примерно 50% и они работают в двухтактном
режиме. Это - наиболее популярный класс
усилителейдля аудиоаппаратуры.
Class D. КлассD.
На выходной каскад усилителя класса D
(напряжение смещения которого должно быть
больше напряжения запирания) подается
последовательность прямоугольных импульсов,
прошедших широтно-импульсную модуляцию
сигналом, который необходимо усилить. Эта
последовательность отпирает и запирает каскад,
вынуждая его работать в ключевом режиме.
Таким образом, потери в закрытом или полностью
открытом состоянии минимальны, а ток,
поступающий на выходное устройство при
отсутствии сигнала, равен нулю Значения КПД
для этого класса теоретически составляют до
100%.
50

ПРИЛОЖЕНИЕ
СЛОВАРЬ ТЕРМИНОВ
Class G. КлассG.
Усилители этого класса имеют изменяемое
напряжение питания. Особенность усилителя в
том то, что он содержит два каскада, работающих
при разных напряжениях питания. Первый каскад
(использующий источник питания с низким
уровнем напряжения) работает, когда входной
сигнал не превышает определенного порогового
значения. Когда входной сигнал начинает
превышать это значение, включается второй
каскад (работающий от источника с высоким
уровнем напряжения). Амплитуда музыкального
(или голосового) сигнала, как правило,
колеблется в определенном интервале значений,
поэтому такой способ увеличивает КПД
усилителя по сравнению с классом В. Усилитель
большую часть времени работает как
относительно маломощный (класса В или АВ),
изредка подключая мощный второй каскад.
Типичное соотношение напряжений питания
первого и второго каскадов - один кдвум.
Class H. КлассH.
Класс Н (который иногда обозначается как класс
А+) схож с классом G, но отличается от него тем,
что не имеет двух установленных уровней
напряжения. Напряжение питания в этом классе
определяется уровнем входного сигнала, тем
самым обеспечивая оптимальную работу
транзисторов. Усилитель этого класса содержит
два каскада - первый класса В (получающий
питание от обычного источника) и второй,
напряжение питания которого зависит от уровня
входного сигнала. КПД усилителей такого класса
сравним с КПДусилителейкласса G.
Amplitude. Амплитуда.
Уровень (воспринимаемый как громкость)
электрического или акустического сигнала.
Обычно отображается как вертикальный столбик
при графическом отображениизвуковых волн.
Bandwidth. Полоса пропускания.
Диапазон частот, обрабатываемых или
пропускаемых электронной системой. Обычно
описываетсяследующим образом 20 ~20 000 Гц ±
3 дБ . Такой канал пропускает частоты от 20 Гц
(низкие частоты) до 20 кГц (нижние высокие
частоты). Диапазон частот, воспринимаемый
человеческим слухом, находится между 20 Гц и
20 кГц.
Band-Pass Enclosure. Отсечение полосы
пропускания.
Многокамерная фазоинверторная система
передачи звука.
Band-Pass Filter. Фильтрполосыпропускания.
Электрическая схема, обеспечивающая
пропускание только средних частот.
Bass. Басы.
Низкочастотные звуки с частотой порядка 160 Гц
и ниже. А так же струнный инструмент,
предназначенный для воспроизведения
низкочастотных звуков. А так же голос, более
низкий, чем баритон.
Bass Reflex. Фазоинвертор.
Тип акустических колонок, имеющих отверстие в
корпусе, через которое излучается звук в области
нижних частот. Громкоговорители в
фазоинверторном акустическом оформлении
обладают большей глубиной басапо сравнению с
громкоговорителями в закрытом корпусе (infinite
baffle), но, как правило, отличаются худшей
управляемостью баса, то есть хуже передают
переходные процессы в области нижних частот.
Другое название громкоговорителей в
фазоинверторном акустическом оформлении "vented" или "ported".
Center Channel. Центральныйканал.
В многоканальном аудиосистеме домашнего
кинотеатра декодированный из стереосигнала
звук передается на акустическую систему,
расположенную перед слушателем, между
громкоговорителями левого и правого каналов,
для усиления голосов и других звуковых
эффектов, воспроизводимого саундтрека. Почти
все диалоги в кинофильмах воспроизводятся
центральным каналом. Используется в
автомобильных аудио системах для уменьшения
эффекта несимметричного стерео звучания,
возникающего в следствии специфики
размещения слушателя в автомобиле.
Channel Balance. Балансканалов.
В стереосистемах это относительные уровни
громкости правого и левого каналов. При
правильном балансе уровни громкости левого и
правого каналов должны быть одинаковыми в
равноудаленной от них области. В
многоканальной аудиосистеме домашнего
кинотеатра необходимо обеспечить корректный
баланс между акустическими системами.
51

ПРИЛОЖЕНИЕ
СЛОВАРЬ ТЕРМИНОВ
Clipping. Усечение.
При усечении пиков выходного сигнала усилителя
возникают хорошо заметные на слух нелинейные
искажения, слышимые как хрип. Когда на вход
усилителя поступает слишком большой сигнал,
ему не хватает мощности для корректного
воспроизведения выходного сигнала. Обычно
усеченный сигнал обладает чрезмерной
высокочастотной энергией. В результате звуки
становятся жесткими и резкими. Поэтому
усечение является одной из наиболее частых
причин «сгорания» высокочастотных
акустических систем. Даже маломощные
усилители и ресиверы, попавшие в режим
усечения, могут повредить высокочастотные
акустические системы, которые в противном
случае могли бы продолжать нормально
функционировать.
Crossover. Кроссовер, разделительный
фильтр.
Электронная схема, разделяющая диапазон
частот на несколько частей. Кроссоверы
используются в акустических системах для
перенаправления звука различной частоты на
соответствующие устройства воспроизведения.
Кроме того, многие кроссоверы содержат
разнообразные дополнительные фильтры,
предназначенные для стабилизации нагрузки
имепеданса (волнового сопротивления)
акустических систем и/или улучшения частотных
характеристик. Некоторые кроссоверы
обеспечивают контроль уровня сигнала для
ослабления составляющих сигнала с
определеннымичастотами.
Cross-Talk.Переходное затухание.
Разделение каналов, или переходное затухание величина, указывающая, насколько сигнал
одного канала защищен от влияния сигнала
другого канала. При плохом разделении каналов
звук из одного канала просачивается в другой.
Классический пример - сигнал из центрального
канала формата "Dolby Surround" проникает в
тыловые каналы. При хорошем разделении
каналов достигается более определенная
локализация кажущихся источников звука.
Damping. Демпинг.
Параметр, описывающий способность
акустических компонентов полностью прекратить
свою работу при исчезновении входного сигнала.
Например, при воспроизведении барабанных
ударов, звук сначала достигает пиковой
величины, а затем затухает и в течении
определенного времени его не должно быть
вообще. Аудио компоненты, которые позволяют
звуку затухать слишком медленно, имеют плохой
демпинг и ухудшают четкость воспроизведения
звука. Аудио компоненты с хорошим показателем
демпинга не позволяют звуковому сигналу
достичь своего пика и обеспечивают его быстрое,
почти мгновенное затухание. В результате
системы с очень низким демпингом
воспроизводят неразборчивый грохочущий звук,
а системы с очень высоким демпингом
обеспечиваютсухое безжизненноезвучание.
Decibel (dB). Децибел(дБ).
Наш слух воспринимает различные уровни
громкости в логарифмической манере. Чем
интенсивней растет громкость звучания, тем
менее чувствительными становятся наши уши. 1
дБ соответствует минимально уловимому
изменению громкости, 3 дБ соответствуют
средне уловимому изменению громкости, а 10 дБ
соответствует очевидному для слуха изменению
громкости.
- Порог слышимости:0 дБ;
- Болевой порог: 130дБ;
- Шепот: 15-25 дБ;
- Тихий фон: 35дБ;
- Обычный уровень фона в офисе или дома:40-60
дБ;
- Нормальный уровеньразговора: 65-70 дБ;
- Кульминация оркестрового исполнения:105 дБ;
- Рок музыка: 120 дБ;
- Реактивный самолет: 140-180 дБ.
Distortion. Искажение.
Любые нежелательные расхождения между
оригинальным сигналом и сигналом на выходе
электронного устройства. Любые изменения,
вносимые в музыкальный сигнал. Причиной
искажений может являться перегрузка входного
каскада усилителя, но многие другие формы
искажений, такие как искажение гармонических
характеристик присущи большинству нормально
работающих усилителей.
52

ПРИЛОЖЕНИЕ
СЛОВАРЬ ТЕРМИНОВ
Dolby Digital.
Dolby Digital® 5.1 - это формат передачи и
хранения многоканальной 5.1 звуковой
информации, применяемый при записи фильмов
на DVD и при трансляции цифрового и
спутникового телевидения. Пятиканальная
система поддерживает центральный, правый
фронтальный, правый тыловой, левый
фронтальный и левый тыловой каналы, а так же
канал сабвуфера. Обработка всех сигналов
производится в цифровом формате. В отличие от
предшествовавших Dolby Surround® и Pro Logic®,
которые не предполагали раздельного
многоканального кодирования и ограничивали
частоту тыловых каналов в пределах 100-7 000
Гц., в формате Dolby Digital® звуковая запись
кодируется в виде 6-ти независимых каналов с
переменным от 1/3 до 1/9 коэффициентом сжатия
исходного материала и обеспечивается
воспроизведение частот в пределах 20-20КГц на
всех пяти каналах. А стандарт AC3 служит для
воспроизведения сверхнизких частот через канал
сабвуфера.
Dolby Digital exSurround.
Этот формат, называемый так же и Dolby Digital
6.1, получается после добавления центрального
тылового канала к существующим центральному,
фронтальным и тыловым каналам. Для
воспроизведения музыки в этом формате
требуется соответствующий процессор 6.1 в
усилителе или ресивере и DVD проигрыватель,
поддерживающий кодировку звука вформате 6.1.
Dome Tweeter. Купольный высокочастотный
громкоговоритель.
Высокочастотный акустический
громкоговорительс купольной диафрагмой.
DTS
Система цифрового кинотеатра. Аналогичный
Dolby Digital® 5.1 формат передачи и хранения
многоканальной 5.1 звуковой информации.
Отличие в фиксированном коэффициентом
сжатия исходного материала -1/3, что в конечном
итоге обеспечивает более высокое качество
воспроизведения исходной звуковой
информации. В соответствии со спецификациями
формата DTS * применяется 20-битное
кодирование с диапазоном частот от 20Гц до
20кГц для фронтального, центрального и
тыловых каналов, и до 80Гц - для канала
низкочастотных спецэффектов.
Dynamic Range. Динамическийдиапазон.
Разница между уровнями самых тихих и самых
громких звуков, являющихся частью
музыкального сигнала, звуков, которые могут
быть воспроизведены акустической системой без
искажения. Обычно описывается числом
децибелов. В устной речи этот диапазон не редко
превышает 40 дБ, в музыке он максимален при
оркестровом исполнении и может достигать 75
дБ.
Dynamics. Динамика.
В области музыки этот термин используется для
описания характеристики исполнения с
различными степенями громкости и плавности
звучания.
Efficiency Rating. Оценкаэффективности.
Параметр акустической системы, описывающий
соотношение уровня выходного сигнала,
измеряемого на предписанном расстоянии, со
стандартным уровнем электрической энергии,
потребляемойакустической системой.
Equalizer.Эквалайзер.
Эквалайзер, или частотный корректор устройство, изменяющее тональный баланс при
записи и воспроизведении звука. Регуляторы
тембра низких и высоких частот являются
разновидностью эквалайзера.
Extension. Граничная частота.
Параметр, определяющий самые низкие или
максимально высокие частоты звука, которые
способен воспроизводить аудиокомпонент.
Нижняя граничная частота определяет самую
нижнюю частоту, которую может воспроизводить
система, а верхняя граничная частота
определяет самую высокую, которую может
воспроизводить система.
Filter.Фильтр.
Электронная схема или механическое
устройство, которое выборочно подавляет
сигналы определенных частот или уменьшает их
амплитуду, т.е. приглушает их.
Flat Response. Плоский отклик.
Точное воспроизведение аудиосигнала, а именно
допущение изменения выходного уровня менее
чем на 1 дБ (ниже или выше) от среднего уровня
аудиоспектра.
Термином "плоский" характеризуют также
недостатокглубины звуковой сцены.
53

ПРИЛОЖЕНИЕ
СЛОВАРЬ ТЕРМИНОВ
FreeAir Resonance.
Естественное звучание музыки при
воспроизведении на открытом пространстве.
Frequency.Частота.
Число периодов за одну секунду. Измеряется в
герцах (Гц) или циклах в секунду (cps). Звуковой
сигнал частотой 1000 Гц (1 кГц) означает 1000
периодов синусоидального сигнала всекунду.
Человек субъективно воспринимает частоту как
высоту или тон сигнала. (Например 440 Гц = А).
Область человеческого восприятия лежит в
пределах20 ~ 20 000 Гц (20 Гц~ 20 кГц).
Full-Range Speaker. Широкополосный
громкоговоритель
Широкополосный или полнополосный
громкоговоритель - громкоговоритель,
воспроизводящий сигналы во всех диапазонах:
низкочастотном, среднечастотном и
высокочастотном.
Gain. Коэффициент усиления.
Параметр, показывающий, во сколько раз
выходной сигнал отличается от входного.
Измеряется в дБ. (Например, Коэффициент
усиления = +13 дБ) или разах усиления.
Например об усилителе, увеличивающем
напряжение сигнала с0,1 В до1 В, говорят, что его
коэффициент усиления 10.
Headrom.
Способность усилителя кратковременно
повышать свою номинальная мощность для
воспроизведения музыкальных пиков без
искажений. Этот показатель существенно
зависит от источника питания, используемого в
усилителе.
Herz. Герц (Гц.).
Единица измерения частоты, или количество
периодов в секунду. Иногда используется и
старая терминология Cycles Per Second
(количество циклов в секунду) или CPS. 20 Гц =
20 CPS. Килогерц (кГц) - тысяча периодов в
секунду.
High Pass Filter.Фильтр верхних частот.
Фильтр, пропускающий высокие частоты и
задерживающий низкие. Другое название - "lowcut filter", обрезной фильтр нижних частот. Фильтр
высоких частот часто встречается в A/Vресиверах и A/V-предварительных усилителях
для удаления низких частот из сигнала
фронтальных громкоговорителей при
использовании сабвуфера.
Home Theater. Домашний кинотеатр.
Аудио система, разработанная для
воспроизведения высококачественного звука,
имитирующая звучание в кинотеатре, при
просмотре фильмов в домашних условиях. Ее
минимальный комплект включает ресивер,
поддерживающий стандарт воспроизведения
Dolby Pro Logic®, левый и правый фронтальные
громкоговорители, центральный
громкоговоритель и два тыловых
громкоговорителя. Если добавить сабвуфер и
тыловой центральный громкоговоритель, а так же
цифровой формат передачи звука, подобный
Dolby Digital®, то можно добиться радикального
улучшения качества воспроизведения звукового
сопровождения фильмов.
Hum. Шум.
Электрический шум (помехи), который
выражается в устойчивом низкочастотном
сопровождающем тоне.
Impedance. Импеданс.
Электрическое сопротивление измеряется в
Омах. Громкоговорители обычно имеют
сопротивление порядка 4 или 8 Ом. Однако,
громкоговорители это регулируемые устройства
и громкоговоритель с номинальным
сопротивлением 8 Ом можем изменять
сопротивление от 4 до 60 Ом, в зависимости от
воспроизводимого частотного диапазона. Кривая
переменного сопротивления индивидуальна для
каждой модели громкоговорителя, что делает
невозможным разработку идеального фильтра
высоких частот пригодного, для любого
громкоговорителя. Активные устройства, такие
как усилители, имеют входной импеданс в
пределах 10 000 100 000 Ом и он не зависит от
воспроизводимой частоты звука. При
согласованном соединении источника и
приемника сигнала сопротивление приемника в
несколько раз превышает сопротивление
источника.
Input Overload Distortion. Искажения из-за
перегрузки входа.
Большие нелинейные искажения, возникающие
из-за слишком высокого уровня входного сигнала
и передающиеся на выходы усилителя или
ресивера. Их нельзя исправить простой
регулировкой громкости звука.
54

ПРИЛОЖЕНИЕ
СЛОВАРЬ ТЕРМИНОВ
Jitter.Джиттер. Неустойчивая синхронизация.
Временная нестабильность тактовых импульсов,
синхронизирующих работу отдельных элементов
цифровой аудиосистемы. Генератор тактовых
импульсов обычно находится в аналогоцифровом преобразователе и задает моменты
взятия отсчетов звукового сигнала. При
воспроизведении цифрового сигнала тактовые
импульсы задают время преобразования
цифровых отсчетов в аналоговый сигнал.
Джиттер ухудшает качество звучания.
Kilohertz. Килогерц (кГц).
Одна тысяча герц.
Line Level. Линейныйуровень.
Зуковой сигнал с амплитудой от 1 до 2 В.
Линейные сигналы поступают с одного
аудиокомпонента на другой через межблочные
кабели. Противоположность - speaker level сигнал более высокого уровня, предназначенный
для подачи на громкоговоритель.
Low Pass Filter. Фильтр нижнихчастот.
Cхема, устраняющая средние и высокие частоты
из звукового сигнала. Называется также high-cut
filter. Большинство сабвуферов имеют
встроенные фильтры нижних частот, а многие
декодеры окружающего звучания имеют такие
фильтры нижних частот на выходных каскадах
для канала сабвуфера.
Loudness. Минимальная громкость.
Минимально воспринимаемая громкость. Она
часть может вводить слушателя в заблуждение.
Например, если налагаемыесистемой искажения
повышают уровень звука, по сравнению с его
оригинальной громкостью.
Maximum Power Rating. Оценка максимальной
мощности.
Бессмысленный параметр спецификации.
Midbass. Среднечастотныебасы.
Обычно под этим понимаются звуки с частотой
100 ~ 400Гц.
Midrange. «Мидрейндж».
Громкоговоритель, используемый для
воспроизведения средних частот. Такой
громкоговоритель в комбинации с
громкоговорителями для низких частот («вуфер»)
и высоких частот («твитер») образуют
законченную аудио систему для
воспроизведения любого звукового
сопровождения.
Nonlinearity.Нелинейность.
Искажения, возникающие при прохождении
исходного звукового сигнала через систему его
усиления. Идеальная аудио система должна
обеспечивать полную линейность прохождения
звуковых сигналов, без каких-либо искажений.
Т.е. сигнал на выходе должен быть абсолютно
точным аналогом входящего сигнала.
Octave. Октава.
Интервал между двумя частотами, имеющими
соотношение 2:1. Интервал 20 Гц 40 Гц часто
рассматривается как нижняя октава. Каждая
октава, которую вы добавляете к нижней, требует,
чтобы ваши громкоговорители могли пропускать
через себя в четыре раза больше воздуха чем
раньше.
Ohm. Ом.
Единица измерения электрического
сопротивления или импеданса.
Out Of Phase.Противофаза.
Некорректный и опасный режим работы
громкоговорителей, когда один из них подключен
к усилителю по правилу +/+ и -/-, а другой
ошибочно подключен как +/-.
Overload. Перегрузка.
Ситуация, когда на акустическую систему
подается сигнал слишком высокого уровня, что
может вызвать либо существенные искажения,
либо повреждения устройства.
Passive Radiator. Пассивный излучатель.
В некоторых громкоговорителях применяется
дополнительная пассивная диафрагма без
звуковой катушки или с неподключенной к выходу
усилителя мощности звуковой катушкой. Она
приводится в движение звуковым давлением
внутри корпуса, создаваемым рабочей
диафрагмой (снабженной звуковой катушкой).
Также называется дополнительным
низкочастотным излучателем. Пассивный
излучательзаменяет отверстие фазоинвертора.
Peak. Пик.
Максимальная амплитуда напряжения или силы
тока.
Peak Power Rating. Оценка пиковой
мощности.
Еще один бессмысленный параметр
спецификации.
55

ПРИЛОЖЕНИЕ
СЛОВАРЬ ТЕРМИНОВ
Peak Power. Пиковая мощность.
Параметр усилителя мощности, показывающий
повышение амплитуды над уровнем «земли» или
над напряжением в нольвольт.
Peak to Peak Power. Диапазон пиковых
мощностей.
Параметр усилителя мощности, показывающий
амплитуду между пиковым положительным
значением и пиковым отрицательным значением.
Для симметричного сигнала эта величина будет
равна удвоенной величине пиковой мощности.
Phase Coherence. Фазовая когерентность.
Характер звучания музыки воспроизводимой
различными источниками (сабвуфером,
«твитером» и «мидренджем»), при котором она
воспринимается как единое целое, а не в виде
отдельныхсоставляющих.
Phase Distortion. Фазовое искажение.
Искажения, вызванные рассогласованием
музыкальных частей, воспроизводимых
различными источниками, вследствие
запаздывания некоторых из них.
Point Source. Точка отсчета.
Большинство систем с несколькими
громкоговорителями стараются
сапроксимировать так называемуюточку отсчета.
Представьте себе камень, падающий в воду и
волны, расходящиеся от точки падения.
Очевидно, что чрезвычайно сложно объединить в
одно целое волны, расходящиеся от нескольких
таких точек. Только лучшие схемы,
использующие последние разработки в области
слияния сигналов могут обеспечит приемлемый
уровень согласования.
Ported Enclosure.
Способ размещения громкоговорителей для
повышения эффективности воспроизведения на
низких частотах.
Power.Мощность.
В электричестве мощность (P) есть произведение
напряжения (U) и силы тока (I), т.е. P=U*I.
Единица мощности 1 Вт.
Pre-Amplifier.Предусилитель.
Предусилитель это устройство,которое получает
исходный сигнал от радиоприемника, кассетного
магнитофона или DVD проигрывателя и передает
этот сигнал на усилитель мощности.
Предусилитель может иметь несколько
возможностей управления звуковом сигналом,
таких как, выбор источника сигнала, баланс,
изменение громкости и, возможно, тональности.
Фактически это управляющая часть усилителя
мощности. В интегральные усилители
предусилитель встроен (но он может быть и в
блочном исполнении) и его используют в паре с
усилителем мощности или активными
громкоговорителями.
RCAConnector.РазъемыRCA.
Разъем «Phono», обычно используемый для
низкокачественного соединения CD
проигрывателя,тюнера, ресивера и усилителя.
Receiver.Ресивер.
Центральный компонент системы домашнего
кинотеатра, который включает в себя
предусилитель,усилители и тюнер.
Resistance. Сопротивление (R).
Электрическая или электронная схема, а так же
характеристика материала, описывающая его
сопротивление движению электронов.
Громкоговорители имеют сопротивление,
которое препятствуетпрохождению тока.
Resonant Frequency. Резонансная частота.
Резонанс - это усиление амплитуды колебаний
какого-либо объекта или воздуха на
определенной частоте, по сравнению с другими
частотами. Любая система имеет резонансные
частоты. На такой частоте даже незначительное
количество энергии может заставить систему
вибрировать. Натянутые струны фортепьяно при
их пощиповании будут сильно вибрировать на
определенной частоте. Но то, что допустимо в
музыкальных инструментах, совершенно
нежелательно в воспроизводящей и
записывающей музыку аппаратуре.
PowerAmplifier.Усилительмощности.
Усилитель мощности это усилитель без контроля
выходных тонов и с более мощным выходным
сигналом, чем у линейного усилителя или
предусилителя. Обычно такие усилители
используются для управления
громкоговорителями.
56

ПРИЛОЖЕНИЕ
СЛОВАРЬ ТЕРМИНОВ
RMS.
Величина выходной номинальной мощности реальная мощность усилителя акустической
системы, при которой коэффициент
гармонических нелинейных искажений
минимален и не превышает указываемого
значения. Значение RMS характеризует среднюю
мощность, на которой акустическая система
может работать продолжительное время. Это
значение является общепринятым стандартом, и
характеризует объективно измеренную рабочую
мощность.
Roll OFF (cutoff).
Спад - уменьшение сигнала на границах
частотного диапазона, иногда в результате
влияния фильтра. Спад частоты обычно
фиксируется при уменьшении исходной частоты
на 3 дБ. Например, кроссовер обеспечивает спад
с крутизной 12 дБ/окт на частотах выше 2 кГц.
Satellite. Сателлит.
Громкоговорители-сателлиты - небольшие
громкоговорители с ограниченным снизу
диапазоном частот, сконструированные для
использования совместно с сабвуфером.
Sealed Enclosure.
Воздухонепроницаемая оболочка, которая
полностью изолирует фронтальные волны от
возвратных. Такая оболочка позволяет получить
акустическую систему с очень хорошим
временим отклика идостаточноймощностью.
Sensitivity.Чувствительность.
Величина, показывающая, какая энергия
требуетсядля громкоговорителя, чтобы он достиг
определенного уровня выдаваемого сигнала.
Чувствительностьизмеряетсяв SPL
Signal to Noise (SN) Ratio. Отношение
сигнал/шум.
Число, выражающее обычно в децибелах
разницу уровней собственного шума
аудиокомпонента и некоторого сигнала
референсного уровня.
Sound Pressure Level(Spl).
Величина, характеризующая отношение
величины звукового давления к порогу
слышимости, выраженная в децибелах.
Увеличение Spl на 10 дБ, означает увеличение
громкости в два раза. Живой звук оркестра
достигает в пиковые моменты 10 дБ, а рок музыка
120 дБ.
Soundstage. Звуковая сцена.
Впечатление объемности звукового
пространства, возникающее у слушателя при
воспроизведении записи. Реалистичная звуковая
сцена имеет пропорциональные размеры длины,
ширины и высоты.
Sound Waves. Звуковые волны.
Звуковые волны подобны волнам в воде. Частота
звука определяет длину звуковых волн;
амплитуда или громкость, определяют высоту
звуковых волн. При частоте 20 кГц длина волны
достигает 17 метров. Такая длина волны
обеспечивает басам их проникающую
способность.
Standing Wave. Стоячая волна.
Стационарные области высокого и низкого
акустического давления в помещении,
возникающие в результате наложения прямого
сигнала и сигнала, отраженного от
ограничивающих поверхностей и пришедшего с
некоторой задержкой. Примером такой волны
являетсяшум моря.
Stereo. Стерео.
В переводе с греческого означает «слитный».
Целью стереофонического режима является не
предоставление вам возможности услышать
отдельно правый и левый канал, а обеспечить
вам иллюзию трехмерного пространства и
объемного звучания при нахождении слушателя
между двумя громкогоаорителями.
Subwoofer.Сабвуфер.
Громкоговоритель, предназначенный для
воспроизведения исключительно только
низкочастотных сигналов. Хороший сабвуфер
должен обеспечивать звучание нижней октавы
(20 40 Гц.). На рынке существует множество
«сабвуферов», которые правильнее было бы
называть просто «вуферами».
Surrounder.
Устройство для приостановки диафрагмы
громкоговорителя; удерживает диафрагму на
месте, но позволяет ей двигаться при активации.
Обычно делается из пены илигрубой ткани.
57

ПРИЛОЖЕНИЕ
СЛОВАРЬ ТЕРМИНОВ
Surround Sound. Окружающий"звук.
Формат записи и воспроизведения звука, в
котором используется более двух каналов и
более двух громкоговорителей. При этом
обычный стерео сигнал искусственно
разлагается на отдельные каналы и
воспроизводится через несколько маленьких
тыловых и боковых громкоговорителей,
используемых в системах домашнего кинотеатра.
THX.
Совокупность разработанных фирмой "Lucasfilm"
патентов, технических решений и требований,
относящихся к воспроизведению фонограмм
фильмов. Профессиональный THX используется
в коммерческих кинотеатрах. Home THX комплект патентов, технологий, стандартов
воспроизведения фонограмм фильмов в
домашних условиях. Официально спецификации
Home THX не опубликованы и поэтому
производители перед предоставлением своих
продуктов на сертификацию по THX должны
подписывать специальные документы о
неразглашении информации. Производители,
получившие сертификат для своей продукции
должны платить специальный налог с каждой
проданной единицы товара.
Total Harmonic Distortion (THD). Полный
коэффициент гармонических искажений.
Параметр, определяющий количество
гармонических искажений аудиокомпонента.
Называется "полным", поскольку является
суммой отдельных составляющих гармонических
искажений компонента.
Tweeter. Твитер.
Громкоговоритель, предназначенный для
воспроизведения высокочастотных сигналов.
Для построения законченной акустической
системы к «твитеру» необходимо добавить
«вуфер» (2-х канальная система) или «вуфер» и
«мидрейндж» (3-х канальная система).
растет с увеличением звукового давления. При
одинаковом звуковом давлении громкость звука.
чистых тонов (гармонических колебаний)
различной частоты различна, т. е. на разных
частотах одинаковую громкость могутиметь звуки
разной интенсивности. Громкость звука. данной
частоты оценивают, сравнивая её с громкостью
простого тона частотой 1000 гц. Уровень
звукового давления (в дб) чистого тона с частотой
1000 гц, столь же громкого (сравнением на слух),
как и измеряемый звук, называется уровнем
громкости данного звука (в фонах). Громкость
звука. для сложных звуков оценивают по
условной шкале в сонах. Громкость звука.
является важной характеристикой музыкального
звука.
Wavelength.Длина волны.
Расстояние между соседними периодами
синусоидальной волны или другого
периодического колебания. Длину волны любой
частоты можно найти, разделив скорость
распространения этой волны на частоту.
(Скорость распространений звука над
поверхностью моря равна 331,4м/с.).
Woofer.«Вуфер».
Громкоговоритель в акустической системе,
воспроизводящий низкие частоты. Обычно эти
динамики значительно больше и тяжелее, чем
«мидренжи» и «твитеры».
VoiceCoil. Звуковаякатушка.
Катушка, являющаяся составной частью головки
громкоговорителя. По ней протекает выходной
ток усилителя.
Volume.Громкость.
Громкость звука, величина, характеризующая
слуховое ощущение для данного звука.
Громкость звука. сложным образом зависит от
звукового давления (или интенсивности звука),
частоты и формы колебаний. При неизменной
частоте и форме колебаний громкость звука
58

 Loading...