


Metro Banquet
41cm (16”) x 33cm (13”) non-stick electric cookware
Instruction / Recipe Booklet
FP7710
Please read these instructions carefully and retain for future reference.

Contents
S beam’ |
afe |
eca |
i |
1 |
||
Fea |
e |
|
f |
S beam Me |
|
|
Ba |
e |
f |
a |
|
|
2 |
D |
|
Tefl |
Pla i m P |
4 |
||
U i g |
|
S beam Me |
Ba e f a |
5 |
||
Tem e a |
e e |
i g g ide |
6 |
|||
C |
ki g |
i h |
S beam Me |
|
||
Ba |
e |
f |
a |
|
|
7 |
Ca e a d clea i g |
|
9 |
||||
Reci e |
|
|
|
|
10 |
|
Important instructions – retain for future use.

Sunbeam’s safety precautions
SAFETY PRECAUTIONS FOR YOUR
SUNBEAM FRYPAN.
•Use your frypan at least 200mm away from walls and curtains.
•Do not immerse the control probe in water.
•If using a plastic spatula do not leave in cooking vessel when hot.
•The frypan must only be used with the control probe provided.
•Avoid using on metal surfaces e.g. sink, hotplate.
•Remove the control probe before cleaning the frypan.
•After cleaning the frypan ensure that the control probe inlet area is completely dry before using again.
S beam a e |
e |
afe |
c ci |
he |
|
||||
de ig i g a d ma fac |
i g c |
me |
d c , |
||||||
b |
i i e |
e ial |
ha |
he |
d c |
e al |
|
||
e e ci e ca e |
he |
i g a elec |
ical a |
lia ce. |
|||||
Li |
ed bel |
a e |
eca |
i |
hich a e e |
e ial |
|||
f |
he afe |
|
e |
f a elec ical a |
lia ce: |
|
|||
•Read carefully and save all the instructions provided with an appliance.
•Always turn the power off at the power outlet before you insert or remove a plug. Remove by grasping the plug - do not pull on the cord.
•Turn the power off and remove the plug when the appliance is not in use and before cleaning.
•Do not use your appliance with an extension cord unless this cord has been checked and tested by a qualified technician or service person.
•Always use your appliance from a power outlet of the voltage (A.C. only) marked on the appliance.
•This appliance is not intended for use by young children or infirm persons unless they have been adequately supervised by a responsible adult to ensure that they can use the appliance safely.
•Young children should be supervised to ensure that they do not play with the appliance.
•Never leave an appliance unattended while in use.
•Do not use an appliance for any purpose other than its intended use.
•Do not place an appliance on or near a hot gas flame, electric element or on a heated oven. Do not place on top of any other appliance.
•Do not let the power cord of an appliance hang over the edge of a table or bench top or touch any hot surface.
•Do not operate any electrical appliance with a damaged cord or after the appliance has been damaged in any manner. If damage is suspected, return the appliance to the nearest Sunbeam Appointed Service Centre
for examination, repair or adjustment.
•For additional protection, Sunbeam recommend the use of a residual current device (RCD) with a tripping current not exceeding 30mA in the electrical circuit supplying power to your appliances.
•Do not immerse the appliance in water or any other liquid unless recommended.
If you have any concerns regarding the performance and use of your appliance, please visit www.sunbeam.com.au or contact the Sunbeam Consumer Service Line.
Ensure the above safety precautions are understood.
1
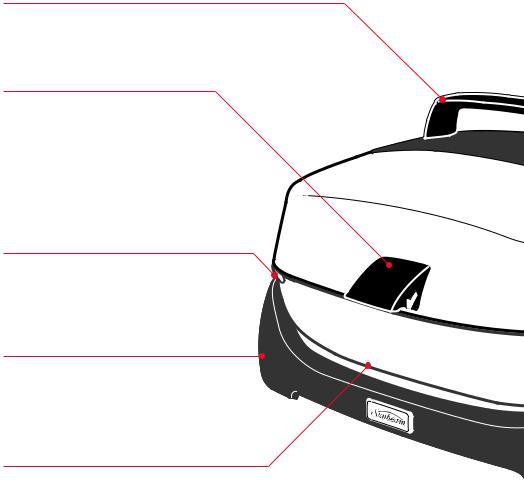
Features of your Sunbeam Metro Banquet frypan
C l ch ha dle
For safe cooking and carrying of the frypan lid.
Adj able lid h lde
A stepped catch on the side of the lid enables the lid to be tilted above the frypan, to help maintain the temperature selected. Both hands are then free for stirring. When the lid is in position the lid then acts as a splatter shield. The lid can rest on either of the frypan sides that do not have handles.
P i g li
With unique pouring lip, juices are easily poured over food or disposed of for easy cleaning.
T igge elea e ba e
With a pull of the quick-release trigger on the side of the pan, the base of the frypan is quickly detached for easy cleaning.
2400 a b e fl ha ed eleme
The butterfly shaped element is completely cast into the metal base providing fast heat up and even heat distribution.
2
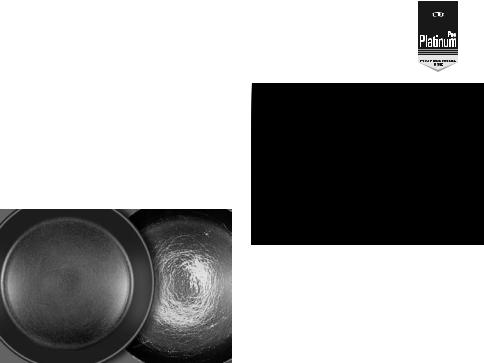
DuPont Teflon® Platinum Pro™
Your Sunbeam frypan features a special scratch and abrasive-resistant non-stick cooking coating that makes it safe to use metal utensils when cooking. Teflon® Platinum Pro™ – Professional Use is DuPont’s toughest non-stick coating to date
– up to 10 times more scratch resistant than single layer non-stick coatings.*
SUNBEAM |
OTHER BRANDS |
Teflon® Platinum Pro™ – 3 layer scratch resistant coating
The result is a non-stick coating that can be treated like ordinary cookware, enabling the use of metal utensils. However, Sunbeam recommends that care is taken with the nonstick coating when using metal utensils.
Results from DuPont’s ‘In-house Cooking Abuse Test’
DuPont is the world leader in non-stick coatings and today more than 2 billion households have Teflon® non-stick coated cookware.
Teflon® Platinum Pro™ is a premium 3 layer non-stick coating. It features special scratch resistant minerals causing metal utensils to slide over these particles without damaging the Teflon® matrix. This preserves the release properties of the non-stick coating and the life of the frypan.
Do not use sharp objects or cut food inside the frypan. Damage caused to your frypan as a result of misuse of metal utensils will void your warranty.
Dim leTech |
face |
The Sunbeam Metro Banquet frypan’s cooking surface features DimpleTech™ embossing that breaks up the contact between the food and the cooking surface providing superior non-stick performance.
*The images shown here and performance claims are based upon the Dupont In-house Cooking Abuse Test used to evaluate scratch resistance and release properties of non-stick coatings.
4
Using your Sunbeam Metro Banquet frypan
Bef e he fi e: Wash, rinse and dry your frypan and lid. Season the cooking surface by applying a thin coat of cooking oil and rub in with paper towelling.
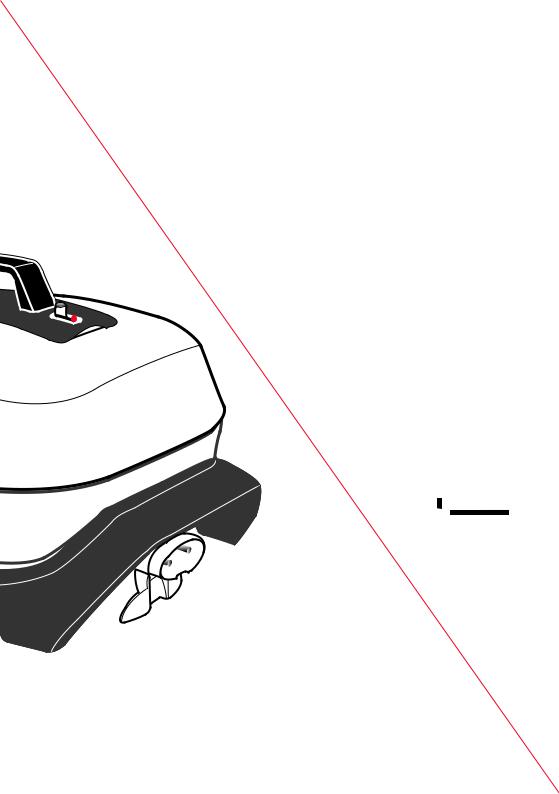
1.Insert the control probe into the inlet on the frypan.
2.Plug the cord into a 230-240V power outlet and turn the power on.
3.Set the control probe dial to the desired temperature setting. Refer to page 6 for the temperature guide.
N e: The light on the control probe will illuminate and will remain on until the set temperature is reached. It will then cycle on and off throughout cooking, as the temperature is maintained by the
thermostat. On initial heating of the frypan, it is recommended that the temperature be allowed to cycle (the light cycling on and off) several times. This will help the cooking surface to adjust to a more accurate cooking temperature.
Adj able lid h lde
This is a stepped catch on the side of the lid. It allows the lid to rest above the frypan and eliminates the need to find a spot on the bench. When in position the lid also acts as a splatter shield. The lid can rest on either side that does not have handles, making it easy for left or right handed use.
U i g he a il le e
The pan tilt lever is positioned under the inlet where the control probe is inserted.
To tilt the frypan, push the lever down. This allows the fat and juices to drain from the food for crisp, low fat cooking. It also makes it easier to baste food and serve sauces or gravy.
T igge elea e c l be
The probe is thermostatically controlled and incorporates an indicator light which switches off automatically when the temperature selected has been reached and then cycles on and off to indicate that the selected temperature is being maintained.
N e: The probe supplied with your frypan may differ from the one illustrated.
5
Temperature setting guide
The numbers on the dial represent the following temperatures approximately.
DIAL |
CELSIUS |
FARENHEIT |
SUGGESTED USES |
TEMPERATURE |
||
SETTING |
(a |
) |
(a |
) |
||
|
|
|
|
|
|
|
1 |
100°C |
|
212°F |
|
Keeping food warm |
LOW |
2 |
110°C |
|
230°F |
|
||
|
|
|
||||
|
|
|
|
|||
|
|
|
|
|
|
|
3 |
125°C |
|
260°F |
|
Simmering, slow cooking |
|
4 |
140°C |
|
285°F |
|
|
|
|
|
|
|
|||
|
|
|
|
|
|
|
5 |
150°C |
|
300°F |
|
Pan frying, roasting |
MEDIUM |
|
|
|
|
|
||
6 |
160°C |
|
320°F |
|
|
|
|
|
|
|
|||
|
|
|
|
|
|
|
7 |
175°C |
|
350°F |
|
Shallow frying |
|
8 |
185°C |
|
365°F |
|
|
|
|
|
|
|
|||
|
|
|
|
|
|
|
9 |
200°C |
|
390°F |
|
Searing, sealing and baking |
HIGH |
10 |
210°C |
|
410°F |
|
|
|
|
|
|
|
|||
N e: The temperature uses are a guide only and may require adjustment to suit various foods and individual tastes. When the dial is set to a low setting, it is quite normal for food to stop and start bubbling, as the thermostat maintains the selected temperature.
6
Cooking with your Sunbeam Metro Banquet frypan
Baki g
Your frypan can be used for baking cakes, with deliciously moist results.
1.Preheat the frypan to setting 10, with the lid on.
2.Elevate the cake pan or tray from the base of the frypan using a small wire rack.
Cooking times will be longer than those of a conventional oven.
Ba i g
The pan tilt lever makes basting easy as it allows the juices to drain to one side of the pan. Reduce the temperature to prevent any fat and juices splattering. Position the pan tilt lever and spoon the juices over the food as desired.
B ili g Pa a
1.Bring 12 cups of water to the boil on setting 9. Add 1-2 teaspoons of oil to stop the pasta from sticking together.
2.Add 400g of pasta and cook until tender, for approximately 7-10 minutes.
3.Reduce to a lower setting if the water boils too rapidly.
N e: Cooking times will vary with different types of pasta.
B ili g Rice
1.Bring 12 cups of water to the boil on setting 5. 2 cups of rice and position the lid.
2.Cook until tender, approximately 10-12 minutes and then drain.
3.Reduce to a lower setting if the water boils too rapidly. Stir occasionally so that the rice does not stick.
Bi g a d eali g mea
It is necessary to brown and seal meat in many recipes. Meat retains its juices and the flavours develop after browning and sealing. This also prevents it from sticking when baking or roasting. Preferably use meat that is at room temperature as this reduces the cooking time.
1.Preheat the frypan to settings 8-9.
2.Brown meat on all sides, with the lid off.
3.After sealing, reduce the temperature to settings 4-5 and replace the lid until the meat is cooked as desired.
F i g
The frypan is ideal for shallow or dry frying. Deep frying is not particularly suitable as the frypan has shallow sides and a greater surface area, which results in heat loss and the possible overflow of oil.
Pa F i g: Suitable for eggs, omelettes, bacon, sausages, steaks and chicken pieces. Preheat to settings 5-6 with a little oil to add flavour. Non-stick cooking surfaces do not require a large amount of oil. Steaks should only be turned once during cooking.
Shall F i g: Suitable for vegetable pieces e.g roast pumpkin and potato, and crumbed food. Preheat on settings 6-8 with sufficient oil so that the food is half immersed. Cook food with the lid off.
Sa e i g: Preheat on settings 5-6 with a little oil to add flavour.
S i F i g: Food is cooked quickly, over a high heat and vegetables retain their flavour and crispness. For best results and even cooking, cut food into even sized, smaller pieces.
7
 Loading...