


MultiBlender Pro
600 watt blender with 1.5 litre blending jug
Instruction/Recipe Booklet
PB7600
Please read these instructions carefully and retain for future reference.

Contents
Sunbeam’s Safety Precautions |
1 |
Features of your MultiBlender Pro |
2 |
The Control Dial |
4 |
Before using your MultiBlender Pro |
5 |
Using your MultiBlender Pro |
6 |
Features uses of the MultiBlender Pro |
7 |
A Guide to your MultiBlender Pro |
8 |
Handy Blending Hints |
9 |
Care and Cleaning |
10 |
Recipes |
|
Soups |
11 |
Dips/Starters/Pastes |
13 |
Light Snacks |
16 |
Desserts |
17 |
Drinks |
19 |
Thick Shakes |
21 |
Cocktails |
22 |

Sunbeam’s Safety Precautions
SAFETY PRECAUTIONS FOR YOUR SUNBEAM MULTIBLENDER PRO BENCHTOP BLENDER.
•Ensure fingers are kept well away from the blades when in use.
•Do not blend hot ingredients.
•Always operate on a flat surface.
•Ensure the control dial is in the off ‘O’ position before plugging into the power outlet.
•Do not operate for more than 4 minutes at a time.
Sunbeam are very safety conscious when designing and manufacturing consumer products, but it is essential that the product user also exercise care when using an electrical appliance. Listed below are precautions which are essential for the safe use of an electrical appliance:
•Read carefully and save all the instructions provided with an appliance.
•Always turn the power off at the power outlet before you insert or remove a plug. Remove by grasping the plug - do not pull on the cord.
•Turn the power off and remove the plug when the appliance is not in use and before cleaning.
•Do not use your appliance with an extension cord unless this cord has been checked and tested by a qualified technician or service person.
•Always use your appliance from a power outlet of the voltage (A.C. only) marked on the appliance.
•Close supervision is necessary when your appliance is being used near children or infirm persons.
•Never leave an appliance unattended while in use.
•Young children should be supervised to ensure that they do not play with the appliance.
•Do not use an appliance for any purpose other than its intended use.
•Do not place an appliance on or near a hot gas flame, electric element or on a heated oven. Do not place on top of any other appliance.
•Do not let the power cord of an appliance hang over the edge of a table or bench top or touch any hot surface.
•For safety reasons and to avoid maintenance by unskilled persons, some appliances are ‘sealed’ using tamperproof screws. Such appliances should always be returned to the nearest Sunbeam Appointed Service Centre for adjustment or repair if required.
•Do not operate any electrical appliance with a damaged cord or after the appliance has been dropped or damaged in any manner. If damage is suspected, return the appliance to the nearest Sunbeam Appointed Service Centre for examination, repair or adjustment.
•For additional protection, Sunbeam recommend the use of a residual current device (RCD) with a tripping current not exceeding 30mA in the electrical circuit supplying power to your appliances.
•Do not immerse the appliance in water or any other liquid unless recommended.
If you have any concerns regarding the performance and use of your appliance, please visit www.sunbeam.com.au or contact the Sunbeam Consumer Service Line.
Ensure the above safety precautions are understood.
1
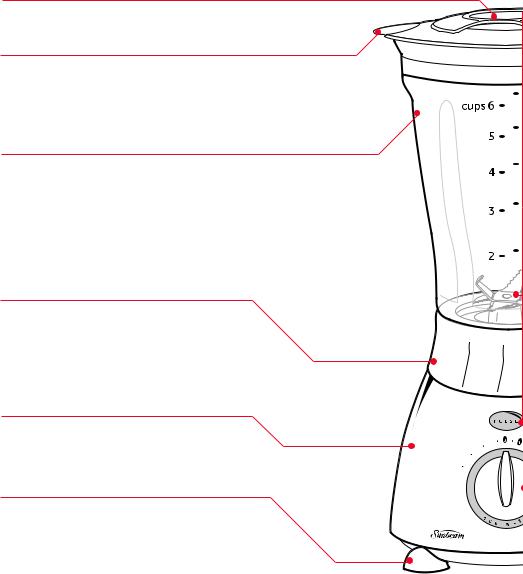
Features of your MultiBlender Pro
Ingredient cup.
Handy 70ml ingredient cup.
Flexible lid with pouring hole.
To provide the necessary safety, the lid seals tightly to the glass jug and features a pouring hole, that allows you to add ingredients during the blending process.
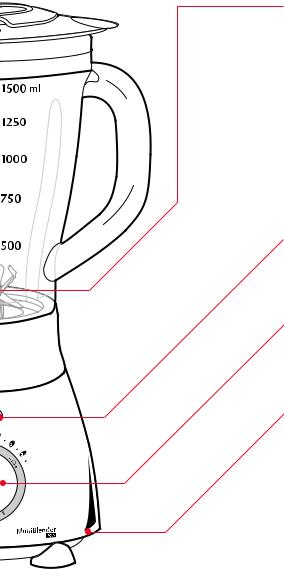
1.5 litre heat-resistant glass jug.
The sizeable 1.5 litre glass jug features specially designed internal ribs to cycle ingredients back into the blade system for superior results.
The jug features an easy to pour lip and is marked in both cups and millilitres (ml) for ease of use. The heat-resistant glass jug is ideal for pureeing warm soups.
Detachable blade system assembly.
The detachable blade assembly unit unscrews from the glass blending jug for convenient and thorough cleaning.
Motor base.
The base houses a powerful 600 watt motor, which provides unbeatable industrial strength performance.
Non-slip feet.
Keeps the blender secure on the bench top during use.
2
Serrated stainless steel six-blade system.
Specially designed for extra durability, the heavy-duty, serrated stainless steel blade with a six-blade construction, smashes ice cubes to powder, produces a smooth consistency when pureeing and combines ingredients perfectly for a frappé.
Pulse button.
Increases the intensity of the standard blending action to assist in the most demanding blending tasks.
3 speed control.
The easy to grip control dial allows you to select one of three speeds ranging from low to high.
Cord storage facility.
For tidy, convenient storage of the cord underneath the motor base.
3

The Control Dial
|
Pulse |
|
Speed 1 |
|
• |
Ice cubes |
• |
Whipping cream |
|
• |
Meat |
• |
Puree vegetables & fruit |
|
• |
Breadcrumbs |
• |
Curry pastes |
|
• |
Biscuits |
• |
Coffee beans |
|
• |
Finely ground nuts |
• |
Mayonnaise |
|
• |
Chocolate |
Speed 2 |
||
• Self cleaning the unit |
||||
• |
Smoothies with fruit |
|||
|
|
|||
|
|
• |
Soups |
|
|
|
• |
Raw vegetables |
|
|
|
• |
Cake batters |
|
|
|
|
Speed 3 |
|
|
|
• |
Cocktails |
|
|
|
• |
Laksa pastes |
|
|
|
• |
Milkshakes |
|
4
Before using your MultiBlender Pro
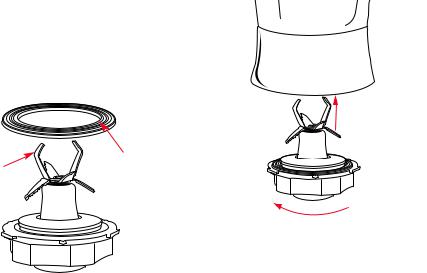
Important: Always ensure your blender is unplugged from the power outlet before fitting or removing the blade assembly. Always handle the blade assembly with caution, as the blades are extremely sharp.
To assemble the six-blade system in the glass jug (see Figure 1).
1.Place the silicone rubber seal over the sixblade assembly, as shown in figure 1.
2.Place the six-blade assembly into the glass jug and turn clockwise to secure firmly into position (see figure 2).
Figure 1 |
|
|
|
Six-blade |
Silicone |
|
|
assembly |
|
||
seal |
Figure 2 |
||
|
|||
|
|
||
|
|
Note: The blender jug will leak if the six- |
|
|
|
blade system is not assembled correctly. |
|
|
|
Note: Do not attempt to remove the |
|
|
|
stainless steel blades from the blade |
|
|
|
assembly. |
|
|
|
3. Plug the power cord into a 230-240 volt |
|
|
|
power outlet and turn the power ‘ON’. |
5
Using your MultiBlender Pro
1.Place the blender jug onto the motor base.
Note: Do not switch ‘ON’ the MultiBlender Pro without the lid in position.
2.Place ingredients into the glass jug. Do not exceed the maximum indicated level – 1.5 litres.
3.Position the lid with ingredient cup onto the blender jug. Ensure the lid is firmly in place.
4.Using the selector dial, select the desired blending speed 1, 2, 3 or PULSE.
Settings 1, 2, 3 will provide continuous blending until the dial is turned to the ‘O’ position.
The Blending Guide on page 8 shows the functions that can be performed and the suggested speeds to use.
Note: Although the lid fits firmly to the glass jug, we advise when blending liquid ingredients, to place your hand on the lid as you initially select the blending speed/function. As the powerfull 600 watt motor could cause the liquid to surge up causing leakage. Once you have started blending you can remove your hand.
Note: Do not operated for more than 4 minutes at a time.
Further ingredients can also be added whilst blending by removing the ingredient cup and pouring ingredients through the hole in the lid.
5.After you have completed blending, turn the control dial to the ‘0’ position.
Note: When removing the six-blade assembly from the glass jug you may need to slightly tilt the blade so that it slides out easily. You shouldn’t force the blades out of the glass jug as this will ultimately damage the blades.
6
Features uses of MultiBlender Pro
Crushing Ice
Simply add ice to the blender and a small quantity of water, which will aid in the crushing process. Then press the ‘Pulse’ function and hold for 1-2 seconds and release. Continue this process and in seconds your ice is fluffy and snow flake-like.
Pulse setting
The pulse function provides short bursts of power, so that you can prepare breadcrumbs, grind chocolate, finely grind nuts and biscuits.
You can also use the Pulse function for cleaning the blender. Simply pour in some warm water and a small amount of detergent, press the ‘Pulse’ function for 1-2 seconds and release. Repeat 3-4 times. The unit will clean itself, without you having to handle the sharp blades. Rinse and dry, being careful as the blades are sharp.
7
 Loading...