


Snack Heroes™
Ice Cream Maker
Instruction Booklet
GL5500
Please read these instructions carefully and retain for future reference.

Contents
Sunbeam's Safety Precautions |
1 |
Features of your Snack Heroes™ Ice Cream Maker |
2 |
Before using your Snack Heroes™ Ice Cream Maker |
4 |
Using your Snack Heroes™ Ice Cream Maker |
5 |
Handy hints when using your |
|
Snack Heroes™ Ice Cream Maker |
7 |
Tips to Making Custard Based Ice Cream |
8 |
Care and Cleaning |
9 |
Recipes |
10 |
Important instructions – retain for future use.
Sunbeam’s Safety Precautions
|
SAFETY PRECAUTIONS FOR SNACK |
• |
Do not place freezer canister or motor unit in a |
|
HEROES™ ICE CREAM MAKER |
|
dishwasher. |
• |
This appliance is not a toy. |
• |
Do not place motor unit in the freezer. |
• |
Always operate on a flat surface. |
|
|
|
|
|
|
|
Sunbeam is very safety conscious when |
• Never leave an appliance unattended while |
|
|
designing and manufacturing consumer products, |
|
in use. |
|
but it is essential that the product user also |
• Do not use an appliance for any purpose |
|
|
exercise care when using an electrical appliance. |
|
other than its intended use. |
|
Listed below are precautions which are essential |
• Do not place an appliance on or near a hot gas |
|
|
for the safe use of an electrical appliance: |
|
flame, electric element or on a heated oven. |
• |
Read carefully and save all the instructions |
• |
Do not place on top of any other appliance. |
|
provided with an appliance. |
• Do not let the power cord of an appliance hang |
|
• Always turn the power off at the power outlet |
|
over the edge of a table or bench top or touch |
|
|
before you insert or remove a plug. Remove |
|
any hot surface. |
|
by grasping the plug - do not pull on the cord. |
• |
Do not operate any electrical appliance with |
• Turn the power off and remove the plug |
|
a damaged cord or after the appliance has |
|
|
when the appliance is not in use and |
|
been damaged in any manner. If damage is |
|
before cleaning. |
|
suspected, return the appliance to the nearest |
• Do not use your appliance with an extension |
|
Sunbeam Appointed Service Centre |
|
|
cord unless this cord has been checked |
|
for examination, repair or adjustment. |
|
and tested by a qualified technician or |
• For additional protection, Sunbeam |
|
|
service person. |
|
recommend the use of a residual current |
• Always use your appliance from a power |
|
device (RCD) with a tripping current not |
|
|
outlet of the voltage (A.C. only) marked |
|
exceeding 30mA in the electrical circuit |
|
on the appliance. |
|
supplying power to your appliances. |
• This appliance is not intended for use by |
• Do not immerse the appliance in water |
||
|
persons (including children) with reduced |
|
or any other liquid unless recommended. |
|
physical, sensory or mental capabilities, or |
• |
Appliances are not intended to be operated |
|
lack of experience and knowledge, unless they |
|
by means of an external timer or separate |
|
have been given supervision or instruction |
|
remote control system. |
|
concerning use of the appliance by a person |
• This appliance is intended to be used in |
|
|
responsible for their safety. |
|
household and similar applications such |
• |
Children should be supervised to ensure that |
|
as: staff kitchen areas in shops, offices and |
|
they do not play with the appliance. |
|
other working environments; farm houses; by |
• |
The temperature of accessible surfaces may be |
|
clients in hotels, motels and other residential |
|
high when the appliance is operating. |
|
type environments; bed and breakfast type |
|
|
|
environments. |
If you have any concerns regarding the performance and use of your appliance, please visit www.sunbeam.com.au or contact the Sunbeam Consumer Service Line.
Ensure the above safety precautions are understood.
1
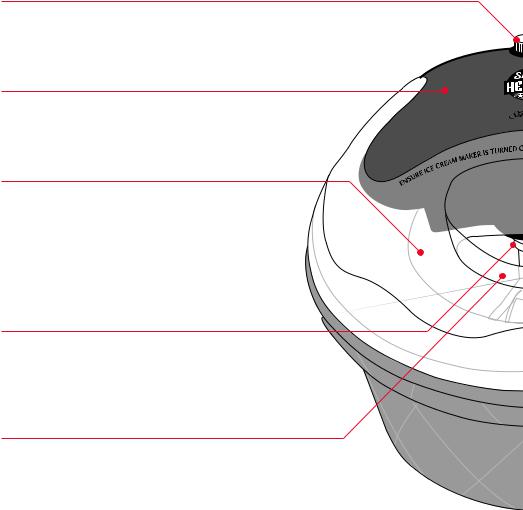
Features of your Snack Heroes™ Ice Cream Maker
On/Off switch
Indicates when the unit is switched on.
Motor unit
Rotates the paddle.
Pouring hole cover
Enables easy pouring of ingredients during the freezing process and its transparency allows observation of the ice cream making process for perfect results every time. Pouring hole cover holds the motor unit in place.
Paddle extender
Connects the paddle to motor unit.
Paddle
Churns mixture until the right consistency is achieved.
2

Freezer canister
The freezer canister has been specially designed to freeze quickly in your freezer and provide an even temperature throughout the freezing process.
Locking Tabs
Holds the pouring hole cover and base in place.
Base
Holds the freezer canister.
Non-slip rubber feet
Non-slip rubber feet provide extra stability.
3
Before using your Snack Heroes™ Ice Cream Maker
1.Before using your ice cream maker for the first time, ensure that all packing material is removed.
2.Remove the motor base from the pouring hole cover. Wash the freezer canister, paddle, pouring hole cover and base in warm soapy water. Be sure to rinse and dry all parts thoroughly. Wipe the motor unit with a damp cloth.
3.It is important when making ice cream that the freezer canister is properly frozen. The ice cream maker features a double insulated bowl which requires thorough freezing. For best results wrap the freezer canister in a plastic bag and place upright in the back of the freezer, where it is coldest. Wrapping the freezer canister with a plastic bag will prevent odours from within the freezer seeping into the freezer canister. As there is liquid in between the canister walls, shake the canister to check if fully frozen; you should not hear any liquid moving within the walls.
NOTE: Continually storing the freezer canister in the freezer allows you the flexibility to make your favourite ice cream at a moment’s notice.
AVERAGE Freezer |
Approximate |
Temperature |
Freezing Time |
|
|
-18˚C |
20-22 hrs |
NOTE: The freezer temperature may vary depending on how many times it is opened throughout the day.
4
Using your Snack Heroes™ Ice Cream Maker
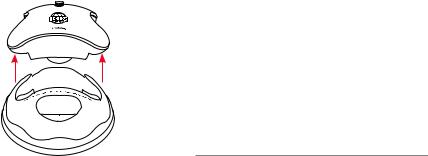
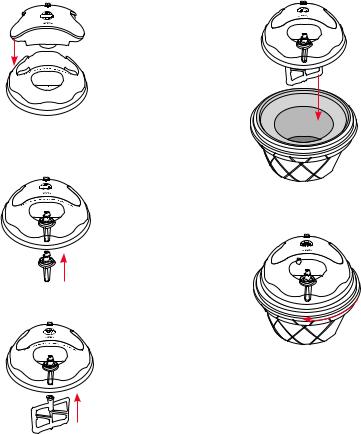
1.Slide the motor unit onto the pouring hole cover until it locks in place. Two tabs underneath will ‘click’ into place.
2.Insert the paddle extender into the motor unit opening.
3.Connect the paddle to the paddle extender.
4.Remove the freezer canister from freezer.
5.Place the freezer canister into the base.
6.Place the pouring hole cover onto the base so that all 4 locking tabs are aligned.
7.Rotate clockwise slightly until the tabs lock into place.
8.Insert the plug into the power outlet and turn the ice cream maker on immediately. This will prevent the paddle from freezing onto the freezer canister.
9.Pour the prepared ice cream mixture through the pouring hole into the freezer canister.
5
Using your Snack Heroes™ Ice Cream Maker (continued)
NOTE: It is extremely important that the freezer canister is used immediately after it is removed from the freezer as it begins to thaw once removed. Ensure the ice cream mixture is ready and well chilled, then remove the freezer canister from the freezer.
10.The ice cream maker process will take anywhere from 20-40 minutes. Do not turn appliance off during use as the mixture may freeze and prevent movement of the paddle.
NOTE: If after 40 minutes the mixture is not yet solid or has thawed again, do not continue. Possible reasons for the mixture
not freezing include: the freezer canister was not cold, the mixture was too warm, room temperature is quite warm or the proportion of the ingredients were incorrect.
11.To add ingredients after the mixture process has begun, gently add them through the pouring hole.
12.When the mixture has thickened and reaches the top of the paddle, the ice cream is completely prepared and the ice cream maker should be turned off. To avoid the motor overheating, the ice cream maker may turn itself off when the mixture has thickened and is ready.
13.Remove the paddle from the mixture.
14.Allow the mixture to sit in the freezer canister for 5 minutes before serving. Only use plastic, rubber or wooden utensils to serve from the freezer canister. Metal spoons may damage the bowl.
NOTE: At this stage your ice cream will be a spoonable consistency.
15.To further harden the mixture, transfer your ice cream into a clean, covered airtight container and place in the freezer.
6
 Loading...