


Pizza Bake & Grill™
19L Stainless Steel Oven
Instruction Booklet
This book covers the use and care of the following Sunbeam Compact Oven:
BT5350
Please read these instructions carefully and retain for future reference.

Contents
Sunbeam’s Safety Precautions |
1 |
Features of your Pizza Bake & Grill |
2 |
Using your Pizza Bake & Grill |
6 |
Cooking Pizza guide |
8 |
Roasting guide |
8 |
Grilling guide |
9 |
Roasting tips for vegetables |
10 |
Care and cleaning |
11 |
Recipes |
12 |
Important instructions – retain for future use.

Sunbeam’s Safety Precautions
SAFETY PRECAUTIONS FOR YOUR SUNBEAM BAKE & GRILL OVENS.
•Always operate on a flat surface.
•Avoid contact with oven surfaces, including oven door, during and after use, as they will be hot.
•Use well away from walls and curtains.
•Do not place items on top of the oven whilst in use.
•Do not block or cover the air vents on the top, back or side of the oven.
•Do not use in confined spaces.
•Do not immerse the unit in water.
Sunbeam is very safety conscious when designing and manufacturing consumer products, but it is essential that the product user also exercise care when using an electrical appliance. Listed below are precautions which are essential for the safe use of an electrical appliance:
•Read carefully and save all the instructions provided with an appliance.
•Always turn the power off at the power outlet before you insert or remove a plug. Remove by grasping the plug - do not pull on the cord.
•Turn the power off and remove the plug when the appliance is not in use and before cleaning.
•Do not use your appliance with an extension cord unless this cord has been checked and tested by a qualified technician or service person.
•Always use your appliance from a power outlet of the voltage (A.C. only) marked on the appliance.
•This appliance is not intended for use by persons (including children) with reduced physical, sensory or mental capabilities, or lack of experience and knowledge, unless they have been given supervision or instruction concerning use of the appliance by a person responsible for their safety.
•Children should be supervised to ensure that they do not play with the appliance.
•The temperature of accessible surfaces may be high when the appliance is operating.
•Do not use an appliance for any purpose other than its intended use.
•Do not place an appliance on or near a hot gas flame, electric element or on a heated oven.
•Do not place on top of any other appliance.
•Do not let the power cord of an appliance hang over the edge of a table or bench top or touch any hot surface.
•Do not operate any electrical appliance with a damaged cord or after the appliance has been damaged in any manner. If damage is suspected, return the appliance to the nearest Sunbeam Appointed Service Centre for examination, repair or adjustment.
•For additional protection, Sunbeam recommend the use of a residual current device (RCD) with a tripping current not exceeding 30mA in the electrical circuit supplying power to your appliances.
•Do not immerse the appliance in water or any other liquid unless recommended.
•Appliances are not intended to be operated
by means of an external timer or separate remote control system.
•This appliance is intended to be used in household and similar applications such as: staff kitchen areas in shops, offices and other working environments; farm houses; by clients in hotels, motels and other residential type environments; bed and breakfast type environments.
•Never leave an appliance unattended while in use.
If you have any concerns regarding the performance and use of your appliance, please visit www.sunbeam.com.au or contact the Sunbeam Consumer Service Line. Ensure the above safety precautions are understood.
1
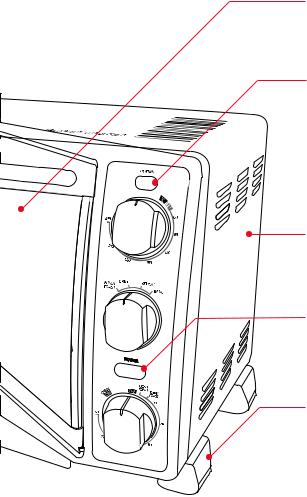
Features of your Sunbeam Pizza Bake & Grill™ – BT5350
Rack support guides
With three rack support guides: upper, middle and lower, each cooking function is maximised.
Removable crumb tray
Crumb tray slides out for emptying without the need to open the door and has a cool touch handle for added safety.
2
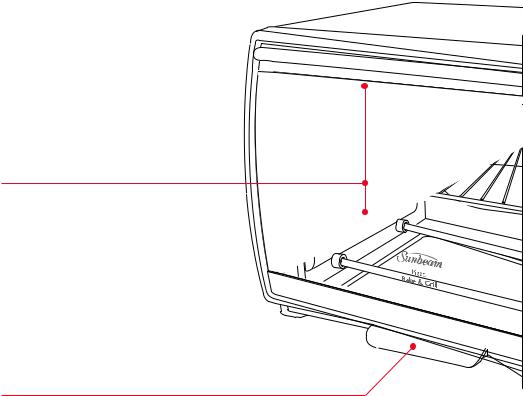
Extra deep back
Extra depth in the back allows you to cook pizzas up to 30cm in size
Heating light
Light on indicates that the oven is heating. When the set temperature is reached, the light will switch off. During the cooking process this light will turn on and off occasionally to ensure that the desired temperature is maintained constantly throughout the oven.
1600 watt element
Powerful 1600 watt oven for a fast heat-up.
Power light
Indicates when the oven is turned on. Lights up when the timer or 'ON' setting has been selected.
Non-slip rubber feet
Keeps the oven secure on the bench top during use and prevents scratching of bench top surfaces.
3
Features of your Sunbeam Bake & Grill continued
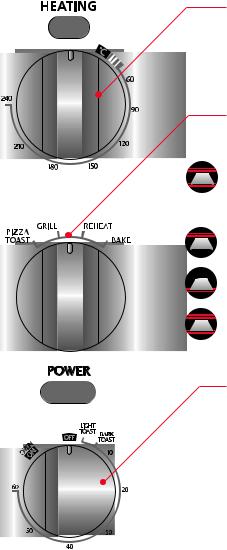
Temperature Control
Variable temperature control allows you to select the perfect temperature for each cooking task. Temperature range is from 60ºC to 240ºC.
Oven Settings
Select from Pizza/Toast, Grill, Reheat or Bake.
Pizza/Toast: Using the pizza/toast setting allows maximum heat for fast, quick cooking of pizzas and toast. For toast, use this setting in combination with the timer.
Grill: Use the GRILL setting for grilling open sandwiches, sausages and vegetables.
Reheat: Heats food from beneath and is ideal for perfectly reheating leftovers.
Bake: Suitable for roasting baked dinners as well as baking homemade biscuits, cakes and muffins.
60 minute timer and on/off control
The timer can be set up to 60 minutes and will automatically turn the oven off and sound a bell at the end of the cooking time. Alternatively, the dial can be set to the ON position for continuous operation, until it is turned off manually. Variable browning control allows you to toast your bread to a desired colour. Light Toast on the timer represents the lightest toasting shade and Dark Toast represents the darkest toasting shade.
4
Features of your Sunbeam Bake & Grill continued
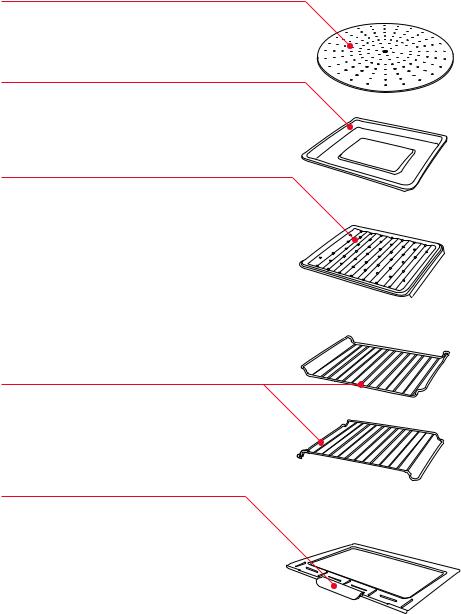
Aluminium pizza tray
Cooks up to a 30cm pizza to perfection
Enamel baking pan
Enamel baking pan can be used on its own or with the drip tray insert.
Enamel drip tray insert
The drip tray insert sits inside the baking pan and allows fats to drain away for fat-free cooking. The drip tray also helps to prevent splattering.
Chrome plated wire rack
The removable wire rack is reversible and may be used in the raised or sunken position, giving you greater versatility when cooking.
Sunken
Raised
Crumb tray
Insert the tray into bottom of the oven. Removable for easy cleaning.
5
Using your Bake & Grill™
Position the oven on a dry, level surface, ensuring that the ventilation slots on the side and top of the appliance are not obstructed. Plug the power cord into a 230-240 volt power outlet and turn the power on.
Note: When turned on for the first time, your Bake & Grill may give off vapours for up to 10 minutes. This is due to the initial heating of the materials used. It is safe, not detrimental to the performance of the oven and will not re occur.
Important: Do not force open the oven door beyond its limit or let the door drop open as this will distort the door and hinder the oven's ability to maintain a proper seal.
For pizza
The top two and bottom two elements will heat when the 'pizza' setting has been selected.
1.Place the wire rack in the middle shelf in the sunken position.
2.Place the pizza tray on the shelf.
3.Turn the oven setting to ‘Pizza/Toast’.
4.Set the temperature to 210ºC and allow tray to preheat for 5-10 minutes before using.
To toast
The top two and bottom two elements will heat when the ‘Toast’ setting has been selected.
1.Place the wire rack into the middle rack support guide, in the sunken position.
2.Arrange bread on the wire rack.
3.Turn the oven setting to ‘Toast’.
4.Set the temperature control to the maximum 240ºC.
5.To set the time first turn the dial fully clockwise to 60 minutes, then turn it ant-clockwise to the toast icons to start the timer. This ensures accurate timing. Light Toast represents the lightest toast shade and Black Toast represents the darkest shade.
6.A bell will sound when the selected toast cycle has ended.
Note: Toasting times will vary depending on the type of bread used. Sweet and fruit
breads generally take less time than white or wholemeal breads.
To grill
The top two elements will heat when the ‘Grill’ setting has been selected.
1.Place the wire rack, in the sunken position, into the highest rack support guide.
2.Place the drip tray inside the baking pan and position the food on the drip tray. Place the baking pan on the wire rack.
3.Turn the oven setting to ‘Grill’.
4.Set the temperature control to maximum 240ºC.
Note: For best results, allow the oven to preheat for 5 -10 minutes or as per recipe instructions.
5.To turn the grill on, turn the timer control clockwise to the desired time. Alternatively, for continuous operation, turn the timer control to the ON position.
6.When finished grilling, the oven will switch off automatically and a bell will sound if the timer was selected. Alternatively, turn the timer control to OFF position if the continuous mode was selected.
6
Using your Bake & Grill continued
To reheat
The bottom two elements will heat when the ‘Reheat’ setting has been selected.
1.Place the wire rack in either the raised or sunken position, into the desired rack support guide, depending on the type of food/dish that is being reheated.
2.Place the food in an oven-proof dish.
3.Turn the oven setting to ‘Reheat’.
4.Select the desired temperature on the temperature control. See page 10 for a guide.
5.To turn the oven on, turn the timer control clockwise to the desired time. Alternatively, for continuous operation, turn the timer control to the 'ON' position.
6.Stir food occasionally to ensure even reheating of food.
Note: Use oven mitts to remove dish as it will be very hot.
7.When finished reheating, the oven will switch off automatically and a bell will sound if the timer was selected. Alternatively turn the timer to the 'OFF' position if the continuous mode was selected.
To bake or roast
The top two and bottom two elements will heat when the ‘Bake’ setting has been selected.
1.Place the wire rack in the sunken position, into the desired rack support guide.
2.Place the food to be baked on the wire rack, using the appropriate pan, tray etc.
3.Place the drip tray inside the baking pan and position the food on the drip tray. Place the baking pan on the wire rack.
4.Turn the oven setting to ‘Bake’.
5.Select the desired temperature on the temperature control.
Note: For best results, allow the oven to preheat for 5 -10 minutes or as per recipe instructions.
Important: If baking cakes, biscuits etc, using recipes other than those provided with this instruction booklet, it is recommended that oven temperatures for the ‘Bake’ setting
be reduced by approximately 20-30°C. The recipes in the back of this book have already been adjusted.
5.To turn the oven on, turn the timer control clockwise to the desired time. Alternatively, for continuous operation, turn the timer control to the ON position.
6.When finished baking, the oven will switch off automatically and a bell will sound if the timer was selected. Alternatively, turn the timer control to OFF position if the continuous mode was selected.
7
 Loading...