


EM8000

ESPRESSO MACHINE
USER GUIDE
EM8000


Important instructions – retain for
future use.
Contents
Sunbeam's Safety Precautions 2
Features of your Torino 4
Torino LCD Display 9
Quick Guide to Using Your Torino 10
Tips to Coffee Making 15
Tips to Milk Texturing 19
Advanced Programming 21
Espresso Recipes 24
Care and Cleaning 26
Coffee Thermoblock Cleaning 28
Steam Thermoblock Descaling 31
Troubleshooting Guide 33

2
Sunbeam’s Safety Precautions
SAFETY PRECAUTIONS FOR YOUR SUNBEAM
ESPRESSO MACHINE
• Always place the unit on a flat, level surface.
• Do not operate without water in reservoir.
Fill reservoir with only clean and cold water.
Observe the maximum filling volume is 2.5L.
• Do not remove the filter handle during the espresso
pour or water flow as the unit is under pressure.
Removing the filter handle during either of these
operations can lead to a scalding or injury.
• The steam wand and hot water tap become very
hot during texturing milk and water flow. This may
cause burns in case of contact, therefore avoid any
direct contact with the steam wand or hot water
tap.
• Always disconnect the plug from the power outlet
prior to cleaning the espresso machine or if there is
any problem during the coffee making process.
• Do not allow the power cord to come into contact
with the hot parts of the espresso machine,
including the cup warming plate, hot water tap and
steam wand.
• Do not place hands directly under the steam, hot
water or coffee pour as this can lead to a scalding
or injury.
• This appliance can be used by children aged from 8
years and above if they have been given supervision
or instruction concerning use of the appliance in a
safe way and understand the hazards involved.
Cleaning and user maintenance shall not be made
by children unless they are older than 8 and above
and supervised. Keep the appliance and its cord
out of reach of children aged less than 8 years.
• Appliance can be used by persons with reduced
physical, sensory or mental capabilities or lack of
experience and knowledge if they have been given
supervision or instruction concerning use of the
appliance in a safe way and understand the hazards
involved.
Children shall not play with the appliance.
• The heating element surface is subject to residual
heat after use.
DISPOSAL:
Do not dispose this product
as unsorted municipal waste.
Collection of such waste separately
for special treatment is necessary.
This product must not be disposed together
with the domestic waste. This product has to be
disposed at an authorized place for recycling of
electrical and electronic appliances.
By collecting and recycling waste, you help save
natural resources, and make sure the product is
disposed in an environmental friendly and healthy
way.

3
If you have any concerns regarding the performance and use of your appliance,
please visit www.sunbeam.com.au or contact the Sunbeam Consumer Service Line.
Ensure the above safety precautions are understood.
Sunbeam’s Safety Precautions
Sunbeam is very safety conscious when designing and
manufacturing consumer products, but it is essential
that the product user also exercise care when using
an electrical appliance. Listed below are precautions
which are essential for the safe use of an electrical
appliance:
• Read carefully and save all the instructions
provided with an appliance.
• Always turn the power off at the power outlet before
you insert or remove a plug. Remove by grasping
the plug - do not pull on the cord.
• Turn the power off and remove the plug when the
appliance is not in use and before cleaning.
• Do not use your appliance with an extension cord
unless this cord has been checked and tested by
a qualified technician or service person.
• Always use your appliance from a power outlet of
the voltage (A.C. only) marked on the appliance.
• The temperature of accessible surfaces may be
high when the appliance is operating.
• Never leave an appliance unattended while in use.
• Do not use an appliance for any purpose other than
its intended use.
• Do not place an appliance on or near a hot gas
flame, electric element or on a heated oven.
• Do not place on top of any other appliance.
• Do not let the power cord of an appliance hang over
the edge of a table or bench top or touch any hot
surface.
• Do not operate any electrical appliance with a
damaged cord or after the appliance has been
damaged in any manner. If damage is suspected,
return the appliance to the nearest Sunbeam
Appointed Service Centre for examination, repair
or adjustment.
• For additional protection, Sunbeam recommend
the use of a residual current device (RCD)
with a tripping current not exceeding 30mA in
the electrical circuit supplying power to your
appliances.
• Do not immerse the appliance in water or any other
liquid unless recommended.
• Appliances are not intended to be operated by
means of an external timer or separate remote
control system.
• This appliance is intended to be used in household
and similar applications such as: staff kitchen areas
in shops, offices and other working environments;
farm houses; by clients in hotels, motels and other
residential type environments; bed and breakfast
type environments.
Temperature of the surface displaying this image
maybe high when the appliance is operating.
4
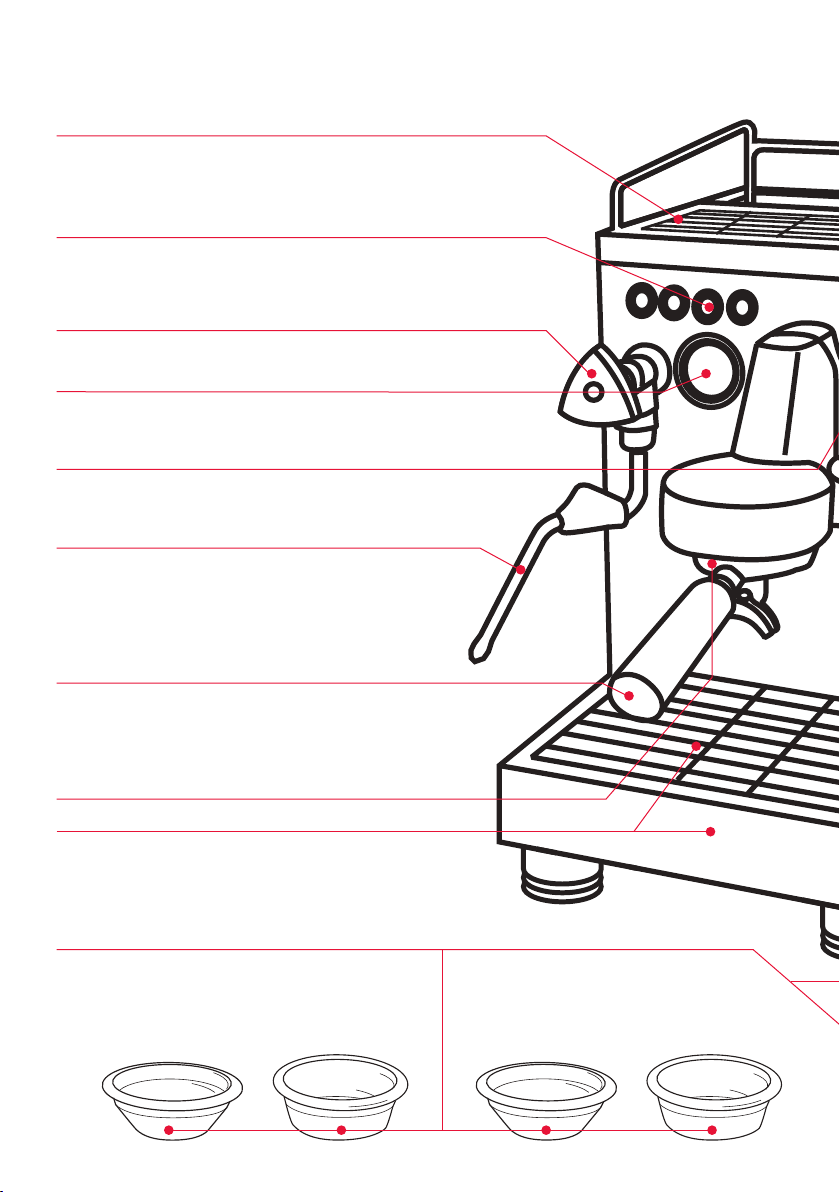
Warming rack
Preheats cups and glasses, which helps retain the
essential characteristics of true espresso - aroma and a
rich, sweet taste.
Programmable control panel
Shows the Coffee Temperature, Steam flow rate,
Pre-infusion profile and cleaning reminder.
Steam control dial
To open and close the steam for texturing milk.
LCD display
Shows shot clock, low water, cleaning and programming
functions.
Espresso pressure gauge
The gauge measures the resistance to the espresso pour,
indicating the quality of the espresso shot.
Steam wand
Group handle
The sloping handle is designed for improved ergonomic
use and when rested on the bench provides an even
tamping surface, resulting in a better tasting espresso.
Commercial size group head
Removable drip tray and grill
Accessories
All the essential accessories to make
an authentic café-quality espresso.
Double filter basket
Dual-floor
Double filter basket
Single filter basket
Dual-floor
Single filter basket
Features of your Torino

5
2.5 litre water reservoir
Removable 2.5 litre water reservoir is fitted with
an anti-calc filter and can be filled from the top.
1 and 2 cup buttons
Choose from 1 and 2 cup (1 shot and 2 shot)
espresso serve pours. A controlled measure of
water is dispensed.
Hot water control dial
Used to open and close the hot water.
Manual pour arm
Alternative to using the 1 and 2 cup pour
buttons, this allows you to control your own
length of pour.
Hot water wand
Dispenses a controlled flow of hot water.
Adjustable feet
Ensure a level machine on level surface.
FEATURES YOU CAN'T SEE
Twin pumps and triple thermoblocks allow you to
texture milk and pour an espresso at the same
time.
15 BAR Italian espresso pump
PID technology controls water temperature
precisely for both espresso and steam functions.
Pre-infusion; 4 programs to choose from.
Brass collar is durable and ideal for frequent use.
Advanced programming to adjust pump and
temperature settings for optimal steam and
brewing performance.
Stainless steel and die-cast metal design
Power saving mode helps save energy by turning
off your machine after 30 minutes of inactivity.
Tamper
600ml jug
Cleaning disc
Cleaning Pin
6
Twin Pump and Triple Thermoblock System
True to commercial use, the Torino
has twin pumps, and a unique triple
thermoblock heating system, to deliver fast
water heat up and delivery at the correct
pressure. There is a dedicated pump and
2 dedicated thermoblocks for the espresso,
and a dedicated pump and 1 dedicated
thermoblock for the steam function.
Dedicated systems for each of the espresso
and steam functions, allow you to pour an
espresso and texture milk and at the same
time; helping to eliminate temperature
variations.
The thermoblock heating systems are lined
with stainless steel and fitted with PID
technology. The PID (proportional integral-
derivative) controller continually monitors
the water temperature to ensure water is
delivered to the coffee grounds at the precise
temperature needed.
Espresso Function
The Torino is fitted with a 15 BAR Italian
pump and two thermoblocks for the espresso
function, delivering the pressure required
for a complete extraction of oils, coffee
solids and aroma. Fitted with a pressure
relief system, it ensures that any remaining
pressure after the extraction is released
internally through to the drip tray, allowing
for quick, successive brews. The second
thermoblock for the espresso pour is located
inside the group head, ensuring the water is
at the exact temperature just before it meets
the coffee grinds.
Steam Function
A 4 BAR Italian pump and one thermoblock
is dedicated to the steam function, producing
instant steam pressure for texturing milk.
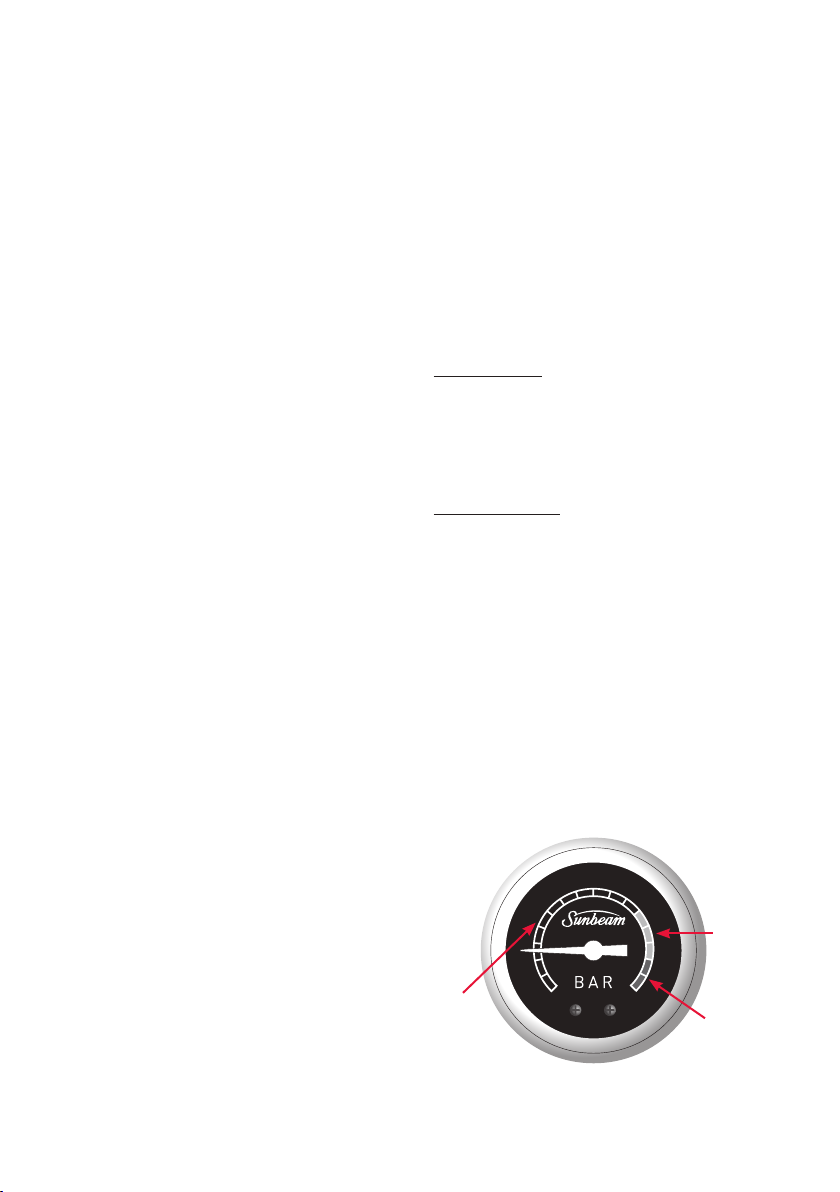
Espresso Pressure Gauge
The espresso gauge is an indicator of the
quality of the espresso pour and should be
used as a guide. It measures the pressure or
resistance created by water being pumped
through the tamped coffee grinds into the
group handle.
Optimum pour. When the needle is within the
target area on the gauge, it indicates a quality
serve of espresso has been made. A quality pour
has a slow, but flowing pour of espresso with
a consistency similar to that of warm dripping
honey. The crema is dark golden in colour.
Under-extracted. If the needle is before
the target area, this indicates the serve
of espresso is ‘under-extracted’ as it has
extracted too little of the essential oils,
flavours and colours from the coffee grinds.
This occurs when water passes too quickly
through the tamped coffee grinds and is
an indication that either the grind is too
coarse (so the water flows straight through
the grinds) or the filter basket has been
under-dosed (too little coffee in the basket).
It tastes flat and lacks flavour. The pour is
quick and light in colour and the resulting
crema is thin with a creamy light brown
colour.
Features of your Torino continued
0
2
4
6
8
10
12
14
16
Under
Extracted
Pour
Over
Extracted
Pour
Optimum
Pour

7
Features of your Torino continued
Over-extracted. When the needle goes beyond
the target area it indicates that the serve of
espresso is ‘over-extracted’ as it has extracted
too much of the essential oils, flavours and
colours from the coffee grinds. This occurs when
the water passes very slowly through the tamped
coffee grinds and is an indication that either
the grind is too fine (so that it is difficult for the
water to pass through) or the filter basket has
been over-dosed (too much coffee in the basket).
In this situation the hot water is in contact with
the coffee grinds for too long which creates a
burnt and bitter tasting espresso. There may be
no pour, or it may be slow and drip throughout
the entire pour. The crema is very dark.
Shot Clock
The shot clock provides another indicator of the
quality of the pour. The optimum time per shot
varies between different bean types. However in
general:
· Single shot = 20 – 35 seconds
· Double shot = 50 - 65 seconds
Manual Pour Arm
You can use the manual arm if you like your
shot shorter or longer than the standard pour,
or if you like to change the duration of the
pour for different bean types which require
different brew lengths.
Commercial Size Group Head & Group Handle
The exterior of the Torino, is inspired from the
traditional, high polished commercial Italian
machines, and the iconic Italian e61 group
head. The group head and 58mm group handle
are designed to commercial specifications
using brass and stainless steel components
for durability, and to help bring a professional
espresso experience to your home.
The sloping group handle has been designed by
Sunbeam for an easier, more ergonomic use;
and to provide a more even tamp. The angle of
the handle provides a more ergonomic action
when attaching and removing the handle from
the group head. The sloping handle also allows
you to rest the group handle on the bench
whilst keeping the filter basket level, making
it easier to produce an even tamp, ensuring an
even extraction. The tamping pad on the under-
side of the group handle basket allows you to
position the group handle on the edge of your
bench top when tamping.
Pre-Infusion
Pre-infusion is pre-programmed into the
Torino. Pre-infusion warms and wets the
coffee grounds under low pressure to bring
the particles together to form one cake/ puck,
before full water pressure is applied. This
helps to prepare the bean oils for extraction
to deliver greater body and sweetness to the
espresso. It also allows the cake to bloom
(expand) into the shower head so there is an
even surface for an even pour.
Drip tray and grill
The large capacity drip tray is lined with
plastic, preventing staining from espresso
oils, lightweight for easy removal and
designed with no dirt traps for simple wipe
down cleaning.
Single floor filter baskets
These are the most common style of filter
baskets. As the name implies, these baskets
have a single floor. If you hold these up to
the light, you can see many small holes.
The smaller single filter is used for a single
cup of coffee, and the larger double filter
is used for two cups of coffee, or one single
'double strength' cup of coffee. Suitable
dosage varies from bean to bean. However in
general the dose for a single filter is between
10-12g, and double flter is 18-20g.

8
Tip: For optimum results Sunbeam
recommends using the single floor filters with
the Torino. To achieve the optimum espresso
pour, it is best to grind your coffee beans as
you need.
Dual floor filter baskets
These filters have 2 floors. When held up to
the light and looking at the under-side of the
filter you will see a single hole. Dual floor
filters are designed for use with pre-ground
coffee as this coffee is too coarse for use in
the single floor baskets. Dual floor baskets
are designed to compensate for this by
slowing the flow of espresso creating a subtle
aeration to ensure a golden crema. Although
designed for use with pre-ground coffee, dual
floor filter baskets can also be used with all
ground coffee. If you are having trouble with
under extracted coffees, try using dual floor
filter baskets.
Power Saving Mode
After 1 hour of non-use the machine will
automatically switch to power saving mode.
All the lights on the buttons will dim and
the machine will power down to 75% of
power. After a further 4 hours of non-use the
machine will beep once and then turn off.
To bring the machine out of power saving
mode simply press any of the buttons on the
control panel.
Features of your Torino continued
9
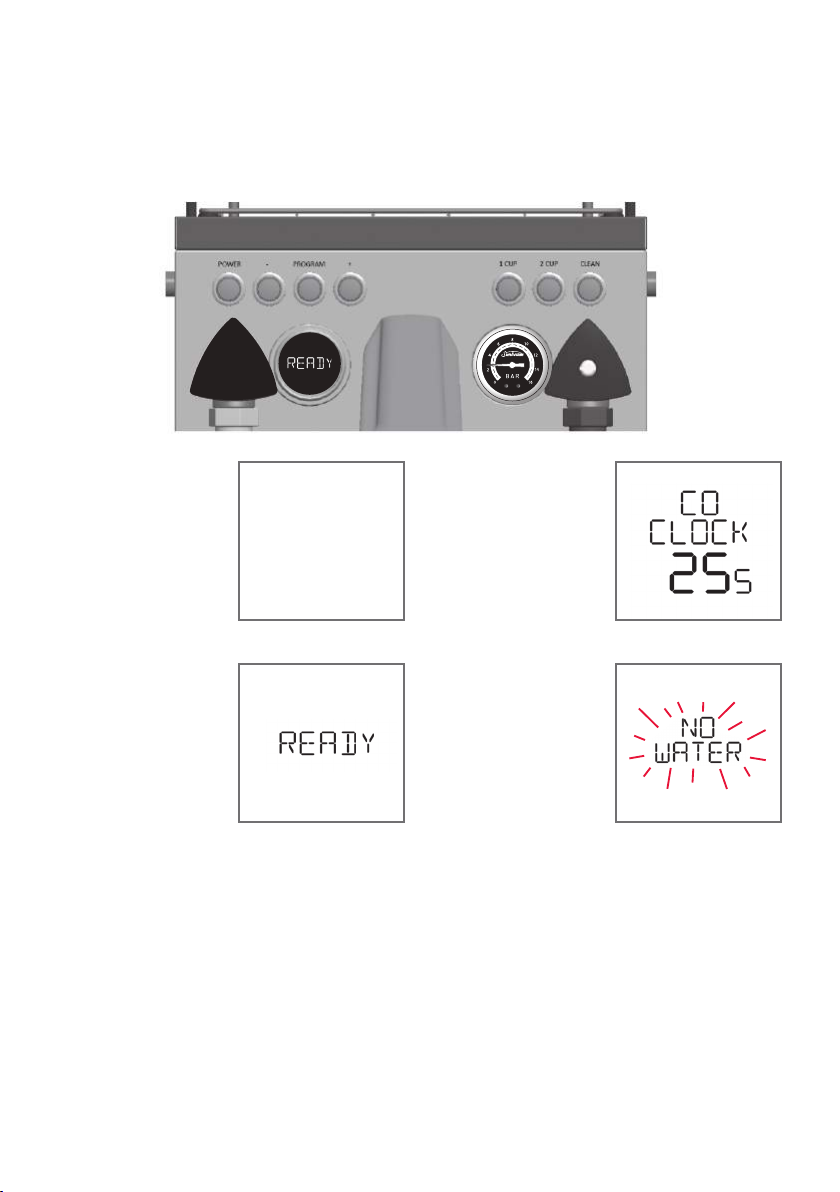
Torino LCD display
Display modes
1. Pre-heat mode:
display nothing
(the power button
flashing)
See figure 22.
2. Ready mode:
display "READY".
See figure 23.
3. Coffee mode:
Counting the
brewing time.
See figure 24.
4.Fill tank:
remind user to fill
tank by flashing
"NO WATER" when
low water level in
water tank.
See figure 25.
10
Quick Guide To Using Your Torino
For greater detail on the coffee making process, use this Quick Guide together with the Tips to
Coffee Making and Tips to Milk Texturing sections.
WARNING: Before turning on the Torino, ensure the steam and hot water control dials, and the
manual pour arm are in the OFF position. If these are not in the OFF position, the machine
may pour when it is ready.
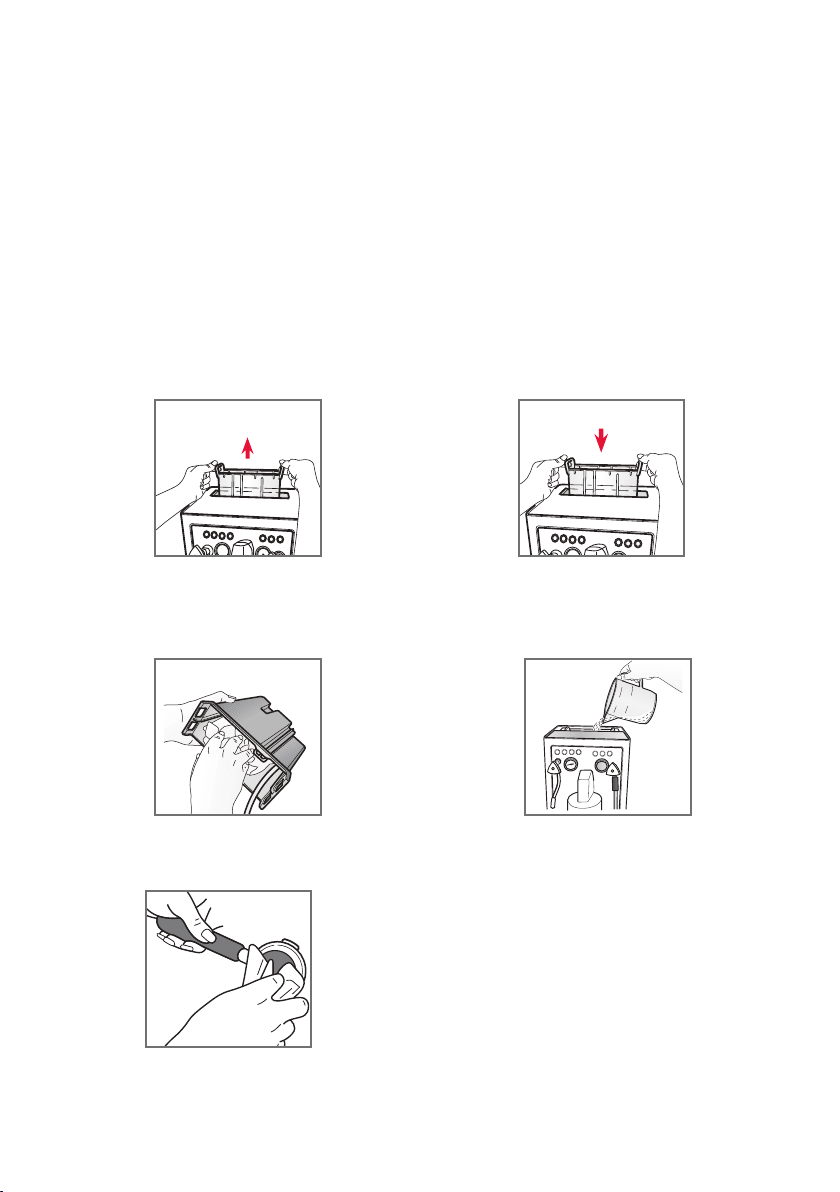
Preparing your Torino for the first time
1. Lift the lid and remove the water reservoir.
2. Carefully rinse the water reservoir and lid
with water.
3. Carefully rinse and dry the group handle
and filter baskets.
4. Reposition the water reservoir in the
machine.
5. Fill water reservoir with good quality
potable drinking water.
11
Quick Guide To Using Your Torino continued
Making the Espresso
Scalding hazard! Warning: Do these
steps very carefully.
1. Plug into 230-240V AC powerpoint and
turn on. Press POWER button. The unit
will beep and button will flash.
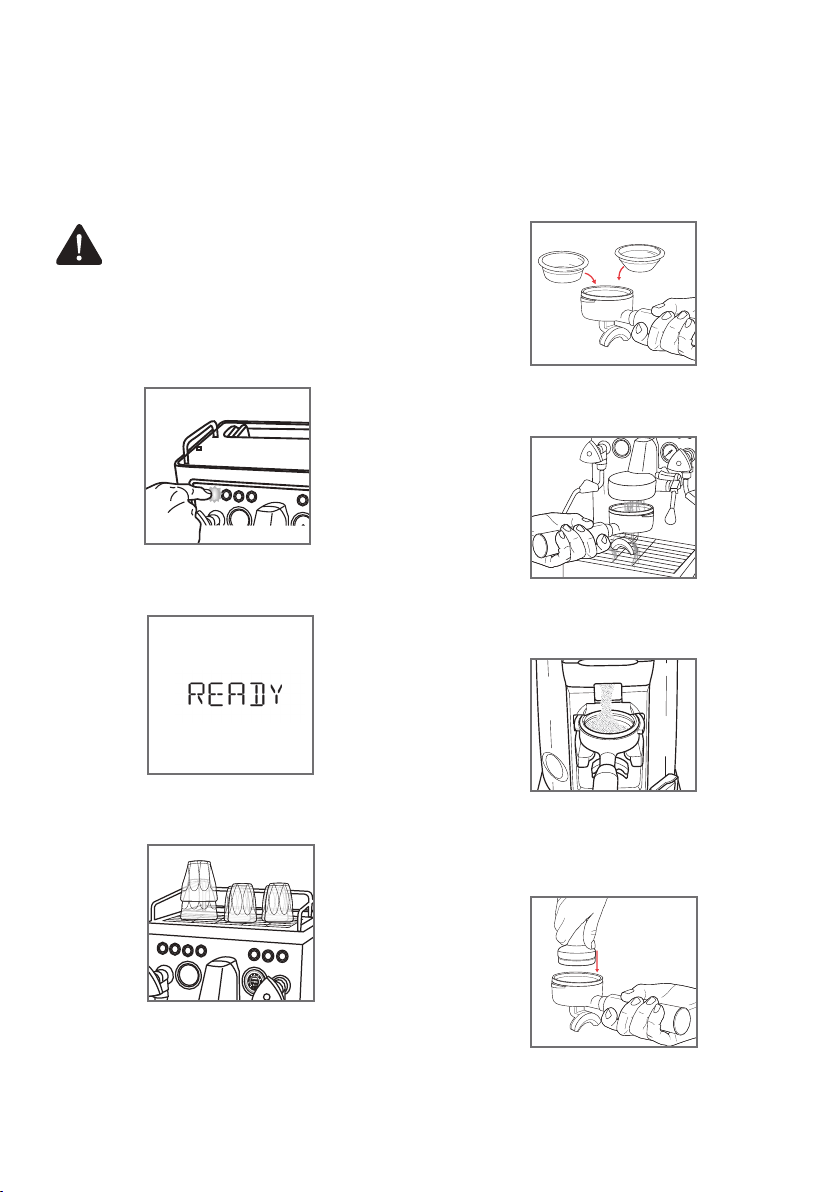
2. When it has heated up, READY will
appear in the LCD display.
3. Warm glasses and cups.
4. Fit the group handle with a filter basket.
5. Hold group handle under the group head
and purge with hot water to preheat.
6. Dry wipe the basket and fill with ground
coffee.
7. Tamp the coffee, ensuring the coffee
level is 3-5mm below the filter basket
rim.
Single filter
basket
Double filter
basket
12
Quick Guide To Using Your Torino continued
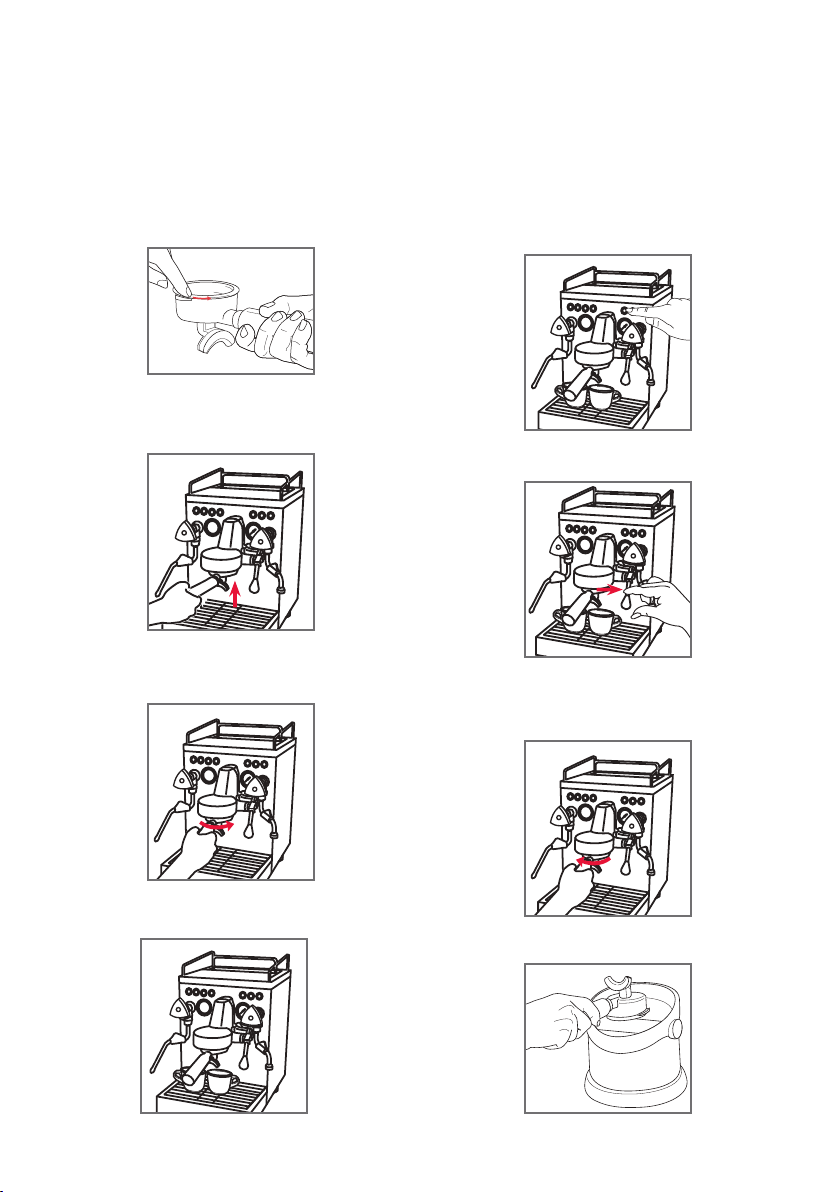
8. Wipe the edge of the filter to remove any
loose grinds, use immediately.
9. Insert group handle up into the group
head.
10. Turn group handle to the right until firmly
locked into place.
11. Place glasses/ cups below pouring spouts.
12. a) Press 1 CUP or 2 CUP button to start
the espresso pour.
12. b) Alternatively use the manual pour arm.
13. Once pour is finished, remove group
handle by turning to the left.
14. Discard the used coffee grinds.
13
Texturing the Milk
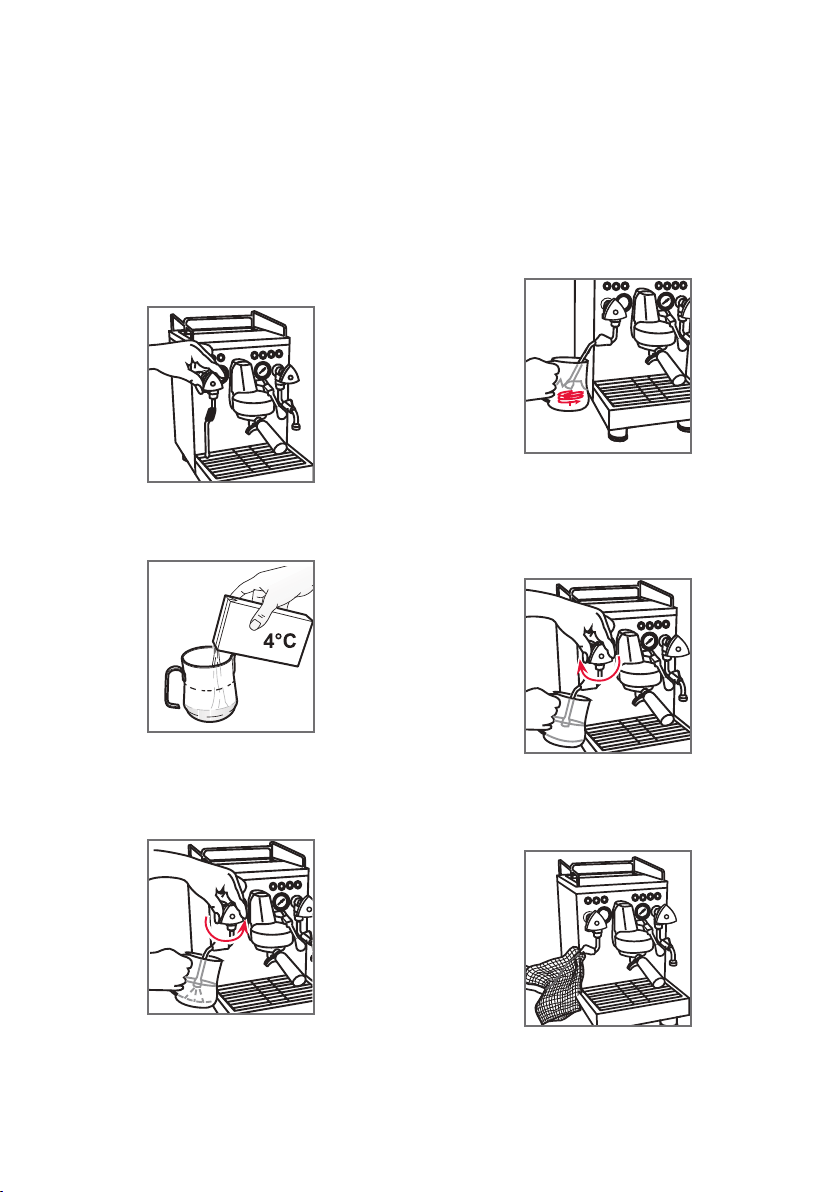
1. Move steam wand over the drip tray, and
purge by turning the steam on for a few
seconds.
2. Pour about 250-300ml of cold milk into
the jug.
3. Place steam wand into the milk, approx.
1cm below surface, and gradually turn
steam dial fully on.
4. Ensure steam tip is just off centre at
the side of the jug, to create a whirlpool
action in the milk.
5. When sufficient microbubbles have
formed and temperature has been
reached (the jug is too hot to touch
continuously), turn steam dial off.
6. Immediately wipe steam nozzle and wand
with thick, damp cloth.
300ml
Using your espresso machine continued

14
Quick Guide To Using Your Torino continued
7. Move steam wand over the drip tray,
and purge by turning steam on for a few
seconds.
8. Tap the jug on the bench to remove larger
bubbles, and swirl jug gently to prevent
the milk separating.
Hot Water
Scalding hazard! Warning: Do these
steps very carefully. Use the special
insulated devices to move the water
and steam wands.
1. Place a glass/ cup beneath the hot water
wand and turn on the hot water dial.
2. Turn off the hot water by turning
the knob clockwise.

15
Tips to Coffee Making
This section gives greater detail about the
coffee making process, and should be used
together with the Quick Guide to Using your
Torino.
1. Pre-heating Glasses
• Pre-heating glasses helps to preserve the
crema of the espresso and also helps to
maintain the temperature of your coffee
once it has been poured.
• Place glasses and cups to be used on the
warming tray of the machine, or fill with
hot water from the hot water wand.
2. Pre-heating the Group Handle and Filter
Baskets
• This is important especially for the first
coffee being made, as a cold group handle
can significantly decrease the temperature
of the water at the point of extraction.
This in turn will alter the quality and
characteristics of the resulting espresso
extraction.
• Fit the group handle with your filter
basket and hold under the group head and
purge with hot water by pressing the 2
CUP button or by using the manual pour
arm. Rotate the group handle so both the
underside of the group handle and the
filter basket is preheated. Dry the filter
basket before filling with coffee.
3. Purge the Group Head, before & after
extraction
• Always purge water from the group head
before locking in the group handle. This
will dislodge any ground coffee residue
from the group head.
• After each extraction, remove the group
handle and purge the group head. This will
ensure it is clean for the next extraction
and prevent residue and grinds building
up. Simply press the 1 CUP button or use
the manual pour arm and allow some water
to run through.
4. Dosing and Tamping
• Grind evenly and directly into the centre
of the filter basket, and fill with ground
coffee. The amount of coffee grinds to add
depends on the bean and how you like
your coffee. However a good guide is to
aim to have the filter basket completely
full to the rim with loose coffee grinds
before tamping. The easiest way to do this
is to fill with ground coffee and collapse
it as you go (by tapping the handle down
on the bench) to create more space to fill
with more coffee. End with a slight mound
above the rim, so that if you smoothed the
grind mound with your finger along the
rim of the basket, the basket would be
completely full to the rim (with no gaps).
At this stage you have not tamped.
• Using the tamper, tamp straight down until
there is about an 3-5mm space between
the tamped grinds and the top of the filter
basket. Again, this will vary depending
on the bean you use, and how you like
your coffee. Ensure to tamp to an even
level, as this will ensure the water flows
evenly through the grinds ensuring an even
extraction and better flavour.
• Suitable dosage varies from bean to bean.
However in general the dose for a single
filter basket is between 10-12g, and
double filter basket is 18-20g. When you
are learning to make espresso for the first
time, you may want to weigh your dose to
ensure the correct dose.

16
Tips to Coffee Making continued
• To ensure a level tamp, use the Sunbeam
tamper as a handy guide. Line up the black
& silver dividing line on the base of the
tamp, and ensure it is level with the rim of
the filter basket.
• TIP. The coffee dosage and the degree of
tamping should remain the same every
time you make a coffee. The only thing
that should vary is the particle size of the
coffee grinds and this will vary depending
on the bean. By keeping a consistent
technique and changing one thing at a
time, it’s easier to know which variable
change produces a better taste for you.
NOTE: If purchasing pre-ground bagged coffee
purchase a very fine grind and use the dual
floor filter baskets as this coffee will still
be too coarse for use with single floor filter
baskets.
If having beans ground fresh for you, request
a very fine grind, the same that would be
used for a commercial espresso machine.
5. The Espresso Pour
• Great coffees start with freshly roasted
beans that will deliver a sweet espresso
that will be rich in texture, body and
aroma. Controlling each part of the coffee
making process is the secret.
• The way the espresso pours will tell you
everything. Look out for:
1. Shot Clock Infusion time. This is when
pressurised water is forced through the
ground coffee. The shot clock provides
a good indicator of the quality of the
pour. The optimum time per shot varies
between different bean types. However
in general:
· Single shot = 20 – 35 seconds
· Double shot = 50 - 65 seconds
2. Pressure Gauge. The pressure gauge
provides an indication of the resistance
created by the dosing/ tamping of the
filter basket and the grind size.
• Optimum pour. When the needle
is within the target area on the
gauge, it indicates a quality serve of
espresso has been made. A quality
pour has a slow, but flowing pour of
espresso with a consistency similar
to that of pouring honey. The crema
is dark golden in colour.
• Under-extracted. If the needle is
before the target area, this indicates
the serve of espresso is ‘under-
extracted’ as it has extracted too
little of the essential oils, flavours
and colours from the coffee grinds.
This occurs when water passes too
quickly through the tamped coffee
grinds and is an indication that
either the grind is too coarse (so
the water flows straight through the
grinds) or the filter basket has been
under-dosed (too little coffee in the
basket). It tastes flat, sour and lacks
flavour. The pour is quick and light
in colour and the resulting crema
is thin with a creamy light brown
colour.
• Over-extracted. When the needle
goes beyond the target area it
indicates that the serve of espresso
is ‘over-extracted’ as it has extracted
too much of the essential oils,
flavours and colours from the coffee
grinds. This occurs when the water
passes very slowly through the
tamped coffee grinds and is an
indication that either the grind is
too fine (so that it is difficult for
the water to pass through) or the
filter basket has been over-dosed
 Loading...