


Duos™
Sous Vide and Slow Cooker
Instruction/Recipe Booklet
MU4000
Please read these instructions carefully and retain for future reference.
2

Contents
Sunbeam’s Safety Precautions |
2 |
Features of your Sunbeam Duos |
4 |
The Control Panel |
6 |
Cooking menus overview |
7 |
Cooking menu settings table |
10 |
How to use the Sous Vide menu |
11 |
Sous Vide Temperature and Time Guide |
12 |
How to use the Slow Cook menu |
14 |
Care and Cleaning |
15 |
Hints and Tips |
16 |
Troubleshooting |
18 |
Recipes |
19 |
Important instructions – retain for future use.
Sunbeam’s Safety Precautions
SAFETY PRECAUTIONS FOR YOUR SUNBEAM DUOS SOUS VIDE AND SLOW COOKER
•Do not plug in or switch on the unit without having the cooking pan inside the unit.
•Do not operate the unit on an inclined surface
•Do not move or cover the unit whilst in operation
•Do not immerse the base of the unit in water or any other liquid
•Use your unit well away from walls and curtains, and don’t use in confined spaces.
•Do not touch any metal surfaces of the unit while it is in use as they will be hot.
•Use handles and oven mitts to move the unit, the cooking pan and the lid when hot.
•Do not operate the unit without food or liquid in the cooking pan.
•Be careful when lifting and removing lid after cooking. Always tilt the lid away from you as steam is hot and can result in serious burns. Never place face over the unit.
•Unplug the unit when not in use and before cleaning. Allow the unit to cool before putting on or taking off parts to clean.
•Do not use the pan on the stovetop, inside a microwave oven or inside an oven
•Do not use the cooking pan for food storage or place in the freezer.
2
Sunbeam’s Safety Precautions
Sunbeam is very safety conscious when designing and manufacturing consumer products, but it is essential that the product user also exercise care when using an electrical appliance. Listed below are precautions which are essential for the safe use of an electrical appliance:
•Read carefully and save all the instructions provided with an appliance.
•Always turn the power off at the power outlet before you insert or remove a plug. Remove by grasping the plug - do not pull on the cord.
•Turn the power off and remove the plug when the appliance is not in use and before cleaning.
•Do not use your appliance with an extension cord unless this cord has been checked and tested by a qualified technician or service person.
•Always use your appliance from a power outlet of the voltage (A.C. only) marked on the appliance.
•This appliance is not intended for use by persons (including children) with reduced physical, sensory or mental capabilities, or lack of experience and knowledge, unless they have been given supervision or instruction concerning use of the appliance by a person responsible for their safety.
•Children should be supervised to ensure that they do not play with the appliance.
•The temperature of accessible surfaces may be high when the appliance is operating.
•Do not use an appliance for any purpose other than its intended use.
•Do not place an appliance on or near a hot gas flame, electric element or on a heated oven.
•Do not place on top of any other appliance.
•Do not let the power cord of an appliance hang over the edge of a table or bench top or touch any hot surface.
•Do not operate any electrical appliance with a damaged cord or after the appliance has been damaged in any manner. If damage is suspected, return the appliance to the nearest Sunbeam Appointed Service Centre
for examination, repair or adjustment.
•For additional protection, Sunbeam recommend the use of a residual current device (RCD) with a tripping current not exceeding 30mA in the electrical circuit supplying power to your appliances.
•Do not immerse the appliance in water or any other liquid unless recommended.
•Appliances are not intended to be operated by means of an external timer or separate remote control system.
•This appliance is intended to be used in household and similar applications such as: staff kitchen areas in shops, offices and other working environments; farm houses; by
clients in hotels, motels and other residential type environments; bed and breakfast type environments.
•Never leave an appliance unattended while in use.
If you have any concerns regarding the performance and use of your appliance, please visit www.sunbeam.com.au or contact the Sunbeam Consumer Service Line. Ensure the above safety precautions are understood.
3
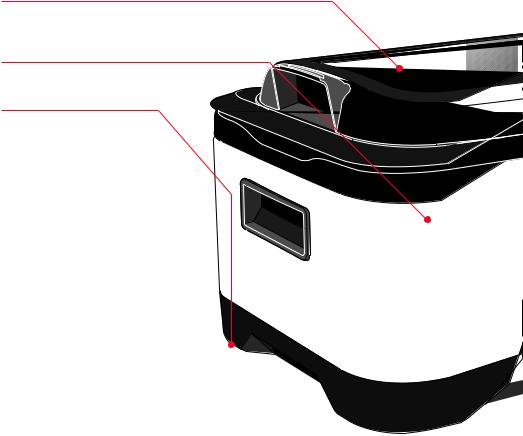
Features of your Sunbeam
Duos™ Sous Vide and Slow Cooker
Tempered Glass Lid
5.5 litre working capacity
Non-slip feet
Keeps the unit secure on the bench top during use and prevents scratching of bench top surfaces.
4

Non-stick Removable Cooking Pan
The removable cooking pan is non-stick, and dishwasher safe for easy cleaning.
Control Panel
Pouch rack
Separates sous vide pouches for more even cooking.
5
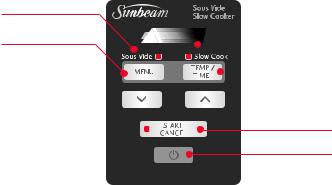
The Control Panel
2 |
|
|
|
1 |
|
|
5 |
|
|
||
|
|
|
3 |
|
|
The control panel on the Sunbeam Duos Sous Vide and Slow Cooker is designed to ensure easy use. Choose your cooking menu, set the temperature and time, and start cooking.
1.Menu Button
Scroll to the Sous Vide menu or the Slow Cooker menu by pressing the MENU button.
2.Cooking Menu indicator
A light will display in the screen next to Sous Vide or Slow Cook menus, when the MENU button is selected.
Sous Vide Menu
The Sous Vide menu has heat settings from 40°C to 90°C.
Slow Cook Menu
The Slow Cook menu has three heat settings – LOW, HIGH and AUTO KEEP WARM.
3.Temp/ Time Button
4
6
4.Start/ Cancel button
Press the START button to begin the selected cooking menu once all settings have been chosen. Press and hold the CANCEL button for three seconds if you wish to change your setting.
5.Timer display screen
Will show the remaining time in the COOKING menus, or elapsed time in the slow cook KEEP WARM mode.
6.Power Button
Press to turn your Sunbeam Duos ON or OFF. Always unplug your unit when cooking is finished.
TIP: After starting your menu selection, if the START button has not been pressed after 20 minutes, the unit will switch off as a safety precaution.
After you’ve selected your cooking menu, set the temperature required by pressing the  and
and  buttons. After you’ve selected the temperature, set the time required by pressing the TIME button, then the
  and
and  buttons.
6
Cooking Menus Overview
The Sunbeam Duos has 2 cooking menus.
Sous Vide Cooking
Sous Vide has been a popular cooking method in restaurants for several years. Sous Vide is a French term which means ‘under vacuum’ and describes food placed in vacuum sealed pouches and cooked in a water oven. Food slowly cooks at precise low temperatures over a long period of time to achieve succulent, superb tasting meals. Sealing foods inside pouches allows it to cook in its own juices in addition to any marinades, seasonings etc you wish to add. Vitamins, minerals and juices are
retained within the food and natural flavours are intensified. This allows the food to be healthier, more tender and flavoursome. Meats cooked in a sous vide tend to be more tender, tougher and mostly cheaper yet flavour filled cuts of meats such as chuck steak can be used.
As sous vide cooking requires foods and meats to be sealed individually, yet cooked at the same time; it is perfect for families and entertaining when there are people with varied tastes and nutritional requirements.
It is difficult to overcook using the Sous Vide method, although textures can change slightly. As it's difficult to overcook, it allows food to be cooked ahead of time, perfect for family meals and entertaining.
Temperatures. The Sunbeam Duos has a 40°C to 90°C temperature range, with 1°C increment selection. Different temperatures are required for different types of food and for different degrees of doneness. See the Sous Vide Temperature and Time Guide on page 12.
Time. The cooking time depends on the thickness of the food, rather than the weight of the food. The default cooking time is 1 hour. Time can be set from 1 hour to 24 hours. See the Sous Vide Temperature and Time Guide on page 12 for more information.
Ideal Foods for Sous Vide Cooking. Meats are ideal to cook using the sous vide method as they are more tender, succulent and flavour filled.
Red meats - Lamb, beef and pork.
Poultry - Chicken, turkey, duck.
Fish and Seafood - Fish, lobster tails, scallops.
Vegetables - Root Vegetables. Potato, carrot, parsnip, beets, turnips.
Vegetables - Tender Vegetables. Peas, asparagus, corn, broccoli, cauliflower, eggplant, onions, squash.
Fruit - Firm Fruits. Apple, pear.
Fruit - Tender Fruits. Mango, plum, apricot, peach, nectarine, papaya, strawberry.
Steps to Sous Vide cooking
Step 1. Seasoning your food
To enhance the flavour of your food, you may wish to marinade or add spices, herbs, butter or oil to your vacuum pouch prior to sealing.
Step 2. Vacuum sealing your food
Sous vide cooking requires food to be vacuum sealed inside pouches to ensure excess air and moisture are removed, so the natural taste and nutritional quality
7
Cooking Menus Overview continued
of the food is captured. Vacuum sealing also assists in opening the pores in food such as meat, poultry and seafood so that marinades and seasonings are more readily absorbed for highlighted flavour.
Oxygen and moisture in air cause food to degrade and lose flavour, texture and nutritional value. Commercial quality vacuum systems remove air and moisture before sealing items airtight to create
a commercial quality vacuum. We recommend Sunbeam FoodSaver vacuum sealers and FoodSaver bags and rolls.
Step 3. Cooking your food
Food Safety Guidelines for Sous Vide Cooking
CAUTION. Food cooked using the Sous Vide method of cooking is not recommended for consumption by those in an ‘at risk’ category (low immune deficiency);
•Pregnant women
•Small children
•Elderly
•Those suffering from illness/disease
The below guidelines regarding using the Sous Vide method will help to ensure good food hygiene safety.
Food Preparation
When the water temperature has been reached in the sous vide, place the pouches carefully in the water. Ensure the pouches are fully submerged in water, and that water can easily circulate around the pouches for even cooking.
Step 4. Searing your food
When sous vide cooking is completed, you may wish to finish off by searing to improve the appearance and flavour of the food. This is particularly suited to meats. Remove the food from the pouch. Quickly sear meat in a hot pan. This will caramelise the fats and proteins for extra flavour.
•All food items to be used for cooking using the Sous Vide method should be of the highest quality in freshness.
•Ensure that all meat, seafood, poultry and game have been stored at below 5°C before preparation begins. Using a digital food thermometer to check the temperature is recommended.
•Make sure that the food pouches are clean and have not been contaminated by dirt or other food contaminants.
•Use detergent and warm water, or a sanitizing solution to wash the food preparation area.
•Separate the raw ingredient preparation area from the finished product area
•Wash hands well before commencing any food preparation.
•Prepare foods to the recommended thickness according to the Sous Vide Temperature and Time Guide on page 12. Smaller cuts of meat will cook more quickly.
8
Cooking Menus Overview continued
Cooking |
Slow Cooking |
•Use the Sous Vide Temperature and Time Guide for cooking times and temperatures.
•Ensure that the cooking pouch is completely sealed before cooking commences.
•Ensure that the cooking pouch is still completely sealed when cooking has finished.
Storage
•If the food is not going to be consumed immediately, plunge the pouch containing the food into iced water to reduce temperature quickly. Refrigerate until required.
Reheating
•Reheat food until internal temperature is above 75°C.
Slow Cooking achieves flavour filled meals, and tender moist meats cooked to perfection. Slow Cooking provides healthy, simple and economical cooking. It requires minimal supervision, short preparation times and quick clean up times.
LOW Setting. This is suitable for simmering and slow cooking.
HIGH Setting. This is for faster cooking. Typically 1 hour on HIGH = approximately 2 - 2.5 hours on LOW.
KEEP WARM Setting. When slow cooking time is completed, the Sunbeam Duos automatically switches to the Keep Warm setting to prevent overcooking and to keep your cooked food warm until serving - perfect for busy families, those on the run and those who need flexible meal times. This setting is not hot enough to cook, and should only be used to keep hot, cooked food warm for serving.
9
Cooking Menu Settings Table
Cooking Menu |
Sous Vide |
Slow Cook |
|
|
|
|
|
Temperature |
|
|
|
|
|
|
|
|
|
High |
|
Settings |
40°C to 90°C |
Low |
|
|
|
(Warm) |
|
|
|
|
|
Default Cooking Temperature |
50°C |
Low |
|
|
|
|
|
Temperature Increments |
1°C |
NA |
|
|
|
|
|
Time |
|
|
|
|
|
|
|
Settings |
1 to 24 hours |
High – 2 to 8 hours |
|
Low – 4 to 16 hours |
|||
|
|
||
|
|
|
|
Default Cooking Time |
1 hour |
High – 4 hours |
|
Low – 8 hours |
|||
|
|
||
|
|
|
|
Time Increments |
10 mins |
30 mins |
|
|
|
|
Note: On the slow cook setting, the maximum combined COOK/KEEP WARM time is 24 hours. For example if the slow cook time selected was 16 hours, the maximum keep warm time would be 8 hours.
10
How to use the Sous Vide menu
Place the Sunbeam Duos on a flat, level surface.
Plug in the unit. To turn the unit on, press the POWER button. The unit will beep, and the indicator lights and the screen will
illuminate. The Sunbeam Duos will default to the Sous Vide menu, on the 50°C setting.
1.Fill the cooking pan with the desired amount of water, and replace the lid. Ensure the water will cover the food pouches and is above the FILL line in the pan. View the Sous Vide Temperature and Time guide on page 12.
TIP: To speed up the time needed to reach the desired temperature, fill with warm water.
2.If the menu is not set to Sous Vide, set the cooking menu by scrolling through the MENU button until a light appears next to Sous Vide on the screen, and the temperature shows 50°C.
3.The default temperature is set to 50°C. To change the temperature, press the  and
and  buttons until your desired temperature appears in the screen.
4.To select the time, press the TIME button, and then press the  and
and  buttons, until your desired time appears in the LCD screen. Each button press will adjust the time by 10 minutes, or if the button is held this will change the time more quickly.
5.Once you have set the desired MENU, TEMP and TIME settings, press START. The unit will start to preheat.
6.The Sunbeam Duos needs to gain temperature before the food pouches can be placed in the sous vide pan. When the unit is gaining temperature, the red Sous Vide light will flash in the screen to
indicate the set temperature has not yet been reached, and the time : symbol won’t
flash to indicate the timer has not begun. When the selected temperature is reached, the unit will beep 3 times to indicate the set temperature has been reached, the Sous Vide light will stop flashing and the unit is ready for the food.
7.Carefully remove the lid. With a pair of tongs gently place the sealed food pouches in the water ensuring the water level does not exceed the MAX line, and that the food is covered by water. Replace the lid.
(For further information regarding sealing your food, see Cooking Menus Overview on page 7.)
TIP: You can slot the sealed food pouches vertically in the slots of the rack to ensure the food is separated and that water can circulate evenly.
8.When the sealed food pouches are in the
pan, press START so the timer can begin to countdown. The : symbol will start flashing to indicate the timer has started and that the unit is counting down.
Tip: If you do not press START to activate the timer the unit will still work as normal at the set temperature and will cook for the maximum setting of 24 hours or until you switch the power off.
9.After the set cooking time has elapsed, unit will beep 3 times and turn off.
TIP: During cooking, only lift the lid if necessary as sous vide uses low temperatures to cook, so the unit does not recover lost heat quickly. If condensation forms on
the inside of the lid reducing your vision, carefully tilt the lid away from you so that the condensation falls back into the pan.
11
Sous Vide Temperature
and Time Guide
The below table is a guide to setting the temperatures and times for your cooking. You may need to adjust for your individual tastes.
Cooking temperatures for Meat (Beef, Lamb and Pork):
RARE: 49°C
MEDIUM RARE: 56°C
MEDIUM: 60°C
MEDIUM WELL: 65°C
WELL: 71°C and up
Cooking temperatures for Poultry:
WITH BONE: 82°C
WITHOUT BONE: 64°C
Cooking temperature for Fish:
RARE: 47°C
MEDIUM RARE: 56°C
MEDIUM: 60°C
General temperature for Vegetables:
83°C -87°C
FOOD |
COOKING |
COOKING |
HOLDING TIME |
THICKNESS |
|
TEMPERATURE |
TIME |
(after cooking) |
|||
|
|
||||
|
|
|
|
|
|
BEEF & LAMB |
|
|
|
|
|
Tender Cuts |
|
|
|
|
|
Tenderloin, cutlets, sirloin, |
49°C or higher |
1 hour |
Up to 6 hours |
1-2cm |
|
rib eye, rump, T-bone |
49°C or higher |
2 hours |
Up to 8 hours |
2-5cm |
|
Tougher Cuts |
|
|
|
|
|
Blade, chuck, leg of lamb, |
49°C or higher |
8 hours |
Up to 10 hours |
4-6cm |
|
shoulder, shanks, game |
|
|
|
|
|
meats |
|
|
|
|
|
|
|
|
|
|
|
PORK: |
|
|
|
|
|
Belly |
82°C |
10 hours |
Up to 12 hours |
3-6cm |
|
Ribs |
59°C |
10 hours |
Up to 12 hours |
2-3cm |
|
Pork Chops |
56°C or higher |
4 hours |
Up to 6 hours |
2-4cm |
|
Pork Roast |
56°C or higher |
10 hours |
Up to 12 hours |
5-7cm |
|
|
|
|
|
|
12
 Loading...