


Mixmaster Series II
600 watt twin-motor benchtop mixer
Instruction/Recipe Booklet
MX7700
Please read these instructions carefully and retain for future reference.

Contents
Sunbeam’s Safety Precautions |
1 |
Features of your Mixmaster Series II |
2 |
Using your Mixmaster Series II |
4 |
Role of the twin-motor |
|
3-way beating action |
6 |
Mixing Guide |
7 |
Oven Temperature Guide |
8 |
Care and Cleaning |
9 |
Let’s Talk Ingredients |
10 |
Cookery Tips for Best Results |
12 |
Helpful Hints for a Successful Dough |
13 |
Helpful Hints for Better Cake Making |
15 |
Recipes |
17 |

Sunbeam’s Safety Precautions
SAFETY PRECAUTIONS FOR YOUR SUNBEAM MIXMASTER SERIES II.
•Never eject beaters or dough hooks when the appliance is in operation.
•Ensure fingers are kept well away from moving beaters and dough hooks.
•Only use the supplied mixing bowl.
•Do not remove the mixing bowl from the base of the Mixmaster whilst mixer is in use.
•When using extremely heavy loads the appliance should not be operated for more than 2 minutes. This does not apply to any
of the recipes in this booklet.
•Should you be using a spatula during mixing, ensure that the spatula is kept well away from moving beaters and dough hooks.
•Never tilt back the head of the Mixmaster whilst the appliance is in operation.
•The mixmaster must be switched off and unplugged before any cleaning.
•Do not restrain the mixer bowl while rotating.
•Turn the Mixmaster off and raise the head before removing the mixing bowl.
Sunbeam are very safety conscious when designing and manufacturing consumer products, but it is essential that the product user also exercise care when using an electrical appliance. Listed below are precautions which are essential for the safe use of an electrical appliance:
•Read carefully and save all the instructions provided with an appliance.
•Always turn the power off at the power outlet before you insert or remove a plug. Remove by grasping the plug - do not pull on the cord.
•Turn the power off and remove the plug when the appliance is not in use and before cleaning.
•Do not use your appliance with an extension cord unless this cord has been checked and tested by a qualified technician or service person.
•Always use your appliance from a power outlet of the voltage (A.C. only) marked on the appliance.
•Close supervision is necessary when your appliance is being used near children or infirm persons.
•Never leave an appliance unattended while in use.
•Young children should be supervised to ensure that they do not play with the appliance.
•Do not use an appliance for any purpose other than its intended use.
•Do not place an appliance on or near a hot gas flame, electric element or on a heated oven. Do not place on top of any other appliance.
•Do not let the power cord of an appliance hang over the edge of a table or bench top or touch any hot surface.
•For safety reasons and to avoid maintenance by unskilled persons, some appliances are ‘sealed’ using tamperproof screws. Such appliances should always be returned to the nearest Sunbeam Appointed Service Centre for adjustment or repair if required.
•Do not operate any electrical appliance with a damaged cord or after the appliance has been dropped or damaged in any manner. If damage is suspected, return the appliance to the nearest Sunbeam Appointed Service Centre for examination, repair or adjustment.
•For additional protection, Sunbeam recommend the use of a residual current device (RCD) with a tripping current not exceeding 30mA in the electrical circuit supplying power to your appliances.
•Do not immerse the appliance in water or any other liquid unless recommended.
If you have any concerns regarding the performance and use of your appliance, |
|
please visit www.sunbeam.com.au or contact the Sunbeam Consumer Service Line. |
1 |
Ensure the above safety precautions are understood. |
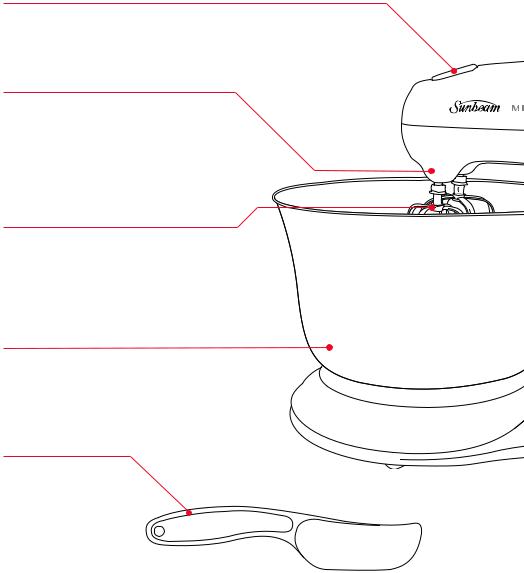
Features of your Sunbeam Mixmaster Series II
Attachment eject button
The eject button effortlessly releases the beaters or dough hooks for easy cleaning.
Twin-motor 3-way beating action
Sunbeam’s famous 3-way beating action with patent pending twin-motor technology provides a powerful mixing action and more thorough result. The first motor drives the individual beaters in opposite directions while the second drives the bowl.
Off-centre mixing head and beaters
The head of the Mixmaster and beaters are positioned off-centre to the bowl to make it easier to add ingredients during mixing.
4 litre stainless steel mixing bowl
4 litre stainless steel mixing bowl locks onto the base of the mixer and is designed specifically for mixing regular to large quantities of ingredients.
Spatula
2
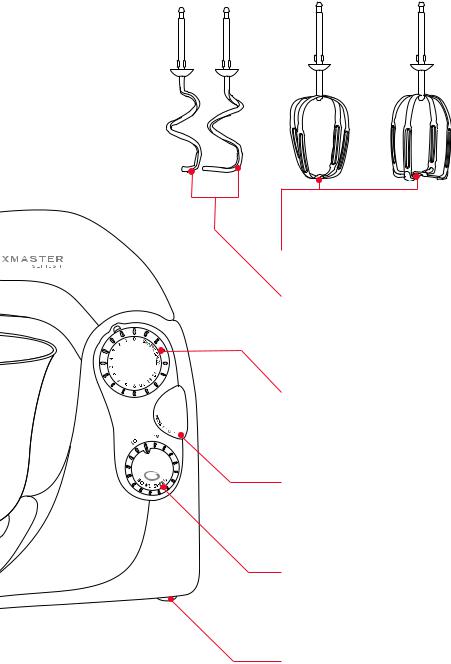
Heavy-duty beaters
Designed for optimum mixing and aeration, ideal for creaming butter and sugar, plus mixing heavy cake mixes.
Dough hooks
Heavy duty dough hooks take the hard work out of kneading dough and other heavy mixtures.
12 speed control dial
12 speed electronic torque control motor maintains the selected speed regardless of the mixing load.
Tilt back and locking head button
The head of the Mixmaster tilts back and locks securely into position to allow for easy removal of mixing bowl and attachments.
Bowl speed control dial
The bowl speed control has the options of high and low allowing you to select the
optimal bowl speed for different mixing tasks.
Non-slip rubber feet
Keep the mixer secure on the bench top during use.
3
Using your Sunbeam Mixmaster Series II
Before using your Mixmaster Series II
Before assembling your Sunbeam Mixmaster Series II, be sure the power cord is unplugged from the power outlet and the speed control dial is in the 'O' position.
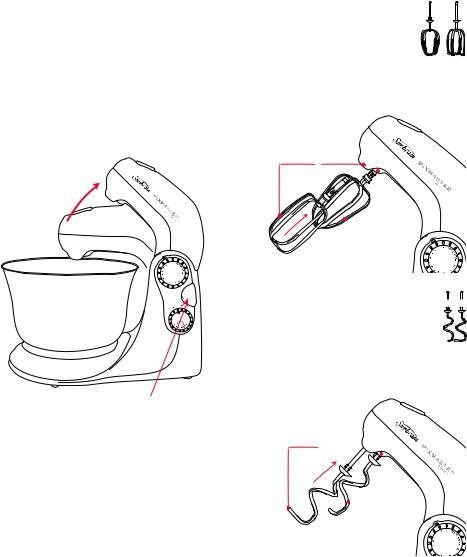
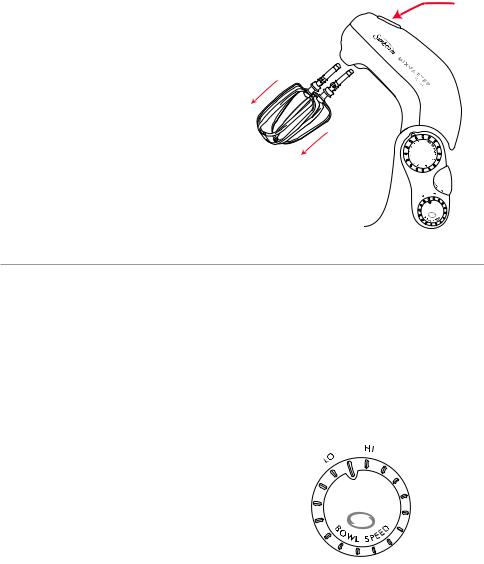
1.Press the ‘tilt' button, located on the neck of the Mixmaster and swing the mixer head up, see Figure 1. The mixer head will lock into this tilt position.
Figure 1
Inserting attachements |
|
3a.Take the two beaters, place the |
|
oval shaped beater (A) into the |
|
left socket, (outer position). |
|
Place the other beater, with |
|
the plastic nodules on the base A |
B |
(B) into the right socket, (inner |
|
position), see Figure 2. |
|
Figure 2 |
|
B |
|
Press 'tilt' button and tilt the mixer head backward.
3b. Take the two dough hooks, place the dough hook with the shorter hook at 
 the bottom (A) into the left socket, (outer position). Likewise, place the dough hook with the longer hook at A B the bottom (B) into the right socket, (inner position), see Figure 3.
Figure 3
B
2.Select the desired attachments depending on the mixing task to be performed;
–Beaters for creaming butter and sugar, mixing cake mixes and whisking cream and egg whites.
–Dough hooks for kneading dough and other heavy mixtures.
4
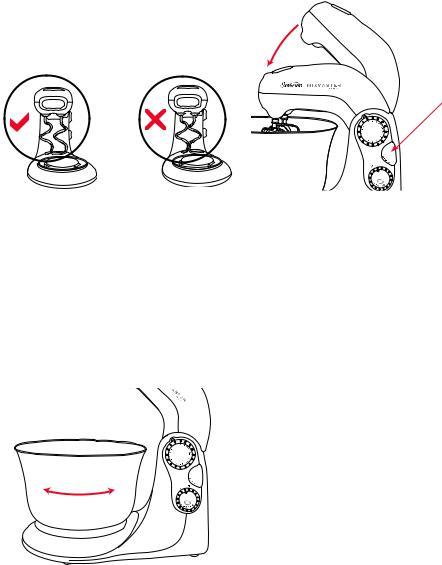
Important: Please review Figure 4. The illustration on the left is how the dough hooks should look when correctly inserted. However should the dough hooks once
Using your Sunbeam Mixmaster Series II (continued)
inserted appear to be touching, as they do in the illustration on the right, then they have been inserted incorrectly.
Figure 4
Note: Be sure both beaters or dough hooks click firmly in place, you may need to twist the attachments slightly to engage them in position prior to pushing them into place.
Attachments can only be locked in place if they are in the correct socket. If only one of the attachments will lock in place, the attachments are in the wrong sockets.
4.Place the mixing bowl onto the metal base plate so that it is sitting evenly. Lock the bowl into place by turning it clockwise, see Figure 5.
Figure 5
5.Press ‘tilt’ button to lower the head with the selected attachments (either, beaters or dough hooks) in place, into the mixing bowl. See Figure 6.
Figure 6
Press 'tilt' button down and tilt mixer head forward
Using your Mixmaster Series II
1.With the speed control dial in the 'O' position, plug the power cord into a 230-240 volt power outlet.
Note: The power indicator light on the speed control dial will now be illuminated.
2.Use the speed control dial to turn the Mixmaster ON and OFF and to control the mixing speeds.
Clearly marked instructions for correct mixing speeds for each type of mixture are shown in the ‘Mixing Guide’ on page 7.
Tip: Start mixing at slow speeds and increase speed gradually to prevent ingredients splashing out of the mixing bowl. When adding dry ingredients, particularly flour, lower the speed temporarily until ingredients are combined.
Tip: When kneading yeast doughs, use speed 1 to achieve best results. For specific instructions for the use of dough hooks see 'Helpful Hints for a Successful Dough' on page 13.
Selecting the mixing bowl speed
1.The mixing bowl automatically turns on when the speed control dial is turned
on. For majority of mixing tasks the |
5 |
|
Using your Sunbeam Mixmaster Series II (continued)
bowl speed should be set on the 'LO' speed setting. For light mixes requiring maximum mixing performance such as cakes and meringue, the 'HI' bowl speed is recommended as this passes the mixture through the beaters more often for faster results. For large volumes the bowl speed should be reduced to "LO", particularly in thick mixtures.
2.When mixing is complete, turn the speed control dial to the 'O' position and unplug the cord from the power outlet.
Note: The indicator light will stay on until power is disconnected from the mixer.
3.Hold down the ‘tilt’ button and ease the Mixmaster head back until the mixer head is locked into the tilt back position, see Figure 1.
4.To remove the particular attachments (either beaters or dough hooks), place
fingers loosely around the attachments and hold down the ‘beater eject’ button see Figure 7.
|
Beater |
|
Figure 7 |
Eject |
|
Button |
||
|
Role of the Twin-motor 3-way beating action
One motor is located in the head of the Mixmaster. This drives the individual beaters, turning each in opposite directions.
The second motor is located in the neck of the Mixmaster and drives the turntable, in turn rotating the bowl. High or low bowl
speed can be selected by simply turning the control dial positioned on the neck of the Mixmaster Series II.
These actions combine to ensure a more powerful and thorough mixing result.
6
Mixing Guide
Please keep in mind that the various mixing tasks and related speeds, listed in the table below, may vary slightly from recipe to recipe.
Please refer to it regularly as you develop your understanding of how different ingredients interact when mixing.
SPEED SETTING RANGE |
MIXING TASK |
|
|
LOW |
FOLDING & BLENDING |
1 |
Scones/Pastry |
2 |
Biscuit dough |
3 |
Tea Cakes |
|
|
MEDIUM |
LIGHT MIXING |
4 |
Sauces & Puddings |
5 |
Custard/Icing |
6 |
Packet Mixes |
|
|
HIGH |
CREAMING & BEATING |
7 |
Butter & Sugar |
8 |
Cream Cheese |
9 |
Heavy Batters |
|
|
VERY HIGH |
WHIPPING & AERATING |
10 |
Cream |
11 |
Egg Whites & Meringues |
12 |
Marshmallow |
|
|
NOTES: For most recipes, it is better to begin your mixing on a slower speed until the ingredients begin combining, then move to the appropriate speed range for the particular task.
Generally there is no one set speed for an entire recipe. You will need to change the speed of the Mixmaster depending on what stage of the recipe you are working on. This is communicated in the recipe section.
When mixing larger quantities you may need to increase the Mixmaster speed due to the amount of mixing required and the larger load on the machine.
When building up a recipe that requires the addition of dry ingredients, such as flour, slow the speed down whilst these ingredients are being added to avoid a snow storm effect. Once the extra ingredients begin combining then slowly increase to the appropriate speed for the particular mixing task.
7

Oven Temperature Guide
For your information, the following temperature settings are included as a guide. These settings may need to be adjusted to suit the individual range.
|
|
Thermostat Settings |
|
|
Description of Oven Temperatures |
Electric |
Gas |
|
|
|
|
|
|
|
|
°F |
°C |
°F |
°C |
|
|
|
|
|
Cool |
200 |
110 |
200 |
100 |
|
|
|
|
|
Very Slow |
250 |
120 |
250 |
120 |
|
|
|
|
|
Slow |
300 |
150 |
300 |
150 |
|
|
|
|
|
Moderately Slow |
350 |
170 |
325 |
160 |
|
|
|
|
|
Moderate |
400 |
200 |
350 |
180 |
|
|
|
|
|
Moderately Hot |
425 |
220 |
375 |
190 |
|
|
|
|
|
Hot |
450 |
230 |
400 |
200 |
|
|
|
|
|
Very Hot |
475 |
250 |
450 |
230 |
Note: If using fan forced ovens be sure to turn the temperature down by 20-30°C. Also check recipes at the back of this book.
8
Care and Cleaning
Before cleaning your Sunbeam Mixmaster Series II, ensure the power is turned off at the power outlet, then remove the plug.
Wipe over the outside area of the Mixmaster and base with a dampened cloth and polish with a soft dry cloth.
Wipe any excess food particles from the power cord.
Wash the mixing bowl, beaters and dough hooks in warm soapy water and wipe dry. Give special attention to the nylon button area on the beater - use a brush if necessary to remove sticky food particles. The stainless steel mixing bowl, beaters and dough hooks may also be placed and washed in the dishwasher.
Maintenance Service
Your Sunbeam Mixmaster Series II should be regularly checked. After approximately four years of domestic use, the grease in the gear compartment should be examined (commercial use after two years). We suggest at that time you send the Mixmaster to your
nearest Sunbeam Appliance Service Centre to ensure efficient, correct servicing.
Note: The Sunbeam Mixmaster Series II and the base have been factory oiled and no additional home oiling is necessary.
Storage
Keep your Sunbeam Mixmaster Series II in a convenient position on your kitchen bench ready for use at all times. Place the beaters and dough hooks into the bowl (storage of beaters and dough hooks in a drawer with other kitchen equipment may cause damage).
Note: Never wind the power cord around the motor after use as the warmth of the motor may cause damage to the power cord.
9
Lets Talk Ingredients
Listed below is a guide regarding some of the ingredients used in the recipes in this book.
Butter
Butter is made from approximately 80% milk fat (cream) and is churned over a period of time to produce a solid (butter). Butter is used to stabilize, texturize and add flavour. Butter may be salted or unsalted, it is best to use unsalted butter for cake baking. Clarified butter has the milk solids and salt removed, which is ideal for pastry making as it can be heated to higher temperatures than regular butter.
Note: Margarine can be used as a substitute for butter. It is made from vegetable oils, therefore it may alter the end result. There are various types of margarines, some of these are butter-margarine blends and fat reduced.
Yeast
A raising agent used in doughs. Yeast is a microscopic living organism that grows rapidly in suitable warm, moist conditions. The yeast plant feeds on sugar and expels carbon dioxide which expands the gluten
framework. When foaming yeast do not allow the water temperature to exceed 40°C, as this will kill the yeast. A 26˚C - 30˚C, draft free area is most suitable for the growth of yeast during the rising process. Both Dry Yeast and fresh Compressed Yeast may be used in the recipes included in this book. (NB. 7g of dry yeast is equivalent to 20g of compressed yeast).
Substitutes
If you find it necessary to substitute ingredients in a recipe, check the following alternatives:
1 cup self raising flour = 1 cup plain flour and 2 teaspoons baking powder.
1 cup plain flour and 1 teaspoon baking powder = ½ cup each of plain and self raising flour.
Sultanas = equal measure of any other dried fruit.
Golden Syrup = equal measure of treacle or molasses.
1 cup buttermilk = 1 cup fresh milk and 2 teaspoons vinegar or lemon juice.
10
 Loading...