


MINI BARISTA
ESPRESSO MACHINE
User Guide
EM4300

Contents
Sunbeam’s Safety Precautions |
1 |
Features of your Sunbeam Mini Barista |
2 - 4 |
Before First Use of the Mini Barista Espresso Machine |
5 |
Coffee Making Guide for the Mini Barista Espresso Machine |
6 - 9 |
Tips for Making the Perfect Cup |
10 - 11 |
Tips for Milk Texturing |
12 - 13 |
Coffee Styles to Try |
14 - 15 |
Shot Volume Programming |
16 - 17 |
Care & Cleaning |
18 - 19 |
Descaling: Group Head & Steam Wand |
20 - 21 |
Troubleshooting Guide |
22 - 23 |
Warranty |
24 |
Espresso Machine Accessories Available for Purchase |
25 |
Important Instructions - retain for future use

Sunbeam’s Safety Precautions
SAFETY PRECAUTIONS FOR YOUR SUNBEAM ESPRESSO MACHINE
•Always place the unit on a flat, level surface.
•Do not operate without water in reservoir. Fill reservoir with only clean and cold water. Observe the maximum filling volume is
2 litres.
•Do not remove the Group Handle during the espresso pour or water flow as the unit is under pressure. Removing the Group Handle during either of these operations can lead to a scalding or injury.
•The Steam & Hot Water Wand becomes very hot during texturing milk and water flow. This may cause burns in case of contact, therefore avoid any direct contact with the wand.
•Always disconnect the plug from the power
outlet prior to cleaning the espresso machine or if there is any problem during the coffee making process.
•Do not allow the Power Cord to come into contact with the hot parts of the espresso machine, including the Cup Warming Plate and the Steam & Hot Water Wand.
•Do not place hands directly under the steam, hot water or espresso pour as this can lead to a scalding or injury.
•The temperature of accessible surfaces may be high when the appliance is operating. Even after use, the heating element surface is subject to residual heat after use.
•Do not use an appliance for any purpose other than its intended use. Injury could occur from misuse.
Sunbeam is very safety conscious when designing and manufacturing consumer products, but it is essential that the product user also exercise care when using an electrical appliance. Listed below are precautions which are essential for the safe use of an electrical appliance:
•Read carefully and save all the instructions provided with an appliance.
•Always turn the power off at the power outlet before you insert or remove a plug. Remove by grasping the plug - do not pull on the cord.
•Turn the power off and remove the plug when the appliance is not in use and before cleaning.
•Do not use your appliance with an extension cord unless this cord has been checked and tested by a qualified technician or service person.
•Always use your appliance from a power outlet of the voltage (A.C. only) marked on the appliance.
•This appliance is not intended for use by persons (including children) with reduced physical, sensory or mental capabilities, or lack of experience and knowledge, unless they have been given supervision or instruction concerning use of the appliance by a person responsible for their safety.
•Children should be supervised to ensure that they do not play with the appliance.
•The temperature of accessible surfaces may be high when the appliance is operating.
•Never leave an appliance unattended while in use.
•Do not use an appliance for any purpose other than its intended use.
•Do not place an appliance on or near a hot gas flame, electric element or on a heated oven.
•Do not place on top of any other appliance.
•Do not let the power cord of an appliance hang over the edge of a table or bench top or touch any hot surface.
•Do not operate any electrical appliance with a damaged cord or after the appliance has been damaged in any manner. If damage
is suspected, return the appliance to the nearest Sunbeam Appointed Service Centre for examination, repair or adjustment.
•For additional protection, Sunbeam recommend the use of a residual current device (RCD)
with a tripping current not exceeding 30mA in the electrical circuit supplying power to your appliances.
•Do not immerse the appliance in water or any other liquid unless recommended.
•Appliances are not intended to be operated by means of an external timer or separate remote control system.
•This appliance is intended to be used in household and similar applications such as: staff kitchen areas in shops, offices and
other working environments; farm houses; by clients in hotels, motels and other residential type environments; bed and breakfast type environments.
If you have any concerns regarding the performance and use of your appliance, please visit the Sunbeam Website or contact Sunbeam Consumer Care - details are on the back page.
Ensure the above safety precautions are understood.
1
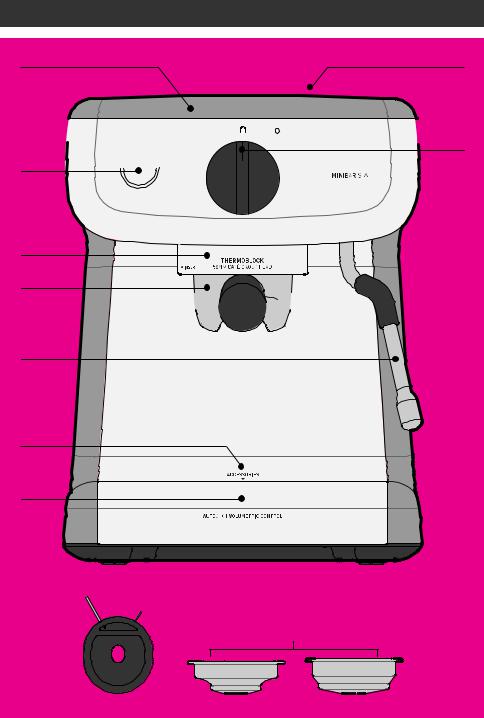
Features of your Sunbeam Mini Barista
A H


 I B
I B 


C
D

 S
S


E
F
G |
Steam Wand |
Dual Wall |
Pin |
Filter Basket Pin |
|
58mm Dual Wall Filter Baskets |
Cleaning Pin |
One Cup |
Two Cups |
2
Features of your Sunbeam Mini Barista
A.Warming Plate with Tamper Home
Preheat cups and glasses which helps retain the essential characteristics of true espresso; aroma and a rich, sweet taste.
B.ON/OFF Button & Light
The ON/OFF LIGHT will illuminate & pulse to indicate it is warming up. The ON/OFF LIGHT stays fully illuminated when ready. The machine will go to sleep after 20 mins, the ON/OFF LIGHT is off.
C.Group Head - 58mm Commercial Size
The larger size accepts more grinds, so you can have a true café tasting coffee at home.
D.Group Handle - 58mm Commercial Size
The wide size used in cafés for a more even water flow & improved extraction taste.
E.Steam and Hot Water Wand
Ball joint movement with silicone cover, so you can move the wand to your desired position without burning your fingers.
F. Accessories Storage Home
Area behind the Drip Tray, for storing the One & Two Cup Filter Baskets & the Cleaning Pin.
G. Removable Drip Tray & Grill
Includes a Water Level Indicator which floats through the Grill indicating when the tray is full and requires emptying.
58mm Tamper 350mL Milk Jug
H.Removable 2L Water Reservoir
Push back the Lid & fill with room temperature water, or remove the Water Reservoir by opening the Lid, & lifting upwards using the Handle located inside.
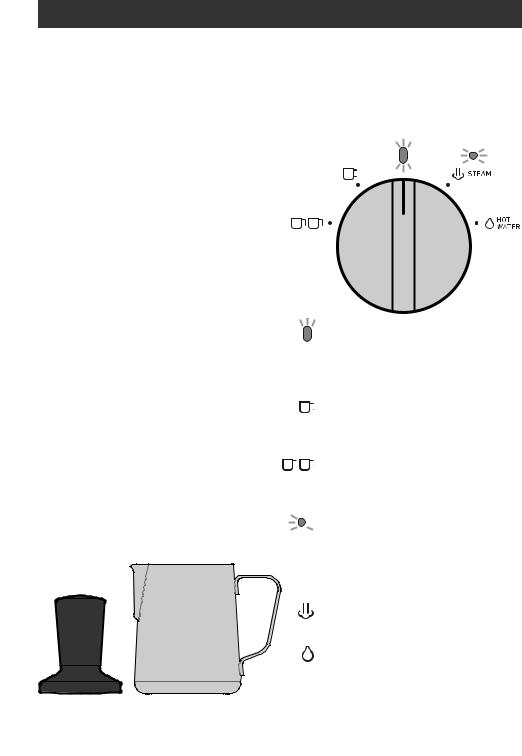
I.Dial with Auto Shot Control
Ready Light


 Fully illuminated when ready. Flashes when DIAL needs to be returned to the vertical position.
One Cup
Pours 1 Shot Espresso - 30mL then automatically stops.
Two Cup
Pours 2 Shots Espresso - 60mL then automatically stops.
 Steam Light
Fully illuminated when ready to steam. Flashes when warming up to steam temperature & when cooling down (purging water) to coffee temperature.
Steam
Use to steam & texture milk.
Hot Water
Pours 200mL then automatically stops. Use for long black coffee; & hot drinks such as tea, instant soups & to heat your cups prior to making espresso.
3
Features of your Sunbeam Mini Barista
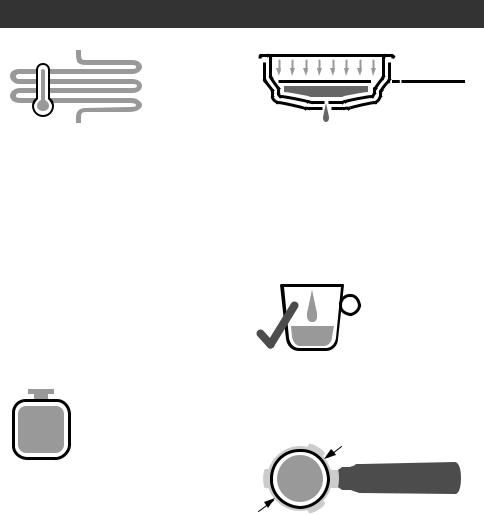
Thermoblock Fast Heating System |
Italian Crema System |
DUAL
WALL
The thermoblock ensures quick heat up, and a precise water temperature for the best coffee extraction, and milk texturing.
The thermoblock is fitted with a
PID controller which continually monitors the water temperature to ensure water is always delivered to the coffee grinds at the precise temperature needed.
An espresso is made with hot rather than
boiling water. The thermoblock heats the water so that the espresso extracts at 92°C
(just below boiling point) for optimum extraction of oils from the coffee grinds. Temperatures above this will burn the grinds resulting in a bitter taste.
15 BAR Italian Pump
15  BAR
BAR
The thermoblock works in conjunction
with the pump to deliver the correct water temperature at the correct pressure for
complete extraction of oils, coffee solids and aroma.
The 15 BAR pump is fitted with a pressure relief system, to limit the pressure to 15
bar (for protection from over-pressure). After extraction, when the DIAL is returned to the vertical READY position, any remaining pressure will be released (purged) into the Drip Tray.
Pre-Infusion
Small amounts of water are released onto the tamped coffee grinds prior to the steady flow of water, for a richer flavoured espresso.
Dual Wall Filter Baskets create additional
back pressure creating a subtle aeration for a great espresso extraction and steady
pour. They ensure a rich velvety espresso with a signature layer of golden crema.
Dual Wall Filter Baskets are designed for use with pre-ground grinds, however they can also be used with freshly ground grinds.
Auto Shot Volumetric Control
Auto Shot is the easiest way to create a
great espresso. Just select ONE or TWO CUP on the DIAL, and it pours just the right amount, then automatically stops.
Café 58mm Group Head & Handle
58
The Group Head and the Group Handle are commercial sized, 58mm, just like your
local café.
The larger 58mm Group Handle holds more coffee grinds, resulting in a true café
tasting coffee. The wider size ensures the grinds are more evenly spread and easier
to fill, for improved flavour extraction.
The larger 58mm Filter Baskets allow a more consistent grind compaction,
resulting in a better tasting coffee, and an easier to empty spent coffee cake.
4

Before First Use of the Mini Barista Espresso Machine
Step 1. Remove Packaging
Ensure all packaging has been removed.
Important: Remove the red Plug found at the base of the Water Reservoir.
Step 2. Position Machine
Ensure the espresso machine is always positioned onto a dry, stable, flat horizontal bench top.
Step 3. Wash Parts
Wash the 8 parts listed below in warm water with a mild detergent.
-Stainless Steel Milk Jug
-Stainless Steel Drip Tray Grill
-Stainless Steel One Cup Filter Basket
-Stainless Steel Two Cup Filter Basket
Important: Below 4 parts are NOT DISHWASHER SAFE:
-Group Handle
-Drip Tray
-Tamper
-Water Reservoir
Rinse and dry each part thoroughly then place on the machine.
Step 4. Prime the Machine
Important: Priming must be completed prior to first use.
• Fill Water Reservoir
-Push back the Lid to open.
-Fill with room temperature water. or
-Remove the reservoir by opening the Lid, & lifting upwards using the Handle inside.
-Fill with room temperature water from the tap.
-Replace the Water Reservoir firmly into position & close the Lid.
Note: Make sure that the Water Reservoir is clean and free of any debris, as any fine particles can block the water flow.
• Power
Ensure that:
-DIAL is in the vertical READY position.
-Insert the Power Plug into a 230-240V AC power outlet & turn the power on.
-Press the ON/OFF BUTTON to start the machine.
The ON/OFF LIGHT will illuminate & pulse to indicate it is warming up.
When both the ON/OFF & READY LIGHTS are fully illuminated, the machine is ready.


 READY
READY
• Insert Group Handle
-Place the Two Cup Filter Basket in the Group Handle.
-Insert the Group Handle into the Group Head.
To ensure that the Group Handle is in the correct position, align the Group Handle with the 'INSERT' position located on the left of the Group Head.
Insert the Group Handle flat against the Group Head, then turn the Group Handle right all the way to the centre position.
• Prime the Machine
- Turn the DIAL to the TWO CUP setting & allow the water to run through.
READY LIGHT flashes when DIAL needs to be returned to the vertical position.
- Do this once more.
Now the machine should be thoroughly primed and ready to use.
If water does not run through the Group Head, contact Sunbeam Customer Care. Details are on the back page.
5

Coffee Making Guide for the Mini Barista Espresso Machine
1. Start Up
|
ON /OFF |
ON /OFF |
MAX |
|
|
2 L |
|
|
 1L
1L
MIN |
M1in |
Check for water in |
Turn on. |
ON/OFF LIGHT pulses |
reservoir. |
|
= Heating up. |
READY
ON/OFF & READY LIGHTS are both fully illuminated = Ready.
2. Warm Cup
|
|
|
|
RETURN |
|
|
HOT |
|
|
|
|
WATER |
|
|
Warm cup & |
Place cup on |
Turn DIAL to |
Half fill cup |
Return DIAL to |
Tamper on top |
benchtop & position |
HOT WATER. |
with hot water. |
vertical position. |
Warming Plate. |
Steam Wand. |
|
|
|
3. Select Filter Baskets |
4. Warm Group Head, Handle & Filter Basket |
|||
ONE CUP |
TWO CUP |
ONE |
|
|
|
|
|
CUP |
THERMOBLOCK INSERT 58MM CAFÉ GROUP HEAD
RETURN
Select either: |
Turn DIAL to |
Hold Group Handle |
READY LIGHT flashes |
- One Cup Filter Basket. |
ONE CUP position. |
under Group Head |
= return DIAL. |
- Two Cup Filter Basket. |
|
while water flows. |
|
6

Coffee Making Guide for the Mini Barista Espresso Machine
5. Dry Basket |
6. Dose & Tamp |
|
|
|
|
|
|
|
|
|||||||
|
|
|
|
|
|
|
|
|
|
|
|
|
|
|
|
|
|
|
|
|
|
|
|
|
|
|
|
|
|
|
|
|
|
|
|
|
|
|
|
|
|
|
|
|
|
|
|
|
|
|
|
|
|
|
|
|
|
|
|
|
|
|
|
|
|
|
|
|
|
|
|
|
|
|
|
|
|
|
|
|
|
|
|
|
|
|
|
|
|
|
|
|
|
|
|
|
|
|
|
|
|
|
|
|
|
|
|
|
|
|
|
|
|
|
|
|
|
|
|
|
|
|
|
|
|
|
|
|
|
|
|
|
|
|
|
|
|
|
|
|
|
|
|
|
|
|
|
|
|
|
|
|

 S
S


Wipe Filter Basket |
Dose the Filter |
Evenly tamp (press) grinds to |
Wipe edges to clear |
with a dry cloth. |
Basket with grinds. |
level indicated. |
any excess grinds. |
7. Insert Group Handle into Group Head |
8. Position Cup |
|
|
ALIGN & INSERT
THERMOBLOCK |
THERMOBLOCK |
INSERT 58MM CAFÉ GROUP HEAD |
INSERT 58MM CAFÉ GROUP HEAD |
TURN
Keep Group Handle |
Turn Group Handle. |
flat, insert into Group Head.
CENTRE
|
THERMOBLOCK |
S |
INSERT |
58MM CAFÉ GROUP HEAD |
|

 S
S

|
Empty hot water |
|
|
|
|
Group Handle |
Position cup on |
||||
should be in the |
from cup. |
Drip Tray, under |
|||
centre position. |
|
Group Handle. |
|||
9. Extraction
ONE CUP |
OR |
TWO CUP |
S |
RETURN |
|
|
|
||||
ONE |
|
|
|
|
THERMOBLOCK |
|
|
|
|
INSERT 58MM CAFÉ GROUP HEAD |
|
CUP |
|
|
|
|
|
|
|
|
|
|
S |
|
|
TWO |
|
|
|
|
|
CUP |
|
|
|
Turn DIAL to either: |
|
Extraction begins |
READY LIGHT flashes |
Leave Group Handle |
|
- One Cup - 30mL pour. |
& will automatically |
= Pour finished. |
in Group Head, until |
||
- Two Cup - 60mL pour. |
stop. |
Return DIAL. |
after milk texturing. |
||
7
 Loading...