


 Loading...
Groove Agent SE
Matthias Klag, Michael Ruf
Cristina Bachmann, Heiko Bischoff, Christina Kaboth, Insa Mingers, Matthias Obrecht, Sabine Pfeifer, Benjamin Schütte, Marita Sladek
This PDF provides improved access for vision-impaired users. Please note that due to the complexity and number of images in this document, it is not possible to include text descriptions of images.
The information in this document is subject to change without notice and does not represent a commitment on the part of Steinberg Media Technologies GmbH. The software described by this document is subject to a License Agreement and may not be copied to other media except as specifically allowed in the License Agreement. No part of this publication may be copied, reproduced, or otherwise transmitted or recorded, for any purpose, without prior written permission by Steinberg Media Technologies GmbH. Registered licensees of the product described herein may print one copy of this document for their personal use.
All product and company names are ™ or ® trademarks of their respective owners. For more information, please visit www.steinberg.net/trademarks.
© Steinberg Media Technologies GmbH, 2018. All rights reserved.
Groove Agent SE_5.0.0_en-US_2018-11-14

Table of Contents
4Introduction
4Conventions
5About the Documentation
6Common Editing Methods
6Dials and Sliders
6Multi Selection and Parameter Controls
6Buttons
7Value Fields
7Using Key Commands
8Presets
10Getting Started
10Window Overview
11Agents, Kits, Presets, and Content Files
12Loading a Kit
13Pattern and Instrument Pads
13Browsing for MIDI Patterns and Styles
14Playing back Pattern Pads
14Converting Styles to MIDI Patterns
15Creating the Different Sections of a Drum Track
16Recording Trigger Notes for Your Patterns
16Dragging Patterns into a Project
17Editing Patterns in the DAW
18Managing Your Sounds
18 Loading Kits
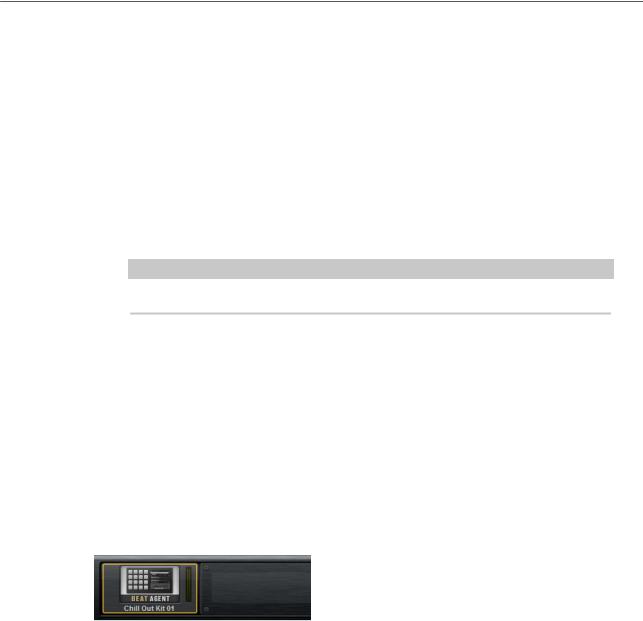
18Kit Slot
19Kit Rack
20Kit Context Menu
21Managing and Loading Files
34Working With Pads
34Pad Section
35Renaming Pads
36Using Different MIDI Channels/Ports for Instrument Pads and Pattern Pads
36 Instrument Pads
43 Pattern Pads
56 Beat Agent SE
56 Beat Agent SE Sound Editing
84 Importing and Exporting Files
87 Acoustic Agent SE
87 Acoustic Agent SE Sound Editing
96Mixing and Effect Handling
96Beat Agent SE Mixer
97Acoustic Agent SE Mixer
100AUX Mixer
101Kits Mixer
102Master Mixer
102Effect Handling
104 Effects Reference
104 Reverb Effects
106 Delay Effects
108EQ Effects
109Filter Effects
113 Distortion Effects
115 Modulation Effects
122 Dynamics Effects
130 Spatial and Panner Effects
132Automation and MIDI Controllers
132Automation
133MIDI Controllers
135Global Functions and Settings
135Plug-in Functions Section
136Plug-in Name and Steinberg Logo
136Toolbar
137Keyboard
138Options Page
141 Mixer Routing Diagrams
143 Index
3

Introduction
Conventions
In our documentation, we use typographical and markup elements to structure information.
Typographical Elements
The following typographical elements mark the following purposes.
Prerequisite
Requires you to complete an action or to fulfill a condition before starting a procedure.
Procedure
Lists the steps that you must take to achieve a specific result.
Important
Informs you about issues that might affect the system, the connected hardware, or that might bring a risk of data loss.
Note
Informs you about issues that you should consider.
Example
Provides you with an example.
Result
Shows the result of the procedure.
After Completing This Task
Informs you about actions or tasks that you can perform after completing the procedure.
Related Links
Lists related topics that you can find in this documentation.
Markup
Bold text indicates the name of a menu, option, function, dialog, window, etc.
EXAMPLE
In the header of the plug-in panel, click the Preset Management button next to the preset name field and select Load Preset.
If bold text is separated by a greater-than symbol, this indicates a sequence of different menus to open.
4

Introduction
About the Documentation
Key Commands
Many of the default key commands, also known as keyboard shortcuts, use modifier keys, some of which are different depending on the operating system.
Many of the default key commands use modifier keys, some of which are different depending on the operating system. When key commands with modifier keys are described in this manual, they are indicated with the Windows modifier key first, followed by the macOS modifier key and the key.
EXAMPLE
Ctrl/Cmd-Z means: press Ctrl on Windows or Cmd on macOS, then press Z.
About the Documentation
The documentation is available online and can be downloaded in PDF format from steinberg.help
●To visit steinberg.help, enter steinberg.help in the address bar of your web browser or open Groove Agent SE, click the Steinberg logo in the top right corner and select Help >
Groove Agent SE Help.
5

Common Editing Methods
Dials and Sliders
Dials and sliders can be unidirectional or bidirectional. Unidirectional values, for example level values, start at a minimum value and go up to the maximum. Bidirectional controls start from the middle position and go to the left for negative and to the right for positive values.
Most of the editing methods are the same for dials and sliders.
●To adjust a value, click a dial or a slider and drag up and down, or use the mouse wheel.
If you press Alt when clicking a dial, a small slider appears, allowing you to set the parameter.
●To make fine adjustments, press Shift and move the dial or use the mouse wheel.
●To restore the default value for a parameter, press Ctrl/Cmd and click on the control.
Multi Selection and Parameter Controls
To edit multiple pad parameters at the same time, select the pads that you want to edit.
If several pads are selected and they are not set to the exact same values, most of the controls indicate this by turning red. This is true for dials, on/off buttons, combo boxes, value fields, and text faders.
NOTE
More complex controls, such as the envelope editors, only show the values of the focused pad.
Adjusting Value Ranges
You can adjust the value range of a parameter using the corona of the encoder. The values for the pads are distributed within the new range, keeping their relative distances.
●To compress or expand the value range, drag the corona.
●To adjust the upper limit of the range, hold down Ctrl/Cmd and drag the corona.
●To adjust the lower limit of the range, hold down Alt and drag the corona.
Buttons
On/Off Buttons
These buttons have two states: on and off. If you move the mouse over an On/Off button, it changes its appearance to show that you can click it.
6
Common Editing Methods
Value Fields
Push Buttons
Push buttons trigger an action and then go back to their inactive state. These buttons open menus or file dialogs.
Value Fields
To set a value, you have the following possibilities:
●Double-click in a value field, enter a new value, and press Enter.
If the entered value exceeds the parameter range, it is automatically set to the maximum or the minimum value, respectively.
●Click in the value field and drag up or down.
●Position the mouse over a value field and use the mouse wheel.
●Click the up/down triangles next to the field.
●To set the parameter to its default value, Ctrl/Cmd-click the value field.
●To use a fader to adjust the value, Alt-click a value field.
●To enter musical values, such as key ranges or the root key, with your MIDI keyboard, double-click the value field, press a key on your MIDI keyboard, and press Return.
●To navigate to the next parameter, press Tab. To jump backwards to the previous parameter, press Shift-Tab.
If no parameter is selected inside the focused view, pressing Tab always jumps to the first parameter.
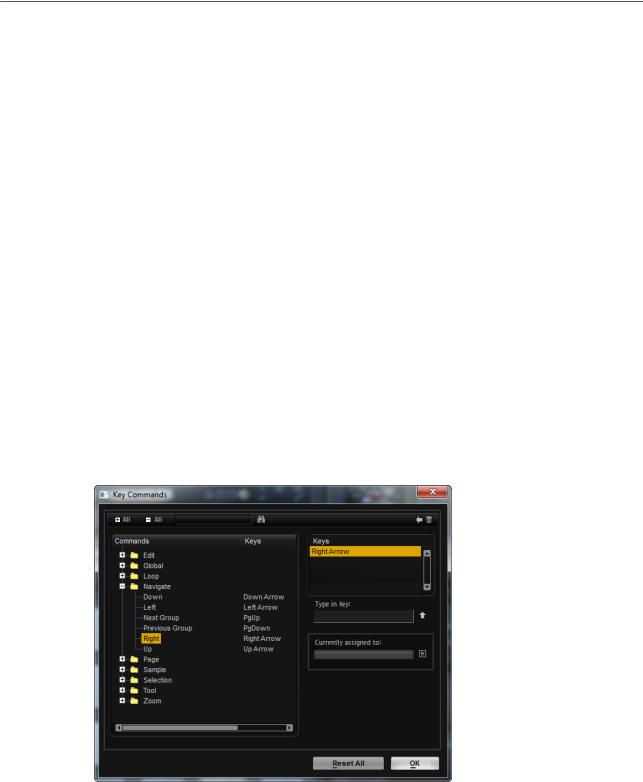
Using Key Commands
●To open the Key Commands dialog, open the Options page and click the Key Commands button in the Global section.
The commands are arranged in a hierarchical folder structure on the left. When you open a category folder, the items and functions are displayed with any currently assigned key commands.
●To set up a key command, select the function in the list, enter the key command in the Type in Key field and click the Assign  button to the right of the field. If this key command is already used for another function, this is displayed in the field below.
7

Common Editing Methods
Presets
●To delete a key command, select the function in the list, select the key command in the Keys list and click the Delete  button.
●To search for a specific function, enter its name in the search field at the top of the dialog and click the Start/Continue Search  button.
NOTE
You can set up several key commands for the same function.
Presets
Groove Agent SE offers two types of presets: section/module presets and VST presets. Section and module presets store and recall the setup of a specific component on the Groove Agent SE panel. VST presets contain all information necessary to restore the complete state of the plug-in.
During setup, the factory presets are installed in a dedicated folder and a user folder is created for your own presets. The handling of presets is the same throughout the program.
NOTE
Factory presets are write-protected, but may be overwritten when a software update is executed. Presets in your user folder are never changed by the software update.
Handling Section and Module Presets
The preset controls can be found throughout the program. The handling is always the same.
●To save a preset, click Save  . NOTE
You cannot overwrite factory presets. If you want to save changes made to a factory preset, save the preset under a new name or in a new location.
●To load a preset, click the arrow icon and select a preset from the list.
●To delete a preset, click Delete  . NOTE
Factory presets cannot be deleted.
Handling VST Presets
Loading VST Presets
PROCEDURE
1.In the header of the plug-in panel, click the Preset Management button next to the preset name field and select Load Preset.
2.Do one of the following:
●Select a preset to load it.
●Double-click a preset to load it and close the preset loader.
8

Common Editing Methods
Presets
Saving VST Presets
PROCEDURE
●In the header of the plug-in panel, click the Preset Management button next to the preset name field and select Save Preset.
9

Getting Started
These sections help you to get started with Groove Agent SE and introduce program functions and settings.
Window Overview
The Groove Agent SE window is divided into several sections.
1 At the top of the window, you can find the plug-in functions section. 2 Below the plug in-functions section on the left, the kit slot is located.
3On the right of the kit slot, you find the kit rack.
4The edit display on the right contains the Edit, Mixer, and Options pages.
5With the two buttons at the top right of the edit display, you can expand the window to show a keyboard at the bottom, and/or the Load panel at the right.
6On the left of the edit display, you can find the pad section.
RELATED LINKS
Kit Slot on page 18
Kit Rack on page 19
10
Getting Started
Agents, Kits, Presets, and Content Files
Agents, Kits, Presets, and Content Files
Groove Agent SE comes with a variety of content that can be loaded and edited. At the top of the hierarchy, you can load kits or multis. Further down the hierarchy, you can load and edit MIDI patterns, styles, drum samples, etc.
Agents
Groove Agent SE combines the creative power of different rhythm modules: Acoustic Agent SE and Beat Agent SE.
Each of these modules offers its own approach to drums and rhythms, with special ways of creating your own inspiring beats in a huge range of styles.
Kits
Kits are loaded to play the sounds in Groove Agent SE. They contain all information that is required to produce the sound of the selected drum kit, that is, about the sliced loop and the MIDI phrase that is needed to play back the loop, about the used MIDI patterns or styles, and about the insert effects that are used on the mixer channel.
You can save and load kits via the kit rack or the kit slot section.
Furthermore, kits contain information on the agent that the kit uses. In the Load dialog and on the Kits tab in the Load panel, kits are identified by the kit preset icon  .
.
VST Presets
VST presets contain all Groove Agent SE settings, that is, all information necessary to restore the complete state of the plug-in. This includes the kit, the MIDI patterns or styles, as well as any insert and AUX effects. All of these settings are also saved with the project in your host application. You can load VST presets via the pop-up menus in the plug-in header and in the plug-in functions section. In the Load dialog, these presets are identified by the VST preset icon
 .
.
Content Files and Folder Structure
Groove Agent SE comes with a large number of ready-to-use sound content files, containing kits, patterns, styles, and presets. Factory kits are write-protected. You can edit those files while they are loaded, but you cannot overwrite them.
To save your modifications to a factory kit, save the file under a new name. The file gets the file name extension .vstpreset and is saved with your user content. User content can be searched and categorized in the same way as factory content. User content is saved in a predefined folder structure on your hard disk. You can create subfolders within this structure to facilitate moving or exchanging content.
MIDI Patterns
MIDI patterns contain information on notes and drum sounds and the rhythm in which they are played.
Styles
Styles are complex structures of multiple patterns suited to create different parts of the drum tracks, for example, main pattern, fill, ending, and intro.
You can manage your user MIDI patterns and styles, for example by adding new subfolders to the folder structure, by moving or removing MIDI files, etc. To access the folder where the user MIDI patterns or styles are saved, right-click the pattern or style, either in the Load panel or the Load dialog and select Show in Explorer/Finder. In this location, you can add, remove and rename files and create subfolders to organize your MIDI patterns.
11
Getting Started
Loading a Kit
Groove Agent ONE Content
Groove Agent SE can load Groove Agent ONE presets. The presets can either be loaded as kits in the kit rack or the kit slot section or as plug-in presets via the preset management menu in the plug-in header.
If you load a Groove Agent ONE preset as a plug-in preset, the global plug-in parameters are set to the default values.
If you load a preset as a kit, the global plug-in parameters remain unchanged.
Loading a Kit
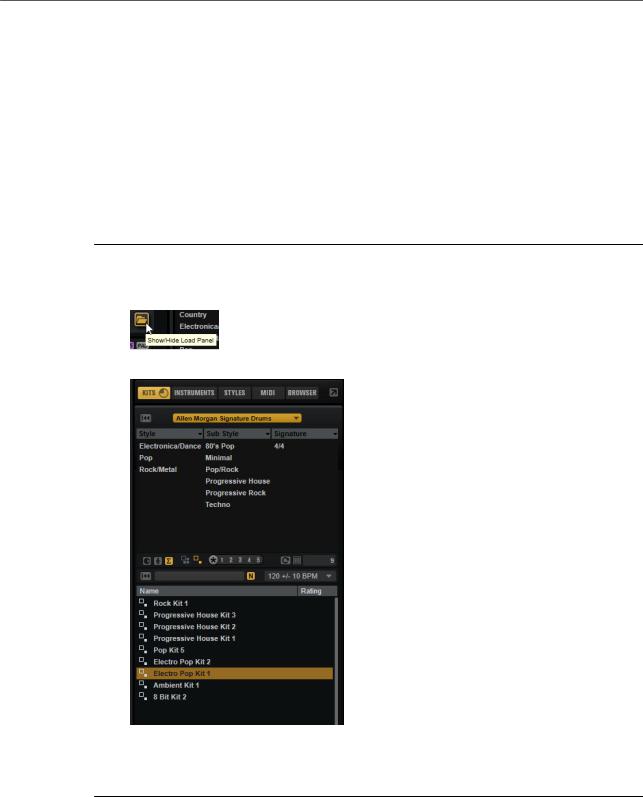
To be able to hear a sound, you need to load a kit into Groove Agent SE.
PROCEDURE
1.Select the kit slot in the kit rack.
2.Open the Load panel and select the Kits tab.
3.On the Select Content Set pop-up menu at the top of the page, select a content set.
4.In the attribute columns, specify the sound that you want to use, by selecting a musical style, sub style, etc.
5.In the results list, select a kit and double-click it or drag it onto the kit slot.
RELATED LINKS
Managing and Loading Files on page 21
12

Getting Started
Pattern and Instrument Pads
Pattern and Instrument Pads
In Groove Agent SE, you can edit both the sounds and the patterns that are used by your drum tracks. Instrument sounds can be accessed via the instrument pads. The pattern or style that is played can be edited via the pattern pads.
●To switch between the instrument pads and the pattern pads, click the corresponding button above the pads.
Instrument Pads
If the instrument pads are shown, the pads trigger the instrument samples and you can edit the sound of the instruments. These instruments are then used by the pattern pads to play the selected MIDI pattern or style.
Pattern Pads
If the pattern pads are shown, the pads trigger the selected MIDI pattern or style.
●MIDI patterns contain information on notes and drum sounds and the rhythm in which they are played.
●Styles are complex structures of multiple patterns suited to create different sections of the drum tracks, such as, fills, endings, and intros.
Browsing for MIDI Patterns and Styles
The Load panel allows you to browse for patterns and styles and assign them to the pattern pads.
PREREQUISITE
Show Pattern Pads is activated on the left.
PROCEDURE
1.Depending on the file type that you want to load, select the Styles or MIDI page.
2.On the Select Content Set menu, select the content set from which you want to load a file. To browse the entire content, select All.
3.Optional: In the upper section of the page, click on an attribute to display only those files containing the attribute, for example, percussion, or a specific musical style, etc.
You can activate several attribute filters simultaneously.
4.If you are looking for a specific file, enter its name in the text search field on the toolbar. You can also enter text that is part of the file name or the file attributes in the search field.
5.Use the transport controls below the results list to prelisten the results.
6.Step through the files in the results list and listen to them until you found the file that you want to use.
7.Drag the file onto a pad.
8.Repeat the above steps to assigning more files to other pads.
RELATED LINKS
Prelistening Patterns and Styles on page 26
Prelisten Section for MIDI Patterns and Styles on page 25
13
Getting Started
Playing back Pattern Pads
Playing back Pattern Pads
You can play back pattern pads using the MIDI Player or the Style Player. The MIDI player allows you to play and modify one pattern. The style player offers a variety of patterns, suited to create the different sections of your drum tracks.
PROCEDURE
1.Load an Acoustic Agent SE kit.
2.Open the Pattern page and click on an empty pattern pad. If a pattern pad is empty, it also plays the instrument sound.
3.To activate the pattern pad and make it play the pattern, open the Edit page in the right section of the plug-in panel and click Pad On/Off in the top right so that it lights up.
4.Click the Use Style button to activate the style player, and select a style from the Select Style pop-up menu.
5.Adjust the tempo in the DAW to match the tempo of the style.
The original tempo of the style is indicated by the second number in the file name of the style and in the value field to the right of the Select Style pop-up menu.
6.Click the Play button in the transport section to play back the style.
7.Try out different Quantize and Swing settings, move the Complexity slider, select a main pattern, a fill, an ending, etc., and listen to the results.
8.Keep the settings as they are and select different styles on the Pattern Library pop-up menu in the Pattern section to compare the sound and to find the style that you want to use.
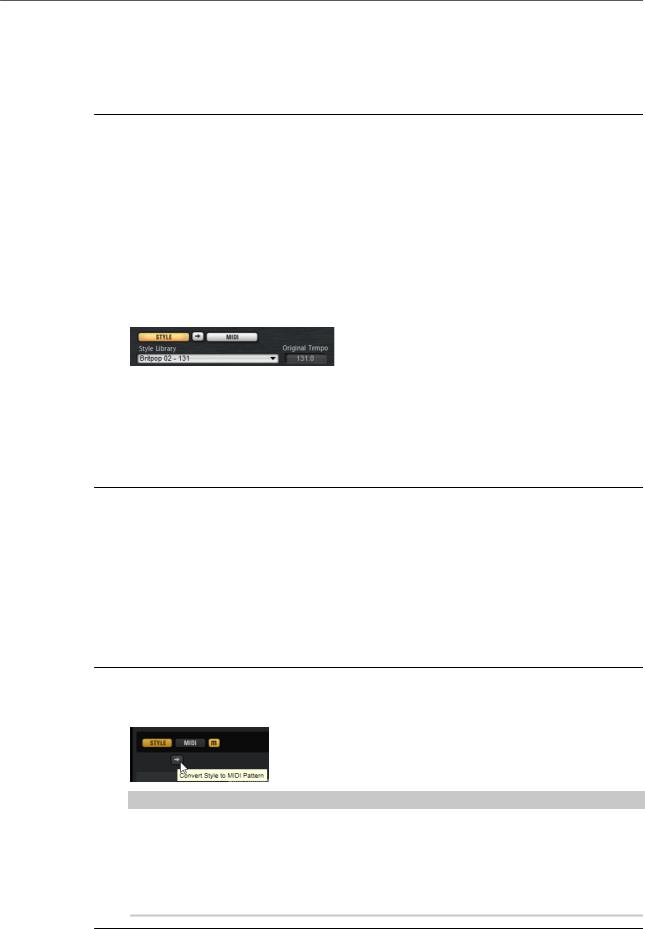
Converting Styles to MIDI Patterns
If you have found an acoustic or a percussion style that you want to use on your pad, but want to edit it further in the Pattern editor, you must convert it to a MIDI pattern first.
PREREQUISITE
●In the pad section on the left, the pad that contains the style is active.
●You have set up the style on the Agent page so that it plays the way you want it.
PROCEDURE
●Click Convert Style to MIDI Pattern on the Agent page to convert the current style into a MIDI pattern.
NOTE
The conversion takes into account all the settings in the Performance section, with one exception: If you convert a percussion style, Random Complexity is not taken into account.
If you convert an acoustic style, only the active part of the style, that is, the selected main, fill, intro, or ending is converted.
14
Getting Started
Creating the Different Sections of a Drum Track
RESULT
The style is converted and the Agent page automatically switches to the MIDI player. The Pattern editor becomes available, allowing you to modify the pattern.
NOTE
Once a style is converted to a MIDI pattern, it can no longer be opened in the style player.
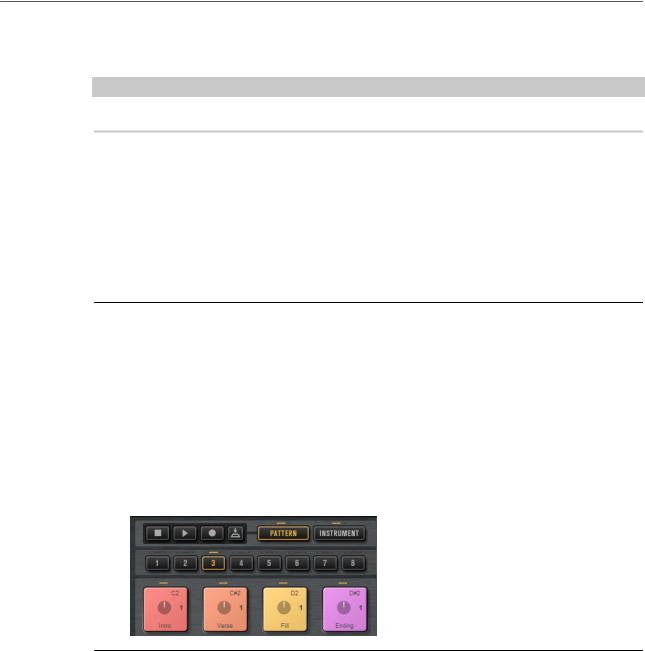
Creating the Different Sections of a Drum Track
To create the different sections of your drum track, for example, an intro, a fill, a main part, and an ending, it is useful to start by copying the current style to other pads. And then, to modify the style for those pads.
PREREQUISITE
You have set up a pattern pad to play back a style.
PROCEDURE
1.To copy the settings of the current pad to another pad, hold down Alt and drag the pad onto another pad.
2.Repeat this until you have four pads with the same settings.
3.Select the second pad. Set the dial to a fill. You can choose between eight fills.
4.Set up the fill to your liking. For example, change the complexity, activate half-time, try out different intensity settings, etc.
5.When you are done, right-click the pattern pad, select Rename Pad from the context menu, and enter a name for the pad, for example Fill.
6.Set up the pads for intro and ending in the same way.
AFTER COMPLETING THIS TASK
You can now record trigger notes for the pads in the DAW or transfer the patterns to the DAW by dragging them into a project.
RELATED LINKS
Converting Styles to MIDI Patterns on page 14
Dragging Patterns into a Project on page 16
Recording Trigger Notes for Your Patterns on page 16
15

Getting Started
Recording Trigger Notes for Your Patterns
Recording Trigger Notes for Your Patterns
When you use Groove Agent SE in a DAW project, you can record trigger notes at the positions where you want to trigger the patterns. This allows you to create the drums for your project on the fly, in the project context.
PREREQUISITE
You have created a project in your DAW to which you want to add a drum track.
You have added a MIDI track that is assigned to Groove Agent SE.
PROCEDURE
1.In Groove Agent SE, set up the MIDI patterns or styles for your drum track.
2.In the DAW, record-enable the MIDI track and start playback of your project.
3.Record the trigger notes at the positions in the project where you want to hear the drums.
RESULT
When you now play back the project, the trigger notes trigger the pattern playback. You can automate parameters like Complexity and Intensity from within the DAW. Any changes that you make to a pattern in Groove Agent SE are automatically reflected in all occurrences of this pattern in the project.
Dragging Patterns into a Project
You can drag patterns from Groove Agent SE into your DAW project and edit them there.
PREREQUISITE
You have created a project in your DAW to which you want to add a drum track. You have added a MIDI track that is assigned to Groove Agent SE.
Before you drag your patterns into a project, check whether the pattern pads are mapped to the same keys as the instrument pads. If this is the case, the trigger notes of the pattern pads interfere with the notes that are part of your pattern pads. To prevent this, you can either set up a different MIDI port or a different MIDI channel for the pattern pads.
PROCEDURE
1.In Groove Agent SE, set up the MIDI patterns or styles for your drum track.
2.Select the pad that plays the pattern that you want to use and drag it onto the MIDI track at the position where you want to insert it.
3.In the same way, drag the other pads into the project until you have assembled your drum track.
RESULT
The patterns are inserted as MIDI parts on the track. When you play back the project, the drum parts are played back as well.
RELATED LINKS
Using Different MIDI Channels/Ports for Instrument Pads and Pattern Pads on page 36 Editing Patterns in the DAW on page 17
16

Getting Started
Editing Patterns in the DAW
Editing Patterns in the DAW
When you have created MIDI parts from your Groove Agent SE patterns, you can further edit the parts in the DAW.
PREREQUISITE
You have assigned a MIDI track in your DAW to Groove Agent SE.
You have dragged your patterns to this track.
PROCEDURE
1.In the Inspector of your Steinberg DAW, open the Drum Map pop-up menu for the track and select Create Drum Map from Instrument.
This creates a drum map based on the information about the used drum sounds in Groove Agent SE.
2.Open the part in the Drum Editor.
The editor displays the correct drum names in the drum names list on the left. In the event display on the right, the MIDI notes are shown.
3.Set up the pattern by deleting or entering notes, by copying or moving notes, etc.
For information about how to edit notes and controllers in the Drum Editor, refer to the Operation Manual for your Steinberg DAW.
17

Managing Your Sounds
The following sections describe how to load, save, and manage the different kinds of sound files in Groove Agent SE.
Loading Kits
You need to load a kit to produce a sound with Groove Agent SE.
There are several ways to load kits:
●Via drag & drop from the Kits page or the Browser page in the Load panel onto the kit slot or the kit rack.
●Via drag & drop from the File Explorer/macOS Finder or the MediaBay of your Steinberg DAW.
●Via the context menu in the kit rack.
●By clicking the Load Kit button at the right of the kit name in the kit slot section.
●By clicking the name of the kit in the lower section of the kit rack to open the Load dialog and selecting a new kit.
Kit Slot
This section shows the name of the loaded kit, allows you to load a different kit, and make basic settings such as specifying the polyphony for the kit, for example.
Load button
Click this button to show the list of available kits.
You can also click the kit name to open this list. Right-click the kit name to open the kit context menu.
Load Previous/Next Kit
Click these buttons to load the previous/next kit from the list of available kits.
Load Kit with Patterns
Activate this button to make sure that kits are always loaded together with their patterns.
Polyphony
Adjusts the polyphony of the kit.
MIDI Input Indicator
The MIDI symbol starts blinking if incoming MIDI signals are detected.
18
Managing Your Sounds
Kit Rack
Velocity Curve
Sets the velocity response curve of the kit. This allows you to adapt the kit to your hardware MIDI controller or playing style.
Follow Transport
If Follow Transport is activated, you can use the transport functions in the DAW to start and stop playback both in the DAW and in Groove Agent SE. This allows you to record an audio track in your host application while Groove Agent SE plays the drums, for example.
●If playback is started in the DAW, Groove Agent SE plays back the active pad.
●If trigger keys are sent and the active pad is in Exclusive mode, playback switches to the pad that was triggered last. Playback returns to the active pad as soon as the trigger key is released. Pads that are not in Exclusive mode can play simultaneously.
NOTE
Follow Transport works differently in Jam Mode.
Song Position Counter
The song position counter shows the current song position in bars, beats, and 16th notes. If you activate the Play button in Groove Agent SE, the song position counter always starts at 1.0.0.0 and runs until you click stop.
Tempo Display
The tempo display next to the position counter shows the tempo of the host application.
Kit Rack
The kit rack to the right of the kit slot section gives you an overview over the loaded kit and its agent, and allows you to perform some editing via the context menu.
19
Managing Your Sounds
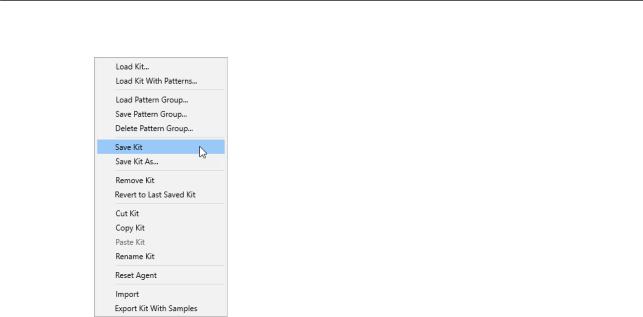
Kit Context Menu
Kit Context Menu
Load Kit
Allows you to load a kit.
Load Kit With Patterns
Allows you to load a kit with its MIDI patterns or its styles, if any.
Load Pattern Group
Allows you to load a predefined set of MIDI file assignments and play parameter settings for the 16 pads of the group.
Save Pattern Group
Allows you to save the 16 pads of the group and their settings as a pattern group.
Delete Pattern Group
Allows you to delete a pattern group.
Save Kit
Saves the kit. If you try to overwrite write-protected factory content, a dialog opens that allows you to save the edited kit under a new name.
Save Kit As
Allows you to save the kit under a new name.
Remove Kit
Removes the kit and its patterns from the slot.
Revert to Last Saved Kit
Reverts to the kit that was originally loaded on the slot. If the kit was loaded without patterns, only the kit and no patterns are loaded.
Cut Kit
Copies the kit and its patterns and removes it from the slot.
Copy Kit
Copies the kit and its patterns.
Paste Kit
Pastes the copied kit into the slot. If the slot already contains a kit, it is replaced.
20
Managing Your Sounds
Managing and Loading Files
Rename Kit
Allows you to rename the kit.
Reset Agent
Loads the Init preset of the agent.
Import (Beat Agent SE only)
Allows you to import MPC and GAK files into Beat Agent SE kits.
Export Kit With Samples (Beat Agent SE only)
Exports the Beat Agent SE kit together with its associated samples.
NOTE
Samples that are part of protected content, such as the VST Sound content, cannot be exported.
Export Mixer and FX to Cubase/Nuendo
Allows you to transfer the Acoustic Agent SE mixer settings, complete with equalizer settings and effects, to your Steinberg DAW, which means, you can perform mixing for the kit entirely in the MixConsole.
Export Mixer to Cubase/Nuendo
Allows you to transfer the Acoustic Agent SE mixer settings, without equalizer settings or effects, to your Steinberg DAW. This is useful if you want to create your own mix from scratch.
Managing and Loading Files
The Load panel allows you to manage, navigate to, load, and preview different file types. To display the Load panel, click the corresponding button in the top right of the edit display.
To open the Load panel in a separate window, click Dock/Undock Load Panel  at the right of the page buttons.
The Load panel contains the Kits, Instruments, Styles, MIDI, and Browser pages.
In the top section of the page, you specify which sounds to look for. The lower section presents the corresponding results.
21
Managing Your Sounds
Managing and Loading Files
●To adjust the size of the two sections, drag the divider at the top of the results list.
Managing Files via the Kits, Instruments, Styles, and MIDI Pages
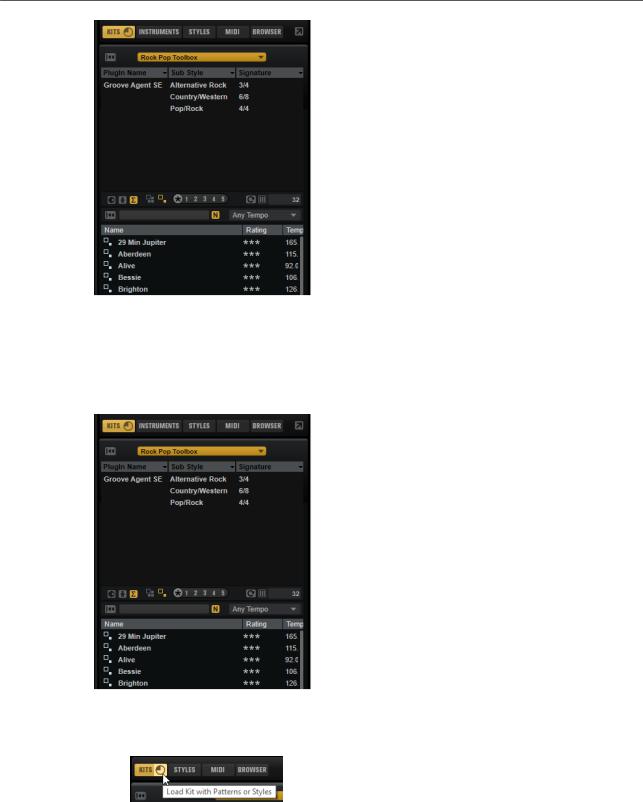
The Kits, Instruments, Styles, and MIDI pages are based on Steinberg’s MediaBay technology. These pages give you access to the available kits, MIDI patterns, styles, etc.
●The Kits page gives you access to the kits.
If you want to load kits with their patterns or styles, activate Load Kit with Patterns or Styles.
If this button is deactivated, only the kits are loaded while the patterns and styles are kept.
●The Instruments page on the Load panel shows the instruments that you created from your instrument pads.
●The Styles page gives you access to the styles.
The factory styles are created for Acoustic Agent SE kits and are usually loaded and used in the Style Player. Furthermore, content from Content Sets such as “Nashville” and “Simon Phillips Studio Drums”, make use of the style player.
22

Managing Your Sounds
Managing and Loading Files
You can also load styles in Beat Agent SE. However, in this case, make sure to map the instruments correctly to the instrument pads.
Percussion styles are available for the Percussion Player used by Percussion Agent, but can also be used with the MIDI Player.
●The MIDI page gives you access to MIDI files and MIDI patterns. They can be used in the MIDI Player. The MIDI files in the factory content are created for use in Beat Agent SE kits. Furthermore, the MIDI file content from VST Sound Instrument Sets such as “Neuro Mindset” or “Prime Cuts” can be loaded in the MIDI Player.
Filtering the Results
You can filter the results list using the configurable attribute columns at the top or by restricting the search to a specific content set.
Content Set Filter
Use the Select Content Set pop-up menu to restrict the search to a specific content set. By default, the search is performed in all installed content sets.
Attribute Filter
●To set up the filter, click on specific values in the columns.
●To select different filter criteria, click the column header and select a different attribute from the submenu.
Only the files that match the set filter are displayed in the results list.
Results List
The results list shows all files that have been found, according to your filter settings.
Content Filters
The content filter buttons allow you to define whether to show the entire content  , only the factory content
  , or only your user content
  .
.
View Filters (Kits Page)
The toolbar has two filter buttons that allow you to define which preset types to display: multis or kits. In the results list, the corresponding icon is shown to the left of the preset name.
Style Filters (Styles Page)
The two style filter buttons allow you to show the styles that are used in the Style Player  , the styles that are used in the Percussion Player
  , or both.
Rating Filter
You can limit the results list according to the rating of the presets. Use the rating slider to define the minimum rating.
Rescan Disk
Rescans the disk for files that match the search criteria. Click this button if you added or removed files on your hard disk, for example.
Set Up Result Columns
Allows you to select which attribute columns to display on the toolbar.
Results Counter
Displays the number of files that match the filter criteria. To stop an active scanning process, click in the value field.
23

Managing Your Sounds
Managing and Loading Files
Text Search
In the text search field on the results list toolbar, you can enter text contained in the name or any of the attributes of a preset that you are looking for. The results list is updated immediately and the category search section above shows all categories that contain presets matching the text search.
To reset the text-based result filter, click Clear Search Text next to the search field.
To restrict the search to the names only, activate Search Names Only  . This way, other attributes are not taken into account.
Tempo Filter
The Tempo Filter pop-up menu allows you to limit the results list to files within a specified tempo range. This way, you can restrict the results to files that match your current project. The options on the pop-up menu are automatically adapted to the tempo of the host application. You can set the filter to display only files that match the project tempo, or you can allow for a deviation of 5, 10, or 20 bpm from the project tempo.
NOTE
If you change the tempo in the host application, this is not reflected automatically on the pop-up menu. The menu is updated when you open it and select an option.
To show all files, regardless of their tempo, set Tempo Filter to Any Tempo.
RELATED LINKS
Configuring the Results List on page 24
onfi ur n the Results List
You can specify which file attributes you want to be displayed in the results list and set up the column order so that this attribute is visible without scrolling. This allows you to find the files that have a particular attribute more quickly.
●To configure which attributes are shown in the results list, click Set up Result Columns in the upper right corner of the results list and activate the corresponding entries. New attributes are added at the right of the list.
●To reorder the columns in the results list, drag the column headers to another position.
●To change the sorting of the list entries, click the column header. The triangle in the column header shows the sorting direction.
Assigning General MIDI Program Change Numbers to Sounds
Assigning General MIDI program change numbers to sounds allows you to use MIDI program change messages to load the sounds into the slot of the corresponding MIDI channel.
PROCEDURE
1.In the Load section, select the Kits, Styles, or MIDI page and click Set up Result Columns on the title bar of the lower section.
2.Select Musical > GM Sound.
3.Select the sound to which you want to apply the GM program change number.
4.In the GM Sound column for the sound, select the General MIDI program change number that you want to use.
You can assign the same GM Sound program number several times. If a program number is used more than once, the Rating attribute can be used to decide which program to load.
24
Managing Your Sounds
Managing and Loading Files
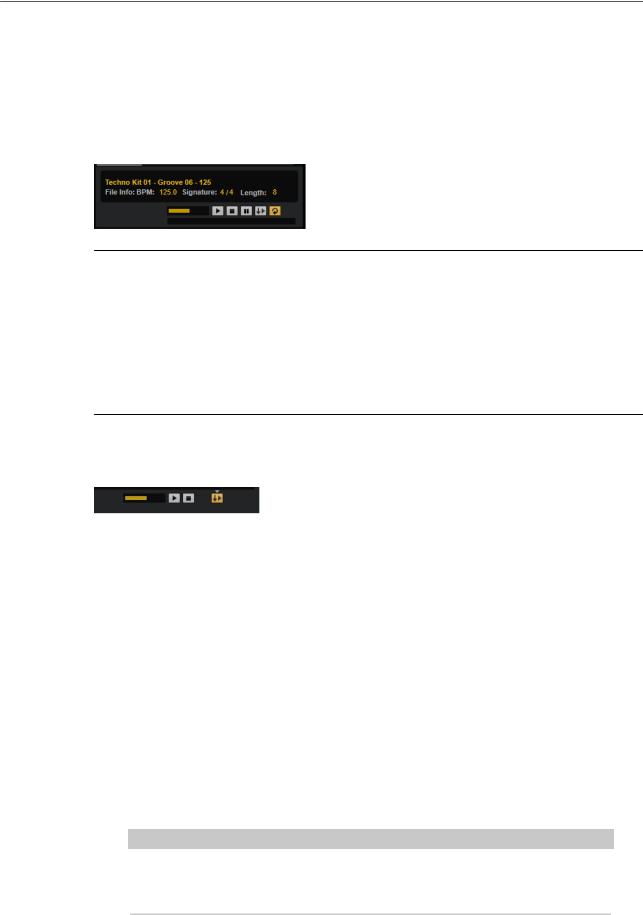
File Info Section
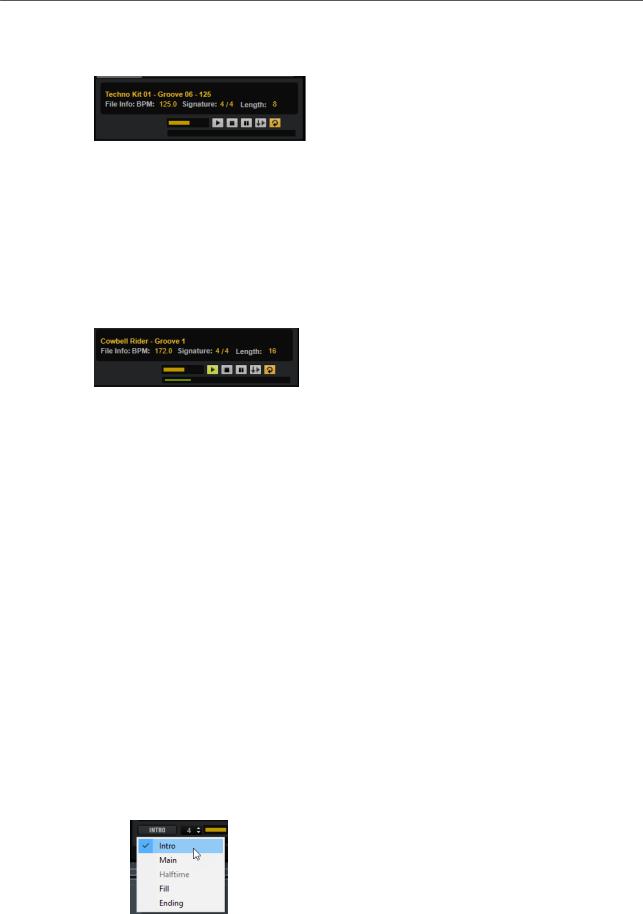
The File Info section below the results list shows information about the selected file.
●For MIDI files, original tempo, signature, and length are shown, as they are saved in the file.
●For styles, signature and length are shown.
●For instruments, the name of the instrument and the number of samples that it contains are shown.
Prelisten Section for MIDI Patterns and Styles
The Prelisten section below the results list allows you to listen to the selected MIDI pattern or style.
For MIDI pattern and style files, the following controls are available:
Level
Adjusts the playback level.
Play
Plays back the focused file.
Stop
Stops playback. The play locator jumps back to the start of the file.
Pause
Pauses playback. Click again to resume playback.
Auto Play
Automatically starts playback of the focused file.
Loop Playback
If this button is activated, the focused file is played back repeatedly.
Play Position
The play position indicator shows the playback position within the focused file. To select another position for playback, click on the slider or drag the handle.
For styles, the following additional controls are available:
Style Part
Allows you to select a part of the style, such as intro, fill, ending, etc.
25
Managing Your Sounds
Managing and Loading Files
Complexity/Variation
●If the Main part of the style is selected, you can select a complexity.
●If any other part of the style is selected, you can select a variation.
Prelistening Patterns and Styles
With the controls below the results list, you can listen to the MIDI patterns and styles in the results list before loading them.
PROCEDURE
1.On the Styles or MIDI page, select a file in the results list.
If you listen to a style, you can use the pop-up menu on the left to specify which part of the style you want to listen to. With the Complexity/Variation control, you can select a complexity for the Main part of the style or a variation for the other parts of the style.
2.Use the transport controls below the list to play back the file.
If Auto Play  is activated, the selected file is automatically played back.
3.Step through the files in the results list to listen to different files.
Prelisten Section for Instruments
The Prelisten section below the results list allows you to listen to the selected instrument.
Level
Adjusts the playback level.
Play
Plays back the focused file.
Stop
Stops playback. The play locator jumps back to the start of the file.
Prelisten in Place
Activates prelistening of the selected instrument. This allows you to listen to the instrument in the context of a running style or pattern.
Click the triangle above the button to select a prelisten option.
●If Always is selected, selecting an instrument in the results list always triggers the instrument.
●If Auto is selected, selecting an instrument in the results list does not trigger the instrument if the Style Player or the MIDI Player are playing. This prevents the prelisten instruments from being triggered off the beat.
NOTE
As soon as the instrument loses the focus in the results list, the Prelisten function stops and the original pad content is played again. This allows you to quickly compare two instruments, for example.
26

Managing Your Sounds
Managing and Loading Files
Loading MIDI Patterns or Styles in Your Host Application
You can drag MIDI patterns and styles from the Load panel onto a MIDI track in your host application.
PREREQUISITE
You have added a MIDI track in your host application project.
PROCEDURE
1.In the Load section, open the MIDI page or the Styles page.
2.Select the file that you want to import into your host application.
3.If you want to drag a style into the project, use the prelisten controls below the results list to select the part of the file and the complexity/variation.
All performance settings, such as Auto Complexity, Auto Fill, Quantize,etc. are taken into account, that is, they will be part of the resulting MIDI pattern.
4.Drag the file onto a MIDI track in you DAW.
RESULT
A MIDI part containing the pattern is added to your project.
The MIDI patterns that you drag out of Groove Agent SE are MIDI files, that is, you can drop them in any host application that supports drag and drop of MIDI files.
Editing Attributes
Presets can be described by using a predefined set of attributes.
PROCEDURE
1.In the New Preset Attributes section of the Save dialog, click in the field of the attribute value that you want to set.
Depending on the attribute, a menu or a dialog opens.
2.Select a value.
Attribute values are written into the corresponding preset files.
27

Managing Your Sounds
Managing and Loading Files
Loading Files Using the Browser
In the Browser, you can browse for samples, MIDI files, and presets. The Browser also shows samples that are part of VST Sound content.
In the Browser, you can search and load the following files
●Samples from the file system or from within loaded kits. NOTE
Samples can only be loaded for Beat Agent kits.
●MIDI files.
●Multis and kits.
Path Section
●To step through the recent locations, click the Previous Browse Location/Next Browse Location buttons.
●To navigate to the folder one level up in the location tree, click the Browse Containing Folder button.
●The path to the current position in the hierarchy is shown on the right. To navigate to one of these folders, click its name.
●To open the navigation history, click at the very right of the path field.
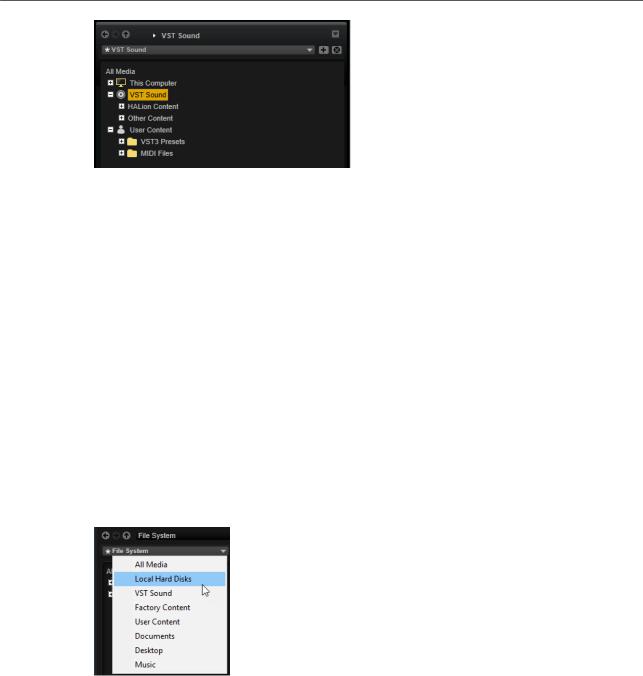
Location Tree
The location tree on the left in the Browser allows you to navigate through your samples, in any folder on your system. You can even access files contained in VST Sound containers and ISO files.
28
Managing Your Sounds
Managing and Loading Files
If you select an entry in the tree, the results list shows the corresponding content.
Location Tree Context Menu
Refresh Views
Updates the tree. This is useful if you added a new disk to your setup or created a new folder on the hard disk.
Rescan Disk
Rescans the selected element in the tree. The corresponding files are opened, the information is extracted, and the database file is updated accordingly.
Quick Rescan Disk
Rescans only the folders that have changed since the last scan.
Show in Explorer (Win)/Reveal in Finder (Mac)
Shows the location of the selected file on your system.
Locations
Locations are folders or directories on your system that contain media files. By setting up locations, you can organize the files that are available in the results list according to context.
The text field above the tree shows the name of the selected folder. If the name is preceded by an asterisk, the folder has not been saved as a location yet.
Managing Locations
●To open the list of favorite locations, click in the text field.
●To add the current folder to the favorite locations, click Add Selected Media Node as Favorite Location.
You can keep the folder name or specify a new name for the location.
●To delete the current location from the list, click Remove Favorite Location.
Results List
The results list shows the files found in the selected folder. It displays all files that Groove Agent SE can read, such as VST presets or samples.
29

Managing Your Sounds
Managing and Loading Files
In addition to information like file name and path, the columns in the results list can be configured to show different attributes.
The results list also shows any subfolders of the selected folder, but does not include the files contained in the subfolders themselves. To see the content of subfolders, you must select the corresponding subfolder.
●To open a folder or location, double-click it in the results list. If you double-click a preset, its contents are shown.
●To move up one level in the folder hierarchy, click Browse Containing Folder.
You can limit the number of results in the results list using the text search function. This way, you can search for files with specific names, for example. For presets, the search also takes any attributes into account. The value field in the top right corner indicates the number of files that match the search text. To clear the search text, click Clear Filter Text.
onfi ur n the Results List
You can specify which file attributes you want to be displayed in the results list and set up the column order so that this attribute is visible without scrolling. This allows you to find the files that have a particular attribute more quickly.
●To configure which attributes are shown in the results list, click Set up Result Columns in the upper right corner of the results list and activate the corresponding entries. New attributes are added at the right of the list.
●To reorder the columns in the results list, drag the column headers to another position.
●To change the sorting of the list entries, click the column header. The triangle in the column header shows the sorting direction.
Searching for Files on Your System
Instead of searching the current results list, you can also use the text search to look for files on your hard disks or in VST Sound containers.
PROCEDURE
1.Select the location that you want to use as the starting point for the search. The higher up in the hierarchy the location, the longer the search takes.
2.In the top left corner of the results list, click the Search Location Content  button and enter the search text in the text field.
3.Optional: Click the button to the right of the search field to specify whether you want to search for samples, MIDI patterns, kits, multis, or all types.
4.To start the search, press Return or click Search/Stop Search to the right of the search text.
The files that match the search criteria are listed in the results list. NOTE
The maximum of files that can be displayed in the list is 10,000.
5.Double-click a result to show it in the location tree.
30
Loading...