


 Loading...
Operation Manual
Cristina Bachmann, Heiko Bischoff, Marion Bröer, Sabine Pfeifer, Heike Schilling
The information in this document is subject to change without notice and does not represent a commitment on the part of Steinberg Media Technologies GmbH. The software described by this document is subject to a License Agreement and may not be copied to other media except as specifically allowed in the License Agreement. No part of this publication may be copied, reproduced or otherwise transmitted or recorded, for any purpose, without prior written permission by Steinberg Media Technologies GmbH.
All product and company names are ™ or ® trademarks of their respective owners. Windows XP is a trademark of Microsoft Corporation. Windows Vista is a registered trademark or trademark of Microsoft Corporation in the United States and/or other countries. The Mac logo is a trademark used under license. Macintosh and Power Macintosh are registered trademarks. MP3SURROUND and the MP3SURROUND logo are registered trademarks of Thomson SA, registered in the US and other countries, and are used under license from Thomson Licensing SAS.
Release Date: November 18, 2009
© Steinberg Media Technologies GmbH, 2009.
All rights reserved.
Table of Contents
6 |
About this manual |
84 |
Audio effects |
|
7 |
Welcome! |
85 |
About this chapter |
|
8 |
VST Connections: Setting up input and |
85 |
Overview |
|
86 |
Insert effects |
|||
|
output busses |
|||
|
89 |
Send effects |
||
9 |
About this chapter |
93 |
Editing effects |
|
9 |
Setting up busses |
93 |
Effect presets |
|
11 |
Using the busses |
95 |
Installing and managing effect plug-ins |
|
12 |
About monitoring |
98 |
Instrument tracks |
|
13 |
The Project window |
|||
99 |
Introduction |
|||
14 |
Background |
99 |
Instrument tracks |
|
16 |
Window Overview |
100 |
VST instruments and processor load |
|
20 |
Operations |
100 |
Using presets for VSTi configuration |
|
38 |
Options |
101 |
About latency |
|
41 |
Playback and the Transport panel |
103 |
Automation |
|
42 |
Background |
104 |
Introduction |
|
43 |
Operations |
104 |
Enabling and disabling the writing of automation |
|
45 |
Options and Settings |
|
data |
|
46 |
The Virtual Keyboard |
105 |
What can be automated? |
|
48 |
Recording |
106 |
Hints and further options |
|
106 |
Automation track operations |
|||
49 |
Background |
|||
109 |
Working with automation curves |
|||
49 |
Basic recording methods |
|||
111 |
MIDI Part Data vs Track Automation |
|||
51 |
Audio recording specifics |
|||
112 |
Audio processing and functions |
|||
54 |
MIDI recording specifics |
|||
59 |
Options and Settings |
113 |
Background |
|
61 |
Recovery of audio recordings after system failure |
113 |
Audio processing |
|
62 |
Fades, crossfades and envelopes |
118 |
Freeze Edits |
|
119 |
The Sample Editor |
|||
63 |
Creating fades |
|||
65 |
The Fade dialogs |
120 |
Background |
|
66 |
Creating crossfades |
120 |
Window overview |
|
67 |
The Crossfade dialog |
122 |
General Operations |
|
68 |
Auto Fades and Crossfades |
126 |
Options and settings |
|
69 |
The mixer |
126 |
AudioWarp: Tempo matching audio |
|
128 |
Working with hitpoints and slices |
|||
70 |
About this chapter |
|||
132 |
The Audio Part Editor |
|||
70 |
Overview |
|||
70 |
Configuring the mixer |
133 |
Background |
|
73 |
The audio-related channel strips |
133 |
Opening the Audio Part Editor |
|
73 |
The MIDI channel strips |
133 |
Window overview |
|
74 |
The output channels |
135 |
Operations |
|
74 |
Basic mixing procedures |
136 |
Common methods |
|
76 |
Audio-specific procedures |
136 |
Options and Settings |
|
81 |
MIDI-specific procedures |
|
|
|
81 |
Utilities |
|
|
4
137The Pool
138Background
138 Window overview
140 Operations
149Remote controlling Cubase LE
150Introduction
150Setting Up
151Operations
152The Generic Remote device
154Apple Remote (Macintosh only)
155MIDI realtime parameters
156Introduction
156 The Inspector – General handling
156 The Inspector sections
160MIDI processing and quantizing
161Introduction
161 The Quantizing functions
165Permanent settings with Freeze MIDI Modifiers
166Dissolve Part
167Other MIDI functions
170The MIDI editors
171Introduction
171 Opening a MIDI editor
173 The Key Editor – Overview
175 Key Editor operations
188The Drum Editor – Overview
189Drum Editor operations
191Working with drum maps
194Using drum name lists
195The List Editor – Overview
195List Editor operations
198Working with System Exclusive messages
200Recording System Exclusive parameter changes
200Editing System Exclusive messages
201The Score Editor – Overview
202Score Editor operations
209Editing tempo and signature
210Background
210Tempo and signature display
211Editing tempo and signature
214Export Audio Mixdown
215Introduction
215Mixing down to audio files
216The available file formats
220Synchronization
221Background
221Synchronization signals
222Synchronizing the transport vs. synchronizing audio
223Making basic settings and connections
224Synchronization settings
228 Sync Options
228 Working with VST System Link
228 Preparations
231 Activating VST System Link
234Application examples
235Video
236Background
236 Before you start
238 Operations
240File handling
241Working with Projects
244Importing audio
245Exporting and importing standard MIDI files
247Customizing
248Background
248Using the Setup options
249Customizing track controls
251Appearance
251Applying track and event colors
253Where are the settings stored?
254Key commands
255Introduction
255 Setting up key commands
257Setting up tool modifier keys
258The default key commands
261 Index
5
1
About this manual
Welcome!
This is the Operation Manual for Steinberg’s Cubase LE. Here you will find detailed information about all the features and functions in the program.
About the program versions
The documentation covers two different operating systems or “platforms”; Windows and Mac OS X.
Some features and settings are specific to one of the platforms. This is clearly stated in the applicable cases. In other words:
Ö If nothing else is said, all descriptions and procedures in the documentation are valid for both Windows and Mac OS X.
The screenshots are taken from the Windows version of Cubase LE.
Key command conventions
Many of the default key commands in Cubase LE use modifier keys, some of which are different depending on the operating system. For example, the default key command for Undo is [Ctrl]-[Z] under Windows and [Com- mand]-[Z] under Mac OS X.
When key commands with modifier keys are described in this manual, they are shown with the Windows modifier key first, in the following way:
[Win modifier key]/[Mac modifier key]-[key]
For example, [Ctrl]/[Command]-[Z] means “press [Ctrl] under Windows or [Command] under Mac OS X, then press [Z]”.
Similarly, [Alt]/[Option]-[X] means “press [Alt] under Windows or [Option] under Mac OS X, then press [X]”.
Ö Please note that this manual often refers to right-click- ing, e.g. to open context menus. If you are using a Mac with a single-button mouse, hold down [Ctrl] and click.
7
About this manual
2
VST Connections: Setting up input and output busses
About this chapter
Cubase LE uses a system of input and output busses to transfer audio between the program and the audio hardware.
•Input busses let you route audio from the inputs on your audio hardware into the program. This means that when you record audio, you will always do this through one or several input busses.
•Output busses let you route audio from the program to the outputs on your audio hardware. When you play back audio, you will always do this through one or several output busses.
As you can see, the input and output busses are vital when you work with Cubase LE. This is why you find this chapter at the beginning of the Operation Manual – once you understand the bus system and know how to set up the busses properly, it will be easy to go on with recording, playing back and mixing.
Setting up busses
Strategies
In Cubase LE, you can create up to 8 stereo busses or up to 16 mono busses.
Ö The bus configuration is saved with the project – therefore it is a good idea to add and set up the busses you need and save these in a template project (see “Save as Template” on page 242).
When you start working on new projects, you start from this template. That way you get your standard bus configuration without having to make new bus settings for each new project. If you need to work with different bus configurations in different projects, you can either create several different templates or store your configurations as presets (see “Other bus operations” on page 11). The templates can of course also contain other settings that you regularly use – sample rate, record format, a basic track layout, etc.
Input busses
•Most likely you need at least one stereo input bus assigned to an analog input pair. This would let you record stereo material. If you want to be able to record in stereo from other analog input pairs as well, you add stereo input busses for these, too.
•Although you can record mono tracks from one side of a stereo input, it may be a good idea to add a dedicated mono input bus. This could be assigned to an analog input to which you have connected a dedicated microphone pre-amp for example. Again, you can have several different mono busses.
•You probably want a dedicated stereo input bus assigned to the digital stereo input, for digital transfers.
Output busses
•For digital transfers, you need a stereo bus assigned to the digital stereo output as well.
Preparations
Before you set up busses, you should name the inputs and outputs on your audio hardware.
The reason for this is compatibility – it makes it easier to transfer projects between different computers and setups. For example, if you move your project to another studio, the audio hardware may be of a different model. But if both you and the other studio owner have given your inputs and outputs names according to the setup (rather than names based on the audio hardware model), Cubase LE will automatically find the correct inputs and outputs for your busses and you will be able to play and record without having to change the settings.
Use the Device Setup dialog to assign names to the inputs and outputs of your audio hardware:
1.Open the Device Setup dialog from the Devices menu.
2.Make sure that the correct driver for your audio hardware is selected on the VST Audio System page, so that the audio card is listed in the Devices list.
3.Select your audio card in the list.
The available input and output ports on your audio hardware are listed on the right.
4. To rename a port, click its name in the “Show as” column and enter a new name.
• If needed, you can also disable ports by deactivating them in the “Visible” column.
Disabled ports will not show up in the VST Connections window when you are making bus settings. If you attempt to disable a port that is used by a bus, you will be asked whether this is really what you want – note that this will remove the port from the bus!
5. Click OK to close the Device Setup dialog.
9
VST Connections: Setting up input and output busses
Ö If you open a project created on another computer and the port names do not match (or the port configuration is not the same), the Missing Ports dialog will appear.
This allows you to manually re-route ports used in the project to ports available in your system.
Mac OS X only: Port selection and activation
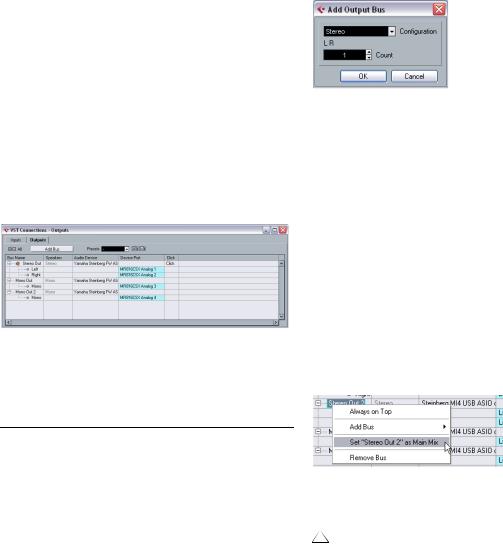
Adding a bus
1.Click the Inputs or Outputs tab depending on which you want to add.
2.Click the Add Bus button.
A dialog appears.
On the settings page for your audio card (opened via the Device Setup dialog, see above), you can specify which input and which output port should be active. This allows you, for example, to use the Microphone input instead of the Line input or even to deactivate the audio card input or output completely, if required.
Ö This function is only available for Built-In Audio, standard USB audio devices and a certain number of other audio cards (e.g. Pinnacle CineWave).
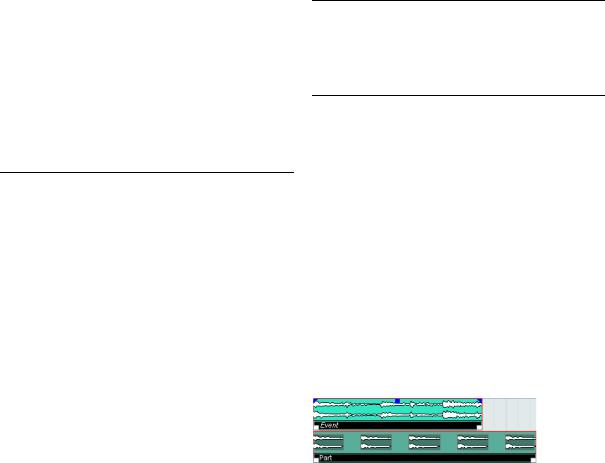
The VST Connections window
You add and set up busses in the VST Connections window, opened from the Devices menu.
This window contains the Inputs and Outputs tabs for viewing input busses and output busses.
Depending on which tab you have selected, the window lists the current input or output busses, with the following columns:
Column |
Description |
Bus Name |
Lists the busses. You can select busses and rename |
|
them by clicking on them in this column. |
Speakers |
Indicates the speaker configuration (mono, stereo) of |
|
each bus. |
Audio Device |
This shows the currently selected ASIO driver. |
Device Port |
When you have “opened” a bus (by clicking its + button |
|
in the Bus Name column) this column shows which phys- |
|
ical inputs/outputs on your audio hardware are used by |
|
the bus. |
Click |
You can route the click to a specific output bus. |
|
|
3. Select the desired (channel) configuration.
You can add stereo and mono busses.
• Alternatively you can right-click in the VST Connections window and add a bus in the desired format directly from the context menu.
The new bus appears with the ports visible.
4. Click in the Device Port column to select an input/output port for a channel in the bus.
The pop-up menu that appears lists the ports with the names you have assigned in the Device Setup dialog. Repeat this for all channels in the bus.
Setting the Main Mix bus (the default output bus)
The Main Mix is the output bus that each new channel in the mixer will be assigned to when it is created.
Any of the output busses in the VST Connections window can be the default output bus. By right-clicking on the name of an output bus, you can set this bus as the Main Mix bus.
Setting the default output bus in the VST Connections window.
When creating new audio, group or FX channels in the mixer, they will automatically be routed to the default bus.
The default bus is indicated by an orange colored speaker icon next to its name in the VST Connections window.
10
VST Connections: Setting up input and output busses
Presets
On the Inputs and Outputs tabs, you will find a Presets menu. Here you can find the following types of presets:
•Automatically created presets tailored to your specific hardware configuration.
On each startup, Cubase LE will analyze the physical inputs and outputs provided by your audio hardware and create a number of hardwaredependent presets with the following possible configurations:
•one stereo bus
•various combinations of stereo and mono busses
•a number of mono busses
•You can also save your own setups as presets.
To store the current configuration as a preset, click the Store “+” button and enter a name for the preset. You can then select the stored configuration directly from the Presets pop-up menu at any time. To remove a stored preset, select it and click the “-” button.
Other bus operations
•To change the port assignment for a bus, you proceed as when you added it: Make sure the channels are visible (by clicking the “+” button next to the bus, or by clicking the “+ All” button at the top of the window) and click in the Device Port column to select ports.
•To remove a bus you do not need, select it in the list, right-click and select “Remove Bus” from the pop-up menu, or press [Backspace].
Using the busses
This section describes briefly how to use the input and output busses you have created. For details refer to the chapters “Recording” on page 48 and “The mixer” on page 69.
Routing
When you play back an audio track (or any other audio-re- lated channel in the mixer), you route it to an output bus. In the same way, when you record on an audio track you select from which input bus the audio should be sent.
• You can select input and output busses in the Inspector, using the Input and Output Routing pop-up menus.
Ö For audio-related channel types other than audio track channels (i.e. Group channels and FX channels), only the Output Routing pop-up menu is available.
When selecting an input bus for a track you can only select busses that correspond to the track’s channel configuration. Here are the details for input busses:
•Mono tracks can be routed to mono input busses or individual channels within a stereo input bus.
•Stereo tracks can be routed to mono or stereo input busses.
For output busses any assignment is possible.
Assignments that will lead to feedback are not available in the pop-up menu. This is also indicated by a one-way symbol.
To disconnect input or output bus assignments, select “No Bus” from the corresponding pop-up menu.
11
VST Connections: Setting up input and output busses

Viewing the busses in the mixer
Ö Note that only the output busses are available in the mixer – not the input busses.
The available output busses are represented as output channel strips in the mixer (shown in a separate pane to the right). You can show or hide output channels by clicking the corresponding button in the mixer common panel:
About monitoring
The Main Mix bus (the default output bus) is used for monitoring (see “Setting the Main Mix bus (the default output bus)” on page 10).
You can adjust the monitoring level in the Mixer.
Hide Output Channels
Output channels
The output channels are shown to the right in the mixer.
Here you can do the following:
•Adjust the output level for the busses with the faders.
•Open the Channel Settings window to add effects or EQ.
These will affect the whole bus. Examples of effects you may want to add here include compressors, limiters and dithering, see the chapter “Audio effects” on page 84.
12
VST Connections: Setting up input and output busses
3
The Project window
Background
The Project window is the main window in Cubase LE. This provides you with an overview of the project, allowing you to navigate and perform large scale editing. Each project has one Project window.
Track type |
Description |
Marker |
The Marker track displays markers which can be moved |
|
and renamed directly in the Project window (see “Mark- |
|
ers” on page 37). A project can have only one marker |
|
track. |
Video |
For playing back video events. A project can have only |
|
one video track. |
About tracks
The Project window is divided vertically into tracks, with a timeline running horizontally from left to right. The following track types are available:
Track type |
Description |
Audio |
For recording and playing back audio events and audio |
|
parts. Each audio track has a corresponding audio chan- |
|
nel in the mixer. |
|
An audio track can have an automation track for automat- |
|
ing mixer channel parameters, effect settings, etc. |
Folder |
Folder tracks function as containers for other tracks, mak- |
|
ing it easier to organize and manage the track structure. |
|
They also allow you to edit several tracks at the same time, |
|
see “Folder tracks” on page 36. |
FX Channel |
FX channel tracks are used for adding send effects. Each |
|
FX channel can contain up to eight effect processors – by |
|
routing effect sends from an audio channel to an FX chan- |
|
nel, you send audio from the audio channel to the effect(s) |
|
on the FX channel. Each FX channel has a corresponding |
|
channel strip in the mixer – in essence an effect return |
|
channel, see the chapter “Audio effects” on page 84. |
|
All FX channel tracks are automatically placed in a special |
|
FX channel folder in the Track list, for easy management. |
|
An FX channel can also have an automation track for au- |
|
tomating mixer channel parameters, effect settings, etc. |
Group |
By routing several audio channels to a Group channel, |
Channel |
you can submix them, apply the same effects to them, |
|
etc. (see “Using group channels” on page 80). |
|
A Group channel track contains no events as such, but |
|
displays settings and automation curves for the corre- |
|
sponding Group channel. Each Group channel track has |
|
a corresponding channel strip in the mixer. In the Project |
|
window, Group channels are organized as tracks in a |
|
special Group Tracks folder. |
Instrument |
This allows you to create a track for a dedicated instru- |
|
ment. Instrument tracks have a corresponding channel |
|
strip in the mixer. Each instrument track can have an au- |
|
tomation track in the Project window. However, Volume |
|
and Pan are automated from within the mixer. For more |
|
information on instrument tracks, see the chapter “Instru- |
|
ment tracks” on page 98. |
MIDI |
For recording and playing back MIDI parts. Each MIDI |
|
track has a corresponding MIDI channel strip in the mixer. |
|
A MIDI track can have an automation track for automating |
|
mixer channel parameters, etc. |
|
|
About parts and events
The tracks in the Project window contain parts and/or events. Events are the basic building blocks in Cubase LE. Different event types are handled differently in the Project window:
•Video events and automation events (curve points) are always viewed and rearranged directly in the Project window.
•MIDI events can always be found in MIDI parts, which are containers for one or more MIDI events. MIDI parts are rearranged and manipulated in the Project window. To edit the individual MIDI events in a part, you have to open the part in a MIDI editor (see “The MIDI editors” on page 170).
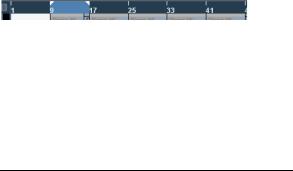
•Audio events can be displayed and edited directly in the Project window, but you can also work with audio parts containing several events. This is useful if you have a number of events which you want to treat as one unit in the project. Au- dio parts also contain information about the time position in the project.
An audio event and an audio part
Audio handling
When you work with audio files, it is crucial to understand how audio is handled in Cubase LE:
When you edit or process audio in the Project window, you always work with an audio clip that is automatically created on import or during recording. This audio clip refers to an audio file on the hard disk that itself remains untouched. This means, that audio editing and processing is “non-destructive”, in the sense that you can always undo changes or revert to the original versions.
14
The Project window
An audio clip does not necessarily refer to just one original audio file! If you apply e.g. some processing to a specific section of an audio clip, this will create a new audio file containing only this section. The processing will then be applied to the new audio file only, leaving the original audio file unchanged. Finally, the audio clip is automatically adjusted, so that it refers both to the original file and to the new, processed file. During playback, the program will switch between the original file and the processed file at the correct positions. You will hear this as a single recording, with processing applied to one section only. This feature makes it possible to undo processing at a later stage, and to apply different processing to different audio clips that refer to the same original file.
An audio event is the object that you place on a time position in Cubase LE. If you make copies of an audio event and move them to different positions in the project, they will still all refer to the same audio clip. Furthermore, each audio event has an Offset value and a Length value. These determine at which positions in the clip the event will start and end, i.e. which section of the audio clip will be played back by the audio event. For example, if you resize the audio event, you will just change its start and/or end position in the audio clip – the clip itself will not be affected.
Ö If you want to use one audio file in different contexts, or if you want to create several loops from one audio file, you should convert the corresponding regions of the audio clip to events and bounce them into separate audio files. This is necessary since different events that refer to the same clip access the same clip information.
15
The Project window

Window Overview
Toolbar
Info line
Ruler
Inspector
The Track list with various track types |
The event display, showing audio parts and events, MIDI parts, automation, markers, etc. |
The Track list
The Track list displays all the tracks used in a project. It contains name fields and settings for the tracks. Different track types have different controls in the Track list. To see all the controls you may have to resize the track in the Track list (see “Resizing tracks in the Track list” on page 22).
• The Track list area for an audio track:
Mute & |
Track |
Record Enable & Automation |
||||
Solo |
name |
Monitor |
Read/Write |
|||
|
|
|
|
|
|
Track activity |
Show/hide |
Edit channel |
|
|
indicator |
||
Indicate whether effect sends, EQ |
||||||
automation |
settings |
or insert effects are activated for the |
||||
|
|
|
|
track. Click to bypass. |
||
• The Track list area for an automation track (opened by clicking the Show/Hide Automation button on a track):
Automation Read/Write
Mute |
Automation parameter (click to select parameter) |
• The Track list area for a MIDI track:
Mute & Solo |
Track |
Record Enable & |
Automation |
|||
|
|
name |
Monitor |
|
|
Read/Write |
Edit |
|
|
|
|
Track activity |
|
|
|
|
|
indicator |
||
channel |
|
|
|
|
||
|
|
|
|
|
||
settings |
|
|
|
|
MIDI channel |
|
|
|
|
|
|
|
|
|
|
|
|
|
|
|
Drum map |
|
Bank |
Patch |
MIDI Output |
||
16
The Project window

The Inspector
The area to the left of the Track list is called the Inspector. This shows additional controls and parameters for the track you have selected in the Track list. If several tracks are selected (see “Handling tracks” on page 25), the Inspector shows the setting for the first (topmost) selected track.
To hide or show the Inspector, click the Inspector icon in the toolbar.
The Inspector icon
• For most track classes, the Inspector is divided into a number of sections, each containing different controls for the track. You can hide or show sections by clicking on their names.
Clicking the name for a hidden section brings it into view and hides the other sections. [Ctrl]/[Command]-clicking the section name allows you to hide or show a section without affecting the other sections. [Alt]/[Op- tion]-clicking a section name shows or hides all sections in the Inspector.
• You can also use key commands to show different Inspector sections.
These are set up in the Key Commands dialog, see “Setting up key commands” on page 255.
Ö Hiding a section does not affect its functionality.
For example, if you have set up a track parameter or activated an effect, your settings will still be active even if you hide the respective Inspector section.
Which sections are available in the Inspector depends on the selected track.
Ö Please note that not all Inspector tabs are shown by default. You can show/hide Inspector sections by rightclicking on an Inspector tab and activating/deactivating the desired option(s).
Make sure you right-click on an inspector tab and not on the empty area below the Inspector, as this will open the Quick context menu instead.
The Inspector Setup context menu
Inspector sections
The Inspector contains the controls that can be found on the Track list, plus some additional buttons and parameters. In the table below, these additional settings and the different sections are listed. Which sections are available for which track type is described in the following sections.
Parameter |
Description |
Auto Fades |
Opens a dialog in which you can make separate Auto |
Settings |
Fade settings for the audio track, see “Making Auto Fade |
button |
settings for a separate track” on page 68. |
Edit Channel |
Opens the Channel Settings window for the track, allow- |
settings |
ing you to view and adjust effect and EQ settings, etc., |
|
see “Using Channel Settings” on page 76. |
Volume |
Use this to adjust the level for the track. Changing this |
|
setting will move the track’s fader in the mixer window, |
|
and vice versa. See “Setting volume in the mixer” on page |
|
74 to learn more about setting levels. |
Pan |
Use this to adjust the panning of the track. As with the |
|
Volume setting, this corresponds to the Pan setting in the |
|
mixer. |
Delay |
This adjusts the playback timing of the audio track. Positive |
|
values delay the playback while negative values cause the |
|
track to play earlier. The values are set in milliseconds. |
Input Routing |
This lets you specify which Input bus or MIDI input the |
|
track should use. See “Setting up busses” on page 9 for |
|
information about Input busses. |
Output |
Here you decide to which output the track should be |
Routing |
routed. For audio tracks you select an output bus (see |
|
“Setting up busses” on page 9) or Group channel, for |
|
MIDI tracks you select a MIDI output and for Instrument |
|
tracks, you select the Instrument to which it is routed. |
Inserts section |
Allows you to add insert effects to the track, see the |
|
chapters “Audio effects” on page 84 and “MIDI realtime |
|
parameters” on page 155. The Edit button at the top of |
|
the section opens the control panels for the added insert |
|
effects. |
|
|
17
The Project window

Parameter |
Description |
Equalizers |
Lets you adjust the EQs for the track. You can have up to |
section |
four bands of EQ for each track, see “Making EQ set- |
|
tings” on page 77. The Edit button at the top of the sec- |
|
tion opens the Channel Settings window for the track. |
Channel |
Shows a duplicate of the corresponding mixer channel |
section |
strip. The channel overview strip to the left lets you acti- |
|
vate and deactivate insert effects, EQs and sends. |
|
|
Audio tracks
For audio tracks, all settings and sections listed above are available.
Instrument tracks
As Instrument tracks are combinations of MIDI tracks and associated sounds (VST Instruments), the Inspector offers sections with both MIDI and audio-related settings (basic track settings, MIDI Modifiers, Inserts, Equalizers, Sends and the Channel section).
MIDI tracks
When a MIDI track is selected, the Inspector contains a number of additional sections and parameters, affecting the MIDI events in realtime (e.g. on playback). Which sections are available for MIDI tracks is described in the chapter “MIDI realtime parameters” on page 155.
Folder tracks
When a folder track is selected, the Inspector shows the folder and its underlying tracks, much like a folder structure in the Windows Explorer or Mac OS X Finder.
Ö You can click one of the tracks shown under the folder in the Inspector to have the Inspector show the settings for that track. This way, you don’t have to “open” a folder track to make settings for tracks within it.
FX channel tracks
When an FX channel track is selected, the following controls and sections are available:
•Edit button
•Volume control
•Pan control
•Output Routing pop-up menu
•Inserts section
•Equalizers section
•Sends section
•Channel section
FX channel tracks are automatically placed in a special folder, for easier management. When this folder track is selected, the Inspector shows the folder and the FX channels it contains. You can click one of the FX channels shown in the folder to have the Inspector show the settings for that FX channel – this way you don’t have to “open” a folder track to access the settings for the FX channels in it.
Group channel tracks
When a Group channel track is selected, the following controls and sections are available:
•Edit button
•Volume control
•Pan control
•Output Routing pop-up menu
•Inserts section
•Equalizers section
•Sends section
•Channel section
Just like FX channel tracks, all Group channel tracks are placed in a separate folder – when this is selected, the Inspector shows the folder and the Group channels it contains. You can click one of the Group channels shown in the folder to have the Inspector show the settings for that Group channel – this way, you don’t have to “open” a folder track to access the settings for the Group channels in it.
Marker tracks
When the marker track is selected, the Inspector shows the marker list. For more information, see the section “Markers” on page 37.
Video tracks
When a video track is selected, the Inspector contains a Mute button for interrupting video playback.
18
The Project window

The toolbar
The toolbar contains tools and shortcuts for opening other windows and various project settings and functions:
Constrain delay compensation (see “Constrain Delay Compensation” on page 102).
Show/hide info line
Active project |
|
|
|
|
|
|
Open Mixer |
|
|
|
|
||||
indicator |
|
|
|
|
|
||
|
|
|
|
||||
Show/hide Inspector |
Open Pool |
||||||
Project window tools
Transport controls
(Previous/Next Marker, Cycle, Stop, Play, and Record)
Autoscroll and Suspend |
Grid pop-up |
Snap to Zero |
||||||
Autoscroll when Editing |
menu |
Crossing |
||||||
|
|
|
|
|
|
|
|
|
|
|
|
|
|
|
|
|
|
|
|
|
|
|
||||
|
|
|
|
|
|
|
|
|
Snap on/off |
Snap mode Quantize |
Color pop-up |
||||||
|
|
|
|
|
value |
menu |
||
Ö In addition to these, the toolbar can contain a number of other tools and shortcuts, not visible by default. How to set up the toolbar and specify which tools should be displayed or hidden is described in the section “Using the Setup options” on page 248.
The info line
The info line shows information about the currently selected event or part in the Project window. You can edit almost all values on the info line using regular value editing. Length and position values are displayed in the format currently selected for the ruler (see “The ruler” on page 20).
• To hide or show the info line, click the Show Event Info Line button on the toolbar.
The following elements can be selected for display and editing on the info line:
•Audio events
•Audio parts
•MIDI parts
•Video events
•Markers
•Automation curve points
When several elements are selected
•If you have several elements selected, the info line will show information about the first item in the selection. The values will be shown in yellow to indicate that several elements are selected.
•If you edit a value on the info line, the value change is applied to all selected elements, relatively to the current values.
If you have two audio events selected and the first is one bar long and the other two bars long, the info line shows the length of the first event (one bar). If you now edit this value to 3 bars in the info line, the other event will be resized by the same amount – and will thus be 4 bars long.
•If you press [Ctrl]/[Command] and edit on the info line, the values will be absolute instead. In our example above, both events would be resized to 3 bars. Note that [Ctrl]/ [Command] is the default modifier key for this – you can change this in the Preferences (Editing–Tool Modifiers page, under the Info Line category).
Editing Transpose and Velocity for MIDI parts
When one or several MIDI parts are selected, the info line contains Transpose and Velocity fields.
•Adjusting the Transpose field transposes the selected parts in semitone steps.
Note that this transposition doesn’t change the actual notes in the part – it’s just a “play parameter”, affecting the notes on playback. The transposition you specify for a part on the info line is added to the transposition set for the whole track.
•Adjusting the Velocity field shifts the velocity for the selected parts – the value you specify is added to the velocities of the notes in the parts.
Again, this velocity shift only affects the notes on playback, and again, the value you specify is added to the Vel.Shift. value set for the whole MIDI track in the Inspector.
19
The Project window
Getting on-the-fly info with the Arrow tool
If the option “Select Tool: Show Extra Info” is activated in the Preferences (Editing–Tools page), a tooltip will be shown for the Arrow tool, displaying information depending on where you point it. For example, in the Project window event display, the tool will show the current pointer position and the name of the track and event you’re pointing at.
The ruler
The ruler at the top of the event display shows the timeline. Initially, the Project window ruler uses the display format specified in the Project Setup dialog (see “The Project Setup dialog” on page 21), as do all other rulers and position displays in the project. However, you can select an independent display format for the ruler by clicking the arrow button to the right of it and selecting an option from the pop-up menu (you can also bring up this pop-up menu by right-clicking anywhere in the ruler).
Option |
Positions and lengths displayed as |
Bars+Beats |
Bars, beats, sixteenth notes and ticks. By default there |
|
are 120 ticks per sixteenth note. |
Seconds |
Hours, minutes, seconds and milliseconds. |
Timecode |
This format displays hours, minutes, seconds and frames. |
|
The number of frames per second (fps) is set in the |
|
Project Setup dialog (see “The Project Setup dialog” on |
|
page 21). You can choose between 24, 25, 29.97 and |
|
30fps or 29.97 and 30dfps (“drop frame”). |
Samples |
Samples. |
Time Linear |
When this is selected, the ruler will be linear relative to |
|
time. This means that if there are tempo changes on the |
|
tempo track, the distance between the bars will vary in |
|
Bars+Beats mode. |
Bars+Beats |
When this is selected, the ruler will be linear relative to |
Linear |
the meter position – bars and beats. This means that if |
|
there are tempo changes on the tempo track, there still |
|
will be the same distance between bars in Bars+Beats |
|
mode. If the ruler is set to a time-based mode, the dis- |
|
tance between seconds will vary depending on the |
|
tempo changes. |
|
|
•The selection you make here affects the ruler, the info line and tooltip position values (which appear when you drag an event in the Project window).
You can also select independent formats for other rulers and position displays.
•To set the display format globally (for all windows), use the primary display format pop-up on the Transport panel, or hold down [Ctrl]/[Command] and select a display format in any ruler.
•If you use the “Timecode” option and the option “Show Timecode Subframes” is activated in the Preferences (Transport page), the frames will also display subframes.
There are 80 subframes per frame.
Operations
Creating a new project
You create a new project in the following way:
1. Select “New Project” from the File menu.
A dialog appears, listing a number of project templates, including any custom templates you may have created (see “Save as Template” on page 242).
2. Select a template (or “Empty”) and click OK.
A file dialog appears, allowing you to specify a location for the project folder. This will contain all files related to the project.
3. Select an existing folder or create a new one. Then click OK.
A Project window opens. If you selected a template, the new project will be based on this template, and include the corresponding tracks, events and settings.
20
The Project window
The Project Setup dialog
General settings for the project are made in the Project Setup dialog. This is opened by selecting “Project Setup…” from the Project menu.
Ö If the “Run Setup on Create New Project” option is activated in the Preferences dialog (General page), the Project Setup dialog will open automatically when you create a new project.
The following settings are available in the Project Setup dialog:
Setting |
Description |
Start |
The start time of the project. Allows you to have the project |
|
start at another time than zero. Also used for setting the |
|
sync start position when synchronizing Cubase LE to ex- |
|
ternal devices (see “Setting up Cubase LE for external |
|
sync to timecode” on page 225). When you change this |
|
setting you will be asked whether you want to keep the |
|
project content at its timecode positions. “Yes” means that |
|
all events will stay at their original timecode positions – i.e. |
|
they will be moved in relation to the start of the project. |
|
“No” means that all events keep their position relative to |
|
the project start. |
Setting |
Description |
Display Offset |
Offsets the time positions displayed in the ruler etc., al- |
|
lowing you to compensate for the Start position setting. |
|
Typically, if you synchronize Cubase LE to an external |
|
source starting at a frame other than zero, you set the |
|
Start position to this value. However, if you still want the |
|
display in Cubase LE to start at zero, set the Display Off- |
|
set to the same value. |
Sample Rate |
The sample rate at which Cubase LE records and plays |
|
audio. |
Record |
When you record audio in Cubase LE, the files that are |
Format/ |
created will be of this resolution and file type, see “Se- |
File Type |
lecting a recording file format” on page 51. |
Stereo Pan |
Decides whether panning should use power compensa- |
Law |
tion or not, see “About the “Stereo Pan Law” setting (au- |
|
dio channels only)” on page 76. |
|
|
While most Project Setup settings can be changed at any time, you must select a sample rate once and for all when starting with a new project! All audio files must be of this sample rate to play back correctly.
Zoom and view options
Zooming in the Project window is done according to the standard zoom techniques, with the following special notes:
•When you are using the Zoom tool (magnifying glass), the result depends on the option “Zoom Tool Standard Mode: Horizontal Zooming Only” in the Preferences (Edit- ing–Tools page).
If this is activated and you drag a selection rectangle with the Zoom tool, the window will only be zoomed horizontally (track height will not change). If the option is off, the window will be zoomed both horizontally and vertically.
•When using the vertical zoom sliders, the tracks are scaled relatively.
In other words, if you have made any individual track height adjustments (see below), the relative height differences are maintained.
You find the following options are available on the Zoom
Length |
The length of the project. |
Frame Rate |
Used when synchronizing Cubase LE with external |
|
equipment. If Cubase LE is slave, this value is automati- |
|
cally set to the frame rate of the incoming sync signal. If |
|
Cubase LE is the master, this determines the frame rate |
|
of the sent sync signal, see “Setting the Frame Rate” on |
|
page 223. |
Display Format |
This is the global display format used for all rulers and |
|
position displays in the program. However, you can make |
|
independent display format selections for the individual |
|
rulers and displays if you like. |
|
For descriptions of the different display format options, |
|
see “The ruler” on page 20. |
|
|
submenu on the Edit menu:
Option |
Description |
Zoom In |
Zooms in one step, centering on the project cursor. |
Zoom Out |
Zooms out one step, centering on the project cursor. |
Zoom Full |
Zooms out so that the whole project is visible. “The |
|
whole project” means the timeline from the project |
|
start to the length set in the Project Setup dialog (see |
|
above). |
Zoom to |
Zooms in horizontally and vertically so that the current |
Selection |
selection fills the screen. |
|
|
21
The Project window
Option |
Description |
Zoom to Selec- |
Zooms in horizontally so that the current selection fills |
tion (Horiz) |
the screen. |
Zoom to Event |
This option is available only in the Sample Editor (see |
|
“Zooming” on page 122). |
Zoom In Vertically |
Zooms in one step vertically. |
Zoom Out |
Zooms out one step vertically. |
Vertically |
|
Zoom In Tracks |
Zooms in on the selected track(s) one step vertically. |
Zoom Out Tracks |
Zooms out the selected track(s) one step vertically. |
Zoom Selected |
This zooms in vertically on the selected track(s) and |
Tracks |
minimizes the height of all other tracks. |
|
|
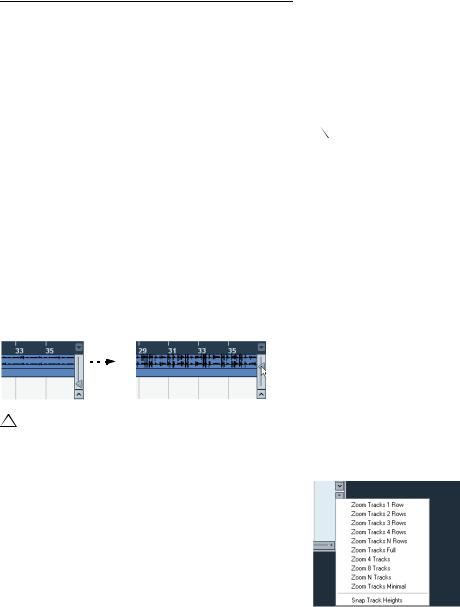
•If the option “Zoom while Locating in Time Scale” is activated in the Preferences (Transport page), you can also zoom by clicking in the main ruler and dragging up or down with the mouse button pressed.
Drag up to zoom out; drag down to zoom in.
•You can zoom the contents of parts and events vertically, using the waveform zoom slider in the top right corner of the event display.
This is useful when viewing quiet audio passages.
To get an approximate reading on the level of the audio events by viewing the waveforms, make sure this slider is all the way down. Otherwise, zoomed waveforms may be mistaken for clipped audio.
• If you activate the option Quick Zoom in the Preferences (Editing page), the contents of parts and events will not be continuously redrawn when you zoom manually.
Instead, the contents are redrawn once you have stopped changing the zoom – activate this if screen redraws are slow on your system.
Resizing tracks in the Track list
• You can change the height of an individual track by clicking on its lower border in the Track list and dragging up or down.
To change the height of all tracks simultaneously, hold down [Ctrl]/ [Command] and resize one of the tracks in this way. If “Snap Track Heights” is activated on the Track scale pop-up (see below), the track height will change in fixed increments when you resize it.
This behavior is different when “Enlarge Selected Track” is activated on the Edit menu (see below).
•You can also change the width of the Track list area, by dragging the border between the Track list and the event display.
•By default, the controls shown for tracks in the Track list will adapt to the track size. This means that when resizing a track’s height or width the controls will be placed where they best “fit in”.
If you prefer to have the controls in fixed positions, you can deactivate the option “Wrap Controls” in the Track Controls settings dialog (see “Customizing track controls” on page 249).
•You can decide for each track type which controls should be shown in the Track list – see “Customizing track controls” on page 249.
•You can use the Track scale pop-up (opened by clicking the arrow button above the vertical zoom control) to set the number of tracks to view in the current Project window.
The track height will be adjusted to show only the number of tracks specified on the pop-up menu. By selecting “Zoom N Tracks” from the popup you can manually set the number of tracks to fit in the current Project window.
22
The Project window
The Enlarge Selected Track option
When this option is activated on the Edit menu (or in the Preferences, Editing–Project & Mixer page), the selected track is enlarged automatically. This is useful if you are stepping through the tracks in the Track list, to check or edit the settings. The tracks will revert to the size they had before when they are deselected. You can adjust the size directly in the Track list if the default enlargement factor does not suit you.
While this is the program behavior you will want in most cases, it may be a disadvantage when changing the track height you started out with for one or more tracks (i.e. their “original” height, before “Enlarge Selected Track” was activated). As soon as you try to resize a track, it is selected and automatically enlarged. Instead of turning off “Enlarge Selected Track”, resizing the desired track(s) and the activating “Enlarge Selected Track” again, you can resize a track in the Track list without selecting it.
Proceed as follows:
1.Move the mouse pointer over the lower border of the (unselected) track you want to resize.
The mouse pointer turns into a divider symbol.
2.Hold down [Alt]/[Option] and drag the lower border of the track until it reaches the desired height.
Now, when you select this track, (and “Enlarge Selected Track” is activated), it will be enlarged. It will revert to the changed size, when you select a different track.
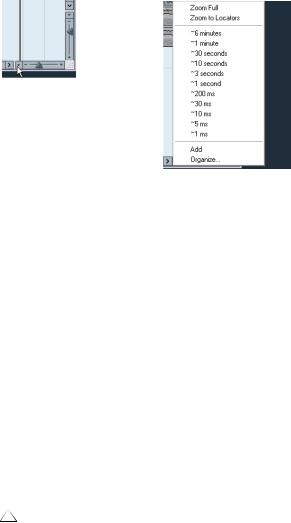
Zoom presets and Cycle markers
The pop-up menu to the left of the horizontal zoom control allows you to select, create and organize zoom presets. These are useful if you want to toggle between different zoom settings (e.g. one where the whole project is displayed in the project window and another with a high zoom factor for detailed editing). With this pop-up menu, you can also zoom in on the area between cycle markers in the project.
Click here…
…to open the context menu.
The upper part of the menu lists the zoom presets:
•To store the current zoom setting as a preset, select Add from the pop-up menu.
A dialog appears, allowing you to type in a name for the preset.
•To select and apply a preset, select it from the pop-up menu.
•The “Zoom Full” preset is always available. Selecting this option zooms out so that the whole project is visible. “The whole project” means the timeline from the project start to the length set in the Project Setup dialog (see “The Project Setup dialog” on page 21).
•If you want to delete a preset, select “Organize…” from the pop-up menu.
In the dialog that appears, select the preset in the list and click the Delete button. The preset is removed from the list.
•If you want to rename a preset, select “Organize…” from the pop-up menu.
In the dialog that appears, select the desired preset in the list and click the Rename button. A second dialog opens, allowing you to type in a new name for the preset. Click OK to close the dialogs.
Zoom presets are global for all projects, i.e. they are available in all projects you open or create.
The middle part of the pop-up lists any cycle markers you have added in the project:
• If you select a cycle marker from this menu, the event display is zoomed in to encompass the marker area (see “Markers” on page 37).
23
The Project window

• You cannot edit the cycle markers in this pop-up menu. For information on editing markers, see “Editing markers in the Marker window” on page 37.
Only the cycle markers you create in the current project are available on the menu.
Adjusting how parts and events are shown
The Preferences on the File menu (the Cubase LE menu, under Mac OS X) contains several settings for customizing the display in the Project window.
The Event Display page contains common settings for all track types:
Option |
Description |
Colorize Event |
Determines whether the backgrounds or “contents” |
Background |
(waveforms, etc.) of parts and events will be colorized, |
|
see “Handling tracks” on page 25. |
Show Event |
Determines whether the names of parts and events |
Names |
should be shown in the Project window. |
Transparent |
When this is activated, events and parts will be transpar- |
Events |
ent, showing the waveforms and MIDI events only. |
Show Data on |
If this is activated, the contents of events and parts will be |
Small Track |
shown, even if the height of a track is very small. |
Heights |
|
|
|
The Event Display–Audio page contains settings for audio events:
Option |
Description |
Interpolate |
If the option is deactivated, single sample values are |
Audio Images |
drawn as “steps”. If the option is activated they are inter- |
|
polated to form “curves”. |
Wave Image |
Determines whether audio waveforms will be displayed as |
Style |
solid images, frames or “inverted” images (solid+frame). |
|
This selection affects all waveform images in the Project |
|
window, Sample Editor and Audio Part Editor. |
|
Note that the “Framed” and “Solid and Framed” styles |
|
are more demanding for the computer. If the system feels |
|
slower in these modes, please switch back to “Solid” |
|
wave image style. |
Show Event |
If this is activated the “volume curves” created with the |
VolumeCurves |
volume and fade handles are always shown – if not, the |
Always |
curves are only shown for selected events. |
Fade Handles |
When this option is activated, the fade handles stay at |
always on top |
the top of the event, and vertical help lines indicate the |
|
exact end or start points of fades. |
Thick Fade |
If this option is activated, the fade lines and volume |
Lines |
curves are thicker, increasing their visibility. |
|
|
Option |
Description |
Show |
Determines whether audio waveforms should be shown |
Waveforms |
at all. |
Background |
When this is activated, the backgrounds of audio wave- |
Color |
forms are displayed in a different way, reflecting the |
Modulation |
waveform dynamics. This is especially useful to get an |
|
overview when working with small track heights. |
|
|
The Event Display–MIDI page contains settings for MIDI parts:
Option |
Description |
Default Edit |
Determines which editor should be opened when you |
Action |
double-click a MIDI part or select it and press [Ctrl]/ |
|
[Command]-[E]: the Key, List, Drum or Score Editor. |
|
Note that this setting is overridden for tracks with drum |
|
maps if the option “Edit as Drums when Drum Map is as- |
|
signed” (see below) is activated. |
Part Data Mode |
Determines if and how events in MIDI parts should be |
|
shown in the Project window: as score notes, as drum |
|
notes or as lines. If “No Data” is selected, events will not |
|
be shown at all. Note that this setting is overridden for |
|
tracks with drum maps if the option “Edit as Drums when |
|
Drum Map is assigned” (see below) is activated. |
Show |
Governs whether non-note events (controllers, etc.) |
Controllers |
should be shown in MIDI parts in the Project window. |
Edit as Drums |
If this is activated, parts on MIDI tracks with drum maps |
when Drum |
assigned will be shown with drum note symbols in the |
Map is |
Project window. Also, the parts will automatically open in |
assigned |
the Drum Editor when double-clicked (overriding the De- |
|
fault Edit Action setting above). |
Note Name |
Determines how MIDI note names (pitches) should be |
Style |
displayed in editors, etc. |
|
|
The Event Display–Video page contains settings for video events:
Option |
Description |
Show Video |
When this is activated, thumbnail frames of the video |
Thumbnails |
contents are shown on the Video track. |
Video Cache |
This determines how much memory is available for video |
Size |
thumbnails. If you have long video clips and/or work with |
|
a large zoom factor (so that a lot of frames are shown in |
|
the thumbnails), you may have to raise this value. |
|
|
24
The Project window
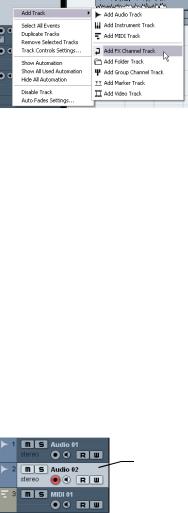
Handling tracks
To add a track to the project, select “Add Track” from the Project menu and select a track type from the submenu that appears. The new track is added below the currently selected track in the Track list.
• The items on the “Add Track” submenu are also available on the context menu.
This is accessed by right-clicking in the Track list.
•If you select Audio, MIDI, Group Channel or Instrument from the Add Track submenu, a dialog opens, allowing you to insert several tracks in one go.
Just enter the desired number of tracks in the value field.
•For audio and group channel tracks, the channel configuration – mono or stereo – can be set in the Configuration pop-up.
•In the Preferences (Editing–Project & Mixer page), you can find the option “Auto Track Color Mode”.
This offers you several options for automatically assigning colors to tracks that are added to the project.
Once you have created tracks, you can manipulate and rearrange them in various ways:
•To rename a track, double-click in the name field and type in a new name.
If you hold down any modifier key when pressing [Return] to close the name field, all events on the track will get the name you entered.
•To select a track, click on it in the Track list.
A selected track is indicated by a light gray color in the Track list.
This track is selected.
It is possible to select several tracks by pressing [Ctrl]/[Command] and clicking on them. [Shift]-click to select a continuous range of tracks.
•To move a track, click and drag it up or down in the list.
•To duplicate a track, complete with all contents and channel settings, right-click in the Track list and select “Duplicate tracks” from the context menu, or select “Duplicate tracks” from the Project menu.
The duplicated track will appear below the original track.
•You can select a default color for a track by activating “Show Track Colors” above the Track list and selecting a color from the Color pop-up menu on the toolbar. This color will be used for all events on the track and will also be shown in the Mixer. You can override the default track color for individual events and parts by using the Color tool or the Color Selector pop-up menu. For more information, see “Applying track and event colors” on page 251.
The option “Colorize Event Background” in the Preferences dialog (Event Display page) determines whether the backgrounds or waveforms of events will be colorized.
•To remove a track, right-click on it in the Track list and select “Remove Selected Tracks” from the context menu.
You can also remove multiple selected tracks, by selecting “Remove Selected Tracks” either from the context menu or from the Project menu.
•To change the track height of an individual track, click on its lower border in the Track list and drag up or down, see “Resizing tracks in the Track list” on page 22.
Ö Note that you can also automatically enlarge the selected track, see “The Enlarge Selected Track option” on page 23.
Disabling audio tracks
Audio tracks can be disabled by selecting “Disable Track” from the Track list context menu. Disabling a track is similar to muting it (see “Muting events” on page 32), since a disabled track will not be played back. However, disabling a track not only “zeroes” the output volume from the track, but actually shuts down all disk activity for it. See “About track disable/enable” on page 45 for more information.
25
The Project window

Adding events to a track
There are a number of ways to add events to a track:
•By recording (see “Basic recording methods” on page 49).
•By dragging files and dropping them on the track at the desired position.
You can create events by dragging and dropping from the following locations:
•The desktop
•The Pool
•The “Find media” dialog
•The Project window of another open project
•The Audio Part Editor of any open project
•The Sample Editor – press [Ctrl]/[Command] and drag to create an event of the current selection.
While you drag the clip in the Project window, its position will be indicated by a marker line and a numerical position box (see also “Using drag and drop” on page 140).
•By selecting “Audio File…” or “Video File…” from the Import submenu on the File menu.
This opens a file dialog, allowing you to locate the file you wish to import. When you import a file this way, a clip is created for the file and an event that plays the whole clip is inserted on the selected track, at the position of the project cursor.
You can also import MIDI files by using the Import submenu, but this works in a slightly different way (see “Exporting and importing standard MIDI files” on page 245).
•By using Copy and Paste on the Edit menu.
This allows you to copy all kinds of events between projects. You can also copy events within the project, e.g. from the Sample Editor.
• By drawing.
Some types of events (markers and automation events) can be drawn directly into the Project window. For audio and MIDI tracks, you can draw parts (see “Creating parts” on page 27).
Audio file import options
When you are importing audio files there are a number of options concerning how the files should be treated by Cubase LE:
•You can choose to copy the file into the audio folder of the project and have the project make reference to the copied file rather than the original file. This helps you keep your project “self-contained”.
•Furthermore, you may want all files in the project to have the same sample rate and sample size (resolution).
The Preferences dialog (Editing–Audio page) contains a setting that lets you decide which options to use. Select one of the following options on the “On Import Audio Files” pop-up menu:
• Open Options Dialog
An Options dialog appears when you import, allowing you to select whether you want to copy the files to the Audio folder and/or convert them to the project settings. Please note the following:
–When importing a single file of a format other than the project settings, you can specify which properties (sample rate and/or resolution) should be changed.
–When importing multiple files at the same time, you can select to convert the imported files automatically if necessary, i.e. if the sample rate is different than the project’s or the resolution is lower than the project setting.
• Use Settings
No Options dialog will appear when you import. Instead, you can choose to make any of the options below the pop-up the standard action(s). Activate any number of the following options to have them performed automatically each time you import audio files:
Option |
Description |
Copy Files to |
If files are not already in the project’s audio folder they are |
Working |
copied there before being imported. |
Directory |
|
Convert and |
If files are not already in the project’s audio folder they are |
Copy to |
copied there before being imported. Furthermore, if the |
Project If |
files have a different sample rate or a lower resolution than |
Needed |
the project settings, they are automatically converted. |
|
|
26
The Project window
Creating parts
Parts are containers for MIDI or audio events. If you record MIDI, a MIDI part is automatically created, containing the recorded events. You can also create empty audio or MIDI parts and later add events to them.
There are two ways to do this:
•Draw a part on a MIDI or audio track with the Pencil tool.
You can also draw parts by pressing [Alt]/[Option] and using the Arrow tool.
•Double-click with the Arrow tool on a MIDI or audio track, between the left and right locator.
To add events to a MIDI part, you use the tools and functions in a MIDI editor (see “The Key Editor – Overview” on page 173). Adding events to audio parts is done in the Audio Part Editor (see “Window overview” on page 133) by pasting or by using drag and drop.
• You can also gather existing audio events into a part, by using the “Events to Part” function on the Audio menu.
This creates an audio part containing all selected audio events on the same track. To remove the part and make the events appear as independent objects on the track again, select the part and use the “Dissolve Part” function on the Audio menu.
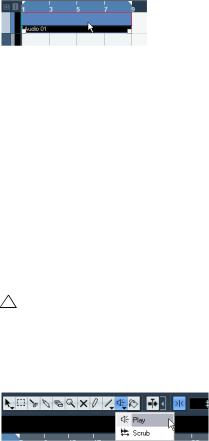
Auditioning audio parts and events
Audio parts and events can be auditioned in the Project window with the Play tool:
When auditioning, the Main Mix bus is used.
1. Select the Play tool.
Note that the Play tool and the Scrub tool share the same tool button. If the tool icon on the toolbar doesn’t show a speaker symbol, first click on the icon to select it, then click again and select “Play” from the pop-up menu.
2.Click where you want playback to start, and keep the mouse button pressed.
Only the track on which you click is played back, starting at the click position.
3.Release the mouse button to stop playback.
Scrubbing
The Scrub tool allows you to locate positions in the audio by playing back, forwards or backwards, at any speed:
1. Select the Scrub tool.
Note that the Play tool and the Scrub tool share the same tool button. If the tool icon on the toolbar doesn’t show a “scrub symbol”, first click on the icon to select it, then click again and select “Scrub” from the pop-up menu.
2.Click at the desired position and keep the mouse button pressed.
The project cursor is moved to the position at which you click.
3.Drag to the left or right.
The project cursor follows the mouse pointer and the audio is played back. The speed and pitch of the playback depend on how fast you move the pointer.
You can adjust the responsiveness of the Scrub function in the Preferences (Transport–Scrub page).
Ö It is also possible to “scrub” the whole project with the Jog wheel on the Transport panel.
See “Project scrubbing – the Jog Wheel” on page 44.
• Note that scrubbing can be quite a burden on your system. To avoid playback problems, you will find the “CPU Saving Scrub Mode” option in the Preferences (Transport– Scrub page).
When you activate this option, scrubbing will be less demanding on the processor. This can be very useful when scrubbing in a large project, where the “normal” scrub behavior leads to processing overloads. When “CPU Saving Scrub Mode” is activated, the effects are disabled for scrubbing and the resampling quality is lower.
27
The Project window

Editing parts and events
This section describes techniques for editing in the Project window. If not explicitly stated, all descriptions apply to both events and parts, even though we use the term “event” for convenience.
Ö When you are using the tools for editing, you can in many cases get additional functions by pressing modifier keys (e.g. pressing [Alt]/[Option] and dragging with the Arrow tool creates a copy of the dragged event).
On the following pages, the default modifier keys are described – you can customize these in the Preferences (Editing–Tool Modifiers page), see “Setting up tool modifier keys” on page 257.
Selecting events
Selecting events is done using any of the following methods:
• Use the Arrow tool.
The standard selection techniques apply.
• Use the Select submenu on the Edit menu.
The options are:
Option |
Description |
All |
Selects all events in the Project window. |
None |
Deselects all events. |
In Loop |
Selects all events that are partly or wholly between |
|
the left and right locator. |
From Start to |
Selects all events that begin to the left of the project |
Cursor |
cursor. |
From Cursor to |
Selects all events that end to the right of the project |
End |
cursor. |
All on Selected |
Selects all events on the selected track. |
Tracks |
|
Select Event |
This is available in the Sample Editor (see “Window |
|
overview” on page 120). |
Left/Right Selec- |
These two functions are only used for range selection |
tion Side to Cursor |
editing (see “Creating a selection range” on page 33). |
|
|
Note that these functions work differently when the Range Selection tool is selected (see “Creating a selection range” on page 33).
• Select all events on a track by right-clicking on it in the Track list and selecting “Select All Events” from the context menu.
•You can also use the arrow keys on the computer keyboard to select the closest event to the left, right, above or below.
If you press [Shift] and use the arrow keys, the current selection will be kept, allowing you to select several events.
•If the option “Auto Select Events under Cursor” is activated in the Preferences (Editing page), all events on the selected track(s) that are “touched” by the project cursor are automatically selected.
This can be helpful when rearranging your project, since it allows you to select whole sections (on all tracks) by selecting all tracks and moving the project cursor.
•It is also possible to select ranges, regardless of the event and track boundaries.
This is done using the Range Selection tool (see “Range editing” on page 33).
•Note that in the Preferences (Editing page), you can find the option “Use Up/Down Navigation Commands for selecting Tracks only”.
By default, tracks are selected with the up/down arrow keys on the computer keyboard. However, these are also used for selecting events (see above) which can lead to confusing results in some cases. Since track selection is a most vital operation in both editing and mixing, you have the option to use the navigation controls for track selection only. The follow- ing applies:
•When this option is deactivated and no event/part is selected in the Project window, the up/down arrow keys on the computer keyboard are used to step through the tracks in the Track list – just as you would expect this to work.
•When this option is deactivated and an event/part is selected in the Project window, the up/down arrow keys still step through the tracks in the Track list – but on the currently selected track, the first event/part will automatically be selected as well. If this is not the desired behavior, you have to activate “Use Up/Down Navigation Commands for selecting Tracks only”.
•When this option is activated, the up/down arrow keys are only used to change the track selection – the current event/ part selection in the Project window will not be altered.
28
The Project window
•Also in the Preferences (Editing–Tools page), you can find the Cross Hair Cursor options section.
This allows you to display a cross hair cursor when working in the Project window and editors, facilitating navigation and editing, especially when arranging in large projects. You can set up the colors for the line and the mask of the cross hair cursor, and define its width. The cross hair cursor works as follows:
•When the Selection tool (or one of its subtools) is selected, the cross hair cursor appears when you start moving/copying a part/event, or when using the event trim handles.
•When the Pencil tool, the Scissors tool or any other tool that makes use of this function is selected, the cross hair cursor appears as soon as you move the mouse over the event display.
•The cross hair cursor is only available for tools where such a function is of any use. The Mute tool for example does not use a cross hair cursor, as you have to click directly on an event to mute it.
Moving events
To move events in the Project window, use the following methods:
• Click and drag to a new position.
All selected events will be moved, maintaining their relative positions. You can only drag events to tracks of the same type. If Snap is activated, this determines to which positions you can move the events (see “The Snap function” on page 38).
Note also that you can restrict movement to be either horizontal or vertical only, by holding down [Ctrl]/[Command] while dragging.
You will note that there is a slightly delayed response when you move an event by dragging. This helps you avoid accidentally moving events when you click on them in the Project window. You can adjust this delay with the Drag Delay setting in the Preferences (Editing page).
•Select the event and edit the Start position in the info line.
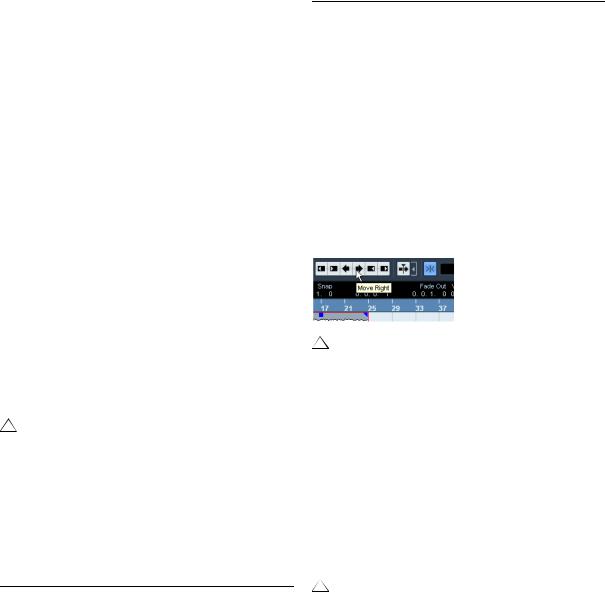
•Use the “Move to” options on the Edit menu.
The following options are available:
Option |
Description |
Cursor |
Moves the selected event to the project cursor position. If |
|
there are several selected events on the same track, the |
|
first event will start at the cursor, and the following will be |
|
lined up end-to-start after the first one. |
|
|
Option |
Description |
Origin |
Moves the selected events to their original positions, i.e. |
|
the positions at which they were originally recorded. |
Front/Back |
This function doesn’t actually change the position of the |
|
events, but moves the selected events to the front or |
|
back, respectively. This is useful if you have overlapping |
|
events, and want to see one that is partially obscured. |
|
For audio events, this is an extra important feature, since |
|
only the visible sections of events will be played back. |
|
Moving an obscured audio event to front (or moving the |
|
obscuring event to back) will allow you to hear the whole |
|
event on playback (see also “Overlapping events” on |
|
page 134). |
|
Note that it is also possible to use the “To Front” function |
|
on the event context menu for this. |
|
|
• Use the Nudge buttons in the toolbar.
These move the selected events to the left or right. The amount of movement depends on the selected display format (see “The Project Setup dialog” on page 21) and the value set on the Grid pop-up menu.
When the Range Selection tool is used, the Nudge buttons move the selection range (see “Moving and duplicating” on page 35).
Ö The Nudge buttons are not visible in the toolbar by default.
You can decide which items should be visible by right-clicking in the toolbar and activating the corresponding option on the context menu. See “The setup context menus” on page 248 for more information.
Duplicating events
Events can be duplicated in the following ways:
• Hold down [Alt]/[Option] and drag the event to a new position.
If Snap is activated, this determines to which positions you can copy the events (see “The Snap function” on page 38).
If you hold down [Ctrl]/[Command] as well, movement direction is restricted to either horizontal or vertical. That means if you drag an event vertically it cannot be moved horizontally at the same time.
29
The Project window
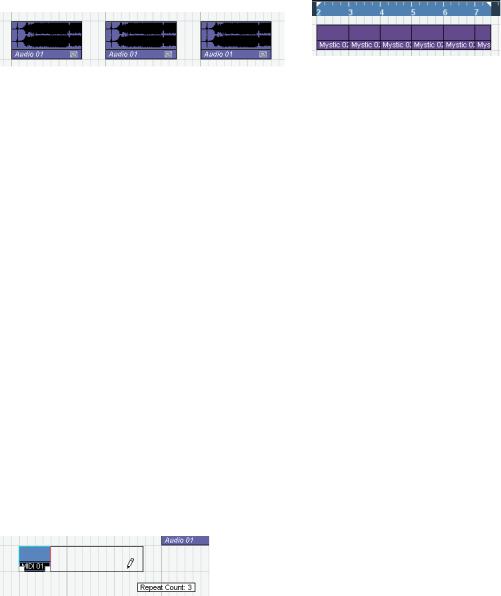
• Audio and MIDI parts can also be duplicated by pressing [Alt]/[Option]-[Shift] and dragging.
This creates a shared copy of the part. If you edit the contents of a shared copy, all other shared copies of the same part are automatically edited in the same way.
Shared copies are indicated by showing the name in italic text and an icon in the right corner of the part.
Note:
•When you duplicate audio events, the copies are always shared. This means that shared copies of audio events always refer to the same audio clip (see “Audio processing” on page 113).
•You can convert a shared copy to a real copy by selecting “Convert to Real Copy” from the Edit menu. This creates a new version of the clip (that can be edited independently) and adds this to the Pool. Note that no new files are created by this operation – for that you need to use the “Bounce Selection” function from the Audio menu.
•Selecting “Duplicate” from the Edit menu creates a copy of the selected event and places it directly after the original.
If several events are selected, all of these are copied “as one unit”, maintaining the relative distance between the events.
•Selecting “Repeat…” from the Edit menu opens a dialog, allowing you to create a number of copies (regular or shared) of the selected event(s).
This works just like the Duplicate function, but you can specify the number of copies.
•You can also perform the Repeat function by dragging: Select the event(s) to repeat, press [Alt]/[Option], click the handle in the lower right corner of the last selected event and drag to the right.
The longer to the right you drag, the more copies are created (as shown by the tooltip).
• Selecting “Fill Loop” from the Edit menu creates a number of copies starting at the left locator and ending at the right locator.
The last copy is automatically shortened to end at the right locator position.
Using Cut, Copy and Paste
You can cut or copy selected events, and paste them in again, using the functions on the Edit menu.
•When you paste an audio event, it is inserted on the selected track, positioned so that its snap point is aligned with the cursor position.
If the selected track is of the wrong type, the event will be inserted on its original track. See “The Snap function” on page 38 for information about the snap point.
•If you use the “Paste at Origin” function, the event is pasted at its original position (the position from which you cut or copied it).
Renaming events
By default, audio events show the name of their clip, but you can enter a separate descriptive name for separate events if you like. This is done by selecting the event and typing in a new name in the “Description” field in the info line.
• You can also give all events on a track the same name as the track by changing the track name, holding down a modifier key and pressing [Return].
See “Handling tracks” on page 25.
Splitting events
You can split events in the Project window in the following ways:
• Click with the Scissors tool on the event you want to split.
If Snap is activated, this determines the exact split position (see “The Snap function” on page 38). You can also split events by pressing [Alt]/ [Option] and clicking with the Arrow tool.
30
The Project window
Loading...