Steinberg HALion - 6.0 Operation Manual

Operation Manual
Matthias Klag, Michael Ruf
Cristina Bachmann, Heiko Bischoff, Christina Kaboth, Insa Mingers, Matthias Obrecht, Sabine Pfeifer, Benjamin Schütte, Marita Sladek
This PDF provides improved access for vision-impaired users. Please note that due to the complexity and number of images in this document, it is not possible to include text descriptions of images.
The information in this document is subject to change without notice and does not represent a commitment on the part of Steinberg Media Technologies GmbH. The software described by this document is subject to a License Agreement and may not be copied to other media except as specifically allowed in the License Agreement. No part of this publication may be copied, reproduced, or otherwise transmitted or recorded, for any purpose, without prior written permission by Steinberg Media Technologies GmbH. Registered licensees of the product described herein may print one copy of this document for their personal use.
All product and company names are ™ or ® trademarks of their respective owners. For more information, please visit www.steinberg.net/trademarks.
© Steinberg Media Technologies GmbH, 2017. All rights reserved.

Table of Contents
6 Installation and Setup
6Conventions
7System Requirements
8Downloading Program Files
8Installing the Program
8Activating Your License
9Registering Your Software
9How You Can Reach Us
9About the Documentation
10Setting Up
11HALion Control Panel
11Configuring the Control Panel
12View and Tab Operations
13Window Handling
15 Setting the Focus
15 Available Editors
18Common Editing Methods
18Dials and Sliders
18Multi Selection and Parameter Controls
19Buttons
19Value Fields
20Using Key Commands
20 Presets
23Global Functions and Settings
23Plug-in Functions Section
24Plug-in Name and Steinberg Logo
24 Toolbar
26Keyboard Editor
27Quick Controls
35Options Editor
41AI Knob Support
42 Automation
42Automation Parameters
43Automation Editor
44Setting Up Automation
46 Managing Your Sounds
46About Programs, Layers, Multis, Macro Pages, and Presets
47Registering VST Sounds
48Loading Programs and Layers
50 Load Dialog
50 Slot Rack
53 Managing and Loading Files
69 Working with General MIDI Files
70 Mapping Zones
70 Mapping Editor
74 Mapping Editor Context Menu
78Sample Zones and their Root Keys
78Moving Zones
79Creating Fades and Crossfades
79 Setting Key Range and Velocity Range
79Zooming
80Selecting Zones
80Importing Single Samples Using Drag And Drop
81Importing Multiple Samples Using Drag And Drop
82Editing Programs and Layers
82Main Section
83Trigger Section
85 Voice Management Section
90Variation Groups Section
91Quick Control Assignments Section
91Note Expression Section
92Editing Zones
92Adding Zones
92Zone Types
93Adding Samples to Empty Zones
93Absolute and Relative Editing
94Editing Selected Zones or All Zones
94Global Zone Settings
95Voice Control Section
99 Voice Control Section for Organ Zones
101Pitch Section
102Oscillator Section
106 Sample Oscillator Section
109 Organ Oscillator Section
109 Wavetable Section
116 AudioWarp Section
119 Filter Section
123 Amplifier Section
125 Envelope Section
132 LFO Section
135 Step Modulator
137 Modulation Matrix
150 Editing Samples in the Sample Editor
150 Loading and Previewing Samples
150 Toolbar
3

Table of Contents
153 Info Line
155 Overview Line
155 Waveform Display
157 Parameter Section
163 Sample Editor Context Menu
166Markers
167Zooming
167Editing Samples in an External Editor
168Creating Loops
170Creating Slices Automatically
171Replacing Samples
173Wavetable Synthesis
174Wavetable Editor
186Creating a Wavetable
186Pitch Detection
187Markers
188Replacing Samples
188Importing Wavetables
189Managing Wavetables
190 Granular Synthesis
190 Grain Oscillator
197Modulating the Grain Oscillator
198MIDI Editing and Controllers
198MIDI Editor
200MIDI Controllers
204 Mixing, Routing, and Effect Handling
204 Mixer Window
206 Audio Bus Architecture
210 Insert Effects
213Loading and Managing Programs via the Program Table
213Program Table
214Configuring the Program Table
215Program Table Context Menu
217 Program Tree
217Program Tree Elements
218Program Tree Columns and Controls
227Editing Programs, Zones and Layers
228Importing Samples
233Replacing Samples
234Exporting Samples
238Exporting Programs and Layers with Samples
244Exporting Programs and Layers as HALion Sonic SE Layer Presets
244Importing Sliced Loops
248Selections in the Program Tree
249Navigating in the Program Tree
249Sorting the Program Tree Elements
250Setting Up the Program in the Program Tree
251Renaming Elements
254 Sample Recorder
260Recording From an Audio Track With Multiple Drum Sounds
261Recording the Output of Another Plug-In
262Recording Samples in the Standalone Version
263Included Instruments
263 |
Auron |
271 |
Trium |
279 |
Voltage |
285 |
Model C |
291 |
HALiotron |
294 |
B-Box |
300 |
World Instruments |
304 |
World Percussion |
308 |
Anima |
326 |
Skylab |
340Raven
341Eagle
343Hot Brass
354Studio Strings
365 Parameter List
367 Macro Pages
367Macro Pages, Templates, Controls, Resources, and Libraries
368Getting Started
370 Macro Page Designer
385 Editing and Assembling Elements
401Libraries
402Connecting Macro Page Controls to HALion Parameters
403Collaborating on Macro Pages
403Cleaning Up and Consolidating Your Macro Pages
404Saving Macro Pages
405Library Creator
405 Libraries
409 Library Creator Editor
418 Unassigned VST Sound Containers
420Consistency Check
421Library Manager
421 Library Manager Editor
424 Effects Reference
424 Introduction
424 Reverb Effects
428Delay Effects
429EQ Effects
431Filter Effects
439Distortion Effects
443Pitch Shift Effects
444Modulation Effects
455Dynamics Effects
465Spatial and Panner Effects
466Surround Effects
467Tools Effects
468Legacy Effects
4

Table of Contents
480 MIDI Modules Reference
480 Common Functions
483 FlexPhraser
494 Trigger Pads
497 MIDI Player
502 Drum Player
508 Mono Envelope
510 Mono LFO
512 Mono Step Modulator
514 True Pedaling
516 MegaTrig
522 Layer Alternate
524 Key Switch Alternate
526Key Switch Remote
527MIDI Randomizer
529CC Mapper
530Velocity Curve
531Tuning Scale
533Lua Script
537 Key Commands Reference
540 Note Expression
540 Note Expression Editor
542 Using the Standalone Version of the Plug-In
542 Making Preferences Settings
542 Preferences Dialog
544Selecting the MIDI Input and the Audio Output
544 Scratch Pad
546Loading a MIDI File
547Saving a MIDI File
547Master Volume
548Index
5

Installation and Setup
Conventions
In our documentation, we use typographical and markup elements to structure information.
Typographical Elements
The following typographical elements mark the following purposes.
PREREQUISITE
Requires you to complete an action or to fulfill a condition before starting a procedure.
PROCEDURE
Lists the steps that you must take to achieve a specific result.
IMPORTANT
Informs you about issues that might affect the system, the connected hardware, or that might bring a risk of data loss.
NOTE
Informs you about issues that you should consider.
EXAMPLE
Provides you with an example.
RESULT
Shows the result of the procedure.
AFTER COMPLETING THIS TASK
Informs you about actions or tasks that you can undertake after completing the procedure.
RELATED LINKS
Lists related topics that you can find in this documentation.
6

Installation and Setup
System Requirements
Markup
Bold text indicates the name of a menu, option, function, dialog, window, etc.
EXAMPLE
In the header of the plug-in panel, click the Preset Management button next to the preset name field and select Load Preset.
If bold text is separated by a greater-than symbol, this indicates a sequence of different menus to open.
EXAMPLE
To save a specific layer, right-click it and select Load/Save > Save Layer As.
Key Commands
Many of the default key commands, also known as keyboard shortcuts, use modifier keys, some of which are different depending on the operating system.
For example, the default key command for Undo is Ctrl-Z on Windows and Cmd-Z on Mac OS. When key commands with modifier keys are described in this manual, they are shown with the Windows modifier key first, in the following way:
•Windows modifier key/Mac OS modifier key-key
EXAMPLE
Ctrl/Cmd-Z means: press Ctrl on Windows or Cmd on Mac OS, then press Z.
System Requirements
Your computer must meet the following minimum requirements:
Mac
•Mac OS X Version 10.11/macOS 10.12
•VST 3, AAX, or AU compatible host application for using HALion as a plug-in
•64-bit Intel or AMD mutli-core processor (Intel i5 or faster recommended)
•4 GB RAM (8 GB recommended)
•40 GB of free hard-disk space
•Display resolution of 1366 x 768 pixels (1920 x 1080 recommended)
•OS-compatible audio hardware*
•Internet connection required for activation, account setup, and personal/ product registration
•Downloads are required for the installation
*ASIO-compatible audio hardware recommended for low-latency performance
7

Installation and Setup
Downloading Program Files
Windows
•64-bit Windows 7*/8.x/10
•VST 2, VST 3, or AAX compatible host application for using HALion as a plug-in
•64-bit Intel or AMD mutli-core processor (Intel i5 or faster recommended)
•4 GB RAM (8 GB recommended)
•40 GB of free hard-disk space
•Display resolution of 1366 x 768 pixels (1920 x 1080 recommended)
•OS-compatible audio hardware**
•Internet connection required for activation, account setup, and personal/ product registration
•Downloads are required for the installation
*Windows 7 Service Pack 1, Microsoft.NET Framework 4.0 and Platform Update for Windows
**ASIO-compatible audio hardware recommended for low-latency performance
Downloading Program Files
The Steinberg Download Assistant helps you download the required files to your computer.
1.Start the Steinberg Download Assistant.
2.On the left, select the program that you want to install.
3.On the right, select which version you want to install.
You can install a new program, update an existing program, etc.
4.Click Download to download the files.
Installing the Program
After downloading the required files, you can install HALion on your computer.
•On Windows systems, double-click the product installer  and follow the instructions on screen.
•On a Mac, double-click the file HALion 6.pkg and follow the instructions on screen.
Activating Your License
HALion uses a software-based copy protection scheme. This Soft-eLicenser is installed automatically with HALion. It can be accessed via the eLicenser Control Center application that is installed automatically with the product.
After installation, you must activate your product.
If you purchased HALion in a shop, the product package contains a “Download Access Code” that allows you to download both the software and the license of the product.
If you purchased the download version of HALion, you receive an e-mail with the activation code and a description of the activation process.
8
Installation and Setup
Registering Your Software
IMPORTANT
The process for license activation is described in detail on the Steinberg web site.
Registering Your Software
Register your product at the MySteinberg online customer portal. As a registered user, you are entitled to technical support, you gain access to exclusive offers such as software updates and upgrades, and more.
PROCEDURE
1.Start your software.
2.Select Help > Register now.
An online registration form opens in your web browser.
3.Follow the instructions on screen to register at MySteinberg.
How You Can Reach Us
Click the Steinberg logo in the top right corner of the control panel to open a pop-up menu containing items for getting additional information and help.
•This menu contains links to various Steinberg web pages. Select a link to open the corresponding page. On the web pages, you can find support and compatibility
information, answers to frequently asked questions, links for downloading new drivers, etc.
•You also find a menu item for the registration of your product.
As a registered user, you are entitled to technical support, you gain access to exclusive offers such as software updates and upgrades, and more.
About the Documentation
The documentation is available online and most of it can be downloaded in PDF format from steinberg.help.
•To visit steinberg.help, enter steinberg.help in the address bar of your web browser or open HALion, click the Steinberg logo in the top right corner and select
Help > HALion Help.
•You can find the documentation for the HALion scripting features, as well as additional parameter descriptions regarding the Macro Page Designer and the Library Creator under http://developer.steinberg.help.
Here, you can find tutorials and parameter references, download example files, and much more.
9

Installation and Setup
Setting Up
Setting Up
The following sections describe how to use HALion as a plug-in in different host applications. NOTE
HALion can also be used as a standalone application.
Selecting Outputs
HALion loads with a stereo output configuration by default. However, you can use up to 32 stereo outputs plus one 5.1 output in the Steinberg DAW. This allows you to route all 64 program slots to a dedicated channel in the MixConsole.
PROCEDURE
1.To make the outputs available in the VST instrument, open the VST Instruments window.
2.Click the Activate Outputs button for the instrument.
3.Activate the outputs that you want to use.
RESULT
The Steinberg DAW automatically adds an output channel for each additional output to the MixConsole. You can now route programs or layers to these outputs for further signal processing within the DAW.
Using the Instrument in an AU-Compatible Application
The AU version of HALion is installed in your AU plug-ins folder and lets HALion work in an AU environment without any performance loss or incompatibilities.
For example, to load HALion as an AU instrument for Logic Pro, proceed as follows:
PROCEDURE
1.Open the Track Mixer and select the instrument channel that you want to use.
2.Click in the I/O field and select AU Instruments > Steinberg > HALion.
3.Select one of the available channel configurations.
Using the Instrument as Standalone Application
HALion can be used as a standalone application, independently of any host application. In this case, you can connect the instrument directly to your audio hardware.
RELATED LINKS
Using the Standalone Version of the Plug-In on page 542
10

HALion Control Panel
HALion provides flexible and highly customizable window management. You can arrange the available editors in the window, structure the window sections using tabs, and configure several separate windows for your work. The size of each window, and window section, is freely adjustable. This allows you to make the most of the available screen space.
Configuring the Control Panel
You can set up the control panel by determining the number of different views, that is, window sections, and by further configuring these sections, for example, by adding tabs. For the views and tabs, you can specify the editor that is displayed.
Setup Options
You can configure the control panel using the setup options.
For views, click the Setup Options icon in the header to open the menu that contains the setup options.
For tabs, right-click the name of the tab to open the context menu contains the setup options.
Split | and Split --
You can add a view or tab to the window by splitting an existing view or tab.
•To perform a vertical split, select Split |. This adds a new editor to the right of the current editor.
•To perform a horizontal split, select Split --. This adds an editor below the current editor.
NOTE
To create a copy of an existing view or tab, click its upper left corner and drag it to another position in the window. A colored frame indicates the insert position.
11

HALion Control Panel
View and Tab Operations
Undock
Creates a duplicate of the view or tab in a new window.
Create Tab
Creates a tab. You can also create tabs within tabs.
Rename
Allows you to rename tabs.
Close
Removes the view or tab.
Select
Opens a pane that shows icons for the available editors. To select an editor, click its icon.
Editor
Allows you to select the editor to be displayed from the list of available editors.
View and Tab Operations
You can add, move, and resize tabs and views to configure the control panel.
Creating Tabs
You can create tabs in the following ways:
•Select Create Tab from the setup options.
•Click in the upper left corner of an existing view or tab and drag it onto another one.
•Click the + icon to the right of the rightmost tab and click the icon for the editor that you want to display.
NOTE
•You can also create tabs within tabs.
•If a view contains more tabs than can be displayed, arrow buttons are displayed to navigate between the tabs.
Moving Views and Tabs
•To move a view or tab, hold down Shift, click in its upper left corner, and drag it to another position.
Depending on the drop position, it is added as a tab or as part of a split view.
Expanding and Resizing Editor Sections
Some editors, such as the Options Editor, contain expandable sections. These sections can be resized or collapsed so that they only show their title bar. This helps you to save space and focus on the edited parameters.
12

HALion Control Panel
Window Handling
•To expand or collapse a section, click the + or - icon on the left of the title bar, or click the title bar.
•To expand or collapse all sections at the same time, hold down Shift and click the + or the - icon or the title bar.
•To resize a section, click the dotted line in the middle of its lower border and drag up or down.
Adjusting the Size of a Split View
•To adjust the size of two split views, point the mouse at the divider between these two, click, and drag.
If a view is split into three or more parts, these parts are resized proportionally. To resize an individual part, hold down Ctrl/Cmd and drag.
Window Handling
Creating Additional Windows
You can create new windows from existing views in the following ways:
•Click in the upper left corner of an existing view or tab and drag it out of the current window.
•Use the Undock command on the tab context menu or the View pop-up menu.
Using Window Presets
HALion comes with several preconfigured window presets.
•To open a window preset, click the Open New Window button in the top bar and select it from the pop-up menu.
•To create your own window presets, use the corresponding commands on the pop-up menu.
Locking Windows
If you open an additional window, HALion shows the settings of the focused program, layer, zone, etc. This way, all editors and separate windows relate to the same material. However, in some cases it might be necessary to show different objects in different windows, for example, to compare the parameter sets of two zones or layers. This can be achieved by locking a window.
•To lock a window, click the Lock button in the upper right corner. If this button is activated, the window no longer follows selection and focus changes in the main plugin window. Instead, it displays the settings of the program that was selected when you clicked the Lock button.
Screen Sets
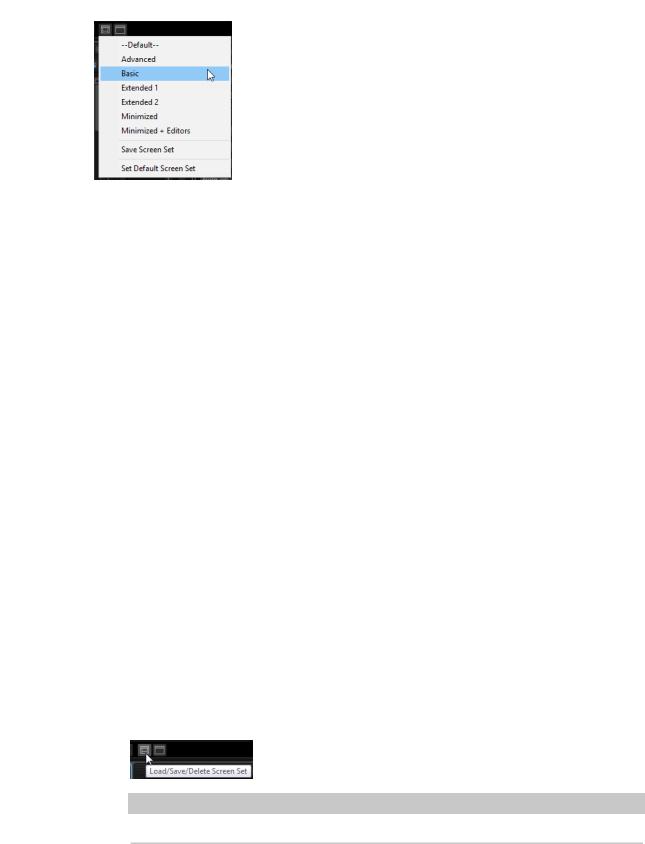
You can save the configuration of the control panel as a screen set. This way, you can preconfigure HALion for different workflows and editing situations. By default, the following screen sets are available:
13
HALion Control Panel
Window Handling
Default
This screen set is optimized for wide-screen monitors and contains the most important editors. It is suitable for a display resolution of 1440 x 900.
Advanced
This is the full editor screen set. It is suitable for a resolution of 1440 x 900.
Basic
This is a minimized single slot player view. It is suitable for a display resolution of 1024 x 768.
Extended 1
This screen set is optimized for use on laptops with a display resolution of 1280 x 800.
Extended 2
This screen set is also optimized for laptops, but it is slightly larger than Extended 1. It is suitable for a display resolution of 1440 x 900.
Minimized
This screen set shows the smallest configuration.
Minimized + Editors
This screen set provides the minimized plug-in window plus an additional floating window that contains all editors. This configuration is intended for use in host applications where you cannot resize the main plug-in window.
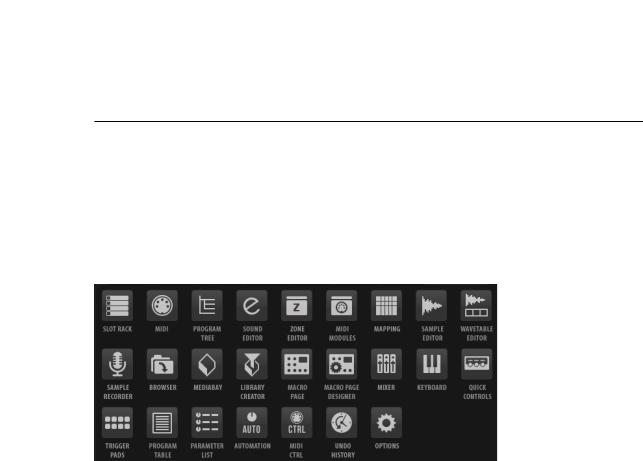
•To load, save, and delete screen sets, click the Load/Save/Delete Screen Set button on the toolbar in the plug-in functions section and select the corresponding command from the pop-up menu.
NOTE
Factory presets cannot be deleted.
14
HALion Control Panel
Setting the Focus
Setting the Focus
It is important to know which view, window, or tab has the focus. The focused section of the window is the area to which your actions, such as key commands, are applied. The view that has the focus is indicated by a blue frame.
PROCEDURE
•To set the focus on a specific view, use one of its controls, edit a parameter, or click on the frame or in an empty background of a view.
Available Editors
The editors give you access to the parameters of HALion and its programs and modules.
Slot Rack
Allows you to load and manage the loaded programs.
MIDI
Allows you to configure the ranges and MIDI parameters of the slots.
Program Tree
Allows you to create programs by combining samples, layers, busses, and MIDI and audio effects.
Sound Editor
Gives you access to the parameters of the various program components. It can display the parameters of programs, layers, zones, MIDI modules, busses, and effects. Which parameters are displayed depends on the object that is selected in the Program Tree.
Zone Editor
Allows you to edit the parameters of all zones of the focused layer simultaneously, including any sublayers. If zones are selected in the Program Tree or the Mapping Editor, only these zones can be modified.
MIDI Modules
Allows you to edit MIDI modules, such as FlexPhrasers or MegaTrig modules.
15

HALion Control Panel
Available Editors
Mapping
Allows you to specify and visualize how samples are distributed over the keyboard and velocity range.
Sample Editor
Allows you to define the sample and loop parameters.
Wavetable Editor
Allows you to make settings for the wavetable synthesizer that is used by wavetable zones.
Sample Recorder
The Sample Recorder allows you to record samples in HALion.
Browser
Allows you to browse and import files, including external sampler formats.
MediaBay
Allows you to load programs and layers.
Library Creator
Allows you to create your own VST Sound content in HALion.
Macro Page
VST Sound Instrument Sets provide macro pages. These pages are preconfigured to show the most important parameters for the specific programs. Whether it is possible to edit a program only via its macro page or whether you have access to all underlying zone and layer parameters depends on the instrument set.
If a program comes with a macro page, this page is displayed when you open the Macro Editor. If you load a program that contains one or multiple layers with macro pages, all macro pages are shown together in the Macro Editor. For each macro page, HALion inserts a navigation button on the toolbar that allows you to switch between the pages.
Macro Page Designer
Allows you to create your own macro pages.
Mixer
Allows you to mix the program slots, access the output and AUX busses, and manage effects.
Keyboard
Combines a keyboard, two wheels, and the sphere control. You can use these controls to simulate external hardware.
Quick Controls
Allows you to remote-control any parameter inside the program.
16

HALion Control Panel
Available Editors
Trigger Pads
Allow you to assign and trigger notes and chords. Furthermore, it is possible to use the trigger pads to switch the states of FlexPhraser modules.
Program Table
Shows all loaded programs. This includes the programs that are used in the Slot Rack as well as those that are loaded via MIDI program change.
Parameter List
Gives you a detailed overview of the parameters of the selected item in the Program Tree. For example, if you select an effect in the Program Tree, only the parameters of that effect are shown.
Automation
Lists all assigned automation parameters. With the tabs at the top, you can specify whether you want to show the automation parameters for the slot, the global parameters, or all automation parameters.
MIDI Ctrl
Lists all assigned MIDI controllers.
Undo History
Lists all of your actions and allows you to undo changes.
Options
Contains global plug-in settings regarding the overall performance, global edit functions, and MIDI controllers.
RELATED LINKS Slot Rack on page 50
MIDI Editor on page 198 Program Tree on page 217
Editing Programs and Layers on page 82 Editing Zones on page 92
MIDI Modules Reference on page 480 Mapping Editor on page 70
Editing Samples in the Sample Editor on page 150 Wavetable Editor on page 174
Sample Recorder on page 254 Macro Page Designer on page 370 Mixer Window on page 204 Keyboard Editor on page 26 Quick Controls on page 27 Trigger Pads on page 494
Loading and Managing Programs via the Program Table on page 213 Parameter List on page 365
Automation Editor on page 43 MIDI Controllers on page 200
17

Common Editing Methods
Dials and Sliders
Dials and sliders can be unidirectional or bidirectional. Unidirectional values, for example level values, start at a minimum value and go up to the maximum. Bidirectional controls start from the middle position and go to the left for negative and to the right for positive values.
Most of the editing methods are the same for dials and sliders.
•To adjust a value, click a dial or a fader and drag up and down, or use the mouse wheel.
If you press Alt when clicking a dial, a small fader appears, allowing you to set the parameter.
•To make fine adjustments, press Shift and move the dial or use the mouse wheel.
•To restore the default value for a parameter, press Ctrl/Cmd and click on the control.
Multi Selection and Parameter Controls
If several zones are selected and they are not set to the exact same values, most of the controls indicate this by turning red. This is true for encoders, switches, combo boxes, value fields, and text faders.
For example, if you have selected 3 zones with cutoff frequency values of 1200, 1400, and 2500 Hz, the corona of the frequency encoders shows a range from 1200 to 2500. The corresponding field shows the value of the focused zone in red.
NOTE
More complex controls, such as the envelope editors, only show the values of the focused zone.
Adjusting Value Ranges
You can adjust the value range of a parameter using the corona of the encoder. The values for the zones are distributed within the new range, keeping their relative distances.
•To compress or expand the value range, drag the corona.
•To adjust the upper limit of the range, hold down Ctrl/Cmd and drag the corona.
•To adjust the lower limit of the range, hold down Alt and drag the corona.
18

Common Editing Methods
Buttons
Buttons
On/Off Buttons
These buttons have two states: on and off. If you move the mouse over an On/Off button, it changes its appearance to show that you can click it.
Push Buttons
Push buttons trigger an action and then go back to their inactive state. These buttons open menus or file dialogs.
Value Fields
To set a value, you have the following possibilities:
•Double-click in a value field, enter a new value, and press Enter.
If the entered value exceeds the parameter range, it is automatically set to the maximum or the minimum value, respectively.
•Click in the value field and drag up or down.
•Position the mouse over a value field and use the mouse wheel.
•Click the up/down triangles next to the field.
•To set the parameter to its default value, Ctrl/Cmd-click the value field.
•To use a fader to adjust the value, Alt-click a value field.
•To enter musical values, such as key ranges or the root key, with your MIDI keyboard, double-click the value field, press a key on your MIDI keyboard, and press Return.
•To navigate to the next parameter, press Tab. To jump backwards to the previous parameter, press Shift-Tab.
If no parameter is selected inside the focused view, pressing Tab always jumps to the first parameter.
19
Common Editing Methods
Using Key Commands
Using Key Commands
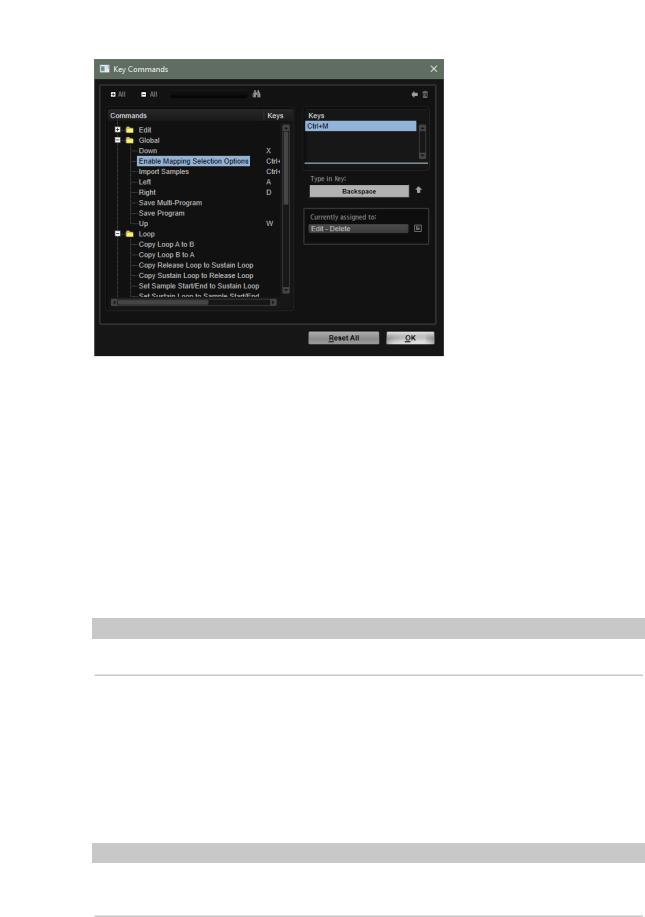
•To open the Key Commands dialog, open the Options Editor and click the Key Commands button in the Edit section.
The commands are arranged in a hierarchical folder structure on the left. When you open a category folder, the items and functions are displayed with any currently assigned key commands.
•To set up a key command, select the function in the list, enter the key command in the Type in Key field and click the Assign  button to the right of the field. If this key command is already used for another function, this is displayed in the field below.
•To delete a key command, select the function in the list, select the key command in the Keys list and click the Delete  button.
•To search for a specific function, enter its name in the search field at the top of the dialog and click the search  button.
NOTE
You can set up several key commands for the same function.
Presets
HALion offers two types of presets: section/module presets and VST presets. Section and module presets store and recall the setup of a specific component on the HALion panel. VST presets contain all information necessary to restore the complete state of the plug-in.
During setup, the factory presets are installed in a dedicated folder and a user folder is created for your own presets. The handling of presets is the same throughout the program.
NOTE
Factory presets are write-protected, but may be overwritten when a software update is executed. Presets in your user folder are never changed by the software update.
20

Common Editing Methods
Presets
For more information on VST presets, see the Operation Manual of your Steinberg DAW.
Handling Section and Module Presets
The preset controls can be found throughout the program. The handling is always the same.
•To save a preset, click Save  .
.
NOTE
You cannot overwrite factory presets. If you want to save changes made to a factory preset, save the preset under a new name or in a new location.
•To load a preset, click the arrow icon and select a preset from the list.
•To delete a preset, click Delete  .
.
NOTE
Factory presets cannot be deleted.
Handling VST Presets
Loading VST Presets
PROCEDURE
1.In the header of the plug-in panel, click the Preset Management button next to the preset name field and select Load Preset.
2.Do one of the following:
•Select a preset to load it.
•Double-click a preset to load it and close the preset loader.
Saving VST Presets
PROCEDURE
•In the header of the plug-in panel, click the Preset Management button next to the preset name field and select Save Preset.
Inserting VST Presets as Layers
PROCEDURE
1.Right-click the program or layer for which you want to insert the VST preset and select
Load/Save > Load to new Layer.
2.Select a VST preset and click OK.
RESULT
The program is inserted as an additional layer.
•Alternatively, drag the VST preset from the MediaBay or the file browser into the Program Tree, and drop it on a layer.
21

Common Editing Methods
Presets
Replacing Programs and Layers with VST Presets
PROCEDURE
1.Right-click the program or layer that you want to replace.
2.Open the Load/Save submenu and select Replace Program or Replace Layer.
3.Select a VST preset and click OK.
RESULT
The program or layer is replaced.
•Alternatively, drag the VST preset from the MediaBay or the file browser onto the Program Tree, and drop it on a program or layer.
22

Global Functions and Settings
Plug-in Functions Section
The plug-in functions section at the top of the window gives you access to global functions that affect both the currently loaded programs, and the general working of the plug-in.
The plug-in functions section contains the multi slot section, the program slot section, the master section, and the performance displays.
The toolbar below the plug-in functions section contains controls for loading multi-programs on the left. To the right of these, you can find two buttons for managing screen sets. And to the right of these, you can find various buttons with useful global functions.
Program Slot Section
This section contains a copy of the slot that is selected in the Slot Rack, as well as the main parameters of the program.
The slot parameters are the same as in the Slot Rack. In addition, the following parameters are available:
Slot Number
The number of the active slot. You can switch to another slot by clicking the slot number and selecting an entry from the list.
RELATED LINKS
Slot Controls on page 51
Master Section
The master section can be used to set volume and tuning of the plug-in.
Master Volume
Adjusts the overall volume of the plug-in.
Master Tune
You can set the Master Tune slider from 415.3 Hz to 466.2 Hz, which equals -100 cents to +100 cents.
23

Global Functions and Settings
Plug-in Name and Steinberg Logo
Performance Displays
The meters and text displays indicate the system load of the plug-in.
CPU
This meter shows the processor load during playback. The more voices you play, the higher the processor load. If the overload indicator lights up, reduce the Max Voices setting on the Options page.
Disk
This meter shows the hard disk transfer load during the streaming of samples or when loading presets. If the overload indicator lights up, the hard disk is not supplying data fast enough. In such a case, open the Options page and adjust the Disk vs. RAM slider towards RAM or decrease the Max Voices setting.
Polyphony
This display indicates the number of samples that are currently played back, to help you trace performance problems. For example, if you have to reduce the Max Voices setting on the Options page, you can verify your settings by monitoring the number of samples that are currently playing.
Memory
This display indicates the overall amount of RAM that is currently used by the plug-in and the loaded programs. The number refers to the streaming buffer and the preloaded samples. The MEM display helps you trace performance problems. For example, if you need to free up memory for other applications, you can adjust the Disk vs. RAM slider on the Options page toward Disk. You can verify your settings by monitoring the MEM display.
Plug-in Name and Steinberg Logo
To get information regarding the version and build number of the plug-in, click the plugin logo. This opens the About box. To close the About box, click it or press Esc on your computer keyboard.
If you click the Steinberg logo in the top right corner of the plug-in interface, a pop-up menu opens. Select one of the options to navigate to Steinberg web pages containing information on software updates, troubleshooting, etc.
Toolbar
Missing Busses
Opens the Pending Busses dialog, allowing you to resolve any bus connections that could not be established.
Find Missing Samples
Opens the Find Missing Samples dialog, allowing you to resolve any missing samples for the loaded program.
24

Global Functions and Settings
Toolbar
Global insert, AUX, and FlexPhraser buttons
Use these buttons to switch off all insert effects, AUX effects, and FlexPhrasers for the whole plug-in at once. You can use this to compare sounds with and without effects or to use a preset without the FlexPhrasers, for example.
RAM Save
The RAM Save function scans the playback of your project and unloads unused samples.
1.Click the RAM Save button and in the dialog, click Yes to start collecting the necessary samples.
The RAM Save button starts blinking.
2.Play back the project in your host application from the beginning to the end or to the point where no new notes are played.
3.Click the RAM Save button again. In the dialog, click Yes to unload the unused samples.
To deactivate RAM Save and reload the unused samples, click the RAM Save button again.
RAM Save mode always keeps samples that are within the range of the highest and lowest note of the played programs. This also applies for unused expression layers that can be controlled via key switches. This allows you to switch between expressions within the valid note range after applying RAM Save mode.
IMPORTANT
If a program randomly triggers notes, for example, different guitar slide noises, it is possible that these notes are not triggered during the RAM Save analysis process, and that the samples are therefore removed. To prevent this, trigger the highest required note manually during the analysis.
Enable MIDI Mapping Selection Options
If this button is activated, played MIDI notes can be used to select zones. This also influences the zone parameters that are displayed in the editors.
This parameter is linked to the corresponding option in the Mapping Editor, allowing you to remote-control the option even if the Mapping Editor is not visible.
MIDI Reset
Click this button to stop playback and reset all MIDI controllers to their default values.
Undo/Redo
To undo or redo a single operation, click the Undo or Redo buttons. To undo or redo multiple operations, click the arrow next to the button to open the history and select the step to which you want to return.
25
Global Functions and Settings
Keyboard Editor
NOTE
How many undo/redo operations are available depends on the Number of Undo
Steps setting on the Options page.
Keyboard Editor
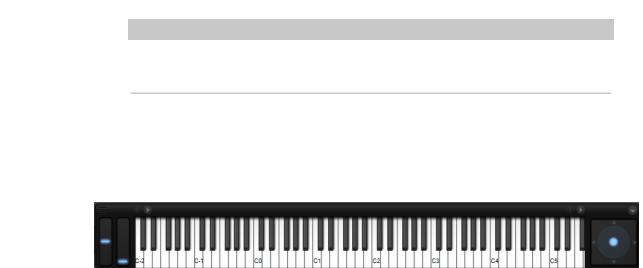
The Keyboard Editor contains the wheel controls, the sphere control and the internal keyboard.
Wheel Controls
To the left of the internal keyboard, the pitchbend wheel and the modulation wheel are located.
The modulation wheel is hardwired to MIDI controller #1, which is normally used as a source in the modulation matrix, but can be used as a quick control as well.
Typically, you assign the modulation wheel to a parameter of an insert effect, such as the speed of the Rotary effect.
Internal Keyboard
The internal keyboard in HALion spans the entire MIDI note range from C-2 to G8. You can use it to trigger notes by playing them, but you can also drop samples onto it to import and map samples, for example.
You can resize the internal keyboard horizontally and vertically. A vertical resize changes the size of the individual keys and a horizontal resize defines how many octaves are visible. If the horizontal size is not sufficient to display all octaves, you can use the left/right arrow buttons on both sides of the keys to shift the visible range by octaves.
For each key, the keyboard indicates whether a sample is mapped to it. The following color scheme is used for the keys:
•Keys to which a key switch is assigned are shown in yellow.
•Keys to which a remapped key switch is assigned are shown in beige.
•Keys to which an expression in the Layer Alternate MIDI module is assigned are shown in red.
•Keys that are assigned to a trigger pad are shown in blue.
•Keys to which a loop trigger note is assigned are shown in green.
Previewing Notes Using the Keyboard
•To preview a note, click the corresponding key on the keyboard.
The vertical position where you click a key defines the velocity that is used to trigger the note. Click the lower part of a key to use the highest velocity, and the upper part to use the lowest velocity.
26

Global Functions and Settings
Quick Controls
•To play a key and all following keys at the same velocity, for as long as you keep the mouse button pressed, hold down Ctrl/Cmd and click the key on the keyboard.
•To play each note 10 times at increasing velocities between 1 and 127, hold down Ctrl/ Cmd-Alt and click a key.
Keyboard Context Menu
Right-click a key to open a context menu that contains information about the key.
•The Assigned Zones submenu displays the names of all zones that are mapped to this key, allowing you to select a zone.
•The Info submenu shows pitch and velocity information.
•Select Clear key to remove all assignments.
Sphere Control
The sphere is a two-dimensional control. It allows you to adjust two parameters simultaneously, by dragging the mouse horizontally (Sphere H) and vertically (Sphere V). Typically, two parameters that belong together are assigned to the sphere, such as cutoff and resonance.
If parameters are assigned to Sphere H and Sphere V, triangles for indicating the horizontal and vertical axis are available.
You can reset the sphere to the center position using the corresponding options on the context menu.
•If Center Horizontal and/or Center Vertical are activated, the sphere returns to the corresponding center position as soon as you release the mouse button.
Quick Controls
Quick controls allow you to remote-control any parameter inside the program.
Quick controls can be set up for programs and for layers. If a layer has no quick controls, the quick controls of the program are used. If a layer has quick controls, the layer and all its zones use these quick controls.
For each program and layer, eight quick controls are available. Furthermore, Sphere H, Sphere V, and the modulation wheel can also serve as quick controls.
The quick controls can be accessed via the Quick Controls Editor for a program or layer.
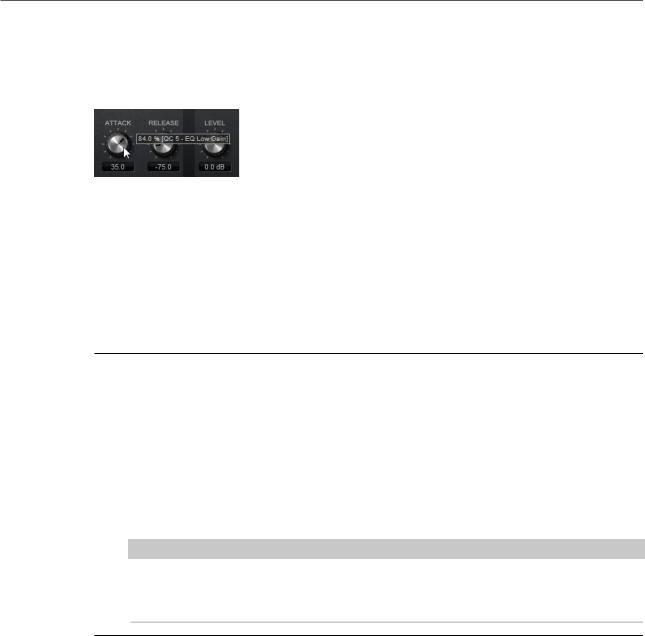
Value Tooltips
If you use quick controls, the following situations can happen:
•The actual value of a parameter and the value that is displayed in its value field differ.
•A button on the user interface is deactivated but the corresponding parameter is active.
27
Global Functions and Settings
Quick Controls
For example, this can happen if the quick control introduces an offset or if a button is controlled by a quick control.
Therefore, parameters that are assigned to a quick control show a value tooltip. This value tooltip indicates the resulting parameter value and the name of the assigned quick control.
Value tooltips can be activated or deactivated in the Options Editor.
RELATED LINKS
Edit Section on page 38
Assigning Quick Controls
You can assign quick controls to a parameter of the program or one of its layers, to zones inside a program or layer, or to parameters of a MIDI module or an effect.
PROCEDURE
1.In the Program Tree, select the element that you want to remote-control via a quick control.
2.Open the Sound Editor.
3.Right-click the control to which you want to assign a quick control and on the Assign Quick Control submenu, select a quick control.
You can assign the same quick control to different parameters. This allows you to make complex sound settings with a single control. However, you cannot assign different quick controls to the same parameter.
NOTE
You can also assign a quick control as modulation source or modulation modifier in the modulation matrix. This allows you to combine the quick control with other modulation sources.
RELATED LINKS
Modulation Matrix Parameters on page 140
Setting the Minimum/Maximum Range
You can set the minimum and maximum range for each assignment separately. This gives you better control over the parameter change.
•Right-click a control and define the range using the Set Minimum and Set Maximum commands.
•In the Quick Control Assignments editor, enter the values in the Minimum Value and
Maximum Value fields or click and drag the handles in the curve display.
28

Global Functions and Settings
Quick Controls
Trimming the Range
The Trim Range function allows you to automatically set the best quick control range, depending on the current parameter value.
PROCEDURE
•In the Quick Control Assignments editor, right-click the assignment in the list on the right.
•To trim the range of a single assignment, select Trim Range.
•To trim the range of all quick controls, select Trim Range of All Quick Controls.
RESULT
The minimum and maximum values are set automatically.
NOTE
If you change the original parameter, you have to apply the Trim Range function again to guarantee the best control range.
Setting the Default Range
PROCEDURE
•In the Quick Control Assignments editor, right-click the assignment on the right.
•To set the default range of a single assignment, select Set Default Range.
•To set the default range of all quick controls, select Set Default Range of All Quick Controls.
RESULT
The quick controls are set to their maximum possible range.
NOTE
If you change the original parameter, you must apply the Set Default Range function again to guarantee the best control range.
Unassigning Quick Controls
PROCEDURE
•Do one of the following:
•To remove a quick control assignment, right-click the parameter in the Quick Control Assignments editor and select Remove Assignment.
•To remove all assignments of the selected quick control, open the context menu and select Remove All Assignments.
•To remove all quick control assignments of all quick controls that belong to the selected layer in the Program Tree, open the context menu and select Remove All Assignments of All Quick Controls.
29
Global Functions and Settings
Quick Controls
Single Assignment vs. Multi Assignment
You can assign a quick control to a single parameter of a zone or module. This is called a single assignment. And you can assign a quick control to the same parameter of all zones inside a layer. This is called a multi assignment.
•Single assignments override multi assignments.
For example, if a quick control remote-controls the cutoff of all zones inside a layer and you assign the cutoff of one of these zones to another quick control, the multi assignment is overridden by this single assignment.
•If you remove a single assignment from a parameter of a zone that is part of a layer that has a multi assignment on the same parameter of all other zones, the zone becomes part of the multi assignment again.
•If you add another zone to a layer that has a multi assignment, the added zone gets the same quick control assignments as the other zones of that layer.
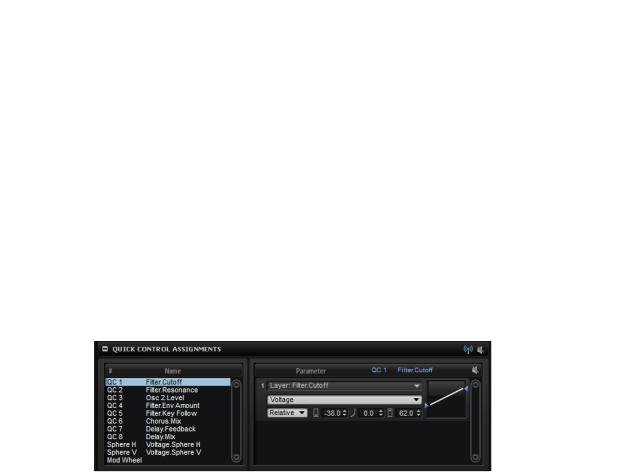
Quick Control Assignments Editor
•The Quick Control Assignments editor can be found in the Sound Editor for programs or layers.
Receive Quick Controls
If Receive Quick Controls is deactivated for a layer, its quick controls are not routed any further, that is, any layers, zones, etc., that come after this layer are not affected by the quick controls.
You can use this as a filter for quick controls. For example, if you have a guitar sound, and you assign quick controls to the amplifier envelope, you want them to affect the entire instrument, except for the fret noises. In this case, deactivate Receive Quick Controls for the layer that contains the fret noises, so that these are unaffected by the amp envelope.
Bypass All Quick Control Assignments
Allows you to hear a sound without quick control assignments.
Quick Controls List
The eight quick controls are listed on the left. The assignments of the selected quick control are listed on the right. You can edit the parameters for each assignment separately.
Quick Control Parameter
Displays the parameter assignment for the selected quick control.
30
 Loading...