


Operation Manual
Operation Manual by Anders Nordmark
Quality Control: Cristina Bachmann, Heiko Bischoff, Sabine Pfeifer, Claudia Schomburg
The information in this document is subject to change without notice and does not represent a commitment on the part of Steinberg Media Technologies GmbH. The software described by this document is subject to a License Agreement and may not be copied to other media except as specifically allowed in the License Agreement. No part of this publication may be copied, reproduced or otherwise transmitted or recorded, for any purpose, without prior written permission by Steinberg Media Technologies GmbH.
All product and company names are ™ or ® trademarks of their respective owners. Windows XP is a trademark of Microsoft Corporation.
© Steinberg Media Technologies GmbH, 2005. All rights reserved.
Table of Contents

11Introduction
12Welcome!
12 What’s new in WaveLab 6.0?
14How you can reach us
15Requirements
16This is what you need…
16Computer requirements
18Sampler requirements
18About audio cards
19About the System Information feature
21Installing and setting up
22Setting up the computer
23Installation procedure
24Register your software!
25Launching WaveLab
25 Program settings
30Installing a CD/DVD recorder
31Installing samplers
33Installation done! Where do I go next?
33 About the Tracer application
35Overview
36Get to know WaveLab
36 The windows and what you can do with them
43Find your way around in WaveLab
45Basic methods
46Why you should read this
chapter
46Getting help
47Undo and Redo
49 Working with windows
56 Dockable control bars
59The status bar
60Speed menus
61Units of time and level
62Setting values
65 Presets
67About non-modal dialogs
68Using the computer keyboard
69Editing in the Wave
window
70About this chapter
70Creating new empty documents
71Opening Waves
76Window overview and adjustments
80 Setting the zoom factor
86Navigating through the file
87Snapshots
88Setting the ruler start position
89Working with a meter based
display
89Setting the wave cursor position
91 |
Selecting |
99 |
Basic editing commands |
113File handling in Wave windows
127 Editing attributes and getting information
129About the Loudness envelope display mode
133Playback and recording
134Playing back
146 Recording
155Metering
156Introduction
156 Selecting what to monitor
158Multi-channel metering
159The meters
WAVELAB
4Table of Contents

175 |
Off-line processing |
|
255 |
Spectrum Editor |
|
176 |
Introduction |
256 |
Introduction |
||
176 |
Applying processing |
256 |
Basics |
||
178 |
Level Normalizer |
260 |
Defining a region |
||
178 |
Gain Change |
262 |
Surgical processing |
||
180 |
Loudness Normalizer |
269 |
Master Section processing |
||
183 |
Pan Normalizer |
273 |
Batch processing |
||
184 |
Dynamics |
||||
|
|
|
|||
189 |
Level envelope |
274 |
Introduction |
||
191 |
Fade-in and fade-out |
276 |
Opening the Batch |
||
192 |
Crossfade |
|
|
Processor |
|
195 |
Invert Phase |
277 |
Overview of the Window |
||
195 |
Reverse |
278 |
The Input tab – Assembling a |
||
195 |
Eliminate DC Offset |
|
|
list of files |
|
196 |
Waveform Restorer |
285 |
Setting up the processing |
||
196 |
Time Stretch |
|
|
tasks to be performed |
|
201 |
Pitch Correction |
292 |
The Output tab – Settings for |
||
204 |
Pitch Quantize |
|
|
created files |
|
205 |
Pitch Bend |
299 |
Scheduling |
||
207 |
Harmonization |
301 |
Running and stopping the |
||
208 |
Hi-fi Chorus |
|
|
batch(es) |
|
209 |
EQ |
301 |
Using presets for batch |
||
210 |
Convert sample rate |
|
|
processing |
|
211 |
Effect Morphing |
303 |
Batch file encoding |
||
215 |
Support for reNOVAtor™ |
||||
|
|
|
|
|
|
217 |
Master Section |
304 |
Basic procedure |
||
|
|
|
307 |
Batch renaming |
|
218 |
Introduction |
||||
219 |
The Master Section window |
308 |
Introduction |
||
221 |
About the signal path |
||||
308 |
Setting up which files/clips/ |
||||
222 |
The Master level pane |
||||
|
|
markers to rename |
|||
225 |
The Effects pane |
|
|
||
312 |
Renaming operations |
||||
231 |
The Dithering pane |
||||
321 |
About regular expressions |
||||
236 |
Master Section presets |
||||
327 |
Markers |
||||
239 |
Rendering |
||||
244 |
Smart bypass |
|
|
|
|
328 |
Introduction |
||||
247 |
The Monitor window |
||||
331 |
Creating markers |
||||
251 |
Audio Input |
||||
332 |
About the marker list |
||||
252 |
Using External effects |
||||
333 |
Marker appearance and visi- |
||||
|
|
||||
bility
WAVELAB
Table of Contents 5

334 |
Editing, converting and |
365 |
About the DVD-Audio |
||
|
naming markers |
|
|
format |
|
336 |
Moving and duplicating |
|
|
|
|
366 |
Background information |
||||
|
markers |
||||
337 |
Deleting markers |
371 |
The Audio Montage |
||
338 |
Operations involving markers |
||||
|
|
|
|||
372 |
Introduction |
||||
341 |
Using Auto Split |
||||
373 |
The Audio Montage window |
||||
342 |
Introduction |
378 |
Assembling the Montage |
||
342 |
The Auto Split dialog |
392 |
Zooming and navigating |
||
347 |
Preparing a |
399 |
Playing back |
||
406 |
Recording |
||||
|
Basic Audio CD |
408 |
Rearranging clips |
||
|
|
433 |
The Zoom view |
||
348 |
Creating, opening and saving |
||||
436 |
Editing in the Clips view |
||||
|
Basic Audio CDs |
||||
|
441 |
Managing clips and source |
|||
349 |
About the Basic |
||||
|
|
files |
|||
|
Audio CD window |
|
|
||
|
445 |
The volume envelope |
|||
350 |
Adding files to a Basic |
||||
457 |
Using fades and crossfades |
||||
|
Audio CD |
||||
|
|
|
in the Montage |
||
353 |
Setting the order of the tracks |
|
|
||
469 |
The pan envelope |
||||
|
on the CD |
||||
|
470 |
Transforming clips |
|||
353 |
Deleting files from Basic |
||||
474 |
Adding effects to tracks and |
||||
|
Audio CDs |
||||
|
|
|
clips |
||
354 |
Managing list columns |
|
|
||
483 |
Managing effects in the |
||||
355 |
“Unfolding” a track |
||||
|
|
Plug-ins view |
|||
356 |
Opening CD tracks for wave |
|
|
||
486 |
The Meta Normalizer |
||||
|
editing |
||||
|
489 |
Groups |
|||
357 |
About the relation between |
||||
492 |
Using markers in the Montage |
||||
|
the track list and CD markers |
||||
|
496 |
Undo/Redo and History |
|||
358 |
Working with CD markers |
||||
498 |
File handling in the Audio |
||||
360 |
Adjusting pauses |
||||
|
|
Montage |
|||
360 |
Naming tracks |
|
|
||
504 |
Using video tracks |
||||
360 |
Other settings |
||||
506 |
Multichannel operation in the |
||||
361 |
Checking the total length of |
||||
|
|
Montage |
|||
|
the CD |
|
|
||
|
527 |
Mixing down – The Render |
|||
361 |
Playing files in the track list |
||||
|
|
function |
|||
362 |
Creating a disc image |
|
|
||
531 |
Preparing the Audio Montage |
||||
363 |
Exporting audio files from a |
||||
|
|
for CD/DVD-Audio burning |
|||
|
track list |
|
|
||
|
541 |
Creating an Audio CD report |
|||
364 |
Preparations done! |
||||
|
|
|
|||
WAVELAB
6Table of Contents

546 |
Using DVD-A picture and text |
593 |
Importing audio |
||
|
tracks |
|
|
CD/DVD tracks |
|
547 |
Exporting and importing |
|
|
|
|
594 |
Importing audio CD tracks |
||||
|
AES-31 files |
||||
549 |
XML Export/Import of Audio |
|
|
into WaveLab |
|
|
Montages |
599 |
Importing DVD-Audio tracks |
||
551 |
DVD-Audio projects |
|
|
into WaveLab |
|
603 |
Creating labels |
||||
|
|
||||
552 |
Creating and opening a |
||||
|
|
|
|||
604 |
Introduction |
||||
|
DVD-Audio project |
||||
553 |
Adding Montages to a |
606 |
Using the Label Editor |
||
|
DVD-Audio project |
614 |
Defining user variables |
||
554 |
The DVD-Audio project |
616 |
Printing labels |
||
|
window |
619 |
Analysis |
||
556 |
The Main settings dialog |
||||
|
|
|
|||
620 |
Global analysis |
||||
558 |
Generating DVD menus |
||||
566 |
DVD-Audio text |
631 |
Audio error detection and |
||
568 |
Final preparations |
|
|
correction |
|
571 |
Burning an audio CD |
637 |
Audio file comparer |
||
638 |
3D Frequency Analysis |
||||
572 |
Introduction |
641 |
Loudness distribution tool |
||
572 |
Selecting a CD-R unit |
643 |
Generating signals |
||
573 |
Testing a basic audio CD |
||||
|
|
|
|||
644 |
Audio Signal Generator |
||||
|
before burning |
||||
574 |
Writing a CD |
646 |
DTMF Generator |
||
576 |
Validating an audio CD after |
649 |
Synchronizing |
||
|
burning |
||||
|
|
|
WaveLab to |
||
577 |
The audio CD format – |
|
|
||
|
Background information |
|
|
external devices |
|
|
|
|
|
|
|
583 |
Data CD/DVD Projects |
650 |
Introduction |
||
|
|
650 |
MTC sync |
||
584 |
Introduction |
||||
656 |
Sync to ASIO Positioning |
||||
585 |
Creating a new Data |
||||
|
|
Protocol (APP) |
|||
|
CD/DVD Project |
|
|
||
|
657 |
Using samplers and |
|||
586 |
Source window settings |
||||
587 |
Destination window settings |
|
|
creating loops |
|
590 |
The Write dialog for the |
|
|
|
|
658 |
Introduction |
||||
|
Data CD/DVD |
||||
|
658 |
Background information |
|||
|
|
||||
|
|
661 |
Setting up your sampler(s) |
||
|
|
663 |
Transmitting samples |
||
WAVELAB
Table of Contents 7

664 |
Receiving samples |
707 |
Workspaces |
||
664 |
Deleting and getting informa- |
|
|
|
|
708 |
What are Workspaces? |
||||
|
tion about samples |
||||
|
709 |
Creating and opening |
|||
665 |
The Transmit Back feature |
||||
|
|
Workspaces |
|||
665 |
In case of problems |
|
|
||
709 |
How Workspaces are saved |
||||
666 |
Using WaveLab with |
||||
710 |
Creating, renaming and |
||||
|
Steinberg HALion |
||||
|
|
|
deleting groups |
||
667 |
Editing sample attributes |
|
|
||
710 |
File operations |
||||
669 |
Basic looping |
||||
|
|
|
|||
671 |
Using the Crossfade Looper |
713 |
Using WaveLab for |
||
679 |
Using the Loop Tone |
|
|
backup |
|
|
Equalizer |
|
|
||
|
|
|
|
||
|
714 |
Background |
|||
683 |
Audio Databases |
||||
715 |
Creating a Backup Plan |
||||
684 |
What is an Audio Database |
723 |
Performing the backup |
||
|
and why do I need it? |
725 |
Opening an archive |
||
685 |
Creating and opening Audio |
728 |
Other functions |
||
|
Databases |
729 |
Customizing |
||
685 |
How Audio Databases are |
||||
|
|
|
|||
730 |
What is customizing? |
||||
|
saved |
||||
686 |
Window overview and |
730 |
Preferences |
||
|
adjustments |
731 |
Folder editing |
||
687 |
Adding files to the Audio |
733 |
Saving the window layout |
||
|
Database |
734 |
Styling WaveLab – |
||
693 |
Customizing the File List |
|
|
Wave windows |
|
693 |
Selecting in the File List |
739 |
Styling WaveLab – |
||
694 |
Finding out where files are |
|
|
Audio Montage windows |
|
|
located |
744 |
Working with window layouts |
||
694 |
Opening a file for editing |
745 |
Setting default size and posi- |
||
694 |
Playing a file |
|
|
tion for windows |
|
695 |
Other file operations |
746 |
Creating a Favorites menu |
||
699 |
Working with categories |
746 |
Customizable key/MIDI |
||
702 |
Location operations |
|
|
commands |
|
703 |
Filtering the list |
753 |
Organizing plug-in processors |
||
704 |
Finding files |
759 |
Plug-in Processor |
||
705 |
Changing the default |
||||
|
|
Reference |
|||
|
categories and keywords |
|
|
||
|
|
760 |
About WaveLab plug-ins |
||
|
|
768 |
VST Plug-ins |
||
WAVELAB
8Table of Contents

791 |
Sampler Details |
809 |
Key commands |
||
|
|
|
|
|
|
792 |
SDS - Generic Sample Dump |
810 |
File handling |
||
|
Standard |
810 |
Wave display mode |
||
792 |
SMDI (Standard SCSI |
811 |
Zooming |
||
|
transfer) |
811 |
View |
||
793 |
Akai S1000/1100 including |
812 |
Playback and cursor position |
||
|
PB models |
813 |
Selecting |
||
793 |
Akai S2000/S2800/S3000/ |
815 |
Editing and Recording |
||
|
S3200, including all “i”, CD, |
817 |
Processing |
||
|
and “XL” derivatives etc. |
817 |
Markers |
||
794 |
Ensoniq, EPS, EPS16+, |
818 |
Database |
||
|
ASR-10, ASR-88 |
818 |
Miscellaneous |
||
794 |
E-mu Esi-32 |
819 |
Index |
||
795 |
E-mu EIV, e64 and other |
||||
|
|
|
|||
samplers running the EOS operating system
795Kurzweil K2000 and K2500
796Roland S-760
797Troubleshooting
798General problems
799Problems with opening files
800Problems with saving files
800Recording problems
801Playback problems
802Editing problems
802Audio database and workspace problems
803Troubleshooting and precautions
803Sampler communication problems
804Problems and solutions
805Questions and Answers
806Day to day precautions for trouble free CD writing
807Hardware and setup issues
WAVELAB
Table of Contents 9

WAVELAB
10 Table of Contents
1
Introduction

Welcome!
Congratulations on your choice of WaveLab! Ever since its early versions WaveLab has enjoyed a high reputation among professional and semiprofessional users. WaveLab is the audio editor of choice, not only in top- of-the-line mastering and restoration facilities, but also for any serious engineer or musician.
This new version of WaveLab continues in the tradition of introducing new powerful and exciting features while maintaining the ease of use and workflow that makes working with WaveLab so effective. We are quite confident that version 6.0 will define a new standard in applying psychoacoustic tools to professional audio editing and mastering. WaveLab 6.0 will integrate seamlessly into your existing studio environment, and with your outboard gear.
Steinberg has always shown a strong commitment to protect the investment of loyal customers. WaveLab 6.0 follows this route by introducing the Steinberg key to preserve your competitive advantage.
Your Steinberg Team.
What’s new in WaveLab 6.0?
This section lists the main new functions and features added to the 6.0 version of WaveLab:
•The main wave window and the overview can independently be set to display one of three display modes: Standard waveform display (Wave), the loudness envelope of the sound (Loudness envelope), or as a spectrogram (Spectrum).
•New Spectrum editor offers powerful audio restoration and processing functions. High quality linear-phase filters allow you to remove unwanted artefacts in the audio with surgical precision. You can also process a selected frequency/time region separately via the Master Section.
•New Rename function that can automatically update all file references in other documents such as Audio Montages. Files, clips and markers can also be batch renamed.
•Marker regions can be rendered as separate audio files.
•Improved file read/write performance.
•No limitation on audio file size.
•DIRAC engine - perhaps the highest quality algorithm for Time stretch/Pitch shift processing available today.
•Crystal Resampler plug-in, a professional sample rate converter providing exceptional transparency and preservation of the frequency content.
WAVELAB
1 – 12 Introduction

•External gear plug-in allows you to process audio via external equipment.
•New Audio input plug-in replaces the Live input feature, with the option to record the incoming signal.
•Option to save an audio selection as an Audio Montage clip.
•Redesigned graphic user interface in all menus and dialogs.
•Auto Split enhancements includes Split to specific file length and Split according to a text file (XML support).
•Clip files can be created when using Auto Split.
•The Loudness Normalizer allows you specify the desired loudness of a file to a given value. A high quality limiter coupled with multi-pass analysis ensures very accurate results.
•The Pan Normalizer allows you to process the left/right audio channels in a stereo file to the same loudness.
•The Level envelope processor can control the level of an audio file or selection using an envelope curve.
•The Pitch Quantize processor can automatically detect and correct the pitch of an audio file.
•Effect morphing - gradually blend two processed audio ranges with a custom envelope for sample accurate effect transitions.
•Global Bypass tool compensates for the loudness difference between processed/unprocessed audio.
•New Edit folders dialog manages all default file folders used by WaveLab.
•Define up to 3 temporary file folders to further improve file performance.
•View settings files (extension “.mem”) can store/recall information relating to a specific audio file such as window/zoom/scroll positions, Master Section preset etc.
•Audio peak files (extension “.gpk”) can now be stored in a separate folder.
•Improved graphic speed for displaying large files. Peak files can also be created in the background with graphical progress monitoring.
•Updated preference dialogs.
•Advanced “Insert silence” function allows you to insert user specified ambient background noise instead of silence, with optional cross-faded insertion.
•K-System support for loudness metering.
•New Audio Montage tab can manage all plug-ins used in a Montage in a variety of ways. Copy and paste plug-ins between clips or tracks, or load and save whole plug-in chains.
•Batch processing of Audio Montages.
•WaveLab can now be slaved to the ASIO Positioning Protocol, for sample accurate synchronization.
•You can now assign MIDI commands for WaveLab functions.
Best of all, WaveLab is continuously developed and refined, in collaboration with our users – from professional audio engineers to hobbyists. Your input has helped make this version of WaveLab the most complete, flexible and user-friendly ever!
WAVELAB
Introduction 1 – 13

How you can reach us
After having installed and launched the program, you will find a number of useful Steinberg Web links on the Help menu (“Steinberg on the internet” submenu). These allow you to get online support, check for updates, get answers to frequently asked questions, etc.
These features require that you have a working Internet connection.
WAVELAB
1 – 14 Introduction
2
Requirements

This is what you need…
To use WaveLab you need the following:
•A PC with Windows XP or 2000 installed and ready.
A free USB port is also required. For more details about the computer requirements, see below.
•A Multimedia PC compatible, 16-bit (or better) audio card.
By audio card we mean a card capable of recording and playing back audio, using the computer’s hard disk as storage media. See “About audio cards” on page 18.
To take advantage of WaveLab’s more advanced features, you need the following:
•To utilize WaveLab’s CD burning capabilities, you will need a CD recorder.
Your CD recorder must support the disc-at-once write mode.
•To utilize WaveLab’s DVD-A burning capabilities, you will need a DVD recorder.
•To utilize WaveLab’s surround and multichannel capabilities, you will need an audio card with multiple inputs and outputs.
Furthermore, the audio card must have an ASIO driver.
•DirectX 9 or later must be installed.
Computer requirements
Below, the minimum computer requirements are listed, with recommendations where applicable. The following sections describe each system component (processor, RAM, etc.) in more detail.
Minimum requirements
•Intel Pentium III/AMD Athlon 800 MHz (Intel Pentium IV/AMD Athlon or AMD Opteron 2,4GHz).
•Newer dual core CPUs are recommended.
•256 MB RAM (1GB recommended).
• A monitor and video card with a resolution of 24 bit (32bit recommended).
•50MB of free hard disk space (10GB recommended).
•Windows XP or 2000 (Windows XP recommended).
•Windows MME compatible audio hardware (ASIO compatible audio hardware recommended).
•CD or DVD ROM drive for installation (CD/DVD writer recommended).
•USB port.
•DirectX version 9 or later is required for using video and some export functions.
WAVELAB
2 – 16 Requirements

RAM
Since WaveLab is disk based, the amount of RAM does not limit the size of audio files you can work with. Even with moderate amounts of RAM, you can have many files open at the same time. However, when more RAM is available, some processes can be accelerated by WaveLab.
Processing power
The difference between running WaveLab on a faster computer and a slower one is noticeable in many cases:
•More real-time processing
The faster the computer, the more real-time plug-ins you will be able to use.
•Faster “off-line” processing and analysis tasks
Certain types of processing which make heavy demands on the computer will be completed more quickly on a faster machine.
•Screen updates
Scrolling, editing and manipulating objects is “snappier” on a faster machine.
Hard disk
Audio files are relatively big. Approximately 10.6 MB of hard disk space is used up for every minute of 16 bit stereo/44.1 kHz audio recorded. For 24 bit/48 kHz audio or higher, the audio files are of course a lot bigger. Therefore we recommend that you get the largest hard disk you can afford. The speed of the hard disk will affect some of the processing operations. This is mainly noticeable when you work with very long files.
In addition, a fast hard disk is absolutely crucial for CD-R and DVD-R burning. If the hard disk is slow, your recorder might not be able to write at its maximum possible speed.
Do not use file compression on hard disks where audio files are stored!
WAVELAB
Requirements 2 – 17

Sampler requirements
To communicate with samplers, you need the following:
•A MIDI interface, or…
•A SCSI card, or…
•Both a MIDI interface and a SCSI card.
Exactly which of the three is most appropriate depends on the capabilities of your sampler and how you intend to communicate with it. See “About the various communication methods” on page 658.
SCSI card considerations
WaveLab works with SCSI cards that are 100% Windows compatible.
If you are buying a SCSI card specifically to communicate with the sampler, we recommend that you get an original Adaptec card. Small deviations in SCSI implementations can cause transfer problems.
About audio cards
WaveLab works with any Multimedia PC compatible audio card. However, the audio quality varies dramatically between cards.
For serious work with WaveLab, we recommend that you get a card with the highest possible specifications.
However, if you use WaveLab to edit files for use with other hardware (such as a hard disk based recording system using its own audio converters) any loss in audio quality that you experience when listening to the files in WaveLab (due to deficiencies in the audio card) will not affect the final audio files in any way.
For professional use (mastering, etc.) we recommend that you get a card capable of playing back files in 24 bit resolution.
Surround
To use the surround capabilities of WaveLab’s Audio Montage, you need an ASIO compatible audio card with multiple inputs and outputs. In a surround configuration, each WaveLab channel can be routed to separate outputs and inputs on the audio card.
WAVELAB
2 – 18 Requirements

About the System Information feature
After having installed and launched WaveLab, you can get a very detailed report describing your computer system by selecting “System Information” on the Help menu. This function analyses your system and lists operating system specifics; processor(s), memory, hard drives, and much more. This is especially useful if you need to contact Technical Support, since this allows you to describe your computer configuration accurately.
WAVELAB
Requirements 2 – 19

WAVELAB
2 – 20 Requirements
3
Installing and setting up

Setting up the computer
Before proceeding, your computer should be set up and the following items should be installed:
•Windows (see “This is what you need…” on page 16 for details on which version to use).
•The audio card and its driver.
Checking the audio card
To make sure the audio card will work as expected, you can perform the following two tests:
•Use the software included with the audio card to make sure you can record and play back without problems.
•Use the Media Player application (included with Windows and described in the Windows documentation) to record and play back audio.
Colors
At this point you might want to check and for example change the number of colors you use on your computer screen. See your Windows documentation for instructions on how to do this. The recommended setting for WaveLab is 24 or 32 bit mode (“True Color”).
WAVELAB
3 – 22 Installing and setting up
Installation procedure
The Steinberg Key
Please read the following section before installing the WaveLab software.
Included with the WaveLab package, you will find the Steinberg Key (sometimes referred to as a “dongle”), a hardware copy protection device that is part of the WaveLab copy protection scheme. WaveLab will not run if there is no Steinberg Key.
The Steinberg Key
The Steinberg Key is, in fact, a little computer on which your Steinberg software licenses are stored. All hardware-protected Steinberg products use the same type of key, and you can store more than one license on one key. Also, licenses can (within certain limits) be transferred between keys
– which is helpful, e.g. if you want to sell a piece of software.
•If you already own copy-protected Steinberg software, you must remove any existing Steinberg Keys from the computer’s USB port before starting the WaveLab installation routine.
•If you are using other copy-protected Steinberg products, you may want to transfer all licenses for your applications to only one Steinberg Key, thus using only one USB port of your computer. More information on the transfer of licenses between keys can be found in the help for the Syncrosoft License Control Center (which can be found in the Start/Programs menu of your computer).
The Steinberg Key must not be plugged in before the installation of WaveLab. Otherwise the operating system of your computer will register it as new USB hardware and try to find drivers that won’t be present before WaveLab installation.
WAVELAB Installing and setting up 3 – 23

Installing the software
The installation procedure unpacks all the files and automatically puts them in the right places.
1.Insert the CD-ROM disk in the drive.
The installation program should start automatically after a few seconds. If, for some reason it doesn’t – for instance if you have “Auto Insert Notification” deactivated for your CD drive
– perform steps 2-4 below. Otherwise, proceed to step 5.
2.Launch the Explorer, open the “My Computer” window or select “Run” from the Start menu.
3.Locate and double click on the drive symbol for the CD-ROM drive.
4.Double click on the “setup” symbol (setup.exe).
5.Follow the instructions on screen.
•If you are updating from WaveLab 4, WaveLab 5 or WaveLab Essential you will need to enter both the serial number and the original CD that came with the previous version.
6.At one point of the installation a dialog appears requesting you to connect your Steinberg Key – do so.
The first time the copy protection device is plugged in, it will be registered as a new hardware device, and a dialog will appear asking you whether you would like to find drivers for the device manually or automatically. You should select to find drivers automatically, and click OK to proceed and close the dialog.
7.Finally, a dialog informs you that the installation was successful.
A restart may be requested – but if no dialog requests a restart it is not necessary to do so.
When the installation is finished, the program is found among your other programs on the Start menu and/or the desktop.
This completes the installation of your WaveLab program! But, you’re not really done yet…
Register your software!
Registering your software will make sure you are entitled to technical support and kept aware of updates and news regarding WaveLab.
WAVELAB
3 – 24 Installing and setting up

Launching WaveLab
1.Make sure the Steinberg Key is plugged into the USB port.
2.Launch WaveLab.
WaveLab starts.
•The Steinberg Key has to be plugged in at all times when running WaveLab.
Program settings
Before you start working, you should make some settings:
Audio card settings
You need to specify which audio card and driver you intend to use. WaveLab can communicate with the audio card via any of the standard protocols; ASIO, MME or WDM. Note:
•For multichannel operation and other WaveLab features like the External gear plug-in you must use an ASIO driver.
Selecting an ASIO driver
1.Open the Preferences–Audio device tab.
2.Select the ASIO driver from the “Playback device” pop-up menu.
Note that the “Playback device” menu heading has now changed to “Playback/Record device” and the Recording device section has been greyed out. This is because with ASIO, the same driver is always used both for output and input.
3.If you click the “Control Panel” button the audio card settings application (usually installed with the audio card) for the ASIO driver opens.
In the Control Panel you may find settings for buffer size, digital formats, additional I/O connections, etc. depending on the audio card and the driver.
4.Click on the “Connections” button.
The ASIO Audio connections dialog will appear, listing all available channel inputs and outputs in WaveLab.
Internally there are 8 fixed WaveLab channels that can be freely mapped to ASIO outputs and inputs on your audio interface. “Surround channels” are the available surround speaker channels. See “The ASIO Audio Connections dialog” on page 507 for more information about the ASIO Audio connections dialog.
5.Close the dialog.
WAVELAB Installing and setting up 3 – 25

•When using ASIO, the playback resolution is set from the ASIO driver (you may find a setting for this in the ASIO Control Panel, depending on the hardware and driver).
Therefore, the Playback Resolution settings will be greyed out.
Selecting an MME/WDM driver
1.Select “Preferences…” from the Options menu.
2.Click on the Audio device tab.
3.Select the audio card you want to use for recording and playback from the pop-ups.
If you only have one audio card you can also select the “Microsoft Sound Mapper” options (the sound mapper is a “virtual audio card” which “maps” all audio to your real card). However this does not let you take full advantage of the card’s driver when recording audio and is therefore not recommended.
4.Choose your “Playback Resolution”.
Additional audio settings
There are other settings in the Preferences that affect audio playback and recording. We recommend that you try the default settings before you change anything, since these work well in most cases.
On the “Audio Card” tab, you will find the following settings:
•Playback Buffer Number and Size.
These determine how much RAM memory is used for buffering when playing back. If you get playback problems such as dropouts or glitches, you should try to increase these values. Click the question mark icon in the dialog for details.
With ASIO drivers, you may find these settings in the ASIO Control Panel.
•Recording Buffer Number and Size (not available when using ASIO).
These determine how much RAM is used for buffering when recording. If you get dropouts in the recorded audio, you should try increasing these values. Click the question mark icon in the dialog for details.
On the Preferences–File tab, you will find the following settings:
•Disk block buffer size.
Governs the buffer size used when WaveLab is reading data from the hard disk. If you experience problems in a read intensive scenario (such as playing back an Audio Montage with a lot of simultaneous clips), you should try changing this value.
If you change this setting, playback will stop when you leave the dialog.
WAVELAB
3 – 26 Installing and setting up

•Use system cache.
When this is deactivated (default), WaveLab reads files directly from the hard disk, bypassing Windows’ file cache.
We recommend that you leave this option deactivated!
The option is available since it may remedy problems on certain systems with slow disk drives. Note:
•If you activate this, avoid using large disk block buffer size values!
•After activating this option, you need to close and reopen all open files, for the setting to take effect!
About latency
In the Playback section of the Audio device tab, you will find an indication of the current latency (at 16bit/44.1kHz stereo). Latency is the delay between when audio is “sent” from the program and when you actually hear it. The latency in an audio system depends on the audio hardware, its drivers and their settings. It’s usually possible to reduce latency by lowering the number and size of the playback/recording buffers. However, please note:
While a very low latency can be crucial in a real-time DAW application such as Steinberg Nuendo or Cubase, this is not strictly the case with WaveLab. Here the important issues are optimum and stable playback and editing precision. Therefore, you should not try to reach the lowest possible latency figures when working with WaveLab. And again, should you get dropouts, crackles or glitches during playback, raise the Buffer Number setting on the Preferences–Audio device tab.
WAVELAB Installing and setting up 3 – 27

Temporary files
You also need to specify where WaveLab should store its temporary files. Temporary files are used for certain operations, such as WaveLab’s extensive Undo function (see “Undo and Redo” on page 47).
WaveLab allows you to specify up to three different folders for storing temporary files. If you have access to more than one drive, saving your temp files on separate drives (not partitions) can considerably speed up performance.
For example, if your source files are located on the C: drive, you could specify D:\temp and E:\temp as temporary folders.
This will not only improve performance, but also reduce disk fragmentation.
1.In Windows, create a separate folder in which to store your “temp” files.
The folder(s) should be on your fastest hard disk and you should make sure you have plenty of room available on that hard disk (or partition). Putting the “temp” files on a separate drive (that is, not the same drive as your regular files) will speed up file operations considerably.
2.Select “Folders…” from the Options menu.
This opens the Folders dialog, where you can edit how various WaveLab folders are handled (see “Folder editing” on page 731).
3.Click on the plus sign beside the “Temporary folders” item (this is located in the “Work folders” category).
Three possible folders can be specified for temp files.
4.Selecting one of the Temporary Folder items will show the current location where the temp files will be created in the Folder field to the right.
5.Either type in the path to the directory or you can browse the drives to locate and select the folder via a standard Windows file dialog.
Click OK to select a folder and exit the file dialog.
WAVELAB
3 – 28 Installing and setting up

Peak and view memories
A peak file is a small file with the extension “.gpk” automatically created by WaveLab each time a file is modified or opened in WaveLab (if it hasn’t been previously). The peak file contains information about the waveform, and determines how it is drawn in the wave window.
View memory files (extension “.mem”) store view information relating to a specific audio file such as window and scroll positions, etc., and optionally any Master Section effects used – see “Saving view settings” on page 124.
By default, peak files and view memory files are stored in the same folder as the related audio file. Setting this to another folder on a different drive will also improve performance to a certain degree. Regardless of whether this folder is on a different drive or not you also get the advantage of not having the audio file folder cluttered with non-audio files if a separate folder is used.
This folder can be specified from the Folders dialog, either directly or via the Preferences–Wave edit tab.
Select Preferences from the Options menu and select the Wave edit tab.
•If the “Save view settings in companion file” option is activated, view memory files will be saved in the same folder as the related audio file.
•If you select “Save in independent folder” you can click the “Edit” button, which will open the Folder dialog with the “Peak and view memories” work folder selected.
From here you can navigate to a new folder location to store the peak and view memory temp files.
WAVELAB Installing and setting up 3 – 29
Installing a CD/DVD recorder
Hardware installation/connection
For general instructions on installing internal or connecting external recorders via USB or Firewire, please refer to the instructions that came with the computer, or the recorder itself.
For WaveLab, please just check the following points:
•Make sure to have the latest firmware version installed in your recorder unit. For CD recorders, the firmware you have must support Disk-at-Once mode! In addition, running a unit with older firmware might for example prevent you from writing sub-index markers into the tracks.
Checking the installation of the CD/DVD recorder
You might want to check that the recorder unit was actually found by the program. Proceed as follows:
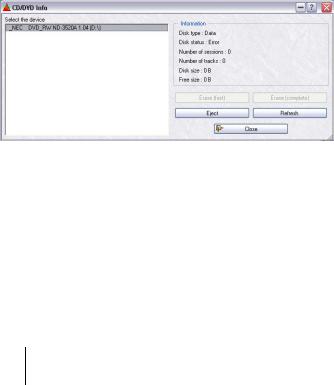
1.Select “CD/DVD Information…” from the Tools menu.
The CD/DVD Info dialog appears.
2.Check that your recorder unit appears in the list to the left.
The list will also contain any regular DVD-ROM drives, etc. If your CD/DVD recorder isn’t listed, there’s either something wrong with the installation or the unit is not supported by WaveLab.
WAVELAB
3 – 30 Installing and setting up
 Loading...