


Groove Agent - 5.0
Table of contents
 Loading...
Operation Manual

Matthias Klag, Michael Ruf
Cristina Bachmann, Heiko Bischoff, Christina Kaboth, Insa Mingers, Matthias Obrecht, Sabine Pfeifer, Benjamin
Schütte, Marita Sladek
This PDF provides improved access for vision-impaired users. Please note that due to the complexity and number
of images in this document, it is not possible to include text descriptions of images.
The information in this document is subject to change without notice and does not represent a commitment on
the part of Steinberg Media Technologies GmbH. The software described by this document is subject to a License
Agreement and may not be copied to other media except as
part of this publication may be copied, reproduced, or otherwise transmitted or recorded, for any purpose,
without prior written permission by Steinberg Media Technologies GmbH. Registered licensees of the product
described herein may print one copy of this document for their personal use.
All product and company names are ™ or ® trademarks of their respective owners. For more information, please
visit www.steinberg.net/trademarks.
© Steinberg Media Technologies GmbH, 2018.
All rights reserved.
Groove Agent_5.0.0_en-US_2018-11-01
specically allowed in the License Agreement. No

Table of Contents
4 Installation and Setup
4 Conventions
5 Installing the Program
5 Activating Your License
5 How You Can Reach Us
5 About the Documentation
6 Setting Up
8 Common Editing Methods
8 Dials and Sliders
8 Multi Selection and Parameter Controls
8 Buttons
9 Value Fields
9 Using Key Commands
10 Presets
12 Getting Started
12 Window Overview
13 Agents, Kits, Presets, and Content Files
14 Loading a Kit
15 Pattern and Instrument Pads
15 Browsing for MIDI Patterns and Styles
16 Playing back Pattern Pads
16 Converting Styles to MIDI Patterns
17 Modifying MIDI Patterns in the Pattern Editor
17 Creating the Different Sections of a Drum Track
18 Recording Trigger Notes for Your Patterns
18 Dragging Patterns into a Project
19 Editing Patterns in the DAW
20 Working with Multiple Agents
21 Recording the MIDI Output
22 Note Repeat
30 Decompose
33 Managing Your Sounds
33 Loading Kits
33 Kit Slot
34 Kit Rack
35 Kit Context Menu
36 Managing and Loading Files
50 Working With Pads
50 Pad Section
52 Renaming Pads
52 Using Different MIDI Channels/Ports for
Instrument Pads and Pattern Pads
53 Instrument Pads
59 Pattern Pads
90 Beat Agent
90 Beat Agent Sound Editing
133 Importing and Exporting Files
136 Acoustic Agent
136 Acoustic Agent Sound Editing
145 Percussion Agent
145 Percussion Agent Sound Editing
148 Mixing and Effect Handling
148 Beat Agent Mixer
149 Acoustic Agent Mixer
153 Percussion Agent Mixer
155 AUX Mixer
155 Kits Mixer
156 Master Mixer
156 Effect Handling
158 Effects Reference
158 Reverb Effects
161 Delay Effects
162 EQ Effects
164 Filter Effects
168 Distortion Effects
170 Modulation Effects
177 Dynamics Effects
186 Spatial and Panner Effects
187 Automation and MIDI Controllers
187 Automation
188 MIDI Controllers
190 Global Functions and Settings
190 Plug-in Functions Section
191 Plug-in Name and Steinberg Logo
191 Toolbar
192 Keyboard
193 Options Page
198 Using the Standalone Version of the Plug-In
198 Making Preferences Settings
198 Preferences Dialog
202 Selecting the MIDI Input and the Audio Output
202 Scratch Pad
204 Loading a MIDI File
204 Saving a MIDI File
205 Master Volume
206 Mixer Routing Diagrams
209 Index
3

Installation and Setup
Before you can use Groove Agent, you must install the program and the required content and set
up your system.
Conventions
In our documentation, we use typographical and markup elements to structure information.
Typographical Elements
The following typographical elements mark the following purposes.
Prerequisite
Requires you to complete an action or to fulll a condition before starting a
procedure.
Markup
Procedure
Lists the steps that you must take to achieve a specic result.
Important
Informs you about issues that might affect the system, the connected hardware, or
that might bring a risk of data loss.
Note
Informs you about issues that you should consider.
Example
Provides you with an example.
Result
Shows the result of the procedure.
After Completing This Task
Informs you about actions or tasks that you can perform after completing the
procedure.
Related Links
Lists related topics that you can nd in this documentation.
Bold text indicates the name of a menu, option, function, dialog, window, etc.
EXAMPLE
In the header of the plug-in panel, click the Preset Management button next to the preset name
eld and select Load Preset.
4

Installation and Setup
Installing the Program
If bold text is separated by a greater-than symbol, this indicates a sequence of different menus
to open.
Key Commands
Many of the default key commands, also known as keyboard shortcuts, use modier keys, some
of which are different depending on the operating system.
Many of the default key commands use modier keys, some of which are different depending on
the operating system. When key commands with modier keys are described in this manual, they
are indicated with the Windows modier key rst, followed by the macOS modier key and the
key.
EXAMPLE
Ctrl/Cmd-Z means: press Ctrl on Windows or Cmd on macOS, then press Z.
Installing the Program
After downloading the required les, you can install Groove Agent on your computer.
For detailed installation instructions, see https://www.steinberg.net/how-to-install-grooveagent-5.
Activating Your License
Groove Agent uses a software-based copy protection scheme. This Soft-eLicenser is installed
automatically with Groove Agent. It can be accessed via the eLicenser Control Center application
that is installed automatically with the product.
After installation, you must activate your product.
If you purchased Groove Agent in a shop, the product package contains a “Download Access
Code” that allows you to download both the software and the license of the product.
If you purchased the download version of Groove Agent, you receive an e-mail with the activation
code and a description of the activation process.
How You Can Reach Us
Click the Steinberg logo in the top right corner of the control panel to open a pop-up menu
containing items for getting additional information and help.
● This menu contains links to various Steinberg web pages. Select a link to open the
corresponding page. On the web pages, you can nd support and compatibility
information, answers to frequently asked questions, links for downloading new drivers,
etc.
About the Documentation
The documentation is available online and can be downloaded in PDF format from steinberg.help
To visit steinberg.help, enter steinberg.help in the address bar of your web browser or
●
open Groove Agent, click the Steinberg logo in the top right corner and select Help >
Groove Agent Help.
5

Installation and Setup
Setting Up
Setting Up
The following sections describe how to use Groove Agent as a plug-in in different host
applications.
NOTE
Groove Agent can also be used as a standalone application.
Selecting Outputs
Groove Agent loads with a stereo output conguration by default. However, you can use up to 32
stereo outputs in the Steinberg DAW. This allows you to route all kit slots to a dedicated channel
in the MixConsole.
PROCEDURE
1. To make the outputs available in the VST instrument, open the VST Instruments window.
2. Click the Activate Outputs button for the instrument.
3. Activate the outputs that you want to use.
RESULT
The Steinberg DAW automatically adds an output channel for each additional output to the
MixConsole.
Using the Instrument in an AU-Compatible Application
The AU version of Groove Agent is installed in your AU plug-ins folder and lets Groove Agent
work in an AU environment without any performance loss or incompatibilities.
For example, to load Groove Agent as an AU instrument for Logic Pro, proceed as follows:
PROCEDURE
1. Open the Track Mixer and select the instrument channel that you want to use.
2. Click in the I/O eld and select AU Instruments > Steinberg > Groove Agent.
3. Select one of the available channel congurations.
Using the Instrument in an AAX-Compatible Application
The AAX version of Groove Agent is installed in your AAX plug-ins folder and makes Groove Agent
available as AAX instrument in ProTools.
PROCEDURE
1. To use Groove Agent as stereo multichannel plug-in, open the Track menu, and select
New > Stereo > Instrument Track.
2. On the instrument track, click Inserts and select Groove Agent from the multichannel
plug-in > Instrument submenus.
Using the Instrument as Standalone Application
Groove Agent can be used as a standalone application, independently of any host application. In
this case, you can connect the instrument directly to your audio hardware.
6

Installation and Setup
Setting Up
RELATED LINKS
Using the Standalone Version of the Plug-In on page 198
7

Common Editing Methods
Dials and Sliders
Dials and sliders can be unidirectional or bidirectional. Unidirectional values, for example level
values, start at a minimum value and go up to the maximum. Bidirectional controls start from the
middle position and go to the left for negative and to the right for positive values.
Most of the editing methods are the same for dials and sliders.
● To adjust a value, click a dial or a slider and drag up and down, or use the mouse wheel.
If you press Alt when clicking a dial, a small slider appears, allowing you to set the
parameter.
● To make ne adjustments, press Shift and move the dial or use the mouse wheel.
● To restore the default value for a parameter, press Ctrl/Cmd and click on the control.
Multi Selection and Parameter Controls
To edit multiple pad parameters at the same time, select the pads that you want to edit.
If several pads are selected and they are not set to the exact same values, most of the controls
indicate this by turning red. This is true for dials, on/off buttons, combo boxes, value elds, and
text faders.
NOTE
More complex controls, such as the envelope editors, only show the values of the focused pad.
Adjusting Value Ranges
You can adjust the value range of a parameter using the corona of the encoder. The values for
the pads are distributed within the new range, keeping their relative distances.
● To compress or expand the value range, drag the corona.
● To adjust the upper limit of the range, hold down Ctrl/Cmd and drag the corona.
● To adjust the lower limit of the range, hold down Alt and drag the corona.
Buttons
On/Off Buttons
These buttons have two states: on and off. If you move the mouse over an On/Off button, it
changes its appearance to show that you can click it.
8
Common Editing Methods
Value Fields
Push Buttons
Push buttons trigger an action and then go back to their inactive state. These buttons open
menus or le dialogs.
Value Fields
To set a value, you have the following possibilities:
● Double-click in a value eld, enter a new value, and press Enter.
If the entered value exceeds the parameter range, it is automatically set to the maximum
or the minimum value, respectively.
● Click in the value eld and drag up or down.
● Position the mouse over a value eld and use the mouse wheel.
● Click the up/down triangles next to the eld.
● To set the parameter to its default value, Ctrl/Cmd-click the value eld.
● To use a fader to adjust the value, Alt-click a value eld.
● To enter musical values, such as key ranges or the root key, with your MIDI keyboard,
double-click the value eld, press a key on your MIDI keyboard, and press Return.
● To navigate to the next parameter, press Tab. To jump backwards to the previous
parameter, press Shift-Tab.
If no parameter is selected inside the focused view, pressing Tab always jumps to the rst
parameter.
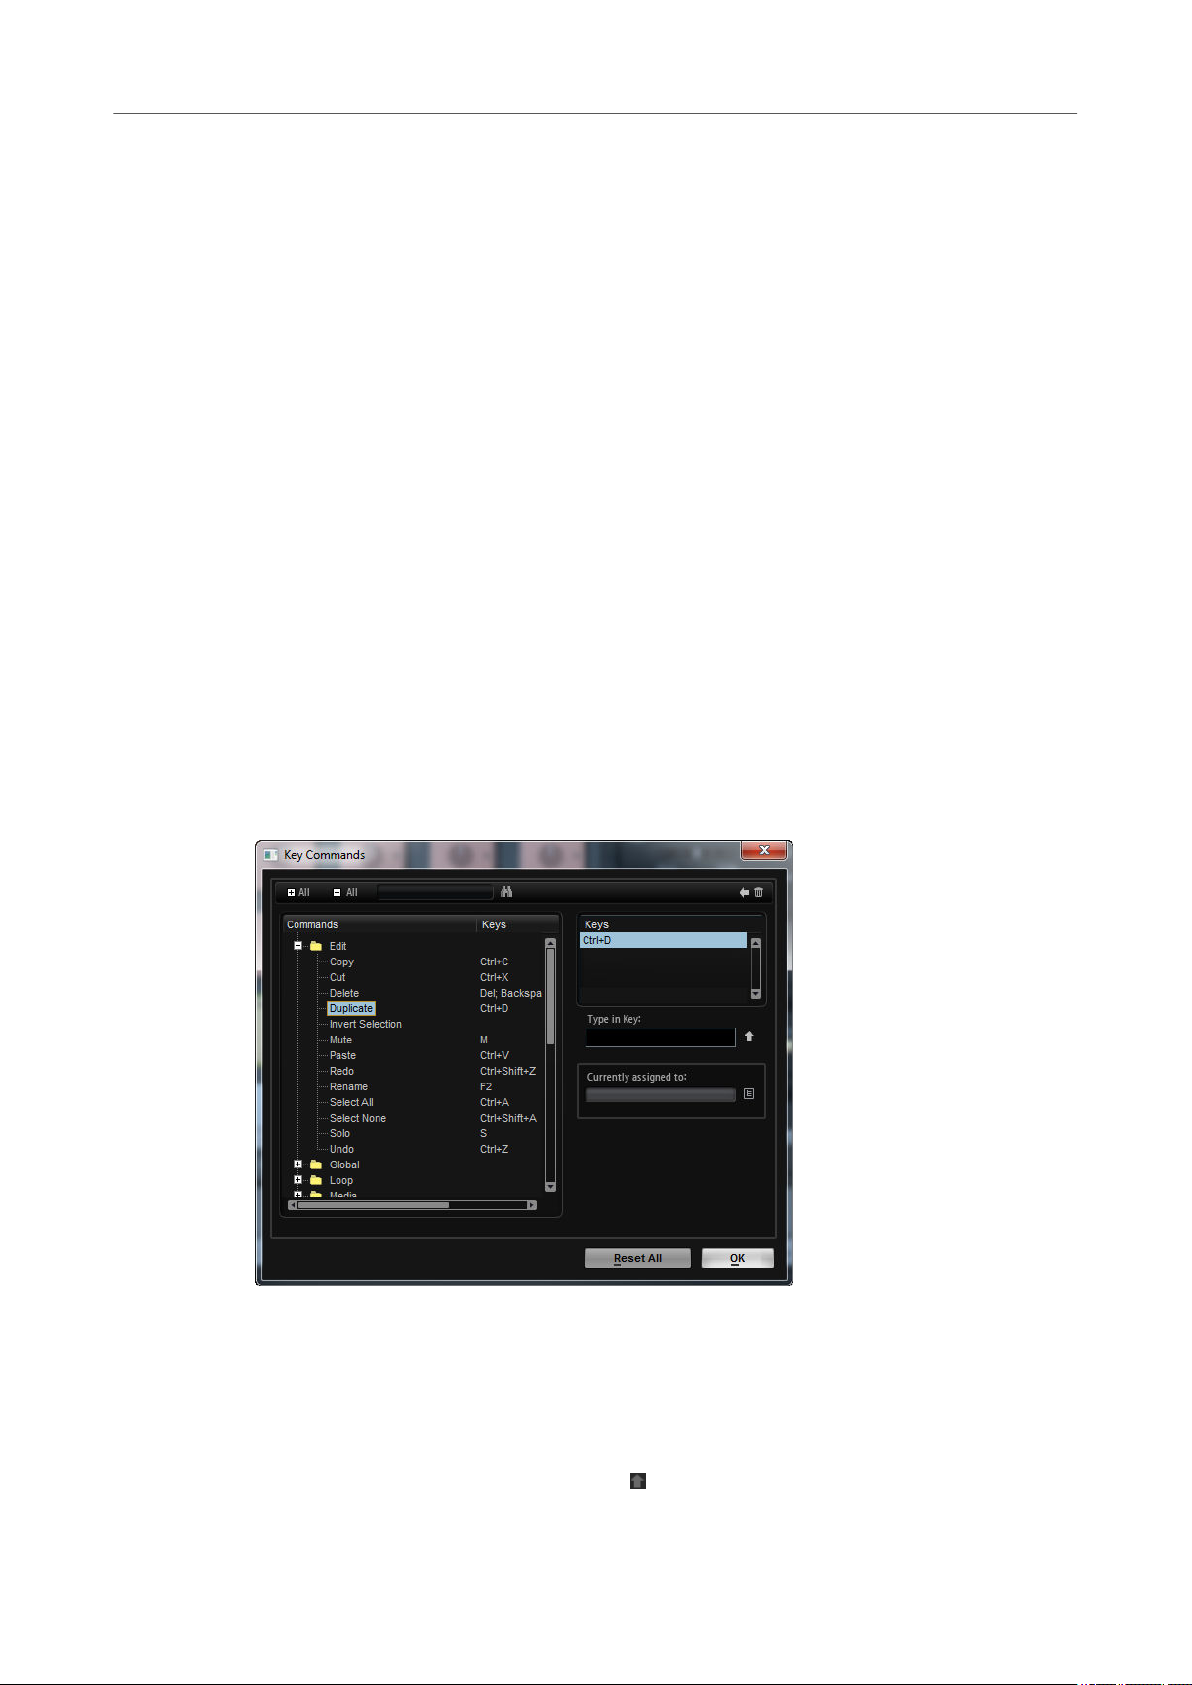
Using Key Commands
● To open the Key Commands dialog, open the Options page and click the Key Commands
button.
The commands are arranged in a hierarchical folder structure on the left. When you open a
category folder, the items and functions are displayed with any currently assigned key
commands.
● To set up a key command, select the function in the list, enter the key command in the
Type in Key eld and click the Assign button to the right of the eld. If this key
command is already used for another function, this is displayed in the
9
eld below.
Common Editing Methods
Presets
● To delete a key command, select the function in the list, select the key command in the
Keys list and click the Delete button.
● To search for a specic function, enter its name in the search eld at the top of the dialog
and click the
NOTE
You can set up several key commands for the same function.
Presets
Groove Agent offers two types of presets: section/module presets and VST presets. Section and
module presets store and recall the setup of a specic component on the Groove Agent panel.
VST presets contain all information necessary to restore the complete state of the plug-in.
During setup, the factory presets are installed in a dedicated folder and a user folder is created
for your own presets. The handling of presets is the same throughout the program.
NOTE
Factory presets are write-protected, but may be overwritten when a software update is executed.
Presets in your user folder are never changed by the software update.
Start/Continue Search button.
Handling Section and Module Presets
The preset controls can be found throughout the program. The handling is always the same.
● To save a preset, click Save .
NOTE
You cannot overwrite factory presets. If you want to save changes made to a factory
preset, save the preset under a new name or in a new location.
● To load a preset, click the arrow icon and select a preset from the list.
● To delete a preset, click Delete .
NOTE
Factory presets cannot be deleted.
Handling VST Presets
Loading VST Presets
PROCEDURE
1. In the header of the plug-in panel, click the Preset Management button next to the preset
name eld and select Load Preset.
2. Do one of the following:
Select a preset to load it.
●
Double-click a preset to load it and close the preset loader.
●
10

Common Editing Methods
Presets
Saving VST Presets
PROCEDURE
● In the header of the plug-in panel, click the Preset Management button next to the preset
name eld and select Save Preset.
11
Getting Started
These sections help you to get started with Groove Agent and introduce program functions and
settings.
Window Overview
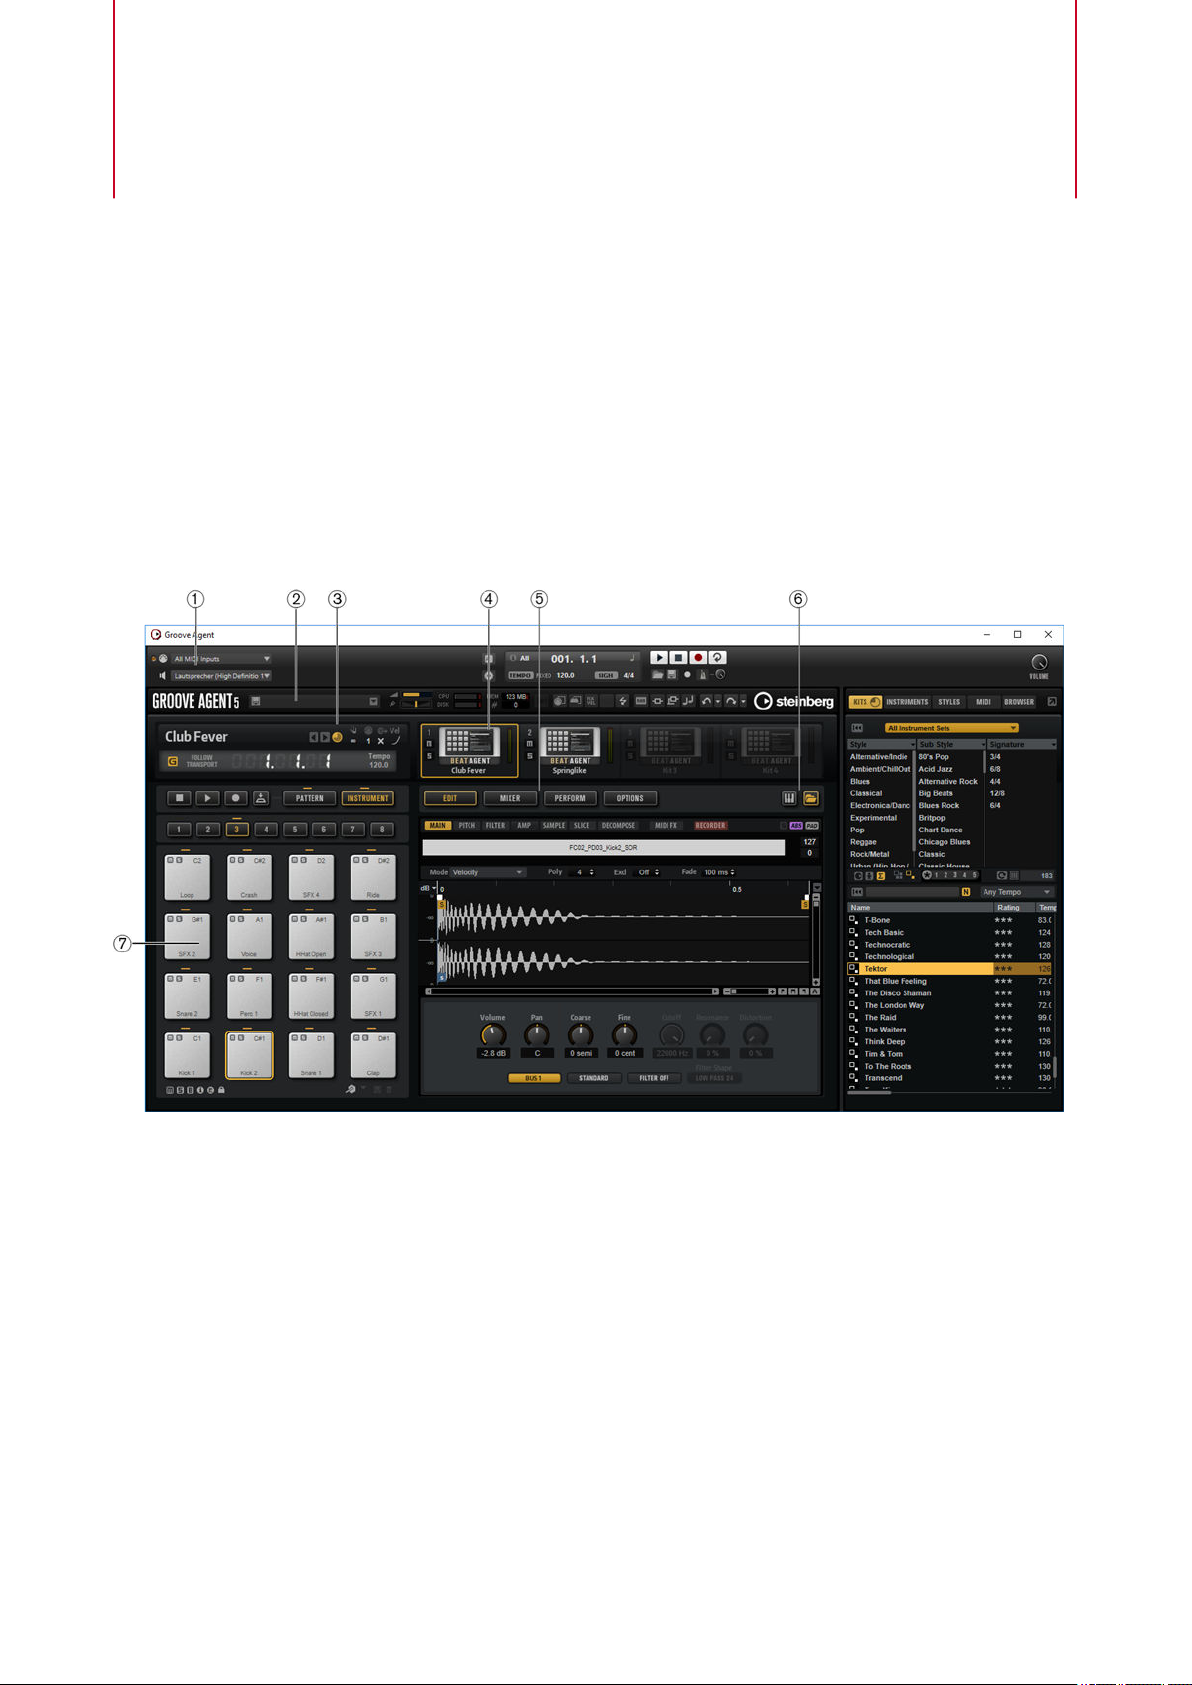
The Groove Agent window is divided into several sections.
1 In the standalone version of Groove Agent, you nd a number of additional functions in an
extra section at the top of the application window.
2 If you use the plug-in in a host application, you nd the plug-in functions section at the top
of the window.
3 Below the plug in-functions section on the left, the kit slot is located.
4 On the right of the kit slot, you nd the kit rack.
5 The edit display on the right contains the Edit, Mixer, Perform, and Options pages.
6 With the two buttons at the top right of the edit display, you can expand the window to
show a keyboard at the bottom, and/or the Load panel at the right.
7 On the left of the edit display, you can nd the pad section.
RELATED LINKS
Kit Slot on page 33
Kit Rack on page 34
12

Getting Started
Agents, Kits, Presets, and Content Files
Using the Standalone Version of the Plug-In on page 198
Agents, Kits, Presets, and Content Files
Groove Agent comes with a variety of content that can be loaded and edited. At the top of the
hierarchy, you can load kits or multis. Further down the hierarchy, you can load and edit MIDI
patterns, styles, drum samples, etc.
Agents
Groove Agent combines the creative power of different rhythm modules: Acoustic Agent, Beat
Agent, and Percussion Agent.
Each of these modules offers its own approach to drums and rhythms, with special ways of
creating your own inspiring beats in a huge range of styles.
The creative potential of each agent can be combined with any of the others. Four slots allow you
to mix and match your ideal rhythm section or create ultra-modern hybrid beats, for example.
Kits
Kits are loaded to play the sounds in Groove Agent. They contain all information that is required
to produce the sound of the selected drum kit, that is, about the sliced loop and the MIDI phrase
that is needed to play back the loop, about the used MIDI patterns or styles, and about the insert
effects that are used on the mixer channel.
You can save and load kits via the kit rack or the kit slot section.
Furthermore, kits contain information on the agent that the kit uses. In the Load dialog and on
the Kits tab in the Load panel, kits are identied by the kit preset icon .
VST Presets
VST presets contain all Groove Agent settings, that is, all information necessary to restore the
complete state of the plug-in. This includes all 4 kits, the MIDI patterns or styles, as well as any
insert and AUX effects. All of these settings are also saved with the project in your host
application. You can load VST presets via the pop-up menus in the plug-in header and in the
plug-in functions section. In the Load dialog, these presets are identied by the VST preset icon
.
Content Files and Folder Structure
Groove Agent comes with a large number of ready-to-use sound content les, containing kits,
patterns, styles, and presets. Factory kits are write-protected. You can edit those les while they
are loaded, but you cannot overwrite them.
To save your modications to a factory kit, save the le under a new name. The le gets the le
name extension .vstpreset and is saved with your user content. User content can be searched
and categorized in the same way as factory content. User content is saved in a
structure on your hard disk. You can create subfolders within this structure to facilitate moving
or exchanging content.
MIDI Patterns
MIDI patterns contain information on notes and drum sounds and the rhythm in
which they are played.
predened folder
Styles
Styles are complex structures of multiple patterns suited to create different parts of
the drum tracks, for example, main pattern, ll, ending, and intro.
You can manage your user MIDI patterns and styles, for example by adding new subfolders to
the folder structure, by moving or removing MIDI
13
les, etc. To access the folder where the user
Getting Started
Loading a Kit
MIDI patterns or styles are saved, right-click the pattern or style, either in the Load panel or the
Load dialog and select Show in Explorer/Finder. In this location, you can add, remove and
rename les and create subfolders to organize your MIDI patterns.
Groove Agent ONE Content
Groove Agent can load Groove Agent ONE presets. The presets can either be loaded as kits in the
kit rack or the kit slot section or as plug-in presets via the preset management menu in the plugin header.
If you load a Groove Agent ONE preset as a plug-in preset, the global plug-in parameters are set
to the default values.
If you load a preset as a kit, the global plug-in parameters remain unchanged.
Loading a Kit
To be able to hear a sound, you need to load a kit into Groove Agent.
PROCEDURE
1. Select a kit slot in the kit rack.
2. Open the Load panel and select the Kits tab.
3. On the Select Content Set pop-up menu at the top of the page, select a content set.
4. In the attribute columns, specify the sound that you want to use, by selecting a musical
style, sub style, etc.
5. In the results list, select a kit and double-click it or drag it onto the kit slot.
RELATED LINKS
Managing and Loading Files on page 36
14

Getting Started
Pattern and Instrument Pads
Pattern and Instrument Pads
In Groove Agent, you can edit both the sounds and the patterns that are used by your drum
tracks. Instrument sounds can be accessed via the instrument pads. The pattern or style that is
played can be edited via the pattern pads.
To switch between the instrument pads and the pattern pads, click the corresponding
●
button above the pads.
Instrument Pads
If the instrument pads are shown, the pads trigger the instrument samples and you
can edit the sound of the instruments. These instruments are then used by the
pattern pads to play the selected MIDI pattern or style.
Pattern Pads
If the pattern pads are shown, the pads trigger the selected MIDI pattern or style.
●
MIDI patterns contain information on notes and drum sounds and the
rhythm in which they are played.
●
Styles are complex structures of multiple patterns suited to create different
sections of the drum tracks, such as,
lls, endings, and intros.
Browsing for MIDI Patterns and Styles
The Load panel allows you to browse for patterns and styles and assign them to the pattern
pads.
PREREQUISITE
Show Pattern Pads is activated on the left.
PROCEDURE
1. Depending on the le type that you want to load, select the Styles or MIDI page.
2. On the Select Content Set menu, select the content set from which you want to load a le.
To browse the entire content, select All.
3. Optional: In the upper section of the page, click on an attribute to display only those les
containing the attribute, for example, percussion, or a specic musical style, etc.
You can activate several attribute lters simultaneously.
4. If you are looking for a specic le, enter its name in the text search eld on the toolbar.
You can also enter text that is part of the le name or the le attributes in the search eld.
5. Use the transport controls below the results list to prelisten the results.
6. Step through the les in the results list and listen to them until you found the le that you
want to use.
7. Drag the le onto a pad.
8. Repeat the above steps to assigning more les to other pads.
RELATED LINKS
Prelistening Patterns and Styles on page 41
Prelisten Section for MIDI Patterns and Styles on page 40
15
Getting Started
Playing back Pattern Pads
Playing back Pattern Pads
You can play back pattern pads using the MIDI Player or the Style Player. The MIDI player
allows you to play and modify one pattern. The style player offers a variety of patterns, suited to
create the different sections of your drum tracks.
PROCEDURE
1. Load an Acoustic Agent kit.
2. Open the Pattern page and click on an empty pattern pad.
If a pattern pad is empty, it also plays the instrument sound.
3. To activate the pattern pad and make it play the pattern, open the Edit page in the right
section of the plug-in panel and click Pad On/Off in the top right so that it lights up.
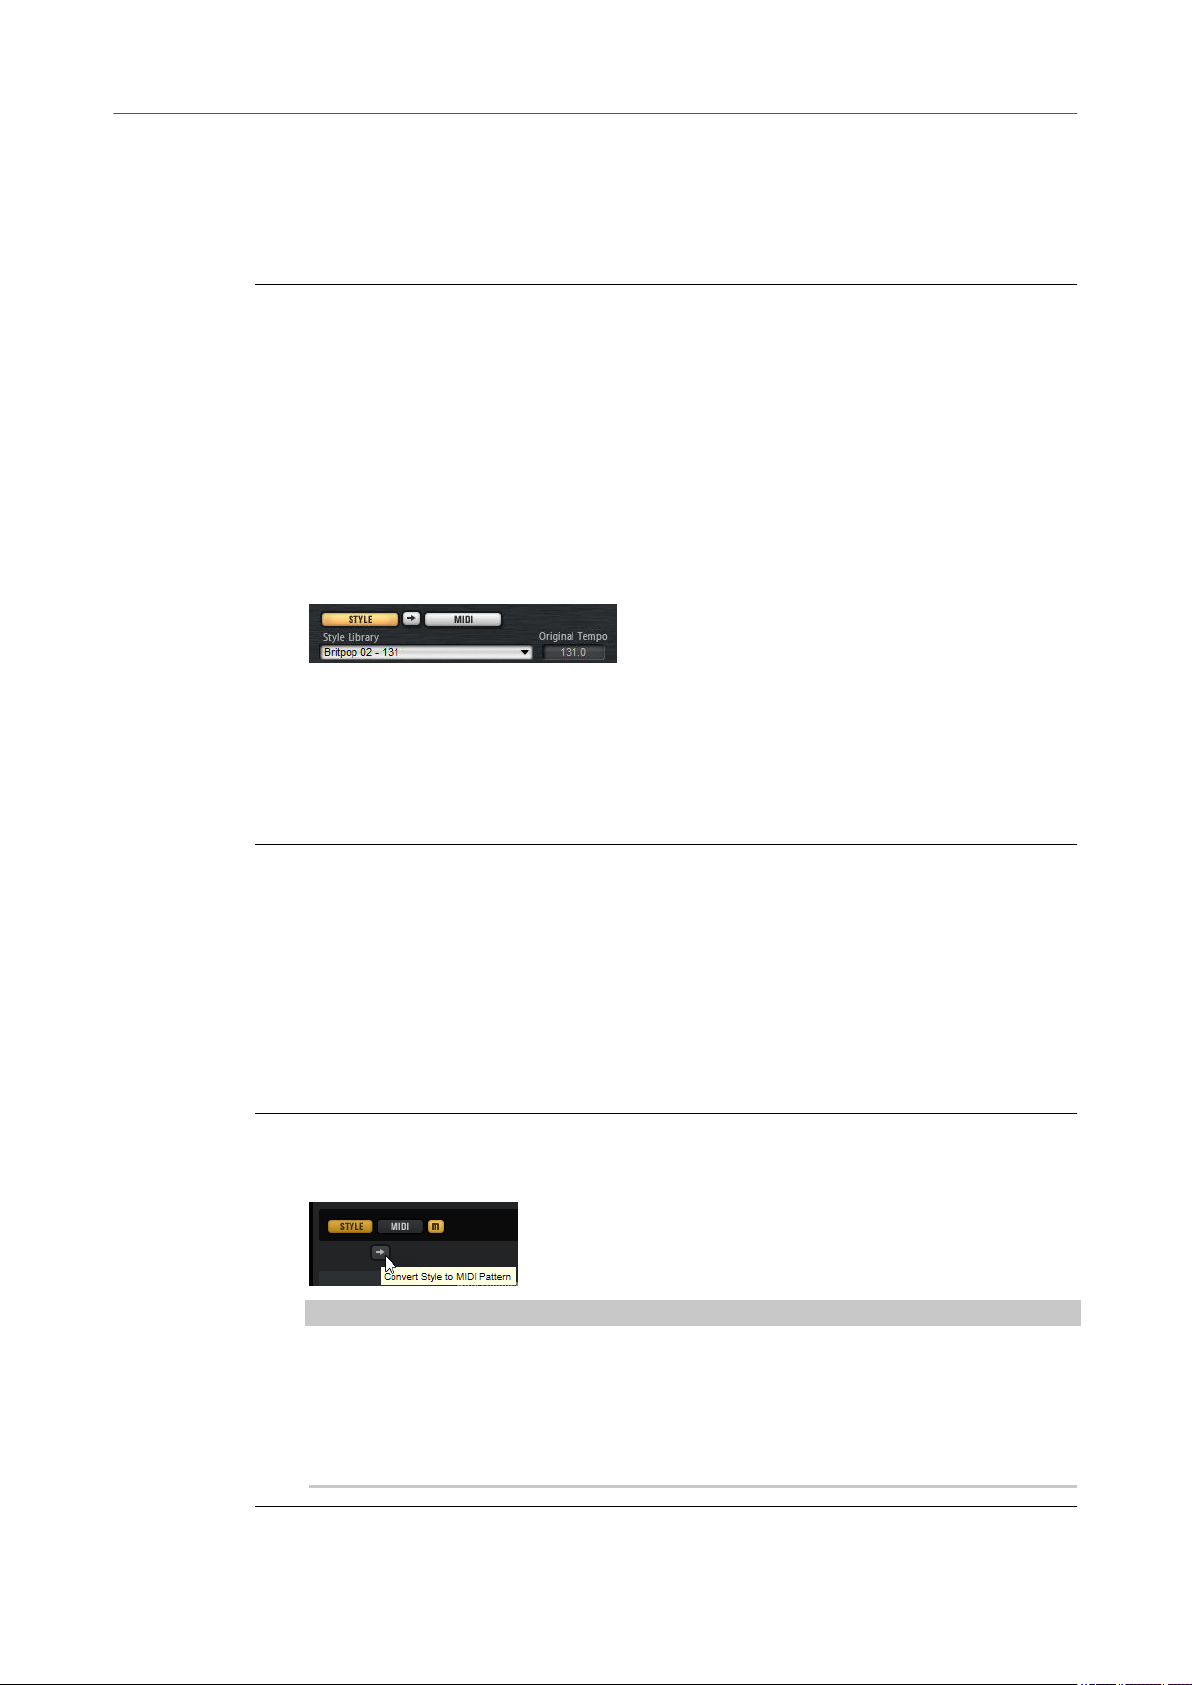
4. Click the Use Style button to activate the style player, and select a style from the Select
Style pop-up menu.
5. Adjust the tempo in the DAW to match the tempo of the style.
The original tempo of the style is indicated by the second number in the le name of the
style and in the value eld to the right of the Select Style pop-up menu.
6. Click the Play button in the transport section to play back the style.
7. Try out different Quantize and Swing settings, move the Complexity slider, select a main
pattern, a
8. Keep the settings as they are and select different styles on the Pattern Library pop-up
menu in the Pattern section to compare the sound and to nd the style that you want to
use.
ll, an ending, etc., and listen to the results.
Converting Styles to MIDI Patterns
If you have found an acoustic or a percussion style that you want to use on your pad, but want to
edit it further in the Pattern editor, you must convert it to a MIDI pattern rst.
PREREQUISITE
● In the pad section on the left, the pad that contains the style is active.
● You have set up the style on the Agent page so that it plays the way you want it.
PROCEDURE
● Click Convert Style to MIDI Pattern on the Agent page to convert the current style into a
MIDI pattern.
NOTE
The conversion takes into account all the settings in the Performance section, with one
exception: If you convert a percussion style, Random Complexity is not taken into
account.
If you convert an acoustic style, only the active part of the style, that is, the selected main,
ll, intro, or ending is converted.
16

Getting Started
Modifying MIDI Patterns in the Pattern Editor
RESULT
The style is converted and the Agent page automatically switches to the MIDI player. The Pattern
editor becomes available, allowing you to modify the pattern.
NOTE
Once a style is converted to a MIDI pattern, it can no longer be opened in the style player.
Modifying MIDI Patterns in the Pattern Editor
In the Pattern editor, you can modify patterns by adding or deleting notes, by replacing a drum
sound with another, etc.
PROCEDURE
1. Click the Pattern tab in the edit display to open the Pattern editor.
2. Edit the pattern. You can for example insert new notes for an existing or for a new drum
sound, delete notes or move notes.
RELATED LINKS
Entering, Editing, and Previewing Notes on page 85
Creating the Different Sections of a Drum Track
To create the different sections of your drum track, for example, an intro, a ll, a main part, and
an ending, it is useful to start by copying the current style to other pads. And then, to modify the
style for those pads.
PREREQUISITE
You have set up a pattern pad to play back a style.
PROCEDURE
1. To copy the settings of the current pad to another pad, hold down Alt and drag the pad
onto another pad.
2. Repeat this until you have four pads with the same settings.
3. Select the second pad. Set the dial to a ll.
You can choose between eight lls.
4. Set up the ll to your liking. For example, change the complexity, activate half-time, try out
different intensity settings, etc.
5. When you are done, right-click the pattern pad, select Rename Pad from the context
menu, and enter a name for the pad, for example
6. Set up the pads for intro and ending in the same way.
Fill.
17

Getting Started
Recording Trigger Notes for Your Patterns
AFTER COMPLETING THIS TASK
You can now record trigger notes for the pads in the DAW or transfer the patterns to the DAW by
dragging them into a project.
RELATED LINKS
Pattern Editor on page 81
Converting Styles to MIDI Patterns on page 16
Dragging Patterns into a Project on page 18
Recording Trigger Notes for Your Patterns on page 18
Recording Trigger Notes for Your Patterns
When you use Groove Agent in a DAW project, you can record trigger notes at the positions
where you want to trigger the patterns. This allows you to create the drums for your project on
the y, in the project context.
PREREQUISITE
You have created a project in your DAW to which you want to add a drum track.
You have added a MIDI track that is assigned to Groove Agent.
PROCEDURE
1. In Groove Agent, set up the MIDI patterns or styles for your drum track.
2. In the DAW, record-enable the MIDI track and start playback of your project.
3. Record the trigger notes at the positions in the project where you want to hear the drums.
RESULT
When you now play back the project, the trigger notes trigger the pattern playback. You can
automate parameters like Complexity and Intensity from within the DAW. Any changes that you
make to a pattern in Groove Agent are automatically reected in all occurrences of this pattern in
the project.
Dragging Patterns into a Project
You can drag patterns from Groove Agent into your DAW project and edit them there.
PREREQUISITE
You have created a project in your DAW to which you want to add a drum track.
You have added a MIDI track that is assigned to Groove Agent.
Before you drag your patterns into a project, check whether the pattern pads are mapped to the
same keys as the instrument pads. If this is the case, the trigger notes of the pattern pads
interfere with the notes that are part of your pattern pads. To prevent this, you can either set up
a different MIDI port or a different MIDI channel for the pattern pads.
PROCEDURE
1. In Groove Agent, set up the MIDI patterns or styles for your drum track.
2. Select the pad that plays the pattern that you want to use and drag it onto the MIDI track
at the position where you want to insert it.
3. In the same way, drag the other pads into the project until you have assembled your drum
track.
18

Getting Started
Editing Patterns in the DAW
RESULT
The patterns are inserted as MIDI parts on the track. When you play back the project, the drum
parts are played back as well.
RELATED LINKS
Using Different MIDI Channels/Ports for Instrument Pads and Pattern Pads on page 52
Editing Patterns in the DAW on page 19
Editing Patterns in the DAW
When you have created MIDI parts from your Groove Agent patterns, you can further edit the
parts in the DAW.
PREREQUISITE
You have assigned a MIDI track in your DAW to Groove Agent.
You have dragged your patterns to this track.
PROCEDURE
1. In the Inspector of your Steinberg DAW, open the Drum Map pop-up menu for the track
and select Create Drum Map from Instrument.
This creates a drum map based on the information about the used drum sounds in Groove
Agent.
2. Open the part in the Drum Editor.
The editor displays the correct drum names in the drum names list on the left. In the event
display on the right, the MIDI notes are shown.
3. Set up the pattern by deleting or entering notes, by copying or moving notes, etc.
For information about how to edit notes and controllers in the Drum Editor, refer to the
Operation Manual for your Steinberg DAW.
19
Getting Started
Working with Multiple Agents
Working with Multiple Agents
Using multiple agents allows you to add drums of different styles to your drum track, for
example, to add percussion to your acoustic drums.
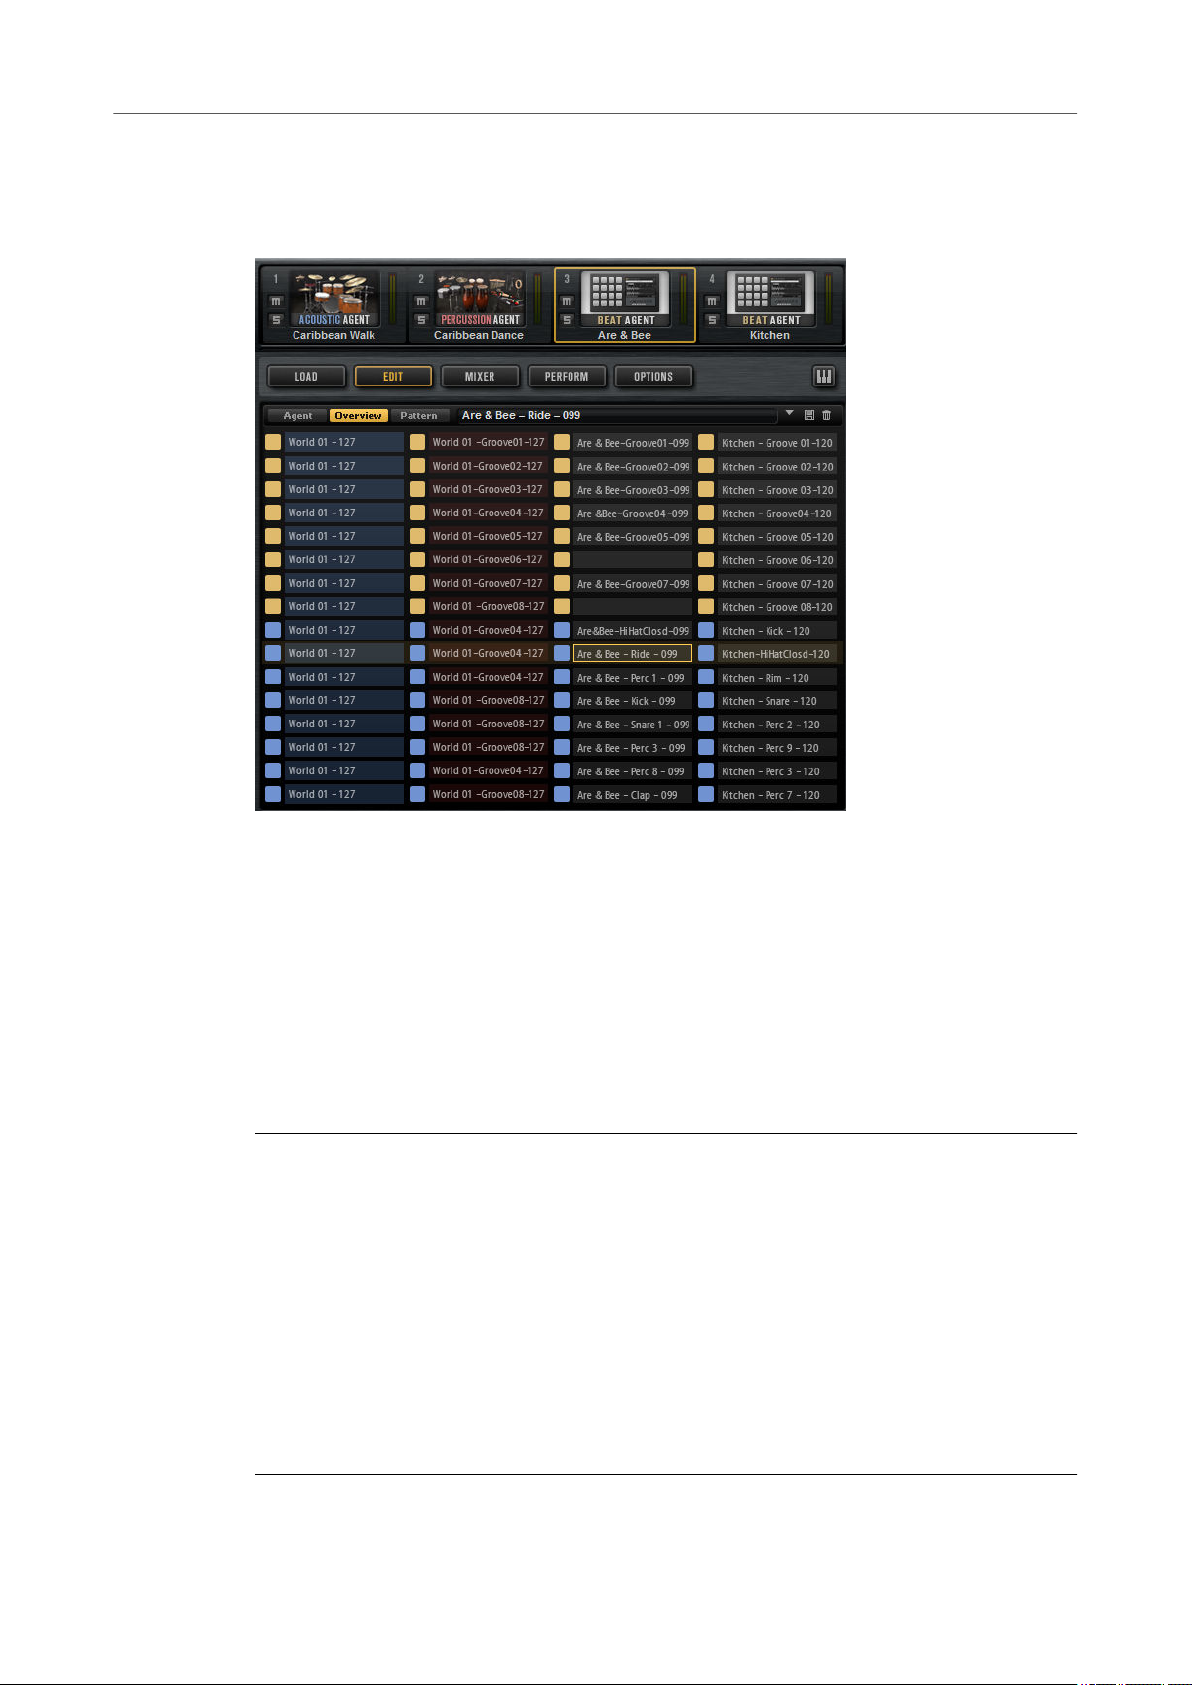
When working with multiple agents, the Overview page shows you exactly which kit contains
which patterns, to which pads the patterns are mapped, and which patterns are played
simultaneously. The four columns correspond to the four kits in the kit rack. The 16 slots
represent the pattern pads of the selected pattern group.
Adding a Second Agent to Complement the First Agent
You can set up the kits for two different agents to play styles that complement each other.
Some of the Percussion Agent styles were created to be used with Acoustic Agent styles. These
styles are found in the Complements folder of the Select Style pop-up menu for the style player
in
Percussion Agent.
PROCEDURE
1. For the rst kit slot in the kit rack, open the Kits tab in the Load section.
2. Deactivate Load Kit with Patterns or Styles and load an Acoustic Agent kit.
3. For the second kit slot, load a Percussion Agent kit, also without patterns.
4. Select a pattern pad from the rst kit, open the Agent page, activate the pad and select
the style player.
5. Select the style Acid Jazz 01 for the pattern pad.
6. Select the main pattern and adjust the complexity to your liking.
7. Select the second kit, open the Select Style pop-up menu, navigate to the Complements
folder, and select a style from the Acid Jazz 01 folder.
The instrument sounds for this kit are received on MIDI channel 2.
20

Getting Started
Recording the MIDI Output
RESULT
Now, the pattern pads for Acoustic Agent and Percussion Agent trigger matching styles.
● To listen only to the patterns of one kit, deactivate the patterns of the other kit on the
Overview page or mute the sounds of the second kit in the corresponding Agent mixer.
Adding a Second Agent to Fatten the Sound
You can fatten the sound of your current drum kit by adding a kit from another agent that does
not contain its own patterns, but that adds to the patterns of the rst kit.
PREREQUISITE
You have loaded a kit in the rst kit slot and set it up to play the way you want it.
PROCEDURE
1. Select the second kit slot in the kit rack and open the Kits tab in the Load section.
2. Deactivate Load Kit with Patterns or Styles .
3. Load a kit in the second slot.
4. On the Overview page, copy the patterns or styles of the rst agent to the second agent.
This way, the same groove is played by both kits.
5. To accentuate only particular drum sounds, for example, snare or kick drums, make sure
that only these drum sounds are used for the pads.
This way, the unused instrument pads do not play back any samples. Do one of the
following:
● Reset the instrument pads for all drum sounds that you do not want to use.
● Edit the MIDI patterns for the drum sounds that you want to use, so that it contains
only the notes that you want to play.
6. If you use Beat Agent kits, you can load your own drum samples to customize your drum
sounds even further.
RELATED LINKS
Assigning Samples to Pads on page 92
Recording the MIDI Output
If the host application supports MIDI output from plug-ins, you can record the MIDI output on a
track in your DAW.
The kits in the kit rack are routed to the MIDI output ports Kit 1 to Kit 4.
PROCEDURE
1. In Groove Agent, load one or more kits with patterns.
2. In the DAW, create one or more MIDI tracks.
3. On the MIDI input pop-up menu for each track, select one of the four kit outputs.
4. Record-enable the tracks.
5. If you have not recorded trigger notes in the DAW, select the patterns that you want to use
for the kits on the Pattern page and activate Follow Transport in the kit slot section.
6. In the DAW, activate recording.
21

Getting Started
Note Repeat
RESULT
The MIDI output of the kits is recorded on the tracks for which Groove Agent is selected as MIDI
input.
NOTE
Under VST2 hosts, the kits send their events only to the rst MIDI output port. If you do not want
to record all loaded kits, deactivate MIDI output for the kits that you do not want to use in the kit
slot section.
AFTER COMPLETING THIS TASK
You can now separate the recordings for the kits by dissolving the recorded MIDI part according
to MIDI channel. The channel number of the events of a kit corresponds to the MIDI channel that
is set in the kit slot section.
Note Repeat
Note Repeat allows you to repeat the notes of a particular drum sound.
In its most basic form, Note Repeat plays the current note with its velocity and note length over
and over again. Additionally, Note Repeat allows you to specify the note length, based on note
values or on milliseconds, and to
dene the velocity of the notes.
Using the phrase player, you can set up a complex series of repeat notes, specify both a velocity
and a pitch progression for the notes, and create your own rhythmic patterns.
Each kit comes with its own Note Repeat settings. This allows you to simultaneously perform
note repeats for different instruments of multiple kits on dedicated MIDI channels.
The Note Repeat notes are also sent to the MIDI output of Groove Agent, allowing you to trigger
external plug-ins, or to record the notes in your host sequencer. Furthermore, if you are working
with Beat Agent, you can use the pitch curve to modulate the pitch of your samples.
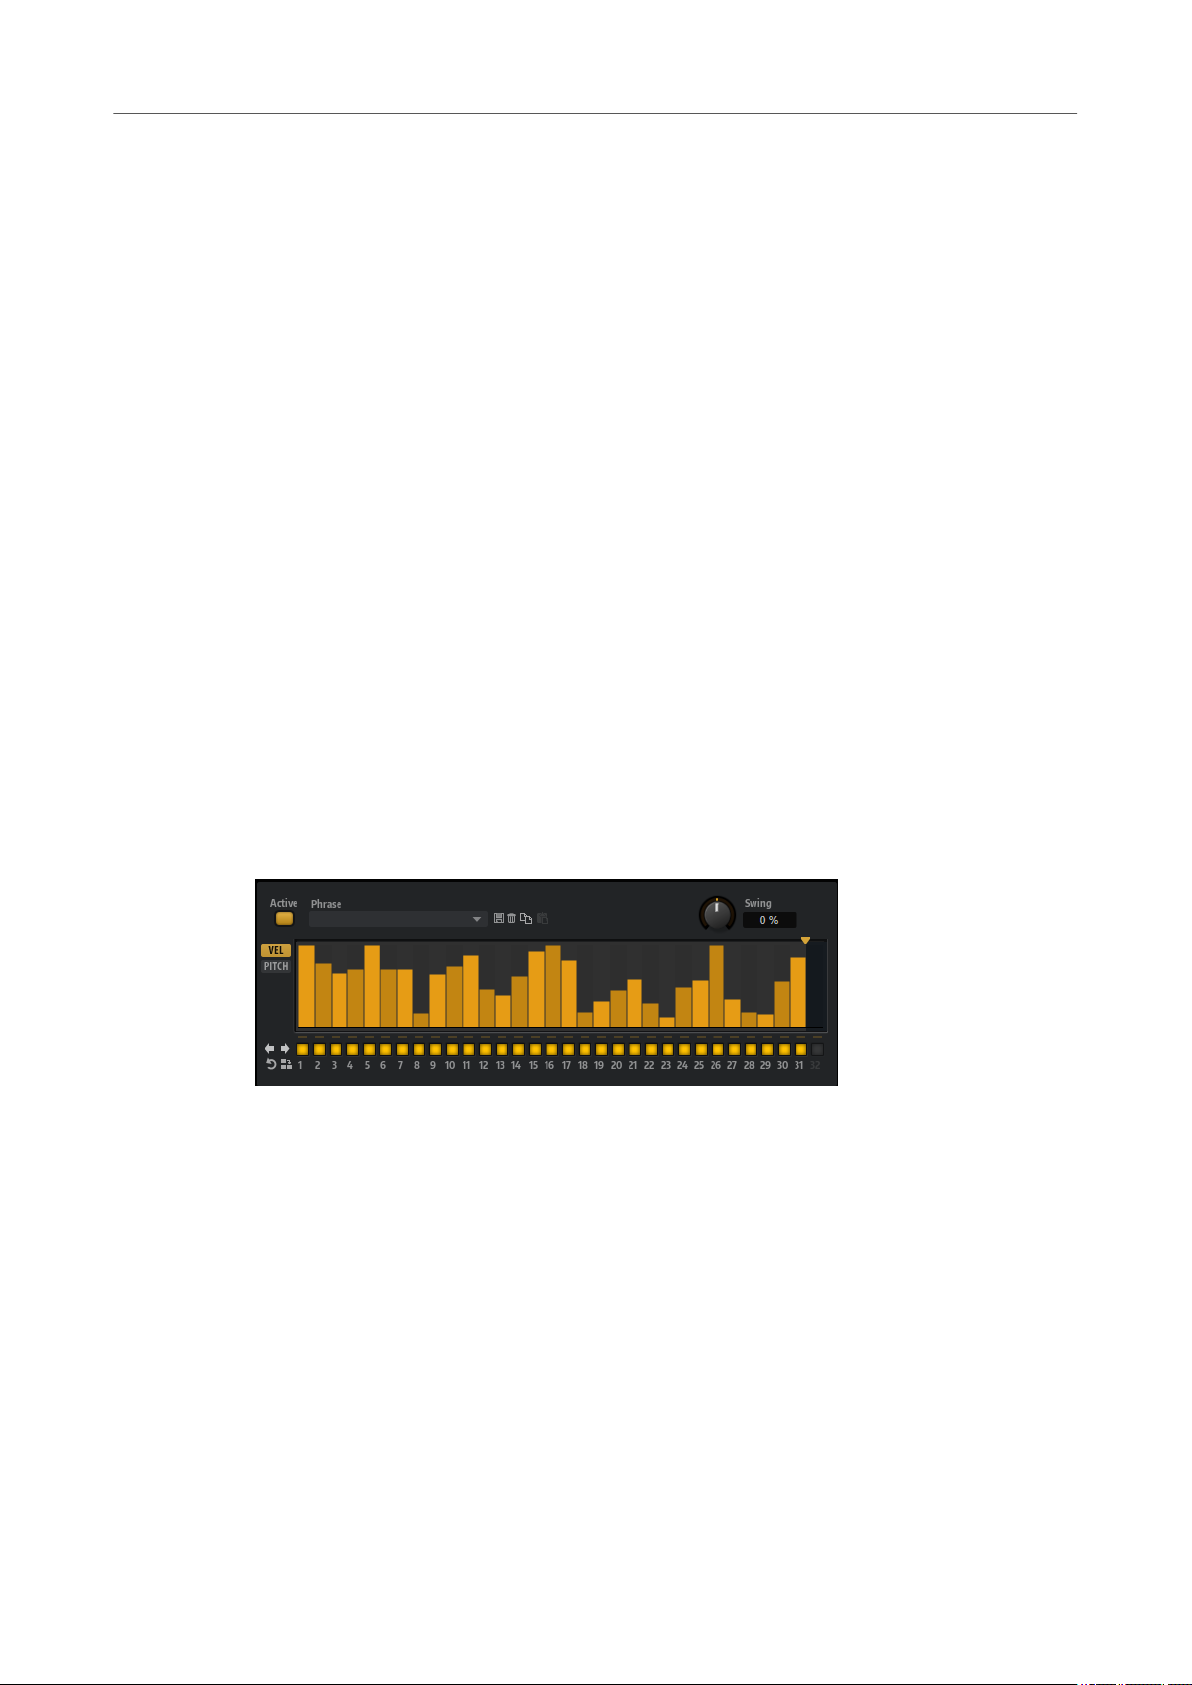
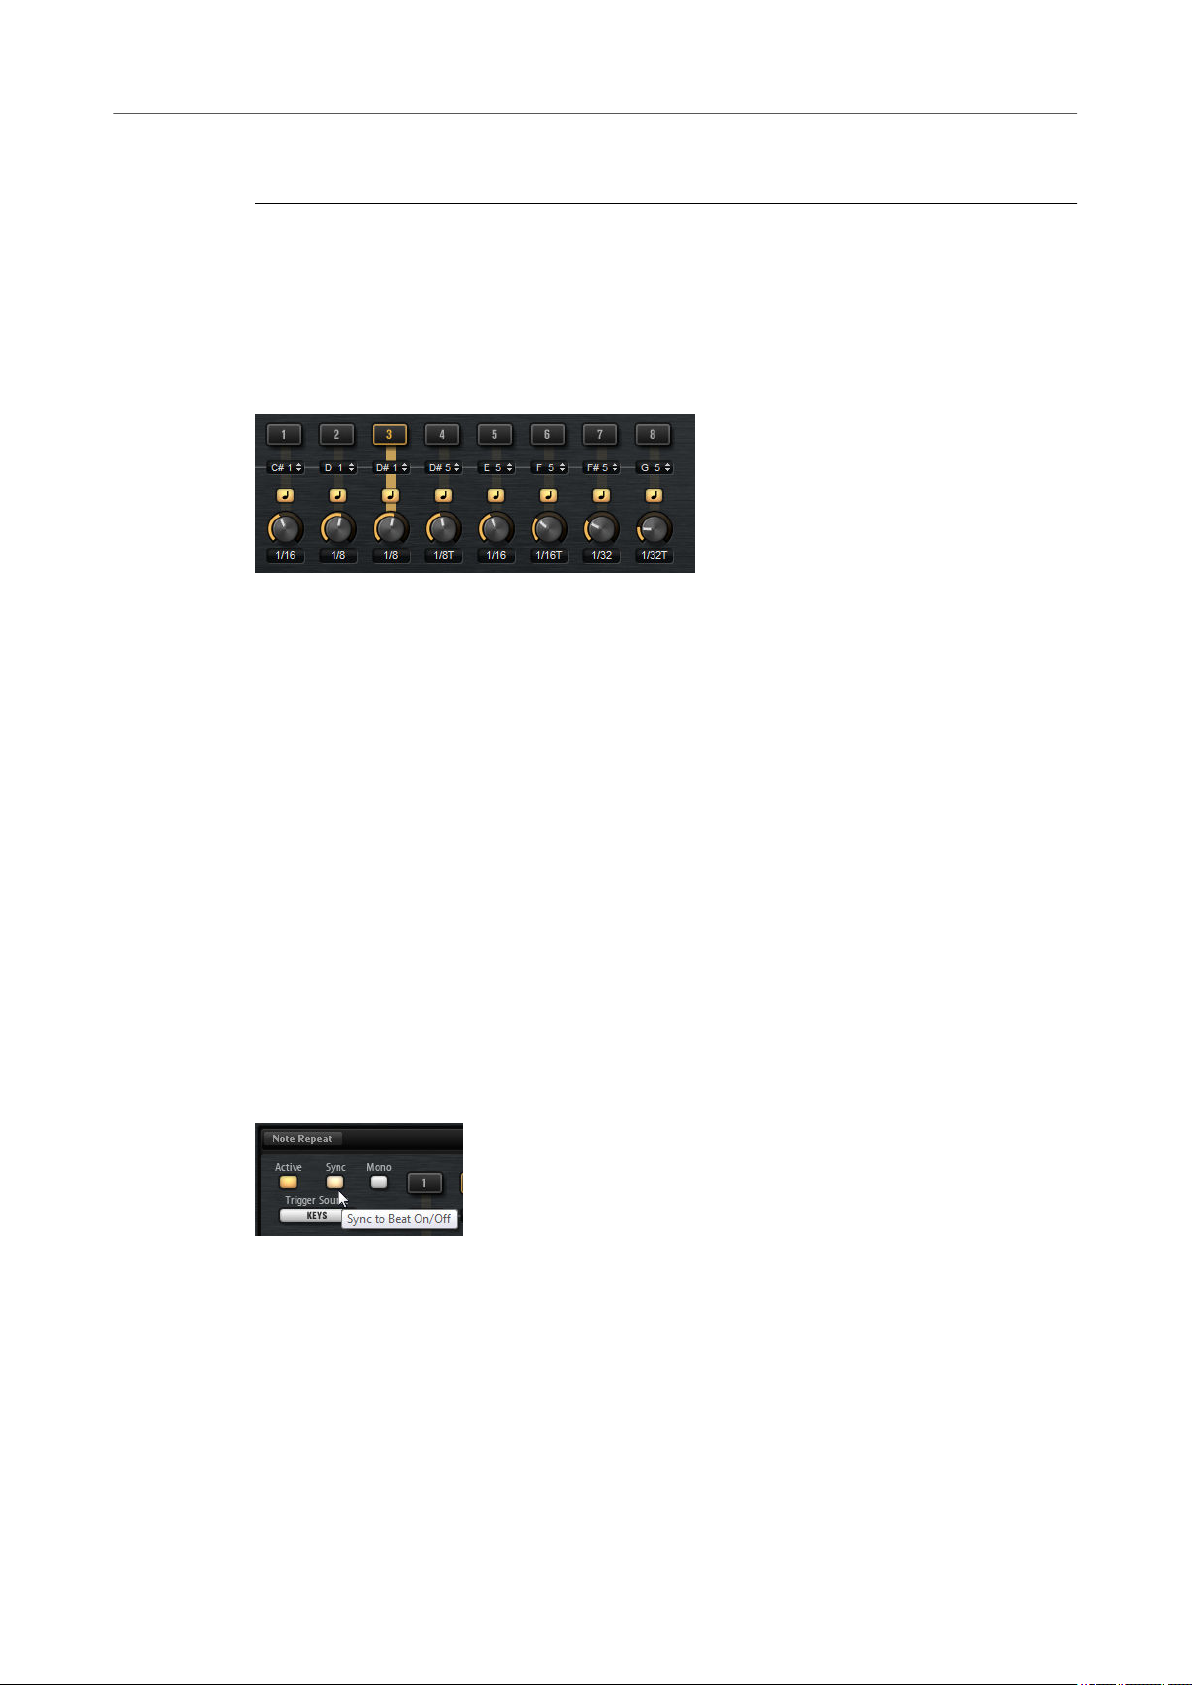
Note Repeat Page
The Note Repeat page has two sections. The upper section allows you to create simple note
repeats, assign trigger keys, and control the general behavior. The lower section provides the
phrase player.
● To open the Note Repeat page, open the Perform page in the edit display.
Active
Activates the Note Repeat parameters.
Sync
If Sync is activated, the repeat notes always start on the next valid note position,
depending on the current song position.
If Sync is deactivated, the note repeat starts immediately, even if the note is not
played on the beat.
22

Getting Started
Note Repeat
Mono
By default, Note Repeat works on all instruments that you trigger simultaneously,
which means that if you play two notes, both are repeated.
If Mono is activated, only the last note that was played is repeated.
Trigger Source
Determines whether the keys on the keyboard or MIDI controller messages are used
to switch between variations.
● If this parameter is set to Keys, you can specify a key, either by clicking in the
eld below the button and dragging up or down, or by playing the note on
your keyboard.
NOTE
Trigger notes for variations can only be used for one variation at a time.
● If this parameter is set to Controllers, you can specify a controller, either by
clicking in the eld below the button and selecting a controller from the list, or
by using the corresponding hardware control on your MIDI keyboard.
Low Key/High Key
You can limit the key range that is affected by Note Repeat with the Low Key and
High Key parameters.
Notes outside this range are not repeated, they are played back normally. This way,
you can use Note Repeat to record complex hihat patterns in your host sequencer,
without repeating an already recorded bass drum or snare from the same kit, for
example.
Velocity Controller
Determines how the output velocities of the repeated notes are generated.
If you use single note repeat notes, the following applies:
● Constant (127) triggers the notes with a xed velocity of 127.
● Velocity triggers the notes with the velocity of the note that you play.
● The MIDI Controller submenu allows you to select a MIDI controller. The
value of this MIDI controller is used as velocity for the triggered notes.
● If Aftertouch is selected, the triggered notes get the velocity from the
aftertouch controller.
● Poly Pressure is similar to Aftertouch, but by sending poly pressure
messages, you can control the velocity per key.
NOTE
Note Repeat starts to trigger notes if a poly pressure value greater than 0 is
received, even if no MIDI note is triggered.
If you use note repeat phrases, the following applies:
● If Constant (127) is selected, the velocity of the trigger note is not taken into
account. The output velocity is determined by the velocity specied for the
steps.
● If Velocity, MIDI Controller, Aftertouch, or Poly Pressure are selected, the
velocity progression specied in the phrase is used to modulate the velocity of
the trigger note. For example, if a phrase contains 3 steps with the velocity
values 127, 64, and 1, and you trigger the phrase using a note with the velocity
127, the output velocity of the 3 steps is 127, 64, and 1. However, if you trigger
the phrase with a velocity of 64, the output velocity of the 3 steps is scaled,
and you get 64, 32, and 1.
23
Getting Started
Note Repeat
Fetch
If aftertouch, poly pressure, or a MIDI controller are used to specify the velocity of
the notes, the Fetch option determines the way that the notes are generated.
● If Fetch is activated, the rst note that you play denes the initial velocity. As
soon as the controller value exceeds this velocity, new notes get their velocity
from the controller.
● If Fetch is deactivated, notes are directly generated with the current controller
value.
If poly pressure is used, notes are only generated for values larger than 0. This
means that if you play a note, and the poly pressure has not yet been set to a
value larger than 0, no note repeats are generated. If you raise the poly
pressure value above 0, note repeats are generated, with a velocity that
corresponds to the current poly pressure value.
Note Repeat Variation Buttons 1–8
You can set up eight different variations for the Note Repeat and use these buttons
to play the associated repeat notes or phrases.
MIDI Follow
● If MIDI Follow is activated and you switch between note repeat variations, the
editor also switches to the current settings.
● If MIDI Follow is deactivated, the editor alway shows the settings for the
selected note repeat variation.
Phrase Player Section
The lower section of the page contains the phrase player.
You can edit the velocity and the pitch controller values for the steps. To display the velocity
values, activate VEL, and to display the pitch modulation curve, activate PITCH.
Active
Activates/Deactivates the phrase player.
Phrase
Allows you to select one of the available phrases.
Preset controls
With the preset controls, you can save a phrase or remove it from the user library, or
copy and paste phrases between variations.
MIDI Controller
If the pitch modulation curve is displayed, this pop-up menu allows you to select the
MIDI controller that is used for pitch modulation.
If you want to use the pitch curve to modulate the pitch of your samples, open the
Pitch page for the corresponding pad and select the same MIDI controller on the
MIDI Controller pop-up menu.
24
Getting Started
Note Repeat
Swing
Shifts the timing of notes on even-numbered beats. This way, the pattern gets a
swing feeling. Negative values let the notes play earlier, positive values let the notes
play later.
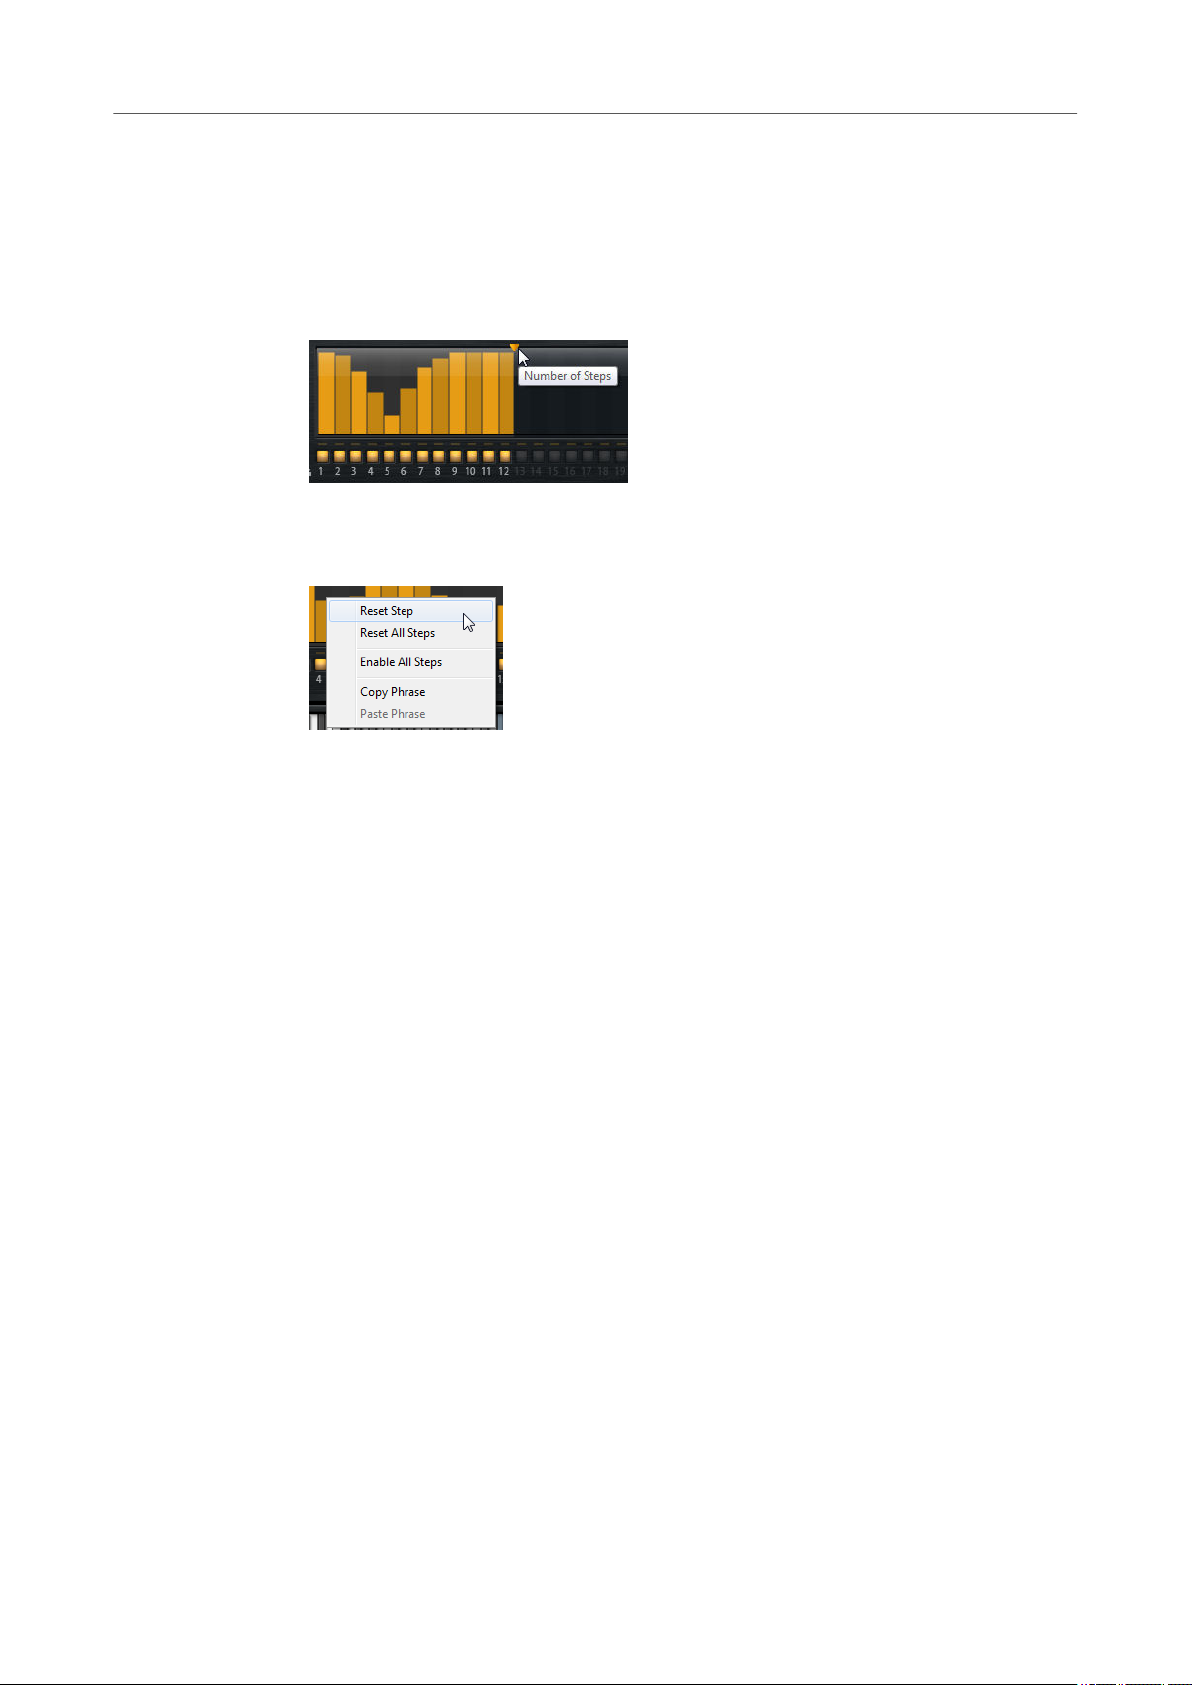
Number of Steps
To specify the length of the phrase, drag the Number of Steps handle to the right or
left.
Step display context menu
The context menu is available both for the velocities and for the pitch modulation
values of the steps.
● If velocity values are displayed, Reset Step sets the velocity of the step to 127.
If the pitch modulation curve is displayed, Reset Step sets the pitch
modulation for the step to 0 semitones.
● If velocity values are displayed, Reset All Steps sets the velocity of all steps to
127.
If the pitch modulation curve is displayed, Reset All Steps sets the pitch
modulation for all steps to 0 semitones.
● Enable All Steps activates all steps.
● If velocity values are displayed, Copy Phrase copies the current phrase to the
clipboard.
If the pitch modulation curve is displayed, Copy Phrase copies the pitch
modulation curve to the clipboard.
● If velocity values are displayed, Paste Phrase pastes the phrase from the
clipboard to the current phrase player. This allows you to copy phrases
between different kits.
If the pitch modulation curve is displayed, Paste Phrase pastes the pitch
modulation curve to the current curve display. This allows you to copy pitch
modulation curves between different kits.
Performing Simple Note Repeats
You can create note repeats for a particular drum sound, and specify the interval in which the
notes are repeated.
PREREQUISITE
● A MIDI keyboard is connected to your computer and set up correctly.
● You have loaded a kit into the rst kit slot.
25

Getting Started
Note Repeat
PROCEDURE
1. Open the Perform page in the edit display.
2. Set Trigger Mode to Keys.
This way, you can trigger the note repeats using the keys on your MIDI keyboard.
NOTE
Note Repeat variation trigger notes have a higher priority than instrument notes, which
means that if they share the same key, you cannot play the instrument on that key.
3. Activate the rst variation button.
4. Specify the trigger note in the eld below the button.
The corresponding instrument pad displays a repeat icon.
5. Click the Note Values/Milliseconds button below the trigger note eld to specify whether
you want to set the repeat interval in note values or milliseconds.
6. Use the control below the Note Values/Milliseconds button to specify the note repeat
interval.
7. On the MIDI keyboard, play the trigger key for the instrument pad, and then play the
trigger key that you specied for the note repeat.
RESULT
The drum sound is repeated, according to the set interval, for as long as you press the key.
Creating Note Repeat Phrases
With the phrase player in the lower section of the Note Repeat page, you can create complex
note repeats phrases for a particular drum sound.
● To use the phrase player, activate the Active button.
Activating Steps
A phrase can contain up to 32 steps. Only the steps that are activated are played.
● To activate a step, click its On/Off button below the display.
● To activate all steps, right-click in the step display and select Enable All Steps from the
context menu.
Setting the Velocity for the Steps
The height of a step represents its velocity value. You can edit the velocity of steps in the
following way:
● To adjust the velocity for a single step, click it and drag up or down.
26
Getting Started
Note Repeat
● To adjust the velocity of multiple steps, click and draw a curve.
● To adjust the velocity of all steps relatively, Shift-click and drag.
● To draw a ramp, hold down Alt and draw a line.
● To draw symmetric ramps at the beginning and the end of the sequence, hold down Shift-
Alt and draw a line.
● To reset the velocity of a step to 127, Ctrl/Cmd-click the step.
● To reset the velocity of all steps to 127, hold Shift-Ctrl/Cmd and click a step.
Adjusting the Phrase
● To shift the rhythm of the phrase, use the Shift Phrase Right /Shift Phrase Left
buttons.
If you shift the rhythm of the phrase to the left, the rst step is moved to the end. If you
shift the phrase to the right, the last step is moved to the beginning.
● To reverse the phrase, click the Reverse Phrase button.
● To duplicate short phrases, click the Duplicate Phrase button.
NOTE
The maximum number of steps is 32. Therefore, phrases that contain more than 16 steps
cannot be duplicated entirely.
Phrase Presets
Groove Agent comes with a set of phrase presets.
● To load a preset, click in the Phrase eld and select a preset from the pop-up menu.
● To create your own presets, use the preset controls to the right of the Phrase eld.
Performing Note Repeat Phrases
PREREQUISITE
● A MIDI keyboard is connected to your computer and set up correctly.
● You have loaded a kit into the rst kit slot.
PROCEDURE
1. Open the Perform page in the edit display.
2. Set the Trigger Mode to Keys.
This way, you can trigger the note repeats using keys on your MIDI keyboard.
NOTE
Note Repeat variation trigger notes have a higher priority than normal instrument notes,
which means that if they share the same key, you cannot play the instrument on that key.
3. Activate the rst variation button.
4. Specify the trigger note in the eld below the button.
The corresponding instrument pad displays a repeat icon.
5. Activate the phrase player by clicking the Phrase On/Off button.
6. Set up the steps for the phrase or select a phrase from the Phrase pop-up menu.
27
Getting Started
Note Repeat
7. On the MIDI keyboard, play the trigger key for the instrument pad, and then play the
trigger key that you specied for the note repeat phrase.
RESULT
The phrase is repeated for as long as you keep the keys pressed.
Creating and Using Note Repeat Variations
You can set up eight different Note Repeat variations using the variation buttons and switch
between them to bring more variation to your Note Repeat performance.
Variations can trigger both Note Repeat notes and Note Repeat phrases. For example, you can
set up repeats with different note values, and then switch between them in real time, or switch
between phrases of different complexities.
If a pattern pad and a note repeat variation share the same trigger note, the pattern pad gets
priority.
You can copy and paste variation settings between buttons using the commands on the variation
button context menu.
Triggering Variations Using MIDI Controllers
If you trigger the variations using MIDI controllers, a variation is activated as soon as the
controller value exceeds 64. The last controller value higher than 64 decides which variation to
play.
It is recommended to use On/Off buttons or push buttons rather than faders or encoders to
control the variation selection. Set the buttons up so that they send a value of 127 when you
press the button, and a value of 0 when you release it.
The use of faders or encoder controls is not recommended for the triggering of variations,
because they do not offer the required amount of control.
Note Repeat Variations and Sync to Beat
● If Sync to Beat is activated, the repeated notes always start at the next valid position. If
you play a legato to switch between two variations, the repeat phrase is not restarted, but
continues from the current beat position.
● If Sync to Beat is deactivated, the note repeat starts immediately, even if the note is not
played on the beat. Phrases are always restarted from the beginning.
28

Getting Started
Note Repeat
Recording the Notes Created by Note Repeat
You can record the Note Repeat output using the pattern player. This way, you can record
complex rhythmic patterns that would be
another plug-in.
PREREQUISITE
You have added two instrument tracks in your Steinberg DAW.
If you record a drum pattern in a loop, you can add different instruments with each cycle using
various note repeat variations.
NOTE
It is not recommended to route the recording track back to the kit that you are using to generate
the note repeat notes, because if you want to record a second cycle, notes that have been
recorded in a rst cycle will also be affected by this second cycle.
PROCEDURE
1. Leave the rst kit slot empty.
This slot is used to generate the notes.
2. Open the Perform page for the rst kit slot and activate the note repeat functionality by
clicking the Active button.
3. Select kit slot 2 and load the kit that contains the drum sound that you want to use for the
repeated notes.
4. In the DAW, route the rst track to kit slot 1. This way, the notes that you play on your MIDI
keyboard are routed to the Note Repeat page for the rst kit slot.
5. Set up the note repeat parameters for kit slot 1.
6. Activate the Monitor button on the rst track in the DAW.
7. For the second track, open the Input Routing pop-up menu, and select Groove Agent Kit
1.
8. Set the MIDI channel for the track to channel 2. This way, the notes are sent to the second
kit slot.
9. Record-enable the second track.
10. Activate the Record button and play an instrument key together with a note repeat
variation key to generate and record the notes.
dicult to play live or use the recorded notes to trigger
Recording Patterns on Pattern Pads
Notes generated by Note Repeat can be used to record complex patterns directly on the pattern
pads in
PROCEDURE
1. Load a kit in the rst kit slot.
2. Activate and congure the Note Repeat parameters for that slot.
3. Select an empty pattern pad and click the Record button.
4. Click the Play button.
5. Play your instruments and add note repeats.
6. Optional: Add different note repeat notes which each pattern cycle.
Groove Agent.
Recording starts.
The instrument notes and the repeated notes are recorded into the pattern.
29

Getting Started
Decompose
7. Click the Stop button to stop recording.
RESULT
When you trigger the pattern pad, it plays the pattern that you recorded.
Decompose
If you are working with Beat Agent kits, you can use the Decompose function to split your
samples into their noise and tonal components.
This allows you to edit the tonal and the noise components of your samples separately, for
example, to change the distribution between the noise and tonal portions of a sample, to
combine different noise samples with a tonal sample, or to experiment with different source
samples to create entirely new sounds.
Decomposing Samples
The Decompose function separates the noise and the tonal components of a sample and allows
you to save these components separately as new samples.
PREREQUISITE
● The instrument pads are shown in the pad section.
● You have loaded the sample that you want to decompose and opened the Decompose
tab.
PROCEDURE
1. Optional: On the Main tab, click Prelisten.
You can now play back the two components separately by using the corresponding Solo
buttons.
2. Click Apply to decompose the sample.
RESULT
Two new samples are created. They are saved with the extensions “_noise” and “_tonal”,
respectively.
30
Loading...