


 Loading...
Operation Manual
Cristina Bachmann, Heiko Bischoff, Marion Bröer, Sabine Pfeifer, Heike Schilling, Benjamin Schütte
Thanks to: Ashley Shepherd
This PDF provides improved access for vision-impaired users. Please note that due to the complexity and number of images in this document, it is not possible to include text descriptions of images.
The information in this document is subject to change without notice and does not represent a commitment on the part of Steinberg Media Technologies GmbH. The software described by this document is subject to a License Agreement and may not be copied to other media except as specifically allowed in the License Agreement. No part of this publication may be copied, reproduced, or otherwise transmitted or recorded, for any purpose, without prior written permission by Steinberg Media Technologies GmbH. Registered licensees of the product described herein may print one copy of this document for their personal use.
All product and company names are ™ or ® trademarks of their respective owners. Windows 7 is a registered trademark or trademark of Microsoft Corporation in the United States and/or other countries. The Mac logo is a trademark used under license. Macintosh and Power Macintosh are registered trademarks. MP3SURROUND and the MP3SURROUND logo are registered trademarks of Thomson SA, registered in the US and other countries, and are used under license from Thomson Licensing SAS.
Release Date: March 31, 2011
© Steinberg Media Technologies GmbH, 2011.
All rights reserved.
Table of Contents
8About this manual
9Welcome!
10Setting up your system
11Setting up audio
15 Setting up MIDI
17 Connecting a synchronizer
17 Setting up video
17 Optimizing audio performance
21VST Connections
22About this chapter
22 The VST Connections window
22 Setting up busses
24 Routing
24About monitoring
25Editing operations
27The Project window
28Window Overview
29The track list
29 The Inspector
32The toolbar
33The status line
33The info line
34The overview line
34The ruler
35The Snap function
37Auto-Scroll
38Working with projects
39Creating new projects
40Opening projects
40 Closing projects
40 Saving projects
42The Archive and Backup functions
43Startup Options
44The Project Setup dialog
45Zoom and view options
47Audio handling
48Auditioning audio parts and events
48Scrubbing audio
48Editing parts and events
55Range editing
57Region operations
57The Edit History dialog
58The Preferences dialog
60Working with tracks
61Setting up tracks
63Editing tracks
64Organizing tracks in folder tracks
66Dividing the track list
67Playback and the Transport panel
68Background
69Operations
71 Options and Settings
73The Virtual Keyboard
74Recording
75Background
75 Basic recording methods
77 Audio recording specifics
82 MIDI recording specifics
86 Options and Settings
89Quantizing MIDI and audio
90Introduction
91Quantize functions
91Advanced Quantize functions
92The Quantize Panel
95Fades and crossfades
96Creating fades
97The Fade dialogs
98Creating crossfades
99The Crossfade dialog
100Auto fades and crossfades
101The arranger track (Cubase Elements only)
102Introduction
102Setting up the arranger track
103Working with arranger events
105Flattening the arranger chain
106Live mode
106Arranging your music to video
108Using markers
109Introduction
109 The Marker window
111 The marker track
113 Marker key commands
113 Exporting and importing markers
4
Table of Contents
114 |
The Mixer |
165 |
Audio processing and functions |
115 |
Overview |
166 |
Background |
116 |
Configuring the Mixer |
166 |
Audio processing |
118 |
Basic mixing procedures |
171 |
Freeze Edits |
121 |
Audio-specific procedures |
172 |
Detect Silence |
127 |
Routing |
173 |
The Spectrum Analyzer |
129 |
MIDI-specific procedures |
175 |
Statistics |
130 |
Utilities |
175 |
About time stretch and pitch shift algorithms |
131Audio effects
132About this chapter
132Overview
133Insert effects
136Send effects
140Editing effects
140Effect presets
142Installing and managing effect plug-ins
145VST instruments and instrument tracks
146Introduction
146 VST instrument channels vs. instrument tracks
146VST instrument channels (not in Cubase LE)
148 Instrument tracks
150What do I need? Instrument channel or instrument track?
150Instrument Freeze
151VST instruments and processor load
151Using presets for VSTi configuration
154About latency
156Automation
157Introduction
157Working with automation curves
158Enabling and disabling the writing of automation
data
158 Writing automation data
160Editing automation events
161Automation track operations
164 MIDI part data vs. track automation
164 Hints and further options
176The Sample Editor
177Window overview
180 General functions
185Warping audio
186Working with hitpoints and slices
190The Audio Part Editor
191Background
191Opening the Audio Part Editor
191Window overview
192Operations
194Options and Settings
195The Pool
196Background
196 Window overview
198 Operations
206The MediaBay
207Introduction
208Working with the MediaBay
209The Define Locations section
210The Locations section
211The Results list
213 Previewing files
215 The Filters section
217The Loop Browser and Sound Browser windows
217Preferences
218Key commands
218 Working with MediaBay-related windows
220Working with Volume databases
221Working with track presets
222Introduction
222Types of track presets
223Applying track presets
225Creating a track preset
226Creating tracks from track presets or VST presets
5
Table of Contents
227 |
Remote controlling Cubase |
296 |
Export Audio Mixdown |
228 |
Introduction |
297 |
Introduction |
228 |
Setting Up |
297 |
Mixing down to audio files |
229 |
Operations |
298 |
The Export Audio Mixdown dialog |
230 |
The Generic Remote device |
299 |
The available file formats |
232 |
Apple Remote (Macintosh only) |
303 |
Synchronization |
|
|
233MIDI realtime parameters
234Introduction
234 The Inspector – general handling
234 The Inspector sections
238Using MIDI devices
239Background
239MIDI devices – general settings and patch handling
243About Studio Connections
244MIDI processing
245Introduction
246Making your settings permanent
247Dissolve Part
248Repeat Loop
248 Other MIDI functions
304 Background
304Timecode (positional references)
305Clock sources (speed references)
306The Project Synchronization Setup dialog
308Synchronized operation
308Working with VST System Link
311Activating VST System Link
316Video
317Before you start
318Preparing a video project in Cubase
319Video files in the Project window
320Playing back video
322 Editing video
322Extracting audio from a video file
323Replacing the audio in a video file
252The MIDI editors
253Introduction
253 Opening a MIDI editor
255 The Key Editor – Overview
257 Key Editor operations
273The Drum Editor – Overview
274Drum Editor operations
276Working with drum maps
279Using drum name lists
279Working with SysEx messages
280Recording SysEx parameter changes
280Editing SysEx messages
282The Score Editor – Overview
283Score Editor operations
290Editing tempo and signature
291Background
291Tempo and signature display
292Editing tempo and signature
294The Beat Calculator
294Adjusting the audio to the project tempo
324ReWire
(not in Cubase LE)
325Introduction
325Launching and quitting
326Activating ReWire channels
326Using the transport and tempo controls
327How the ReWire channels are handled in Cubase
327Routing MIDI via ReWire2
327Considerations and limitations
328File handling
329Importing audio
332 Exporting and importing standard MIDI files
334Exporting and importing MIDI loops
335Customizing
336Background
336Using the Setup options
337Customizing track controls
339Appearance
339Applying colors in the Project window
342Where are the settings stored?
6
Table of Contents
343Key commands
344Introduction
344 Setting up key commands
347 Setting up tool modifier keys
347 The default key commands
351 Index
7
Table of Contents
1
About this manual
Welcome!
This is the Operation Manual for Steinberg’s Cubase. Here you will find detailed information about all the features and functions in the program.
Ö This manual often refers to right-clicking, for example, to open context menus. If you are using a Mac with a singlebutton mouse, hold down [Ctrl] and click.
About the program versions
The documentation covers three program versions, Cubase Elements, Cubase AI, and Cubase LE, for two different operating systems or “platforms”, Windows and Mac OS X. Whenever the program is only called “Cubase” in this document, this refers to all three program versions.
Some features described in the documentation are not applicable to all three Cubase versions. Whenever this is the case, it is clearly indicated in the heading of the related subject. For example, if a heading is followed by “ (Cubase Elements only)”, the corresponding feature is not available in Cubase AI and Cubase LE. Likewise, if you see “ (not in LE)”, the corresponding feature is only available in Cubase Elements and Cubase AI.
Some features and settings are also specific to one of the platforms. This is clearly stated in the applicable cases. If nothing else is said, all descriptions and procedures in the documentation are valid for all Cubase versions for both Windows and Mac OS X.
The screenshots are taken from the Windows version of Cubase Elements.
Key command conventions
Many of the default key commands in Cubase use modifier keys, some of which are different depending on the operating system. For example, the default key command for Undo is [Ctrl]-[Z] under Windows and [Command]-[Z] under Mac OS X.
When key commands with modifier keys are described in this manual, they are shown with the Windows modifier key first, in the following way:
[Win modifier key]/[Mac modifier key]-[key]
For example, [Ctrl]/[Command]-[Z] means “press [Ctrl] under Windows or [Command] under Mac OS X, then press [Z]”.
Similarly, [Alt]/[Option]-[X] means “press [Alt] under Windows or [Option] under Mac OS X, then press [X]”.
9
About this manual
2
Setting up your system
Setting up audio
!Make sure that all equipment is turned off before making any connections!
Connecting audio
Exactly how to set up your system depends on many different factors, e.g. the kind of project you wish to create, the external equipment you want to use, or the computer hardware available to you. Therefore, the following sections can only serve as examples.
How you connect your equipment, i.e. whether you use digital or analog connections, also depends on your individual setup.
Stereo input and output – the simplest connection
If you only use a stereo input and output from Cubase, you can connect your audio hardware, e.g. the inputs of your audio card or your audio interface, directly to the input source and the outputs to a power amplifier and speaker.
Multi-channel input and output
Most likely however, you will have other audio equipment that you want to integrate with Cubase, using several input and output channels. Depending on the equipment available to you, there are two ways to go: either mixing using an external mixing desk, or mixing using the Mixer inside Cubase.
• External mixing means having a hardware mixing device with a group or bus system that can be used for feeding inputs on your audio hardware.
In the example below, four busses are used for feeding signals to the audio hardware’s inputs. The four outputs are connected back to the mixer for monitoring and playback. Remaining mixer inputs can be used for connecting audio sources like microphones, instruments, etc.
A simple stereo audio setup
This is probably the simplest of all setups – once you have set up the internal input and output busses, you can connect your audio source, e.g. a microphone, to your audio interface and start recording.
A multi-channel audio setup using an external mixer
Ö When connecting an input source (like a mixer) to the audio hardware, you should use output busses, sends or similar that are separate from the mixer’s master output to avoid recording what you are playing back. You may also have mixing hardware that can be connected via FireWire.
11
Setting up your system

• When using the Mixer inside Cubase, you can use the inputs on your audio hardware to connect microphones and/or external devices. Use the outputs to connect your monitoring equipment.
(-10dBV) or professional line level (+4dBV), or you may be able to adjust input characteristics on the audio interface or in its control panel. Please check the audio hardware documentation for details.
Using the correct types of input is important to avoid distortion or noisy recordings.
!Cubase does not provide any input level adjustments for the signals coming in to your audio hardware, since these are handled differently for each card. Adjusting input levels is either done in a special application included with the hardware or from its control panel (see below).
Mixing inside Cubase
Recording from a CD player
Most computers come with a CD-ROM drive that can also be used as a regular CD player. In some cases the CD player is internally connected to the audio hardware so that you can record the output of the CD player directly into Cubase (consult the audio hardware documentation if you are uncertain).
•All routing and level adjustments for recording from a CD (if available) are done in the audio hardware setup application (see below).
•Cubase Elements only: You can also grab audio tracks directly from a CD in Cubase (see the chapter “File handling” on page 328).
Word clock connections
If you are using a digital audio connection, you may also need a word clock connection between the audio hardware and external devices. Please refer to the documentation that came with the audio hardware for details.
!It is very important that word clock synchronization is done correctly or there might be clicks and crackles in recordings that you make!
About recording levels and inputs
When you connect your equipment, you should make sure that the impedance and levels of the audio sources and inputs are matched. Typically, different inputs may be designed for use with microphones, consumer line level
Making settings for the audio hardware
Most audio cards come with one or more small applications that allow you to configure the inputs of the hardware to your liking. This includes:
•Selecting which inputs/outputs are active.
•Setting up word clock synchronization (if available).
•Turning monitoring via the hardware on/off (see “About monitoring” on page 15).
•Setting levels for each input. This is very important!
•Setting levels for the outputs, so that they match the equipment you use for monitoring.
•Selecting digital input and output formats.
•Making settings for the audio buffers.
In many cases all available settings for the audio hardware are gathered in a control panel, which can be opened from within Cubase as described below (or opened separately, when Cubase isn’t running). In some cases, there may be several different applications and panels – please refer to the audio hardware documentation for details.
Plug and Play support for ASIO devices
The Steinberg MR816 hardware series supports Plug and Play in Cubase. These devices can be plugged in and switched on while the application is running. Cubase will automatically use the driver of the MR816 series and will re-map the VST connections accordingly.
12
Setting up your system
Steinberg cannot guarantee that this will work with other hardware. If you are unsure of whether your device supports plug and play, please consult its documentation.
!If a device that does not support Plug and Play is connected/disconnected while the computer is running, it may get damaged.
Selecting a driver and making audio settings in Cubase
The first thing you need to do is select the correct driver in Cubase to make sure that the program can communicate with the audio hardware:
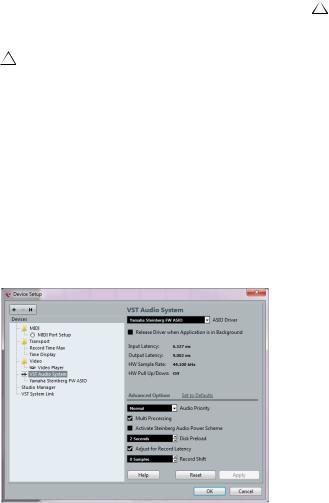
1.Launch Cubase and select Device Setup from the Devices menu.
2.In the Devices list to the left, click on “VST Audio System”.
The VST Audio System page is shown.
3. On the ASIO Driver menu, select your audio hardware driver.
There may be several options here that all refer to the same audio hardware. When you have selected a driver, it is added to the Devices list.
!Under Windows, we strongly recommend that you access your hardware via an ASIO driver written specifically for the hardware. If no ASIO driver is installed, we recommend that you check with your audio hardware manufacturer if they have an ASIO driver available, for example, for download via the Internet. You can use the Generic Low Latency ASIO driver if no specific ASIO driver is available.
4.Select the driver in the Devices list to open the driver settings for your audio hardware.
5.Bring up the control panel for the audio hardware and adjust the settings as recommended by the audio hardware manufacturer.
•Under Windows, you open the control panel by clicking the Control Panel button.
The control panel that opens when you click this button is provided by the audio hardware manufacturer – not Cubase (unless you use DirectX, see below). Hence it will be different for each audio card brand and model.
The control panels for the ASIO DirectX driver and the Generic Low Latency ASIO Driver (Windows only) are exceptions, in that they are provided by Steinberg and described in the dialog help, opened by clicking the Help button in the dialog. See also the notes on DirectX below.
•Under Mac OS X, the control panel for your audio hardware is opened by clicking the “Open Config App” button on the settings page for your audio device in the Device Setup dialog.
Note that this button is available only for some hardware products. If “Open Config App” is not available in your setup, refer to the documentation that came with your audio hardware for information on where to make hardware settings.
6. If you plan to use several audio applications simultaneously, you may want to activate the “Release Driver when Application is in Background” option on the VST Audio System page. This will allow another application to play back via your audio hardware even though Cubase is running.
The application that is currently active (i.e. the “top window” on the desktop) gets access to the audio hardware. Make sure that any other audio application accessing the audio hardware is also set to release the ASIO (or Mac OS X) driver so Cubase can use it when it becomes the active application again.
7. If your audio hardware receives clock signals from an external sample clock source, you may want to activate the “Externally Clocked” option on the page for the driver.
This is described in detail in the section “If your hardware setup is based on an external clock source” on page 14.
13
Setting up your system

8.If your audio hardware and its driver support ASIO Direct Monitoring, you may want to activate the Direct Monitoring checkbox on the page for the driver.
Read more about monitoring later in this chapter and in the chapter “Recording” on page 74.
9.Click Apply and then OK to close the dialog.
If your hardware setup is based on an external clock source
For proper audio playback and recording, it is essential that you set the project’s sample rate to the sample rate of the incoming clock signals. If you load a project with a sample rate that is different from your clock source, the program will try to change the settings of the clock source, which may not be what you want.
By activating the “Externally Clocked” option, you “tell” Cubase that it receives external clock signals and therefore derives its speed from that source. The program will not try to change the hardware sample rate any longer. The sample rate mismatch is accepted and playback will therefore be faster or slower. For more information about the Sample Rate setting, see “The Project Setup dialog” on page 44.
Ö When a sample rate mismatch occurs, the Record Format field on the status line is highlighted in a different color.
If you are using audio hardware with a DirectX driver (Windows only)
!A DirectX driver is the next best option to a specific ASIO driver and the Generic Low Latency ASIO driver.
Cubase comes with a driver called ASIO DirectX Full Duplex, available for selection on the ASIO Driver pop-up menu (VST Audio System page).
ÖTo take full advantage of DirectX Full Duplex, the audio hardware must support WDM (Windows Driver Model) in combination with DirectX version 8.1 or higher. In all other cases, the audio inputs will be emulated by DirectX (see the dialog help for the ASIO DirectX Full Duplex Setup dialog for details about how this is reported).
ÖDuring the installation of Cubase, the latest DirectX version will be installed on your computer.
When the ASIO DirectX Full Duplex driver is selected in the Device Setup dialog, you can open the ASIO Control Panel and adjust the following settings (for more details, click the Help button in the control panel):
• Direct Sound Output and Input Ports
In the list on the left in the window, all available Direct Sound output and input ports are listed. In many cases, there will be only one port in each list. To activate or deactivate a port in the list, click the checkbox in the left column. If the checkbox is ticked, the port is activated.
•You can edit the Buffer Size and Offset settings in this list if necessary, by double-clicking on the value and typing in a new value.
In most cases, the default settings will work fine. Audio buffers are used when audio data is transferred between Cubase and the audio card. While larger buffers ensure that playback will occur without glitches, the latency (the time between the moment Cubase sends out the data and when it actually reaches the output) will be higher.
•Offset
If a constant offset is audible during playback of Audio and MIDI recordings, you can adjust the output or input latency time using this value.
Setting up the input and output ports
Once you have selected the driver and made the settings as described above, you need to specify which inputs and outputs will be used and name these:
1. In the Device Setup dialog, select your driver in the Devices list on the left to display the driver settings for your audio hardware.
All input and output ports on the audio hardware are listed.
14
Setting up your system

2.To hide a port, click in the “Visible” column for the port (deselecting the checkbox).
Ports that are not visible cannot be selected in the VST Connections window where you set up your input and output busses – see the chapter “VST Connections” on page 21.
!If you attempt to hide a port that is already used by a bus you will be asked whether this is really what you want – note that this will disable the port!
3.To rename a port, click on its name in the “Show as” column and type in a new name.
• It is a good idea to give your ports names that are related to the channel configuration (rather than to the actual hardware model)!
4. Click OK to close the Device Setup dialog and apply your changes.
About monitoring
In Cubase, monitoring means listening to the input signal while preparing to record or while recording. There are three ways to monitor:
External monitoring
External monitoring (listening to the input signal before it goes into Cubase) requires an external mixer for mixing the audio playback with the input signal. This can be a classic mixing desk or a mixer application for your audio hardware, if this has a mode in which the input audio is sent back out again (usually called “Thru”, “Direct Thru” or similar).
Via Cubase
In this case, the audio passes from the input into Cubase, possibly through Cubase effects and EQ and then back to the output. You control monitoring via settings in Cubase.
This allows you to control the monitoring level from Cubase and add effects to the monitored signal only.
ASIO Direct Monitoring
If your audio hardware is ASIO 2.0 compatible, it may support ASIO Direct Monitoring (this feature may also be available for audio hardware with Mac OS X drivers). In this mode, the actual monitoring is done in the audio hardware, by sending the input signal back out again. However, monitoring is controlled from Cubase. This means that the audio hardware’s direct monitoring feature can be turned on or off automatically by Cubase.
Monitoring is described in detail in the chapter “Recording” on page 74. However, when setting up, there is one thing to note:
• If you want to use the external monitoring via your audio hardware, make sure that the corresponding functions are activated in the card’s mixer application.
Ö If you are using RME Audio Hammerfall DSP audio hardware, make sure that the pan law is set to -3dB in the card’s preferences.
Setting up MIDI
!Make sure that all equipment is turned off before making any connections!
This section describes how to connect and set up MIDI equipment. If you have no MIDI equipment, you can skip this section. Note that this is only an example – you might need or want to hook things up differently!
15
Setting up your system
Connecting the MIDI equipment
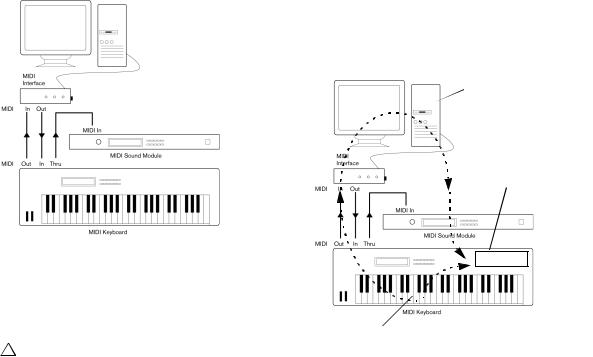
In this example we assume that you have a MIDI keyboard and an external MIDI sound module. The keyboard is used both for feeding the computer with MIDI messages for recording and for playing back MIDI tracks. The sound module is used for playback only. Using Cubase’s MIDI Thru feature (described later) you will be able to hear the correct sound from the sound module while playing the keyboard or recording.
A typical MIDI Setup
If you want to use even more instruments for playback, simply connect MIDI Thru on the sound module to MIDI In on the next instrument, and so on. In this hook-up, you will always play the first keyboard when recording. But you can still use all your devices for providing sounds on playback.
Setting MIDI Thru and Local On/Off
On the MIDI page in the Preferences dialog (located on the File menu under Windows and on the Cubase menu under Mac OS X), you will find a setting called “MIDI Thru Active”. This is related to a setting in your instrument called “Local On/Off” or “Local Control On/Off”.
•If you use a MIDI keyboard instrument, as described earlier in this chapter, MIDI Thru should be activated and that instrument should be set to Local Off (sometimes called Local Control Off – see the instrument’s operation manual for details). The MIDI signal from the keyboard will be recorded in Cubase and at the same time be re-routed back to the instrument so that you hear what you are playing, without the keyboard “triggering” its own sounds.
When “MIDI Thru” is active in Cubase, MIDI data received is immediately “echoed” back out.
MIDI data coming in to the instrument is played by the “Synth” inside it.
“Synth”
When you press a key, it is sent out via MIDI to
!If you plan to use more than three sound sources, we When Local Control is turned on in the instrument, the keys you press
recommend that you either use an interface with more than one output, or a separate MIDI Thru box instead of the Thru jacks on each unit.
will be played by the “Synth” inside the instrument. When Local Control is turned off, this connection is cut off.
•If you use a separate MIDI keyboard – one that does not produce any sounds itself – MIDI Thru in Cubase should also be activated, but you don’t need to look for any Local On/Off setting in your instruments.
•The only case where MIDI Thru should be deactivated is if you use Cubase with only one keyboard instrument and that instrument cannot be set to Local Off mode.
•MIDI Thru will be active only for MIDI tracks that are record enabled and/or have the Monitor button activated. See the chapter “Recording” on page 74 for more information.
16
Setting up your system

Setting up MIDI ports in Cubase
The Device Setup dialog lets you set up your MIDI system as follows:
Ö When you change MIDI port settings in the Device Setup dialog, these are automatically applied.
Showing or hiding MIDI Ports
The MIDI ports are listed in the Device Setup dialog on the MIDI Port Setup page. By clicking in the “Visible” column for a MIDI input or output, you can specify whether or not it is listed on the MIDI pop-up menus in the program.
If you are trying to hide a MIDI port which is already selected for a track or a MIDI device, a warning message will appear, allowing you to hide – and disconnect – the port or to cancel the operation and keep the MIDI port visible.
Setting up the “All MIDI Inputs” option
When you record MIDI in Cubase, you can specify which MIDI input each recording MIDI track should use. However, you can also select the “In ‘All MIDI Inputs’” option for an input port, which causes any MIDI data from any MIDI input to be recorded.
The “In ‘All MIDI Inputs’” option on the MIDI Port Setup page allows you to specify which inputs are included when you select All MIDI Inputs for a MIDI track. This can be especially useful if your system provides several instances of the same physical MIDI input – by deactivating the duplicates you make sure only the desired MIDI data is recorded.
Ö If you have a MIDI remote control unit connected, you should also make sure to deactivate the “In ‘All MIDI Inputs’” option for that MIDI input. This will avoid accidentally recording the data from the remote control when the “All MIDI Inputs” option is selected as input for a MIDI track.
Connecting a synchronizer
!Make sure that all equipment is turned off before making any connections!
When using Cubase with external tape transports, you will most likely need to add a synchronizer to your system. All connections and setup procedures for synchronization are described in the chapter “Synchronization” on page 303.
Setting up video
Cubase plays back video files in a number of formats, such as AVI, QuickTime, or MPEG. QuickTime is used as playback engine. Which formats can be played back depends on the video codecs installed on your system, see the chapter “Video” on page 316.
There are several ways to play back video, e.g. without any special hardware, using a FireWire port, or using dedicated video cards, see “Video output devices” on page 317.
If you plan to use special video hardware, install it and set it up as recommended by the manufacturer.
Before you use the video hardware with Cubase, we recommend that you test the hardware installation with the utility applications that came with the hardware and/or the QuickTime Player application.
Optimizing audio performance
This section gives you some hints and tips on how to get the most out of your Cubase system, performance-wise. Some of this text refers to hardware properties and can be used as a guide when upgrading your system. This text is very brief. Look for details and current information on the Cubase web site.
Two aspects of performance
There are two distinct aspects of performance with respect to Cubase.
Tracks and effects
Simply put: the faster your computer, the more tracks, effects and EQ you will be able to play. Exactly what constitutes a “fast computer” is almost a science in itself, but some hints are given below.
17
Setting up your system

Short response times (latency)
Another aspect of performance is response time. The term “latency” refers to the “buffering”, i.e. the temporary storing, of small chunks of audio data during various steps of the recording and playback process on a computer. The more and larger those chunks, the higher the latency.
High latency is most irritating when playing VST instruments and when monitoring through the computer, i.e. when listening to a live audio source via the Cubase Mixer and effects. However, very long latency times (several hundred milliseconds) can also affect other processes like mixing, e.g. when the effect of a fader movement is heard only after a noticeable delay.
While Direct Monitoring and other techniques reduce the problems associated with very long latency times, a system that responds fast will always be more convenient to work with.
• Depending on your audio hardware, it may be possible to “trim” your latency times, usually by lowering the size and the number of buffers.
For details, refer to the audio hardware documentation, or, if you are using a DirectX driver under Windows, the dialog help.
System factors that affect performance
RAM
Generally speaking, the more RAM is installed in your computer, the better.
!On computers running a Windows 32-bit operating system, a running application can address a maximum of 2GB of RAM. On a Macintosh computer running Mac OS X, this limit is 4GB.The 64-bit versions of Windows and Mac OS X are able to assign considerably more than 4GB of RAM to a running 64-bit application.
This limitation is imposed by the operating system, and it is independent of the amount of RAM that you may have installed in your computer.
Some program functions may “eat up” all the available memory, e.g. recording, the use of effect plug-ins, and the pre-loading of samples.
!When a function has used up all the memory made available by the operating system, the computer will crash.
Always keep in mind the RAM limitation of your operating system when setting up your projects.
CPU and processor cache
It goes without saying that the faster the computer processor, the better. But there are a number of factors that affect the apparent speed of a computer: the bus speed and type (PCI is strongly recommended), the processor cache size and of course, the processor type and brand. Cubase relies heavily on floating point calculations. When shopping for a processor, please make sure that you get one that is powerful in calculating floating point arithmetics.
Note also that Cubase features full support for multi-pro- cessor systems. So, if you own a computer system with more than one processor, Cubase can take advantage of the total capacity and evenly distribute the processing load to all available processors. For further information, see “Multi processing” on page 19.
Hard disk and controller
The number of hard disk tracks you can record and play back at the same time also depends on the speed of your hard disk and hard disk controller. If you use E-IDE disks and controllers, make sure that the transfer mode is DMA Busmaster. Under Windows, you can check the current mode by launching the Windows Device Manager and looking for properties of the IDE ATA/ATAPI Controller’s primary and secondary channel. DMA transfer mode is enabled by default, but may be turned off by the system should hardware problems occur.
18
Setting up your system
Audio hardware and driver
The hardware and its driver can have some effect on regular performance. A badly written driver can reduce the performance of your computer. But where the hardware driver design makes the most difference is with latency.
!Again, we strongly recommend that you use audio hardware for which there is a specific ASIO driver!
This is especially true when using Cubase for Windows:
•Under Windows, ASIO drivers written specifically for the hardware are more efficient than the Generic Low Latency ASIO Driver or a DirectX driver and produce shorter latency times.
•Under Mac OS X, audio hardware with properly written Mac OS X (Core Audio) drivers can be very efficient and produce very low latency times.
However, there are additional features currently only available with ASIO drivers, such as the ASIO Positioning Protocol.
Making settings that affect performance
Audio buffer settings
Audio buffers affect how audio is sent to and from the audio hardware. The size of the audio buffers affects both the latency and the audio performance. Generally, the smaller the buffer size, the lower the latency. On the other hand, working with small buffers can be demanding for the computer. If the audio buffers are too small, you may get clicks, pops or other audio playback problems.
•Under Mac OS X, you can adjust the size of the buffers on the VST Audio System page in the Device Setup dialog.
You may also find buffer settings in the control panel for the audio hardware.
•Under Windows, you adjust the buffer size settings in the control panel for the audio hardware (opened by clicking the Control Panel button on the driver page in the Device Setup dialog).
Optimizing processor scheduling (Windows only)
To get the lowest possible latencies when using ASIO under Windows (on a single-CPU system), the “system performance” has to be optimized for background tasks:
1.Open the Control Panel and select the System settings.
2.On the left, select the “Advanced system settings” option.
The System Properties dialog opens.
3.Select the Advanced tab and click the “Settings…” button in the Performance section.
The Performance Options dialog opens.
4.Select the Advanced tab and activate the “Adjust for best performance of: Background services” option.
5.Click OK to close the dialogs.
Multi processing
On the VST Audio System page you will find the “Advanced options” section. Here you find advanced settings for the VST Engine, including a Multi Processing option. When this is activated and there is more than one CPU in your system, the processing load is distributed evenly to all available CPUs, allowing Cubase to make full use of the combined power of the multiple processors.
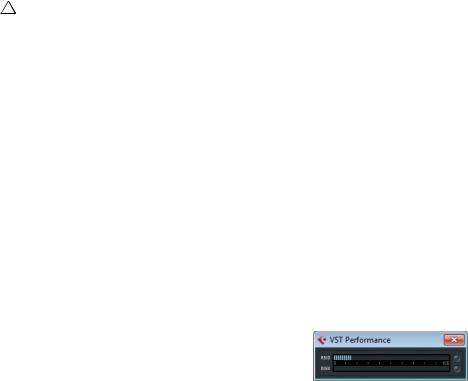
About the VST Performance window
The VST Performance window is opened from the Devices menu. The window shows two meter displays: The ASIO meter, which indicates CPU load, and the Disk meter, which shows the hard disk transfer rate. It is recommended that you check this from time to time, or keep it always open. Even if you have been able to activate a number of audio channels in the project without getting any warning, you may run into performance problems when adding EQ or effects.
19
Setting up your system
•The ASIO meter (at the top) shows the ASIO time usage, i.e. the time required to complete the current processing tasks. The more tracks, effects, EQ, etc. you use in your project, the longer processing will take, and the longer the ASIO meter will show activity.
If the overload indicator (on the far right) lights up, you need to decrease the number of EQ modules, active effects, and/or audio channels playing back simultaneously.
•The lower bar graph shows the hard disk transfer load.
If the overload indicator (on the far right) lights up, the hard disk is not supplying data fast enough to the computer. Cubase Elements only: You may need to reduce the number of tracks playing back by using the Disable Track function (see “About track disable/enable (Cubase Elements only)” on page 71). If this does not help, you need a faster hard disk.
ÖThe overload indicator may occasionally blink, e.g. when you locate during playback. This does not indicate a problem, but happens because the program needs a moment for all channels to load data for the new playback position.
ÖThe ASIO and Disk load meters can also be shown on the Transport panel (as “Performance”) and on the Project window toolbar (as “Performance Meter”). There they are shown as two miniature vertical meters (by default at the left side of the panel/toolbar).
20
Setting up your system
3
VST Connections

About this chapter
This chapter focuses on the settings you can perform in the VST Connections window. Here you can set up input and output busses.
Since input and output busses are vital for working with Cubase, a large part of this chapter concentrates on busses and this is also the reason why you find this chapter at the beginning of the Operation Manual.
The VST Connections window
The VST Connections window is opened from the Devices menu. It contains an Inputs and an Outputs tab, which allow you to set up your busses.
Setting up busses
Cubase uses a system of input and output busses to transfer audio between the program and the audio hardware.
•Input busses let you route audio from the inputs on your audio hardware into the program. This means that when you record audio, you will always do this through one or several input busses.
•Output busses let you route audio from the program to the outputs on your audio hardware. When you play back audio, you will always do this through one or several output busses.
Once you understand the bus system and know how to set up the busses properly, it will be easy to go on with recording, playing back and mixing.
Strategies
The bus configuration is saved with the project – therefore it is a good idea to add and set up the busses you need and save these in a template project (see “Save as Template” on page 41).
When you start working on new projects, you start from this template. That way you get your standard bus configuration without having to make new bus settings for each new project. If you need to work with different bus configurations in different projects, you can either create several different templates or store your configurations as presets (see “Presets” on page 24). The templates can of course also contain other settings that you regularly use – sample rate, record format, a basic track layout, etc.
Input busses
•Most likely you need at least one stereo input bus assigned to an analog input pair. This will let you record stereo material. If you want to be able to record in stereo from other analog input pairs as well, you add stereo input busses for these, too.
•Although you can record mono tracks from one side of a stereo input, it may be a good idea to add a dedicated mono input bus. This can be assigned to an analog input to which you have connected a dedicated microphone pre-amp, for example. Again, you can have several different mono busses.
•You probably want a dedicated stereo input bus assigned to the digital stereo input, for digital transfers.
Output busses
•You probably want one or several stereo output busses for monitoring and listening to stereo mixes.
•For digital transfers, you need a stereo bus assigned to the digital stereo output as well.
Preparations
Before you set up busses, you should name the inputs and outputs on your audio hardware.
The reason for this is compatibility – it makes it easier to transfer projects between different computers and setups. For example, if you move your project to another studio, the audio hardware may be of a different model. But if both you and the other studio owner have given your inputs and outputs names according to the setup (rather than names based on the audio hardware model), Cubase will automatically find the correct inputs and outputs for your busses and you will be able to play and record without having to change the settings.
22
VST Connections
To assign names to the inputs and outputs of your audio hardware, proceed as follows:
1.Open the Device Setup dialog from the Devices menu.
2.On the VST Audio System page, make sure that the correct driver for your audio hardware is selected.
If this is the case, your audio card is listed in the Devices list on the left of the Device Setup window.
3.In the Devices list, select your audio card.
The available input and output ports on your audio hardware are listed on the right.
4. To rename a port, click on its name in the Show As column and enter a new name.
• If needed, you can also disable ports by deactivating them in the Visible column.
Disabled ports are not shown in the VST Connections window. If you attempt to disable a port that is used by a bus, you will be asked whether this is really what you want – note that this will remove the port from the bus!
5. Click OK to close the Device Setup dialog.
Ö If you open a project created on another computer and the port names do not match (or the port configuration is not the same), the Missing Ports dialog will appear. This allows you to manually re-route ports used in the project to ports available in your system.
Mac OS X only: Port selection and activation
On the settings page for your audio card (opened via the Device Setup dialog, see above), you can specify which input and output ports are active. This allows you to use the Microphone input instead of the Line input or even to deactivate the audio card input or output completely, if required.
Ö This function is only available for Built-In Audio, standard USB audio devices and a certain number of other audio cards.
Adding input and output busses
Depending on whether you have selected the Inputs or the Outputs tab in the VST Connections window, the corresponding busses are listed, with the following information:
Column |
Description |
Bus Name |
Lists the busses. You can select and rename busses by |
|
clicking on them in this column. |
Speakers |
Indicates the speaker configuration (mono, stereo) of |
|
each bus. |
Audio Device |
This shows the currently selected ASIO driver. |
Device Port |
If a bus entry is expanded to show all speaker channels, |
|
this column shows which physical inputs/outputs on your |
|
audio hardware are used by the bus. If the bus entry is col- |
|
lapsed, only the first port used by this bus is visible here. |
Click (Outputs |
You can route the click to a specific output bus. |
tab only) |
|
|
|
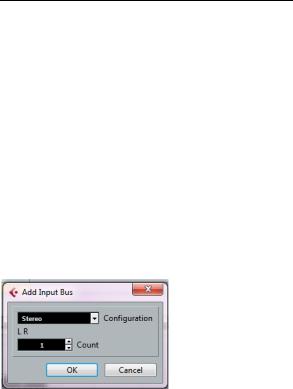
To add an input or output bus, proceed as follows:
1.Open the Inputs or Outputs tab depending on the type of bus that you want to add.
2.Click the Add Bus button.
A dialog opens.
3. Select a (channel) configuration.
You can add stereo and mono busses.
• Alternatively, you can right-click in the VST Connections window and add a bus in the desired format directly from the context menu.
The new bus appears with the ports visible.
4. For each of the speaker channels in the bus, click in the Device Port column to select a port on your audio hardware.
The pop-up menu that opens lists the ports with the names you have assigned in the Device Setup dialog.
23
VST Connections
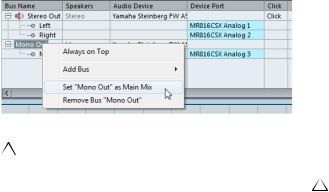
Setting the Main Mix bus (the default output bus)
The Main Mix is the output bus that each new audio, group or FX channel is automatically routed to.
Any of the output busses in the VST Connections window can be the default output bus. By right-clicking on the name of an output bus, you can set it as the Main Mix bus.
Setting the default output bus.
!The Main Mix is indicated by an orange colored speaker icon next to its name.
Presets
On the Inputs and Outputs tabs you will find a Presets menu. Here you can find three different types of presets:
•A number of standard bus configurations.
•Automatically created presets tailored to your specific hardware configuration.
On startup, Cubase analyzes the physical inputs and outputs provided by your audio hardware and creates a number of hardware-dependent presets with the following possible configurations:
•One stereo bus.
•Various combinations of stereo and mono busses.
•A number of mono busses.
•Your own user presets that you can save by clicking the Store button (“+” symbol). You can then select the stored configuration directly from the Presets pop-up menu at any time. To remove a stored preset, select it and click the Delete button (“-” symbol).
Routing
When you play back an audio track (or any other audio-re- lated channel in the Mixer), you route it to an output bus. In the same way, when you record on an audio track you select from which input bus the audio should be sent.
• You can select input and output busses in the Inspector using the Input and Output Routing pop-up menus.
Ö For audio-related channel types other than audio track channels (e.g. VST instrument channels), only the Output Routing pop-up menu is available.
When selecting an input bus for a track you can only select busses that correspond to the track’s channel configuration. Here are the details for input busses:
•Mono tracks can be routed to mono input busses or individual channels within a stereo input bus.
•Stereo tracks can be routed to mono or stereo input busses.
For output busses any assignment is possible.
!Assignments that will lead to feedback are not available in the pop-up menu. This is also indicated by a one-way symbol.
•To disconnect input or output bus assignments, select “No Bus” from the corresponding pop-up menu.
About monitoring
The Main Mix bus (the default output bus) is used for monitoring (see “Setting the Main Mix bus (the default output bus)” on page 24). You can adjust the monitoring level in the Mixer.
24
VST Connections

Editing operations
On the different tabs of the VST Connections window the corresponding busses are shown in a table containing a tree view with expandable entries. After you have set up all the required busses for a project it might be necessary to edit the names and/or change port assignments. Cubase provides a number of features to make such tasks easier.
Expanding and collapsing entries
•Bus entries can be expanded or collapsed to show or hide the corresponding speaker channels or sub-busses by clicking the “+” or “-” sign in front of the corresponding list entry.
•To expand or collapse all entries on a tab at the same time, use the “+ All” button or the “- All” button (respectively) above the tree view.
Determining how many busses a device port is connected to
To give you an idea how many busses a given port is already connected to, the busses are shown in square brackets on the Device Port pop-up menu, to the right of the port name.
Up to three bus assignments can be displayed in this way. If more connections have been made, this is indicated by a number at the far right.
Therefore, if you see the following:
Adat 1 [Stereo1] [Stereo2] [Stereo3] (+2)…
this means that the Adat 1 port is already assigned to three stereo busses plus two additional busses.
Identifying exclusive port assignments
In some cases (i.e. for certain channel types), the port assignment is exclusive. Once a port has been assigned to such a bus or channel, it must not be assigned to another bus, otherwise the connection to the first bus will be broken.
To help you identify such exclusive port assignments and avoid accidental reassignment, the corresponding ports are marked in red on the Device Port pop-up menu.
Selecting/Deselecting multiple entries
•Using the key commands [Ctrl]/[Command]-[A] (Select All) and [Shift]-[Ctrl]/[Command]-[A] (Select None), you can select and deselect all entries in the Bus Name column.
Note that for this to work, the table on the current tab needs to have the focus. This can be achieved by clicking anywhere on the background of the table.
•By holding [Shift] when selecting entries in the Bus Name column, you can select multiple entries at the same time.
This is useful for automatic renaming or changing the port assignments globally, see below.
Ö If you select a subentry (e.g. a speaker channel in a bus) the parent entry is automatically selected as well.
Selecting entries by typing the name
In the Bus Name list you can jump to an entry by typing the first letter of the bus name on the keyboard.
!This will only work if the table has the focus. To do this, simply select any list entry.
Navigating the Bus Name list using the [Tab] key
By pressing the [Tab] key you can jump to the next entry in the Bus Name list, allowing you to rename your busses quickly. Similarly, by pressing [Shift]-[Tab] you can return to the previous list entry.
Automatically renaming selected busses
You can rename all the selected busses at once using incrementing numbers or letters.
•To use incrementing numbers, select the busses that you want to rename and enter a new name for one of the busses, followed by a number.
For example, if you have eight inputs that you want to be named “In 1, In 2, …, In 8”, you select all the busses and enter the name “In 1” for the first bus. All other busses are then renamed automatically.
•To use letters from the alphabet, proceed as with numbers, but enter a capital letter instead of a number.
For example, if you have three FX channels that you want to be named “FX A, FX B, and FX C”, you select all the channels and enter the name “FX A” for the first. All other channels are then renamed automatically.
The last letter that can be used is Z. If you have more selected entries than there are letters available, the remaining entries will be skipped.
25
VST Connections

!When using letters instead of numbers, it is important to note that these must be preceded by a space. If you leave out the space before the letter or if you do enter neither a letter nor a number, only the first selected entry is renamed.
Ö You do not have to begin renaming with the topmost selected entry. The renaming will start from the bus where you edit the name, will go down the list to the bottom and then continue from the top until all selected busses have been renamed.
Changing the port assignment for a single bus
To change the port assignment for a single bus, you proceed as when you added it: Make sure that the channels are visible and click in the Device Port column to select ports.
Changing the port assignment for multiple busses
To change the port assignment (or the output routing in case of groups/FX channels) for multiple entries in the Bus Name column at the same time, you need to select the corresponding busses first.
•To assign different ports to the selected busses, press [Shift], open the Device Port pop-up menu for the first selected entry (i.e. the topmost bus) and select a device port.
All subsequent busses are automatically connected to the next available port.
•To assign the same port to all selected busses, press [Shift]-[Alt]/[Option], open the Device Port pop-up menu for the first selected entry (i.e. the topmost bus) and select a device port.
Ö You can also set all selected busses or channels to Not Connected.
Removing busses
To remove a bus you do not need, select it in the list, rightclick and select Remove Bus from the pop-up menu, or press [Backspace].
26
VST Connections
4
The Project window
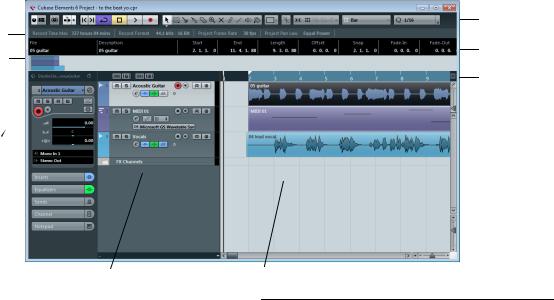
Window Overview
The Project window is the main window in Cubase. This provides you with an overview of the project, allowing you to navigate and perform large scale editing. Each project has one Project window.
Toolbar
Status line
Info line
Project
overview
Ruler
Inspector
The track list with various track types |
The event display, showing audio parts and events, MIDI parts, automation, markers, etc. |
About tracks
Track type Description
The Project window is divided vertically into tracks, with a |
|
Group |
By routing several audio channels to a Group channel, you |
|
timeline running horizontally from left to right. The follow- |
|
Channel |
can submix them, apply the same effects to them, etc. (see |
|
|
|
“Using group channels” on page 128). |
||
ing track types are available: |
|
|
||
|
|
A Group channel track contains no events as such, but dis- |
||
|
|
|
|
plays settings and automation curves for the corresponding |
Track type |
Description |
|
|
Group channel. Each Group channel track has a corre- |
Audio |
For recording and playing back audio events and audio |
|
|
sponding channel strip in the Mixer. In the Project window, |
|
|
Group channels are organized as tracks in a special Group |
||
|
parts. Each audio track has a corresponding audio channel |
|
|
|
|
|
|
Tracks folder. |
|
|
in the Mixer. |
|
|
|
|
|
|
|
|
|
An audio track can have any number of automation tracks for |
|
Instrument |
This allows you to create a track for a dedicated instrument, |
|
automating Mixer channel parameters, effect settings, etc. |
|
|
making VST instrument handling easier and more intuitive. In- |
Folder |
Folder tracks function as containers for other tracks, mak- |
|
|
strument tracks have a corresponding channel strip in the |
|
|
Mixer. Each instrument track can have any number of auto- |
||
|
ing it easier to organize and manage the track structure. |
|
|
|
|
|
|
mation tracks in the Project window. However, Volume and |
|
|
They also allow you to edit several tracks at the same time, |
|
|
|
|
|
|
Pan are automated from within the Mixer. For more informa- |
|
|
see “Organizing tracks in folder tracks” on page 64. |
|
|
|
|
|
|
tion on instrument tracks, see the chapter “VST instruments |
|
|
|
|
|
|
FX Channel |
FX channel tracks are used for adding send effects. Each FX |
|
|
and instrument tracks” on page 145. |
|
channel can contain up to eight effect processors – by rout- |
|
MIDI |
For recording and playing back MIDI parts. Each MIDI track |
|
ing effect sends from an audio channel to an FX channel, you |
|
||
|
|
|
has a corresponding MIDI channel strip in the Mixer. |
|
|
send audio from the audio channel to the effect(s) on the FX |
|
|
|
|
|
|
A MIDI track can have any number of automation tracks for |
|
|
channel. Each FX channel has a corresponding channel strip |
|
|
|
|
|
|
automating Mixer channel parameters, insert and send ef- |
|
|
in the Mixer – in essence an effect return channel, see the |
|
|
|
|
|
|
fect settings, etc. |
|
|
chapter “Audio effects” on page 131. |
|
|
|
|
|
|
|
|
|
All FX channel tracks are automatically placed in a special FX |
|
Marker |
Marker tracks display markers which can be moved and re- |
|
channel folder in the track list, for easy management. |
|
|
named directly in the Project window (see the chapter “Us- |
|
An FX channel can also have any number of automation |
|
|
ing markers” on page 108). A project can have only one |
|
tracks for automating Mixer channel parameters, effect |
|
|
marker track. |
|
settings, etc. |
|
|
|
|
|
|
|
|
|
|
|
|
|
28
The Project window

Track type |
Description |
Arranger |
The arranger track is used for arranging your project, by |
(Cubase Elemarking out sections in the project and determining in |
|
ments only) |
which order they are to be played back. See the chapter |
|
“The arranger track (Cubase Elements only)” on page 101 |
|
for details. |
Ruler |
Ruler tracks contain additional rulers, displaying the time- |
|
line from left to right. You can use any number of ruler |
|
tracks, each with a different display format if you wish. See |
|
“The ruler” on page 34 for more information about the ruler |
|
and the display formats. |
Video |
For playing back video events. A project can only have one |
|
video track. |
|
|
About parts and events
The tracks in the Project window contain parts and/or events. Events are the basic building blocks in Cubase. Different event types are handled differently in the Project window:
•Video events and automation events (curve points) are always viewed and rearranged directly in the Project window.
•MIDI events can always be found in MIDI parts, which are containers for one or more MIDI events. MIDI parts are rearranged and manipulated in the Project window. To edit the individual MIDI events in a part, you have to open the part in a MIDI editor (see “The MIDI editors” on page 252).
•Audio events can be displayed and edited directly in the Project window, but you can also work with audio parts containing several events. This is useful if you have a number of events which you want to treat as one unit in the project. Audio parts also contain information about the time position in the project.
An audio event and an audio part
Getting on-the-fly info with the Arrow tool
If the “Select Tool: Show Extra Info” option is activated in the Preferences dialog (Editing–Tools page), a tooltip will be shown for the Arrow tool, displaying information depending on where you point it. For example, in the Project window event display, the tool will show the current pointer position and the name of the track and event you are pointing at.
The track list
The track list displays all the tracks used in a project. It contains name fields and settings for the tracks. Different track types have different controls in the track list. To see all available controls, you may have to resize the track in the track list (see “Resizing tracks” on page 62).
The track list showing a MIDI track, an audio track with an automation track, and a VST instrument track
• Using the Track Controls Settings dialog you can decide which controls are visible for each track type, see “Customizing track controls” on page 337.
The Inspector
The area to the left of the track list is called the Inspector. This shows additional controls and parameters for the track you have selected in the track list. If several tracks are selected, the Inspector shows the setting for the first (topmost) selected track.
Opening the Inspector
To show the Inspector, proceed as follows:
1. On the toolbar, click the “Set up Window Layout” button.
A transparent pane appears, covering the Project window.
29
The Project window

2. In the gray area in the middle, activate the Inspector option.
Not all Inspector tabs are shown by default. You can show/hide Inspector sections by right-clicking on an Inspector tab and activating/deactivating the desired options on the Inspector Setup context menu.
Inspector handling
For most track classes, the Inspector is divided into a number of sections, each containing different controls for the track. Which sections are available in the Inspector depends on the selected track.
• You can hide or show sections by clicking on their names.
Clicking the name for a hidden section brings it into view and hides the other sections. [Ctrl]/[Command]-clicking the section name allows you to hide or show a section without affecting the other sections. [Alt]/[Op- tion]-clicking a section name shows or hides all sections in the Inspector.
• You can also use key commands to show different Inspector sections.
These are set up in the Key Commands dialog, see “Setting up key commands” on page 344.
Ö Hiding a section does not affect its functionality. For example, if you have set up a track parameter or activated an effect, your settings will still be active even if you hide the respective Inspector section.
Ö Make sure that you right-click on an Inspector tab and not on the empty area below the Inspector, as this will open the Quick context menu instead.
Inspector sections
The Inspector contains the controls that can be found on the track list, plus some additional buttons and parameters. In the table below, these additional settings and the different sections are listed. Which sections are available for which track type is described in the following sections.
Parameter |
Description |
Auto Fades |
Opens a dialog in which you can make separate Auto |
Settings |
Fade settings for the audio track, see “Making Auto Fade |
button |
settings for individual tracks” on page 100. |
Edit Channel |
Opens the Channel Settings window for the track, allow- |
Settings |
ing you to view and adjust effect and EQ settings, etc., |
|
see “Using Channel Settings” on page 122. |
Volume |
Use this to adjust the level for the track. Changing this |
|
setting will move the track’s fader in the Mixer window, |
|
and vice versa. See “Setting volume in the Mixer” on page |
|
118 to learn more about setting levels. |
Pan |
Use this to adjust the panning of the track. As with the |
|
Volume setting, this corresponds to the Pan setting in the |
|
Mixer. |
Delay |
This adjusts the playback timing of the audio track. Positive |
|
values delay the playback while negative values cause the |
|
track to play earlier. The values are set in milliseconds. |
Input |
This lets you specify the input bus or MIDI input for the |
Routing |
track. See “Setting up busses” on page 22 for informa- |
|
tion about input busses. |
|
|
30
The Project window
Loading...