


 Loading...
English
Cristina Bachmann, Heiko Bischoff, Christina Kaboth, Insa Mingers, Matthias Obrecht, Sabine Pfeifer, Kevin Quarshie, Benjamin Schütte
This PDF provides improved access for vision-impaired users. Please note that due to the complexity and number of images in this document, it is not possible to include text descriptions of images.
The information in this document is subject to change without notice and does not represent a commitment on the part of Steinberg Media Technologies GmbH. The software described by this document is subject to a License Agreement and may not be copied to other media except as specifically allowed in the License Agreement. No part of this publication may be copied, reproduced, or otherwise transmitted or recorded, for any purpose, without prior written permission by Steinberg Media Technologies GmbH. Registered licensees of the product described herein may print one copy of this document for their personal use.
All product and company names are ™ or ® trademarks of their respective owners. For more information, please visit www.steinberg.net/trademarks.
© Steinberg Media Technologies GmbH, 2015.
All rights reserved.

Table of Contents
6Introduction
6Welcome!
7 About the Documentation and the Help
8 Typographical Conventions
9How You Can Reach Us
10System Requirements and Installation
10System Requirements
11Installing the Program
12Activating Your License
15 Hardware Installation
17 Setting up Your System
NGLISHE
4
5

Introduction
Welcome!
Congratulations and thank you for purchasing one of the range of Cubase 8 music production systems!
Boasting core technologies proven throughout the industry to perform with consistency and deliver high quality, Cubase Elements 8 and the hardware-bundled versions, Cubase AI 8 and Cubase LE 8, feature essential tools for composing, recording, editing and mixing that will help you to turn sparks of musical inspiration into a blazing masterpiece. Combining the very best sound quality, intuitive handling with highly advanced audio and MIDI editing, version eight condenses over 30 years of Steinberg development into the most cutting-edge line-up of digital audio workstations anywhere.
Merging technology and creativity, bringing innovation and inspiration together — the list of features in Cubase perfectly reflects this approach, inviting you to venture into new artistic territory and let your creativity reign free. Whether you are a professional, a hobby musician, a student or a teacher, Cubase has it all covered and supports you through every stage of music production, from the inception of the first fleeting idea right down to the final mix.
In case you are using Cubase LE or AI versions make sure to trial the great additions to Cubase Elements by simply entering a trial activation code — there’s no additional installation required!
Please keep in touch with us and let us know about your thoughts, suggestions and experiences with our software. Visit our website, drop by our forum, follow us through our social media channels, sign up for our newsletter or reach out to the contact channels available in your region.
Enjoy your copy of Cubase! We look forward to hearing from you.
Your Steinberg Cubase Team
NGLISHE
6

Introduction
About the Documentation and the Help
About the Documentation and the Help
The documentation are available in the PDF format and divided into the following sections:
•To open the help in the program, select Help > Documentation.
•On Windows systems, you open the PDF documents via the Start menu, from the Steinberg Cubase folder.
•On Mac OS X systems, the PDF documents are located in the
/Library/Documentation/Steinberg/Cubase 8 folder.
NOTE
To read the PDF documents, a suitable PDF reader application must be installed on your computer.
Quick Start Guide
This is the document you are reading. It covers the following areas without going into details:
•System requirements, installation procedure, and license activation.
•Setting up your system.
Operation Manual
The Operation Manual is the main Cubase reference documentation, with detailed descriptions of operations, parameters, functions, and techniques.
Plug-in Reference
This document describes the features and parameters of the included VST plug-ins and VST instruments.
7

Introduction
Typographical Conventions
HALion Sonic SE
This document describes the features and parameters of the included VST instrument HALion Sonic SE.
Groove Agent SE (Cubase Elements only)
This document describes the features and parameters of the included VST instrument Groove Agent SE.
Remote Control Devices
This document lists the supported MIDI remote control devices.
Dialog Help
To get information about the active dialog, click its Help button.
Typographical Conventions
Many of the default key commands in Cubase use modifier keys, some of which are different depending on the operating system. For example, the default key command for Undo is [Ctrl]-[Z] on Windows and [Command]-[Z] on Mac OS X.
When key commands with modifier keys are described in this manual, they are shown with the Windows modifier key first, in the following way:
•[Win modifier key]/[Mac modifier key]-[key]
For example, [Ctrl]/[Command]-[Z] means “press [Ctrl] on Windows or [Command] on Mac OS X, then press [Z]”.
NGLISHE
8

Introduction
How You Can Reach Us
Similarly, [Alt]/[Option]-[X] means “press [Alt] on Windows or [Option] on Mac OS X, then press [X]”.
NOTE
This manual often refers to right-clicking, for example, to open context menus. If you are using a Mac with a single-button mouse, hold down [Ctrl] and click.
How You Can Reach Us
On the Steinberg Hub menu in Cubase you find items linking to additional information.
The menu contains links to various Steinberg web pages. Selecting a menu item automatically launches your browser and opens the page. On these pages you can find support and compatibility information, answers to frequently asked questions, information about updates and other Steinberg products, etc. This requires that you have a web browser installed on your computer, and a working internet connection.
9

System Requirements and
Installation
System Requirements
Your computer must meet the following minimum requirements for the PC and Mac versions of Cubase:
PC |
Mac |
Windows 7/8.x |
OS X versions 10.9/10.10 |
|
|
Intel or AMD dual-core CPU 4 GB RAM
10 GB free HD space
1920 x 1080 display resolution (minimum: 1366 x 768) Graphics card with DirectX 10 and WDDM 1.1 support (Windows only)
OS compatible audio hardware DVD ROM dual-layer drive
Internet connection required for activation, account setup, and personal/product registration. Additional downloads may be required for the installation.
For recommended systems and support of future operating systems, please refer to the Support section on our website www.steinberg.net.
NGLISHE
10
System Requirements and Installation
Installing the Program
Installing the Program
You have two possibilities to install your program, via the Start Center application or manually.
Launching Installation via the Start Center
From the Start Center application you can easily install your program and inform yourself about the package contents.
•For Steinberg software delivered with an installation medium, the Start Center launches automatically as soon as you insert the disc in your computer’s CD/DVD drive, provided that autorun is activated.
•For Steinberg software downloaded from the internet, the Start Center launches when you double-click the downloaded file.
PROCEDURE
1.In the Start Center, choose your preferred language.
2.Click Install.
3.Follow the instructions on screen.
Launching Installation Manually
If you do not want to install the program via the Start Center, you can install it manually.
•On Windows systems, double-click the file Setup.exe and follow the instructions on screen.
•On Mac OS X systems, double-click the file
Cubase LE AI Elements 8.pkg and follow the instructions on screen.
11

System Requirements and Installation
Activating Your License
Activating Your License
IMPORTANT
The process for license activation is described in detail on the Steinberg web site. To open the corresponding page, follow the Activation & Registration link in the Start Center.
Cubase Elements, Cubase AI, and Cubase LE use a software-based copy protection scheme. The so-called Soft-eLicenser is installed automatically with your version of Cubase. It can be accessed via the eLicenser Control Center application that is installed automatically with the product.
Cubase Elements
After installation, you must activate your product. For information on how to activate your product visit www.steinberg.net/activate.
NGLISHE
12

System Requirements and Installation
Activating Your License
Registering Cubase Elements
Register your product at the MySteinberg online customer portal. As a registered user, you are entitled to technical support, you gain access to exclusive offers such as software updates and upgrades, and more.
PREREQUISITE
Make sure that you have a working internet connection.
PROCEDURE
1.Start your software.
2.Select Steinberg Hub > Registration.
An online registration form opens in your web browser.
3.Follow the instructions on screen to register at MySteinberg.
Cubase AI and Cubase LE
To be entitled to technical support, you must register Cubase AI and Cubase LE. Once you have subscribed to the Steinberg newsletter, you are kept aware of updates and other news regarding Cubase.
For information on how to activate your product visit
www.steinberg.net/activate.
13

System Requirements and Installation
Activating Your License
Registering and Activating the DVD-Version
If you have received Cubase AI or Cubase LE on a DVD, you can use the program out of the box for 30 days. After this period, you must register your program and activate your license permanently.
When you start Cubase AI or Cubase LE, a dialog opens that informs you for how much longer you can use the program without registration and activation.
Registering and Activating the Download-Version
If you have downloaded Cubase AI or Cubase LE from MySteinberg using a download access code, you must activate Cubase AI or Cubase LE permanently using the activation code that you have received at MySteinberg. Cubase AI or Cubase LE are automatically registered when they are activated.
For information on how to activate your product visit
www.steinberg.net/activate.
NGLISHE
14

System Requirements and Installation
Hardware Installation
Hardware Installation
Installing the Audio Hardware and its Driver
PROCEDURE
1.Install the audio hardware and related equipment on the computer, as described in the hardware documentation.
2.Install the driver for the audio hardware.
A driver is a piece of software that allows a program to communicate with a certain piece of hardware. In this case, the driver allows Cubase to use the audio hardware. Depending on the operating system of your computer, there are different types of drivers that can be used.
Dedicated ASIO Drivers
Professional audio hardware often comes with an ASIO driver written especially for the device. This allows for direct communication between Cubase and the audio hardware. As a result, the devices with specific ASIO drivers can provide lower latency (input-output delay), which is crucial when monitoring audio via Cubase or using VST instruments.
The ASIO driver may also provide special support for multiple inputs and outputs, routing, synchronization, etc.
ASIO drivers are provided by the audio hardware manufacturers. Make sure to check the manufacturer’s web site for the latest driver versions.
IMPORTANT
If your audio hardware comes with a specific ASIO driver, we strongly recommend that you use this.
15

System Requirements and Installation
Hardware Installation
Generic Low Latency ASIO Driver (Windows Only)
On Windows systems, you can use the Generic Low Latency ASIO driver. This driver provides ASIO support for any audio hardware supported by Windows, thus allowing for low latency. The Generic Low Latency ASIO driver provides the Windows Core Audio technology in Cubase. No additional driver is needed. This driver is included with Cubase and does not require any special installation.
NOTE
This driver should be used if no specific ASIO driver is available. Although the Generic Low Latency ASIO driver supports all audio devices, you might get better results with on-board audio cards than with external USB audio interfaces.
Mac OS X Drivers (Mac only)
If you are using a Macintosh computer, make sure that you are using the latest Mac OS X drivers for your audio hardware. Follow the manufacturer’s instructions to install the driver.
Testing the Audio Hardware
To make sure that the audio device works as expected, perform the following tests:
•Use any software included with the hardware to make sure that you can record and play back audio without problems.
•If the hardware is accessed via a standard operating system driver, try playing back audio using the standard audio application of the computer, for example, Windows Media Player or Apple iTunes.
NGLISHE
16

System Requirements and Installation
Setting up Your System
Installing a MIDI Interface or USB MIDI Keyboard
Although many USB MIDI keyboards and MIDI interfaces are plug&play devices, you may have to install a dedicated device driver. Follow the installation procedure described in the documentation that came with the device.
NOTE
You should also check the manufacturer’s web site for the latest driver updates.
Setting up Your System
Selecting the Driver for Your Audio Device
Before you can set up the routing for your audio signals and start recording, you need to make sure that the correct ASIO driver is selected.
PROCEDURE
1.Select Devices > Device Setup.
2.In the Device Setup dialog, click the VST Audio System entry on the left.
The VST Audio System page is shown on the right.
3.On the ASIO Driver pop-up menu, select the driver that you want to use.
4.Click OK.
17
System Requirements and Installation
Setting up Your System
Setting Up the VST Connections
The VST Connections dialog allows you to set up the routing of input and output signals between Cubase and your audio hardware. These connections are called busses. In this section you learn how to set up the busses for playback and recording.
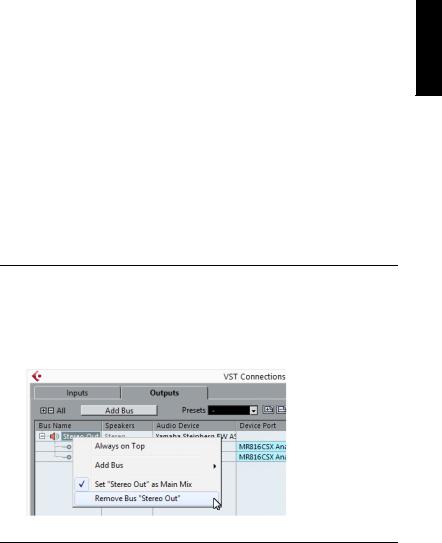
Removing Busses
Before you add busses, it is recommended to remove any outputs that were automatically added by Cubase.
PROCEDURE
1.Select Devices > VST Connections.
2.In the VST Connections dialog, select the Outputs tab.
3.In the Bus Name column, right-click the top entry and select Remove Bus from the context menu.
If necessary, repeat this step for any further busses.
NGLISHE
18

System Requirements and Installation
Setting up Your System
Adding Outputs
You must set up the outputs for playing back audio in Cubase.
PREREQUISITE
Remove the busses that were automatically added by Cubase.
PROCEDURE
1.Select Devices > VST Connections.
2.In the VST Connections dialog, select the Outputs tab.
3.Click Add Bus.
4.In the Add Output Bus dialog, make your settings.
5.Click Add Bus.
The new bus is added, allowing you to have audio in Cubase routed to your audio hardware.
6.Optional: If you want to change the output ports that were selected automatically, open the Device Port pop-up menu and select different ports.
Depending on your audio hardware, more than two output ports might be available. For most cases we recommend to use the main stereo outputs.
19

System Requirements and Installation
Setting up Your System
RELATED LINKS
“Removing Busses” on page 18
Adding Inputs
You must set up the inputs for recording into Cubase.
PROCEDURE
1.Select Devices > VST Connections.
2.In the VST Connections dialog, select the Inputs tab.
3.In the Bus Name column, right-click the top entry and select Remove Bus from the context menu.
If necessary, repeat this step for any further busses.
4.Click Add Bus.
5.In the Add Input Bus dialog, make your settings.
6.Click Add Bus.
The new bus is added, allowing you to have audio from the input of your audio device routed to Cubase for recording.
7.Optional: If you want to change the input ports that were selected automatically, open the Device Port pop-up menu and select different ports.
RESULT
You are now ready to record audio in Cubase and play it back.
IMPORTANT
The Cubase Start Center provides a link to a demo project that can be downloaded from the Steinberg web site. If you can play back this project, you have set up your program properly.
NGLISHE
20
System Requirements and Installation
Setting up Your System
NOTE
To get started with Cubase, we recommend watching the video tutorials on the Steinberg YouTube Channel including a demonstration of the new features of Cubase.
21
Deutsch
Cristina Bachmann, Heiko Bischoff, Christina Kaboth, Insa Mingers, Matthias Obrecht, Sabine Pfeifer, Kevin Quarshie, Benjamin Schütte
Diese PDF wurde für die Verwendung von Screenreader-Software optimiert. Beachten Sie, dass es aufgrund der Komplexität und großen Anzahl von Bildern in diesem Dokument nicht möglich ist, alternative Bildbeschreibungen einzufügen.
Die in diesem Dokument enthaltenen Informationen können ohne Vorankündigung geändert werden und stellen keine Verpflichtung seitens der Steinberg Media Technologies GmbH dar. Die hier beschriebene Software wird unter einer Lizenzvereinbarung zur Verfügung gestellt und darf ausschließlich nach Maßgabe der Bedingungen der Vereinbarung (Sicherheitskopie) kopiert werden. Ohne ausdrückliche schriftliche Erlaubnis durch die Steinberg Media Technologies GmbH darf kein Teil dieses Handbuchs für irgendwelche Zwecke oder in irgendeiner Form mit irgendwelchen Mitteln reproduziert oder übertragen werden. Registrierte Lizenznehmer des Produkts dürfen eine Kopie dieses Dokuments zur persönlichen Nutzung ausdrucken.
Alle Produktund Firmennamen sind ™ oder ® Marken der entsprechenden Firmen. Weitere Informationen hierzu finden Sie auf der Steinberg-Website unter www.steinberg.net/trademarks.
© Steinberg Media Technologies GmbH, 2015.
Alle Rechte vorbehalten.

Inhaltsverzeichnis
26 Einleitung
26Willkommen!
27Die Dokumentation und die Hilfe
29Typographische Konventionen
30So können Sie uns erreichen
32 Systemanforderungen und Installation
32Systemanforderungen
33Programm installieren
34Lizenzaktivierung
36 Hardware-Installation
39 System einrichten
EUTSCHD
24
25

Einleitung
Willkommen!
Vielen Dank, dass Sie sich für den Erwerb eines Musikproduktionssystems aus der Cubase-Familie entschieden haben!
Cubase Elements 8 und die als Hardware-Bundles erhältlichen Versionen Cubase AI 8 und Cubase LE 8 bieten alle Technologien, die in der Musikindustrie als verlässlich und für höchste Qualitätsansprüche unerlässlich angesehen werden. Mit den Funktionen für Komposition, Aufnahme, Bearbeitung und Abmischung können Sie auch eine kleine musikalische Idee in ein großes Meisterwerk verwandeln. Mit der Kombination aus höchster Soundqualität, intuitiver Bedienung und hochentwickelter Audiound MIDI-Bearbeitung kann Version 8 nach mehr als 30 Jahren Entwicklung bei Steinberg mit dem fortschrittlichsten Funktionsumfang aufwarten, den der Markt für DAWs zu bieten hat.
Die Liste der Cubase-Features spiegelt unseren Anspruch wieder, Technologie und Kreativität zu verschmelzen und Innovation und Inspiration zusammenzubringen, damit Sie Ihrer Kunst und Kreativität freien Lauf lassen können. Ganz gleich, ob Sie professionell, als Hobbymusiker, als Student oder als Lehrer arbeiten, Cubase begleitet Sie von der ersten vagen Idee über deren Entwicklung bis hin zum finalen Mix.
Wenn Sie Cubase LE oder AI verwenden, probieren Sie die großartigen Features von Cubase Elements aus, indem Sie einfach den Aktivierungscode für die Trial-Version eingeben. Eine Neuinstallation ist nicht erforderlich!
Bitte bleiben Sie mit uns in Verbindung und teilen Sie Ihre Gedanken, Vorschläge und Erfahrungen mit uns. Besuchen Sie unsere Website, schauen Sie in unserem Forum vorbei, folgen Sie uns in den sozialen
EUTSCHD
26

Einleitung
Die Dokumentation und die Hilfe
Medien, abonnieren Sie unsere Newsletter oder wenden Sie sich an unsere für Ihre Region zuständigen Mitarbeiter.
Viel Spaß mit Ihrer Cubase-Version! Wir freuen uns auf Sie!
Das Steinberg Cubase-Team
Die Dokumentation und die Hilfe
Die Dokumente sind im Format Adobe Acrobat (Dateinamenerweiterung .pdf) verfügbar und können wie folgt aufgerufen werden:
•Um die Hilfe im Programm zu öffnen, klicken Sie auf Hilfe > Dokumentation.
•Unter Windows öffnen Sie die PDF-Dokumente über das
Start-Menü im Ordner Steinberg Cubase.
•Unter Mac OS X liegen die PDF-Dokumente im Ordner
/Library/Documentation/Steinberg/Cubase 8.
HINWEIS
Damit Sie die PDF-Dokumente lesen können, muss ein PDF-Reader auf Ihrem Computer installiert sein.
Schnelleinstieg
Das ist das Dokument, das Sie vor sich haben. Es deckt die folgenden Bereiche ab, ohne jedoch zu sehr ins Detail zu gehen:
•Systemvoraussetzungen, Installationsprozess und Lizenzaktivierung.
•System einrichten.
27

Einleitung
Die Dokumentation und die Hilfe
Benutzerhandbuch
Das Benutzerhandbuch ist die wichtigste Informationsquelle mit ausführlichen Beschreibungen aller Parameter, Funktionen und Arbeitsweisen in Cubase.
PlugIn-Referenz
Dieses Dokument beschreibt die Funktionen und Parameter der mitgelieferten VST-PlugIns und VST-Instrumente.
HALion Sonic SE
Dieses Dokument beschreibt die Funktionen und Parameter des mitgelieferten VST-Instruments HALion Sonic SE.
Groove Agent SE (nur Cubase Elements)
Dieses Dokument beschreibt die Funktionen und Parameter des mitgelieferten VST-Instruments Groove Agent SE.
Remote Control Devices
Dieses Dokument listet die unterstützten MIDI-Fernbedienungsgeräte auf.
Dialog-Hilfe
Wenn Sie Informationen über den aktiven Dialog erhalten möchten, klicken Sie auf den Hilfe-Schalter.
EUTSCHD
28

Einleitung
Typographische Konventionen
Typographische Konventionen
Für viele Standardtastaturbefehle in Cubase werden Sondertasten verwendet, die sich je nach Betriebssystem unterscheiden. Der Standardtastaturbefehl für »Rückgängig« ist z.B. unter Windows [Strg]-[Z] und unter Mac OS X [Befehlstaste]-[Z].
Wenn in diesem Handbuch Tastaturbefehle mit Sondertasten beschrieben werden, stehen die Windows-Sondertasten an erster Stelle:
•[Windows-Sondertaste]/[Mac-Sondertaste]-[Taste]
So bedeutet z.B. [Strg]-Taste/[Befehlstaste]-[Z]: »Drücken Sie die [Strg]-Taste unter Windows bzw. die [Befehlstaste] unter Mac OS X und dann die Taste [Z]«.
Entsprechend bedeutet [Alt]-Taste/[Wahltaste]-[X]: »Drücken Sie die [Alt]-Taste unter Windows bzw. die [Wahltaste] unter Mac OS X und dann die Taste [X]«.
HINWEIS
Sie werden in diesem Handbuch oft dazu aufgefordert, mit der rechten Maustaste zu klicken, z.B. um ein Kontextmenü zu öffnen. Wenn Sie auf einem Mac mit einer Eintastenmaus arbeiten, müssen Sie dafür beim Klicken die [Ctrl]-Taste gedrückt halten.
29

Einleitung
So können Sie uns erreichen
So können Sie uns erreichen
Im Menü »Steinberg Hub« von Cubase finden Sie Optionen, über die Sie auf weitere Informationen zugreifen können.
Das Menü enthält Links zu diversen Steinberg-Seiten im Internet. Beim Auswählen einer Menüoption wird automatisch Ihr Browser gestartet und die entsprechende Seite geöffnet. Hier erhalten Sie technische Unterstützung und Informationen zur Kompatibilität, Antworten auf häufig gestellte Fragen, Informationen über Updates und andere Steinberg-Produkte usw. Dazu muss auf Ihrem Computer ein Web-Browser installiert sein und Sie benötigen eine aktive Internetverbindung.
EUTSCHD
30
Loading...