


 Loading...
This PDF provides improved access for vision-impaired users. Please note that due to the complexity and number of images in this document, it is not possible to include text descriptions of images.
The information in this document is subject to change without notice and does not represent a commitment on the part of Steinberg Media Technologies GmbH. The software described by this document is subject to a License Agreement and may not be copied to other media except as specifically allowed in the License Agreement. No part of this publication may be copied, reproduced, or otherwise transmitted or recorded, for any purpose, without prior written permission by Steinberg Media Technologies GmbH. Registered licensees of the product described herein may print one copy of this document for their personal use.
All product and company names are ™ or ® trademarks of their respective holders. For more information, please visit www.steinberg.net/trademarks.
© Steinberg Media Technologies GmbH, 2015.
All rights reserved.

Table of Contents
4Preface
6Overview
6Quick Guide
7Cubase / Nuendo Setup
9VST Connect
9User Interface Overview 10 Connection
12 Control Room
14 Talkback
15 Mixer
15 Performer Monitor (Headphone) Mix
16 Recording Mix
17 Cubase/Nuendo Menus
18 Event Monitor
20 Setup Tabs
20 |
CONFIGURATION |
22 |
PERFORMER |
22 |
MANAGER |
24RECORDINGS
24Toolbox Items
25Status and File Transfer
25Performer HD Recording
27Drag and Drop File Transfer
28VST Connect Monitor
29VST Connect Performer
29User Interface Overview
30Connection
31Performer Monitor (Headphone) Mix
33Effects
33Reverb
34EQ
34Compressor
35Inserts
35Toolbox Items
36Status and File Transfer
37Settings
38Plug-In Manager
39Using a VST Instrument
40Troubleshooting
40Connection
40Server Not Responding
41Avoid Audio Dropouts
41Avoid Feedback
41More ...
3

Preface
by Karl (Charlie) Steinberg
Welcome to VST Connect 3! We are very proud to present this exciting new version of VST Connect, which features an all new user interface and mixer, significantly simplified setup for the engineer, and many more new features and improvements.
VST Connect has been used by skilled and professional producers all over the world to record artists from all over the world conveniently and with highest audio quality standards using the affordable PRO version. And hobbyists and serious amateurs have recorded friends and colleagues with the SE version coming for free with the latest Cubase and Nuendo versions.
With VST Connect an engineer can connect to a remote artist and create a situation, which is entirely similar to recording somebody next door, including video to see each other through the virtual Control Room window. The artist does not have to do anything but perform, just like in a professional studio. All that is required on his or her end is a decent microphone, headphones, and audio interface. The artist doesn't need any DAW, but simply downloads and installs the freely available "VST Connect Performer" application from the Steinberg website, available for Apple OSX, Windows, and iOS (iPad). Once installed, it is sufficient to start this application and connect to the studio; everything else, even including setup of the audio and video devices and connections, can be remote-controlled by the connected studio engineer. This allows for artists and talents to concentrate on their job and use this new technology even when they are not technically skilled.
With this third iteration of VST Connect also comes an incredibly simplified setup procedure for the studio engineer. From Cubase 8 and Nuendo 7 on, there is a menu allowing to incorporate the entire setup for VST Connect in one single step, either from an empty project, or an already elaborated production. It also utilizes the built-in Cue Mix and Control Room features of Cubase/Nuendo in exactly the same way as they are being used in the room-to-room studio! Using the PRO version, high resolution ("HD") and glitch-free audio files recorded on the Performer end can be transferred after the job. So now, the recording situation is entirely transparent, whether the artist is located next room, or on the other side of our precious planet.
We have been working on connecting musicians and talents over the Internet for more than 10 years now. Having come a long way from the early 80s, when “Internet” wasn't yet a word and we just started to send our first e-mails to those "chosen few" who even knew that remote communication was applicable, it is truly exciting for me to see how far it has come, and I'm particularly amazed to be part of this process.
4

Preface
There are too many colleagues at Steinberg and elsewhere to mention, who have helped to make this dream come true, so I hope they don't mind if I express my gratitude to all of them here. In particular, I would like to thank Michael Spork who has provided at least as much of the programming work as myself, and my very long term friend and partner Manfred Rürup, with whom I am happy to still share the experience of these amazing developments of our brave new world.
October 2014
5

Overview
Quick Guide
VST Connect is used by two people, the artist or talent performing vocals or other instrument, and an engineer in a studio using Cubase/Nuendo along with the VST Connect components. The artist downloads and installs the VST Connect Performer application or app. The Apple OSX and Microsoft Windows versions are freely downloadable from the Steinberg website, the iPad IOS version is very affordable. Everything else that is required on the artist side is a microphone, headphone, and audio interface along with a suitable driver. For a test, even the built-in hardware can be used, but for reasonable quality recordings, a good audio interface like the Steinberg UR22 is recommended.
For a quick start, and also for explaining some of the new features of this version, we will start by describing the steps necessary on the Cubase/Nuendo end, assuming the artist is ready to go and has installed and launched the VST Connect Performer application (or app).
For the impatient, and those already familiar with previous versions of VST Connect, here is a super-quick rundown how to start remote recording instantly:
PROCEDURE
1.Create a new Cubase/Nuendo project or use an existing one.
2.Access the Project/VST Connect menu and choose "Create VST Connect".
3.If not already present, create a Talkback channel using "Add Talkback" in the same menu.
4.If the VST Editor is not already visible, choose "Open Editor".
5.Enter your name in the "Name" field and click the "Login" button. A code appears in the “Key” field; pass this to the artist and let him/her enter it in the Performer app "Key" field and hit the "Connect" button.
RESULT
You can see, hear, and immediately record the artist now, just like you would record yourself or somebody else next door!
6

Overview
Cubase / Nuendo Setup
Now let's have a look at the details.
Cubase / Nuendo Setup
With version 3 of VST Connect comes an all new sub-menu in Cubase/Nuendo that you can find under the "Project" menu. To begin with, let's assume that you start from scratch, so the first step is to launch Cubase/Nuendo and
PROCEDURE
1.create a new empty project, using either the "Empty", "Default", or your preferred default project template. To set up a VST Connect session, all you have to do is to
2.select "Create VST Connect" from the VST Connect menu. Depending on
whether you are using the built-in VST Connect SE, or have purchased the VST Connect PRO version, you will find this in the accordingly labeled menu. This will create an Input channel with the VST Connect plug-in, possibly (if not existing already) create a Cue Mix Channel in the Control Room Mixer, install the VST Connect Cue plug-in in that channel, and create an audio track in the arrangement, which is readily set up to record and chat with a remote artist.
3.You can create more such audio tracks from the VST Connect menu ("Create Performer Track"), or right click and choose "Duplicate Track" if you need several recording tracks like for double-tracking, two-part guitars, choir, or
various versions etc. This is similar to creating a new Audio Track and select "VST Connect" as its input audio source.
The only thing that is left to do, if you haven't already done so is to create a Talkback setup. You have to do this only once. For convenience, there is an entry in the VST Connect menu labeled "Create Talkback" which you should select now.
4.Then make sure that the Talkback channel of the Control Room is assigned an audio input with your Talkback (abbreviated: TB) microphone attached. This is done in the "Devices" menu of Cubase/Nuendo:
5.Select "VST Connections" (not to be confused with "VST Connect") in the "Devices" menu and then, access the rightmost tab labeled "Studio". You should see the "Talkback" row; assign the according audio port to which your TB microphone is connected (you may have to click the "+" plus icon to open up the connections row). This is the same procedure as assigning audio ports in the "Inputs" tab of the VST Connections panel.
NOTE
If you have never recorded an artist or yourself in your studio using the Control Room, you might consider having look around the Control Room and its settings in the "Studio" tab and/or refer to the Control Room section of the Cubase/Nuendo manual. There are many useful functions available there that relate to professional studio recording and monitoring.
7

Overview
Cubase / Nuendo Setup
To access the Control Room Mixer, use the "Devices" menu and there choose "Control Room Mixer". You can also use the top left control in the MixConsole window to show the Control Room mixer on the right hand side of Cubase/Nuendos' mixer window. For more details on this, again refer to the related sections in the Cubase/Nuendo manual.
8
VST Connect
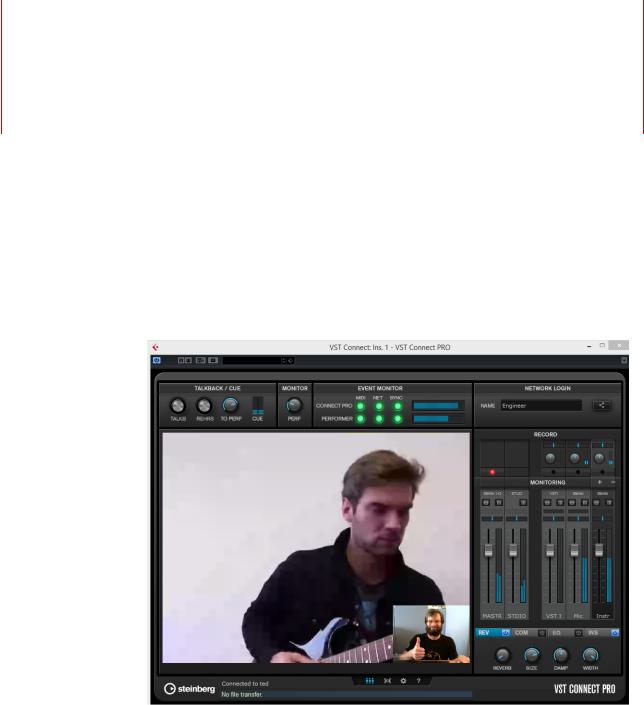
User Interface Overview
•On the top left, Talkback can be controlled. These controls are linked to the according controls in the Cubase/Nuendo Control Room Mixer. See TALKBACK how to use this.
•The top middle section shows status information, none of these can be changed, they are for informational purpose only. See EVENT MONITOR.
•The top right section is where you connect to the artist. See CONNECTION for further details
•To the middle left, usually the Performer video is displayed, but depending on other settings, also the large mixer view or settings pages can be seen. See SETUP TABS section for more information on this.
•To the right, the Monitor Mixer is shown. See MIXER section for details.
9

VST Connect
Connection
Connection
1
Now you are ready to record the remote artist. You should see the VST Connect plug-in user interface; if that window has been closed accidentally, you can re-open it by selecting "Open Editor" in the Cubase/Nuendo "Project/VST Connect" menu.
PROCEDURE
1.If you haven't done so yet, type your name in the "Name" field in the top right "Network login" section. This can be your real name, or a nickname that the artist will see.
2.Click on the "Login" button right to the name field. A two-part number ("Key") will appear in the second field below the name, provided you are connected to the Internet. Communicate this number to the artist, for instance via SMS, email, or phone.
3.Ask the artist to start the Performer application and enter a name in the "Name" field in top right section, also labeled "Network Login", and to enter the "Key" number into the according field. Make sure that there is a blank (space) between the two groups of numbers.
4.Ask the artist to click the "Connect" button.
If the Performer should be connected in your Local Area Network (LAN), and provided that you are running the PRO version of VST Connect, the green LAN button in the Performer application is lit. The artist can then click this to see and select your computer to connect as is described in the Performer documentation.
You should now see the artist in the VST Connect plug-in window, provided he or she has a webcam connected and installed, and hear his or her voice provided he or she has connected a microphone via an audio interface to the computer. It is also necessary that the Performer Track in Cubase/Nuendo is in Monitor mode (the yellow speaker icon must be lit) to be able to hear the artist's microphone signal, just the same way it would be required if you wanted to hear your own signal source when recording alone.
If this is the first time, you may have to help the artist assigning the correct video and/or audio device and connections:
10
VST Connect
Connection
PROCEDURE
1.Click the "gearwheel" item on the lower right of the VST Connect editor window and select the "Performer" tab. In the "Audio Device" item, choose an audio device of the Performer's computer from the list.
2.If you cannot hear the artist yet, click the toolbox icon again to close the settings page, and choose his or her microphone's port on top of the "Mic" channel in the VST Connect mixer.
3.It is also important that the audio track (channel) that you want to record the artist to in Cubase/Nuendo has the Monitor function activated. This is usually automatically engaged when you set that track to record mode, depending on Cubase/Nuendos' "Auto Monitor" settings in the "Preferences" menu ("VST" tab). If in doubt, set this to "Tapemachine Style".
4.For the artist to hear his or her monitoring (headphone) signals, you may also have to choose the correct output ports above the "MASTER" channel found in the Monitor mixer all to the left.
RESULT
You are now ready to record the artist just like with any other recording you are used to! You will probably want to import some playback audio file for the artist etc. Just use Cubase/Nuendo the same way you would if you were recording yourself or somebody else.
11

VST Connect
Control Room
Control Room
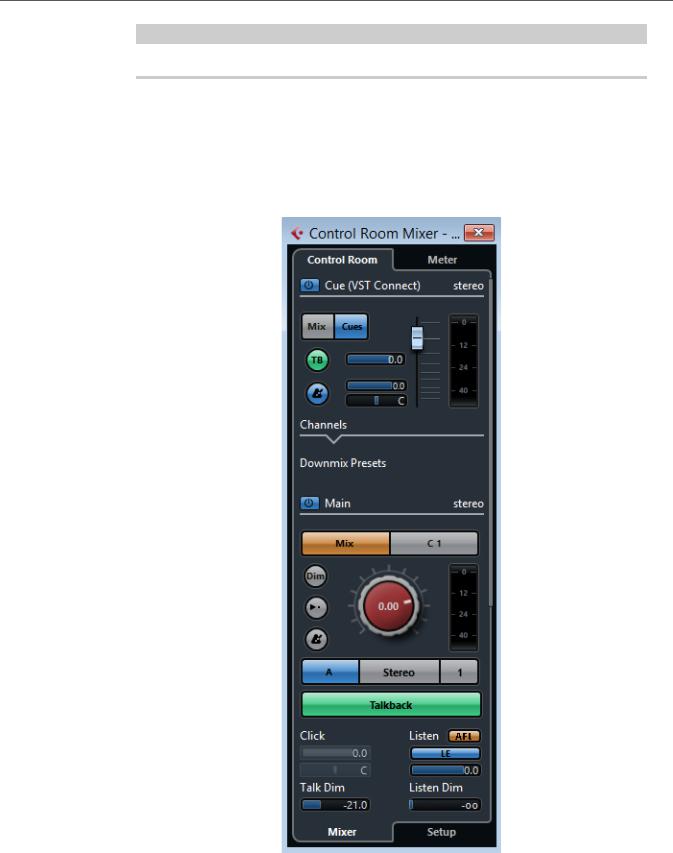
The artist will hear whatever you send via the Control Room Cue Mix channel. Playback and review channels (tracks on which you already recorded a performance of the artist) are sent to the Performer application via the VST Connect Cue Channel. Each channel in the Cubase/Nuendo MixConsole has a “CUES” mix level control (use "Racks" on the mixer header and enable "Cue Sends", should it not show up), which determines how much of that channel is audible on the artist side. This can be set pre or post fader like other channel sends, and also features a pan control.
12
VST Connect
Control Room
NOTE
You may find further details about Cue Sends in the Cubase/Nuendo manual.
Make sure Control Room settings are visible so you can control what the artist hears ("Devices/Control Room"):
13
Loading...