


SPIRIT FOLIO RAC PAC |
|
|
Connections |
|
1 |
The Controls in Detail - |
Mono Input |
3 |
|
Stereo Input |
6 |
|
Stereo Returns |
8 |
|
Master Section |
10 |
Technical Specifications |
|
13 |
System Block Diagram |
|
15 |

Introduction
Thank you for buying a SPIRIT FOLIO RAC PAC mixer, brought to you with pride by the SPIRIT team of Peter, Graham, Martin, Ian, Stuart, Peter, George, Colin, James, Chris, Mukesh, Andy, Candy and Simon. We hope you have as much fun as we did!
Owning a SPIRIT console brings you the expertise and support of one of the industry’s leading manufacturers and the results of over 20 years experience supporting some of the biggest names in the business.
Built to the highest standards using quality components, FOLIO RAC PAC is designed to be as easy to use as possible, but some time spent NOW, looking through this manual and getting to know your new mixer will give you lots of helpful tips and confidence, away from the pressures of an important session. Don’t be afraid to experiment to find out how each control affects the sound - this will only extend your creativity and help you to get the best from your mixer.
SAFETY PRECAUTIONS
For your own safety and to avoid invalidation of the warranty please read this section carefully.
The FOLIO RAC PAC desk must only be connected through the Power Supply
Unit supplied.
The wires in the mains lead are coloured in accordance with the following code:
Green and Yellow: |
Earth |
Blue: |
Neutral |
Brown: |
Live |
As the colours of the wires in the mains lead may not correspond with the coloured markings identifying the terminals in your plug, proceed as follows:
∙The wire which is coloured Green and Yellow must be connected to the terminal in the plug which is marked with the letter E or by the earth symbol.
∙The wire which is coloured Blue must be connected to the terminal in the plug which is marked with the letter N or coloured Black.
∙The wire which is coloured Brown must be connected to the terminal in the plug which is marked with the letter L or coloured Red.
Ensure that these colour codings are followed carefully in the event of the plug being changed.
The power supply contains no user-serviceable parts. Refer all servicing to a qualified service engineer, through the appropriate Soundcraft dealer.
1 |
SPIRIT FOLIO RAC PAC |
|
|
|
|
ConnectORS
R
|
|
|
|
|
|
|
|
|
|
Signal |
Send |
|
|
|
|
Signal (+ve) |
|
|
|
|
Signal (+ve) |
|
|
Left Signal |
||||
|
|
|
|
|
|
|
|
|
|
|
|
|
|
|
|
|
|
|
||||||||||
|
|
|
|
|
|
|
|
|
|
Signal |
Return |
|
|
|
|
Ground Sense (-ve) |
|
|
|
|
Gnd/Screen |
|
|
Right Signal |
||||
|
|
|
|
|
|
|
|
|
|
|
|
|
|
|
|
|
|
|
|
|||||||||
Tip |
|
|
|
|
|
|
|
|
Gnd/Screen |
|
|
|
|
Screen |
|
|
|
|
Gnd/Screen |
|
|
Ground |
||||||
|
|
|
|
|||||||||||||||||||||||||
|
|
|
|
|
|
|
|
|
|
|||||||||||||||||||
|
|
|
|
|
|
|
|
|
|
|
|
|
|
|
|
|
|
|
|
|
|
|
|
|
|
|
||
|
|
|
|
|
|
|
|
|
|
|
|
|
|
|
|
|
|
|
|
|
|
|
|
|
|
|
||
Ring |
|
|
|
|
|
|
|
|
|
Sleeve |
|
|
|
|
|
|
|
|
|
|
|
|
|
|
|
|
|
|
|
|
|
|
|
|
|
|
|
|
|
|
|
|
|
|
|
|
|
|
|
|
|
|
|
||||
|
|
|
|
|
|
|
|
|
|
|
|
|
|
|
|
|
|
|
|
|
|
|
|
|
|
|||
|
|
|
|
|
|
|
|
|
|
|
|
|
|
|
|
|
|
|
|
|
|
|
|
|
||||
|
|
|
|
|
|
|
|
|
|
|
|
|
|
|
|
|
|
|
|
|
|
|
|
|
|
|
||
|
|
|
|
|
|
|
|
|
|
|
|
|
|
|
|
|
|
|
|
|
|
|
|
|
|
|
||
|
|
Inserts |
|
|
|
|
Mix Outputs |
|
Direct Outputs |
|
Headphones |
|
||||||||||||||||
|
|
|
|
|
|
|
|
|
|
|
|
|
Group Outputs |
|
|
|
|
|
|
|
|
|
|
|
||||
|
|
|
|
|
|
|
|
|
|
|
|
|
Aux Outputs |
|
|
|
|
|
|
|
|
|
|
|
||||
|
|
|
|
|
|
|
|
|
|
|
|
|
|
|
|
|
|
|
|
|
|
|
|
|
|
|
|
|
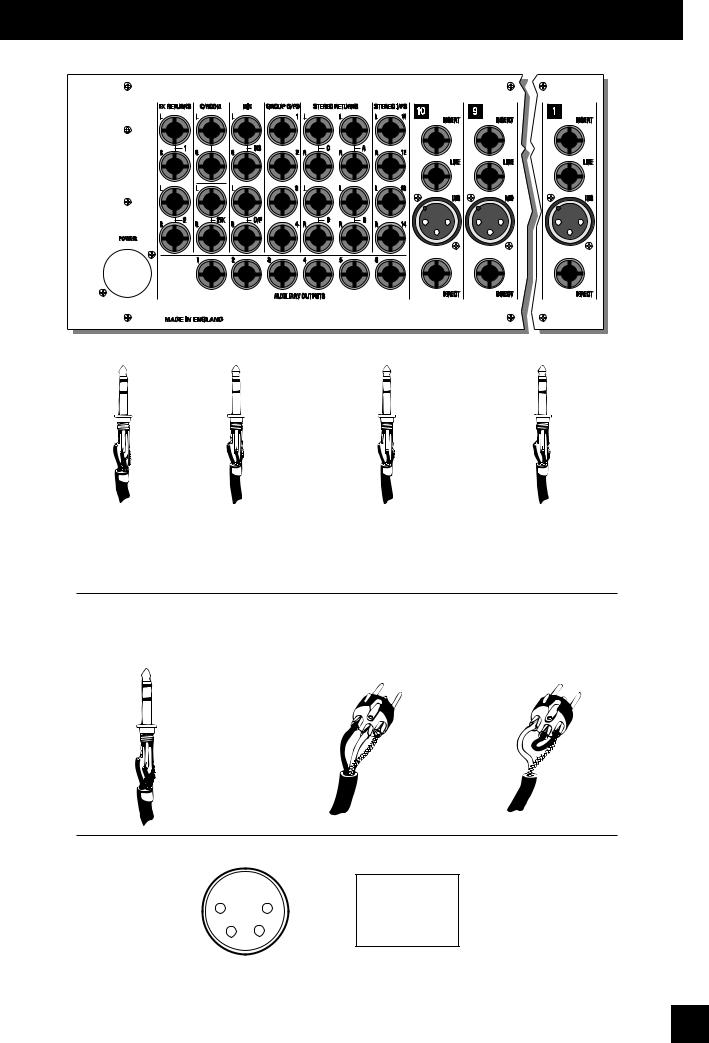
INPUTS, 2 TRACK RETURNS & FX RETURNS
(Note: All inputs are balanced, but unbalanced sources may be used as shown)
Balanced |
|
|
|
|
Unbalanced |
Balanced Mic |
Unbalanced Mic |
||||
3 pole Jack |
|
|
|
|
3 pole Jack |
XLR |
XLR |
||||
Hot |
(+ve) |
|
|
|
|
|
|
|
Signal |
|
|
|
|
|
|
|
|
||||||
Cold |
(-ve) |
|
|
|
|
|
|
Gnd/Screen |
2. |
Hot(+ve) |
|
|
|
|
|
|
|
||||||
Gnd/Screen |
|
|
|
|
|
Gnd/Screen |
|||||
|
|
|
|
|
|||||||
|
2. |
Hot(+ve) |
|
|
|
|
|
|
|
|
|
|
|
|
|
|
|
|
|
|
|
|
|
|
|
|
|
|
Link |
3 |
|
|
|
|
|
|
|
||||
|
|
|
|
|
|
|
|
|
|
|
|
|
|
|
||||||
Tip |
|
3. |
Cold(-ve) |
|
|
|
|
|
|
|
|
|
|
|
|
|
||||
|
|
|
|
|
|
|
to |
1 |
|
|
|
|
|
|
1. Screen |
|||||
|
|
|
|
|
|
|
|
|
|
|
|
|||||||||
|
|
|||||||||||||||||||
|
|
|
|
|
|
|
|
|
|
|
1. Screen |
|
|
|
|
|
|
|
|
|
|
|
|
|
|
|
|
|
|
|
|
|
|
|
|
|
|
|
|
||
Ring 

 Sleeve
POWER CONNECTOR PINOUTS
4 |
1 |
Pin 1 |
20V |
AC |
Pin 2 |
n/c |
|
||
|
|
|
||
3 2 |
|
Pin 3 |
0V |
|
|
|
Pin 4 |
20V |
AC |
(viewed from cable end)
SPIRIT FOLIO RAC PAC |
2 |
|
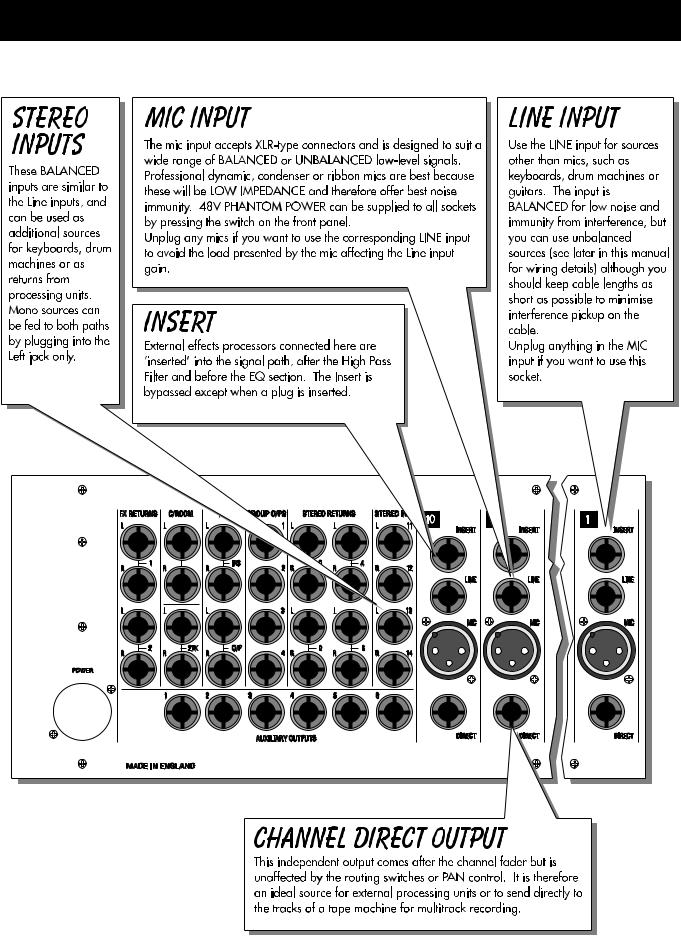
ConNections - Input Channels
R
3 |
SPIRIT FOLIO RAC PAC |
|
|
|
|

CONNECTIONS - MASTER SECTION
R
SPIRIT FOLIO RAC PAC |
4 |
|

INITIAL SETTING UP
You will probably use your SPIRIT FOLIO RAC PAC with a wide range of different types of sound source, and these will be at varying signal levels. It is important to set the GAIN of the inputs correctly to give the best performance.
Set up the individual Mono input channels as follows:
∙Plug in the chosen source (usually the MIC input for mics and the LINE input for anything else). Plug in phantom powered mics before switching the phantom power on. Set the channel fader fully down.
∙Set the Group and Master Faders at ’0’ and GROUPS TO MIX pressed.
∙Select MIX to C/Room & Phones.
∙Check that SOLO MODE is released.
∙Release the channel routing switches to route to Groups 1-2
∙Provide the chosen source with a typical signal level and press the latching PFL button by the fader. The level of signal will be shown on the right-hand Bargraph Meter (the Left meter will be switched off when the PFL button is down).
∙Adjust the input GAIN until the meter is just reaching the amber LED (0dB) at a typical maximum source level with a steady signal. If the source signal is rich in high-level transients (e.g. drums) a rather higher meter reading of +6/+9 will be needed to achieve an equivalent average level. This leaves enough headroom to cope with peaks in the signal without distortion.
∙Adjust each input channel in the same way.
∙If you find that you cannot set a reasonable level within the range of the GAIN control when using a MIC input on the Mono channels, try the LINE input instead.
Stereo inputs 11-14 do not have a GAIN control, since the typical source for these inputs will be external tape machines or effects units which have a much more predictable signal level. Set the +4/-10 switch to +4 (released) initially, and check the input level with the PFL switch as decribed above. If the level is too low, switch to the -10 input setting.
You will now have initial settings for each of the input sources and are ready to start building a mix.
∙Connect your power amplifiers and speakers and set the gain of the amplifiers to about 70%.
∙Move the individual channel faders gradually to the required working level, listening carefully for any hint of feedback or overload. You may find that the input gain settings will need to be edged back slightly as the mix is built up.
∙Listen carefully for the characteristic sound of ‘feedback’. If you cannot achieve a satisfactory input level setting without feedback, adjust microphone and speaker positions and try again.
Careful microphone placement and the choice of a suitable type of microphone is important for vocals. The aim should be to place the microphone as close as possible to the source, to cut out unwanted surrounding sounds. This allows a lower gain setting on the mixer and helps to avoid feedback. You will also find that a well-placed microphone will not need any appreciable equalisation.
5 |
SPIRIT FOLIO RAC PAC |
|
|
|
|

SETTING UP FOR RECORDING
While the connections to the FOLIO RAC PAC for PA work are quite straightforward, recording is rather more demanding because the mixer is not only required to mix down input signals but also to provide a monitor mix for artists to hear previously recorded tracks when overdubbing new parts. Two typical set-ups are as follows:
Stereo Recording to DAT
∙Connect input sources and set gain as described above. Route the channels via the groups to Mix. Connect the Mix L/R outputs to the tape inputs.
∙Connect the tape outputs to the 2TK Returns. Set the level control on these returns at zero.
∙Connect a monitor amplifier for foldback headphones or a monitor speaker to the Aux 1 output. Set the amplifier volume to a normal listening level.
∙Use the Aux 1 send controls on the tape channels to set up a mono monitor mix. (make sure that all other Aux 1 controls are fully off)
∙If a compressor is to be used on an individual source, connect this to the channel insert point.
∙Connect any effects required using Aux 2-6, and return them to the mix on the FX Returns or unused Stereo Returns to allow the effect to be balanced with the original source.
It is important to match the input and output levels of your mixer and recording device to avoid distortion and create the best recording.
∙Set the recording level as recommended for your recording device, feeding a suitable signal from the Group or Mix outputs.
∙Monitor the signal going to the recorder by selecting the appropriate source on the C/Room & Phones source select switches. Gradually increase the 2TK return level control while alternately switching between the monitor source and 2TK until no change in level is detected.
8 Track Recording
∙Connect input sources and set gain as described above. Set the C/Room & Phones source to MIX.
∙Check that the GROUPS TO MIX button is released.
∙Connect the direct outputs on the eight required channels to the recorder inputs.
∙Connect a monitor amplifier for foldback headphones or a monitor speaker to the Aux 1 or Aux 2 (set PRE) output. Set the amplifier volume to a normal listening level.
∙If a compressor or other effect is to be used on an individual source, connect this to the channel insert point.
∙Connect the recorder outputs to the 4 stereo returns. Route the returns to MIX. Alternatively, if only one or two tracks are being recorded, the machine outputs could be brought back to spare mono inputs and routed to a group for monitoring.
The C/Room & Phones will now be listening to the monitor mix, or, if selected to Groups will carry the source mix. Note that the balance of these mixes will be essentially the same.
This configuration allows a very high quality recording to be made, with the signal passing through the shortest signal path. The mixer may be reconfigured for a separate mix-down session to a stereo master at a later date.
SPIRIT FOLIO RAC PAC |
6 |
|
 Loading...