


SPIRIT FOLIO - A quick overview |
1 |
|
The Controls - |
The Mono Input Channel |
3 |
|
The Stereo Input Channel |
5 |
|
The Master Section |
7 |
Introduction |
|
9 |
Safety Precautions |
9 |
|
Initial Setting Up |
10 |
|
The Controls in More Detail |
11 |
|
Using Folio - |
Typical Applications |
16 |
|
Stereo Public Address |
16 |
|
Stereo Recording |
17 |
|
Location Recording |
17 |
Glossary |
|
18 |
Technical Specifications |
19 |
|
System Block Diagram |
20 |
|

MIC is for low level microphone signals such as vocals (Mono Inputs only)
LINE is for higher level signals such as keyboards, guitars, drum machines and tapes
You can listen to the signal from here on stereo HEADPHONES.
AUX 1
AUX 2
9
|
|
PHNS |
|
|
|
|
MNTR |
|
|
|
|
|
R |
|
|
|
|
MNTR |
|
|
|
|
|
L |
|
|
|
|
|
|
|
|
|
|
L |
|
|
|
L |
|
TAPE |
|
|
|
|
|
RETN |
|
L |
|
|
IX |
|
|
|
|
M |
R |
|
|
|
|
|
INS |
|
|
|
|
|
|
|
11 |
|
IX |
|
|
R |
|
|
M |
|
|
|
|
STE |
|
R |
|
|
STE |
12 |
|
|
|
|
10 |
|
|
|
|
|
Along the CHANNEL STRIP, controls adjust the GAIN (to get the best quality signal and avoid overload) and the FILTER and EQUALISER change the frequency response to clean up or enhance the sound.
The AUX SENDS let you set up a separate mix for artists FOLDBACK or to add EFFECTS PROCESSORS.
PAN swings the signal to the LEFT or RIGHT of the stereo MIX output.
1
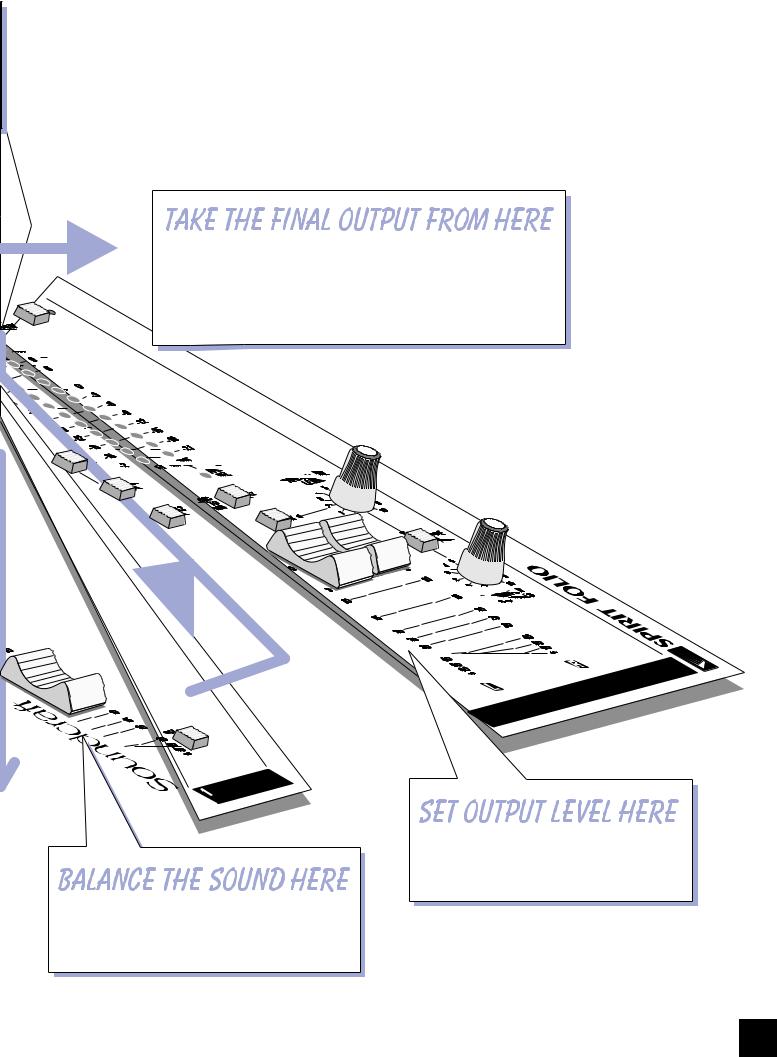
The final MIX OUTPUT is taken from here to a suitable power
amplifier and loudspeakers or to record the mix to a tape machine. You can listen to the signal on loudspeakers by taking the signal
from the MONITOR OUTPUTS via a suitable power amplifier.
The CHANNEL FADER sets the level of the channel signal which is fed to the Master Section and adjusts the sound BALANCE between the different sources.
The MASTER FADERS set the level of the combined signal from all of the input channels going to the amps and speakers.
2
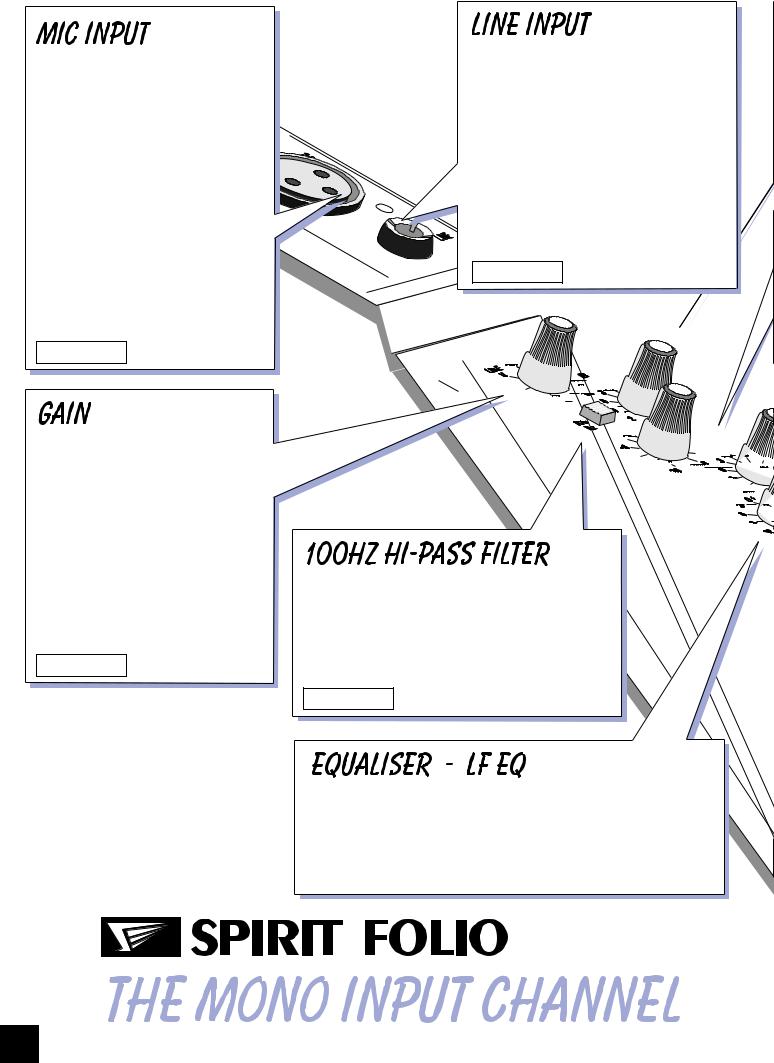
Accepts XLR-type connectors and is designed to suit a wide range of BALANCED or UNBALANCED signals. Professional dynamic, condenser or ribbon mics are best because these will be LOW IMPEDANCE. You can use  low-cost HIGH IMPEDANCE mics, but
  the level of background noise will be higher.
If you turn the PHANTOM POWER on (top right-hand side of the mixer) the socket provides a suitable powering voltage for professional condenser mics. Unplug any mics if you want to use the LINE Input. Set the input level using the GAIN knob.
See page 11
This knob sets how much of the source signal is sent to the rest of the mixer.
Too high, and the signal will distort as it overloads the channel.
Too low, and the level of any background hiss will be more noticeable and you may not be able to get enough signal level to the output of the mixer. See `Initial Setting Up' to learn how to set the GAIN correctly.
See page 11
Accepts 3-pole `A' gauge (TRS) jacks. Use this input for sources other than mics, such as keyboards, drum machines, synths, tape machines or guitars. The input is BALANCED for low noise and immunity from interference, but you can use UNBALANCED sources by wiring up the jacks as shown on page 11, although you should then keep cable lengths as short as possible. Unplug anything in the MIC input if you want to use this socket. Set the input level using the GAIN knob.
See page 11
Pressing this switch reduces the level of bass frequencies only. This feature is very rare for such a small mixer.
Use this in live PA situations to reduce stage rumble or `popping' from microphones.
See page 11
Turn to the right to boost low (bass) frequencies, adding warmth to vocals or extra punch to synths, guitars and drums. Turn to the left to reduce hum, stage rumble or improve a mushy sound. Set the knob to the centre-detented position for a neutral EQ response.
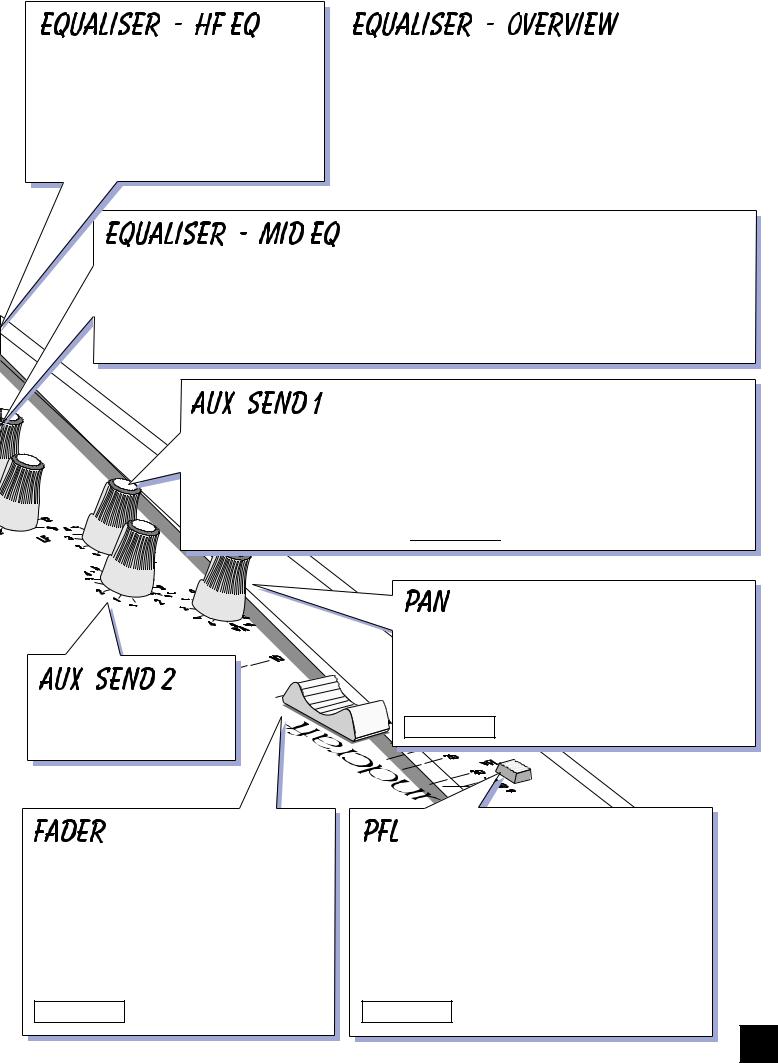
Turn to the right to boost high (treble) frequencies, |
|
The Equaliser (EQ) allows fine manipulation of the sound, particularly |
|
||
|
|
||||
adding crispness to cymbals, vocals and |
|
to improve the sound in live PA applications where the original signal |
|
||
electronic instruments. Turn to the left to cut these |
|
is often far from ideal. |
|
||
frequencies, reducing hiss or distorted consonants |
|
There are three sections (HF, MID & LF) giving the sort of control |
|
||
which can occur with certain types of microphone. |
|
usually only found on much larger mixers. The EQ knobs can have a |
|
||
Set the knob in the centre-detented position for a |
|
dramatic effect on the sound, so use them sparingly and listen carefully |
|
||
neutral EQ response. |
|
|
|
|
|
|
to the result. |
See page 12 |
|
|
|
|
|
|
|
||
|
|
|
|
|
|
|
|
|
|
|
|
|
|
|
|
|
|
to form a SWEPT MID EQ. The lower knob provides boost and cut, just which this occurs is set by the upper knob over a wide range. This
the signal in live situations, because this mid band covers the range of these controls together to find how particular characteristics of a vocal
the lower knob to the centre-detented position for a neutral EQ
response.
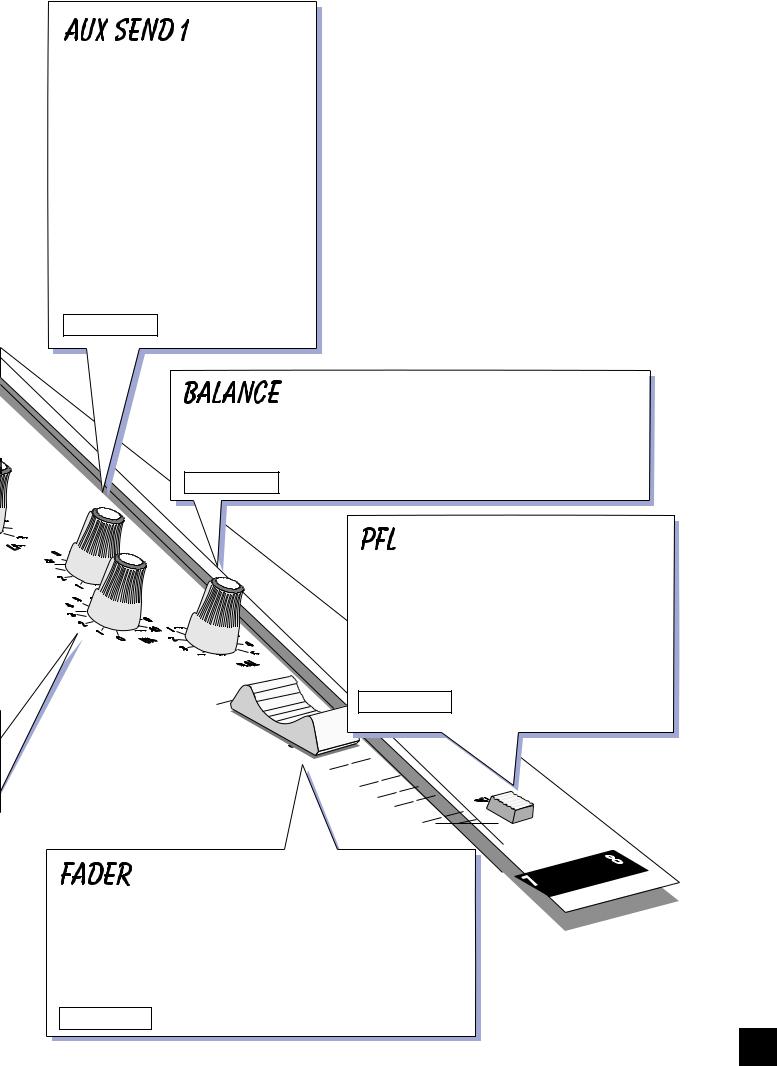
This is used to set up a separate mix for FOLDBACK, EFFECTS or recording, and the combination of all the Aux 1 Sends is mixed to the Aux 1 Output. For Effects it is useful for this to fade up and down with the FADER (this is called POST-FADE), but for Foldback or Monitor feeds it is important for the send to be independent of the FADER (this is called PRE-FADE). The Master Section AUX1 PRE switch allows you to chose preor post-fade across the whole mixer as required. Leave the knob turned down when not in use. 

This is similar to the Aux Send 1 control, but is always POST-FADE.
The linear FADER gives you smooth control of the overall signal level in the channel strip, allowing precise balancing of the various source signals being mixed to the Master Section. It is important to set up the input GAIN correctly to give full travel (i.e. maximum control) on the fader. See the `Initial Setting Up' section on page 10 for help in setting a suitable signal level.
See page 12
4
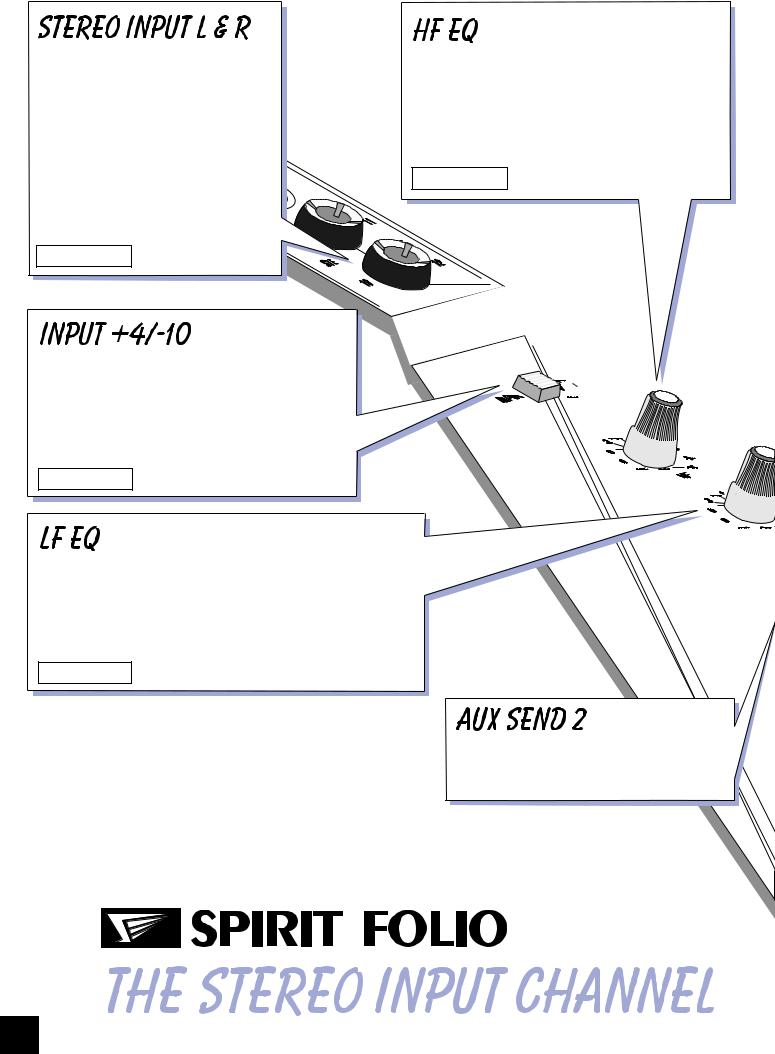
Accept 3-pole `A' gauge (TRS) jacks. Use these inputs for sources such as keyboards, drum machines, synths, tape machines or as returns from processing units. The inputs are BALANCED for low noise and immunity from interference, but you can use UNBALANCED sources by wiring up the jacks as shown later in this guide, although you should then keep cable lengths as short as possible.
See page 13
Most professional equipment uses input and output levels of +4dBu, but semi-professional tape machines use a low level of -10dBV (or hi-fi systems 100mV). This switch allows you to match the stereo input to either standard. Release the switch for +4dBu, or press for -10dBV.
See page 13
Turn to the right to boost low (bass) frequencies, adding extra punch to synths, guitars and drums.
Turn to the left to reduce hum, boominess or improve a mushy sound. Set the knob to the centre-detented position when not required.
See page 13
Turn to the right to boost high (treble) frequencies, adding crispness to percussion from drum machines, synths and electronic instruments. Turn to the left to cut these frequencies, reducing hiss or excessive brilliance. Set the knob in the centre-detented position when not required.
See page 13
This is similar to the Aux Send 1 control, but is always POST-FADE.
5
This is used to set up a separate mono mix for FOLDBACK or to drive EFFECTS PROCESSORS, and the combination of all the Aux 1 Sends is mixed to the Aux 1 Output. For Effects it is useful for this to fade up and down with the FADER (this is called POST-FADE), but for Foldback or Monitor feeds it is important for the send to be independent of the FADER (this is called PRE-FADE).
The Master Section AUX1 PRE switch allows you to chose preor post-fade as required. Leave the knob turned down when not in use.
See page 13
This control sets the amount of the channel signal feeding the Right and Left MIX outputs, allowing you to balance the source in the stereo image. When the control is turned fully right or left you feed only that side of the signal to the mix.
See page 13
10
When the PFL (Pre-Fade-Listen) switch is pressed a mono sum of the pre-fade channel signal is fed to the monitor output or headphones, replacing the normal source (either Mix or Tape Return).
You use this switch to listen to a channel signal without affecting the mixer outputs, to check the signal quality or simply to check that it is there!
See page 13
5
0
5
10 15 20
30 40 50∞
The linear FADER gives you smooth control of the overall signal level in the channel strip, allowing precise balancing of the various source signals being mixed to the Master Section. It is important that the input level is set correctly to give maximum travel on the fader. See the `Initial Setting Up' section on page 10 for help in setting the right level.
See page 13
6
 Loading...