


SPIRIT F1

Contents
Safety Precautions . . . . . . . . . . 3
Sicherheitshinweise . . . . . . . . . . . . . . . 4
Precautions . . . . . . . . . . . . . . . . . . . . . 5
Sicurezza . . . . . . . . . . . . . . . . . . . . . . . 6
Precauciones de Seguridad . . . . . . . . . . 7
Getting Started . . . . . . . . . . . . . 9
Übersicht . . . . . . . . . . . . . . . . . . . . . . 9
Démarrage . . . . . . . . . . . . . . . . . . . . . 9
Inizio . . . . . . . . . . . . . . . . . . . . . . . . . . 9
Puesta en Marcha . . . . . . . . . . . . . . . . 9
Using the Folio F1 . . . . . . . . . . 10
Anwendung . . . . . . . . . . . . . . . . . . . . 10
Utilisation de la Folio F1 . . . . . . . . . . . 11
Utilizzo del Mixer Folio F1 . . . . . . . . . 11
Usando la Folio F1 . . . . . . . . . . . . . . . 11
Setting Up & Troubleshooting . 24
Erste Einstellungen am Mischpult . . . . 24
Réglages st problèmes de foncionnement . . . 2 5
Set Up & Individuzione dei guasti . . . . 25
Ajuste y Solución de Problemas . . . . . . 25
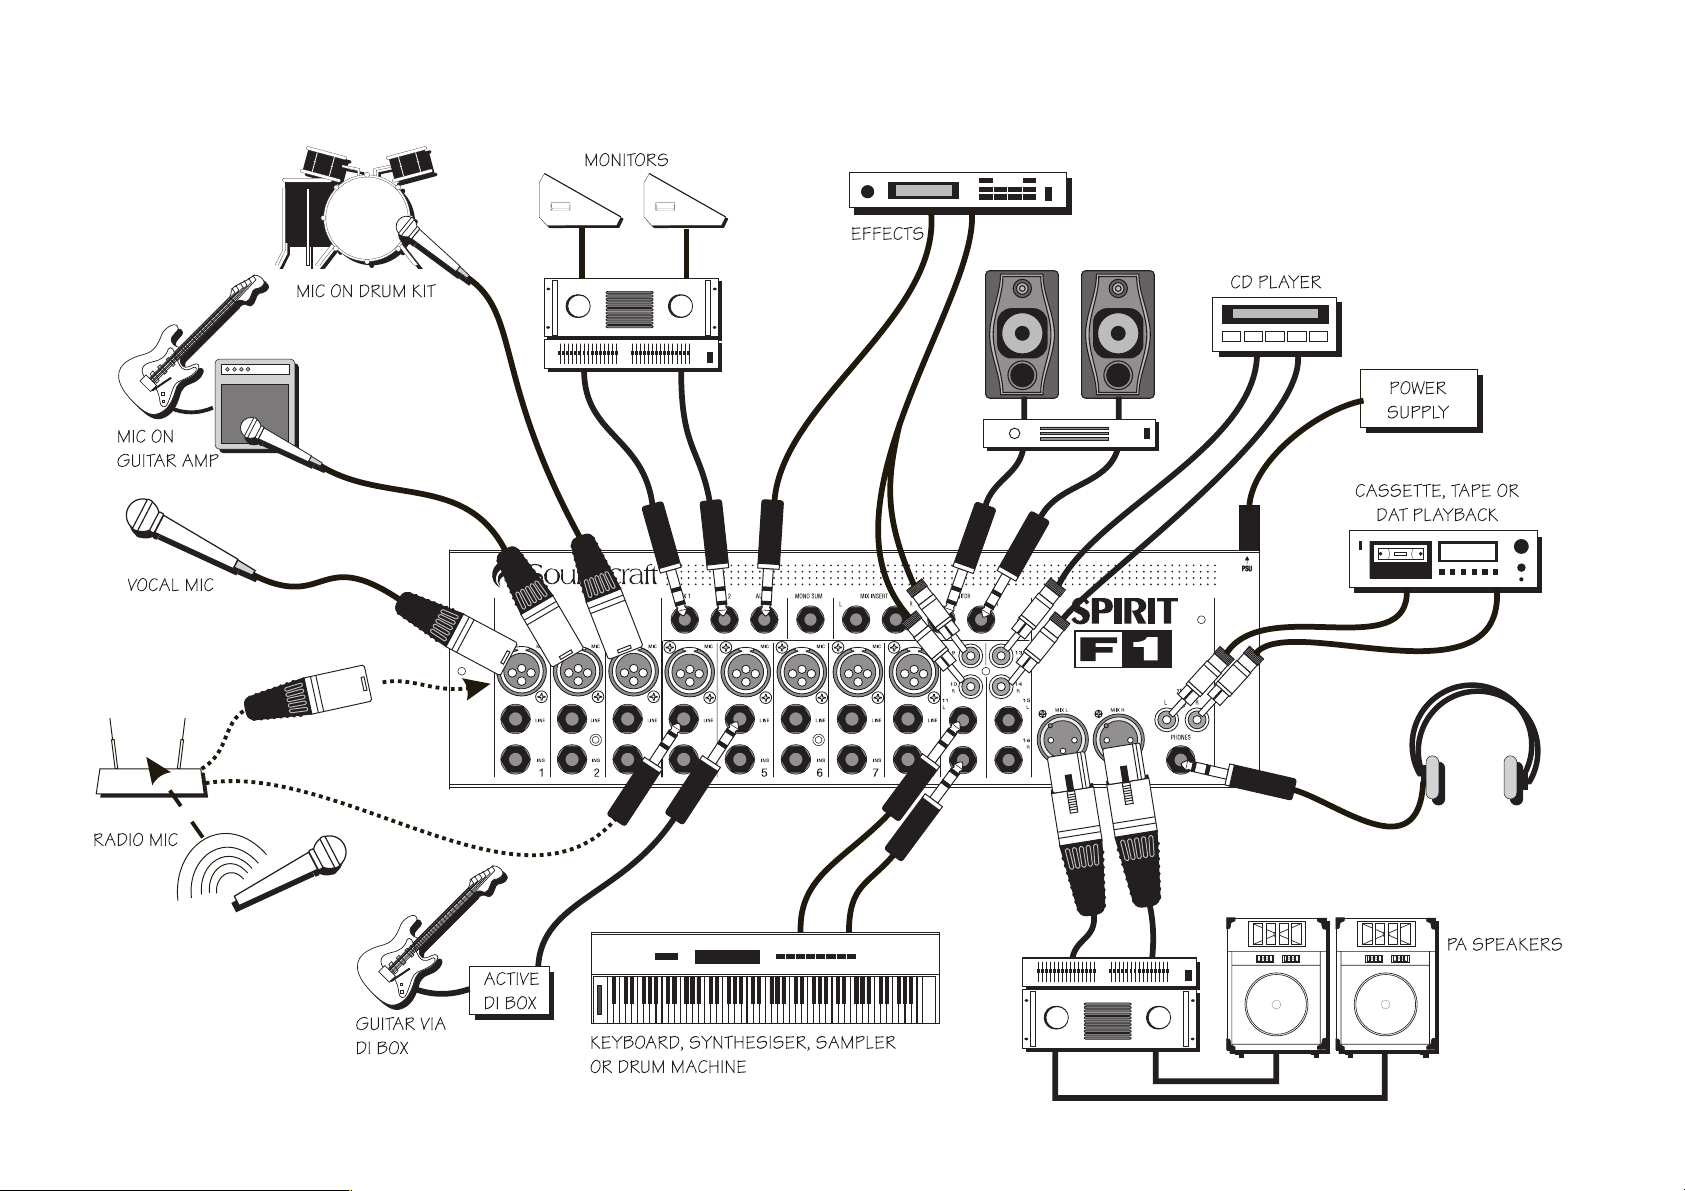
Applications . . . . . . . . . . . . . . . 26
Anwendungen . . . . . . . . . . . . . . . . . . 26
Applications . . . . . . . . . . . . . . . . . . . . 26
Applicazioni . . . . . . . . . . . . . . . . . . . . 26
Aplicaciones . . . . . . . . . . . . . . . . . . . . 26
System Block Diagram . . . . . . 31
Block Diagramm . . . . . . . . . . . . . . . . 31
Synoptique . . . . . . . . . . . . . . . . . . . . . 31
Diagramma a blocchi) . . . . . . . . . . . . 31
Diagrama de Bloques del Sistema . . . . 31
Technical Information . . . . . . . 32
Technische Informationen . . . . . . . . . . 32
Informations Techniques . . . . . . . . . . . 32
Informazioni Tecniche . . . . . . . . . . . . . 32
Información Técnica . . . . . . . . . . . . . . 32
Mark-up Sheet . . . . . . . . . . . . 36
Page 2
Warranty
1 Soundcraft is a trading division of Harman International Industries Ltd .
End User means the person who first puts the equipment into regular oper-
ation.
Dealer means the person other than Soundcraft (if any) from whom the End
User purchased the Equipment, provided such a person is authorised for
this purpose by Soundcraft or its accredited Distributor.
Equipment means the equipment supplied with this manual.
2 If within the period of twelve months from the date of delivery of the
Equipment to the End User it shall prove defective by reason only of faulty
materials and/or workmanship to such an extent that the effectiveness
and/or usability thereof is materially affected the Equipment or the defective
component should be returned to the Dealer or to Soundcraft and subject to
the following conditions the Dealer or Soundcraft will repair or replace the
defective components. Any components replaced will become the property
of Soundcraft.
3 Any Equipment or component returned will be at the risk of the End User
whilst in transit (both to and from the Dealer or Soundcraft) and postage
must be prepaid.
4 This warranty shall only be valid if:
a) the Equipment has been properly installed in accordance with instruc-
tions contained in Soundcrafts manual; and
b) the End User has notified Soundcraft or the Dealer within 14 days of the
defect appearing; and
c) no persons other than authorised representatives of Soundcraft or the
Dealer have effected any replacement of parts maintenance adjustments or
repairs to the Equipment; and
d) the End User has used the Equipment only for such purposes as
Soundcraft recommends, with only such operating supplies as meet
Soundcrafts specifications and otherwise in all respects in accordance
Soundcrafts recommendations.
5 Defects arising as a result of the following are not covered by this Warranty:
faulty or negligent handling, chemical or electro-chemical or electrical influ-
ences, accidental damage, Acts of God, neglect, deficiency in electrical
power, air-conditioning or humidity control.
6 The benefit of this Warranty may not be assigned by the End User.
7 End Users who are consumers should note their rights under this Warranty
are in addition to and do not affect any other rights to which they may be
entitled against the seller of the Equipment.
IMPORTANT
Please read this manual carefully before connecting your
Mixer and Power Supply Unit for the first time.
© Harman International
Industries Ltd. 2001
All rights reserved
Parts of the design of these products may be protected by worldwide patents.
Part No. ZM0210
Issue: 2
Soundcraft is a trading division of Harman International Industries Ltd. Information in this manual is sub-
ject to change without notice and does not represent a commitment on the part of the vendor.
Soundcraft shall not be liable for any loss or damage whatsoever arising from the use of information or
any error contained in this manual.
No part of this manual may be reproduced, stored in a retrieval system, or transmitted, in any form or by
any means, electronic, electrical, mechanical, optical, chemical, including photocopying and recording, for
any purpose without the express written permission of Soundcraft.
Harman International Industries Limited
Cranborne House
Cranborne Road
POTTERS BAR
Hertfordshire
EN6 3JN
UK
E-MAIL: info@soundcraft.com
Tel:+44 (0)1707 665000
fax:+44 (0)1707 660742
http://www.soundcraft.com
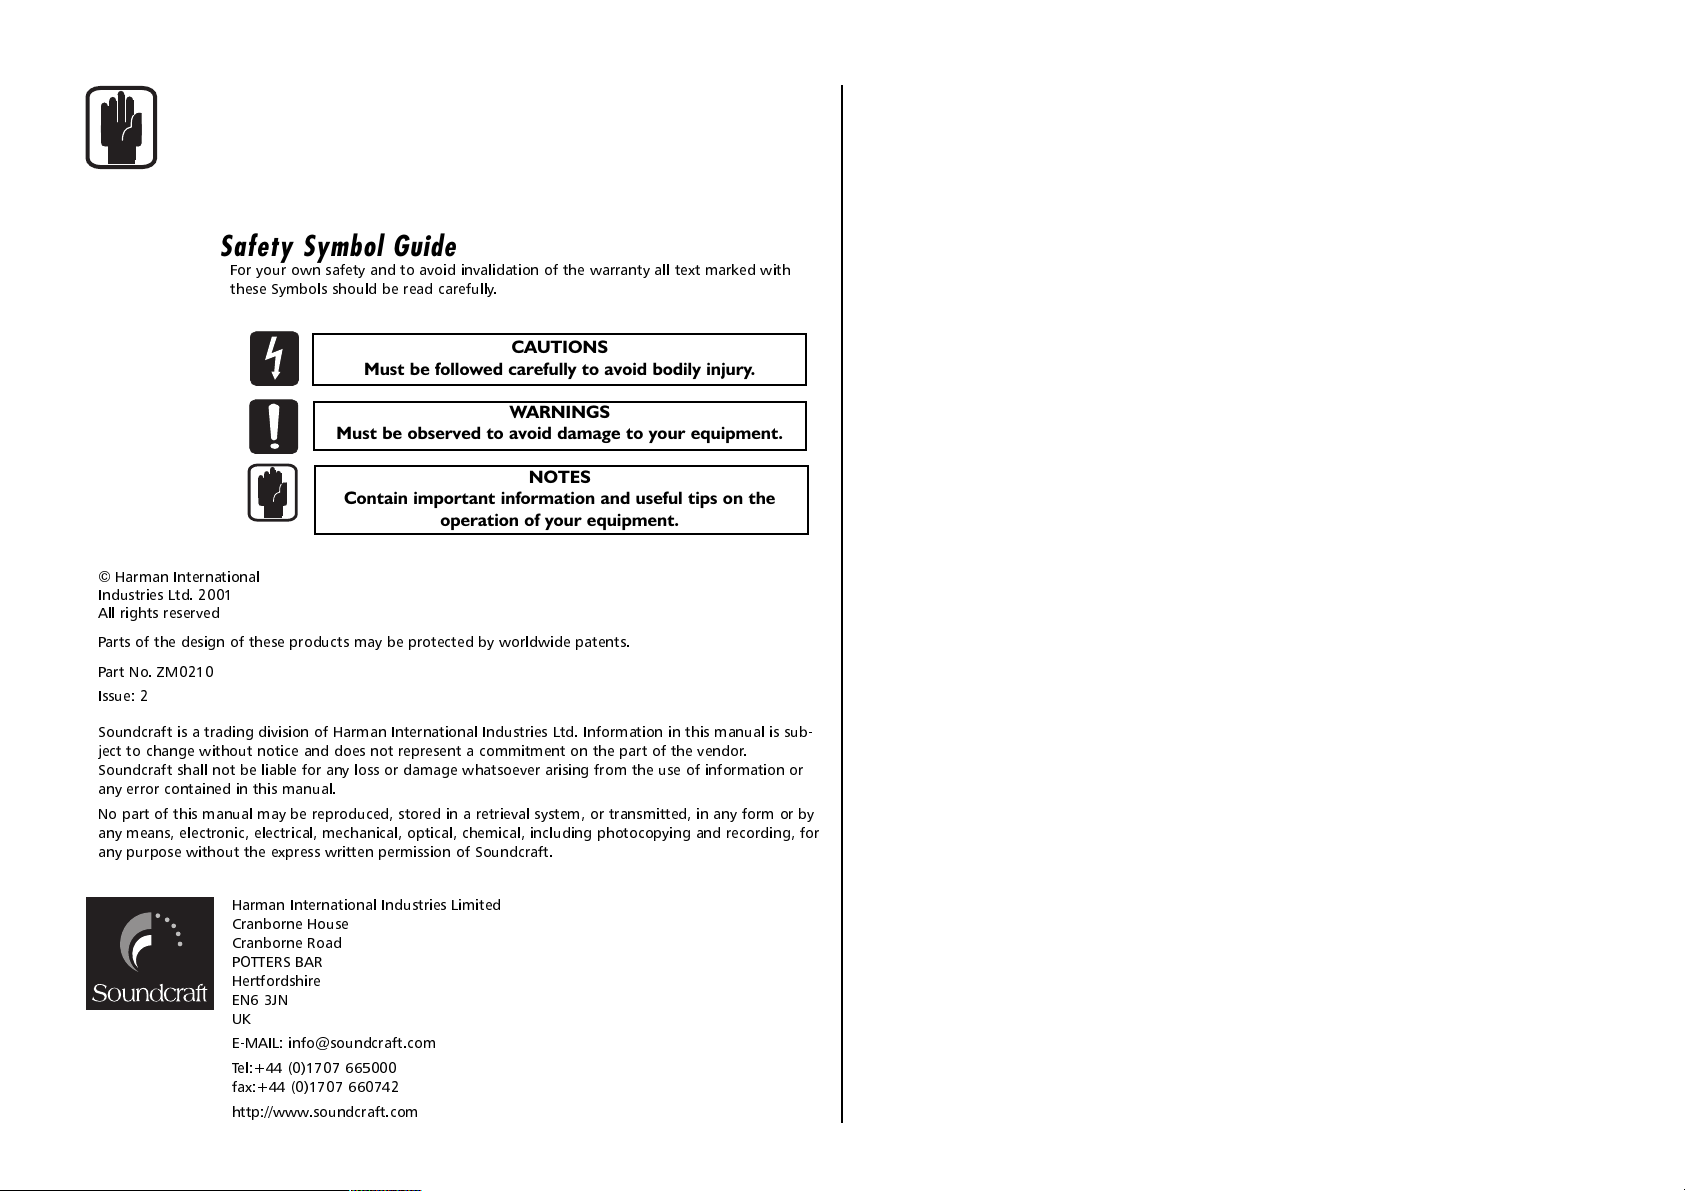
Safety Symbol Guide
For your own safety and to avoid invalidation of the warranty all text marked with
these Symbols should be read carefully.
CAUTIONS
Must be followed carefully to avoid bodily injury.
WARNINGS
Must be observed to avoid damage to your equipment.
NOTES
Contain important information and useful tips on the
operation of your equipment.
Page 3
SAFETY PRECAUTIONS
The SPIRIT F1 mixer must only be connected through
the Power Supply supplied.
The wires in the mains lead are coloured in accordance with
the following code:
Neutral: Blue
(White - US)
Live: Brown
(Black - US)
As the colours of the wires in the mains lead may not corre-
spond with the coloured markings identifying the terminals
in your plug, proceed as follows:
l The wire which is coloured Blue must be connected to
the terminal in the plug which is marked with the letter
N.
l The wire which is coloured Brown must be connected
to the terminal in the plug which is marked with the let-
ter L.
Ensure that these colour codings are followed carefully in
the event of the plug being changed.
To avoid the risk of fire, replace the mains fuse
only with the correct value fuse, as indicated on
the power supply.
WARNINGS
Read these instructions.
Keep these instructions.
Heed all warnings.
Follow all instructions.
This unit contains no user serviceable parts. Refer all ser-
vicing to a qualified service engineer, through the appro-
priate Soundcraft dealer.
Clean only with a damp cloth.
DO Install in accordance with the manufacturers instruc-
tions
.
CAUTIONS
Do not install near any heat sources such as radiators,
heat resistors, stoves, or other apparatus (including
amplifiers) that produce heat.
Do not use this apparatus near water.
Protect the power cord from being walked on or
pinched particularly at plugs, convenience receptacles
and the point where they exit from the apparatus.
Only use cables and hardware specified by the manufac-
turer.
Unplug this apparatus during lightning storms or when
unused for long periods of time.
Refer all servicing to qualified service personnel.
It is recommended that all maintenance and service on
the product should be carried out by Soundcraft or its
authorised agents. Soundcraft cannot accept any liability
whatsoever for any loss or damage caused by service,
maintenance or repair by unauthorised personnel.
If a trolley is used, use caution when moving the trolley
/ apparatus combination to avoid injury from tip-over.

Page 4
SICHERHEITSHINWEISE
Das SPIRIT F1 darf nur an das entsprechend mit-
gelieferte Netzgerät angeschlossen werden !
Die Verdrahtung der Hauptleitungen stimmt mit folgendem Farbcode
überein:
Blau Mittelpunktsleiter
Braun Phase
Falls diese Festlegung nicht mit der Belegung der Steckkontakte in der
Steckdose übereinstimmt, gehen Sie bitte folgendermaßen vor:
l Die braune Leitung ist mit der Anschlußklemme zu belegen, die mit
dem Buchstaben L gekennzeichnet ist. An diesem Pol liegt liegt die
Phase an (stromführender Pol).
l Die blaue Leitung ist mit der Anschlußklemme zu belegen, die mit
dem Buchstaben N gekennzeichnet ist.
Achten Sie auch bei einem Steckdosenwechsel auf den Farbcode an den
Steckkontakten der Steckdose.
Die mitgelieferten Netzgeräte enthalten keine Komponenten, die vom
Benutzer gewechselt werden könnten. Eventuelle Serviceleistungen nur
qualifiziertem Fachpersonal oder dem SPIRIT-Fachmann überlassen !
Um die Gefahr eines Elektrobrandes zu verhindern,
dürfen nur Hauptsicherungen am Netzgerät ersetzt
werden, wie sie entsprechend auf dem Gerätegehäuse
aufgeführt sind.
HINWEISE
Lesen Sie diese Anleitung sorgfältig durch.
Bewahren Sie diese Anleitung auf.
Leisten Sie allen Hinweisen in jedem Fall Folge.
Leisten Sie allen Informationen in dieser Anleitung unbedingt
Folge.
Dieses Gerät enthält keine Bauteile, die vom Anwender ausge-
tauscht werden können. Wenden Sie sich im Reparaturfall an
Ihren Soundcraft-Händler bzw. an qualifiziertes Fachpersonal.
Reinigen Sie das Gerät nur mit einem trockenen Tuch.
FÜHREN SIE die Installation gemäß den Anleitungen des
Herstellers durch.
WARNUNGEN
Betreiben Sie das Gerät nicht in direkter Nähe von
Wärmequellen wie Radiatoren, Wärmespeichern,
Heizkörpern oder anderen Vorrichtungen (inklusive
Leistungsverstärkern), die Wärme produzieren
Schützen Sie das Gerät vor Feuchtigkeit und betreiben Sie es
nicht in der Nähe von fließendem Wasser.
Verlegen Sie das Netzkabel so, daß es keinen äußeren
Belastungen ausgesetzt ist. Achten Sie besonders darauf, daß
die Stecker nicht gequetscht werden oder an den Netz- bzw.
Gerätebuchsen unter Zug stehen.
Verwenden Sie ausschließlich vom Hersteller empfohlene
Kabel und Hardware.
Entfernen Sie das Gerät vom Netz im Falle eines Gewitters
oder wenn Sie es für längere Zeit nicht benutzen werden.
Wenden Sie sich im Servicefall ausschließlich an qualifiziertes
Fachpersonal.
Es wird empfohlen, alle Wartungsarbeiten und Reparaturen
direkt von Soundcraft oder einem autorisierten Vertreter aus-
führen zu lassen. Soundcraft kann keine Verantwortung für
Verluste oder Schäden in jeglicher Form übernehmen, die auf-
grund von Serviceleistungen, Wartungsarbeiten oder
Reparaturen durch unqualifiziertes Personal auftreten.
Sofern Sie das Gerät auf einem Rollwagen betreiben bzw.
bewegen, geben Sie besonders darauf Acht, daß der Wagen
aufgrund des hohen Schwerpunktes nicht kippt.
Page 5
PRECAUTIONS
La console SPIRIT F1 doit impérativement être con-
nectée avec lalimentation fournie.
Les conducteurs du câble secteur sont identifiés comme suit :
Bleu Neutre
Brun Phase
Pour éviter tout risque dincendie, remplacez le fusible
uniquement avec un fusible de la valeur correcte
indiquée sur lalimentation.
PRECAUTIONS
N'installez pas l'appareil à proximité de sources de chaleur
telles que radiateurs, résistances chauffantes, réchauds ou
autres appareils susceptibles de produire de la chaleur (y
compris les amplificateurs) .
N'utilisez pas cet appareil près d'un point d'eau.
Veillez à ce que le cordon d'alimentation ne soit ni écrasé ni
pincé, en particulier au niveau de l'appareil et de la prise
secteur murale.
Veillez à n'utiliser que les câbles, connecteurs et accessoires
recommandés par le fabricant.
Débranchez l'appareil en cas d'orage ou d'inutilisation pro-
longée.
Adressez-vous à un technicien qualifié pour toute réparation.
La maintenance et les réparations doivent être assurées par un
revendeur agréé par Soundcraft ou son distributeur. La
garantie ne pourra pas s'appliquer en cas de dommage causé
par un réparateur non agréé.
Si un chariot élévateur est utilisé pour déplacer l'appareil,
maniez l'ensemble avec précaution pour éviter la chute de
l'appareil et les risques de blessures.
AVERTISSEMENTS
Lisez attentivement ces instructions.
Conservez ces instructions
Tenez compte de ces instructions.
Suivez toutes les instructions.
Aucun élément de cet appareil n'est réparable par l'utilisateur.
Adressez-vous à un technicien qualifié pour toute réparation
par l'intermédiaire du distributeur Soundcraft.
Nettoyez l'appareil avec un chiffon sec.
L'installation doit être conforme aux instructions des fabricants.
Page 6
SICUREZZA
Il mixer SPIRIT F1 deve essere collegato
allalimentatore in dotazione.
I cavi nella presa sono colorati secondo il seguente codice:
Neutro: Blu
(Bianco - US)
Vivo: Marrone
(Nero - US)
Poichè i colori potrebbero non corrispondere a quelli dei terminali nella
presa, procedere come segue:
l Il cavo Blu va collegato al terminale indicato con N.
l Il cavo Marrone va collegato al terminale indicato con L
Assicurarsi che questi colori siano rispettati in caso di sostituzione della
spina.
Per evitare il rischio di incendi sostituire il fusibile solo
con uno del valore indicato.
AVVERTENZE
Non installare vicino a fonti di calore come radiatori, caloriferi,
stufe o altre apparecchiature che producono calore (amplifica-
tori inclusi).
Non utilizzare queste apparecchiature vicino all'acqua.
Non manomettere in alcun modo il cavo di alimentazione.
Proteggere il cavo da evenutali calpestii ed evitare di strappare
il cavo dalla presa.
Usare solo cavi indicati dal fabbricante.
Scollegare l'alimentazione durante i temporali o quando l'ap-
parecchio non viene utilizzato per lunghi periodi di tempo.
Per l'assistenza rivolgersi solo a personale qualificato.
Si raccomanda che la manutenzione ed il servizio assistenza sul
prodotto siano eseguiti da Soundcraft o dai suoi distributori
autorizzati. Soundcraft non accetta nessuna responsabilita per
alcuna perdita o danno causati da assistenza e riparazioni ese-
guiti da personale non autorizzato.
Se trasportato su carrello, fare attenzione quando viene sposta-
to per evitare lesioni da accidentale capovolgimento.
ATTENZIONE
Leggere queste istruzioni.
Conservare queste istruzioni.
Fare attenzione a tutte le avvertenze.
Seguire tutte le istruzioni.
Questa unita non contiene parti di ricambio. Fare riferimento ai
centri di assistenza qualificati attraverso il rivenditore
Soundcraft autorizzato.
Pulire solo con un panno morbido ed asciutto.
Installare seguendo le indicazioni fornite dal costruttore.
Page 7
PRECAUCIONES DE SEGURIDAD
La consola SPIRIT F1 debe ser conectada únicamente a
la fuente de alimentación suministrada.
Los conductores en el terminal de red se encuentran codificados por co-
lores del siguiente modo:
Neutro: Azul
Vivo: Marrón
En caso de que los colores de los conductores del terminal de red no coin-
cidan con los colores de las marcas que identifican los terminales en su
enchufe, proceda del siguiente modo:
l El conductor de color azul debe conectarse al terminal del enchufe
que este marcado con la letra N, o sea, de color negro.
l El conductor de color marrón debe conectarse al terminal del
enchufe que este marcado con la letra L, o sea, de color rojo.
Asegúrese de seguir cuidadosamente este código de colores en caso de que
deba sustituirse el enchufe.
Para evitar riesgos de incendio, al reemplazar un
fusible deberá tratar siempre de mantener su valor, tal
como se indica en la fuente de alimentación.
PRECAUCIONES
No instalar cerca de fuentes de calor, tales como radiadores,
resistencias de calor, estufas u otro aparato emisor de calor
(incluyendo amplificadores).
No usar este aparato cerca del agua.
Proteger el cable de alimentación para que no sea pisado o pel-
lizcado, especialmente en los conectores y en el punto de la sal-
ida del aparato.
Utilizar solamente cables y accesorios especificados por el fab-
ricante.
Desconectar este aparato durante tormentas eléctricas o cuan-
do no se vaya a utilizar por un largo período de tiempo.
Cualquier reparación tiene que efectuarse por personal cualifi-
cado.
Se recomienda que el mantenimiento y cualquier reparación
del producto sea efectuado por Soundcraft o sus distribuidores
autorizados. Soundcraft no aceptará ninguna reclamación por
pérdidas o daños causados en mantenimiento, reparaciones u
otro servicio efectuado por personas no autorizadas.
Si el aparato está colocado en una caretilla, tome las precau-
ciones necesarias para evitar que esta pueda volcar.
ADVERTENCIAS
Lea estas instrucciones atentamente.
Guarde estas instrucciones para futuras consultas.
Haga caso de todas las advertencias.
Siga todas las instrucciones
Esta unidad no contiene partes reparables por el usuario. Llame
al servicio técnico del representante de Soundcraft en su zona.
Limpiar solo con un paño húmedo.
Instalar de acuerdo con las instrucciones del fabricante.
Page 8
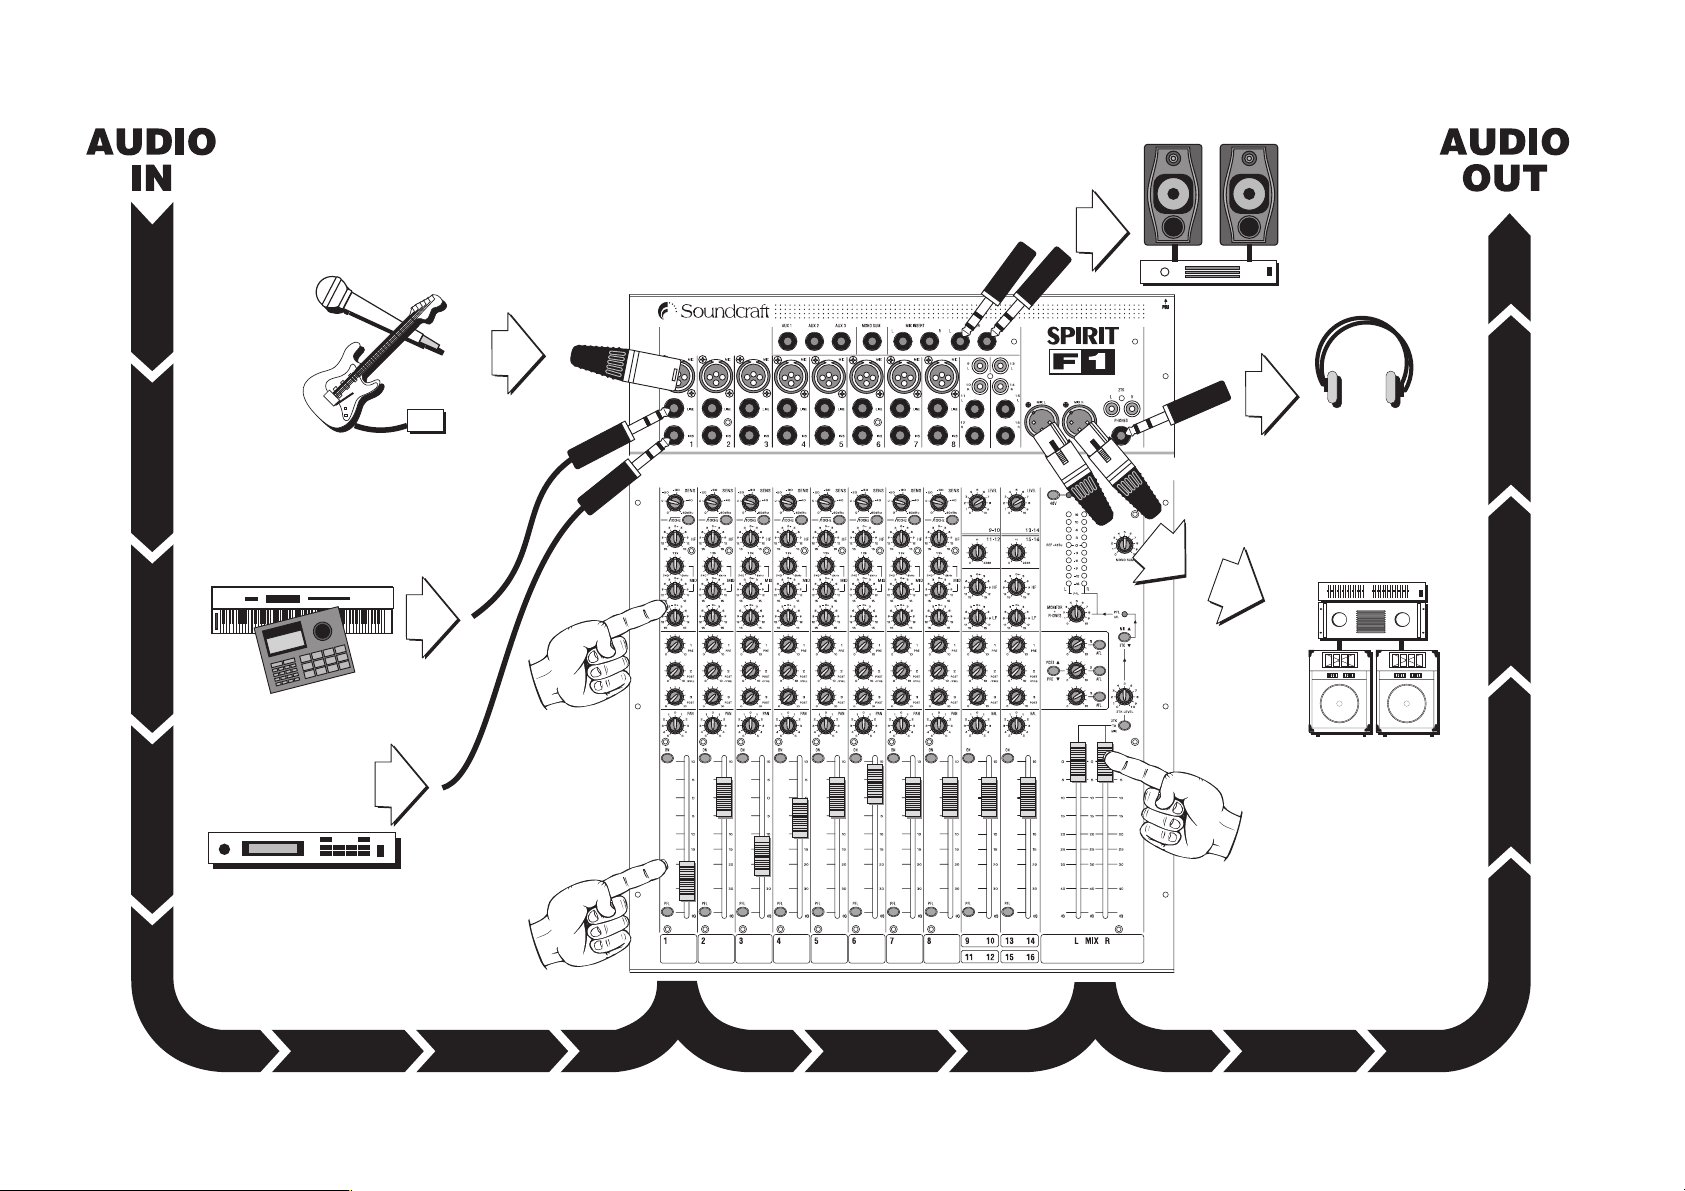
GETTING STARTED - Overview
Übersicht
Démarrage
Per Iniziare
Puesta en Marcha
Page 9
Connecting Up
Anschlüsse
Raccordement
Collegamento
Conexiones
Page 10
0
1
0
4
1
2
3
5
8
6
7
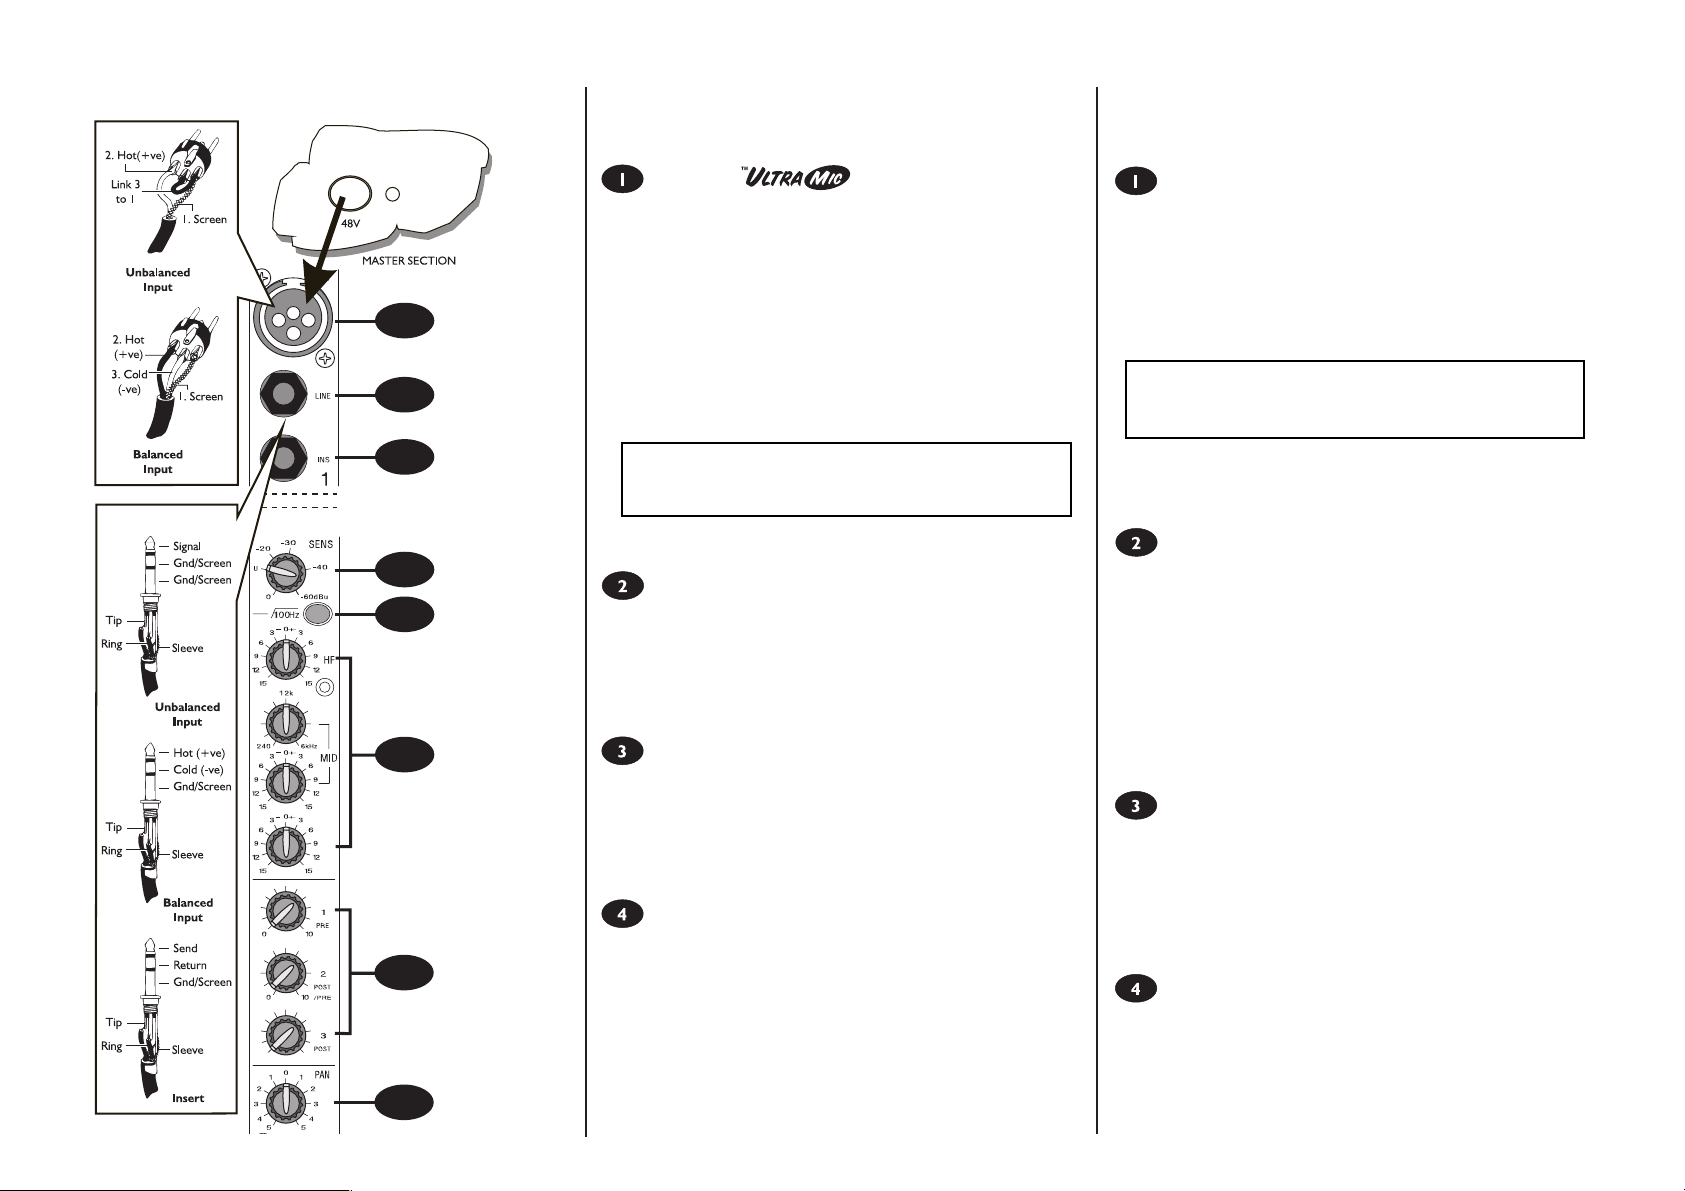
USING THE FOLIO F1
Mono Input Channel
Mic Input
The mic input accepts XLR-type connectors and is designed to suit a wide
range of BALANCED or UNBALANCED signals. Professional dynamic,
condenser or ribbon mics are best because these will be LOW IMPED-
ANCE. You can use low-cost HIGH IMPEDANCE mics, but the level of
background noise will be higher. If you press the 48V switch down (top
right-hand side of the mixer) the socket provides a suitable powering volt-
age for professional condenser mics (this is also known as Phantom Power).
ONLY connect condenser microphones with the 48V
powering OFF (switch UP), and ONLY turn the 48V
powering on or off with all output faders DOWN, to
prevent damage to the mixer or external devices.
TAKE CARE when using unbalanced sources, which
may be damaged by the phantom power voltage on
pins 2 & 3 of the XLR connector.
Unplug any mics if you want to use the LINE Input. The input level is set
using the SENS knob.
LINE INPUT
Accepts 3-pole `A gauge (TRS) jacks. Use this high impedance input for
sources other than mics, such as keyboards, drum machines, synths, tape
machines or guitars. The input is BALANCED for low noise and top quali-
ty from professional equipment, but you can use UNBALANCED sources
by wiring up the jacks as shown, although you should then keep cable
lengths as short as possible. Unplug anything in the MIC input if you want
to use this socket. Set the input level using the SENS knob.
INSERT POINT
The unbalanced, pre-EQ insert point is a break in the channel signal path,
allowing limiters, compressors, special EQ or other signal processing units
to be added in the signal path. The Insert is a 3-pole A gauge jack socket
which is normally bypassed. When a jack is inserted, the signal path is bro-
ken, just before the EQ section. The Send may be tapped off as an alter-
native pre-fade, pre-EQ direct output if required, using a lead with tip and
ring shorted together so that the signal path is not interrupted (see left).
SENS (Sensitivity)
This knob sets how much of the source signal is sent to the rest of the
mixer. Too high, and the signal will distort as it overloads the channel. Too
low, and the level of any background hiss will be more noticeable and you
may not be able to get enough signal level to the output of the mixer.
Setting the knob to the `U mark gives unity gain for the LINE input. Note
that some sound equipment, particularly that intended for domestic use,
operates at a lower level (-10dBV) than professional equipment and will
therefore need a higher gain setting to give the same output level.
See `Setting Up & Troubleshooting on page 20 to learn how to set SENS
correctly.
ANSCHLÜSSE
MONO EINGANG
Mikrofon Anschluß (MIC)
Am MIC-Eingang können symmetrische und unsymmetrische XLR Stecker
angeschlossen werden. Professionelle Dynamik- oder Bändchenmikrofone
eignen sich hevorragend wegen ihrer niedrigen Impedanz. Es können auch
preiswerte Mikrofone mit hoher Impedanz angeschlossen werden, hier ist
jedoch das Hintergrundrauschen höher. Werden professionelle
Kondensator Mikrofone eingesetzt, muß die erforderliche PHANTOM
SPANNUNG (48V) rechts auf der Mastersektion (siehe Abschnitt Master
Sektion) eingeschaltet werden.
ACHTUNG: Kondensator-Mikrofone nur anschließen,
wenn +48V ausgeschaltet ist. Bei Einschalten der
+48V Spannung alle Fader herunterpegeln.
Bei unsymmetrischen Quellen ist Vorsicht geboten, da die
Phantomspannung am Pin2 und 3 des XLR-Anschlusses anliegt. Die XLR
Anschlüsse müssen nicht abgezogen werden, wenn Sie den LINE Eingang
des entsprechenden Anschlusses verwenden möchten.
LINE Anschluß
Der LINE Eingang ist für 3polige 6,3mm Klinkenstecker vorgesehen. Die
6,3mm Klinkenstecker-Buchse eignet sich für Eingangsquellen mit höherer
Impedanz, wie z.B. Keyboards, Drum Computer, Synthesizer,
Bandmaschinen oder Gitarren. Der Eingang ist symmetrisch, geeignet für
professionelles Equipment mit niedrigem Rauschen und Top Qualität. Es
können jedoch auch unsymmetrische Quellen angeschlossen werden.
Hierbei sollte die Kabellänge so kurz wie möglich gewählt werden. Wird ein
6,3mm Klinkenstecker in den LINE Eingang gesteckt, so wird automatisch
der XLR Eingang unterbrochen. Dies bedeutet, daß Sie das am XLR-
Eingang angeschlossene Mikrofon nicht abziehen müssen, wenn Sie den
LINE Eingang nutzen möchten. Die Empfindlichkeitseinstellung des LINE
Eingangs erfolgt mit dem SENS Regler.
INS (Insert Anschluß)
Der unsymmetrische Insert-Anschluß (Einschleifpunkt) ist eine
Unterbrechung im Kanal-Signalweg. Über diesen 6,3mm Anschluß können
Audiosignale direkt zu externen Geräten, wie Effektgeräte usw. ausgespielt
und gleichzeitig wieder über diesen Anschluß eingespielt werden. Diese
Geräte werden somit zusätzlich in den Signalweg eingeschleift, der
Signalweg wird an dieser Stelle im Mischpult unterbrochen. Ist kein
Klinkenstecker eingesteckt, ist der Signalweg an dieser Stelle bypass
(= durchlaß) geschaltet.
SENS (Empfindlichkeit)
Mit diesem Regler wird die optimale Signalverstärkung der an MIC und
LINE angeschlossenen Quelle voreingestellt. Mit diesem Signalpegel wird
die entsprechende Quelle im weiteren Signalweg des Mischpultes weiter-
verarbeitet. Bei zu hoch eingestellter Empfindlichkeit wird der Kanal über-
steuert, das Signal verzerrt. Bei zu niedrig eingestellter Empfindlichkeit
kann Hintergrund-Zischen hörbar werden. Zum weiteren ergibt sich dann
ein zu geringer Signal-Ausgangspegel am Mischpult.
Page 11
UTILISATION DE LA FOLIO F1
Voie dEntrée Mono
Entrée Micro
Lentrée micro sur connecteurs de type XLR est conçue pour convenir à
une large gamme de signaux SYMETRIQUES ou ASYMETRIQUES. Les
micros professionnels dynamiques, statiques ou à ruban sont les meilleurs
parce quils sont BASSE IMPEDANCE. Vous pouvez utiliser des micros peu
coûteux HAUTE IMPEDANCE, mais le niveau du bruit de fond sera plus
haut. Si vous mettez lalimentation FANTOME en service (côté droit
supérieur de la console) lembase fournit la tension appropriée pour des
micros professionnels statiques.
Connecter SEULEMENT des microphones statiques
avec lalimentation fantôme +48V, et mettre lalimen-
tation fantôme 48V en ou hors service avec tous les
faders EN BAS, pour éviter des dommages à la console
ou aux equipements externes.
FAIRE ATTENTION lors dutilisation de sources
asymétriques, elles peuvent être endommagées par la
tension de lalimentation fantôme présente sur les
broches 2 et 3 du connecteur XLR.
Débrancher le micro si vous voulez utiliser lentrée LIGNE. Le niveau den-
trée est réglé par le potentiomètre SENS.
ENTREE LIGNE
Cette entrée sur jack 6.35 STEREO est destinée à des sources autres que
des micros, telles que des claviers, des boîtes à rythmes, des synthétiseurs,
des magnétophones ou des guitares. Lentrée est SYMETRIQUE pour un
bon rapport signal/bruit et pour du matériel professionnel, mais vous pou-
vez utiliser des sources ASYMETRIQUES en câblant les jacks comme mon-
tré ci-dessous ; dans ce cas utiliser des câbles aussi courts que possible.
Débrancher tout micro de lentrée MICRO si vous voulez utiliser cette
embase. Le niveau dentrée est réglé par le potentiomètre SENS.
INSERT
Le point dinsertion asymétrique, pré-correcteur est une rupture dans le
circuit de voie, permettant dinsérer des limiteurs, des compresseurs, un
correcteur spécial ou dautres appareils de traitement de signaux.
Linsertion utilise une embase jack 6.35 stéréo qui est normalement by-
passée. Quand une prise est insérée, le circuit est coupé, juste avant la sec-
tion CORRECTEUR.
Le départ insert peut être utilisé en tant que sortie directe avant tirette et
avant correcteur, en créant une liaison entre lextrémité et lanneau du jack
de sorte que le circuit ne soit pas interrompu (voir à gauche).
SENS (Sensibilité)
Ce potentiomètre permet dadapter la sensibilité du préampli micro au
niveau de signal de la source. Réglé trop haut, le signal sera distordu et sur-
chargera la voie. Trop bas, le niveau de bruit sera plus audible et vous ne
pourrez pas obtenir assez de niveau en sortie de console.
UTILIZZO DEL MIXER FOLIO F1
Ingresso Mono
Ingresso Mic
Lingresso Mic accetta connettori XLR ed è progettato per sostenere una
vasta gamma di segnali BILANCIATI e SBILANCIATI. Si consiglia luso di
microfoni professionali dinamici, a condensatore o a nastro perchè sono A
BASSA IMPEDENZA. E possibile usare microfoni ad ALTA IMPEDENZA,
ma il livello del rumore di fondo sarà superiore. Se viene premuto il pulsante
48V (in alto a destra) la presa eroga una tensione adatta allalimentazione dei
microfoni professionali a condensatore (nota come alimentazione
Phantom).
Collegare microfoni a condensatore SOLO con lali-
mentazione Phantom 48V disinserita., Per evitare
danni al mixer o alle aparecchiature esterne si consiglia
di attivare o disattivare lalimentazione Phantom con i
fader azzerati,
FARE ATTENZIONE in caso di sorgenti sbilanciate:
potrebbero rimanere danneggiate dallalimentazione
Phantom sui pin 2 & 3 del connettore XLR.
Staccare ogni microfono se si vuole usare lingresso LINE. Il livello dingres-
so viene regolato con la manopola SENS.
INGRESSO LINE
Accetta jack TRS a 3 poli. Usare questo ingresso ad alta impedenza per sor-
genti diverse dai microfoni, ad esempio tastiere, drum machines, sintetizza-
tori, registratori o chitarre. Lingresso è BILANCIATO per ottenere un
basso rumore e la massima qualità dalle apparecchiature professionali, ma è
possibile usare sorgenti SBILANCIATE collegando i jack come mostrato,
sebbene la lunghezza dei cavi debba essere la più corta possibile. Staccare
qualsiasi collegamento dallingresso MIC in caso si debba usare questa presa.
Il livello di ingresso viene regolato dalla manopola SENS.
INSERT POINT
Linsert point, non bilanciato, pre-EQ, è uninterruzione nel percorso del
segnale che permette di aggiungere limiter, compressori, equalizzatori spe-
ciali o altre unità. L Insert è una presa jack a 3-poli A normalmente bypas-
sata. Quando si inserisce un jack, il percorso del segnale viene interrotto,
prima della sezione EQ. La mandata Send può essere derivata come pre-
fade alternativo, uscita diretta pre-EQ se necessario, usando un cavo con
punta e anello in corto circuito per non interrompere il pecorso del segnale
(vd. figura di sinistra).
SENS (Sensibilità)
Questa manopola imposta la quantità di segnale da mandare al resto del
mixer. Se è troppo alta il segnale sarà distorto per il sovraccarico del canale.
Se è tropppo bassa il livello del fruscio di fondo sarà più udibile ed il livello
alluscita del mixer non sarà sufficiente.
USANDO LA FOLIO F1
Canal de Entrada Mono
Entrada Mic
La entrada de micrófono acepta conectores tipo XLR y ha sido diseñada
para acomodarse a un amplio abanico de señales balanceadas y no ba-
lanceadas. Los micrófonos profesionales dinámicos, de condensador o de
cinta son los más adecuados ya que presentan una baja impedancia. Si uti-
liza micrófonos baratos de alta impedancia, el nivel del ruido de fondo
puede ser mayor. Si activa la alimentación phantom de 48V (en la parte
superior derecha del mezclador), el conector suministrará una tensión de
alimentación adecuada para los micrófonos profesionles de condensador.
SOLO conecte micrófonos de condensador cuando la
alimentación phantom esté desactivada (conmutador
arriba), y SOLO active la alimentación phantom con
todos los faders de salida ABAJO, para evitar daños en
el mezclador o en aparatos externos.
TENGA CUIDADO cuando use fuentes no bal-
anceadas, ya que pueden ser dañadas por la tensión
que aparece sobre los pins 2 y 3 del conector XLR.
Desconecte los micrófonos si desea utilizar las correspondientes entradas
LINE. El nivel de entrada se ajusta a través del control SENS.
ENTRADA DE LINEA
Acepta jacks de 1/4 (TRS). Utilice esta entrada de alta impedancia para
otras fuentes que no sean micrófonos como, por ejemplo, teclados, cajas
de ritmos, sintetizadores, magnetófonos o guitarras. Con el fin de ofrecer
una bajo nivel de ruido e inmunidad frente a las interferencias, la entrada es
balanceada; sin embargo, puede utilizar fuentes no balanceadas cableando
los conectores tal como se muestra, aunque. deberá mantener la longitud
de los cables tan corta como le sea posible. El nivel de entrada se ajusta a
través del control SENS.
PUNTO DE INSERCIÓN
El punto de inserción no balanceado, pre-EQ es un corte en el paso de la
señal del canal, permitiendo añadir en éste limitadores, compresores, ecua-
lización especial u otros procesadores de señal. La inserción es un conector
jack de 1/4 de tipo A, que normalmente está en BYPASS. Cuando se inser-
ta un jack, se corta la señal justo antes del ecualizador. El envío puede
enviarse a grabación como alternativa a la salida directa pre-fader, pre-EQ
si se necesita, usando un conector en el que se conectan la PUNTA y el
ANILLO para no interrumpir el paso de la señal (ver a la izquierda).
SENS (Sensibilidad)
Este botón regula la cantidad de señal fuente enviada a al resto del mez-
clador. Si se sube demasiado, la señal distorsionará al saturar el canal. Si se
baja demasiado, el nivel del ruido de fondo será más apreciable y no tendrá
suficiente nivel a la salida del mezclador.

Page 12
100Hz HI-PASS FILTER
Pressing this switch activates a steep 18dB per octave filter which reduces
the level of bass frequencies only, and is a real bonus for a such a small
mixer. Use this in live PA situations to clean up the mix, reducing stage rum-
ble or `popping from microphones.
EQUALISER
The Equaliser (EQ) allows fine manipulation of the frequency bands, and is
particularly useful for improving the sound in live PA applications where the
original signal is often far from ideal and where slight boosting or cutting of
particular voice frequencies can really make a difference to clarity. The EQ
knobs can have a dramatic effect, so use them sparingly and listen carefully
as you change any settings so that you get to know how they affect the
sound.
HF EQ
Turn clockwise to boost high (treble) frequencies (12kHz and above) by up
to 15dB, adding crispness to cymbals, vocals and electronic instruments.
Turn anticlockwise to cut by up to 15dB, reducing hiss or excessive sibilance
which can occur with certain types of microphone. Set the knob in the cen-
tre-detented position when not required.
MID EQ
There are two knobs which work together to form a SWEPT MID EQ. The
lower knob provides 15dB of boost and cut, just like the HF EQ knob, but
the frequency at which this occurs can be set by the upper knob over a
range of 240Hz to 6kHz. This allows some truly creative improvement of
the signal in live situations, because this mid band covers the range of most
vocals. Listen carefully as you use these controls together to find how par-
ticular characteristics of, for instance, a vocal signal can be enhanced or
reduced. Set the gain (lower) knob to the centre-detented position when
not required. Note: Q is set at 1.5.
LF EQ
Turn clockwise to boost low (bass) frequencies (60Hz and below) by up to
15dB, adding warmth to vocals or extra punch to synths, guitars and drums.
Turn anticlockwise to cut low frequencies by up to 15dB for reducing hum,
stage rumble or to improve a mushy sound. Set the knob to the centre-
detented position when not required.
AUX SENDS
These are used to set up a separate mixes for FOLDBACK, EFFECTS or
recording, and the combination of each Aux Send is mixed to the respective
Aux Output at the rear of the mixer. For Effects it is useful for the signal to
fade up and down with the fader (this is called POST-FADE), but for
Foldback or Monitor feeds it is important for the send to be independent of
the fader (this is called PRE-FADE). All Aux Sends are muted with the other
channel outputs when the ON switch is released.
AUX SEND 1
This is always PRE-FADE, POST-EQ and therefore most appropriate for
foldback or monitor mixes or external submix.
0
1
0
4
1
2
3
5
8
6
7
Ab der U Markierung wird die Empfindlichkeit für den LINE Eingang
eingestellt.
HINWEIS: Beachten Sie, daß Sound Equipment für den häuslichen Bereich i.d.
Regel mit geringerem Pegel (-10 dBV) arbeitet, als vergleichsweise profes-
sionelles Equipment, so daß bei diesem eine höhere SENS Einstellung erforder-
lich ist, um den gleichen Ausgangspegel zu erhalten. Beachten Sie hierzu die
Hinweise im Kapitel Der richtige Einsatz des Folio F1 .
100 Hz (Hochpaßfilter)
Durch Einschalten dieses Tasters wird ein 100 Hz- Hochpaßfilter mit 18 dB
/ Oktave in den Signalweg - direkt hinter dem SENS Regler - geschaltet.
Dieser Filter wird in erster Linie bei Live PA-Einsätzen eingeschaltet, um
Bühnenschwingungen oder Popping zu reduzieren, sowie für alle Quellen,
die unter 100 Hz keine echten Signalanteile haben (z.B. Gesang, Gitarre).
EQUALIZER (EQ)
Der Equalizer besteht aus 3 Sektionen (vgl. mit großen, professionellen
Mischpulten) und ermöglicht eine Fein-Einstellung des Gesamtklangbildes.
Oft kommt es vor, daß der Sound einer Live PA nicht das ideale Klangbild
hat. Durch geringfügiges Verstärken bzw. Abschwächen bestimmter
Frequenzen kann hier ein gutes Ergebnis erzielt werden.
HINWEIS: Die EQ Sektion kann ein Klangbild extrem verändern. Es ist also
wichtig, alle Einstellungen mit Vorsicht anzugehen, alle Einstellungen Probe zu
hören, um festzustellen, wie das Klangbild durch die Einstellungsveränderung
sich ebenfalls verändert.
HF
Der HF-Regler ist zum Verstärken und Abschwächen der hohen
Frequenzen (12 kHz und mehr) um +/- 15 dB. Werden durch den HF-
Regler die Höhen verstärkt, so erhalten beispielsweise Percussion-Becken,
Gesang und elektronische Instrumente lebendige Höhen. Durch Absenken
des HF-Bereiches werden Zischlaute und andere unerwünschte, hochfre-
quente Anteile im Signal reduziert, die sonst durch gewisse Mikrofontypen
frequenzabhängig verstärkt würden.
MID
Für den Mitten-Bereich stehen 2 Regler zur Verfügung: Mit dem unteren
Regler wird - wie beim HF Regler - eine Verstärkung bzw. Abschwächung
von 15 dB eingestellt. Mi dem oberen Regler wird die zugehörige Frequenz
im Bereich von 240 Hz bis 6 kHz exakt eingestellt. Dies ermöglicht eine
wesentliche Einstellungs-Verbesserung in Live Situationen, da man genau bei
der benötigten Frequenz (Tonhöhe) nachregeln kann.
LF
Durch Verstärken des LF Bereiches (60 Hz und weniger) kann beispiel-
sweise dem Gesang klangliche Wärme hinzugefügt werden, oder dem
Sound von Synths, Gitarren und Drums einen gewissen Punch.
Abschwächen des LF Bereiches reduziert Bühnenschwingungen.
HINWEIS: Alle EQ-Regler - mit Ausnahme des oberen MID Regler - sollten in
Mittenposition stehen, falls die EQ-Sektion nicht genutzt wird.
AUX SENDS
Mit den Aux Sends (Hilfs-Ausspielwege) können Sie von jedem Kanal
Ausgangssignale für Monitor, Effekte oder Aufnahmen ausspielen. An den
AUX Ausgängen erhalten Sie die Summe aller entsprechender Kanal Aux
Sends.
 Loading...