


4-135-539-01 (1)
Data
Projector
VPL-EX70
VPL-EX7
VPL-ES7


_________________ JP Quick Reference Manual___ GB Guide de référence rapide _ FR Manual de referencia rápida __ ES Kurzreferez ______________ DE Guida rapida all’uso_______ IT


 ______________ CS
© 2009 Sony Corporation

CD-ROM
CD-ROM
CD-ROM ReadMeReadMe
CD-ROM Adobe Acrobat Reader5.0
Adobe Acrobat Reader
CD-ROM CD-ROM CD-ROMCD-ROM
CD-ROM
Windows
1
Windows Vista
2 CD-ROM
3index.htm
Macintosh
1CD-ROM
2index.htm
index.htmOperating_Instructions
JP 2 / CD-ROM

Adobe Acrobat Adobe Systems Incorporated
Windows Microsoft Corporation
Kensington Kensington
Macintosh Apple
VESA Video Electronics Standard Association
Display Data Channel Video Electronics Standards Association
録商標です。なお、本文中ではTM ®
JP
CD-ROM 3JP
1
2
3
4
4
JP 4

5JP
|
a |
b |
VPL-EX70 |
1 |
|
|
2 |
|
HD D-sub 15 ) |
|
AUDIO INPUT
JP 6
DVD
a b
3
1
2 S DIN4-pin
3 × 3
VPL-EX70
1
2
抵抗無しのケーブルをお使いください
AUDIO INPUT
7JP
a ?/1 ( /
b
cINPUT
d
 A
A
B
(VPL-EX70
S
1
Power
2 |
F7 |
Fx 4 |
Fn |
|
|
|
|
JP 8
a b
c
を選べるスクリーン設定メニューがあります。
3
2
1
a ?/1( /
b ?/1( /
c?/1( / /
1
2
9JP
うメッセージが表示されたとき
LAMP/COVER3
ターランプLMP-E191
1
合は、ランプを冷やすため、1
2
3 1
4 2
a
b
c
JP 10
5
a 2 b
c
6 1
7
8
?/1
9 ?/1
10MENU
11
ENTER
12V ENTER
0
13v
11JP
1
2
3
4
5
JP 12

1
CD-ROM
?/1
c90
|
|
|
|
|
c |
|
|
|
c DDC2B Display Data Channel 2B |
|
DDC 1. |
|
2. 3. |
|
|
|
|
|
c |
|
|
|
c PIC MUTING |
|
|
|
|
|
|
|
|
|
c |
|
|
|
|
|
LCD |
|
|
|
c |
|
|
|
|
|
c |
|
|
|
c 2 |
13JP

|
APA |
c APA
c
|
|
LAMP/COVER |
|
|
c |
2 |
|
|
|
|
|
|
|
LAMP/COVER |
|
|
c |
3 |
|
|
c 60 |
|
|
|
|
?/1 |
|
2 |
c |
|
|
|
c |
|
|
?/1 |
|
4 |
c |
|
|
|
|
?/1 |
?/1 |
6 |
|
|
|
|
c |
JP 14

3LCD 1 3
LCD VPL-EX70/EX7
0.63 XGA
236 1024 × 768 × 3 VPL-ES7
0.63 SVGA
144 800 × 600 × 3
190 W
40 3001)
VPL-EX70 2600 lm VPL-EX7/ES7 2000 lm
1
しており、JIS X 6911 2003
2
/
|
m |
|
|
|
|
40 |
1.1 |
1.4 |
|
|
|
80 |
2.3 |
2.8 |
|
|
|
100 |
2.9 |
3.5 |
|
|
|
150 |
4.4 |
5.2 |
|
|
|
200 |
5.8 |
7.0 |
|
|
|
250 |
7.3 |
8.8 |
|
|
|
300 |
8.8 |
10.5 |
|
|
|
NTSC3.58 PAL SECAM NTSC4.43 PAL-M PAL-N PAL60
NTSC4.43 NTSC NTSC4.43
2
fH: 19 92 kHz fV: 48 92 Hz
SXGA 1400 × 1050 fV 60Hz
2
15k RGB 50/ 60Hz 50/60Hz DTV 480/60i 575/50i 480/ 60p 575/50p 720/60p 720/ 50p 1080/60i 1080/50iY/C
314 × 109 × 269 mm
質量VPL-EX70 3.0 kg
VPL-EX7/ES7 2.9 kgVPL-EX70/EX7 :
AC100 V 2.6 A 50/60 Hz VPL-ES7 :
AC100V 2.4 A 50/60 Hz
VPL-EX70/EX7 :
260 W
3W VPL-ES7 :
240W
3W
1
CR2025 1 HD D-sub 151.8 m 1 1-832-428-11
SONY
15JP

11 1
CD-ROM 1
1 11 1
LMP-E191
JP 16

17JP

About the Quick
Reference Manual
This Quick Reference Manual explains the connections and basic operations of this unit, and gives notes on operations and information required for maintenance. For details on the operations, refer to the Operating Instructions contained in the supplied CD-ROM.
For safety precautions, refer to the separate “Safety Regulations.”
Using the CD-ROM
Manuals
The supplied CD-ROM contains Operating Instructions and ReadMe file in Japanese, English, French, German, Italian, Spanish, Chinese and Russian. First, refer to the ReadMe file.
Preparations
To read the Operating Instructions in the CD-ROM, Adobe Acrobat Reader 5.0 or later is required. If the Adobe Acrobat Reader is not installed in your computer, you can download free Acrobat Reader software from URL of Adobe Systems.
To read the Operating Instructions
The Operating Instructions are contained in the supplied CD-ROM. Insert the supplied CD-ROM into the CD-ROM drive of your computer, and the CD-ROM will start automatically after a while. Select the Operating Instructions you want to read.
The CD-ROM may not start automatically depending on the computer. In this case, open the Operating Instructions file as follows:
(In case of Windows)
1Open “My Computer.” (“Computer” is displayed in Windows Vista.)
2Right-click the CD-ROM icon and select “Explorer.”
3Double-click “index.htm” file and select the Operating Instructions you want to read.
(In case of Macintosh)
1Double-click the CD-ROM icon on the desk top.
2Double-click “index.htm” file and select the Operating Instructions you want to read.
Note
If you cannot open “index.htm” file, doubleclick on the Operating Instructions you want to read from among those in “Operating_Instructions” folder.
On trademarks
•Adobe Acrobat is a trademark of Adobe Systems Incorporated.
•Windows is a registered trademark of Microsoft Corporation in the United States and/or other countries.
•Kensington is a registered trademark of Kensington Technology Group.
•Macintosh is a registered trademark of Apple Inc.
•VESA is a registered trademark of the Video Electronics Standards Association.
•Display Data Channel is a trademark of the Video Electronics Standards Association.
•All other trademarks and registered trademarks are trademarks or registered trademarks of their respective holders. In this manual, ™ and ® marks are not specified.
GB 2 About the Quick Reference Manual / Using the CD-ROM Manuals
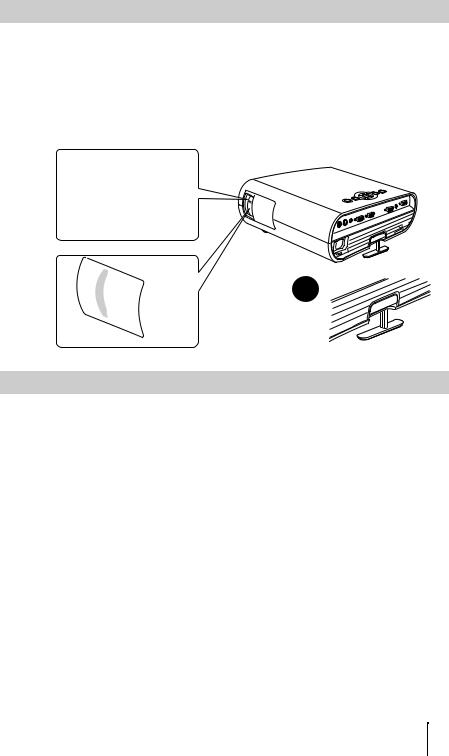
Notes on Use
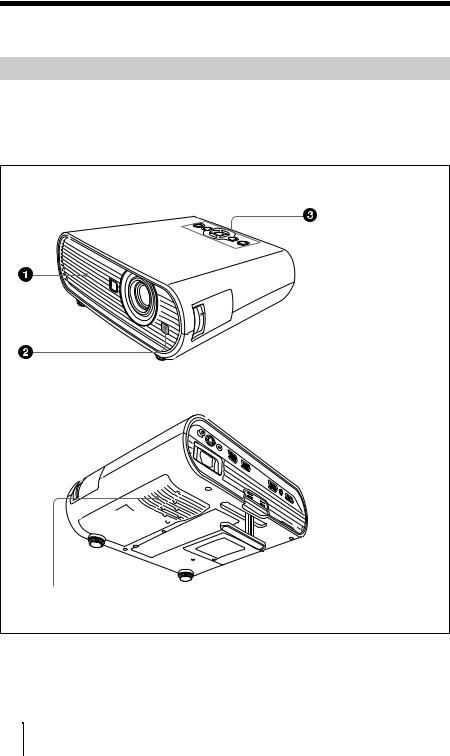
Note on the Ventilation Holes
Do not block ventilation holes (exhaust/intake). If they are blocked, internal heat may build up and cause fire or damage to the unit.
Check the positions of the ventilation holes shown in the following illustrations. For other precautions, read the separate “Safety Regulations” carefully.
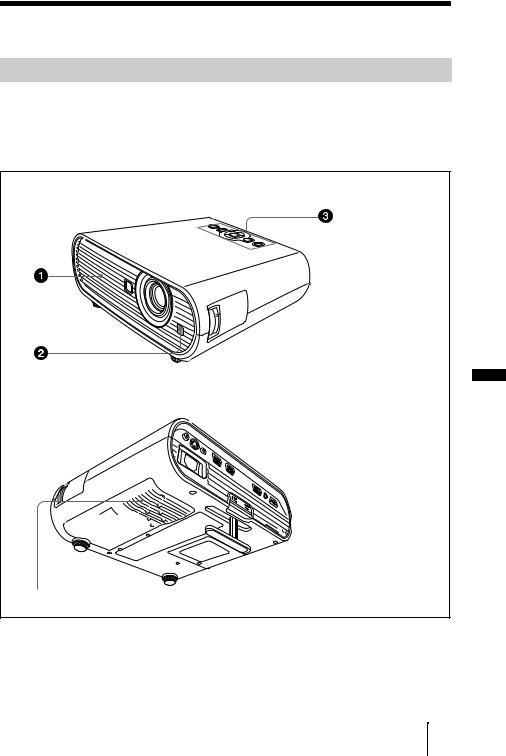
Top/Right Side/Front
a Ventilation holes (exhaust)
b Remote control detector
c Indicators
d Ventilation
holes (intake)
GB
Rear/Right Side/Bottom
4
Notes on Use 3GB
Projecting
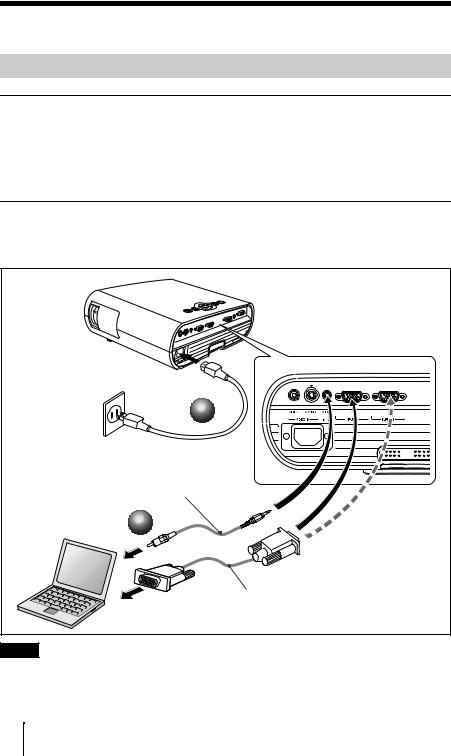
Connecting the Projector
When you connect the projector, make sure to:
•Turn off all equipment before making any connections.
•Use the proper cables for each connection.
•Insert the cable plugs firmly. When pulling out a cable, be sure to pull it out from the plug, not the cable itself.
•Refer also to the instruction manual of the equipment to be connected.
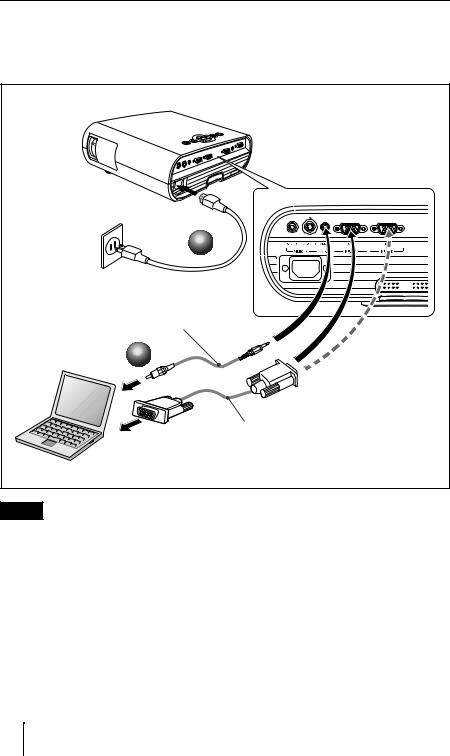
To connect a computer (Analog)
a Plug the AC power cord into a wall outlet. b Connect the projector to a computer.
VPL-EX70 |
1 |
Stereo audio connecting cable |
(not supplied) |
(Use a no-resistance cable.) |
2 |
HD D-sub 15 pin |
cable (supplied) |
Note |
For stereo audio connection, connect the stereo audio connecting cable to the AUDIO INPUT connector.
GB 4 Projecting

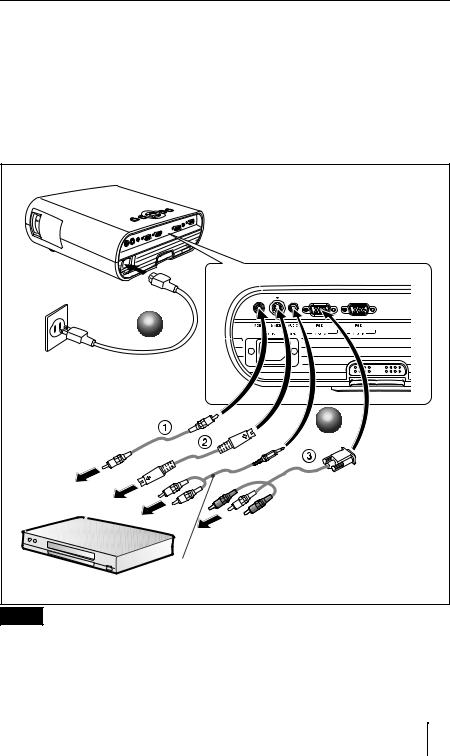
To connect a VCR/DVD player
a Plug the AC power cord into a wall outlet.
bConnect the projector to a video equipment.
For video signal connections, the following three connecting options are available: 1 Composite video (phono) cable (not supplied)
2 S video (Mini DIN 4-pin) cable (not supplied) 3 Component (phono × 3) cable (not supplied)
VPL-EX70 |
1 |
2 |
Stereo audio connecting cable |
(not supplied) |
(Use a no-resistance cable.) |
Note |
For stereo audio connection, connect the stereo audio connecting cable to the AUDIO INPUT connector.
Projecting 5GB
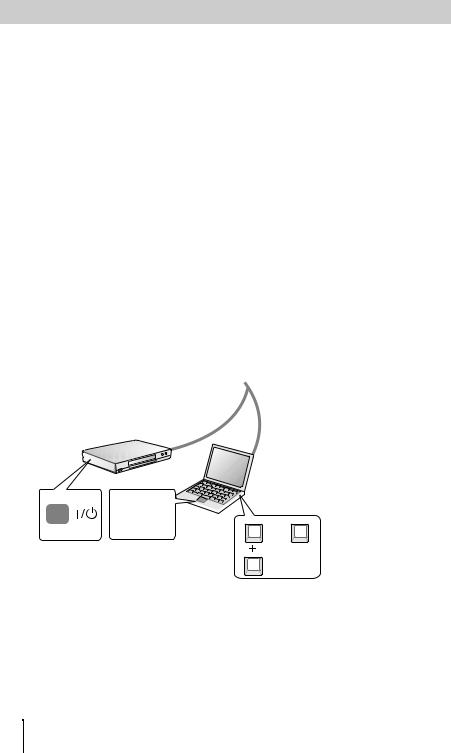
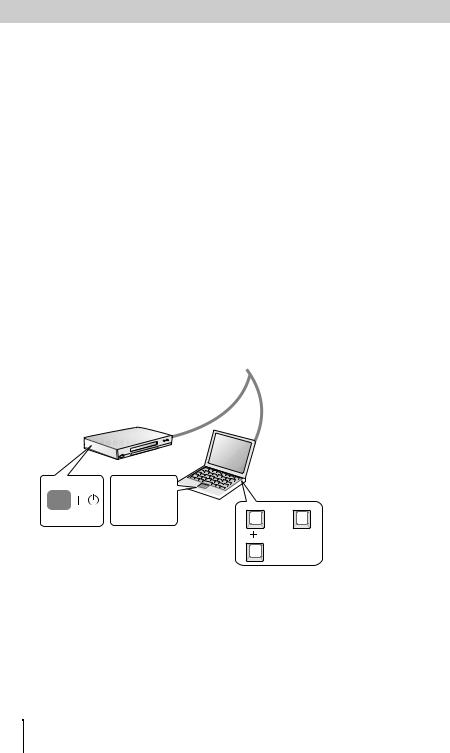
Projecting
a Press the ?/1 (on/standby) key.
b Turn on the equipment connected to the projector.
cPress the INPUT key on the Remote Commander or the control panel to select the input source.
dWhen the computer is connected, set it to output the signal to only the external monitor.
|
|
|
Input-A |
|
|
|
|
|
Input-B |
|
|
|
|
(VPL-EX70 only) |
|
||
|
|
|
Video |
|
|
|
|
|
S-Video |
1 |
|
|
|
|
|
|
|
|
|
Power |
|
|
|
|
|
F7 |
or |
Fx |
4 |
|
2 |
Fn |
|
|
|
GB 6 |
Projecting |
|
|
|
|

Adjusting the Projector
a Adjust the position of the picture.
b Adjust the size of the picture.
cAdjust the focus.
The projector is equipped with the Picture menu to select the picture mode, and the Screen menu to select the appropriate aspect ratio of the picture.
3 |
2 |
1 |
Turning off the Power
a Press the ?/1 (on/standby) key.
b When a message appears, press the ?/1 (on/standby) key again.
cUnplug the AC power cord from the wall outlet after the fan stops running and the ?/1 (on/standby) key lights in red. (Except when using the Direct
Power On/Off function or the Off & Go function.)
1
2
Projecting 7GB
Replacing the Lamp
The lamp used as a light source is consumable product. Thus replace the lamp with a new one in the following cases.
•When the lamp has burnt out or dims
•“Please replace the Lamp.” appears on the screen
•The LAMP/COVER indicator lights up (repeats flashing three times)
The lamp life varies depending on conditions of use.
Use an LMP-E191 Projector Lamp as the replacement lamp.
Use of any other lamps than the LMP-E191 may cause damage to the projector.
Notes
•If the lamp breaks, ask qualified Sony personnel to replace the lamp and to check inside.
•Pull out the lamp by holding the handle.
•When removing the lamp, make sure it remains horizontal, then pull straight up. Do not tilt the lamp. If you pull out the lamp while it is tilted and if the lamp breaks.
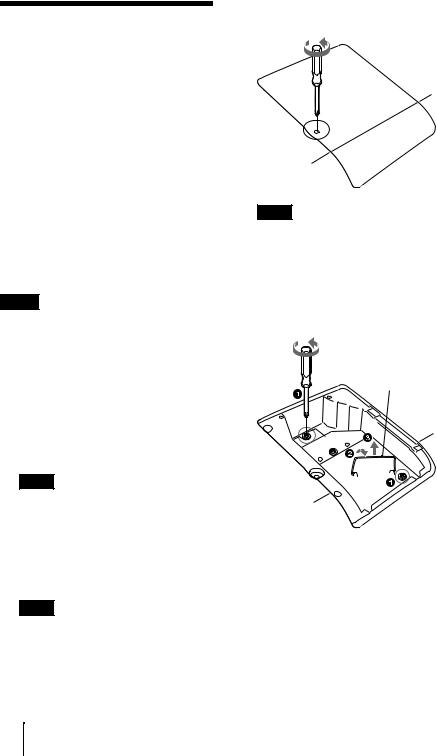
1 Turn off the projector, and disconnect the AC power cord from the AC outlet.
Note
When replacing the lamp after using the projector, wait for at least an hour for the lamp to cool.
2 Place a protective sheet (cloth) beneath the projector. Turn the projector over so you can see its underside.
Note
Be sure that the projector is stable after turning it over.
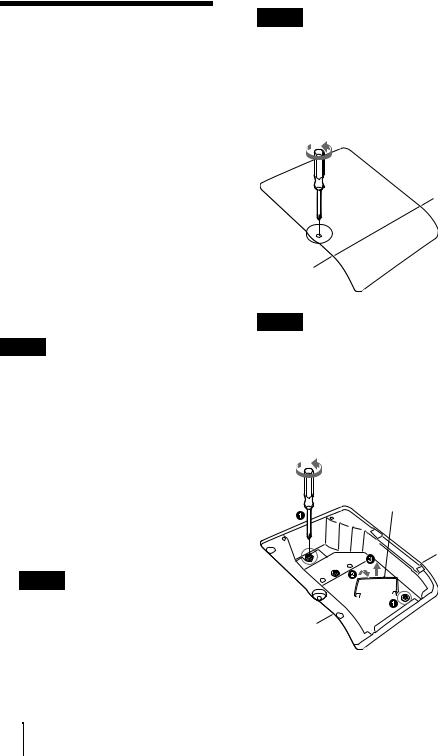
3 Open the lamp cover by loosening the screw with a Phillips screwdriver.
Note
For safety reasons, do not loosen any other screws.
4 Loosen the two screws on the lamp unit with the Phillips screwdriver (a). Fold out the handle (b), then pull out the lamp unit by the handle (c).
Handle
GB 8 Replacing the Lamp
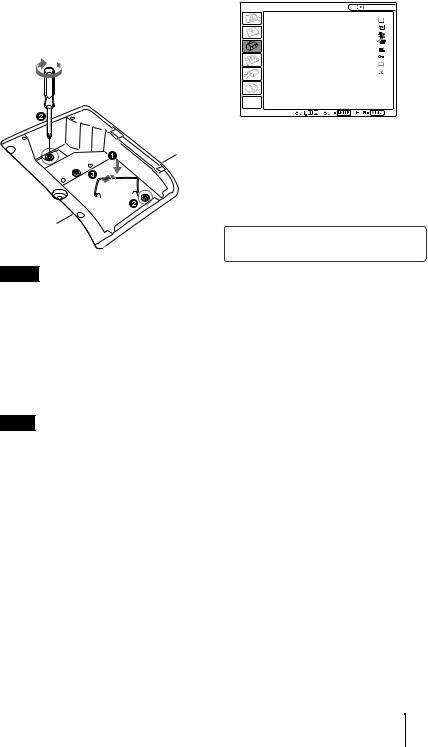
5 Insert the new lamp all the way in until it is securely in place (a). Tighten the two screws (b). Fold down the handle to replace it (c).
Notes
•Be careful not to touch the glass surface of the lamp.
•The power will not turn on if the lamp is not secured properly.
•Do not allow any liquid or other objects into the slot to avoid electrical shock or fire.
6 Close the lamp cover and tighten the screw.
Note
Be sure to attach the lamp cover securely as it was. If not, the projector cannot be turned on.
7 Turn the projector back over.
8 Connect the power cord. The ?/1 key lights in red.
9 Press the ?/1 key to turn the projector on.
10Press the MENU key, and then select the SET SETTING menu.
11Select “Lamp Timer Reset”, and then press the ENTER key.
SET SETTING |
Input-A |
Smart APA: |
On |
Auto Input Search: Off |
|
Input-A Signal Sel.: Auto |
|
Color System: |
Auto |
Power Saving: |
Off |
Panel Key Lock: |
Off |
CC Display: |
Off |
Lamp Timer Reset |
|
12Select “Execute” with the V key, and then press the ENTER key.
The Lamp Timer is initialized to 0, and “Change the Lamp and clean the Filter?” is displayed in the menu screen.
Change the Lamp and clean the Filter?
Yes: No:
No:
Refer to page 10 for “Cleaning the Air Filter”.
13Select “Yes” with the v key. “Lamp Timer Reset Complete!” is displayed in the menu screen.
Disposal of the used lamp
For the customers in the USA
Lamp in this product contains mercury. Disposal of these materials may be regulated due to environmental considerations. For disposal or recycling information, please contact your local authorities or the Electronic Industries Alliance (www.eiae.org).
Replacing the Lamp 9GB

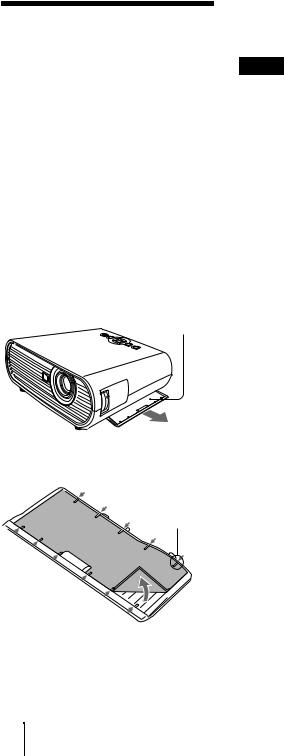
Cleaning the Air
Filter
The air filter should be cleaned whenever you replace the lamp. Remove the air filter, and then remove the dust with a vacuum cleaner.
The time needed to clean the air filter will vary depending on the environment or how the projector is used.
When it becomes difficult to remove the dust from the filter with a vacuum cleaner, remove the air filter and wash it.
1 Turn the power off and unplug the power cord.
2
Air filter
3 Remove the air filter.
Claws
Notes
•If you neglect to clean the air filter, dust may accumulate, clogging it. As a result, the temperature may rise inside the unit, leading to a possible malfunction or fire.
•Be sure to attach the air filter cover firmly; the power can not be turned on if it is not closed securely.
•The air filter has a face and a reverse side. Place the air filter so that it fits in a notch on the air filter cover.
4 Wash the air filter with a mild detergent solution and dry it in a shaded place.
5 Attach the air filter so that it fits into the each claws on the air filter cover and replace the cover.
GB 10 Cleaning the Air Filter

Troubleshooting
If the projector appears to be operating erratically, try to diagnose and correct the problem using the following instructions. If the problem persists, consult with qualified Sony personnel.
For details on the symptoms, see the Operating Instructions contained in the CD-ROM.
Power
Symptom |
Cause and Remedy |
|
|
The power is not turned on. |
• The power has been turned off and on with the ?/1 key at a short |
|
interval. |
|
c Wait for about 90 seconds before turning on the power. |
|
• The lamp cover is not secured. |
|
c Close the lamp cover securely. |
|
• The air filter cover is detached. |
|
c Attach the air filter cover securely. |
|
|
Picture
Symptom |
Cause and Remedy |
|
|
No picture. |
• A cable is disconnected or the connections are wrong. |
|
c Check that the proper connections have been made. |
|
• The connections are wrong. |
|
c This projector is compatible with DDC2B (Digital Data |
|
Channel 2B). If your computer is compatible with DDC, turn |
|
the projector on according to the following procedures. |
|
1 Connect the projector to the computer. |
|
2 Turn the projector on. |
|
3 Start the computer. |
|
• Input selection is incorrect. |
|
c Select the input source correctly. |
|
• The picture is muted. |
|
c Press the PIC MUTING key to release the picture muting. |
|
• The computer signal is not set to output to an external monitor or |
|
set to output both to an external monitor and a LCD monitor of a |
|
computer. |
|
c Set the computer signal to output only to an external monitor . |
|
|
The picture is noisy. |
Noise may appear on the background depending on the combination |
|
of the number of dots input from the computer and the numbers of |
|
pixels on the LCD panel. |
|
c Change the desktop pattern on the connected computer. |
|
|
The picture is not clear. |
• The picture is out of focus. |
|
c Adjust the focus. |
|
• Condensation has accumulated on the lens. |
|
c Leave the projector for about two hours with the power on. |
|
|
The image extends beyond |
The APA key has been pressed even though there are black edges |
the screen. |
around the image. |
|
c Display the full image on the screen and press the APA key. |
|
c Adjust “Shift” in the Input setting menu properly. |
|
|
Troubleshooting 11 GB

Symptom |
Cause and Remedy |
|
|
The picture flickers. |
“Dot Phase” in the Input setting menu has not been adjusted |
|
properly. |
|
c Adjust “Dot Phase” in the Input setting menu properly. |
|
|
Indicators
Message |
Meaning and Remedy |
|
|
The LAMP/COVER |
The lamp cover or the air filter cover is detached. |
indicator flashes in orange. |
c Attach the cover securely. |
(Repetition rate of 2 |
|
flashes) |
|
|
|
The LAMP/COVER |
• The lamp has reached the end of its life. |
indicator flashes in orange. |
c Replace the lamp. |
(Repetition rate of 3 |
• The lamp has reached a high temperature. |
flashes) |
c Wait for 60 seconds to cool the lamp and then turn on the power |
|
again. |
|
|
?/1 key flashes in red. |
• The internal temperature is unusually high. |
(Repetition rate of 2 |
c Check to see that nothing is blocking the ventilation holes. |
flashes) |
• The projector is being used at a high altitude. |
|
c Ensure that “High Altitude Mode” in the INSTALL SETTING |
|
menu is set to “On.” |
|
|
?/1 key flashes in red. |
The fan is broken. |
(Repetition rate of 4 |
c Consult with qualified Sony personnel. |
flashes) |
|
|
|
?/1 key flashes in red. |
Unplug the AC power cord from the wall outlet after the ?/1 |
(Repetition rate of 6 |
indicator goes out, plug the power cord to the wall outlet, and then |
flashes) |
turn the projector on again. If the ?/1 flashes in red and the problem |
|
persists, the electrical system has failed. |
|
c Consult with qualified Sony personnel. |
|
|
GB 12 Troubleshooting

Specifications
Projection system
3 LCD panels, 1 lens, projection system
LCD panel VPL-EX70/EX7: 0.63-inch XGA panel, about 2,360,000 pixels (1024 × 768 × 3)
VPL-ES7: 0.63-inch SVGA panel, about 1,440,000 pixels (800 × 600 × 3)
Lamp 190 W Ultra high pressure lamp Projected picture size
40 to 300-inches
Light output1) VPL-EX70: 2600 lm VPL-EX7/ES7: 2000 lm
1) When the Lamp Mode is set to “High.”
Throwing distance (When placed on the floor./ Adjuster not stretched, and the V Keystone function has been done. )
40-inch: 1.1 to 1.4 m
(3.6 to 4.6 feet)
80-inch: 2.3 to 2.8 m
(7.5 to 9.2 feet)
100-inch: 2.9 to 3.5 m
(9.5 to 11.5 feet)
150-inch: 4.4 to 5.2 m
(14.4 to 17.1 feet)
200-inch: 5.8 to 7.0 m
(19.0 to 23.0 feet)
250-inch: 7.3 to 8.8 m
(24.0 to 28.9 feet)
300-inch: 8.8 to 10.5 m
(28.9 to 34.5 feet)
There may be a slight difference between the actual value and the design value shown above.
Color system NTSC3.58/PAL/SECAM/ NTSC4.43/PAL-M/PAL-N/ PAL60 system, switched automatically/manually
(NTSC4.43 is the color system used when playing back a video recorded in NTSC on a NTSC4.43 system VCR.)
Acceptable computer signals2) fH: 19 to 92 kHz
fV: 48 to 92 Hz
(Maximum input signal resolution: SXGA+ 1400 × 1050
fV: 60 Hz)
2)Set the resolution and the frequency of the signal of the connected computer within the range of acceptable preset signals of the projector.
Applicable video signals
|
15 k RGB 50/60 Hz, Progressive |
|
component 50/60 Hz, DTV |
|
(480/60i, 575/50i, 480/60p, |
|
575/50p, 720/60p, 720/50p, |
|
1080/60i, 1080/50i), Composite |
|
video, Y/C video |
Dimensions |
314 × 109 × 269 mm |
|
(12 3/8 × 4 3/8 × 10 5/8 inches) |
|
(w/h/d) (not including the |
|
projection parts) |
Mass |
VPL-EX70: |
Approx. 3.0 kg (6 lb 10 oz) VPL-EX7/ES7:
Approx. 2.9 kg (6 lb 6 oz) Power requirements
VPL-EX70/EX7:
AC 100 to 240 V, 2.6 to 1.1 A, 50/60 Hz
VPL-ES7:
AC 100 to 240 V, 2.4 to 1.0 A, 50/60 Hz
Power consumption VPL-EX70/EX7:
Max.260 W (in standby 3 W) VPL-ES7:
Max.240 W (in standby 3 W) Supplied accessories
Remote Commander (1) Lithium battery CR2025 (1)
HD D-sub 15 pin cable (1.8 m) (1) (1-832-428-11, SONY)
Carrying case (1) AC power cord (1) Lens cap (1)
Operating Instructions (CD-ROM)
(1)
Quick Reference Manual (1) Safety Regulations (1) Security Label (1)
Design and specifications are subject to change without notice.
Note
Always verify that the unit is operating properly before use. SONY WILL NOT BE LIABLE FOR DAMAGES OF ANY KIND INCLUDING, BUT NOT LIMITED TO, COMPENSATION OR REIMBURSEMENT ON ACCOUNT OF THE LOSS OF PRESENT OR PROSPECTIVE PROFITS DUE TO FAILURE OF THIS UNIT, EITHER DURING THE WARRANTY PERIOD OR AFTER EXPIRATION OF THE WARRANTY, OR FOR ANY OTHER REASON WHATSOEVER.
Specifications 13 GB

Optional accessories
Projector Lamp
LMP-E191
GB 14 Specifications
 Loading...