Sony VRD-MC3 User Manual
Recording videos
from HDD camcorders ...........................
Recording videos
from DVD camcorders............................
Recording videos
from DV camcorders ..............................
Recording videos
from miscellaneous video devices .........
Recording photos
from memory cards ................................
Recording photos
from HDD camcorders ...........................
Video Recordable
DVD Drive
Operating Instructions
VRD-MC3
© 2006 Sony Corporation

Safety
Regulations
WARNING
You are cautioned that any changes or modifications not expressly approved in this manual could void your authority to operate this equipment.
To reduce the risk of fire or electric shock, do not expose this apparatus to rain or moisture. To avoid electrical shock, do not open the cabinet. Refer servicing to qualified personnel only.
CAUTION:
As the laser beam in the VRD-MC3 is harmful to the eyes, do not attempt to disassemble the cabinet. Refer servicing to qualified personnel only.
The use of optical instruments with this product will increase eye hazard.
The use of controls or adjustments or performance of procedures other than those specified herein may result in hazardous radiation exposure.
The VRD-MC3 is classified as a CLASS 1 LASER PRODUCT.
The CLASS 1 LASER PRODUCT notice is located on the enclosure.
Bei diesem VRD-MC3 handelt es sich um ein Laser-Produkt der Klasse 1.
Das Etikett mit der Aufschrift LASER KLASSE 1 PRODUKT befindet sich auf dem Gehäuse.
CLASS 1
LASER PRODUCT
LASER KLASSE 1
PRODUKT
LUOKAN 1 LASERLAITE
KLASS 1 LASER APPARAT
FCC Compliance:
This equipment has been tested and found to comply with the limits for a Class B digital device, pursuant to Part 15 of the FCC Rules. These limits are designed to provide reasonable protection against harmful interference in a residential installation. This equipment generates, uses, and can radiate radio frequency energy and, if not installed and used in accordance with the instructions, may cause harmful interference to radio communications. However, there is no guarantee that interference will not occur in a particular installation. If this equipment does cause harmful interference to radio or television reception, which can be determined by turning the equipment off and on, the user is encouraged to try to correct the interference by one or more of the following measures:
•Reorient or relocate the receiving antenna.
•Increase the separation between the equipment and receiver.
•Connect the equipment into an outlet on a circuit different from that to which the receiver is connected.
•Consult the dealer or an experienced radio/ TV technician for help.
The shielded interface cable recommended in this manual must be used with this equipment in order to comply with the limits for a digital device pursuant to Subpart B of Part 15 of FCC Rules.
Notes:
If you have any questions about this product, visit the user support web site listed in “Support Overview” on page 82. The telephone number below is not for customer service but only for official purposes.
Declaration of Conformity
Trade Name: |
SONY |
Model No.: |
VRD-MC3 |
Responsible Party: Sony Electronics Inc. |
|
Address: |
16530 Via Esprillo, |
|
San Diego, CA 92127 |
|
U.S.A. |
Telephone No.: |
858-942-2230 |
This device complies with Part 15 of the FCC Rules. Operation is subject to the following two conditions:
(1)This device may not cause harmful interference, and
(2)This device must accept any interference received, including interference that may cause undesired operation.
2

CE Sicherheitsbestimmungen
Diese Ausrüstung erfüllt die Europäischen EMC-Bestimmungen für die Verwendung in folgender / folgenden Umgebung (en):
•Wohngegenden
•Gewerbegebiete
•Leichtindustriegebiete (Diese Ausrüstung erfüllt die Bestimmungen der Norm EN55022, Klasse B.)
CAUTION:
The mains plug on this equipment must be used to disconnect mains power.
Please ensure that the socket outlet is installed near the equipment and shall be easily accessible.
Achtung:
Zur Trennung vom Netz ist der Netzsecker aus der Steckdose zu ziehen, welche sich in der Nähe des Gerätes befinden muß und leicht zugänlich sein soll.
Compliance
Statements
Disposal of Old Electrical & Electronic Equipment (Applicable in the European Union and other European countries with separate collection systems)
This symbol on the product or on its packaging indicates that this product shall not be treated
as household waste. Instead it shall be handed over to the
applicable collection point for the recycling of electrical and
electronic equipment. By ensuring this product is disposed of correctly, you will help prevent potential negative consequences for the environment and human health, which could otherwise be caused by inappropriate waste handling of this product. The recycling of materials will help to conserve natural resources. For more detailed information about recycling of this product, please contact your local Civic Office, your household waste disposal service or the shop where you purchased the product.
3

Table of Contents
Safety Regulations .......................... |
2 |
Compliance Statements .................. |
3 |
Introducing DVDirect |
|
Introduction .................................... |
7 |
Features ........................................... |
8 |
Package Contents ............................ |
9 |
Parts and Controls ......................... |
10 |
Turning the Power On/Off ............ |
14 |
Auto Setup Navigation ............... |
15 |
Inserting a Disc ............................. |
17 |
Inserting a Memory Card .............. |
19 |
Creating a Video DVD |
|
Creating a Video DVD ................. |
20 |
Types of Recording .................... |
20 |
Supported Camcorders/Video |
|
Devices and Recording Modes ... |
23 |
Writable Discs That Can Be Used |
|
for Creating Video DVDs .......... |
25 |
About Created Video DVDs ...... |
26 |
One Touch Recording Through HDD |
|
Camcorder Control |
|
(DVD BURN) .............................. |
28 |
One Touch Recording |
|
(Full Recording) ........................ |
31 |
Incremental Recording ................ |
35 |
Consolidation Recording ............. |
39 |
Normal Video Recording ........... |
42 |
Previewing a Video DVD ............. |
46 |
Creating/Viewing a Photo
DVD
Creating a Photo DVD .................. |
48 |
Types of Recording ..................... |
48 |
Types of Photo DVD .................. |
48 |
Supported Memory Cards and |
|
Camcorders ................................. |
49 |
Writable Discs That Can Be Used |
|
for Creating Photo DVDs ........... |
49 |
About Created Photo DVDs ....... |
50 |
Recording Photos Stored on a |
|
Memory Card ............................... |
51 |
Recording Photos Stored on an HDD |
|
Camcorder .................................... |
54 |
Viewing and Printing Photos ........ |
58 |
Setup |
|
Using the Setup Menu ................... |
61 |
Rec Quality ............................... |
62 |
Auto Stop Timer ....................... |
62 |
Auto Chaptering ........................ |
63 |
DVD Menu ........................... |
63 |
Slideshow BGM ........................ |
63 |
Slideshow Creation ................... |
64 |
PC Connect ................................. |
64 |
Finalize disc ................................ |
64 |
Erase disc .................................... |
67 |
System ......................................... |
68 |
Demo ........................................... |
68 |
Color System .............................. |
69 |
Language ..................................... |
69 |
4

Using the DVDirect With a
Computer
System Requirements ................... |
70 |
Setting Up the Computer .............. |
71 |
Installing the Software ................ |
71 |
Connecting the DVDirect to a |
|
Computer .................................... |
72 |
Disconnection ............................. |
73 |
Using Memory Card Slots .......... |
73 |
Using the Bundled Software ......... |
74 |
Launching “Nero StartSmart” .... |
74 |
Notes on Using Other Software |
|
With the DVDirect ..................... |
74 |
Additional Information |
|
About Discs .................................. |
75 |
Compatible Writable Discs ........ |
75 |
Recommended Writable Discs ... |
76 |
Writable Discs and |
|
Compatibility .............................. |
76 |
Precautions on Writing/Playing |
|
Discs ........................................... |
77 |
About Memory Cards ................... |
79 |
About “Memory Stick” .............. |
79 |
About the CompactFlash/SD/ |
|
xD-Picture Cards ........................ |
80 |
Precautions .................................... |
81 |
Support Overview ......................... |
82 |
User Support Web Site ............... |
82 |
System Software Updates ........... |
82 |
Technical Support ....................... |
82 |
Specifications ................................ |
83 |
5

•Pentium is a registered trademark of Intel Corporation.
•Microsoft and Windows are registered trademarks of Microsoft Corporation.
•Other system and product names used herein are registered trademarks or trademarks of their respective manufacturers, although the ™ and ® marks are not used in the text.
•Manufactured under license from Dolby Laboratories.
Dolby and the double-D symbol are trademarks of Dolby Laboratories.
•Memory Stick and the memory stick logo are trademarks, or registered trademarks of Sony Corporation.
Our product warranty is valid only when the supplied accessories (including software) are used in the specified or recommended system environment, in accordance with the documentation, and applies only to this DVDirect. Our customer service and user support apply only under these product warranty conditions.
Please note that we cannot accept responsibility for failure of the computer or other devices, incompatibility with special hardware, operating problems caused by improper installation of software, loss of data, discs or other accidental or incidental damage that might occur when using this product.
The guarantee and user support for this product are valid only within the countries or sales regions specified on the warranty card.
Copyright laws prohibit the copying in part or in full of the supplied software and documentation, or loaning the software, without obtaining permission of the copyright holder.
We cannot accept responsibility for any direct or indirect financial damage or loss of profit that might occur when using the supplied software.
The supplied software can only be used with this product.
Specifications of the supplied software may be changed without notice in the interest of product improvement.
Please Record Responsibly
Before copying anything onto a disc, please be sure that you are not violating copyright laws. Most software companies allow you to make a backup or archive copy of software. Check your software’s license agreement for details.
Copyrights
•Television programs, films, video tapes, discs, and other materials may be copyrighted. Unauthorized recording of such material may be contrary to the provisions of the copyright laws. Also, use of this product with cable television transmission may require authorization from the cable television transmitter and/or program owner.
6
B Introducing DVDirect
Introduction
Burning video DVDs
You can record videos from connected video cameras and AV devices directly onto DVDs without using a computer.
You can burn the entire contents of your HDD, DVD, or DV camcorder onto a DVD with one touch of the record button.
Burning photo DVDs
You can archive photos from a memory card or HDD camcorder directly onto a DVD without using a computer.
You can also create slideshows of the photos that will be playable on most
DVD players.
DVDirect Introducing
Auto Setup Navigation
The DVDirect automatically detects inserted memory cards and discs and input signals from connected devices. It then displays a message prompting the next necessary operation. Preparations for recording are made without any complicated button operations.
Direct printing operation
You can print out photos recorded on DVDs or memory cards by connecting the DVDirect to a PictBridge-compatible printer using the supplied USB cable.
Computer-controlled operation
The DVDirect can be used as a high speed DVD/CD drive with Hi-Speed USB (USB 2.0- compatible) interface when connected to a computer via USB cable.
The DVDirect supports high speed recording to the latest format discs such as DVD+R double layer and DVD-R dual layer discs.
7
Features
Depending on the type of device that is connected, you can perform the following operations with the DVDirect.
In this manual, different icons for each operation appear in section headings and page corners to make sections that relate to the operations you intend to perform easier to find.


 Recording videos from HDD camcorders
Create a DVD using video taken with an HDD camcorder*(connected via a USB cable).
Available functions: |
|
One Touch Recording Through HDD Camcorder Control (DVD BURN) |
1 page 28 |
One Touch Recording (Full Recording) |
1 page 31 |
Incremental Recording |
1 page 35 |

 Recording videos from DVD camcorders
Create a DVD using video taken with a DVD camcorder* (connected via a USB cable) and stored on an 8-cm disc.
Available functions: |
|
|||||
One Touch Recording (Full Recording) |
1 page 31 |
|||||
Consolidation Recording |
1 page 39 |
|||||
|
|
|
|
|
Recording videos from DV camcorders |
|
|
|
|
|
|
|
|
|
|
|
|
|
|
|
|
|
|
|
|
Create a DVD using video taken with a DV camcorder. |
|
|
|
|
|
|
|
|
Available functions: |
|
|||||
One Touch Recording (Full Recording) |
1 page 31 |
|||||
Recording videos from miscellaneous video devices
Create a DVD using video taken with an HDD, DVD, DV, or D8 camcorder, or using video from any other video device equipped with a video output connector. To connect a device, use the AV cable supplied with your camera or standard video or S-video cables.
Available functions: |
|
Normal Video Recording |
1 page 42 |
Recording photos from memory cards
Create a DVD using photos taken with a digital still camera and stored on a memory card.
Available functions: |
|
||||
Recording Photos Stored on a Memory Card |
1 page 51 |
||||
|
|
|
|
Recording photos from HDD camcorders |
|
|
|
|
|
||
|
|
|
|
Create a DVD using photos taken with an HDD camcorder*. |
|
|
|
|
|
||
|
|
|
|
||
|
|
|
|
|
|
Available functions: |
|
||||
Recording Photos Stored on an HDD Camcorder |
1 page 54 |
||||
*In this manual, “HDD camcorder” refers to the Sony HDD Handycam® and “DVD camcorder” refers to the Sony DVD Handycam®. The functions available when a camera is connected via USB cable as described in this manual apply only when the Sony HDD Handycam® or Sony DVD Handycam® is used. For details, see page 23 and 49.
8
Package Contents
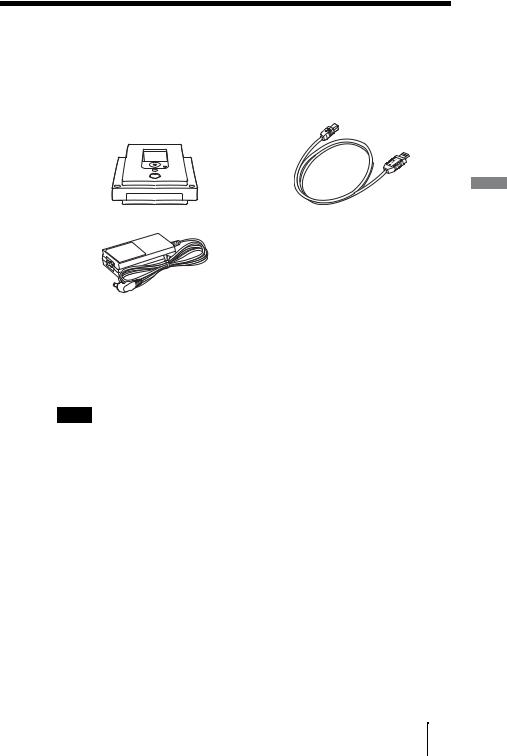
Please confirm that the package contains the following items. If any of these items are missing or damaged, please contact your dealer.
• DVDirect |
• Hi-Speed USB cable (for PC/Printer |
|
connection) |
• AC adaptor
•AC power cord
•Quick Start Guide
•Operating Instructions (this document)
•Software disc
•Warranty card
Note
Make sure that you back up the supplied software disc on another disc as the software disc is not sold separately.
DVDirect Introducing
9
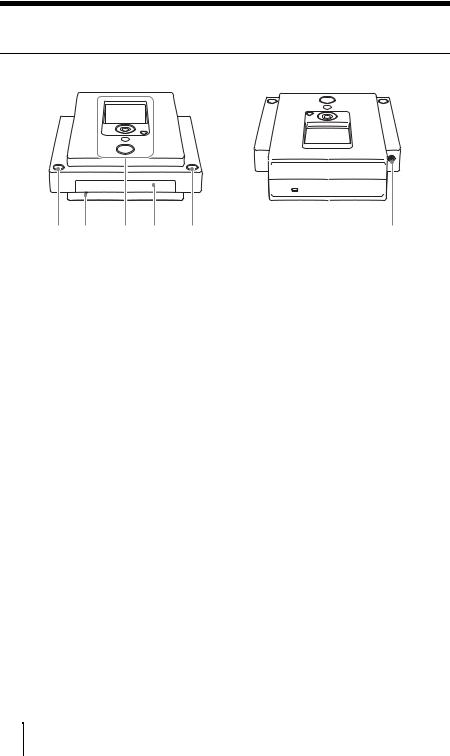
Parts and Controls
Front and rear
1 2 |
3 4 |
5 |
6 |
A 1 (Power) button
Turns the DVDirect on or off.
BEmergency eject hole
If you cannot open the disc tray with the  (Eject) button, turn off your computer, and then insert a thin, elongated object into this hole to eject the disc tray manually.
CTop panel
The buttons and display for operating the DVDirect are located here (page 11).
DDisc tray
Insert a disc here with the label side up (page 17).
E  (Eject) button
Opens and closes the disc tray.
FDC IN connector
Connect the supplied AC adaptor here (page 14).
10

Top panel
1
 2
2
3
4
5
ADisplay window
Displays a menu screen, images from a playback device, or photos from a memory card.
B Mm<,cursor /  (Select) button
Selects a function.
CRETURN button
This returns the display to the main menu screen or to the previous screen when navigating menus.
D  (Stop) button
Stops recording.
E  (Record) button
Starts recording.
Lights red during recording.
DVDirect Introducing
11
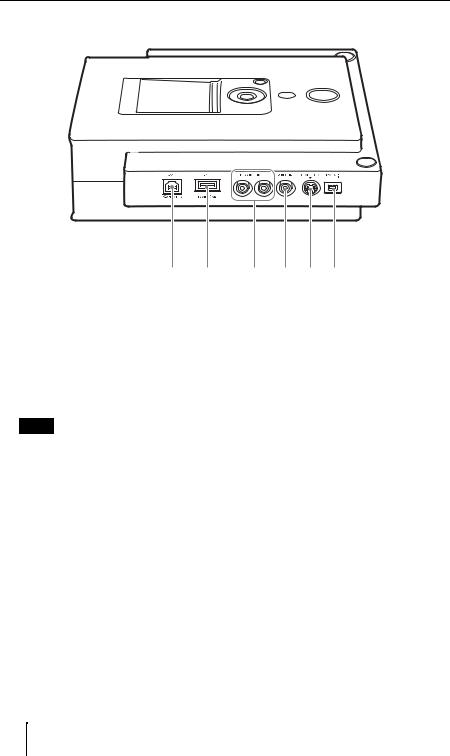
Left side panel
1 2
AUSB connector (Type B)
Connect the supplied USB cable here when connecting the DVDirect to a computer or printer.
BUSB connector (Type A)
Connect the USB cable here when connecting a HDD or DVD camcorder.
Note
Only Sony HDD or DVD camcorder input is supported.
CAUDIO IN L/R connectors
Connect the audio plugs of an AV cable (not supplied) here when connecting the DVDirect to a video device, such as a video camera or VCR.
DVIDEO IN connector
Connect the video plug of an AV cable (not supplied) here when connecting the DVDirect to a video device, such as a video camera or VCR.
3 4 5 6
ES VIDEO IN connector
Connect an S-video cable (not supplied) here when connecting the DVDirect to a video device with an S-video connector, such as a video camera or VCR.
FDV IN connector (4-pin)
Connect a DV (i.LINK) cable (not supplied) here when connecting the DVDirect to a digital video camera.
12
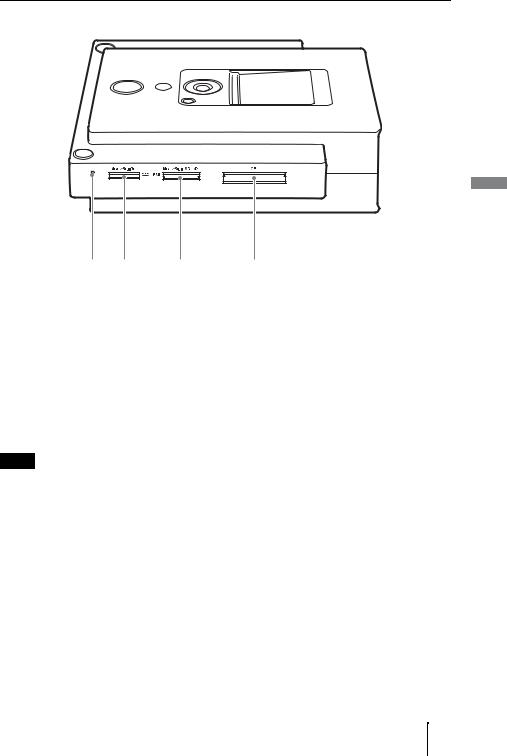
Right side panel
1 |
2 |
3 |
4 |
AMemory card LED
Lights amber when accessing the memory card.
BMemory Stick Duo slot
Insert a “Memory Stick Duo” here.
CMulti memory card slot
Insert a “Memory Stick,” SD Card, or xD-Picture Card here.
DCompactFlash card slot
Insert a CompactFlash card here.
Note
You can use the memory card slot for both stand-alone and computer operation.
DVDirect Introducing
13
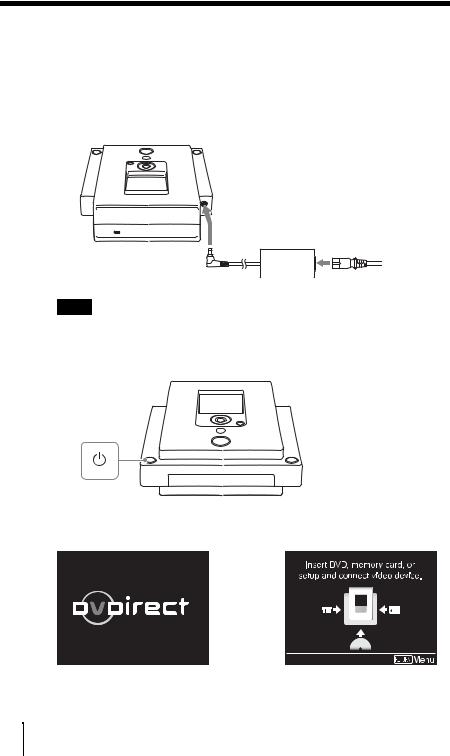
Turning the Power On/Off
1Connect the supplied AC power cord to the AC adaptor.
2Insert the power plug of the AC adaptor into the DVDirect’s DC IN connector.
3Insert the power plug of the AC power cord into a power outlet.
Notes
•Be sure to use the supplied AC power cord.
•Do not use damaged cables, such as cables with deformed connectors.
4 Press the 1 (Power) button.
After the display window lights and the DVDirect logo appears, a different screen appears depending on the DVDirect’s current status.
,
To turn power off
Press the 1 (Power) button again.
14
Auto Setup Navigation
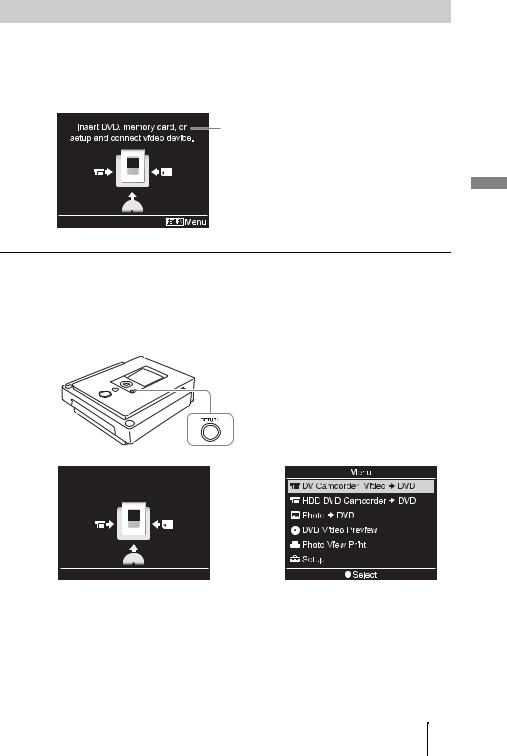
After the power is turned on, the DVDirect automatically detects inserted memory cards and DVD discs and input signals from connected devices. A message indicating how to prepare for recording then appears in the display window. By following this message, you can automatically move on to the recording procedure you intended without complicated button operations.
Messages and illustrations indicate the operations to perform next.
Accessing functions from the main menu
You can perform recording procedures manually by selecting options from the main menu. You can also go to the setup screen (Setup menu) from the main menu for various settings.
Press the RETURN button when [[RETURN] Menu] is displayed at the bottom right of the display window to return to the main menu.
DVDirect Introducing
Insert DVD, memory card, or setup and connect video device.
,
 Menu
Menu
15

Press M or m to select the desired operation, and press the  (Select) button.
DV Camcorder/Video , DVD: Create a video DVD from a digital video camcorder connected via a DV (i.LINK) cable or from a video device connected via a video or S-video cable (page 31, 42).
HDD/DVD Camcorder , DVD: Create a video DVD from an HDD or DVD camcorder connected via a USB cable (page 28, 31, 35, 39).
Photo , DVD: |
Create a photo DVD (page 48). |
DVD Video Preview: |
Playback a created video DVD (page 46). |
Photo View/Print: |
Display or print out photos (page 58). |
Setup: |
Configure various settings (page 61). |
Note
When connecting an HDD or DVD camcorder to the VIDEO IN or S VIDEO IN connector with an AV or S-video cable respectively, select [DV Camcorder/Video , DVD].
16
Inserting a Disc
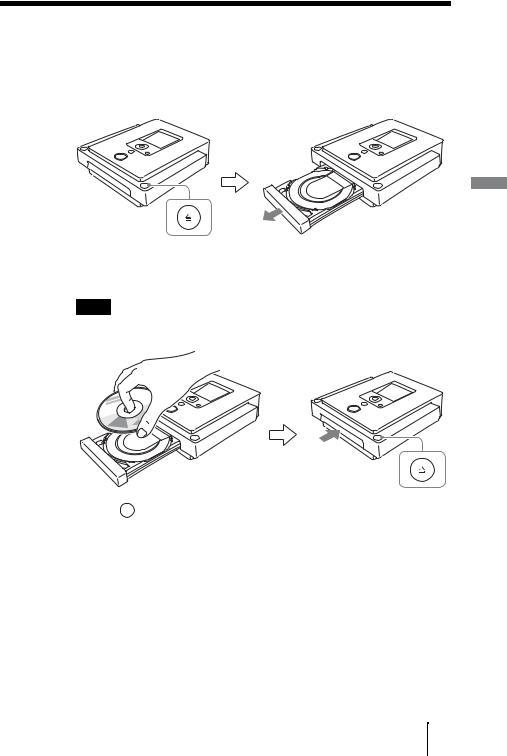
To insert a disc, perform the following while the DVDirect is turned on.
1Press the  (Eject) button.
The disc tray ejects.
2Place the disc in the disc tray with its label facing up, and press the  (Eject) button again.
Notes
•Do not touch the recording side of the disc.
•When inserting the disc, make sure it rests flat under the four tabs on the disc tray.
When the  (Eject) button is pressed again, the disc tray closes and the DVDirect starts reading the inserted disc.
DVDirect Introducing
17

When a new disc is inserted
When a new disc is inserted, the disc will be formatted automatically. If the new disc inserted is a DVD+R disc, a message prompting you to select an input source appears.
To continue with operations, press M or m to select a source to record from, and press the  (Select) button.
Note
•If a disc that cannot be recorded on is inserted, an indication message appears. If this occurs, confirm all the compatible discs and replace the disc.
18
Inserting a Memory Card
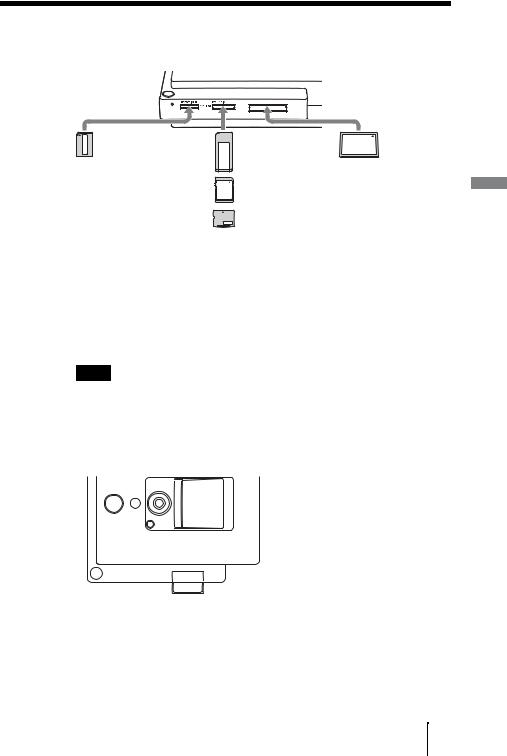
Insert the memory card into its corresponding memory card slot.
SD xD |
CF |
|
Memory |
Memory |
CompactFlash |
Stick Duo |
Stick |
|
|
SD Card |
|
|
xD-Picture Card |
|
Memory Stick Duo |
Memory Stick/SD |
CompactFlash |
Push the “Memory |
Card/xD-Picture Card |
Push the card into the |
Stick Duo” into the slot |
Push the card into the |
CompactFlash slot. |
until you hear a click. |
slot until you hear a |
To remove, pull out |
To remove, push the |
click. |
the CompactFlash |
“Memory Stick Duo” |
To remove, push the |
card. |
and pull out. |
card and pull out. |
|
Notes
•Insert only one memory card into a memory card slot. Furthermore, do not use more than one memory card slot at a time.
•Do not insert another memory card while recording onto a disc is in progress. Doing so may cause a writing error.
•Do not insert a “Memory Stick Duo” with a Memory Stick Duo adaptor into the multi memory card slot.
•The CompactFlash card stays half exposed.
•Never remove the memory card while the memory card LED is lit. Otherwise data in the memory card may be damaged.
•Do not remove the memory card while recording onto a disc.
DVDirect Introducing
19
B Creating a Video DVD
Creating a Video DVD
You can use the DVDirect as a stand-alone DVD recorder to burn videos directly onto DVDs from a connected HDD, DVD, or DV camcorder or video device such as a VCR or DVR.
You can play the created video DVD on other DVD devices or the DVD drives of computers.
Types of Recording
Five types of recording are available for creating video DVDs: DVD BURN, Full Recording, Incremental Recording, Consolidation Recording, and Normal Video Recording.
DVD BURN (One Touch Recording Through HDD Camcorder Control) (page 28) 
This mode allows you to record video from an HDD camcorder onto a disc by simply pressing the DVD BURN button on the camera or Handycam Station (or touching the [DVD BURN] button in the camera’s LCD screen).
The actual recording process is the same as that of Incremental Recording (see below), and you can record additional video onto a disc that has been previously recorded on.
Full Recording (One touch recording) (page 31) 


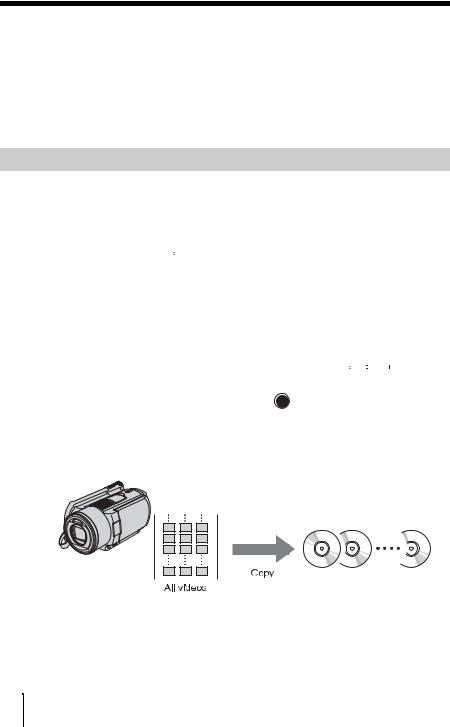
This mode allows you to record video from a digital video camera connected to the DVDirect with a single touch of the  (Record) button onto a DVD. The video is recorded as follows:
HDD camcorder
The entire video content of the camera is recorded onto a disc. (Several discs may be required depending on the length of the video.)
20
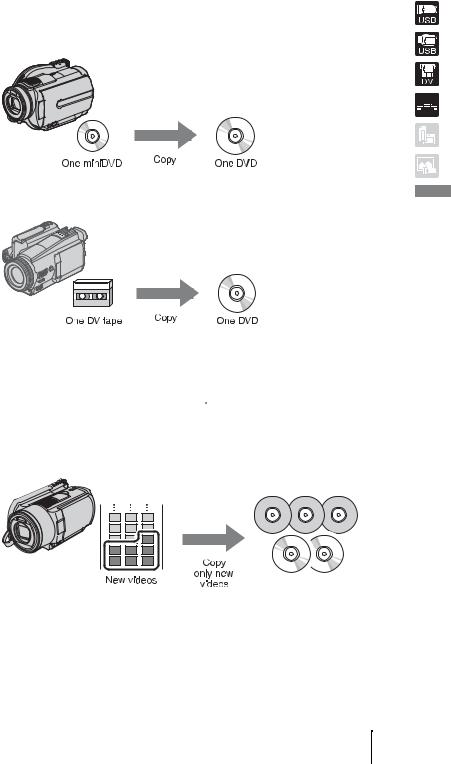
DVD camcorder
The entire video content of the camera’s 8-cm disc is recorded onto a 12-cm disc.
DV camcorder
The entire content of the videotape is recorded onto a single disc.
The DVDirect controls the camera during the entire process, and completes creation of the video DVD. The completed DVD is automatically finalized, allowing immediate playback on DVD players.
Incremental Recording (page 35) 
This mode allows you to record the content of an HDD camcorder connected via a USB cable onto a disc. Using this mode, you can record only the newly taken contents of a camera whose previous contents have already been recorded onto a disc.
DVD Video a Creating
21
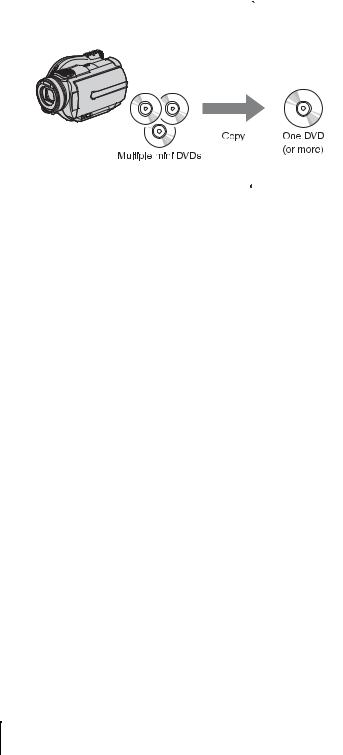
Consolidation Recording (page 39) 
This mode allows you to record the contents of multiple 8-cm discs from a DVD camcorder onto the corresponding number of 12-cm discs.
Normal Video Recording (page 42) 

This mode allows you to create a video DVD using the  (Record) and
  (Stop) buttons on the DVDirect and the play, pause, and stop buttons on the device connected to the DVDirect. You can record from any video device with a video output connector.
22
Supported Camcorders/Video Devices and Recording Modes
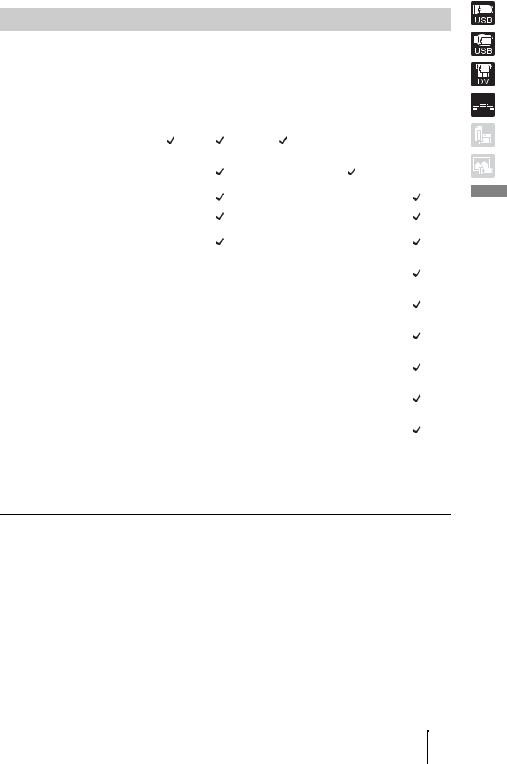
The recording methods available differ as follows, depending on the type of camera or device connected to the DVDirect.
|
|
DVD |
Full |
Incremental |
Consolida |
Normal |
Type of Device |
Interface |
Record- |
-tion |
Video |
||
|
|
BURN |
ing |
Recording |
Recording |
Recording |
|
|
|
|
|
|
|
Sony HDD |
USB |
|
|
|
|
|
camcorder1) |
|
|
|
|
|
|
Sony DVD |
USB |
|
|
|
|
|
camcorder1) |
|
|
|
|
|
|
DV camcorder2) |
DV IN |
|
|
|
|
|
D8 camcorder2) |
DV IN |
|
|
|
|
|
HDV |
DV IN |
|
|
|
|
|
camcorder2)3) |
|
|
|
|
|
|
|
S VIDEO |
|
|
|
|
|
MICROMV |
IN |
|
|
|
|
|
camcorder |
VIDEO |
|
|
|
|
|
|
|
|
|
|
|
|
|
IN |
|
|
|
|
|
|
|
|
|
|
|
|
HDD or DVD |
S VIDEO |
|
|
|
|
|
camcorders |
IN |
|
|
|
|
|
from other |
VIDEO |
|
|
|
|
|
manufacturers |
|
|
|
|
|
|
IN |
|
|
|
|
|
|
|
|
|
|
|
|
|
|
|
|
|
|
|
|
All camcorders |
S VIDEO |
|
|
|
|
|
and video |
IN |
|
|
|
|
|
devices |
VIDEO |
|
|
|
|
|
(analog input) |
|
|
|
|
|
|
IN |
|
|
|
|
|
|
|
|
|
|
|
|
|
|
|
|
|
|
|
|
1)Camcorders equipped with HD (AVCHD) format are not supported.
2)Operation compatibility is confirmed with Sony DV, D8, and HDV camcorders only.
3)Only tapes recorded in DV format are supported.
Notes on presetting camcorders
•The “USB SPEED” setting on HDD and DVD camcorders must be set to “AUTO.” (“AUTO” is the default setting.)
•The “A/V t DV OUT” setting on DV camcorders must be set to “OFF.” (“OFF” is the default setting.)
DVD Video a Creating
23

Notes on time required for recording
When recording from an HDD or DVD camcorder connected via USB cable, the length of time required depends on the REC mode (HQ, SP, or LP) used to shoot the video and the number of scenes the video contains. In general, videos shot in higher image quality modes take longer to be recorded onto a disc. The following provides a general estimate* of the time required to record a 1-hour video containing one scene onto a disc.
When recording from an HDD camcorder
HQ mode: about 30 min (1/2 of the video playback length)
SP mode: about 20 min (1/3 of the video playback length)
LP mode: about 10 min (1/6 of the video playback length)
When recording from a DVD camcorder
HQ mode: about 60 min (almost equal to the video playback length) SP mode: about 40 min (2/3 of the video playback length)
LP mode: about 20 min (1/3 of the video playback length)
*Depending on circumstances, the length of time required to record may be equal to or more than the video playback length.
24
Writable Discs That Can Be Used for Creating Video DVDs
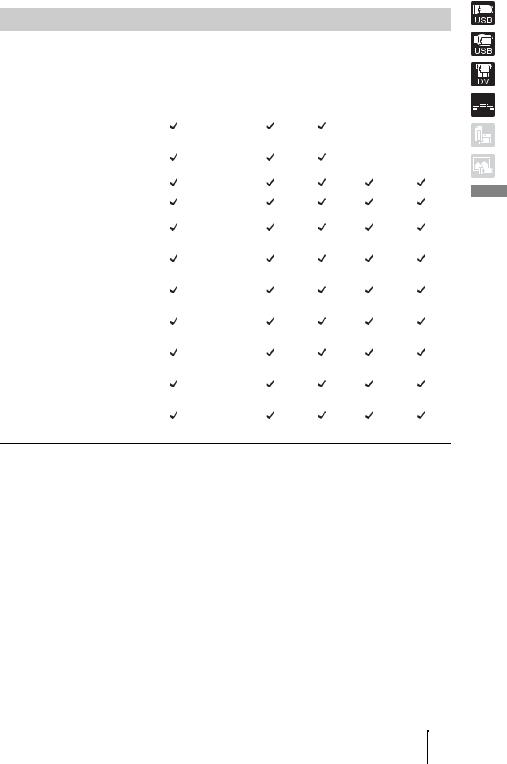
Compatible disc types for recording differ as follows, depending on the type of video device and connection interface you are using.
Type of Device |
Interface |
DVD-R |
DVD-R |
DVD-RW |
DVD+R |
DVD+R |
DVD+RW |
DL |
DL |
||||||
|
|
|
|
|
|
|
|
Sony HDD |
USB |
|
|
|
|
|
|
camcorder |
|
|
|
|
|
|
|
|
|
|
|
|
|
|
|
|
|
|
|
|
|
|
|
Sony DVD |
USB |
|
|
|
|
|
|
camcorder |
|
|
|
|
|
|
|
|
|
|
|
|
|
|
|
|
|
|
|
|
|
|
|
DV camcorder |
DV IN |
|
|
|
|
|
|
|
|
|
|
|
|
|
|
D8 camcorder |
DV IN |
|
|
|
|
|
|
|
|
|
|
|
|
|
|
HDV |
DV IN |
|
|
|
|
|
|
camcorder* |
|
|
|
|
|
|
|
|
|
|
|
|
|
|
|
|
|
|
|
|
|
|
|
|
S VIDEO |
|
|
|
|
|
|
MICROMV |
IN |
|
|
|
|
|
|
camcorder |
VIDEO |
|
|
|
|
|
|
|
|
|
|
|
|
|
|
|
IN |
|
|
|
|
|
|
|
|
|
|
|
|
|
|
HDD or DVD |
S VIDEO |
|
|
|
|
|
|
camcorders |
IN |
|
|
|
|
|
|
from other |
VIDEO |
|
|
|
|
|
|
manufacturers |
|
|
|
|
|
|
|
IN |
|
|
|
|
|
|
|
|
|
|
|
|
|
|
|
|
|
|
|
|
|
|
|
All camcorders |
S VIDEO |
|
|
|
|
|
|
and video |
IN |
|
|
|
|
|
|
devices (analog |
VIDEO |
|
|
|
|
|
|
input) |
|
|
|
|
|
|
|
IN |
|
|
|
|
|
|
|
|
|
|
|
|
|
|
|
|
|
|
|
|
|
|
|
Notes on creating video DVDs
•You cannot record videos with copy-protected signals (commercial DVDs, VHS software, some programs from satellite or CATV receivers, etc.).
•You cannot make incremental recordings on discs that have been created using a computer or other DVD recorder.
•When adding video to a video DVD created using a DVD+R disc, you must use the same interface used during the previous recording to connect the video device and the DVDirect. For example, you cannot add video from a DVD camcorder connected via an S-video or video input cable onto a DVD+R disc with video dubbed from a DVD camcorder that was connected via a USB cable.
•When recording video from an HDD camcorder onto a disc, only the video images stored in the camera are available for recording. You cannot record both the video and still images stored in the camera onto a disc at the same time.
•When using a DVD camcorder, recording is not possible when the disc inside the DVD camcorder is a DVD-RW disc with video recorded in DVD-VR format.
25
DVD Video a Creating
About Created Video DVDs
Titles and chapters
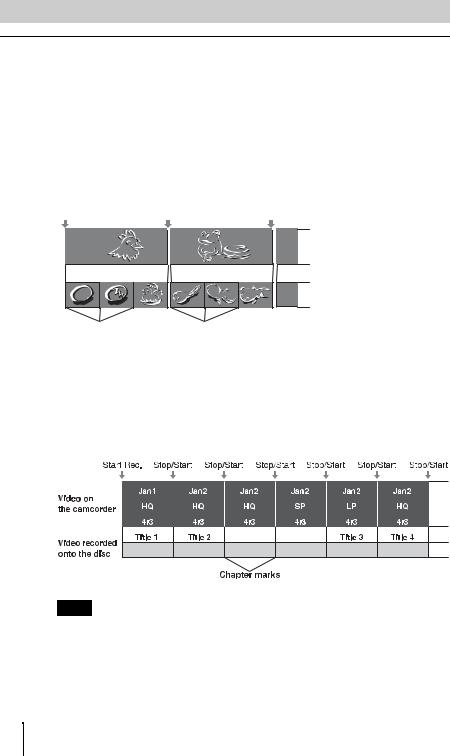
The contents of a DVD consist of sections, called titles, and smaller subsections, called chapters. When you create a video DVD with the DVDirect, titles and chapters are created as follows:
For discs created through normal video recording or recording from DV camcorders connected via DV (i.LINK) cable
Titles are created between the points where you start and stop a recording on the DVDirect.
Chapters are created according to the [Auto Chaptering] setting configured in the Setup menu (page 63).
Start Rec. |
Stop/Start |
Stop Rec. |
Title 1 |
Title 2 |
|
Chapters |
Chapters |
|
Chapter marks |
Chapter marks |
|
For discs created through recording from HDD or DVD camcorders connected via USB cable
Titles are created at points in the video where the date recorded, REC mode (from HQ or SP to LP or vice versa), and aspect ratio (from 4:3 to 16:9 or vice versa) change.
Chapters are created for each scene taken with the HDD or DVD camcorder. (Scenes are created each time recording is started and then stopped.)
Note
Up to 49 titles per disc and 99 chapters per title can be created. This number may decrease depending on the quality of the videos.
26
DVD menus
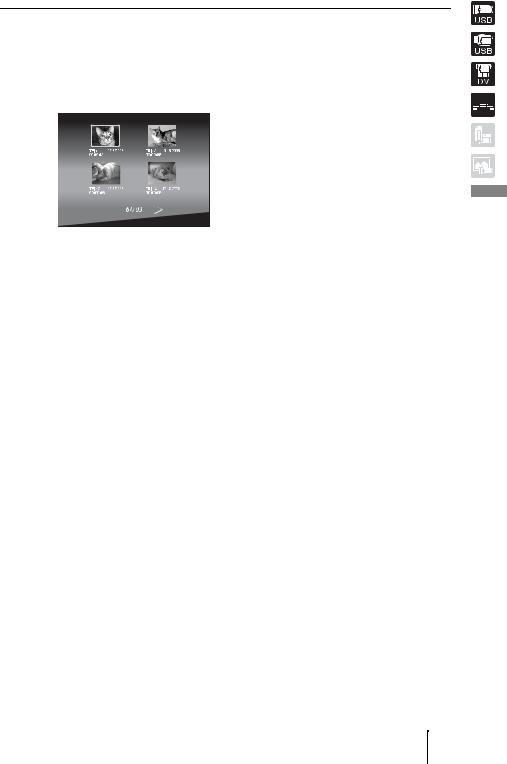
A DVD menu is displayed each time a DVD is inserted into a DVD player and serves as a title page or table of contents for the video DVD.
You can create DVDs that display thumbnail images of titles in their menu screens. You can select from four different menu styles when creating video DVDs with the DVDirect (page 63).
DVD Video a Creating
27
 Loading...