


 Loading...
2-681-469-11(1)
LocationFree Base Station
– LocationFree Player for PC
Operating Instructions
LF-PK1
–LF-B1
–LFA-PC2
© 2006 Sony Corporation

Contents |
|
What is the LocationFree Base Station?................................................................ |
4 |
Identifying Parts and Controls (Base Station) ....................................................... |
5 |
Base Station Preparations............................................ |
6 |
Part 1 Checking the Package Contents .................................................................. |
6 |
Part 2 Attaching the Base Station Stand................................................................ |
7 |
Part 3 Connecting Other Devices .......................................................................... |
8 |
Setup and Connections .............................................. |
10 |
Flow of Setup....................................................................................................... |
10 |
Base Station Modes ............................................................................................. |
11 |
STEP 1 Setup to Watch Video at Home.............................................................. |
12 |
STEP 2 Setup to Watch Video Away from Home .............................................. |
17 |
Watching Video on LocationFree Player................... |
21 |
What is LocationFree Player?.............................................................................. |
21 |
LocationFree Player Basic Window .................................................................... |
22 |
Connecting to the Base Station............................................................................ |
24 |
Video Operations................................................................................................. |
25 |
Adjusting the Video Rate .................................................................................... |
27 |
Making Video Settings ........................................................................................ |
28 |
Registering LocationFree Devices on the Base Station via the Internet ............. |
30 |
Mouse and Keyboard Operations ........................................................................ |
31 |
Setting Up LocationFree Player ................................. |
32 |
LocationFree Player System Requirements......................................................... |
32 |
Installing and Uninstalling LocationFree Player ................................................. |
32 |
2

Advanced Base Station Settings ............................... |
35 |
Opening the [Base Station Settings] Page ........................................................... |
35 |
Checking the Current Base Station Status........................................................... |
37 |
Basic Operations in the [Advanced Setup] Page ................................................. |
37 |
Setting Up Your Internet Connection.................................................................. |
38 |
Setting Up to Watch Video Away From Home................................................... |
39 |
Registering LocationFree Devices on the Base Station via the Internet ............. |
42 |
Changing the Wireless Settings of the Base Station............................................ |
43 |
Other Settings ...................................................................................................... |
45 |
Others........................................................................... |
47 |
About Self-Diagnostics Displays......................................................................... |
47 |
Initializing the Base Station................................................................................. |
48 |
Troubleshooting................................................................................................... |
49 |
Specifications....................................................................................................... |
55 |
Index .................................................................................................................... |
56 |
Trademarks .......................................................................................................... |
57 |
Note
The screen shots used in this manual are only example images.
3

 What is the LocationFree Base Station?
What is the LocationFree Base Station?
The LocationFree Base Station allows you to watch video both at home and on the go. Your home Base Station can be accessed via the Internet while you are away from home by installing and configuring the LocationFree Player on your computer or another LocationFree device*. Also, by placing the Base Station in a central room, such as your living room, you can enjoy video from anywhere in your home via your home LAN.
* LocationFree device: An equipment with LocationFree Player installed.
NetAV: |
A function that allows you to access the Base Station via a home network or the Internet to |
|
watch video. |
Computers
Computers
On the go
|
|
|
|
External device Base Station |
Router Home |
||
z Tips
•You cannot use NetAV when connected to the Internet via an analog phone line that uses a dial-up router or cellular phone.
•You may not be able to watch some video, DVDs, and other media that are copyright protected with the software.
•When the power is turned on, the Base Station continuously emits a wireless signal.
•To use the NetAV function, we recommend a broadband connection with upload and download speeds of at least 300 kbps.
•NetAV cannot be used via a proxy server.
Notes
•The LocationFree Base Station transmits on the 2.4 GHz wireless channel. If other devices in the vicinity emit electrical waves, such as a wireless LAN device or microwave oven, the strength of the wireless signal may decrease. The materials used in the construction of a building’s walls and floors may also affect the signal strength.
•When using NetAV, the Base Station, router, and connected devices at home also need to be left on when you are away from home so that you can connect to them via the Internet.
•Use of the NetAV function for purposes other than personal enjoyment is prohibited.
•You can use this Base Station as a Wireless Access Point.
4

 Identifying Parts and Controls (Base Station)
Identifying Parts and Controls (Base Station)
Front |
1WIRELESS LED |
|||||||||||||
|
|
|
|
|
|
|
|
|
|
|
|
|
||
|
|
|
|
|
|
|
|
|
|
|
|
|
Indicates the wireless function status. |
|
|
|
|
|
|
|
|
|
|
|
|
|
|
Green: Connected with the LocationFree device on the 2.4 GHz |
|
|
|
|
|
|
|
|
|
|
|
|
|
|
channel. |
|
|
|
|
|
|
|
|
|
|
|
|
|
|
Turns green momentarily, then turns off for 3 seconds: Wireless is |
|
|
|
|
|
|
|
|
|
|
|
|
|
|
enabled, but wireless communication with a LocationFree |
|
|
|
|
|
|
|
|
|
|
|
|
|
|
device is not taking place. |
|
|
|
|
|
|
|
|
|
|
|
|
1 |
2NETWORK LED |
||
|
|
|
|
|
|
|||||||||
|
|
|
|
|
|
|
|
|
|
|
|
|
Indicates the connection status to an external network, such as the |
|
|
|
|
|
|
|
|
|
|
|
2 |
Internet. |
|||
|
|
|
|
|
||||||||||
|
|
|
|
|
|
|
|
|
|
|
3 |
Green slow blinking: Attempting to connect. |
||
|
|
|
|
|
|
|
|
|
|
|
Green: Connected to the network. The LED blinks quickly when |
|||
|
|
|
|
|
|
|
|
|
|
|
|
|
||
|
|
|
|
|
|
|
|
|
4 |
data is transmitted. |
||||
|
|
|
|
|
||||||||||
|
|
|
|
|
|
|
|
|
|
|
|
|
Off: Not connected. |
|
|
|
|
|
|
|
|
|
|
|
|
|
|
3NETAV LED |
|
|
|
|
|
|
|
|
|
|
|
5 |
Indicates the connection status with the LocationFree device. |
|||
|
|
|
|
|
|
|||||||||
|
|
|
|
|
|
|
|
|
|
|
|
|
Green fast blinking: NetAV authentication has failed. |
|
6 |
Green slow blinking: Attempting to connect with NetAV. |
|||||||||||||
Green: Connected with NetAV. |
||||||||||||||
|
|
|
|
|
|
|
|
|
|
|
|
|
||
|
|
|
|
|
|
|
|
|
|
|
|
|
Amber blinking: Updating Dynamic DNS. |
|
|
|
|
|
|
|
|
|
|
|
|
|
|
Amber: Dynamic DNS failure. |
|
|
|
|
|
|
|
|
|
|
|
|
|
|
Off: Not connected. |
|
|
|
|
|
|
|
|
|
|
|
|
|
|
Red: The Base Station is being initialized. |
|
|
|
|
|
|
|
|
|
|
|
|
|
|
4SETUP MODE LED (1 page 11) |
|
|
|
|
|
|
|
|
|
|
|
|
|
|
Amber: The Base Station is in Setup mode. |
|
|
|
|
|
|
|
|
|
|
|
|
|
|
Amber blinking: Easy registration is possible. |
|
|
|
|
|
|
|
|
|
|
|
|
|
|
5POWER LED (1 page 12) |
|
|
|
|
|
|
|
|
|
|
|
|
|
|
Green: The power is on. |
|
|
|
|
|
|
|
|
|
|
|
|
|
|
Red blinking: A malfunction has occurred. |
|
|
|
|
|
|
|
|
|
|
|
|
|
|
6POWER button (1 page 12) |
|
Rear |
Turns the Base Station power on and off. |
|||||||||||||
7LAN port |
||||||||||||||
|
|
|
|
|
|
|
|
|
|
|
|
|
||
|
|
|
|
|
|
|
|
|
|
|
|
|
Connect a LAN cable. |
|
|
|
|
|
|
|
|
|
|
|
|
|
|
8BASE STATION RESET button (1 page 48) |
|
|
|
|
|
|
|
|
|
|
|
|
|
|
||
|
|
|
|
|
|
|
|
|
|
|
|
|
Initializes all settings on the Base Station to the factory defaults. |
|
|
|
|
|
|
|
|
|
|
|
|
|
|
9SETUP MODE button (1 page 11) |
|
|
|
|
|
|
|
|
|
|
|
|
|
|
Press to register LocationFree devices, or to make Base Station |
|
|
|
|
|
|
|
|
|
|
|
|
|
|
settings. |
|
|
|
|
|
|
|
|
|
|
|
|
|
|
0IN 2 (AUDIO/VIDEO) terminal (1 page 8) |
|
|
|
|
|
|
|
|
|
|
|
|
|
|
||
|
|
|
|
|
|
|
|
|
|
|
|
|
Connect the scart to A/V cable (supplied) or the A/V cable (RCA |
|
|
|
|
|
|
|
|
|
|
|
|
|
|
||
|
|
|
|
|
|
|
|
|
|
|
|
|
pin cable, supplied). |
|
|
|
|
|
|
|
|
|
|
|
|
|
|
||
|
|
|
|
|
|
|
|
|
|
|
|
|
qaDC IN jack (1 page 12) |
|
|
|
|
|
|
|
|
|
|
|
|
|
|
Connect the AC power adapter (supplied). |
|
|
|
|
|
|
|
|
|
|
|
|
|
|
qsIN 1 (AUDIO/VIDEO) terminal (1 page 8) |
|
|
|
|
|
|
|
|
|
|
|
|
|
|
||
|
|
|
|
|
|
|
|
|
|
|
|
|
||
|
|
|
|
|
|
|
|
|
|
|
|
|
Connect the scart to A/V cable (supplied) or the A/V cable (RCA |
|
|
|
|
|
|
|
|
|
|
|
|
|
|
||
|
|
|
|
|
|
|
|
|
|
|
|
|
pin cable, supplied). |
|
|
|
|
|
|
|
|
|
|
|
|
|
|
||
|
|
|
|
|
|
|
|
|
|
|
|
|
qdIR BLASTER port (1 page 9) |
|
|
|
|
|
|
|
|
|
|
|
|
|
|
||
|
|
|
|
|
|
|
|
|
|
|
|
|
Connect the IR Blaster (supplied). |
|
|
|
|
|
|
|
|
|
|
|
|
|
|
|
|
5

Base Station Preparations
Part 1
Checking the Package Contents
After unpacking, check that all the following items have been included: z Base Station (LF-B1) (1) z AC power adapter (AC-LX1B) (1)
z Mains lead (Type C-6) (1) z Mains lead (Type BF) (1)
|
Notes |
Notes |
Note |
• |
Use this mains lead if you use |
• Use this mains lead if you use the unit |
|
|
the unit outside the United |
in the United Kingdom. |
|
|
Kingdom. |
• This mains lead may not be supplied |
|
• |
This mains lead may not be |
depending on the country. |
|
|
supplied depending on the |
|
|
|
country. |
|
|
zLocationFree Player software CD-ROM (LFA-PC2) (1)
•LocationFree Player software*
•Operating Instructions (PDF file)
•License (text file)
* One Serial Key for LocationFree Player is supplied.
Preparations Station Base
6

Part 2
Attaching the Base
Station Stand
To keep the Base Station stable, attach the Base Station stand.
Notes
•The SSID, WEP key, and initial password are printed on the side panel of the Base Station. Make sure that you can easily see the side panel after installing the Base Station. You will need this information when you set up the Base Station and make wireless connections.
•Place the Base Station at least 10 cm away from the wall.
With the stand positioned so that the section labelled as FRONT is toward the front of the Base Station, insert the claws of the stand in the holes on the bottom of the Base Station and slide the stand toward the back of the Base Station to lock it into place.
Holes
Stand
Claws
FRONT
Preparations Station Base
7

Part 3
Connecting Other
Devices
You can connect external devices featuring a scart output terminal or audio/video output terminals, such as a STB, PVR, or DVD Recorder to the Base Station.
Refer to the operating instructions for each device.
Rear of Base Station
You can also connect to the IN 2 terminal.
Scart to A/V cable (supplied)
A/V cable (RCA pin cable) (supplied)
to the audio/video |
or |
to the scart socket |
output terminals
: Audio/video signal flow
Watching video with a connected device
Select [Video 1] in the [Index] window. You can operate the connected device using the on-screen remote control. Open the [Index] window, select [Video 1] or [Video 2] according to the input terminal to which the device is connected.
z Tip
To operate external devices from the LocationFree device, you must connect the supplied IR Blaster. For details, see the next page.
Note
If you connect a DVD player to the Base Station via a VCR, the VCR’s copy guard function may distort or dim the DVD picture. Connect the DVD player directly to the video input terminal on the Base Station.
Preparations Station Base
8

Connecting the IR Blaster
Attach the supplied IR Blaster to the device connected to the Base Station.
You can control the device with the LocationFree device’s on-screen remote control via the IR Blaster.
When operating two devices with the IR Blaster, set the devices and the IR Blaster as shown.
IR Blaster
to IR BLASTER port
IR Blaster
Infrared transmitter
Remote sensor
With reference to the operating instructions of the device, make sure to place the IR Blaster just above the remote sensor.
Note
Do not remove the backing paper from the IR Blaster yet.
After configuring LocationFree Player remote control settings (1 page 28), remove the backing paper from the IR Blaster and fix it in place.
Remote sensors
Note
For details on setting up a device, refer to the operating instructions of the device.
If the remote sensors on the two devices do not line up like the picture above, you cannot control them with the single supplied IR Blaster, and you need to purchase a 3.5 mm jack splitter, such as Sony Headphone Adapter PC-232S (not supplied), and another IR Blaster. Connect the plug adapter to the IR BLASTER port on the Base Station and connect each IR Blaster to a port on the adapter plug.
z Tips
•If the IR Blaster cable is too short, use the 3.5 mm jack extension cable (not supplied).
•Remote sensors on Sony Recorders and other products are identified with the  symbol.
•You can set up two on-screen remote controls for each video input connector. These on-screen remote controls allow you to operate two devices connected directly to the Base Station, and to control video input via those devices.
Preparations Station Base
9

Setup and Connections
Flow of Setup
Use the following steps to configure.
STEP 1
Setup to watch Video at home
STEP 1-1 Turn on the Base Station (1 page 12).
STEP 1-2 Connect a LocationFree device to the Base Station (1 page 13).
•Connecting with a router (1 page 14)
•Connecting directly to the Base Station by a wireless connection (1 page 14)
Install LocationFree Player Software (1 page 32)
STEP 1-3 Display Video on your LocationFree device (1 page 15).
STEP 2
Setup to watch Video away from home
STEP 2-1 Check Your Internet Connection (1 page 17).
STEP 2-2 Make Easy Setup Settings to Watch Video Away from Home (1 page 17).
If the NetAV Check is incomplete (1 page 19).
Connections and Setup
10
Base Station Modes
The Base Station has a normal mode and a setup mode.
Press the Base Station POWER button
SETUP MODE LED
Normal mode (SETUP MODE LED off)
|
|
Off |
|
• You can use NetAV at home and away from home. |
|
||
• You can make Base Station settings via a wireless connection. |
|
||
• You cannot make Base Station settings.* |
|
|
|
* You can make settings via a router if you set [Security] in the [Advanced Setup] page |
|
||
(1 page 36) to [Enable at all times. (Security Level: Low)] (1 page 45). |
POWER |
||
|
|
button |
|
SETUP MODE button |
|
|
|
Press the SETUP MODE |
• When the Base Station reboots. |
||
button on the rear panel |
|||
|
|
||
of the Base Station. |
• When the Base Station settings |
||
Keep pressing until the |
|||
page has not been accessed for |
|||
SETUP MODE LED starts |
15 minutes. |
|
|
blinking. |
|
|
|
Setup mode (SETUP MODE LED on) |
|
On |
|
•You cannot use NetAV at home and away from home.
•You can make Base Station settings.*
* Use the SSID and WEP key on the sticker of the Base Station for a wireless connection in setup mode.
Status for registration (SETUP MODE LED blinking)
Blinking
•You can register LocationFree devices only during the first 5 minutes after the Base Station is in setup mode. (The Base Station is still in setup mode
after this 5-minute state.)
• If the 5-minute registration state ends before you finish, switch to the registration status by pressing and holding the SETUP MODE button again until the SETUP MODE LED starts blinking.
Connections and Setup
11

STEP 1
Setup to Watch Video at Home
This section describes the setup for using NetAV to watch video at home.
STEP 1-1
Turn on the Base Station
Connect the Mains Lead to the Base Station
Connect the mains lead after you finish making all other connections.
Base Station rear panel
AC-LX1B AC power adapter (supplied)
To DC IN
Mains socket
Mains lead (Type BF) (supplied)
or
Mains lead (Type C-6) (supplied)
Connect the mains lead to the Base Station AC power adapter (AC-LX1B), and the AC power adapter to the DC IN jack on the Base Station, then plug the mains lead into a mains socket.
Note
Use only the supplied AC power adapter (AC-LX1B).
Turn on the Base Station Power
Press the POWER button on the front panel of the Base Station to turn it on.

 POWER button
The POWER LED on the front panel of the Base Station lights green.
POWER
LED
Connections and Setup
12

STEP 1-2
Connect a LocationFree device to the Base Station
|
Connection to watch video away from home |
|
Connection to watch video at home (1 pages 14 to 16) |
||
(1 pages 17 to 20) |
|
Modem |
• Connect to the router by wireless |
|
|
To |
|
|
|
|
yourconnect |
routerwithout |
|
|
to the Internet |
• Connect to the |
|
|
||
|
|
|
|
|
|
|
router by wired LAN |
|
|
computer |
function |
|
to LAN |
|
Router |
port |
|
||
|
DSL or cable modem |
|||
(UPnP compatible) |
|
|||
Base Station |
|
|||
|
|
|||
to |
|
|
|
|
|
• Connect to the modem with internal router by |
|
||
the |
|
|
||
|
wireless |
|
|
|
router a with Station Base |
|
|
|
|
router internal with Modem |
|
|
to the Internet |
|
• Connect to the modem |
|
|
||
with internal router by |
to LAN |
|
||
wired LAN |
|
|||
port |
|
|||
|
|
|||
DSL or cable modem |
|
|
||
|
|
|
|
|
|
|
with internal router |
Base Station |
|
|
|
(UPnP compatible) |
|
|
|
|
|
|
|
|
|
|
|
Connection to watch video away from home |
|
|
Connection to watch video at home (1 pages 14 to 16) |
(1 pages 14 to 20) |
|
|
with Modem without Modem router internal function router |
|
|
to the Internet |
to computer your connect To wireless by Station Base the |
to LAN |
|
DSL or |
|
port |
|
cable modem |
||
Base Station |
Router |
|
||
|
|
|||
(UPnP compatible) |
|
|||
|
|
to the Internet |
||
to LAN |
|
|
||
port |
|
|
||
Base Station |
|
|
||
DSL or cable modem |
|
|||
|
|
|
||
|
|
with internal router |
|
|
|
|
(UPnP compatible) |
|
|
*To determine the type of your modem, check with your Internet service provider.
*UPnP: Universal Plug and Play
Connections and Setup
13

Using a Router to Connect a LocationFree Device to the Base Station
Connecting with a wired router
If your router is configured to assign IP addresses by a DHCP function, and your computer is set to [Obtain an IP address automatically], then you can connect simply by connecting the computer and Base Station with a LAN cable (not supplied).
z Tip
Make sure the NETWORK LED on the front of the Base Station is turned on. If it is off, make sure the router is on and the LAN cable is connected properly.
Connecting with a wireless router
Connect the computer to a wireless router.
Connecting a LocationFree Device to the Base Station by a Wireless Connection
To make a wireless connection between a computer and the Base Station, set up the wireless network connection of the computer. For details, refer to the operating instructions for your computer and wireless LAN devices, such as a wireless LAN card.
The instructions in this section are based on a Windows XP with Service Pack 2 installed.
1 Click [Control Panel] from the [Start] menu of Windows and then double-click [Network Connections].
2 Double-click [Wireless Network
Connection].
3 Select the same SSID as printed on the sticker of the Base Station from the list of wireless networks and then click [Connect].
Connections and Setup
14
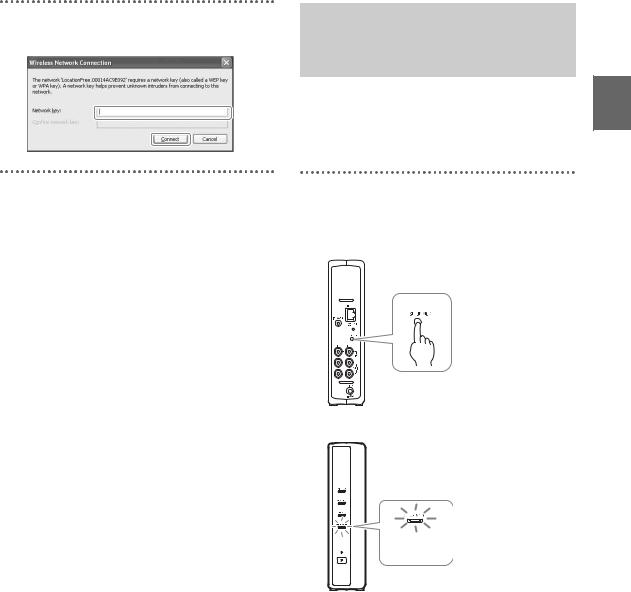
4 Enter the WEP key printed on the sticker of the Base Station and then click [Connect].
STEP 1-3
Display Video on your
LocationFree device
Before you register your computer with the Base Station and display video on the computer, you need to install LocationFree Player on the computer (1 page 32).
1 With the Base Station powered on, press the [SETUP MODE] button on the rear panel of the Base Station. Keep pressing until the SETUP MODE LED starts blinking.
The SETUP MODE LED blinks.
Connections and Setup
SETUP MODE
LED
z Tip
When using a router to connect to the Base Station, it takes a while for the IP address to be assigned to the Base Station by DHCP. The Base Station does not appear in the window shown in Step 2 until the IP address has been assigned. Proceed to Step 2 after the NETWORK LED turns on.
15
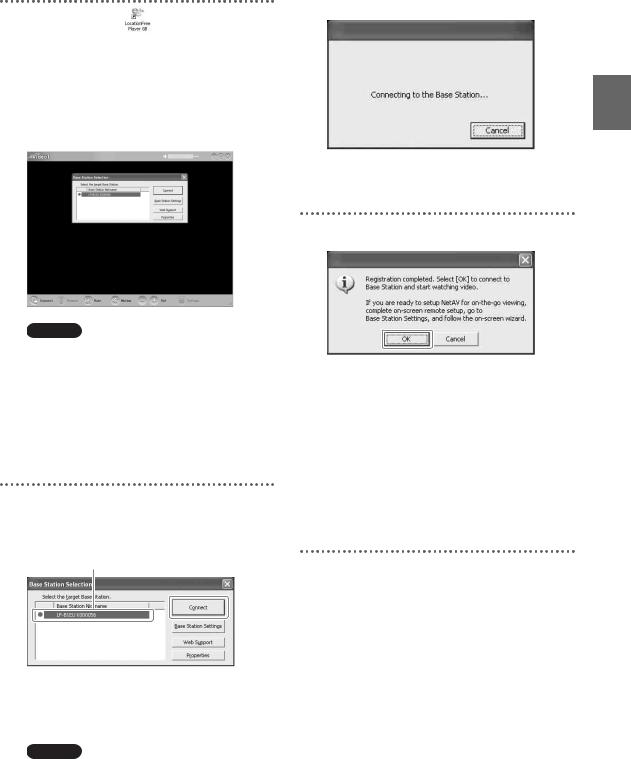
2 Double-click the |
Open a connection with the Base Station. |
(LocationFree |
Player) icon on the desktop of the computer. You can also use the [Start] menu. Point to [All programs] ([Programs] in Windows 2000), [Sony LocationFree Player], and then click [LocationFree Player].
LocationFree Player starts, and the [Base Station Selection] window appears.
Base Station registration begins automatically.
4 Click [OK] to connect to the Base Station.
Note
If your Base Station does not appear on the [Base Station Selection] screen, your security software or browser may be blocking the communication between the LocationFree Player and the Base Station. Refer to the instruction manuals of your security software or the online help of your browser to configure them not to block the communication.
3 In the [Base Station Selection] window, select a Base Station with a green icon from the list, and then click [Connect].
The Base Station is restarted automatically after registration. Wait for a while until a connection is established with the Base Station.
To configure the on-screen remote control and the colour system, go to page 28.
To watch video away from home, proceed to the next section “STEP 2 Setup to Watch Video Away from Home.”
Select a green icon.
z Tip
You can change the nickname on the screen that appears if you click [Properties].
Note
Before clicking [Connect], check that the SETUP MODE LED is still blinking. If the SETUP MODE LED turns on without blinking, keep pressing the SETUP MODE button until the LED starts blinking.
Connections and Setup
16

STEP 2
Setup to Watch Video Away from Home
This step explains how to set up your network to connect to your Base Station at home via either wireless or wired public Internet access.
Notes
•You need to do this setup before you go out.
•A contract or application may be required to connect to the Internet at some locations.
STEP 2-1
Check Your Internet
Connection
To watch video away from home, you must first connect the Base Station to the Internet. You can connect the Base Station to the Internet over a DSL line or a cable TV line.
z Tips
•To use the NetAV function to watch video away from home, we recommend that the connection to the Base Station be broadband with upload and download speeds of at least 300 kbps. Contact your Internet service provider for more information about the speed of your communications line.
•The faster line speeds you use, the better picture quality you get when you watch video using NetAV.
Connecting to the router
Using a LAN cable (not supplied), connect the LAN port of the Base Station to your router. The connection method you should use depends on your ISP and equipment. For more information, contact your ISP.
Notes
•Depending on your Internet service provider, you may not be able to connect multiple devices, such as the Base Station and several computers. For more information, contact your service provider.
•To determine what kind of LAN cable you use, refer to the operating instructions for your router, cable modem, or DSL modem.
•For details on setting up the connection, refer to the operating instructions for your router, cable modem, or DSL modem. If you have any questions, contact your service provider.
•Further information about configurations is also available on the following website. LocationFree Support web site: http://www.sony.net/Products/LocationFree/ support/
STEP 2-2
Make Easy Setup Settings to Watch Video Away from Home
You need to do this setup before you go out.
Setting Up the NetAV Function to Watch Video Away from Home
When connecting a computer to the Base Station using a router (1 page 13), set the Base Station to setup mode by pressing the SETUP MODE button (1 page 11).
1 Double-click the  (LocationFree Player) icon on the desktop of the computer. You can also use the [Start] menu. Point to [All programs] ([Programs] in Windows 2000), [Sony LocationFree Player], and then click [LocationFree Player].
LocationFree Player starts, and the [Base Station Selection] window appears.
z Tip
If the LocationFree Player is already running, disconnect by clicking [Disconnect] in the lower left of the window, then click [Connect] again.
[Disconnect]
Connections and Setup
17

2 Select a Base Station with a green icon, and click [Base Station Settings].
Select a green icon. |
Click this button. |
|
Your web browser starts, and the [Base Station Settings] page opens.
3 Click [Enter].
The password input page appears.
4 Enter the user name and password, and then click [OK].
User name: lfx (lowercase letters) (The user name cannot be changed)
Initial password: WebPassword printed on the sticker of the Base Station.
The following page appears when you log in to [Base Station Settings].
5 Click [Easy Setup].
The [Easy Setup] page appears.
z Tip
Click [Deutsch], [English] or [Français] to choose your language.
6 Follow the on-screen instructions to confirm the NETWORK LED is turned on and then click [Next].
Note
If the NETWORK LED is off, check that the router is turned on and the LAN cable is connected properly.
Connections and Setup
18
Loading...