


 Loading...
4-128-304-13(1)
Mini HI-FI
Component
System
Operating Instructions
LBT-ZX99i
LBT-ZX66i
©2009 Sony Corporation
WARNING
To reduce the risk of fire or electric shock, do not expose this apparatus to rain or moisture. To reduce the risk of fire, do not cover the ventilation opening of the apparatus with newspapers, tablecloths, curtains, etc.
Do not place the naked flame sources such as lighted candles on the apparatus.
To reduce the risk of fire or electric shock, do not expose this apparatus to dripping or splashing, and do not place objects filled with liquids, such as vases, on the apparatus. Do not expose batteries or apparatus with battery-installed to excessive heat such as sunshine, fire or the like.
Do not install the appliance in a confined space, such as a bookcase or built-in cabinet. As the main plug is used to disconnect the unit from the mains, connect the unit to an easily accessible AC outlet. Should you notice an abnormality in the unit, disconnect the main plug from the AC outlet immediately.
Excessive sound pressure from earphones and headphones can cause hearing loss. The unit is not disconnected from the AC power source (mains) as long as it is connected to the wall socket, even if the unit itself has been turned off.
CAUTION
The use of optical instruments with this product will increase eye hazard.
For customer in the United States
Owner’s Record
The model and serial numbers are located on the rear of the unit. Record these numbers in the space provided below. Refer to them whenever you call upon your Sony dealer regarding this product.
ModelNo. SerialNo.
This symbol is intended to alert the user to the presence of uninsulated “dangerous voltage” within the product’s enclosure that may be of sufficient magnitude to constitute a risk of electric shock to persons.
This symbol is intended to alert the user to the presence of important operating and maintenance (servicing) instructions in the literature accompanying the appliance.
The following FCC statement applies only to the version of this model manufactured for sale in the U.S.A. Other versions may not comply with FCC technical regulations.
2US

NOTE
This equipment has been tested and found to comply with the limits for a Class B digital device, pursuant to Part 15 of the FCC Rules. These limits are designed to provide reasonable protection against harmful interference in a residential installation. This equipment generates, uses, and can radiate radio frequency energy and, if not installed and used in accordance with the instructions, may cause harmful interference to radio communications. However, there is no guarantee that interference will not occur in a particular installation.
If this equipment does cause harmful interference to radio or television reception, which can be determined by turning the equipment off and on, the user is encouraged to try to correct the interference by one or more of the following measures:
–Reorient or relocate the receiving antenna.
–Increase the separation between the equipment and receiver.
–Connect the equipment into an outlet on a circuit different from that to which the receiver is connected.
–Consult the dealer or an experienced radio/ TV technician for help.
CAUTION
You are cautioned that any changes or modification not expressly approved in this manual could void your authority to operate this equipment.
Important Safety
Instructions
1)Read these instructions.
2)Keep these instructions.
3)Heed all warnings.
4)Follow all instructions.
5)Do not use this apparatus near water.
6)Clean only with dry cloth.
7)Do not block any ventilation openings. Install in accordance with the manufacturer’s instructions.
8)Do not install near any heat sources such as radiators, heat registers, stoves, or other apparatus (including amplifiers) that produce heat.
9)Do not defeat the safety purpose of the polarized or grounding-type plug. A polarized plug has two blades with one wider than the other. A grounding type plug has two blades and a third grounding prong. The wide blade or the third prong are provided for your safety. If the provided plug does not fit into your outlet, consult an electrician for replacement of the obsolete outlet.
10)Protect the power cord from being walked on or pinched particularly at plugs, convenience receptacles, and the point where they exit from the apparatus.
11)Only use attachments/accessories specified by the manufacturer.
12)Use only with the cart, stand, tripod, bracket, or table specified by the manufacturer, or sold with the apparatus. When a cart is used, use caution when moving the cart/apparatus combination to avoid injury from tip-over.
13)Unplug this apparatus during lightning storms or when unused for long periods of time.
14)Refer all servicing to qualified service personnel. Servicing is required when the apparatus has been damaged in any way, such as power-supply cord or plug is damaged, liquid has been spilled or objects have fallen into the apparatus, the apparatus has been exposed to rain or moisture, does not operate normally, or has been dropped.
Continued l
3US

Note on DualDiscs
A DualDisc is a two sided disc product which mates DVD recorded material on one side with digital audio material on the other side. However, since the audio material side does not conform to the Compact Disc (CD) standard, playback on this product is not guaranteed.
Music discs encoded with copyright protection technologies
This product is designed to play back discs that conform to the Compact Disc (CD) standard. Recently, various music discs encoded with copyright protection technologies are marketed by some record companies. Please be aware that among those discs, there are some that do not conform to the CD standard and may not be playable by this product.
Note on Multi Session disc
When you play back Multi Session discs with different formats for each session, the format of the first session is recognized as the disc type. Tracks in the second and subsequent sessions are played back if they are the same formats as the first session.
MPEG Layer-3 audio coding technology and patents licensed from Fraunhofer IIS and Thomson.
iPod is a trademark of Apple Inc., registered in the U.S. and other countries.
About this manual
The instructions in this manual are for models LBT-ZX99i and LBT-ZX66i. In this manual, the LBT-ZX99i is used for illustration purposes unless stated otherwise.
The LBT-ZX99i consists of:
– Unit |
HCD-ZX99i |
|
– Speaker System |
|
|
• |
Front speakers |
SS-ZX99i |
• |
Surround speakers |
SS-ZX99i |
The LBT-ZX66i consists of: |
||
– Unit |
HCD-ZX66i |
|
– Speaker System |
|
|
• |
Front speakers |
SS-ZX66i |
4US

Table of Contents |
|
About this manual ........................ |
4 |
Guide to parts and controls .......... |
6 |
Getting Started |
|
Hooking up the system............... |
11 |
Positioning the speakers............. |
15 |
Setting the clock......................... |
16 |
Basic Operations |
|
Playing a CD/MP3 disc.............. |
17 |
Listening to the radio ................. |
19 |
Playing the iPod ......................... |
20 |
Using optional components........ |
22 |
Adjusting the sound ................... |
22 |
Creating a party atmosphere ...... |
23 |
(LBT-ZX99i only) |
|
Selecting the speaker setting...... |
25 |
(LBT-ZX99i only) |
|
Enhancing the video game |
|
sound ..................................... |
25 |
— Game Sync |
|
Mixing video game sound with |
|
other sound source ................ |
26 |
— Game Mixing |
|
Changing the display.................. |
26 |
Viewing information in the |
|
display ................................... |
28 |
Other Operations |
|
Creating your own program ...... |
29 |
— Program Play |
|
Presetting radio stations ............ |
30 |
Creating your own sound |
|
effect..................................... |
31 |
Singing along ............................ |
32 |
Using the timer.......................... |
32 |
Additional Information |
|
Troubleshooting ........................ |
34 |
Messages ................................... |
37 |
Precautions ................................ |
38 |
Specifications ............................ |
39 |
Compatible iPod models with |
|
this system............................ |
42 |
Index.......................................... |
43 |
5US

Guide to parts and controls
This manual mainly explains operations using the buttons on the unit, but the same operations can also be performed using the buttons on the remote having the same or similar names.
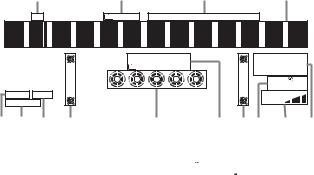
Unit
– Front view
|
1234567 89q;qa qs |
|
eh |
qd |
|
eg |
||
qf |
||
ef |
||
qgqh |
||
ed |
||
es |
qj |
|
qlqk |
||
ea |
w; |
|
e; |
||
wa |
||
|
||
wl |
ws |
|
wk |
wd |
|
wf |
||
|
wj whwg
– Top view
ejek el |
r; rarsrd |
|
HS s rf |
|
PLAY |
rg |
MODE |
|
6US

Remote RM-AMU008
3 |
|
5 |
1 |
t; |
rh |
rl |
rj |
qf |
2 |
|
qh |
qj |
qg |
|
rk |
ej |
|
wg |
qs |
A"/1 (on/standby) (pages 13, 14, 16, 20, 34, 37)
Press to turn the system on or off.
BTIMER MENU (pages 16, 32)
Press to set the clock and the timers.
CDISPLAY (pages 16, 21, 27, 28)
Press to change the information in the display.
DILLUMINATION (page 26)
Press to select the power illuminator.
ESLEEP (page 32)
Press to set the Sleep Timer.
F Display (pages 10, 26, 28, 37)
GPreset Effect buttons (SALSA/ REGGAE/POP/SAMBA/TANGO/ ROCK/JAZZ/DANCE/MOVIE/ GAME) (page 22)
Press to select preset effect.
HAMP MENU (pages 23, 27, 31)
Press to display the menu to operate the system.
IFM MODE (pages 20, 37)
Press to select the FM monaural or stereo reception.
JTUNER/BAND (page 19)
Press to select AM or FM band.
KTUNING +/– (pages 19, 30)
Press to tune in a radio station.
LUnit: FUNCTION (pages 14, 17, 22, 29)
Remote: FUNCTION +/– (pages 17, 19, 22, 29)
Press to select a function.
MTUNING MODE (pages 19, 31, 37)
Press to select the tuning mode.
NTUNER MEMORY (page 30)
Press to preset a radio station.
OTOOL MENU (page 21)
Press to return to previous menu of the iPod.
P V/v/B/b (pages 16, 21, 23, 27, 31, 32)
Push to select the menu items of the system and iPod.
Unit: ENTER (pages 16, 21, 23, 27, 29, 30, 31, 32)
Remote:  (pages 16, 21, 29, 30, 32)
Press to enter the settings.
QUnit: RETURN (page 21) Remote: O RETURN (page 21)
Press to return to previous menu of the iPod.
RiPod (page 20)
Press to select iPod function.
SPHONO (page 22)
Press to select PHONO function.
Continued l
controls and parts to Guide
7US
TOperation buttons for iPod function:
BX (play/pause) (pages 20, 21)
Press to start or pause playback.
m/M (rewind/fast foward) (page 21)
Press to find a point in a track.
./> (go backward/go forward) (page 21)
Press to select a track.
UGAME MIXING (page 26)
Press to select the level of the GAME input.
VGAME (pages 22, 25)
Press to select the GAME function.
WGAME INPUT VIDEO jack (pages 13, 22)
GAME INPUT AUDIO L/R jacks (pages 13, 22)
Connect to an optional video game player.
XPHONES jack (pages 34, 39)
Connect the headphones.
YUnit: VOLUME +/– (pages 17, 19, 20, 22, 32, 34)
Turn to adjust the volume.
Remote: VOLUME +*/– (pages 17, 19, 20, 22, 32, 34)
Press to adjust the volume.
Z Power illuminator (page 26)
wj Disc tray (pages 10, 14, 17, 35, 37)
wk MIC 1/MIC 2 jack (pages 32, 34, 39)
Connect an optional microphone.
wl MIC LEVEL (pages 32, 34)
Turn to adjust the microphone volume.
e; PLAY MODE (pages 18, 36, 37)
Press to select the play mode of CD function.
ea DISC 1 ~ 5 (pages 17, 29)
Press to select a disc.
Press to switch to CD function from other function.
es USER EQ (page 31)
Press to select the preset user equalizer.
ed X-GROOVE (page 22)
Press to reinforce the bass.
ef SURROUND (page 22)
Press to select the surround effect.
eg IR Receptor (page 35)
eh EFFECT ON/OFF (page 22)
Press to activate or deactivate the preset effect.
ej DISC SKIP (pages 14, 17, 29)
Press to select next disc.
ek EX-CHANGE (page 17)
Press to exchange other discs during playback.
el (LBT-ZX99i only) SOUND FLASH (page 24)
Press and hold to select “SOUND FLASH” effect.
r; iPod connector (pages 13, 20)
Place an optional iPod on the connector to listen to audio contents stored in the iPod.
8US

ra (LBT-ZX99i only) MODE (page 23)
When X-ROUND is set to on, press to select X-ROUND mode.
(LBT-ZX99i only) SPEAKERS (page 25)
When X-ROUND is set to off, press to select speaker setting.
rs (LBT-ZX99i only)
X-ROUND ON/OFF (pages 23, 25)
Press to activate or deactivate X-ROUND mode.
rd (LBT-ZX99i only) JOG (page 24)
Turn to select X-ROUND setting. Turn to select SOUND FLASH speed.
rf Operation buttons for CD function:
 +/– (pages 17, 29)
Press to select a folder of MP3 files.
m/M (rewind/fast forward) (page 17)
Press to fast forward or rewind.
./> (go backward/go forward) (page 17)
Press to select a track.
NX (play/pause) (pages 17, 27, 29, 35)
Press to start or pause playback.
x (stop) (pages 17, 19)
Press to stop playback.
rg Z OPEN/CLOSE (pages 14, 17, 35)
Press to open or close the disc tray.
rh EQ (pages 22, 31)
Press to select a preset sound effect.
rj CLEAR (page 30)
Press to delete the last step from the program list.
rk Operation buttons on remote: +/– (tuning) (pages 19, 30)
Press to tune in a radio station.
 +/– (pages 17, 29)
Press to select a folder of MP3 files.
./> (go backward/go forward) (pages 17, 21)
Press to select a track.
m/M (rewind/fast forward) (pages 17, 21)
Press to fast forward or rewind.
 * (play) (pages 17, 20, 29, 35)
Press to start playback.
X (pause) (pages 17, 21)
Press to pause playback.
x (stop) (pages 17, 19)
Press to stop playback.
rl REPEAT/FM MODE (pages 17, 37)
Press to change the Repeat Play setting of CD function.
Press to select the FM monaural or stereo reception.
t; PLAY MODE/TUNING MODE (pages 18, 19, 29, 31, 36, 37)
Press to select the play mode of CD function.
Press to select the tuning mode.
*The VOLUME + and N buttons have tactile dots. Use the tactile dots as references when operating the system.
Continued l
controls and parts to Guide
9US
– Display
1 |
2 |
|
|
3 |
4 |
|
ID3 |
|
TRK |
MP3 |
|
CD |
TEXT |
|
|
ALL 1 DISC S |
|
ST MONO TUNED |
||
|
|
|
SHUF PGM REP 1 |
|
AUTO PRESET |
|
|
1 |
2 |
3 |
4 |
5 |
MANUAL |
|
SLEEP PLAY |
|||||
|
|
|
|
|
|
|
EFFECT SURR |
|
|
|
|
|
GAME |
X-GROOVE |
|
|
|
|
|
MIXING |
qdqs qa 8 |
|
|
q; |
|
9 87 6 5 |
|
ALights up when the MP3 file contains ID3 tag information.
B“TRK” lights up when a file name is
displayed. “ ” lights up when a folder name is displayed.
CIndicates the type of disc or file that the system recognized.
D Displays the current status and information (page 28).
EIndicators for the TUNER function (pages 19, 30).
FIndicators for the level of the Game Mixing (page 26).
GLights up when the timer is set (page 32).
H(LBT-ZX99i only)
Lights up according to the speaker system setting.
IIndicates the selected play mode for CD function (pages 18, 28).
JIndicators for the disc tray (page 17).
“
 ” lights up when the disc is selected. “
 ” lights up when there is
a disc on the disc tray. “1”, “2”, “3”, “4” and “5” light up when the system is turned on.
KLights up when the surround effect is activated (page 22).
LLights up when the X-GROOVE effect is activated (page 22).
MLights up when the sound effect is activated (page 22).
10US
Getting Started
Hooking up the system
– Rear panel – Front panel
B |
|
GAME INPUT |
|
|
|
VIDEO |
|
1 |
2 |
|
G |
F |
|
L |
|
|
|
||
|
AUDIO |
|
|
E |
|
R |
|
|
PHONES |
|
|
|
|
|
|
D |
|
|
|
|
|
1To AM loop antenna |
|
|
A |
2To FM lead antenna |
|
|
3To front speaker (right) |
||
|
H |
||
|
4To front speaker (left) |
||
5* |
6* |
5To surround speaker (right) |
|
C 3 |
4 |
6To surround speaker (left) |
|
|
|
||
|
|
* LBT-ZX99i only. |
|
Started Getting
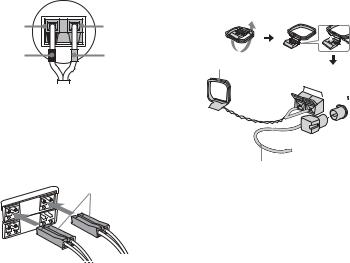
ASpeakers
The speaker connectors are color-coded with their respective speaker terminals on the unit.
Front speakers
(LBT-ZX99i only)
Connect the speaker cords to the SPEAKER FRONT (SPEAKER A) terminals.
|
SUR |
|
|
R |
|
White |
|
|
ER B) |
|
|||
SPE |
AKE |
|
|
|
||
|
|
D |
L |
|
||
|
|
ROUN |
|
|||
R |
(SPEAK |
|
|
|
|
|
|
|
|
|
|
L |
|
R |
FR |
ONT |
A) |
|
|
|
|
|
|
|
|
||
|
(SPEAKER |
|
|
|
||
(LBT-ZX66i only)
Connect the speaker cords to the SPEAKER terminals.
ER
SPEAK

 L
L

 R
R
Continued l
11US
Tip
Connect the speaker cords to the terminals on the front speakers.
Black (#) |
Red (3) |
Black (#) |
Red (3) |
Surround speakers
(LBT-ZX99i only)
Connect the speaker cords to the SPEAKER SURROUND (SPEAKER B) terminals and to the terminals on the speakers as shown in the tip above.
Grey
SP |
EA |
KE |
R |
|
|||
|
ND |
|
|||||
SU |
RROU |
L |
|||||
|
|
||||||
|
ER B) |
|
|||||
R (SPEAK |
|
|
|
|
|||
L 
R |
NT |
A) |
FRO |
|
|
KER |
|
|
(SPEA |
|
|
Notes
•Be sure to use only the supplied speakers.
•Be sure to connect the speakers securely and correctly. When connecting speaker cords, insert the connector straight into the
terminals.
BAntennas
Find a location and an orientation that provide good reception, and then set up the antennas.
AM loop antenna
AM
FM75
COAXIAL
Extend the FM lead antenna horizontally
Note
Keep the antennas away from the speaker cords and the power cord to avoid picking up noise.
CCD DIGITAL OUT jack
Use a digital optical cable (square, not supplied) to connect the digital input of the optional MD deck to this jack. You can then record digital audio from this system.
Note
There is no digital audio output from this jack during playback of MP3 files.
DVIDEO OUT jack
Use a video cable (not supplied) to connect the video input of TV to this jack.
EPHONO IN L/R jacks
Use an audio cord (not supplied) to connect the audio output of the turntable to these jacks. You can then output audio through this system.
12US
FPC IN L/R jacks
Use an audio cord (not supplied) to connect the audio output of the computer to these jacks. You can then output audio through this system.
GGAME INPUT jacks
GAME INPUT VIDEO jack
Use a video cable (not supplied) to connect the video output of the optional video game player to this jack. You can then output video through this system.
Note
The video game player image may appear on the TV screen even if the system is turned off.
GAME INPUT AUDIO L/R jacks
Use an audio cord (not supplied) to connect the audio output of the optional video game player to these jacks. You can then output audio through this system.
HPower
Connect the power cord to a wall outlet. The demonstration appears in the display. When you press "/1, the system turns on and the demonstration automatically ends.
Using the iPod
Insert the iPod Dock Adapter (not supplied) into the iPod connector before use.
Use a Dock Adapter supplied with your iPod. Otherwise, a compatible Dock Adapter will need to be purchased separately from Apple Inc.
To remove the iPod Dock Adapter, pull it up with your fingernail or a flat object using the slot inside the adapter.
Slot
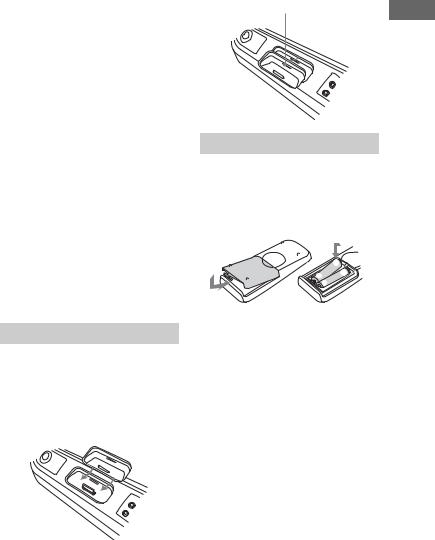
Using the remote
Slide and remove the battery compartment lid, and insert the two supplied R6 (size AA) batteries, E side first, matching the polarities shown below.
|
e |
E |
E |
|
|
e |
|
Notes
•If you do not use the remote for a long period of time, remove the batteries to avoid possible damage from battery leakage and corrosion.
•With normal use, the batteries should last for about six months. When the remote no longer operates the system, replace both batteries with new ones.
•Batteries installed devices shall not be exposed to excessive heat such as sunshine, fire or the like.
Started Getting
13US

Attaching the speaker pads
Attach the supplied speaker pads at each corner on the bottom of the speakers to stabilize the speakers and to prevent them from slipping.
(LBT-ZX99i only)
(LBT-ZX66i only)
When carrying the unit
Do the following procedure to protect the disc mechanism.
Use the buttons on the unit for the operation.
1Press "/1 to turn on the system.
2Press FUNCTION repeatedly to select “CD”.
3Press Z OPEN/CLOSE to open the disc tray and remove the disc. If there are more than one disc in the disc tray, press DISC SKIP to remove the discs.
4Press Z OPEN/CLOSE again to close the disc tray. Wait until “CD No Disc” appears in the display.
5Hold down DISC SKIP and then press "/1 until “STANDBY” appears in the display. Then, “MECHA LOCK” appears in the display.
6Unplug the AC power cord.
Note
Before carrying the unit, be sure to disconnect the iPod.
(LBT-ZX99i only)
When carrying the front and surround speakers
Do not carry the front and surround speakers by their sub panel. Otherwise, the speakers may be damaged.
Sub panel
14US
Loading...