


LBT-D270
Table of contents
 Loading...
SONY.
3-810-805-11 (3)
Compact
Hi-Fi Stereo System
Operating instructions
DIGITAL AUDIO
LBT-D170
LBT-D270
LBT-G1100
LBT-G3100
© 1995 by Sony Corporation
WARNING
For customers in Canada
To prevent fire or shock hazard, do not
expose the unit to rain or moisture.
CAUTION
CAUTION: TO REDUCE THE RISK OF ELECTRIC SHOCK.
DO NOT REMOVE COVER (OR BACK).
NO USER-SERVICEABLE PARTS INSIDE.
REFER SERVICING TO QUALIFIED SERVICE PERSONNEL
This symbol is intended to alert the user to the
presence of uninsulated "dangerous voltage"
within the product's enclosure that may be of
sufficient magnitude to constitute a risk of electric
shock to persons.
This symbol is intended to alert the user to the
presence of important operating and maintenance
(servicing) instructions in the literature
accompanying the appliance.
INFORMATION
This equipment has been tested and tound to comply with the limits
tor a Class 1? digital device, pursuant to Part 13 of the FCC Rules.
I’lie'e limits are designed to provide reasonable protection against
harmtiil interterence in a residential inst,illation. This equipment
generates, uses, and can radiate radio frequence' energy and, if not
installed and used in accordance with the instructions, may cause
harmful interference to radio communications, l lowever, there is no
guarantee that interference will notoccur-in a particular installation.
If this equipment does cause harmful interference to radio or
television reception, which can be determined by turning the
equipment off and on, the user is encouraged to try to correct the
interference by one or more of the following measures:
“ Reorient or relocate the receiving antenna.
- Increase the separation between the equipment and receiver.
- Connect the equipmient into an outlet on a circuit ditterent from
that to which the receiver is connected.
- Consult the dealer or an experienced radio/TV technician for help.
CAUTION
You are cautioned that any changes or modification not expressly
apipiroved in this manual could \ oid vour authority to oprerate this
equipiment.
Note to CATV installer:
This reminder is provided to call CATV system installer's attention
to .Article 820-40 of the NKC that pirovides guidelines for propier
grounding and, in psarticular, sp'ecifies that the cable ground shall be
connected to the grounding system of the building, as close to the
point of cable entry as piractical.
Owner's Record
file model and serial numbers are located at the rear of the unit.
Record the serial number in the spiace firovided below. Refer to them
whcnec er you call upion vour Sony dealer regarding this product.
CAUTION
TO PREVENT ELECTRIC SHOCK, DO NOT USE THIS
POLARIZED AC PLUG WITH AN EXTENSION CORD,
RECEPTACLE OR OTHER OUTLET UNLESS THE BLADES CAN
BE FULLY INSERTED TO PREVENT BLADE EXPOSURE.
This apparatus complies with the Class B limits for radio noise
emissions set out in Radio Interference Regulations.
Welcome !
Thank you for purchasing the Sony Hi-Fi Component System. This
series is packed with fun features. Here are just a few:
• DBFB (Dynamic Bass Feedback) system that boosts low frequency
range audio to provide deepa, powerful bass sound
• A preset feature, that lets you store and recall up to 30 of your
favorite radio stations
• A graphic equalizer that lets you adjust the audio quality to fit five
music types
• A loop play function that lets you palay a short portion of the track
repeatedly like a sampler on the CD player
• A timer that lets you set the CD player or radio to turn on and off
whenever you want
• A dual tape deck that lets you record from the radio, CD player or
from the other tapae deck and relay play from both decks
• A CD palaver that lets you palav upa to 3 CDs in a rcnv
• A renarite that lets vrau crantrral the music from vour seat
About This Manual
The instructions in this manual are for LBT-D170, LBT-D270,
LBT-Gl 100 and LBT-G3100. Before you start reading, check your
model number. LBT-D270/G3100 are the models used for
illustration purpose. Any differences are clearly indicated in the text,
for example, "LBT-D270/G3100 only".
Model No.
Serial .\o.

Table of
Contents
Chapter 1: Setting Up
Connecting the Stereo 4
Inserting the Batteries 6
Setting the Clock 6
Chapter 2: the CD Player
Playing CDs (normal play) 7
Playing Tracks in Random Order (shuffle play) 8
Playing Tracks in the Desired Order (program play) 8
Playing Tracks Repeatedly (repeat play) 9
Playing Tracks with Repeating a Specified Portion (loop play) 10
Chapter 3: the Radio
Listening to the Radio 11
Presetting Radio Stations 12
Playing Preset Radio Stations 12
Chapter 4: the Tape Player
Playing a Tape 13
Recording a CD 13
Recording a CD: Selecting Tape Length (tape select edit) 14
Recording a CD: Specifying Tape Length (time edit) 14
Recording From the Radio 15
Recording From Another Tape (dubbing) 15
Chapter 5; Sound Adjustment
Adjusting the Sound 16
Selecting the Audio Emphasis 16
Adjusting the Audio Emphasis 16
Making Your Personal Audio Emphasis File (personal file) 17
Chapter 6: Additional Features
Falling Asleep to Music 18
Waking up to Music 18
Connecting Optional Equipment 19
For Your Information
Precautions 20
Troubleshooting Guide 20
Maintenance 21
Specifications 21
Index to Parts and Controls 22
Index 23
Connecting the Stereo
Inserting the Batteries
Setting the Clock
Connecting the Stereo
Use the illustrations below to connect your
stereo.
If you want to connect any optional
components to the stereo, see "Connecting
Optional Equipment" in Chapter 6.
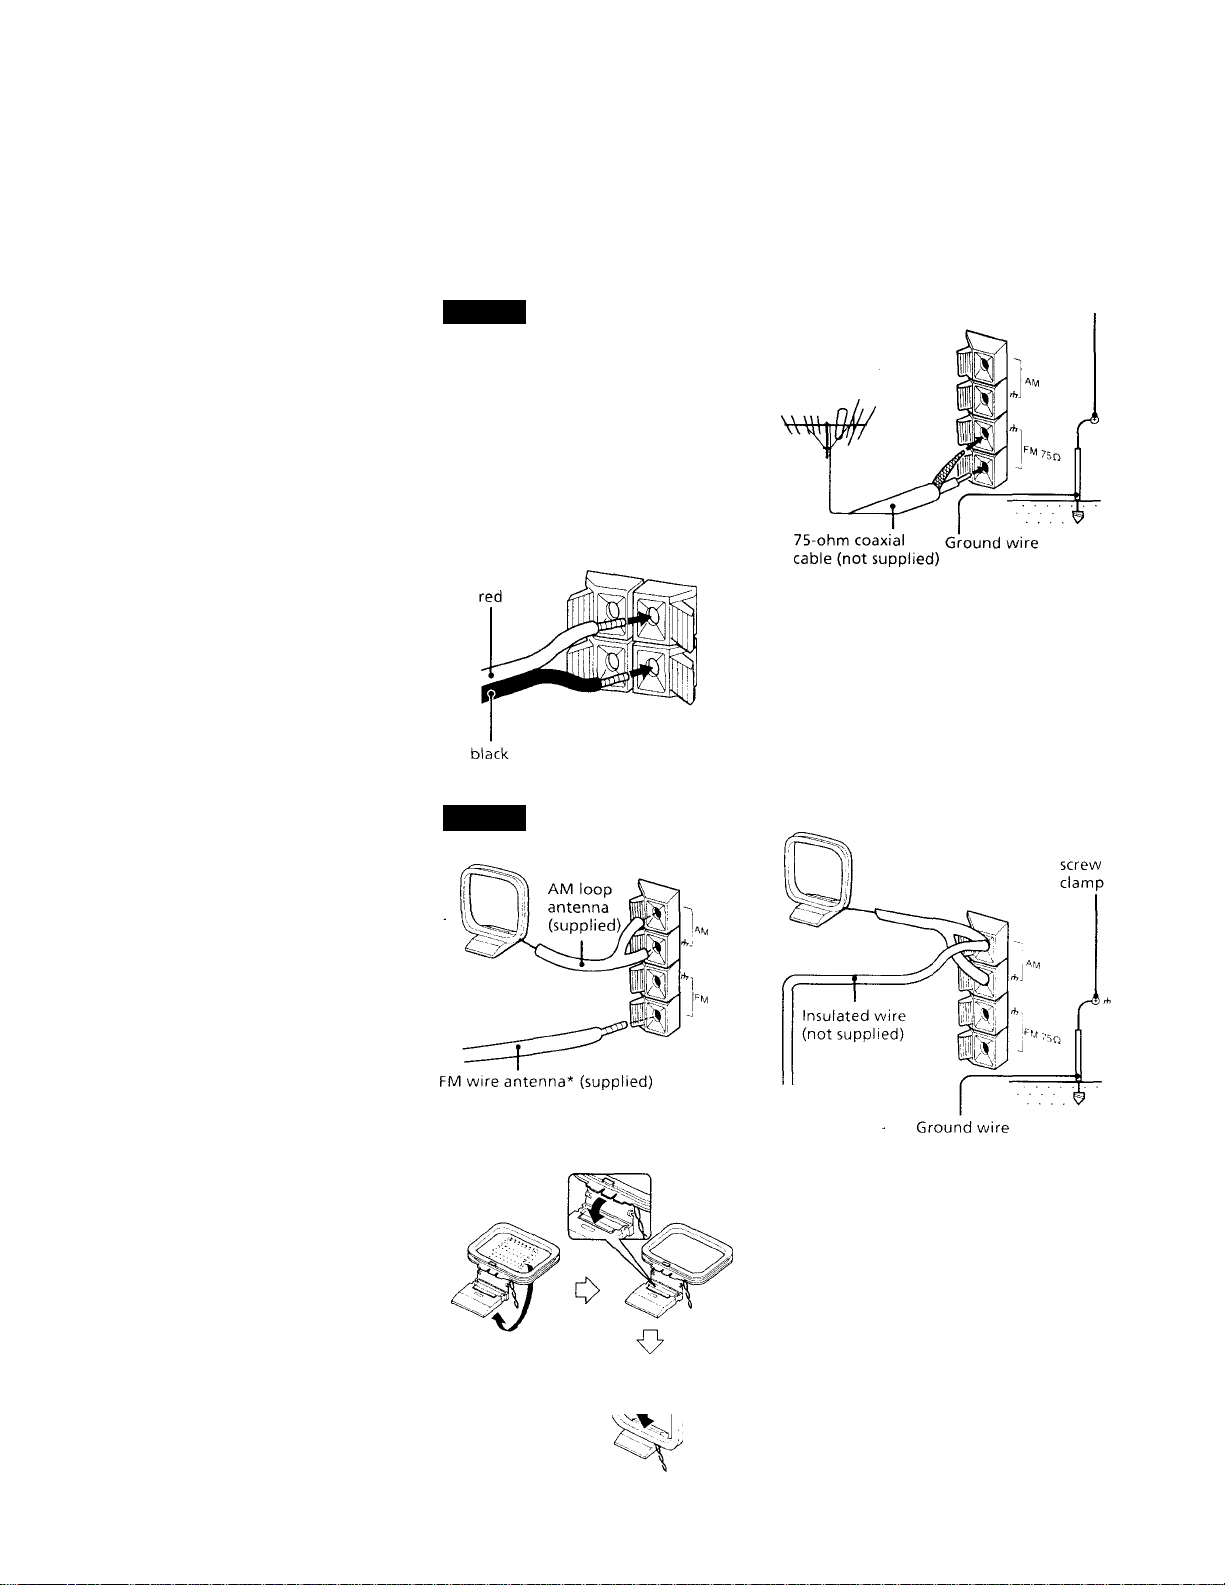
Connecting theSTEP 1
Speakers
1 Twist the speaker cable coating and pull
it from the end of the cable.
2 Connect the right speaker to R
connectors and the left speaker to L
connectors with the red cord to + and
the black cord to -.
STEP 2
Antenna
Connecting the
*Note: Extend it horizontally
To set up the AM loop antenna
To improve the FM reception
Connect an outdoor FM antenna to the FM
75Q terminal, using a 75-ohm coaxial cable.
Important
Ground the external antenna from rh
terminal against lightning with the screw
clamp. To prevent a gas explosion, do not
connect the ground wire to a gas pipe.
screw
clamp
To improve the AM reception
After you connect the AM antenna, connect
a 6- to 15- meter (20- to 50- feet) insulated
wire to the AM terminal. Connect the
ih terminal to ground.
Important
Ground the external antenna fn>m
A terminal against lightning with the screw
clamp. To prev ent a gas exjilosion, do not
connect the ground wire to a gas pipe.
4 Chapter 1: Setting Up
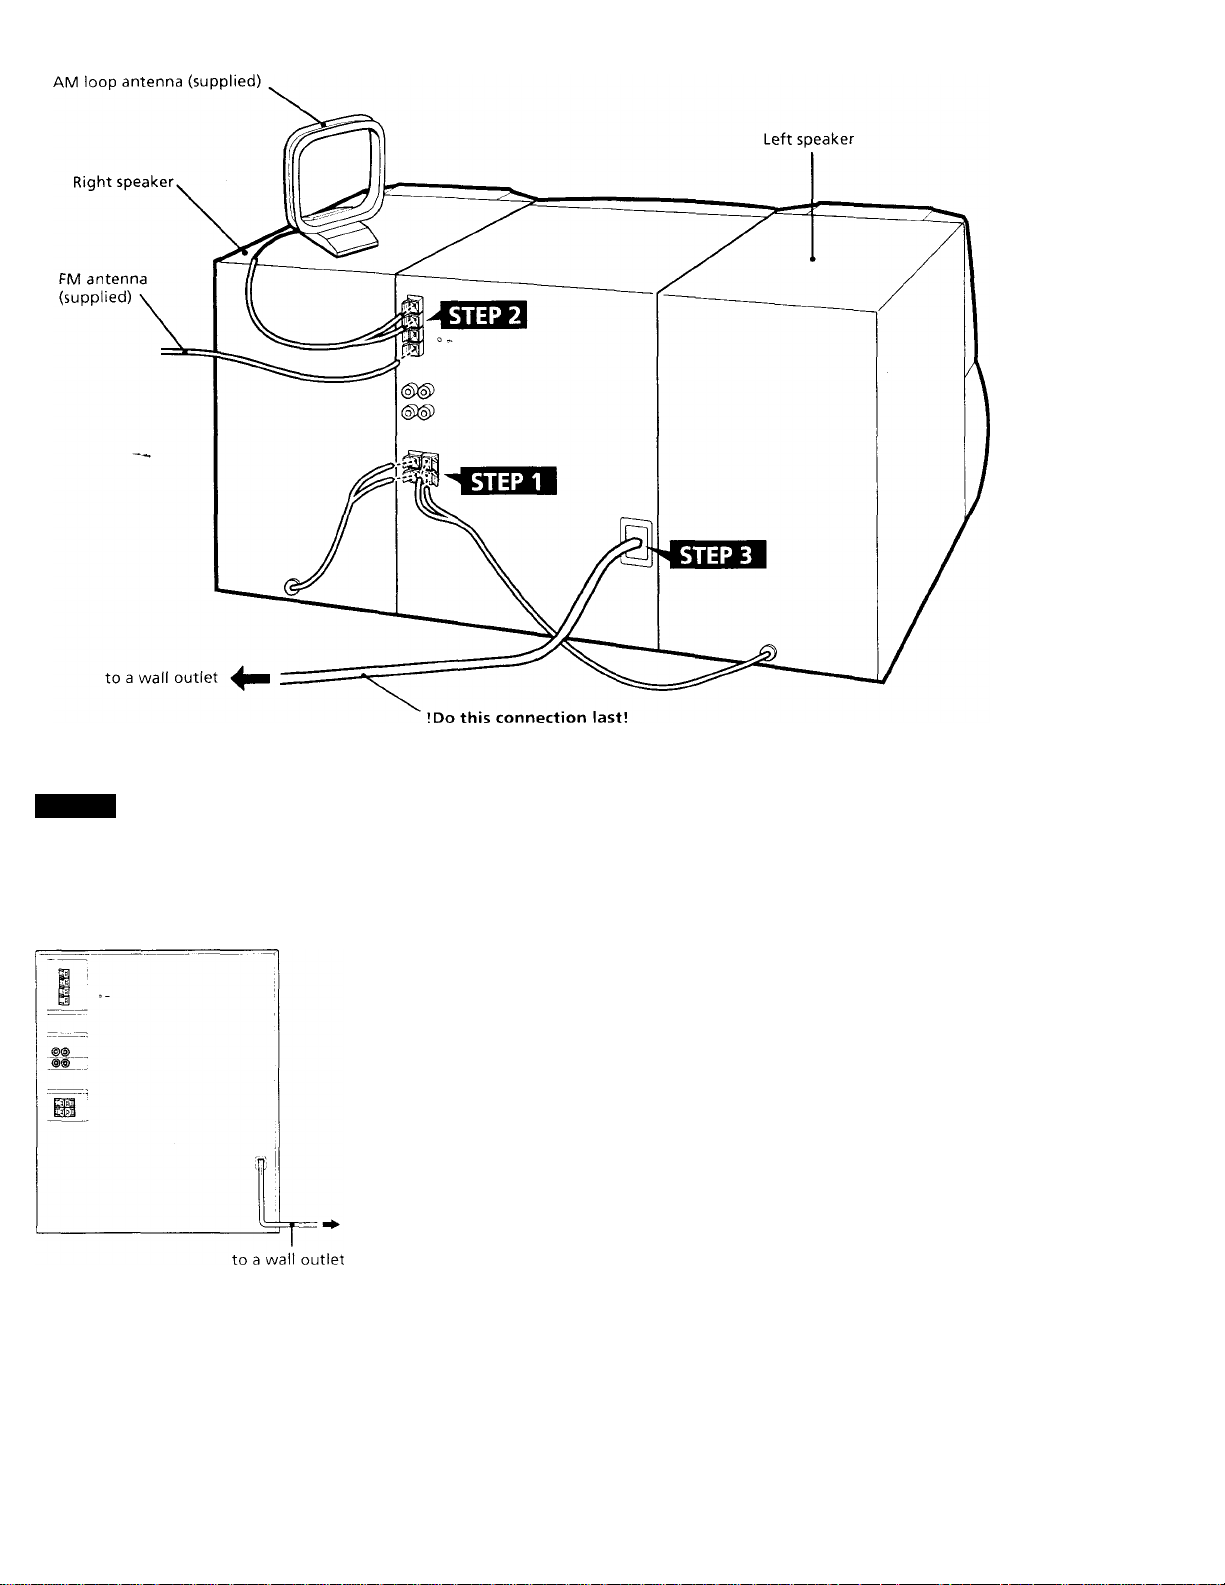
STEP3
Power
Connecting the
Connect the AC power cord to a wall outlet
after you have made all the above
connections.
Note
• When \ ou turn on the system power for
the first time, the disc trav starts rotating
- and the disc calendar ( Jd cd Jd ¿d W ) in
the display disappear one by one.
You can operate the CD player after the
disc trav stops rotating and "no DISC"
appears in the display.
Demo mode
The demo mode appears in the display
ivhen you connect the AC power cord to
a wall outlet. To deactivate the demo
mode, press DlSPl,AY,''DEVIO when the
system power is off.
Chapter 1; Setting Up | 5
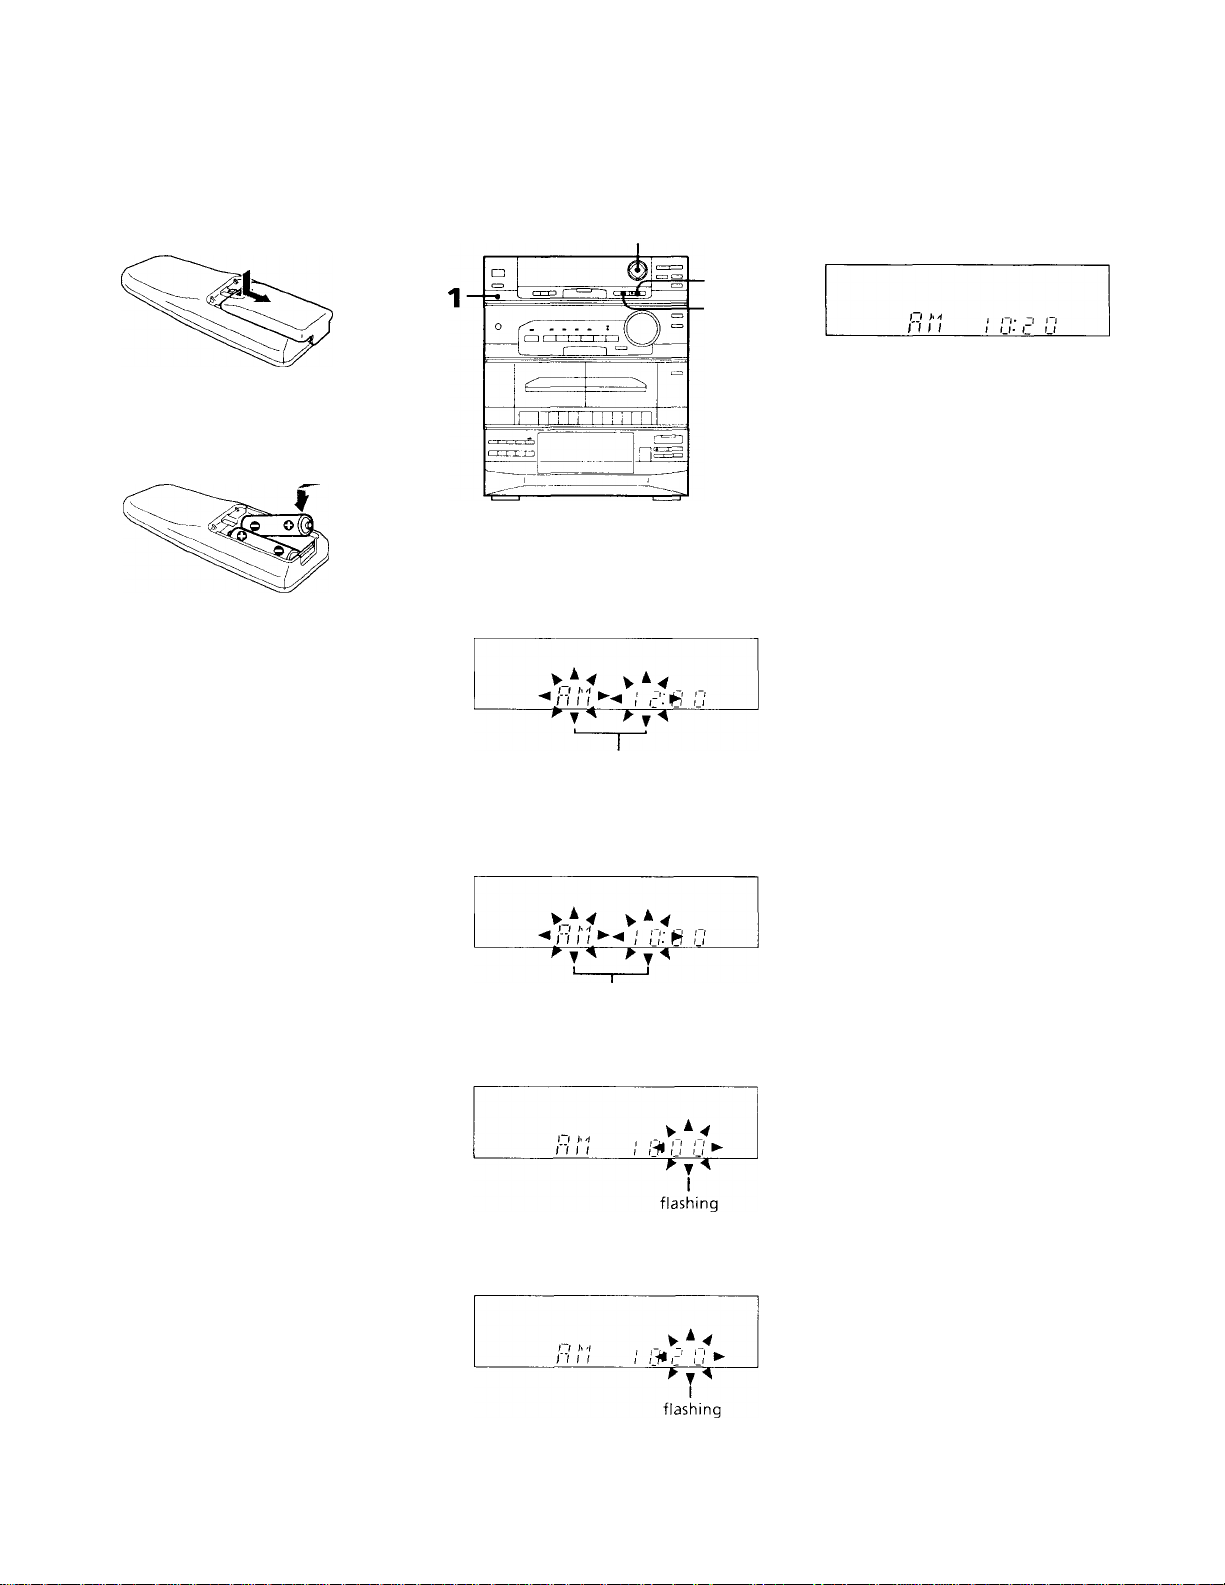
Inserting the Batteries Setting the Clock
Install two size AA (R6) batteries in the
supplied for remote control.
1 Open the lid.
2 Insert two R6 (size AA) batteries.
.Match the + and - to the diagram in the
battery compartment.
i3 Close the lid.
Battery life
You can expect the remote control to
operate tor about six months (using Sony
SLM-a (\S) batteries) before the batteries
run down. Wlien the batteries no longer
('perate the remote, replace all the batteries
with new onec.
To avoid battery leakage
If you are not going to use the renjote for a
long time, remoye the batteries to avoid
damage caused by corrosion from battery
leakage.
The built-in clock shows the time in the
display.
2,4
5 Press ENTER/NEXT.
The clock starts running and the upper
dot flashes. Use the time signal to set the
clock accurately. The upper dot flashes
for the first half of a minute (0 to 29
seconds), and the lower dot flashes for
the last half of a minute (30 to 59
seconds).
3,5
■ DISPLAY/
DEMO
To check the time
Press DISPLAY/DEMO a few times.
The current time appears for a few seconds.
To correct the clock setting
Repeat steps 1 to 5.
1 Press CLOCK SET.
The "AM" and hour indication begin
flashing.
flashing
2 Set the current hour by pressing ◄ or ►
(CURSOR CONTROL) until the correct
hour appears.
flashing
3 I’ress ENTER/NEXT.
Tlie minutes indication begins tlnshing.
4 Set the current minute by pressing ◄ or
► until the correct minute appears.
Chapter 1: Setting Up
the CD
Player
Chapter 2:
Playing CDs (normal play)
Playing Tracks in Random
Order (shuffle play)
Playing Tracks in the
Desired Order (program
play)
Playing Tracks Repeatedly
(repeat play)
Playing Tracks with
Repeating a Specified
Portion (loop play)
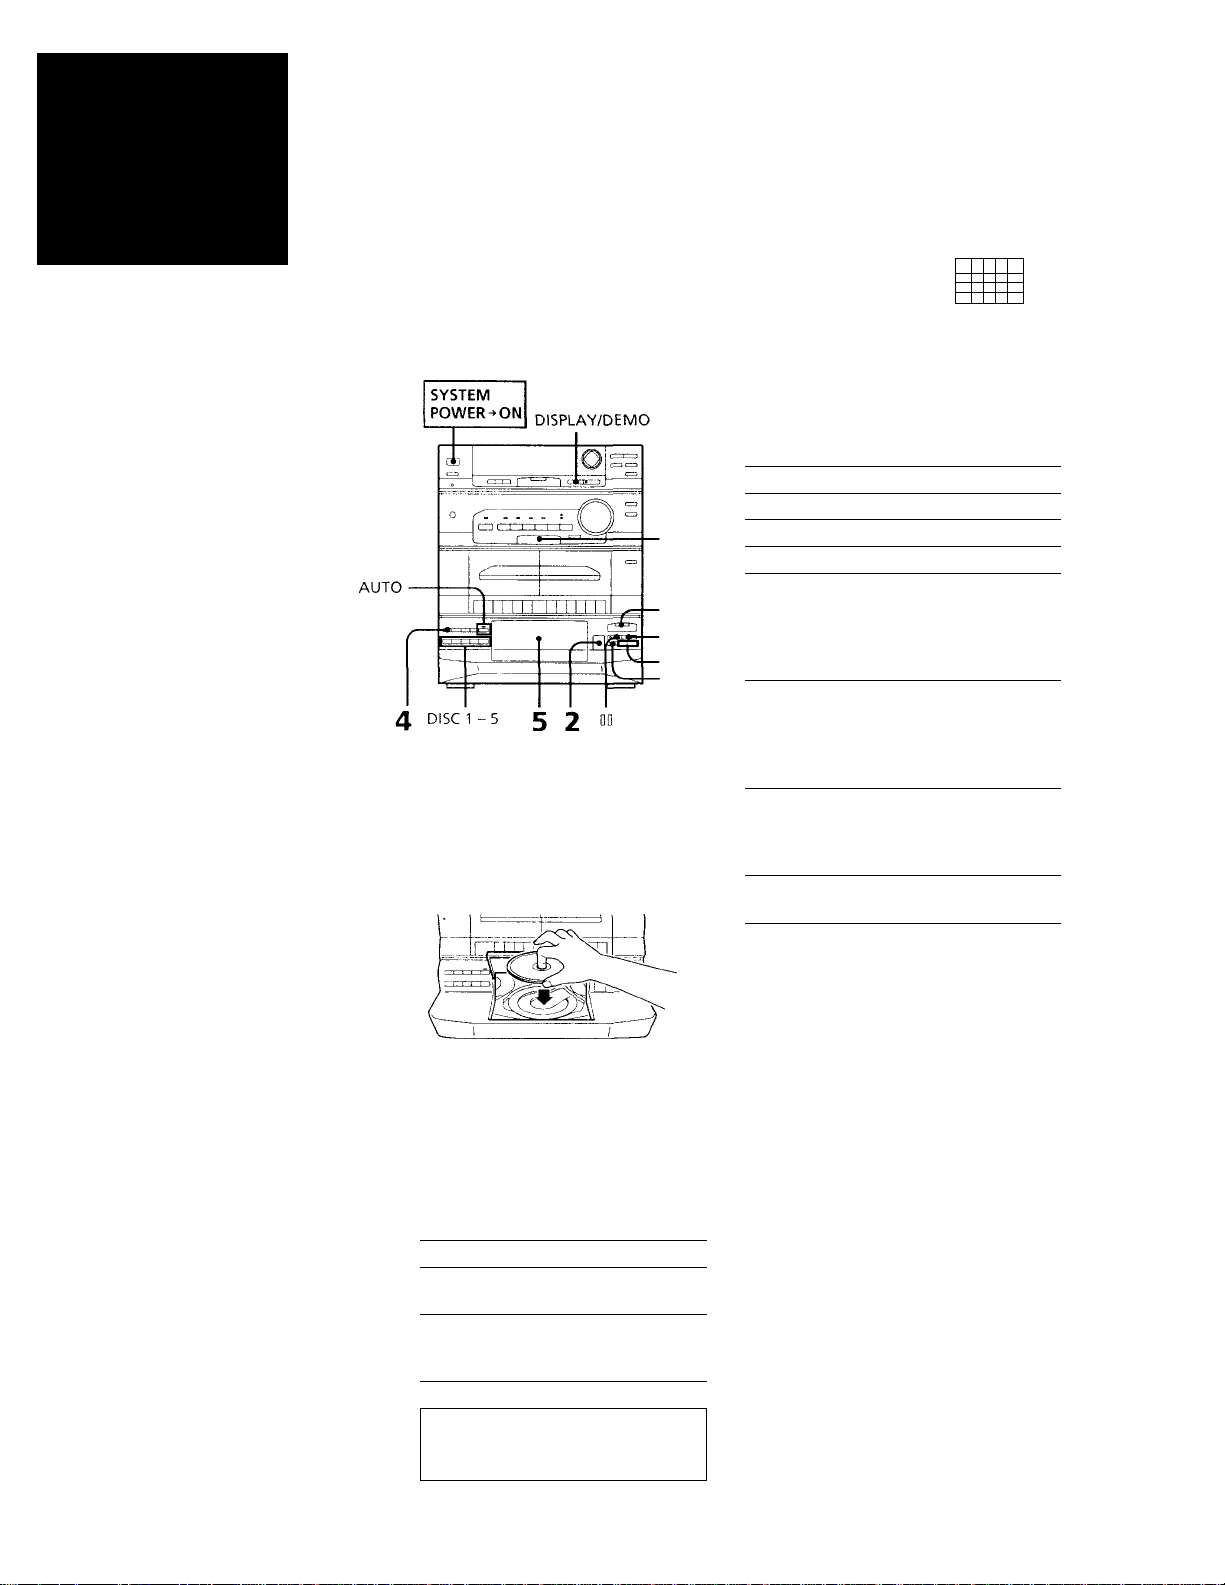
Playing CDs (normal
play)
After vou insert up to five CDs, you can
plav all tracks or discs in the original order
consecutively (normal play). Besides, you
can play them in four modes: normal,
shuffle, program or repeat.
Before you play a CD, decrease the volume
level bv turning the VOLUME control
counterclockwise, to prevent damage to the
speakers.
D Close the front cover.
Play starts automatically from the CD in
the loading position.
The playing position indicator lights
under the disc number which is in the
playing position.
Playing position
indicator Disc calendar Music calendar
i?'
1
5
0 H
1(1
•? •4 is
ry 4U
Disc number Track number Playing time
When AUTO indicator is not lit
Press CD O (or CD !> on the remote) to
play a CD.
1 Press PU\C'TIO\ repeatediv until
"CD” appears in the display.
t.'D is selected.
2 Press ^ OPEN and place a CD (label
side facing up) on the disc tray in the
loading position.
3 Press DISC SKIP to place up to tour
more CDs on the disc tray.
The disc tray rotates so you can insert
other CDs.
4 Press CONTINUE on the unit to choose
whether to play "1 DISC" or "ALL
DISCS".
Choose
To play
1 DISC Only the CD you
have selected.
ALL DISCS
All CDs conseciitiveK'
in order. Hmptv disc
travs are skipped.
^
o i 2 ; ;
sU-iV'’’. i :
L If f " L LI
fia'
I>
□
IKM/tXXl
3
To
Press
Stop play
□ (□»')
Pause
00 ( DD * d
Resume play
Oor
D O (C D * '
or OD*')
Co forward to
another track
During play or pause,
press AMS*’ tX»
(tSO *'). Release w'hen
you reach the track
vou desire.
Go back to a
pre\'ioiis track
During plav or pause,
press AMS"^- KK
(eSLi IC'lease when
vou reach the track
\'ou desire.
Select a particular
CD
The corresponding
DISC 1 “ 3 button*' or
press DISC SKIP
repeatediv
Remove or
exchange a CD
^ OPEN*"
Remote
Auto Music Sensor
* ' If there is no disc at that number, the
disc trav rotates and plavs the next CD.
If there is no disc at that number with
the front cover opened, the disc trav
rotates to the loading position.
The disc tray rotates and brings the CD
in the playing position to the loading
position when AUTO is selected (the
AUTO indicator is lit).
To remove or exchange the CD in the
loading position while playing
Press = OPEN and remove or exchange the
CD in the loading position.
Note
.After exchange the CD in the loading
position while playing, the CD in the
loading position vou exchanged is the next
CD to he played when AUTO is selected.
You can play a CD with little blank
between tracks (non-stop play)
Press and hold down CD O on the CD
player.
Chapter 2: the CD Player
7
Loading...