


PROFESSIONAL DISHWASHER
CONTENTS |
|
||
1 |
PRECAUTIONS FOR SAFETY AND USE ........................................................................... |
3 |
|
2 |
TECHNICAL DATA ......................................................................................................... |
4 |
|
3 |
INSTALLATION AND POSITIONING................................................................................ |
5 |
|
4 |
INSTRUCTIONS FOR TECHNICAL STAFF......................................................................... |
7 |
|
|
4.1 |
Plumbing hookup................................................................................................... |
7 |
|
4.2 |
Electrical connection.............................................................................................. |
8 |
5 |
FIRST START-UP............................................................................................................ |
9 |
|
6 |
SET-UP ....................................................................................................................... |
10 |
|
|
6.1 |
Dishwasher parameter modification procedure: ................................................. |
10 |
|
6.2 |
Quit “ SET-UP “ menu........................................................................................ |
13 |
|
6.3 |
Rinsing temperature setup .................................................................................. |
13 |
|
6.4 |
Washing temperature setup ................................................................................ |
13 |
|
6.5 |
Rinse aid dispensing setup................................................................................... |
13 |
|
6.6 |
Adjusting detergent dispensing (optional if installed).......................................... |
14 |
|
6.7 |
Autostart function ............................................................................................... |
14 |
|
6.8 |
Regeneration frequency setup (models with softener)........................................ |
15 |
|
6.9 |
tStP (minimum rinsing temperature) function ..................................................... |
15 |
|
6.10 Rinse aid pump (display and if required reset during maintenance) ................. |
16 |
|
|
6.11 Detergent pump (display and if required reset during maintenance) ............... |
16 |
|
|
6.12 Energy consumption – Display and reset if required......................................... |
16 |
|
|
6.13 Customisation of duration of program P4......................................................... |
16 |
|
|
6.14 Steam extraction time setting (optional if installed) ......................................... |
17 |
|
|
6.15 Service setting (for After-Sales Service only)..................................................... |
17 |
|
|
6.16 Starting the peristaltic pumps – rapid filling of detergent and rinse aid delivery |
||
|
circuit. 17 |
|
|
7 |
MALFUNCTIONS SHOWN ON THE DISPLAY (FOR THE TECHNICIAN)........................... |
18 |
|
8 |
INSTRUCTIONS FOR THE USER ................................................................................... |
20 |
|

8.1 |
|
Control panel ....................................................................................................... |
20 |
8.2 |
|
Before washing .................................................................................................... |
21 |
8.3 |
First use each day (tank and boiler empty) .......................................................... |
21 |
|
8.4 |
|
Changing the Program ......................................................................................... |
23 |
9 CHOOSING THE PROGRAM ........................................................................................ |
24 |
||
10 |
SUPPLEMENTARY FUNCTIONS ................................................................................ |
24 |
|
10.1 |
Selecting the crys “glassware” function (available in P1-P2) ............................. |
24 |
|
10.2 |
Selecting the “extra rinse” function (available in P1-P2-P3-P4)......................... |
25 |
|
11 |
MAINTENANCE AND CLEANING .............................................................................. |
26 |
|
11.1 |
Daily cleaning.................................................................................................... |
26 |
|
11.2 |
Routine inspection of the spray arms ............................................................... |
27 |
|
11.3 |
Lengthy periods out of use ............................................................................... |
28 |
|
12 |
TROUBLESHOOTING................................................................................................ |
28 |
|
13 |
MALFUNCTIONS SHOWN ON THE DISPLAY (FOR THE USER) ................................... |
30 |
|
SMEG Thanks you for choosing one of its products.
Read all the instructions in this manual carefully to become familiar with the right conditions for the proper use of your dishwasher.
TECHNICAL INSTRUCTIONS
These are intended for the qualified staff who are to install, commission and test the appliance and carry out any servicing and repairs.
INSTRUCTIONS FOR THE USER
These provide recommendations for use, a description of the controls and the correct procedures for cleaning and maintaining the dishwasher.
2
1 PRECAUTIONS FOR SAFETY AND USE
THIS MANUAL IS AN INTEGRAL PART OF THE DISHWASHER AND MUST ALWAYS BE
KEPT INTACT TOGETHER WITH THE APPLIANCE.
POSITIONING, HOOKUP, COMMISSIONING, TROUBLESHOOTING AND REPLACING THE POWER CABLE MUST ALWAYS BE CARRIED OUT BY QUALIFIED STAFF.
THE APPLIANCE MUST BE GROUNDED AS REQUIRED BY ELECTRICAL EQUIPMENT
SAFETY STANDARDS.
THE DISHWASHER IS INTENDED FOR PROFESSIONAL USE ONLY AND MUST ONLY BE USED BY AUTHORISED STAFF. IT IS DESIGNED TO WASH TABLEWARE (PLATES, CUPS, BOWLS, OVEN DISHES AND CUTLERY) AND SIMILAR ITEMS IN THE RESTAURANT AND INSTITUTIONAL CATERING SECTOR, AND COMPLIES WITH THE INTERNATIONAL STANDARDS ON ELECTRICAL AND MECHANICAL SAFETY (CEI-EN-IEC 60335-2-58/61770) AND ELECTROMAGNETIC COMPATIBILITY
(CEI-IEC-EN 55014-1/-2, 61000-3;4, 50366).
THE MANUFACTURER DECLINES ALL RESPONSIBILITY FOR INJURY OR DAMAGE CAUSED BY FAILURE TO COMPLY WITH THE INSTRUCTIONS IN THE MANUAL, BY INCORRECT USE, BY TAMPERING WITH EVEN JUST ONE PART OF THE APPLIANCE AND BY THE USE OF NON-ORIGINAL SPARE PARTS .
THIS APPLIANCE IS TAGGED UNDER EUROPEAN DIRECTIVE 2002/96/EC ON WASTE ELECTRICAL AND ELECTRONIC EQUIPMENT (WEE).
BY MAKING SURE THAT THIS PRODUCT IS DISPOSED OF CORRECTLY THE USER HELPS TO PREVENT POTENTIAL DETRIMENTAL EFFECTS ON HEALTH AND THE ENVIRONMENT. WHEN DECOMMISSIONING
THE APPLIANCE COMPLY WITH THE LOCAL WASTE DISPOSAL |
REGULATIONS.FOR FURTHER |
INFORMATION ON THE TREATMENT, RECOVERY AND RECYCLING OF THIS PRODUCT, CONTACT THE COMPETENT LOCAL OFFICE, THE DOMESTIC WASTE COLLECTION SERVICE, OR THE SHOP WHERE THE PRODUCT WAS PURCHASED.
3
THE SYMBOL OF THE RUBBISH BIN WITH A BAR ACROSS IT ON THE PRODUCT OR IN THE TECHNICAL DOCUMENTATION INDICATES THAT THIS PRODUCT MUST NOT BE TREATED AS ORDINARY DOMESTIC WASTE BUT MUST BE CONSIGNED TO THE SPECIAL COLLECTION POINT FOR THE RECYCLING OF ELECTRICAL AND ELECTRONIC EQUIPMENT.
NEVER PLACE SOLVENTS SUCH AS ALCOHOL OR TURPENTINE, WHICH MIGHT CAUSE AN EXPLOSION, INSIDE THE APPLIANCE. NEVER LOAD DISHES DIRTY WITH ASH, WAX OR PAINTS.
DO NOT DRINK ANY WATER LEFT IN THE DISHES OR DISHWASHER AT THE END OF THE WASHING PROGRAM.
THE APPLIANCE IS NOT SUITABLE FOR USE BY JUVENILES OR PERSONS WITH REDUCED PHYSICAL, SENSORIAL OR MENTAL CAPACITIES, OR THOSE WITHOUT THE NECESSARY KNOWLEDGE AND EXPERIENCE. SUCH PERSONS MAY ONLY USE THE APPLIANCE UNDER THE SUPERVISION OF A PERSON RESPONSIBLE FOR THEIR SAFETY.
|
|
|
2 |
TECHNICAL DATA |
|
|
|
|
|
|
|
|
|
|
|
|
|
|
|||||||||
|
|
|
|
|
|
|
|
|
|
|
|
|
|
|
|
|
|
|
|
|
|
|
|
|
|||
|
|
|
Water intake pressure |
|
|
|
|
|
kPa (bar) |
|
|
|
100-600 (1 ÷ 6) |
|
|
|
|||||||||||
|
|
|
|
|
|
|
|
|
|
|
|
|
|
|
|
|
|
|
|
|
|
|
|
||||
|
|
|
Water intake temperature |
|
|
|
|
|
°C |
|
|
|
15°C – 60°C |
|
|
|
|||||||||||
|
|
|
|
|
|
|
|
|
|
|
|
|
|
|
|
|
|
|
|
|
|
|
|
|
|||
|
|
|
Water intake hardness |
|
|
|
|
|
°f |
|
|
|
|
|
< 15°f |
|
|
|
|||||||||
|
|
|
|
|
|
|
|
|
|
|
|
|
|
|
|
|
|
|
|
|
|
|
|
|
|||
|
|
Rinse cycle water consumption |
|
|
|
|
|
l |
|
|
|
|
3.2 |
|
|
|
|||||||||||
|
|
|
|
|
|
|
|
|
|
|
|
|
|
|
|
|
|
|
|
|
|
|
|
|
|
|
|
|
|
|
|
|
Boiler capacity |
|
|
|
|
|
|
l |
|
|
|
|
8 |
|
|
|
|||||||
|
|
|
|
|
|
|
|
|
|
|
|
|
|
|
|
|
|
|
|
|
|
|
|
|
|
|
|
|
|
|
|
|
|
Tank capacity |
|
|
|
|
|
|
l |
|
|
|
|
22 |
|
|
|
||||||
|
|
|
|
|
|
|
|
|
|
|
|
|
|
|
|
|
|
|
|
||||||||
|
|
Durée cycle standard avec alimentation d’eau à 50°C |
|
|
|
s |
|
|
60/90/150/variable |
|
|
|
|||||||||||||||
|
|
|
|
|
|
|
|
|
|
|
|
|
|
|
|
|
|
|
|
|
|
|
|
|
|
||
|
|
|
Degree of protection |
|
|
|
|
|
IPX |
|
|
|
|
5 |
|
|
|
||||||||||
|
|
|
|
|
|
|
|
|
|
|
|
|
|
|
|
|
|
|
|
|
|
|
|
|
|
|
|
|
|
|
|
|
|
Net weight |
|
|
|
|
|
|
kg |
|
|
|
|
120/149 |
|
|
|
||||||
|
|
|
|
|
|
|
|
|
|
|
|
|
|
|
|
|
|
|
|
|
|
|
|
|
|
|
|
|
|
|
|
|
|
Fuse |
|
|
|
|
|
|
A |
|
|
|
|
4 |
|
|
|
||||||
|
|
|
|
|
|
|
|
|
|
|
|
|
|
|
|
|
|
|
|
|
|
|
|
|
|||
|
|
|
Power supply cable type |
|
|
|
|
|
◄HAR► |
|
|
|
H07RN-F |
|
|
|
|||||||||||
|
|
|
|
|
|
|
|
|
|
|
|
|
|
|
|
|
|
|
|
|
|
|
|
|
|
||
|
|
|
|
|
Supply voltage |
|
|
|
|
|
|
V |
|
|
|
400V 3N ~ |
|
|
|
||||||||
|
|
|
|
|
|
|
|
|
|
|
|
|
|
|
|
|
|
|
|
|
|
|
|
|
|
|
|
|
|
|
|
|
|
Frequency |
|
|
|
|
|
|
Hz |
|
|
|
|
50 |
|
|
|
||||||
|
|
|
|
|
|
|
|
|
|
|
|
|
|
|
|
|
|
|
|
|
|
|
|
|
|
|
|
|
|
|
|
|
|
|
|
|
|
|
|
|
|
|
|
|
|
|
|
|
|
|
|
|
|
||
|
|
|
|
|
|
FUSE |
|
|
TANK |
|
|
|
|
|
|
|
|
TOTAL |
|
|
|
POWER |
|
|
|||
|
|
VOLTAGE |
|
|
|
|
|
|
MOTOR |
|
BOILER |
|
|
CONNECTION |
|
|
|
|
|||||||||
|
|
|
|
PROTECTION |
|
|
HEATING |
|
|
|
|
|
|
CABLE |
|
|
|||||||||||
|
|
|
|
|
|
|
|
|
|
|
|
|
|
|
LOAD |
|
|
|
|
|
|||||||
|
|
|
|
|
|
|
|
|
|
|
|
|
|
|
|
|
|
|
|
|
|
|
|
|
|||
|
|
|
|
|
|
|
|
|
|
|
|
|
|
|
|
|
|
|
|
|
|||||||
|
400V-50Hz/3/N/PE |
|
|
10A |
|
|
1.8kW |
|
1kW |
|
9Kw |
|
|
10kW |
|
|
|
5X4 |
|
|
|||||||
|
|
|
|
|
|
|
|
|
|
|
|
|
|
|
|
||||||||||||
|
230V-50Hz/1/N/PE |
|
|
40A |
|
|
1.8kW |
|
1kW |
|
6kW |
|
|
|
7kW |
|
|
|
3X6 |
|
|
||||||
|
|
|
|
|
|
|
|
|
|
|
|
|
|
|
|
|
|
|
|
|
|
|
|
|
|
|
|
4
3 INSTALLATION AND POSITIONING
INSTALLATION and POSITIONING
Bring the hood dishwasher to the installation site, remove the packaging and check the appliance and components for damage; any damage found must be reported to the transporter in writing.
The packaging components (plastic bags, expanded polystyrene, nails, etc.) must not be left within reach of children and pets since they are potentially dangerous. All packaging materials used are environmentfriendly. They can be kept without constituting any hazard, or may be disposed of at a specialist waste disposal centre. The plastic components suitable for recycling are marked as follows: PE polyethylene: external packaging film, bag containing the instructions, protective bags. PP polypropylene: straps. PS expanded polystyrene: corner guards, top of packaging. Wooden and cardboard components can be disposed of in accordance with the relevant regulations. When the product is decommissioned it must not be dumped in the environment; it must be disposed of in accordance with the relevant regulations. All metal parts are in stainless steel and can be removed. The plastic parts are marked with the symbol identifying the material used and must be disposed of in accordance with the relevant regulations When the product is decommissioned it must not be dumped in the environment; it must be disposed of in accordance with the relevant regulations.
POSITIONING:
Caution: the indoor system and premises in which equipment for institutions is installed must comply with the relevant regulations.
The manufacturer declines all liability for direct or indirect injury or damage deriving from failure to comply with these regulations.
Before installation, check that there are no objects or materials in the vicinity which may be damaged by steam or splashes of washing solution, or that any such items are suitably protected. Place the dishwasher in the chosen point and remove the protective film.
Level the dishwasher (with the aid of a spirit level) on its adjustable feet to ensure that it is stable; all other mounting solutions must be approved by the manufacturer.
5
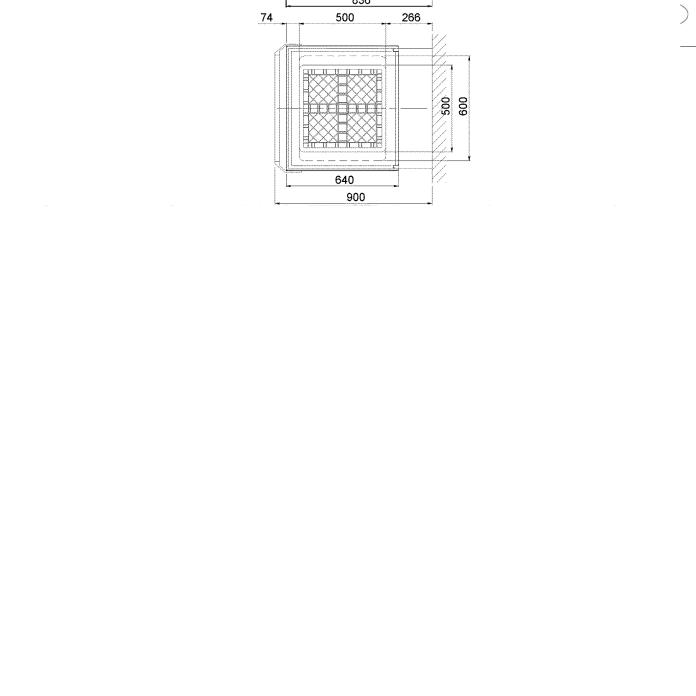
C SOLENOID VALVE
Q EARTH TERMINAL
E ELECTRICITY SUPPLY CABLE P PERISTALTIC HOSES
S DRAIN HOSE
6

4INSTRUCTIONS FOR TECHNICAL STAFF
4.1Plumbing hookup
Water supply and drain connection
The water pipelines and electricity supply cable lead out of the bottom right-hand corner of the appliance. Connect the water intake hose to a connector with ¾” gas threaded fitting, fitting the filter A provided (in models with aquastop, the filter and ring-nut form a single unit).
The connection to the water mains must only be made with new hoses; the use of old or worn hoses is not permitted.
FOR MODELS WITH A WATER SOFTENER
AN ‘APPROVED’ DOUBLE CHECK VALVE OR SOME OTHER NO LESS EFFECTIVE DEVICE PROVIDING BACKFLOW PREVENTION PROTECTION TO AT LEAST FLUID CATEGORY TWO SHALL BE FITTED AT THE POINT OF CONNECTION BETWEEN THE WATER SUPPLY AND THE FITTING OR APPLIANCE.
FOR MODELS WITHOUT A WATER SOFTENER
AN ‘APPROVED’ SINGLE CHECK VALVE OR SOME OTHER NO LESS EFFECTIVE DEVICE PROVIDING BACKFLOW PREVENTION PROTECTION TO AT LEAST FLUID CATEGORY TWO SHALL BE FITTED AT THE POINT OF CONNECTION BETWEEN THE WATER SUPPLY AND THE FITTING OR APPLIANCE.
The dynamic water supply pressure must be between 1 and 6 bar; if it is higher, installation of a pressure reducer is necessary.
It is essential to fit a main stop tap on the water intake deliver pipeline; the tap must be accessible after installation of the appliance, so do not install it behind the dishwasher. The stated cycle duration applies to appliances supplied with hot water >50°C<60°C. If the dishwasher is supplied with cold water, the cycle duration might increase depending on the intake water temperature. The dishwasher is fitted with a drain pump and can operate with drain connections on the floor or wall.
Drainage:
The dishwasher is fitted with a drain pump and can operate with drain connections on the floor or wall.
Caution: make sure that the intake and drain hoses are not bent, constricted or crushed after installation.
Warning! Maximum height of drain hose!
7

 If the appliance is fitted with a water softener, the drain must not be connected to a siphon with valve ! water softener will be out of use
Refer to the connection diagram for the maximum permitted height of wall drains – (see TECHNICAL DATA)
Caution: make sure that the intake and drain hoses are not bent, constricted or crushed after installation.
4.2 Electrical connection
The dishwasher and any additional equipment must be connected to the electrical system by authorised, skilled staff, in accordance with the relevant regulations; also comply with the technical instructions for the connection.
The total rated power is stated on the appliance’s technical data plate.
The electrical protection devices fitted for the dishwasher must serve this appliance only.
The user must have a master switch and a differential safety breaker, with rating suitable for the appliance’s characteristics, installed on the electricity supply line in accordance with the relevant regulations.
These switches must be installed close to the dishwasher, be easily accessible after installation, and provide complete disconnection from the electrical mains in overvoltage class III conditions.
Warning !!!
The dishwasher is always powered up unless the master switch is turned off.
Connect the appliance to the user’s earth system. The  terminal for the connection is in the bottom right-hand corner of the appliance.
The earth wire (PE) is yellow-green in colour, the neutral wire (N) is blue and the live wires (L1, L2, L3) are black, grey and brown.
In the event of single-phase connection (230V-1N~), the connection to the electrical mains must be made using a cable with plug compliant with the relevant regulations.
THE POWER SUPPLY CABLE, AS PROVIDED, MUST BE REPLACED BY THE MANUFACTURER OR AN AUTHORIZED SERVICE CENTER IN COMPLIANCE WITH THE SPECIFICATIONS PROVIDED ON ELECTRICAL DIAGRAM SUPPLIED IN THE MACHINE IN ORDER TO PREVENT ALL RISKS.
8
5 FIRST START-UP
First start-up
The electrical protection system must undergo a functional test before the appliance is put into operation.
The appliance must be installed and/or inspected by qualified staff, who will start it up for the first time and provide the relevant operating instructions.
Preparing for use (important)
The rinse aid dispenser is fitted on all models, the detergent dispenser only on some.
If both dispensers are present put the external detergent and rinse aid containers in place and insert the respective intake hoses on the rear of the appliance into them.
Red hose: detergent blue hose: rinse aid
note: It takes about 10-15 wash cycles before they arrive in detergent and rinse tank and boiler.
Before inserting the hoses into the containers, fit the weights (needed to ensure that they always draw in liquid from the bottoms of the containers) and the filters onto their ends as shown.
If the detergent dispenser is not factory-fitted, it can be retrofitted after ordering the relative kit.
As an alternative an external dispenser can be fitted, making the electrical connection by means of an H05 RN-F 2x0.5 mm electrical cable, which can be laid along the route shown in the TECHNICAL DATA diagram. The electrical connection must be made in accordance with the electrical system diagram supplied with the dishwasher, disconnecting the internal dispenser, if any, and making the connection to the external unit.
The dispenser must operate on 230V/50 Hz with maximum power absorption of 15 W.
Connect to the detergent dispenser outside the dishwasher using the red hose mentioned above.
As an alternative an external dispenser can be fitted, making the electrical connection by means of an H05 RN-F 2x0.5 mm electrical cable, which can be laid along the route shown in the TECHNICAL DATA diagram and connected as shown in the wiring diagram supplied with the dishwasher.
The dispenser must operate on 230V/50 Hz with maximum power absorption of 15 W.
Connect to the detergent dispenser outside the dishwasher using the red hose mentioned above.
IMPORTANT:
Whenever the type of detergent or rinse aid is changed, it is ABSOLUTELY ESSENTIAL to flush out the peristaltic pumps by placing the external intake pipes in water for a few cycles.
Always use only products specifically recommended for use in a dishwasher.
Failure to comply with this recommendation leads to forfeiture of the warranty entitlement on the appliance’s water system.
The internal pipes of the detergent and rinse aid pumps should be replaced by the After-Sales Service every 12 months or 15,000 wash cycles and operation of the diaphragm rinse aid pump should be checked.
9
 Loading...