


 Loading...
s
Be inspired

Contents
Contents
Safety precautions . . . . . . . . . . . . . . . . . . . . . . . . . . . 4 The Gigaset SE505 dsl/cable . . . . . . . . . . . . . . . . . . . 5
Features and applications . . . . . . . . . . . . . . . . . . . . . . . . . . . . . . . . . . . . . . . . . . . . . |
. . 6 |
Procedure for installation and configuration . . . . . . . . . . . . . . . . . . . . . . . . . . . . . . |
. . 8 |
First Steps . . . . . . . . . . . . . . . . . . . . . . . . . . . . . . . . . |
. 9 |
System requirements . . . . . . . . . . . . . . . . . . . . . . . . . . . . . . . . . . . . . . . . . . . . . . . . . . |
. 9 |
Package contents . . . . . . . . . . . . . . . . . . . . . . . . . . . . . . . . . . . . . . . . . . . . . . . . . . . . . . |
9 |
Operating displays and connections . . . . . . . . . . . . . . . . . . . . . . . . . . . . . . . . . . . . . . |
10 |
Front panel . . . . . . . . . . . . . . . . . . . . . . . . . . . . . . . . . . . . . . . . . . . . . . . . . . . . . . |
10 |
Back panel . . . . . . . . . . . . . . . . . . . . . . . . . . . . . . . . . . . . . . . . . . . . . . . . . . . . . . . |
11 |
Setting up the Gigaset SE505 dsl/cable . . . . . . . . . . . . . . . . . . . . . . . . . . . . . . . . . . . . |
13 |
Installing the Gigaset SE505 dsl/cable . . . . . . . . . . . . . . . . . . . . . . . . . . . . . . . . . . . . |
13 |
Connecting a DSL or cable modem to the router . . . . . . . . . . . . . . . . . . . . . . . . . |
14 |
Creating a LAN connection . . . . . . . . . . . . . . . . . . . . . . . . . . . . . . . . . . . . . . . . . . |
15 |
Activating . . . . . . . . . . . . . . . . . . . . . . . . . . . . . . . . . . . . . . . . . . . . . . . . . . . . . . . . |
17 |
Configuring the local network . . . . . . . . . . . . . . . |
18 |
Network configuration for Windows 98, 98 SE, ME . . . . . . . . . . . . . . . . . . . . . . . . . . 19 Setting up a PC as a Client for Microsoft Networks . . . . . . . . . . . . . . . . . . . . . . . . 19 Selecting a computer name and workgroup . . . . . . . . . . . . . . . . . . . . . . . . . . . . . 20 Installing the TCP/IP protocol. . . . . . . . . . . . . . . . . . . . . . . . . . . . . . . . . . . . . . . . . 21 TCP/IP protocol settings . . . . . . . . . . . . . . . . . . . . . . . . . . . . . . . . . . . . . . . . . . . . . 22 Deactivating the http proxy . . . . . . . . . . . . . . . . . . . . . . . . . . . . . . . . . . . . . . . . . . 26 Synchronising the TCP/IP settings with the Gigaset SE505 dsl/cable . . . . . . . . . . 27
Network configuration with Windows XP . . . . . . . . . . . . . . . . . . . . . . . . . . . . . . . . . . 28 Configuring the network . . . . . . . . . . . . . . . . . . . . . . . . . . . . . . . . . . . . . . . . . . . . 28 Selecting a computer name and workgroup . . . . . . . . . . . . . . . . . . . . . . . . . . . . . 30 Checking the network settings and completing the installation procedure . . . . . 30 TCP/IP protocol settings . . . . . . . . . . . . . . . . . . . . . . . . . . . . . . . . . . . . . . . . . . . . . 31 Deactivating the http proxy . . . . . . . . . . . . . . . . . . . . . . . . . . . . . . . . . . . . . . . . . . 34 Synchronising the TCP/IP settings with the Gigaset SE505 dsl/cable . . . . . . . . . . 35
Network configuration with Windows 2000 . . . . . . . . . . . . . . . . . . . . . . . . . . . . . . . . 36 Installing network services . . . . . . . . . . . . . . . . . . . . . . . . . . . . . . . . . . . . . . . . . . 36 Selecting a computer name and workgroup . . . . . . . . . . . . . . . . . . . . . . . . . . . . . 37 Installing the TCP/IP protocol. . . . . . . . . . . . . . . . . . . . . . . . . . . . . . . . . . . . . . . . . 38 TCP/IP protocol settings . . . . . . . . . . . . . . . . . . . . . . . . . . . . . . . . . . . . . . . . . . . . . 40 Deactivating the http proxy . . . . . . . . . . . . . . . . . . . . . . . . . . . . . . . . . . . . . . . . . . 42 Synchronising the TCP/IP settings with the Gigaset SE505 dsl/cable . . . . . . . . . . 43
Checking the connection to the Gigaset SE505 dsl/cable . . . . . . . . . . . . . . . . . . . . . . 44
1

Contents
The user interface . . . . . . . . . . . . . . . . . . . . . . . . . . 45
Launching the user interface . . . . . . . . . . . . . . . . . . . . . . . . . . . . . . . . . . . . . . . . . . . . 45 Selecting the language . . . . . . . . . . . . . . . . . . . . . . . . . . . . . . . . . . . . . . . . . . . . . . . . 46 The start page . . . . . . . . . . . . . . . . . . . . . . . . . . . . . . . . . . . . . . . . . . . . . . . . . . . . . . . 48 UI elements . . . . . . . . . . . . . . . . . . . . . . . . . . . . . . . . . . . . . . . . . . . . . . . . . . . . . . . . . 50
General configuration with Basic Setup . . . . . . . . 52
Select Country . . . . . . . . . . . . . . . . . . . . . . . . . . . . . . . . . . . . . . . . . . . . . . . . . . . . . . . 52 Configuring Internet access . . . . . . . . . . . . . . . . . . . . . . . . . . . . . . . . . . . . . . . . . . . . . 53 Internet Service Providers T-Online and 1&1 . . . . . . . . . . . . . . . . . . . . . . . . . . . . . 53 Other Internet Service Providers . . . . . . . . . . . . . . . . . . . . . . . . . . . . . . . . . . . . . . 56 Testing the WAN connection and completing the configuration . . . . . . . . . . . . . . . . 61
Configuring security measures . . . . . . . . . . . . . . . 63
Assign password . . . . . . . . . . . . . . . . . . . . . . . . . . . . . . . . . . . . . . . . . . . . . . . . . . . . . . 63 Setting the SSID and making it invisible . . . . . . . . . . . . . . . . . . . . . . . . . . . . . . . . . . . 65 Setting the Encryption . . . . . . . . . . . . . . . . . . . . . . . . . . . . . . . . . . . . . . . . . . . . . . . . . 67 Allowing selected PC's access your local network . . . . . . . . . . . . . . . . . . . . . . . . . . . . 68 Saving the router configuration and completing the setup . . . . . . . . . . . . . . . . . . . . 69
Configuration with Advanced Setup . . . . . . . . . . . 70
Configuring wireless connections . . . . . . . . . . . . . . . . . . . . . . . . . . . . . . . . . . . . . . . . |
71 |
Basic Settings . . . . . . . . . . . . . . . . . . . . . . . . . . . . . . . . . . . . . . . . . . . . . . . . . . . . . |
71 |
Setting the Encryption . . . . . . . . . . . . . . . . . . . . . . . . . . . . . . . . . . . . . . . . . . . . . . |
74 |
Access control to local network . . . . . . . . . . . . . . . . . . . . . . . . . . . . . . . . . . . . . . . |
75 |
LAN Configuration . . . . . . . . . . . . . . . . . . . . . . . . . . . . . . . . . . . . . . . . . . . . . . . . . . . . |
76 |
Defining the router's private IP address . . . . . . . . . . . . . . . . . . . . . . . . . . . . . . . . . |
76 |
Using the universal plug and play function . . . . . . . . . . . . . . . . . . . . . . . . . . . . . . |
77 |
Configuring the DHCP server . . . . . . . . . . . . . . . . . . . . . . . . . . . . . . . . . . . . . . . . . |
78 |
WAN Configuration . . . . . . . . . . . . . . . . . . . . . . . . . . . . . . . . . . . . . . . . . . . . . . . . . . . |
80 |
Filtering Internet access . . . . . . . . . . . . . . . . . . . . . . . . . . . . . . . . . . . . . . . . . . . . . . . . |
84 |
Preventing ping attacks from the Internet . . . . . . . . . . . . . . . . . . . . . . . . . . . . . . . |
84 |
Restricting access of local PC's to the Internet . . . . . . . . . . . . . . . . . . . . . . . . . . . . |
84 |
Restricting access to certain Internet domains and sites . . . . . . . . . . . . . . . . . . . . |
85 |
Setting up the router as a virtual server . . . . . . . . . . . . . . . . . . . . . . . . . . . . . . . . . . . |
86 |
Opening the firewall for selected PC's (DMZ) . . . . . . . . . . . . . . . . . . . . . . . . . . . . |
87 |
Port Forwarding . . . . . . . . . . . . . . . . . . . . . . . . . . . . . . . . . . . . . . . . . . . . . . . . . . . |
88 |
Activating dynamic DNS . . . . . . . . . . . . . . . . . . . . . . . . . . . . . . . . . . . . . . . . . . . . . |
89 |
2

Contents |
|
Administration of the Gigaset SE505 dsl/cable . . |
91 |
Manually open or close an Internet connection . . . . . . . . . . . . . . . . . . . . . . . . . . . . |
. 91 |
Setting the time and time zone . . . . . . . . . . . . . . . . . . . . . . . . . . . . . . . . . . . . . . . . . |
. 92 |
Set the time . . . . . . . . . . . . . . . . . . . . . . . . . . . . . . . . . . . . . . . . . . . . . . . . . . . . . |
. 92 |
Setting the Time Zone . . . . . . . . . . . . . . . . . . . . . . . . . . . . . . . . . . . . . . . . . . . . . . |
93 |
Router management . . . . . . . . . . . . . . . . . . . . . . . . . . . . . . . . . . . . . . . . . . . . . . . . . . |
94 |
Assign password . . . . . . . . . . . . . . . . . . . . . . . . . . . . . . . . . . . . . . . . . . . . . . . . . . |
94 |
Setting the Remote Management . . . . . . . . . . . . . . . . . . . . . . . . . . . . . . . . . . . . . |
95 |
Restart the router . . . . . . . . . . . . . . . . . . . . . . . . . . . . . . . . . . . . . . . . . . . . . . . . . |
95 |
Firmware Upgrade . . . . . . . . . . . . . . . . . . . . . . . . . . . . . . . . . . . . . . . . . . . . . . . . . . . . |
96 |
Saving and restoring a configuration . . . . . . . . . . . . . . . . . . . . . . . . . . . . . . . . . . . . . |
98 |
Displaying the router's Status . . . . . . . . . . . . . . . . . . . . . . . . . . . . . . . . . . . . . . . . . . . |
99 |
Overview . . . . . . . . . . . . . . . . . . . . . . . . . . . . . . . . . . . . . . . . . . . . . . . . . . . . . . . |
100 |
Wireless . . . . . . . . . . . . . . . . . . . . . . . . . . . . . . . . . . . . . . . . . . . . . . . . . . . . . . . . |
101 |
PC's in the Local Network . . . . . . . . . . . . . . . . . . . . . . . . . . . . . . . . . . . . . . . . . . |
102 |
Internet . . . . . . . . . . . . . . . . . . . . . . . . . . . . . . . . . . . . . . . . . . . . . . . . . . . . . . . . |
103 |
Log File . . . . . . . . . . . . . . . . . . . . . . . . . . . . . . . . . . . . . . . . . . . . . . . . . . . . . . . . . |
104 |
Appendix . . . . . . . . . . . . . . . . . . . . . . . . . . . . . . . . 105
Fault tracing . . . . . . . . . . . . . . . . . . . . . . . . . . . . . . . . . . . . . . . . . . . . . . . . . . . . . . . . 105 Restoring the Router's factory settings . . . . . . . . . . . . . . . . . . . . . . . . . . . . . . . . . . . 108 Specifications . . . . . . . . . . . . . . . . . . . . . . . . . . . . . . . . . . . . . . . . . . . . . . . . . . . . . . 109 Service (Customer Care) . . . . . . . . . . . . . . . . . . . . . . . . . . . . . . . . . . . . . . . . . . . . . . 110
Glossary . . . . . . . . . . . . . . . . . . . . . . . . . . . . . . . . . 124 Index . . . . . . . . . . . . . . . . . . . . . . . . . . . . . . . . . . . 134
3

Safety precautions
Safety precautions
Only use the mains adapter (12V 1A) that is supplied with the Gigaset SE505 dsl/ cable. Comply with the connection values and ratings when connecting the device to the mains.
Protect the equipment from moisture.
Never open the device. For electrical safety reasons it may only be opened by authorised service technicians.
The router may affect medical equipment. Take account of the technical conditions in the relevant environment.
Make sure you include these operating instructions when you pass on your Gigaset SE505 dsl/cable to someone else.
Please dispose of the Gigaset SE505 dsl/cable in an environmentally friendly manner.
Trademarks
Microsoft, Windows 98, Windows 98 SE, Windows ME, Windows 2000, Windows XP and Internet Explorer are registered trademarks of the Microsoft Corporation.
Netscape, Netscape Navigator and Netscape Communicator are registered trademarks of the Netscape Communications Corporation.
4
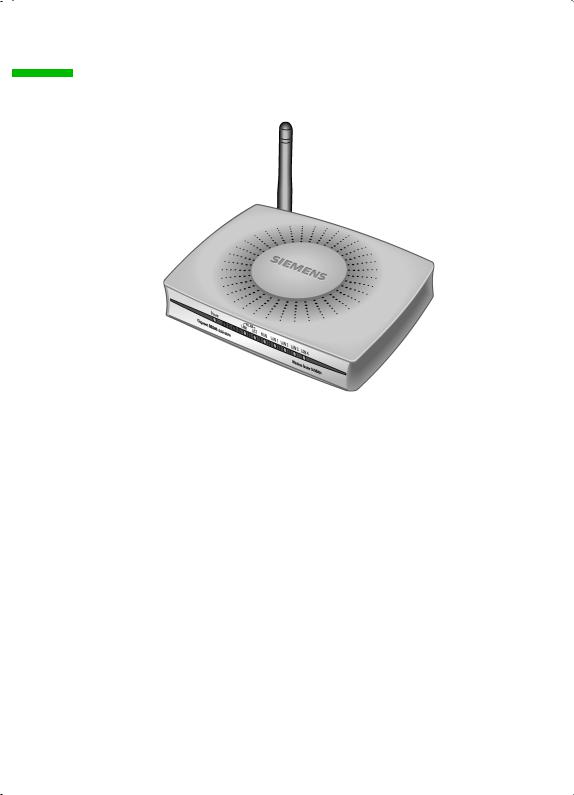
The Gigaset SE505 dsl/cable
The Gigaset SE505 dsl/cable
The Siemens Gigaset SE505 dsl/cable is a powerful but simple communications device for connecting your PC or local network (LAN) to the Internet (WAN).
The Gigaset SE505 dsl/cable permits Internet access for several users. A single user account can be shared, if your Internet Service Provider permits this. If you want to surf the Internet at the lowest possible cost, then the Gigaset SE505 dsl/cable is a convenient and effective solution.
You can connect either a DSL or cable modem to the WAN socket of your Gigaset SE505 dsl/cable.
The Gigaset SE505 dsl/cable is programmed with numerous functions and is simple to handle. It can be configured and operational within a few minutes.
5

The Gigaset SE505 dsl/cable
Features and applications
The Gigaset SE505 dsl/cable's wide range of features make it ideal for a large number of applications, such as:
Setting up a local network
The Gigaset SE505 dsl/cable provides connections
–for four devices via Ethernet ports with a transmission speed of 10 or 100 Mbps.
–for up to 253 mobile terminals via a wireless interface with a transmission speed
of 54 Mbps. Here it complies with Standard IEEE 802.11g – i.e. the router can be used together with products of several other manufacturers.
Using a Gigaset SE505 dsl/cable makes it easy to set up a network at home or in small offices. For example, users can exchange data or share resources on the network, such as a file server or printer.
With the Gigaset devices for wireless networks you can operate a LAN – as envisaged in Standard IEEE 802.11 – in Ad-hoc mode and in Infrastructure mode.
The Gigaset SE505 dsl/cable supports DHCP for dynamic IP configuration of the local network and DNS for Domain name mapping.
Internet access
The Gigaset SE505 dsl/cable permits Internet access via a WAN socket with a transmission speed of 10 or 100 Mbps. You can connect a DSL or cable modem to this socket.
–Since many DSL providers permit communication with end users with the PPPoE protocol, the Gigaset SE505 dsl/cable has an integrated Client for this protocol, so you no longer have to install this service on your computer.
–Shared IP address
If your Internet Service Provider permits this, the Gigaset SE505 dsl/cable can make do with a single IP address for up to 253 users. Several users on your network can then surf the Internet at the same time using only one Internet Service Provider account.
Virtual Private Network (VPN)
The Gigaset SE505 dsl/cable supports three of the most common Protocols for setting up a Virtual Private Network: PPTP, L2TP and IPSec. This allows you to connect devices at different locations via the Internet securely, if your Internet Service Provider offers this service.
6

The Gigaset SE505 dsl/cable
Protection against unauthorised access from the Internet
The Gigaset SE505 dsl/cable offers comprehensive security measures such as:
–Firewall
All the PC's in the local network use the router's Public IP address for their Internet connections, which makes them 'invisible' on the Internet. The router only allows access from the Internet if it has been requested from the local network.
–With its firewall, the Gigaset SE505 dsl/cable also offers comprehensive protection from attack by hackers.
Offering your own services on the Internet
–If you want to offer your own services on the Internet, you can configure the router as a virtual server without permitting further access to the local network.
–DMZ
This allows you to release a PC on your local network for unrestricted access from the Internet without compromising the security of the other PC's.
Restricting Internet access
You can configure the Gigaset SE505 dsl/cable so that Internet access is blocked or limited for various users. You can also use filters to control which PC's are able to use which Internet services, and you can disable access to certain Internet domains and sites.
Important information:
On the CD supplied you will find a document entitled "Practical Tips and i Configuration Examples" which describes many of the uses of the Gigaset
SE505 dsl/cable in full detail together with their configuration settings.
7

The Gigaset SE505 dsl/cable
Procedure for installation and configuration
1.First install an Ethernet network card or a wireless Network adapter such as the Gigaset PCI Card 54 or Gigaset PC Card 54 in the PC's you want to connect with the Gigaset SE505 dsl/cable. The installation procedure can be found in the product's User Guide.
i |
When installing wireless network adapters you should note the |
following: |
|
|
The default SSID of the Gigaset SE505 dsl/cable is ConnectionPoint. |
|
|
2.Now install the router (refer to the section entitled "Installing the Gigaset SE505 dsl/ cable" on page 13).
3.Before the PC's can communicate with the router and with each other in a local network, you have to change their network settings. Configure these network settings on one PC first so that it can establish a connection to the router. You can then use that PC to configure the router. To find out how to do this, refer to "Configuring the local network" on page 18.
4.In a wireless connection you establish the link from the PC's wireless network adapter to the router. This is described in the network adapter's operating instructions.
5.Now configure the router to activate the router's Internet access (refer to the section "General configuration with Basic Setup" on page 52).
This will require the access data from your Internet Service Provider.
6.If you want to connect more PC's to the router, configure their network settings to set up the local network (refer to the section entitled "Configuring the local network" on page 18).
7.If you wish to use the router's other functions, e.g. the comprehensive security features, use the router's Security Setup (see page 63) or Advanced Setup (see page 70).
8

First Steps
First Steps
System requirements
To operate your Gigaset SE505 dsl/cable you need
a PC with
–a Gigaset PCI Card 54, a Gigaset PC Card 54 or other 802.11g-compatible wireless Network adapter
You can also use an 802.11b-compatible network adapter such as the Gigaset PC Card 11 or Gigaset USB Adapter 11. However you
i will not be able to use the full transmission speed of the Gigaset SE505 dsl/cable of 54 Mbps. The 802.11b-compatible products have a maximum transmission speed of 11 Mbps.
or
– an Ethernet network card
a Web browser, such as Microsoft Internet Explorer 5.0 or higher, Netscape Navigator 6.2 or higher for configuring your router
for Internet access: a DSL or cable modem and the access data of your Internet Service Provider.
Package contents
The package contains the following items:
the Gigaset SE505 dsl/cable
a mains adapter (12V 1A)
an Ethernet cable (CAT-5)
the Installation CD including these operating instructions and the document "Practical Tips and Configuration Examples"
a quick installation guide
9
First Steps
Operating displays and connections
Front panel
LED displays
The front panel of the Gigaset SE505 dsl/cable contains LED displays that show the operating state and simplify installation and fault finding in the network.
The LED's show the following:
LED |
State |
Status |
|
|
|
|
|
Power |
On |
The Gigaset SE505 dsl/cable is on. |
|
|
|
||
Off |
The Gigaset SE505 dsl/cable is off. |
||
|
|||
|
|
|
|
|
On |
There is an Internet connection. |
|
|
|
|
|
|
Off |
There is no Internet connection. |
|
|
|
|
|
WWW |
|
The WWW LED indicates the correct status when the |
|
! |
connection is opened or closed directly by the router. This |
||
|
|||
|
happens when the DSL connection is configured with the |
||
|
|
PPPoE or PPTP protocol in the Gigaset SE505 dsl/cable. |
|
|
|
|
|
|
Flashing |
The Gigaset SE505 dsl/cable is sending or receiving data on its |
|
WLAN |
|
wireless interface. |
|
|
Off |
The wireless interface is not active. |
|
|
|
|
10

|
|
First Steps |
|
|
|
|
|
LED |
State |
Status |
|
|
|
|
|
|
On |
A DSL or cable modem is connected. |
|
|
|
|
|
WAN |
Flashing |
The WAN port is sending or receiving data (traffic). |
|
|
|
|
|
Off |
There is no modem connected, or the Gigaset SE505 dsl/cable |
|
|
|
|
||
|
|
is off. |
|
|
|
|
|
|
On |
A device is connected to the relevant LAN port. |
|
LAN1 - |
|
|
|
Flashing |
The LAN port is sending or receiving data (traffic). |
|
|
LAN4 |
|
|
|
Aus |
There is no device connected, or the Gigaset SE505 dsl/cable |
|
|
|
|
is off. |
|
|
|
|
|
Back panel
11

First Steps
The back panel of the Gigaset SE505 dsl/cable houses the various sockets.
Element |
Description |
|
|
12V AC |
Socket for the mains adapter supplied. |
|
Warning: Using the wrong power supply unit may damage the router. |
|
|
Reset |
Reset function. Use this button to |
|
boot the router. |
|
To do this hold the button down for one second. |
|
reset all settings to the factory default settings (see page 108). |
|
Warning: This will clear all the configuration settings you have |
|
made. |
|
Updated firmware will not be affected. |
|
|
WAN |
WAN socket (RJ-45) for a DSL or cable modem. |
|
|
LAN1 - LAN4 |
Four 10/100 Mbps switch sockets with automatic recognition (RJ-45). |
|
You can connect up to four Ethernet devices (such as PCs, a Hub or |
|
Switch). |
|
|
12

First Steps
Setting up the Gigaset SE505 dsl/cable
The Gigaset SE505 dsl/cable can be set up in any suitable location in the home or office. You do not need any special wiring. However you should comply with the following guidelines:
Operate the Gigaset SE505 dsl/cable only indoors within a temperature range of +5 to +40 °C. Do not position the Gigaset SE505 dsl/cable near a heat source. Do not cover the ventilation slots. High temperatures will reduce the transmitter range.
A mains socket for 220/230V~ and a connection socket for the DSL modem, cable modem or LAN must be available where you set up the Gigaset SE505 dsl/cable.
Do not site the router in the immediate vicinity of stereo equipment, TV sets or microwave ovens as this may cause interference.
Position the Gigaset SE505 dsl/cable so that it is as near to the centre of your wireless network as possible. The general rule is: The higher you place the antenna, the better the performance. Make sure that where you position the Gigaset SE505 dsl/ cable has optimum reception throughout the house or office.
Position the Gigaset SE505 dsl/cable on a non-slip surface.
The router feet do not normally leave any traces on the surface they are on. However, some furniture surfaces may contain substances that attack and soften the router's plastic feet. Then the feet may well mark the furniture surface.
Position the Gigaset SE505 dsl/cable so that it cannot fall down and damage the antenna.
Lay the cables so that nobody can trip over them. You should not cover the cables with anything.
Protect the Gigaset SE505 dsl/cable from moisture.
Installing the Gigaset SE505 dsl/cable
Only use the router with the mains adapter (12V 1A) that is supplied.
Do not plug any phone jack connectors into the router WAN and LAN
!sockets.
Use standard network cables for all connections (CAT-5) for the WAN and LAN connections.
An Ethernet cable must not be longer than 100 metres.
Before you start connecting PC's to your Gigaset SE505 dsl/cable make sure that
a wired or wireless Network adapter is connected to the PC. Please read the operating instructions that came with the adapter. The latest PC's and Notebooks have wired adapters built in at the factory.
ConnectionPoint has been entered as SSID on the network adapter.
13
First Steps
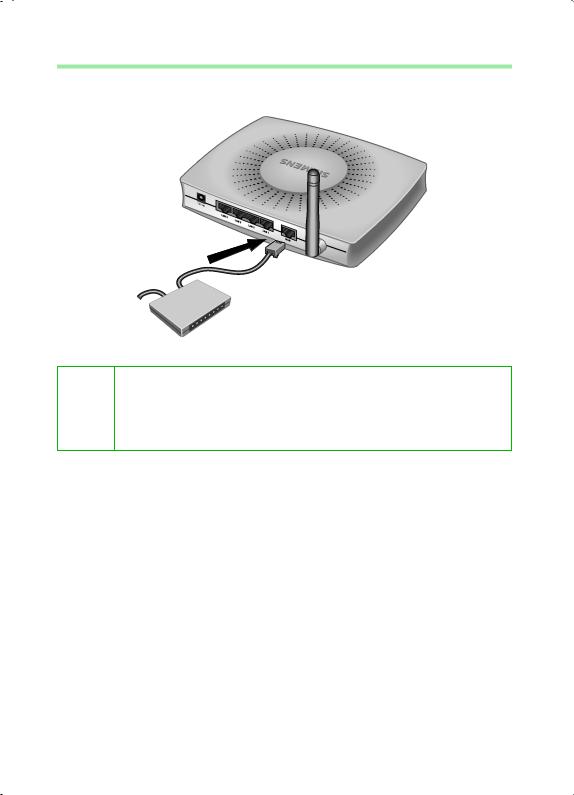
Connecting a DSL or cable modem to the router
Connect the socket on the back of the router marked WAN and your DSL or cable modem with an Ethernet cable.
Gigaset SE505 dsl/cable
DSL or cable modem
Use a 100-Ohm shielded or unshielded 3, 4 or 5 category Ethernet cable with RJ-45 jacks on both ends for all connections.
i Please bear in mind that the cable you use must be the right one for the modem (either straight or crossed wiring). Please consult your modem operating instructions. The Ethernet cable supplied has straight wiring.
14
First Steps
Creating a LAN connection
You can connect PC's to your router in wireless or wired mode and so set up a local area network (LAN).
Wireless
A wireless connection is established by a wireless network adapter installed in your PC. This can be a Gigaset PCI Card 54, Gigaset PC Card 54 or other 802.11g or 802.11b compatible wireless network adapter.
You define a Wireless network by assigning all the devices an identical SSID. Assign the router's SSID to the network adapters. The factory setting for the router's SSID is
ConnectionPoint.
If the correct SSID has been entered in your PC's wireless network adapter, the wireless link will be established automatically once you connect your router to the mains power supply (see page 17).
PC with Gigaset PCI
Card 54 Notebook with Gigaset PC Card 54
15

First Steps
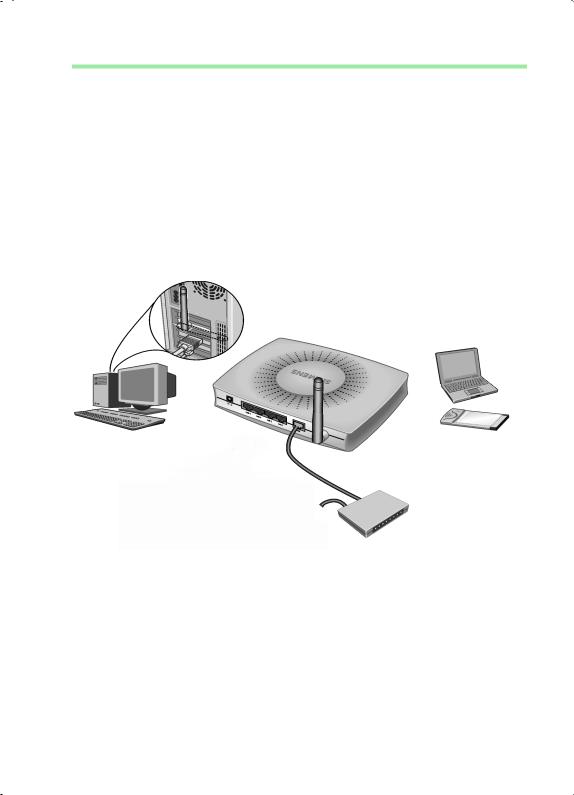
Wired
Insert one end of the supplied Ethernet cable in one of the LAN sockets (LAN1 - LAN4) on the back of the router and the other end in the PC's Ethernet network card. The four LAN sockets can automatically set the transmission speed to 10 Mbps Ethernet or 100 Mbps Fast Ethernet and the transmissions mode to Half duplex or Full duplex depending on the performance of the network adapter in your PC.
PC with
Ethernet card Notebook
with Ethernet card
16
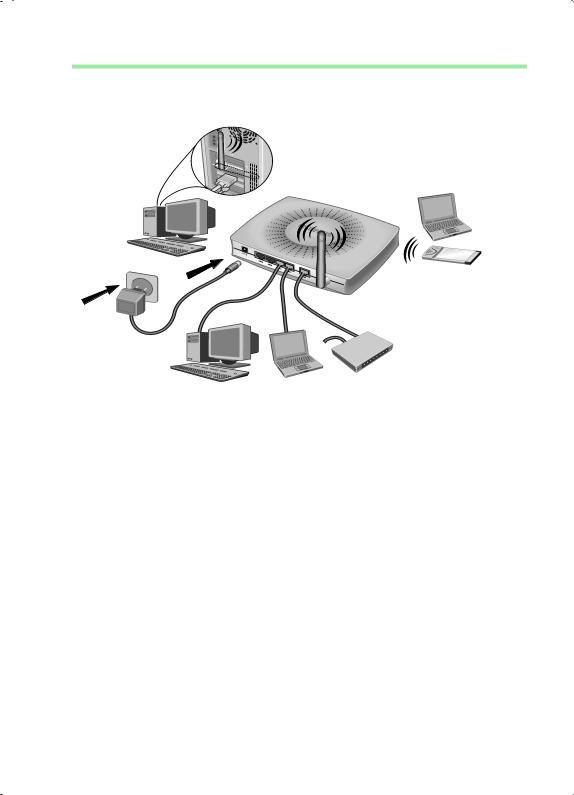
First Steps
Activating
Connect the mains adapter cable to the 12V 1A socket on the router. Plug the mains adapter into a mains socket.
This activates the Gigaset SE505 dsl/cable. The power LED on the front lights up and the WAN LED flashes, indicating that a modem is connected.
Flashing LAN LED's indicate when a device is connected to the corresponding LAN connection.
The WLAN/ACT LED lights up, indicating that the wireless interface of the Gigaset SE505 dsl/cable has been activated.
The wireless link to the PC's connected via a wireless network adapter will be established automatically if their network adapters have been configured with the same SSID as the router (see page 15). It can take a few seconds for the wireless connection to be established. The WLAN/LINK LED flashes to indicate when devices are connected with the wireless interface.
If this is not the case, please turn to "Fault tracing" on page 105.
17

Configuring the local network
Configuring the local network
Once you have set up the hardware and connected all the devices, you have to configure the network settings of all the PC's that will communicate with each other via the Gigaset SE505 dsl/cable.
The LAN is set up as a TCP/IP network. You will have to make certain choices during the configuration procedure. The most important decision is whether you want to use the router's DHCP service or not. The router uses DHCP (Dynamic Host Configuration Protocol) to assign Dynamic IP addresses for the network components, i.e. it automatically assigns a PC that logs in an IP address from a defined address block. The next time the PC logs on it may well be assigned a different IP address. How to configure the router's dynamic address assignment is described on page 76 of the section "LAN Configuration".
In this chapter we assume that you will use the router's DHCP service. This is also the router's default setting.
In many cases however it is advisable to assign Static (fixed) IP addresses, e.g. if you wish to run a wireless network in Ad-hoc mode. How to assign fixed IP addresses is described in "Practical Tips and Configuration Examples" on the CD supplied.
If your network has already been set up you can read on from page 45 in the chapter "The user interface".
The network configuration varies depending on the Windows operating system you are using. You will find the procedure described below for Windows 98 from page 19, for Windows XP from page 28 and for Windows 2000 from page 36.
Have your Windows Installation CD to hand. You may be prompted to insert it.
The Windows user interfaces depicted in this guide may differ from those i on your screen because of the settings you have made. The illustrations
always reflect the state after immediate installation.
18
Configuring the local network
Network configuration for Windows 98, 98 SE, ME
To integrate a PC with Windows 98, 98 SE or ME in a local network, you must carry out the following steps:
1.Set up the PC as the Client for Microsoft Networks (see below).
2.Select computer names and workgroup (see page 20).
3.Install the TCP/IP protocol (see page 21).
4.Make TCP/IP protocol settings (see page 22).
5.Deactivate the http proxy (see page 26).
6.Synchronise the TCP/IP settings to the Gigaset SE505 dsl/cable (see page 27).
Setting up a PC as a Client for Microsoft Networks
Before the PC's on your network can work together, you have to configure them as Microsoft Network Clients. This is done as follows:
Click on Start – Settings – Control Panel.
Double click on the Network icon and open the Configuration tab in the Network window.
Check whether the list of components contains the entry Client for Microsoft Networks.
If it is not there click on Add.
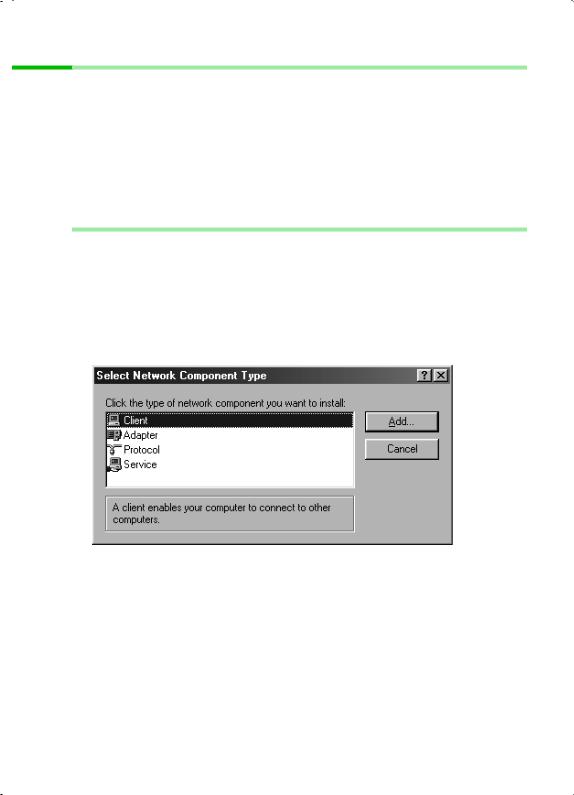
Select Client as the network component type and click on Add.
19
Configuring the local network
Select in Manufacturers the entry Microsoft and in Network clients the entry Client for Microsoft Networks.
Confirm this with OK.
Selecting a computer name and workgroup
You now have to specify a name for the PC and assign it to a workgroup.
In the Network window move from the Configuration tab to the Identification tab.
In the Computer Name box, enter the name the PC is to appear under in the network. This name must be unique within the network.
In the Workgroup box, type a name for the workgroup. This name must be the same for all the PC's in the network.
The Description box can be left empty.
20
Configuring the local network
Installing the TCP/IP protocol.
The TCP/IP protocol ensures that the PC's in the network can communicate with each other. You must first install this Protocol for the network adapter that establishes the connection to the Gigaset SE505 dsl/cable.
In the Network window move from the Identification tab to the Configuration tab.
In the Network window, check that there is a TCP/IP -> entry for your network card or network adapter in the list of components. If you are using a Gigaset PCI Card 54 as the wireless network adapter for example, then there must be an entry called
TCP/IP -> Siemens Gigaset PCI Card 54.
If the entry does not exist, click on Add.
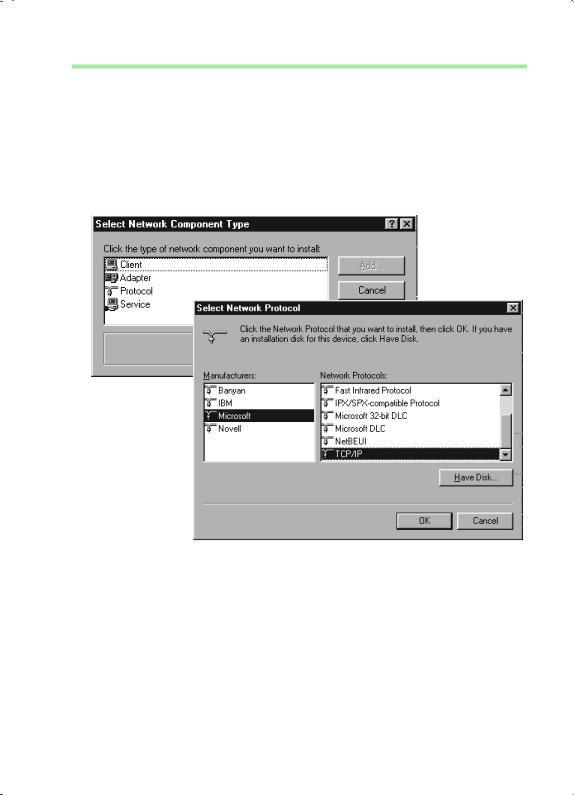
Select Protocol as the network component type and click on Add.
In Manufacturers select Microsoft and in Network Protocols select TCP/IP before confirming with OK.
21

Configuring the local network
TCP/IP protocol settings
The TCP/IP protocol requires certain settings which you will now make so that it can function smoothly.
To do this, open the Configuration tab in the Network window.
Select the TCP/IP > entry for your network card.
Click on Properties.
22
Configuring the local network
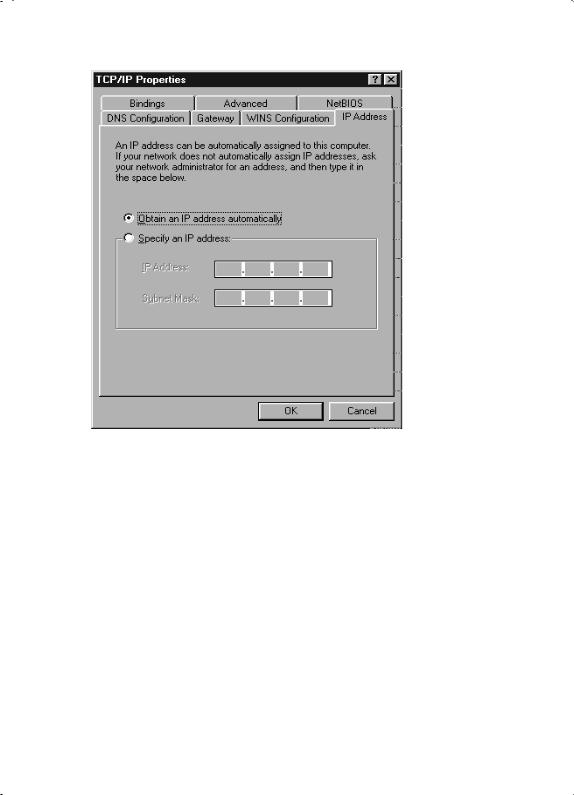
Open the IP Address.tab.
If Obtain an IP address automatically has already been activated, your PC is already configured for DHCP. Click on Cancel and close the next windows with OK to run network configuration.
You may be prompted to insert your Windows Installation CD. Follow the instructions in the installation procedure.
Once the copying procedure is completed, you will be prompted to reboot your system. Click on Yes. The computer will then be rebooted.
Then read on from page 26.
If Obtain an IP address automatically has not been activated, activate this option now.
23
Configuring the local network
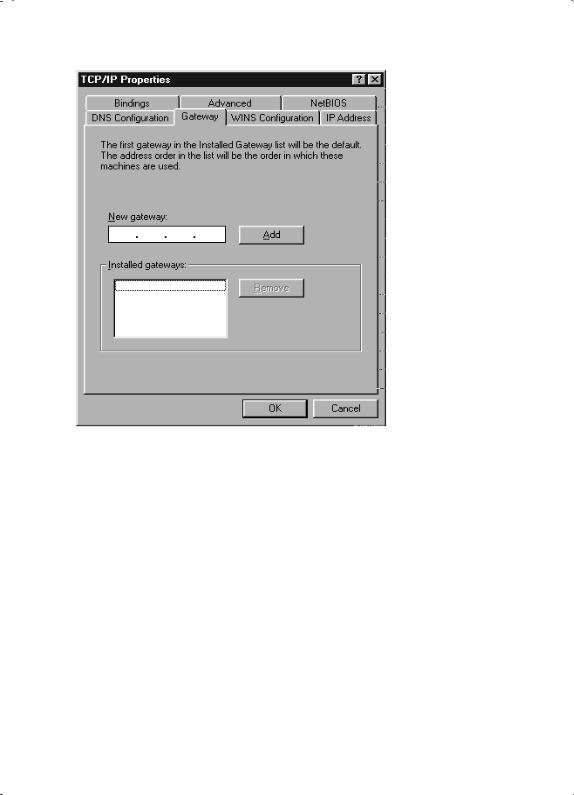
Open the Gateway tab and remove any entries from the Installed Gateways list.
24
Configuring the local network
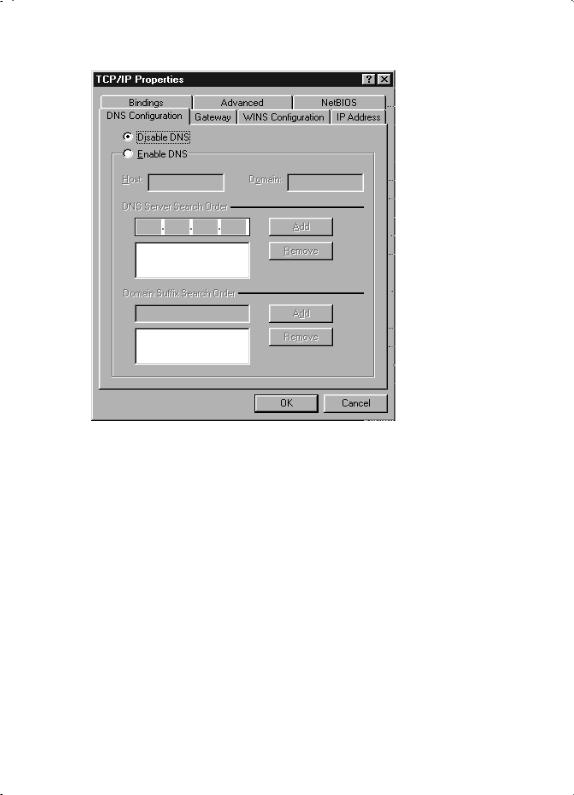
Open the DNS Configuration tab. Select Deactivate DNS.
Click on OK.
Finish the network configuration with OK.
You may be prompted to insert your Windows Installation CD. Follow the instructions in the installation procedure.
Once the copying procedure is completed, you will be prompted to reboot your system. Click on Yes. The computer will then be rebooted.
25

Configuring the local network
Deactivating the http proxy
Make sure that the http proxy in your Web browser is deactivated. This function must be deactivated so that your Web browser can access your Gigaset SE505 dsl/cable's configuration pages.
The following section describes the procedure for Internet Explorer and Netscape. First decide which browser you are using and then follow the appropriate steps.
Internet Explorer
Open Internet Explorer. Click on Extras – Internet Options.
In the Internet Options window click on the Connections tab.
Click on LAN Settings.
Clear all the check boxes in the Local Area Network (LAN) settings window and click on OK.
Click on OK again to close the Internet Options window.
Netscape
Open Netscape. Click on Edit and then Settings.
Double click on Advanced Category in the Settings windows and then click on
Proxies.
Select Direct Connection to Internet.
Click on OK to finish.
26
Configuring the local network
Synchronising the TCP/IP settings with the Gigaset SE505 dsl/cable
You have now configured your PC so that it is ready to be connected to the Gigaset SE505 dsl/cable. You now have to release the old TCP/IP settings and match them to the settings of your Gigaset SE505 dsl/cable.
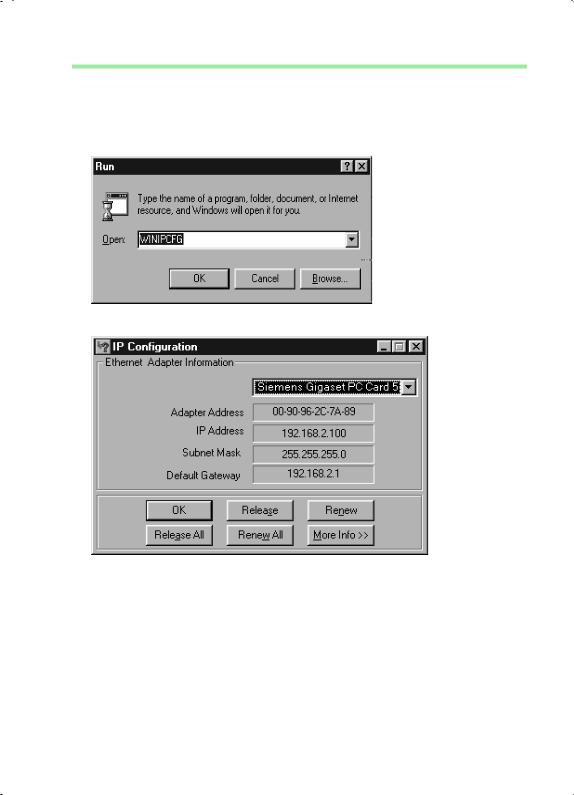
Click on Start – Run.
Type WINIPCFG and click on OK.
There may be a slight delay before the IP Configuration appears.
Select your network adapter from the selection list.
Click on Release and then Update.
If the router's default IP address (192.168.2.1) was not changed, the IP address should now read 192.168.1.x (x being a number between 2 and 254). The Subnet Mask must always be 255.255.255.0 and the Default Gateway must have the router's IP address (192.168.2.1). These values confirm that your Gigaset SE505 dsl/ cable is working.
Click on OK to close the IP Configuration window.
27
Configuring the local network
Network configuration with Windows XP
To integrate a PC with Windows XP into a network that is configured with a Gigaset SE505 dsl/cable:
1.Configure the network (see below).
2.Select computer names and workgroup (see page 30).
3.Check the network settings and complete the installation procedure (see page 30).
4.Make TCP/IP protocol settings (see page 31).
5.Deactivate the http proxy (see page 34).
Configuring the network
Configuring the network in this case means selecting Internet connection as the connection method. You can do this with the network wizard.
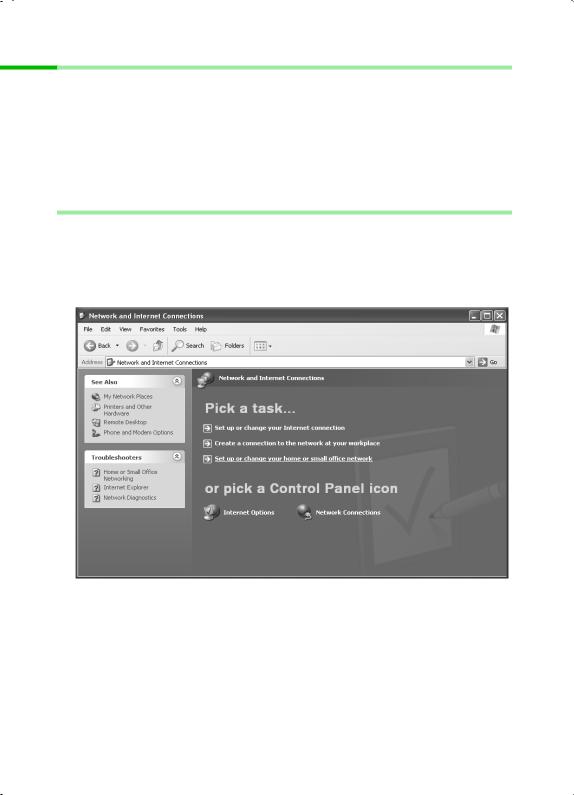
Select Start – Control Panel.
Select Network and Internet connections.
Now select Set up or modify home network or small office network.
This launches the network wizard.
Skip the welcome screen and the checklist by clicking on Next each time.
28
Configuring the local network
You will be prompted to select a connection method.
Select Other Method and confirm with Next.
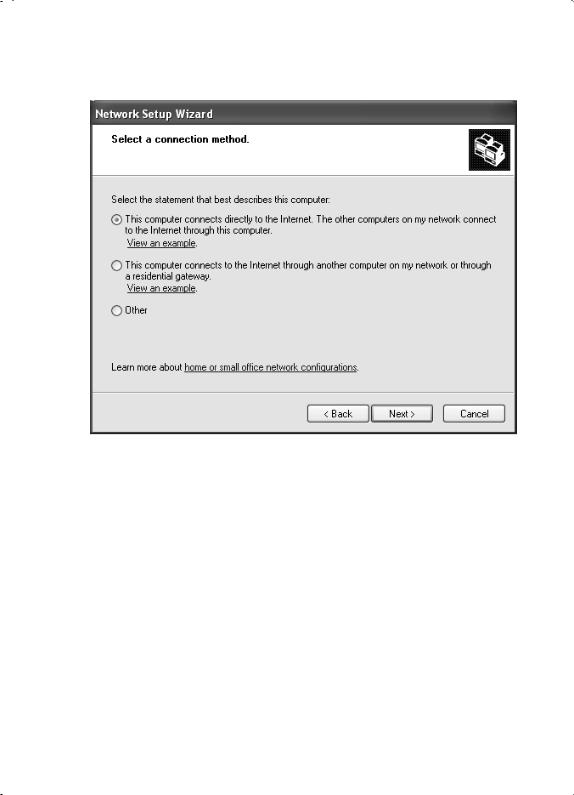
You will now see a screen listing various connection methods.
Select This computer connects directly to the Internet. The other computers on my network connect to the Internet through this computer. and click on Next.
In the next window select your network adapter and click on Next.
Skip the message "This network configuration is not advisable" with Next.
29
Loading...