


F O R C U S T O M E R A S S I S T A N C E
To aid in reporting this microwave oven in case of loss or theft, please record below the model number and serial number located on the unit. We also suggest you record all the information listed and retain for future reference.
MODEL NUMBER _____________________ SERIAL NUMBER _______________
DATE OF PURCHASE ____________________
DEALER __________________________ TELEPHONE __________________
SERVICER _________________________ TELEPHONE __________________
TO PHONE :
DIAL 1-800-BE-SHARP (237-4277) for :
SERVICE (for your nearest Sharp Authorized Servicer)
PARTS (for your authorized parts distributor)
ADDITIONAL CUSTOMER INFORMATION
DIAL 1-800-642-2122 for :
ACCESSORIES and COOKBOOK
TO WRITE :
Sharp Electronics Corporation
Customer Assistance Center
1300 Naperville Drive
Romeoville, IL 60446-1091
Please provide the following information when you write or call: model number, serial number, date of purchase, your complete mailing address (including zip code), your daytime telephone number (including area code) and description of the problem.
TO ACCESS INTERNET : www.sharp-usa.com
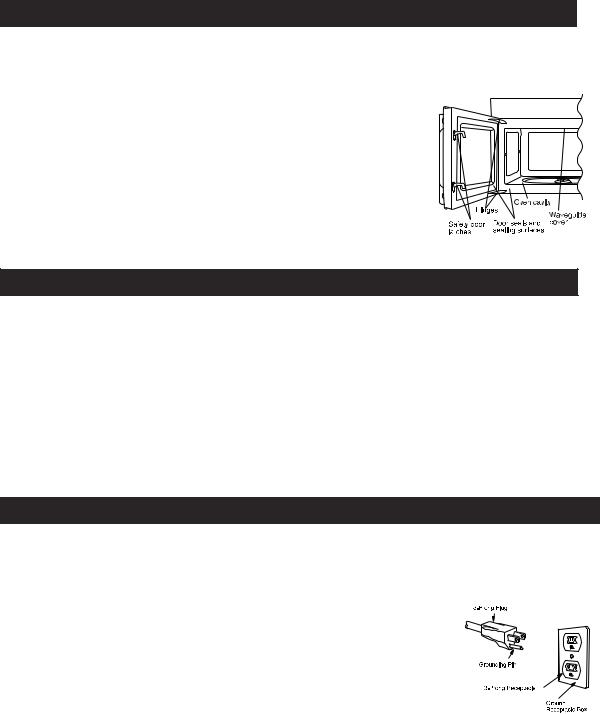
PRECAUTIONS TO AVOID POSSIBLE EXPOSURE TO EXCESSIVE MICROWAVE ENERGY
(a)Do not attempt to operate this oven with the door open since open-door operation can result in harmful exposure to microwave energy. It is important not to defeat or tamper with the safety interlocks.
(b)Do not place any object between the oven front face and the door or allow soil or cleaner residue to accumulate on sealing surfaces.
(c)Do not operate the oven if it is damaged. It is particularly important that the oven door close properly and that there is no damage to the: (1) door (bent), (2) hinges and latches (broken or loosened), (3) door seals and sealing surfaces.
(d)The oven should not be adjusted or repaired by anyone except properly qualified service personnel.
2

C O N T E N T S
2 |
For Customer Assistance |
23 |
Recipes for Low Calorie Entrees |
2 |
Precautions to Avoid Possible Exposure |
24 |
Recipes for Supper Soups And Sauces |
|
to Excessive Microwave Energy |
25 |
Recipes for Delicious Desserts |
3 |
Contents |
26-28 |
Defrost 3+6 |
4 |
Consumer Limited Warranty |
26 |
Super Defrost |
4 |
Product Information Card |
26 |
Super Defrost Chart |
5 |
Important Safety Instructions |
27 |
CompuDefrost |
6 |
Unpacking Instructions |
27 |
CompuDefrost Chart |
6 |
Optional Accessories |
28 |
Beverage Center |
6 |
Grounding Instructions |
28 |
Keep Warm |
7-9 |
Information You Need to Know |
29 |
Fan Options |
7 |
About Your Oven |
29 |
Light Options |
7 |
About Food |
30 |
Turntable On/Off |
8 |
About Utensils and Coverings |
31-32 |
Set Up |
8 |
About Children and the Microwave |
31 |
1. Clock |
9 |
About Microwave Cooking |
31 |
2. Auto Start |
9 |
About Safety |
32 |
3. Sound Adjustment |
9-10 |
Part Names |
32 |
4. Child Lock |
11-12 |
Introduction to Touch Screen |
32 |
5. Video Demo |
12-14 |
Before Operating |
32 |
6. Screen Contrast |
13 |
To Set The Clock |
32-34 |
Other Convenient Features |
14 |
Stop/Clear |
32 |
Minute Plus |
14-16 |
Manual Operation |
33 |
Minute Plus+ |
14 |
High Power Cooking |
33 |
Kitchen Timer |
15 |
Variable Power Cooking |
34 |
More or Less Time Adjustment |
15 |
Multiple Sequence Cooking |
35 |
Cleaning and Care |
16 |
Manual Defrost |
36 |
Replacing Parts |
16-17 |
One Touch Sensor |
36 |
Oven Light |
17 |
Reheat / Popcorn / Baked Potatoes |
36 |
Work Light and Night Light |
17 |
One Touch Sensor Cooking Chart |
36 |
Charcoal Filter |
18-19 |
6x6 No Guess Cooking |
37 |
Specifications |
18 |
Vegetables |
37 |
THE ULTIMATE ACCESSORY |
18 |
Meats-Poultry-Fish/Seafood-Frozen Foods- |
38 |
COOKBOOK ORDER FORM |
|
Pasta/Grains |
38 |
Service Call Check |
19 |
6x6 No Guess Cooking Chart |
39-40 |
Quick Reference |
20-25 |
More From Your Microwave 6x6 |
39 |
One Touch Sensor |
20 |
Breakfast Bar / Lunch On The Run |
39 |
6x6 No Guess Cooking |
20 |
Breakfast Bar / Lunch On The Run Chart |
39 |
More From Your Microwave 6x6 |
21 |
One Dish Dinners-Low Calorie Entrees |
39 |
Beverage Center |
|
Supper Soups And Sauces- |
39 |
Defrost 3+6 |
|
Delicious Desserts |
39 |
Set Up |
22 |
Recipes for One Dish Dinners |
40 |
Auto-Touch Guide |
3

C O N S U M E R L I M I T E D W A R R A N T Y
SHARP ELECTRONICS CORPORATION warrants to the first consumer purchaser that this Sharp brand product (the “Product”), when shipped in its original container, will be free from defective workmanship and materials, and agrees that it will, at its option, either repair the defect or replace the defective Product or part thereof with a new or remanufactured equivalent at no charge to the purchaser for parts or labor for the period(s) set forth below.
This warranty does not apply to any appearance items of the Product nor to the additional excluded item(s) set forth below nor to any Product the exterior of which has been damaged or defaced, which has been subjected to misuse, abnormal service or handling, or which has been altered or modified in design or construction.
In order to enforce the rights under this limited warranty, the purchaser should follow the steps set forth below and provide proof of purchase to the servicer.
The limited warranty described herein is in addition to whatever implied warranties may be granted to purchasers by law. ALL IMPLIED WARRANTIES INCLUDING THE WARRANTIES OF MERCHANTABILITY AND FITNESS FOR USE ARE LIMITED TO THE PERIOD(S) FROM THE DATE OF PURCHASE SET FORTH BELOW. Some states do not allow limitations on how long an implied warranty lasts, so the above limitation may not apply to you.
Neither the sales personnel of the seller nor any other person is authorized to make any warranties other than those described herein, or to extend the duration of any warranties beyond the time period described above on behalf of Sharp.
The warranties described herein shall be the sole and exclusive warranties granted by Sharp and shall be the sole and exclusive remedy available to the purchaser. Correction of defects, in the manner and for the period of time described herein, shall constitute complete fulfillment of all liabilities and responsibilities of Sharp to the purchaser with respect to the Product, and shall constitute full satisfaction of all claims, whether based on contract, negligence, strict liability or otherwise. In no event shall Sharp be liable, or in any way responsible, for any damages or defects in the Product which were caused by repairs or attempted repairs performed by anyone other than an authorized servicer. Nor shall Sharp be liable or in any way responsible for any incidental or consequential economic or property damage. Some states do not allow the exclusion of incidental or consequential damages, so the above exclusion may not apply to you.
THIS WARRANTY GIVES YOU SPECIFIC LEGAL RIGHTS. YOU MAY ALSO HAVE OTHER RIGHTS WHICH VARY FROM STATE TO STATE.
Your Product Model Number |
R-1750, R-1751, R-1752 and R-1754 Home Use Carousel™ Microwave |
& Description: |
Oven. (Be sure to have this information available when you need service |
|
for your Product.) |
Warranty Period for |
One (1) year parts and labor in-home service. The warranty period |
this Product: |
continues for an additional six (6) years, for a total of seven (7) years, |
|
with respect to the magnetron tube in the Product for parts only. Labor |
|
and the servicer trip charge are not provided free of charge for this |
|
additional period. |
Additional Item(s) Excluded from |
Non-functional accessories, turntable and light bulbs. |
Warranty Coverage (if any): |
|
Where to Obtain Service: |
From a Sharp Authorized Servicer located In the United States. Be sure |
|
to have Proof of Purchase available. For in-home service, the servicer |
|
will come to the unit’s location. If it is necessary to remove the unit for |
|
repair, the servicer will reinstall the unit at no extra charge, provided it |
|
was installed according to Sharp’s Installation Instructions. To find the |
|
location of the nearest Sharp Authorized Servicer, call Sharp toll free at |
|
1-800-BE-SHARP (1-800-237-4277). |
TO OBTAIN SUPPLY, ACCESSORY OR PRODUCT INFORMATION, CALL 1-800-BE-SHARP OR VISIT www.sharp-usa.com.
SAVE THE PROOF OF PURCHASE AS IT IS NEEDED SHOULD YOUR OVEN EVER REQUIRE WARRANTY SERVICE.
P R O D U C T I N F O R M A T I O N C A R D
The product information card should be completed within ten days of purchase and returned. We will keep it on file and help you access the information in case of loss, damage or theft. This will also enable us to contact you in the unlikely event that any adjustments or modifications are ever required for your oven.
4

I M P O R T A N T S A F E T Y I N S T R U C T I O N S
When using electrical appliances, basic safety precautions should be followed, including the following: WARNING - To reduce the risk of burns, electric shock, fire, injury to persons or exposure
to excessive microwave energy: |
|
||
1. Read all instructions before using the |
12. |
Do not immerse cord or plug in water. |
|
appliance. |
13. |
Keep cord away from heated surfaces. |
|
2. Read and follow the specific “PRE- |
14. |
Do not let cord hang over edge of table or |
|
CAUTIONS TO AVOID POSSIBLE |
|
counter. |
|
EXPOSURE TO EXCESSIVE |
15. |
See door surface cleaning instructions on |
|
MICROWAVE ENERGY” on page 2. |
|
page 35. |
|
3. This appliance must be grounded. Connect |
16. To reduce the risk of fire in the oven |
||
only to properly grounded outlet. See |
|
cavity: |
|
“GROUNDING INSTRUCTIONS” |
|
a. Do not overcook food. Carefully attend |
|
on page 6 and INSTALLATION |
|
appliance if paper, plastic or other com- |
|
INSTRUCTIONS. |
|
bustible materials are placed inside the |
|
4. Install or locate this appliance only in |
|
oven to facilitate cooking. |
|
accordance with the provided installation |
|
b. Remove wire twist-ties from paper or |
|
instructions. |
|
plastic bags before placing bag in oven. |
|
5. Some products such as whole eggs and |
|
c. If materials inside the oven should |
|
sealed containers — for example, closed |
|
ignite, keep oven door closed, turn |
|
|
oven off, and disconnect the power |
||
glass jars — may explode and should not |
|
||
be heated in this oven. |
|
cord or shut off power at the fuse or |
|
6. Use this appliance only for its intended |
|
circuit breaker panel. |
|
|
d. Do not use the cavity for storage pur- |
||
use as described in this manual. Do not |
|
||
|
poses. Do not leave paper products, |
||
use corrosive chemicals or vapors in this |
|
||
|
cooking utensils or food in the cavity |
||
appliance. This type of oven is specifically |
|
||
|
when not in use. |
||
designed to heat, cook or dry food. It is not |
|
||
17. Clean ventilation openings and grease |
|||
designed for industrial or laboratory use. |
|||
|
filters frequently—Grease should not be |
||
7. As with any appliance, close supervision |
|
||
|
allowed to accumulate on ventilation |
||
is necessary when used by children. |
|
||
|
openings, hood (louver) or grease filters. |
||
8. Do not operate this appliance if it has a |
|
||
18. Use care when cleaning the louver and the |
|||
damaged cord or plug, if it is not working |
|||
|
grease filters. Corrosive cleaning agents, |
||
properly or if it has been damaged or |
|
||
|
such as lye-based oven cleaners, may |
||
dropped. |
|
||
|
damage the louver and the grease filters. |
||
9. This appliance should be serviced only by |
|
||
19. When flaming foods under the hood, turn |
|||
qualified service personnel. Contact near- |
|||
|
the fan on. |
||
est Sharp Authorized Servicer for exami- |
|
||
20. |
This appliance is suitable for use above |
||
nation, repair or adjustment. |
|||
10. Do not cover or block any openings on the |
|
both gas and electric cooking equipment |
|
|
|
||
appliance. |
36" wide or less. |
|
|
11. Do not store or use this appliance outdoors. |
|
Do not use this product near water—for |
|
example, near a kitchen sink, in a wet base- |
|
ment or near a swimming pool, and the like. |
|
SAVE THESE INSTRUCTIONS
5
U N P A C K I N G I N S T R U C T I O N S
Unpacking and Examining Your Oven
Open the bottom of the carton, bend the carton flaps back and tilt the oven over to rest on plasticfoam pad. Lift carton off oven and remove all packing materials, Installation Instructions, Wall Template, Top Template, Charcoal Filter, Turntable and Turntable Support. SAVE THE CARTON AS IT
MAY MAKE INSTALLATION EASIER.
1.Remove the feature sticker from the outside of the door, if there is one.
2.DO NOT REMOVE THE WAVEGUIDE COVER, which is located on the ceiling in the oven cavity. Check to see that there are Installation Instructions,
Wall Template, Top Template and RK-230 Charcoal Filter, which is used when recirculating is chosen. Read enclosures and SAVE the Operation Manual.
Check the oven for any damage, such as misaligned or bent door, damaged door
seals and sealing surfaces, broken or loose door hinges and latches and dents inside the cavity or on the door. If there is any damage, do not operate the oven
and contact your dealer or SHARP AUTHORIZED SERVICER. See Installation Instructions for more details.
O P T I O N A L A C C E S S O R I E S
Two optional accessories are available for this oven.
1.Charcoal Filter (RK-230). The filter packed in the oven is required when hood exhaust is recirculated. See Charcoal Filter on page 36. To purchase a replacement Charcoal Filter, check with the dealer or call 1-800-642-2122. Have credit card ready.
2.Filler Panel Kit. For use when the oven is installed in a 36-inch or 42-inch wide opening. The metal filler panels come in 3-inch wide pairs. One set is needed for a 36-inch opening and 2 sets for a 42-inch opening. White and black are available.
To purchase contact: |
Modern-Aire Ventilating Corporation |
|
|
7319 Lankershim Blvd. |
|
|
North Hollywood, CA 91605 |
|
|
Phone: (818) 765-9870 |
Fax: (818) 765-4916 |
G R O U N D I N G I N S T R U C T I O N S
This appliance must be grounded. This oven is equipped with a cord having a grounding wire with a grounding plug. It must be plugged into a wall receptacle that is properly installed and grounded in accordance with the National Electrical Code and local codes and ordinances. In the event of an electrical short circuit, grounding reduces risk of electric shock by providing an escape wire for the electric current.
WARNING – Improper use of the grounding plug can result in a risk of electric shock.
Electrical Requirements
Check Installation Instructions for proper location for the power supply.
The electrical requirements are a 120 volt 60 Hz, AC only, 15 amp. or more protected electrical supply. It is recommended that a separate circuit serving only the oven be provided.
The oven is equipped with a 3-prong grounding plug. It must be plugged into a wall receptacle that is properly installed and grounded. DO NOT UNDER ANY CIRCUMSTANCES CUT OR REMOVE THE GROUNDING PIN FROM THE PLUG.
Notes: 1. If you have any questions about the grounding or electrical instructions, consult a qualified electrician or service person.
2.Neither Sharp nor the dealer can accept any liability for damage to the oven or personal injury resulting from failure to observe the correct electrical connection procedures.
Radio or TV Interference
Should there be any interference caused by the microwave oven to your radio or TV, check that the microwave oven is on a different electrical circuit, relocate the radio or TV as far away from the oven as feasible or check position and signal of receiving antenna.
6

I N F O R M A T I O N Y O U N E E D
ABOUT YOUR OVEN
This Operation Manual is valuable: read it carefully and always save it for reference.
A good microwave cookbook is a valuable asset. Check it for microwave cooking principles, techniques, hints and recipes. See pages 37 and 38 for ordering the Ultimate Accessory, the SHARP CAROUSEL MICROWAVE COOKBOOK.
NEVER use the oven without the turntable and support nor turn the turntable over so that a large dish could be placed in the oven. The turntable will turn both clockwise and counterclockwise. See page 30 for complete instructions.
ALWAYS have food in the oven when it is on to absorb the microwave energy.
T O K N O W
When using the oven at power levels below 100%, you may hear the magnetron cycling on and off.
Condensation is a normal part of microwave cooking. Room humidity and the moisture in food will influence the amount of moisture that condenses in the oven. Generally, covered foods will not cause as much condensation as uncovered ones. Vents on the oven back must not be blocked.
The oven is for food preparation only. It should not be used to dry clothes or newspapers.
Your oven is rated 1100 watts by using the IEC Test Procedure. In using recipes or package directions, check food a minute or two before the minimum time and add time accordingly.
ABOUT FOOD
F O O D |
|
D O |
|
D O N ' T |
Eggs, sausages, |
• |
Puncture egg yolks before cooking to |
• |
Cook eggs in shells. |
nuts, seeds, |
|
prevent “explosion”. |
• |
Reheat whole eggs. |
fruits & |
• |
Pierce skins of potatoes, apples, squash, |
• |
Dry nuts or seeds in shells. |
vegetables |
|
hot dogs and sausages so that steam es- |
|
|
|
|
capes. |
|
|
Popcorn |
• |
Use specially bagged popcorn for the |
• Pop popcorn in regular brown bags or |
|
|
microwave oven. |
|
glass bowls. |
|
|
• Listen while popping corn for the pop- |
• Exceed maximum time on popcorn |
||
|
|
ping to slow to 1 or 2 seconds or use |
|
package. |
|
|
special Popcorn pad. |
|
|
Baby food |
• |
Transfer baby food to small dish and |
• |
Heat baby food in original jars. |
|
heat carefully, stirring often. Check |
• |
Heat disposable bottles. |
|
|
|
temperature before serving. |
• |
Heat bottles with nipples on. |
•Put nipples on bottles after heating and shake thoroughly. “Wrist” test before feeding.
•Cut baked goods with filling after heat- • Heat or cook in closed glass jars or air
General |
ing to release steam and avoid burns. |
|
tight containers. |
• Stir liquids briskly before and after |
• |
Can in the microwave as harmful bacte- |
|
|
heating to avoid “eruption”. |
|
ria may not be destroyed. |
• |
Use deep bowl, when cooking liquids |
• |
Deep fat fry. |
|
or cereals, to prevent boilovers. |
• |
Dry wood, gourds, herbs or wet papers. |
|
|
• |
Operate the oven empty. |
7

I N F O R M A T I O N Y O U N E E D T O K N O W
ABOUT UTENSILS AND COVERINGS
It is not necessary to buy all new cookware. Many pieces already in your kitchen can be used successfully in your new microwave oven.
Use these utensils for safe microwave cooking and reheating:
•glass ceramic (Pyroceram® ), such as Corningware® .
•heat-resistant glass (Pyrex® )
•microwave-safe plastics (some microwavesafe plastics are not suitable for cooking foods with high fat and sugar content.)
•paper plates
•microwave-safe pottery, stoneware and porcelain
•browning dish (Do not exceed recommended preheating time. Follow manufacturer's directions.)
These items can be used for short time reheating of foods that have little fat or sugar in them:
• wood, straw, wicker
DO NOT USE
•metal pans and bakeware
•dishes with metallic trim
•non-heat-resistant glass
•non-microwave-safe plastics (margarine tubs)
•recycled paper products
•brown paper bags
•food storage bags
•metal twist-ties
Should you wish to check if a dish is safe for microwaving, place the empty dish in the oven and microwave on 100% power for 30 seconds. A dish which becomes very hot should not be used.
The following coverings are ideal:
•Paper towels are good for covering foods for reheating and absorbing fat while cooking bacon.
•Wax paper can be used for cooking and reheating.
•Plastic wrap that is specially marked for microwave use can be used for cooking and reheating. DO NOT allow plastic wrap to touch food. Vent so steam can escape.
•Lids that are microwave-safe are a good choice because heat is kept near the food to hasten cooking.
•Oven cooking bags are good for large meats or foods that need tenderizing. DO NOT use metal twist ties. Remember to slit bag so steam can escape.
How to use aluminum foil in your microwave oven:
•Small flat pieces of aluminum foil placed smoothly on the food can be used to shield areas that are either defrosting or cooking too quickly.
•Foil should not come closer than one inch to any surface of the oven.
Should you have questions about utensils or coverings, check a good microwave cookbook or follow recipe suggestions.
ACCESSORIES There are many microwave accessories available for purchase. Evaluate carefully before you purchase so that they meet your needs. A microwave-safe thermometer will assist you in determining correct doneness and assure you that foods have been cooked to safe temperatures. Sharp is not responsible for any damage to the oven when accessories are used.
ABOUT CHILDREN AND THE MICROWAVE
Children below the age of 7 should use the microwave oven with a supervising person very near to them. Between the ages of 7 and 12, the supervising person should be in the same room.
The child must be able to reach the oven comfortably; if not, he/she should stand on a sturdy stool.
At no time should anyone be allowed to lean or swing on the oven door.
Children should be taught all safety precautions: use potholders, remove coverings carefully, pay special attention to packages that crisp food because they may be extra hot.
Don’t assume that because a child has mastered one cooking skill he/she can cook everything.
Children need to learn that the microwave oven is not a toy. See page 32 for Child Lock feature.
8

I N F O R M A T I O N Y O U N E E D T O K N O W
ABOUT MICROWAVE COOKING
•Arrange food carefully. Place thickest areas toward outside of dish.
•Watch cooking time. Cook for the shortest amount of time indicated and add more as needed. Foods severely overcooked can smoke or ignite.
•Cover foods while cooking. Check recipe or cookbook for suggestions: paper towels, wax paper, microwave plastic wrap or a lid. Covers prevent spattering and help foods to cook evenly.
•Shield with small flat pieces of aluminum foil any thin areas of meats or poultry to prevent overcooking before dense, thick areas are cooked thoroughly.
•Stir foods from outside to center of dish once or twice during cooking, if possible.
•Turn foods over once during microwaving to speed cooking of such foods as chicken and hamburgers. Large items like roasts must be turned over at least once.
•Rearrange foods like meatballs halfway through cooking both from top to bottom and from the center of the dish to the outside.
•Add standing time. Remove food from oven and stir, if possible. Cover for standing time which allows the food to finish cooking without overcooking.
•Check for doneness. Look for signs indicating that cooking temperatures have been reached.
Doneness signs include:
-Food steams throughout, not just at edge.
-Center bottom of dish is very hot to the touch.
-Poultry thigh joints move easily.
-Meats and poultry show no pinkness.
-Fish is opaque and flakes easily with a fork.
ABOUT SAFETY
•Check foods to see that they are cooked to the United States Department of Agriculture’s recommended temperatures:
T E M P |
F O O D |
160°F |
... for fresh pork, ground meat, |
|
boneless white poultry, fish, |
|
seafood, egg dishes and |
|
frozen prepared food. |
165°F |
... for leftover, ready-to-reheat |
|
refrigerated, and deli and |
|
carry-out “fresh” food. |
170°F |
... white meat of poultry. |
180°F |
... dark meat of poultry. |
To test for doneness, insert a meat thermometer in a thick or dense area away from fat or bone. NEVER leave the thermometer in food during cooking, unless it is approved for microwave oven use.
•Always use potholders to prevent burns when handling utensils that are in contact with hot food. Enough heat from the food can transfer through utensils to cause skin burns.
•Avoid steam burns by directing steam away from the face and hands. Slowly lift the farthest edge of a dish’s covering and carefully open popcorn and oven cooking bags away from the face.
•Stay near the oven while it’s in use and check cooking progress frequently so that there is no chance of overcooking food.
•NEVER use the cavity for storing cookbooks or other items.
•Select, store and handle food carefully to preserve its high quality and minimize the spread of foodborne bacteria.
•Keep waveguide cover clean. Food residue can cause arcing and/or fires.
•Use care when removing items from the oven so that the utensil, your clothes or accessories do not touch the safety door latches.
9
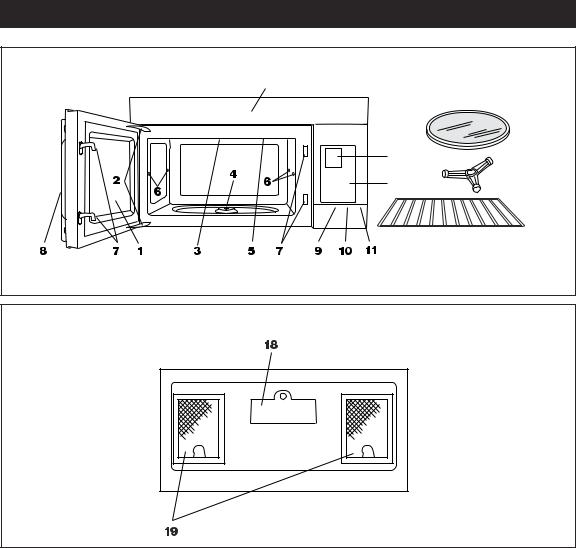
P A R T N A M E S |
FRONT VIEW |
14 |
15 |
13 |
16 |
12 |
17 |
BOTTOM VIEW
(Front of Microwave)
(Rear of Microwave)
1Oven door with see-through window
2Door hinges
3Waveguide cover: DO NOT REMOVE.
4Turntable motor shaft
5Oven light
It will light when oven is operating or door is open.
6Rack holders
7Safety door latches
The oven will not operate unless the door is securely closed.
8Handle
9Fan Options pad
10Light Options pad
11Turntable On/Off pad.
12Auto-Touch control panel
13Smart & Easy Touch Screen
14Ventilation openings
15Removable turntable
The turntable will rotate clockwise or counterclockwise. Only remove for cleaning.
16Removable turntable support
First, carefully place the turntable support in the motor shaft in the center of the oven floor. Then, place the turntable on the turntable support securely.
17Rack for 2-level cooking/reheating
18Light cover
19Grease filters
10
T O U C H S C R E E N C O N T R O L P A N E L
SMART & EASY TOUCH SCREEN : 12-13 |
|
|
|
|
|
|
|
|
|
|
|
|
|
|
ONE TOUCH SENSOR |
|||||||||||||||||||||||||||||
The Home Page is for entering time for cooking or kitchen timer. The TOUCH |
: 16-17 |
|||||||||||||||||||||||||||||||||||||||||||
SCREEN shows cooking information and recipes and lets the user enter chosen |
|
|
|
|
|
Select pad to |
||||||||||||||||||||||||||||||||||||||
options by simply touching directly on the screen. |
|
|
|
|
|
|
|
|
|
|
|
|
|
|
|
|
|
|
bake potatoes, |
|||||||||||||||||||||||||
|
|
|
|
|
|
|
|
|
|
|
|
|
|
|
|
|
|
|
|
|
|
|
|
|
|
|
|
|
|
|
|
|
|
|
|
|
|
|
|
|
|
|
|
pop popcorn or |
|
|
|
|
|
|
|
|
|
|
|
|
|
|
|
|
|
|
|
|
|
|
|
|
|
|
|
|
|
|
|
|
|
|
|
|
|
|
|
|
|
|
|||
Minute Plus+ : 33 |
|
|
|
|
|
|
|
|
|
|
|
|
|
|
|
|
|
|
|
|
|
|
|
|
|
|
|
|
|
|
|
|
|
|
|
|
|
reheat previously |
||||||
|
|
|
|
|
|
|
|
|
|
|
|
|
|
|
|
|
|
|
|
|
|
|
|
|
|
|
|
|
|
|
|
|
|
|
|
|
|
prepared foods. |
||||||
Touch to access |
|
|
|
|
|
|
|
|
|
|
|
|
|
|
|
|
|
|
|
|
|
|
|
|
|
|
|
|
|
|
|
|
|
|
|
|||||||||
|
|
|
|
|
|
|
|
|
|
|
|
|
|
|
|
|
|
|
|
|
|
|
|
|
|
|
|
|
|
|
|
|
|
|
|
|||||||||
screen where 12 |
|
|
|
|
|
|
|
|
|
|
|
|
|
|
|
|
|
|
|
|
|
|
|
|
|
|
|
|
|
|
|
|
|
Kitchen Timer : 33 |
||||||||||
|
|
|
|
|
|
|
|
|
|
|
|
|
|
|
|
|
|
|
|
|
|
|
|
|
|
|
|
|
|
|
|
|
||||||||||||
common cooking |
|
|
|
|
|
|
|
|
|
|
|
|
|
|
|
|
|
|
|
|
|
|
|
|
|
|
|
|
|
|
|
|
|
|||||||||||
|
|
|
|
|
|
|
|
|
|
|
|
|
|
|
|
|
|
|
|
|
|
|
|
|
|
|
|
|
|
|
|
|
||||||||||||
times are shown that |
|
|
|
|
|
|
|
|
|
|
|
|
|
|
|
|
|
|
|
|
|
|
|
|
|
|
|
|
|
|
|
|
|
|
|
Touch Kitchen |
||||||||
|
|
|
|
|
|
|
|
|
|
|
|
|
|
|
|
|
|
|
|
|
|
|
|
|
|
|
|
|
|
|
|
|
||||||||||||
simply require one |
|
|
|
|
|
|
|
|
|
|
|
|
|
|
|
|
|
|
|
|
|
|
|
|
|
|
|
|
|
|
|
|
Timer, enter desired |
|||||||||||
touch to start. |
|
|
|
|
|
|
|
|
|
|
|
|
|
|
|
|
|
|
|
|
|
|
|
|
|
|
|
|
|
|
|
|
|
|
|
time and press |
||||||||
|
|
|
|
|
|
|
|
|
|
|
|
|
|
|
|
|
|
|
|
|
|
|
|
|
|
|
|
|
|
|
|
|
|
|
|
|
|
|
|
|
|
|
|
START. |
STOP/CLEAR : 14 |
|
|
|
|
|
|
|
|
|
|
|
|
|
|
|
|
|
|
|
|
|
|
|
|
|
|
|
|
|
|
|
|
|
|
BEVERAGE CENTER : |
|||||||||
|
|
|
|
|
|
|
|
|
|
|
|
|
|
|
|
|
|
|
|
|
|
|
|
|
|
|
|
|
|
|
|
|
|
|||||||||||
During programming, |
|
|
|
|
|
|
|
|
|
|
|
|
|
|
|
|
|
|
|
|
|
|
|
|
|
|
|
|
|
|
||||||||||||||
press once to return to |
|
|
|
|
|
|
|
|
|
|
|
|
|
|
|
|
|
|
|
|
|
|
|
|
|
|
|
|
|
|
28 |
|||||||||||||
the Home Page. |
|
|
|
|
|
|
|
|
|
|
|
|
|
|
|
|
|
|
|
|
|
|
|
|
|
|
|
|
|
|
|
|
|
Press to prepare or |
||||||||||
During cooking, press |
|
|
|
|
|
|
|
|
|
|
|
|
|
|
|
|
|
|
|
|
|
|
|
|
|
|
|
|
|
|
|
|
|
reheat coffee or tea. |
||||||||||
once to stop cooking |
|
|
|
|
|
|
|
|
|
|
|
|
|
|
|
|
|
|
|
|
|
|
|
|
|
|
|
|
|
|
|
|
|
|
|
|
||||||||
or twice to cancel the |
|
|
|
|
|
|
|
|
|
|
|
|
|
|
|
|
|
|
|
|
|
|
|
|
|
|
|
|
|
|
|
|
|
|
KEEP WARM: 28 |
|||||||||
cooking program. |
|
|
|
|
|
|
|
|
|
|
|
|
|
|
|
|
|
|
|
|
|
|
|
|
|
|
|
|
|
|
|
|
|
Press to warm food |
||||||||||
|
|
|
|
|
|
|
|
|
|
|
|
|
|
|
|
|
|
|
|
|
|
|
|
|
|
|
|
|
|
|
|
|
|
|
|
|
|
|
|
|
|
|||
MINUTE PLUS : 32 |
|
|
|
|
|
|
|
|
|
|
|
|
|
|
|
|
|
|
|
|
|
|
|
|
|
|
|
|
|
|
|
|
|
|
|
|
|
|
up to 30 minutes. |
|||||
|
|
|
|
|
|
|
|
|
|
|
|
|
|
|
|
|
|
|
|
|
|
|
|
|
|
|
|
|
|
|
|
|
|
|
|
|
||||||||
|
|
|
|
|
|
|
|
|
|
|
|
|
|
|
|
|
|
|
|
|
|
|
|
|
|
|
|
|
|
|
|
|
|
|
|
|||||||||
|
|
|
|
|
|
|
|
|
|
|
|
|
|
|
|
|
|
|
|
|
|
|
|
|
|
|
|
|
|
|
|
|
|
|
|
|
||||||||
Press once to cook for |
|
|
|
|
|
|
|
|
|
|
|
|
|
|
|
|
|
|
|
|
|
|
|
|
|
|
|
|
|
|
|
|
|
|
|
DEFROST 3+6 : |
||||||||
one minute at 100% |
|
|
|
|
|
|
|
|
|
|
|
|
|
|
|
|
|
|
|
|
|
|
|
|
|
|
|
|
|
|
26-27 |
|||||||||||||
or press repeatedly to |
|
|
|
|
|
|
|
|
|
|
|
|
|
|
|
|
|
|
|
|
|
|
|
|
|
|
|
|
|
|
|
|
|
|
|
Press to select |
||||||||
extend cooking time |
|
|
|
|
|
|
|
|
|
|
|
|
|
|
|
|
|
|
|
|
|
|
|
|
|
|
|
|
|
|
|
|
|
|
|
|||||||||
|
|
|
|
|
|
|
|
|
|
|
|
|
|
|
|
|
|
|
|
|
|
|
|
|
|
|
|
|
|
|
|
|
|
|
one of three |
|||||||||
in multiples of one |
|
|
|
|
|
|
|
|
|
|
|
|
|
|
|
|
|
|
|
|
|
|
|
|
|
|
|
|
|
|
|
|
|
|
|
|||||||||
|
|
|
|
|
|
|
|
|
|
|
|
|
|
|
|
|
|
|
|
|
|
|
|
|
|
|
|
|
|
|
|
SuperDefrost or one |
||||||||||||
|
|
|
|
|
|
|
|
|
|
|
|
|
|
|
|
|
|
|
|
|
|
|
|
|
|
|
|
|
|
|
|
|||||||||||||
minute. |
|
|
|
|
|
|
|
|
|
|
|
|
|
|
|
|
|
|
|
|
|
|
|
|
|
|
|
|
|
|
|
|
|
|
||||||||||
|
|
|
|
|
|
|
|
|
|
|
|
|
|
|
|
|
|
|
|
|
|
|
|
|
|
|
|
|
|
|
|
|
of six CompuDefrost |
|||||||||||
|
|
|
|
|
|
|
|
|
|
|
|
|
|
|
|
|
|
|
|
|
|
|
|
|
|
|
|
|
|
|
|
|
|
|
|
|
|
|
|
|||||
START |
|
|
|
|
|
|
|
|
|
|
|
|
|
|
|
|
|
|
|
|
|
|
|
|
|
|
|
|
|
|
|
|
|
|
|
|
|
|
|
|
|
|
|
options. |
|
|
|
|
|
|
|
|
|
|
|
|
|
|
|
|
|
|
|
|
|
|
|
|
|
|
|
|
|
|
|
|
|
|
|
|
|
|
|
|
|
|
|||
|
|
|
|
|
|
|
|
|
|
|
|
|
|
|
|
|
|
|
|
|
|
|
|
|
|
|
|
|
|
|
|
|
|
|
|
|
|
|
|
|
||||
|
|
|
|
|
|
|
|
|
|
|
|
|
|
|
|
|
|
|
|
|
|
|
|
|
|
|
|
|
|
|
|
|
|
|
|
|
|
|
|
|||||
Press to start oven |
|
|
|
|
|
|
|
|
|
|
|
|
|
|
|
|
|
|
|
|
|
|
|
|
|
|
|
|
|
|
|
|
|
MORE FROM YOUR |
||||||||||
|
|
|
|
|
|
|
|
|
|
|
|
|
|
|
|
|
|
|
|
|
|
|
|
|
|
|
|
|
|
|||||||||||||||
after programming. |
|
|
|
|
|
|
|
|
|
|
|
|
|
|
|
|
|
|
|
|
|
|
|
|
|
|
|
|
|
|
|
|
|
MICROWAVE 6x6 : |
||||||||||
|
|
|
|
|
|
|
|
|
|
|
|
|
|
|
|
|
|
|
|
|
|
|
|
|
|
|
|
|
|
|
|
|
||||||||||||
|
|
|
|
|
|
|
|
|
|
|
|
|
|
|
|
|
|
|
|
|
|
|
|
|
|
|
|
|
|
|
|
|
|
|
|
|
|
|
20-25 |
|||||
|
|
|
|
|
|
|
|
|
|
|
|
|
|
|
|
|
|
|
|
|
|
|
|
|
|
|
|
|
|
|
|
|
|
|
|
|
|
|
||||||
6x6 NO GUESS |
|
|
|
|
|
|
|
|
|
|
|
|
|
|
|
|
|
|
|
|
|
|
|
|
|
|
|
|
|
|
|
|
|
|
|
|
|
|
|
|
Press pad to show |
|||
|
|
|
|
|
|
|
|
|
|
|
|
|
|
|
|
|
|
|
|
|
|
|
|
|
|
|
|
|
|
|
|
|
|
|
|
|||||||||
COOKING : 18-19 |
|
|
|
|
|
|
|
|
|
|
|
|
|
|
|
|
|
|
|
|
|
|
|
|
|
|
|
|
|
|
|
|
|
six categories, each |
||||||||||
Press each pad to |
|
|
|
|
|
|
|
|
|
|
|
|
|
|
|
|
|
|
|
|
|
|
|
|
|
|
|
|
|
|
|
|
|
|
|
with six foods. |
||||||||
|
|
|
|
|
|
|
|
|
|
|
|
|
|
|
|
|
|
|
|
|
|
|
|
|
|
|
|
|
|
|||||||||||||||
|
|
|
|
|
|
|
|
|
|
|
|
|
|
|
|
|
|
|
|
|
|
|
|
|
|
|
|
|
|
|
|
|
|
|
Breakfast Bar, |
|||||||||
show six selections |
|
|
|
|
|
|
|
|
|
|
|
|
|
|
|
|
|
|
|
|
|
|
|
|
|
|
|
|
|
|
|
|
|
|
|
|||||||||
|
|
|
|
|
|
|
|
|
|
|
|
|
|
|
|
|
|
|
|
|
|
|
|
|
|
|
|
|
|
|
|
|
Lunch on the Run, |
|||||||||||
on the TOUCH |
|
|
|
|
|
|
|
|
|
|
|
|
|
|
|
|
|
|
|
|
|
|
|
|
|
|
|
|
|
|
|
|
|
|||||||||||
|
|
|
|
|
|
|
|
|
|
|
|
|
|
|
|
|
|
|
|
|
|
|
|
|
|
|
|
|
|
|
|
|
One Dish Dinners, |
|||||||||||
SCREEN. |
|
|
|
|
|
|
|
|
|
|
|
|
|
|
|
|
|
|
|
|
|
|
|
|
|
|
|
|
|
|
|
|
|
|||||||||||
|
|
|
|
|
|
|
|
|
|
|
|
|
|
|
|
|
|
|
|
|
|
|
|
|
|
|
|
|
|
|
|
|
|
|
Low Calorie |
|||||||||
|
|
|
|
|
|
|
|
|
|
|
|
|
|
|
|
|
|
|
|
|
|
|
|
|
|
|
|
|
|
|
|
|
|
|
|
|
|
|
|
|
|
|
|
|
|
|
|
|
|
|
|
|
|
|
|
|
|
|
|
|
|
|
|
|
|
|
|
|
|
|
|
|
|
|
|
|
|
|
|
|
|
|
|
|
|
|
|
||
FAN OPTIONS : |
|
|
|
|
|
|
|
|
|
|
|
|
|
|
|
|
|
|
|
|
|
|
|
|
|
|
|
|
|
|
|
|
|
|
|
|
|
|
|
|
|
Entrees, Supper |
||
|
|
|
|
|
|
|
|
|
|
|
|
|
|
|
|
|
|
|
|
|
|
|
|
|
|
|
|
|
|
|
|
|
|
|
|
Soups and Sauces |
||||||||
|
|
|
|
|
|
|
|
|
|
|
|
|
|
|
|
|
|
|
|
|
|
|
|
|
|
|
|
|
|
|
|
|
|
|
|
|||||||||
29 |
|
|
|
|
|
|
|
|
LIGHT OPTIONS : 29 |
|
|
|
|
|
|
SET UP : 31-32 |
|
|
|
|
|
and Delicious |
||||||||||||||||||||||
|
|
|
|
|
|
|
|
|
|
|
|
|
|
|
|
|
|
|||||||||||||||||||||||||||
Press pad to show |
Press pad to show |
|
|
|
|
Press to show |
|
|
|
|
|
Desserts are the |
||||||||||||||||||||||||||||||||
3 selections. |
3 selections. |
|
|
Clock, Child Lock, |
|
|
|
|
|
options. |
||||||||||||||||||||||||||||||||||
|
|
|
|
|
|
|
|
|
TURNTABLE ON/OFF : 30 |
|
|
|
|
|
|
Sound Adjustment, |
|
|
|
|
|
|
||||||||||||||||||||||
|
|
|
|
|
|
|
|
|
|
|
|
|
|
Auto Start, Video |
|
|
|
|
|
|
||||||||||||||||||||||||
|
|
|
|
|
|
|
|
|
|
|
|
|
|
|
|
|
|
|
||||||||||||||||||||||||||
|
|
|
|
|
|
|
|
|
Press to turn turntable off. |
|
|
|
Demo or Screen |
|
|
|
|
|
|
|||||||||||||||||||||||||
|
|
|
|
|
|
|
|
|
The icon will appear on the |
|
|
|
|
|
|
Contrast. |
|
|
|
|
|
|
||||||||||||||||||||||
|
|
|
|
|
|
|
|
|
display. |
|
|
|
|
|
|
|
|
|
|
|
|
|
|
|
|
|
|
|
||||||||||||||||
Number next to the control panel illustration
indicates page on which there are feature descriptions and usage information.
11
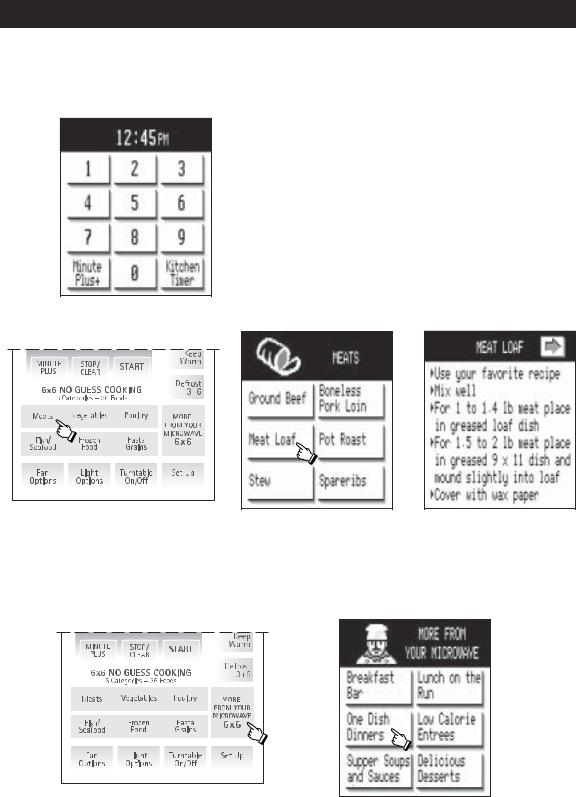
I N T R O D U C T I O N T O T O U C H S C R E E N
Your new Sharp Smart & Easy Touch Screen Microwave Oven features a large screen on the Control Panel which, not only provides much information to make using the oven easy, but also, is used to input information directly about the food being cooked, quantity or desired doneness.
Example 1: Home Page
The Home Page is the beginning. It shows the time of day, if the clock has been set. It also shows Minute Plus+, where by touching the screen the next screen appears, making it easy to select one of twelve commonly used times. Touching Kitchen Timer tells the oven that the time set is only for timing, not for cooking.
Note that if cooking time is touched on the screen, that Minute Plus+ and Kitchen Timer disappear and Power Level appears. Touching Power Level leads to the next screen for selecting the desired Power Level.
Example 2: Suppose you want to cook meat loaf in 6x6 NO GUESS COOKING:
1Press Meats on the Control Panel in 6x6 NO GUESS COOKING.
2Note that six meat selections appear on the TOUCH SCREEN. Touch Meat Loaf.
3Follow directions on the TOUCH SCREEN.
Example 3: Suppose you want to cook Spicy Couscous in More From Your Microwave 6x6:
1Press MORE FROM YOUR MICROWAVE 6x6 on the Control Panel.
2Touch One Dish Dinners on the TOUCH SCREEN.
12
 Loading...