


Model
R-1900M
COMMERCIAL MICROWAVE OVEN
OPERATION MANUAL
OPERATION MANUAL
This operation manual contains important information which you should read carefully before using your microwave oven.
IMPORTANT:There may be a serious risk to health if this operation manual is not followed or if the oven is modified so that it operates with the door open.
INTELLIGENT THINKING

CONTENTS
Contents |
1 |
Programme & Customise |
11 |
Important Safety Instructions |
2 |
Custom Setting |
11 |
Installation |
2 |
Saving Memories |
17 |
Troubleshooting |
4 |
Other Convenient Features |
21 |
Oven & Control Panel |
6 |
Demonstration Mode |
21 |
Before Operation |
7 |
Monitor |
21 |
How to Operate the Oven |
7 |
Cleaning & Maintenance |
22 |
Memory Operation |
7 |
Cooking Advice |
24 |
Memory Cooking |
7 |
Suitable Cookware |
24 |
Cooking Double/Triple Quantity with |
|
Food Handling & Preparation |
26 |
Memory |
8 |
Advice for Defrosting |
27 |
Express Defrost with Memory |
9 |
Advice for Reheating |
28 |
Manual Operation |
9 |
Defrosting Chart |
29 |
Time Cooking |
9 |
Cooking Chart |
31 |
Single Stage Cooking |
9 |
Reheating Chart |
34 |
Multi Stage Cooking |
9 |
Caution |
38 |
Repeat Cooking |
10 |
To Replace the Mains Plug |
39 |
Express Defrost |
10 |
Calling for Service |
39 |
|
|
Specifications |
40 |
1

I MPORTANT SAFETY INSTRUCTIONS
IMPORTANT: PLEASE READ CAREFULLY AND KEEP FOR FUTURE REFERENCE.
•The oven is for food preparation only. Never operate when empty.
•Do not leave or store anything inside the oven when not in use.
•Never attempt to use the oven with the door open.
It is important not to tamper with the door safety latches. This may result in exposure to microwave energy.
•Never operate the oven with any object caught in the door sealing surfaces, this again may cause microwave leakage.
•Do not insert fingers or objects in the holes of the door latches or air vent openings as this may damage the oven and cause an electric shock.
•If water or food drops inside the air vent openings switch off the oven immediately, unplug it and call a Service Technician appointed by SHARP.
•Never attempt to move the oven while it is operating.
•Do not use the oven near a steamer or a fryer.
•Always wipe up spills on the ceramic floor and splashes on the walls after cooking. If you leave grease on the ceramic floor and walls it may overheat, smoke or even catch fire when next using your oven.
•After each use wipe the splash cover on the ceiling of the oven with a soft damp cloth to remove any splashes.
If you leave grease on the splash cover it may overheat, smoke or even catch fire when next using your oven.
 WARNING:
Only allow children to use the oven without supervision when adequate instruction has been given so that the child is able to use the oven in a safe way and understands the hazards of improper use.
This appliance is not intended for use by persons (including children) with reduced physical, sensory or mental capabilities or lack of experience and knowledge unless they have been given supervision or instruction concerning use of the appliance by a person responsible for their safety.
 WARNING:
Children should be supervised to ensure that they do not play with the appliance.
Pacemaker: If you have a heart pacemaker, consult your doctor or the pacemaker manufacturer prior to oven use.
Fire: When heating food in plastic or paper containers, keep an eye on the oven due to the possibility of ignition.
If food overheats, starts to smoke or burn: Keep the oven door closed; turn the oven off; switch off the power at the socket and disconnect the plug from the socket. Failure to follow this procedure may result in fire and oven damage.
Liquids: Take care when microwaving liquids and beverages. To prevent delayed eruptive boiling of liquid and possible scalding: Stir liquid prior to and during heating/reheating, let liquid stand in the oven at the end of cooking.
Liquids and other foods must not be heated in sealed containers since they are liable to explode.
Eggs in their shell and whole hard-boiled eggs should not be heated in microwave ovens since they may explode even after microwave heating has ended. Refer to Cooking Advice.
Check the temperature of food and drink and stir (before serving). Take special care when serving food to babies, children or the elderly. The contents of feeding bottles and baby food jars should be stirred or shaken and the temperature checked before consumption to avoid burns.
For microwaving, use only those utensils suitable for microwave cookery refer to Suitable Cookware.
The oven should be cleaned regularly and any food deposits removed. Refer to Cleaning & Maintenance.
I NSTALLATION
 WARNING:
Inspect the Oven:
Check the oven carefully for damage before and regularly after installation.
•Make sure the door closes properly, that it is not misaligned or warped.
•Check the hinges and door safety latches are not broken or loose.
•Ensure the door seal and sealing surfaces are not damaged.
•Inspect the oven interior and door for dents.
 WARNING:
Caution Sheet:
Always keep the caution sheet (Special Instructions and Warnings) close to the oven for your reference.
Important:
If any damage is apparent, do not operate the oven in any way. Contact your dealer or an authorised Service Technician appointed by SHARP.
2
I NSTALLATION
1.Remove all packing materials. Remove the protective film (blue film) from the outer case cabinet (if covered).
2.Place oven on a secure, level surface, strong enough to take the oven weight, plus the heaviest item likely to be cooked in the oven.
3.Ensure there is a minimum free space above the oven of 25 cm.
4.Do not place the oven where heat, moisture or high humidity are generated, (for example, near or above a conventional oven) or near combustible materials (for example, curtains). Do not block or obstruct air vent openings, as obstructions may ignite due to the emission of hot air.
5.Make sure the power supply cord is undamaged (See Installation next page) and that it does not run under the oven or over any hot or sharp surfaces.
6.The socket must be readily accessible so that it can be easily unplugged in an emergency.
7.Do not use the oven outdoors.
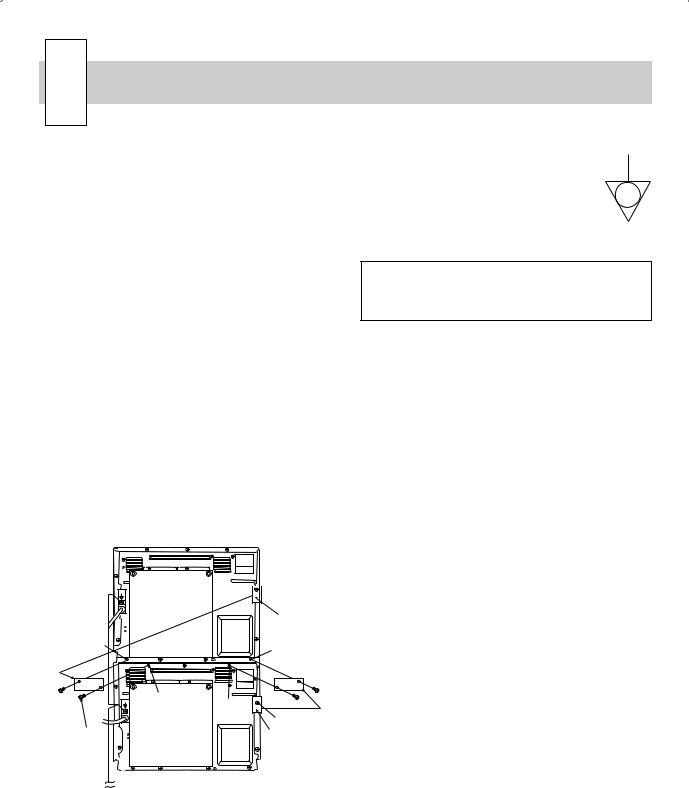
8.Two same oven models can be installed together by placing one on top of another. Follow these instructions.
A.Place oven A in the desired location. Position Oven B on top of Oven A as shown in the figure.
B.Remove Screws (a) and Mounting plate A and B from the right side of the back of Oven A and B.
C.Replace Screws (a) removed at step B and tighten them.
D.Remove Screws (b), (c), (d), and (e) and then install Mounting Plate A and B which were removed at step B to the each lower edge of Oven B as shown in the figure.
E.Replace Screws (b), (c), (d), and (e) which were removed at step D and tighten them.
 Screw (a)
Oven B (Back)
Mounting plate B
Screw (e) |
Screw (b) |
|
Screw (b)
Screw (e) |
Screw (d) |
Screw (c) |
Screw (c) |
|
|
||
Screw (d) |
Oven A (Back) |
|
Screw (a) |
|
Mounting |
||
|
|
||
|
|
|
|
|
|
|
plate A |
 WARNING:
In situations where two ovens are installed together by placing one on top of another,
1)Use the two mounting plates for fixing the two ovens.
2)Make sure that the power supply cord is not caught between the two ovens.
3)Do not install more than one oven on top of another.
4)Do not lose the removed screws.
NOTE: External Equipotential Earthing Terminal
Equipment has secondary earthing terminal. Terminal provides external earthing connection used in addition to earthing prong on plug. Located on outside of oven back, terminal is marked with symbol shown on the right side.
 WARNING:
It is hazardous for anyone other than a Service Technician, approved by SHARP to carry out any service or repair operation which involves the removal of a cover which gives protection against exposure to microwave energy.
IMPORTANT! ELECTRICAL CONNECTION
•Do not allow water to come into contact with the power supply cord or plug.
•Insert the plug properly into the socket as the plug may otherwise overheat and catch fire.
•Do not connect other appliances to the same socket using an adaptor plug as it may cause the wiring to overheat and catch fire.
•If the plug or socket is loose or the power supply cord is damaged, do not operate the oven, it must be replaced by the special power cord. Contact your dealer or a Service Technician appointed by SHARP.
A defective plug, power supply cord or socket may overheat and catch fire during operation or cause an electrical shock.
•When removing the plug from the socket always grip the plug, never the mains lead as this may damage the power supply cord and the connections inside the plug.
•The product is fitted with a non-rewireable (moulded) plug. Should it not be suitable for the socket outlet in your kitchen, remove the plug and fit an appropriate type, observing the wiring code given in “To replace the mains plug” on page 39.
The fuse from a cut-off plug should be removed and the plug disposed of in safe manner. Under no circumstances should the cut-off plug be inserted into a socket outlet as serious electrical shock may occur. The plug must not be used without the fuse cover fitted.
When replacing the plug please ensure that you use a BSI or ASTA approved plug to BS1363, this should be fitted with a brown coloured 13 amp fuse approved by BSI or ASTA to BS1362. If you have any doubt about electrical connection seek the help of a qualified electrician.
 WARNING:
THIS APPLIANCE MUST BE EARTHED.
To wire an appropriate plug, follow the wiring code given in “To replace the mains plug” on page 39.
Radio or TV Interference
Should there be any interference caused by the microwave oven to your radio or TV, check that the microwave oven is on a different electrical circuit, relocate the radio or TV as far away from the oven as feasible or check position and signal of receiving antenna.
3

TROUBLESHOOTING
If you think the oven is not working properly there are some simple checks which you can carry out yourself before you call for an engineer. This will help prevent unnecessary service calls if the fault is something simple.
Simply answer “YES” or “NO” to the following questions:
1.Plug the power cord into a three-pronged electric-outlet. (See page 5)
2.Open the door
A. Does the oven light come on? |
Yes________No |
3.Place one cup of water (approx. 250ml) in a microwavesafe glass measuring cup in the oven and close the door securely. Oven lamp should go off if door is closed properly.
Set the oven for 30 seconds on 100% (HIGH). At this moment:
Press these pads:

 3
3 
 0
0 

A. Does the oven light come on? |
Yes________No |
B.Does the “ON” indicator come on? Yes________No
C.At the end of 30 seconds, is the water hot?
Yes________No
IF SERVICE IS NEEDED, PLEASE CONTACT YOUR NEAREST AUTHORIZED SHARP SERVICER.
ERROR MODE
If you answer “NO” to any question first check that the oven is plugged in properly and the fuse has not blown, if there is no fault with either, check against the troubleshooting chart below.
 WARNING:
•Never adjust, repair or modify the oven yourself, or allow anyone other than a Service Technician, appointed by SHARP to carry out the service.
•The door seal stops microwave leakage during oven operation, but does not form an airtight seal. It is normal to see drops of water, light or feel warm air around the oven door. Food with a high moisture content will release steam and cause condensation inside the door which may drip from the oven.
•Repairs & Modifications: Do not attempt to operate the oven if it is not working properly.
•Outer Cabinet & Lamp Access: Never remove the outer cabinet. This would be very dangerous due to high voltage parts inside which must never be touched, as this could be fatal, As your oven has a removable cover over oven light bulb, it is possible for you to replace the light bulb yourseif with care. The light bulb can be purchased from Sharp Electronics (U.K.) Ltd. See page 39. Unplug the oven before replacing the light bulb.
Should any of the error indicators appear in the display, follow the instructions:
EE Mode |
Reason |
Action Required |
|
|
|
EE 1, EE 2 |
Failure of single magnetron |
Call for service. |
EE 3 |
Both magnetrons failed |
Call for service. |
|
|
|
EE 4 |
Voltage too high |
Call for service. |
|
|
|
EE 5 |
Voltage too low |
Call for service. |
|
|
|
EE 7 |
Oven cavity or component |
Check that nothing is blocking air intake openings on oven back or that |
|
temperature too high |
oven exterior is very hot. Correct. Wait a few minutes and try again. If |
|
|
problem persists, call for service. |
|
|
|
EE 8 |
Circuit failure |
Call for service. |
|
|
|
EE 9 |
Maximum cooking time is |
Check NOTE for Cooking Double/Triple Quantity with Memory on page 8, |
|
exceeded. |
NOTES 2 for Single Stage Cooking or NOTES 2 for Multi Stage Cooking |
|
|
on page 9 in the Operation Manual. |
|
|
Press the STOP/CLEAR pad, and re-input by reducing Total Cooking Time |
|
|
or power levels. |
|
|
|
EE 0 |
Cooling fan motor or other |
Cooling fan motor and other motors: Call for service. |
|
motor failure. Splash cover is |
Splash cover: Check that Splash cover is properly installed. If problem |
|
not installed properly. |
persists, call for service. (See page 22 - 23) |
|
|
|
EE 1 and EE 2 : In case of single magnetron failure, oven can be used until servicing by changing Custom Setting, settings to allow operation under single magnetron only (see page 15). However, check food carefully as additional cooking time will be needed when operating with a single magnetron.
Press the STOP/CLEAR pad to clear the error indicator. Any time an error code appears, check the reason and be sure to call for service except EE7 and EE9. As for EE7, follow Action Required and if EE7 is still displayed, be sure to call for service.
4

MAINTENANCE MODE
Should any of maintenance indicators appear in the display, follow the instruction:
CC Mode |
Reason |
Action required |
|
|
|
|
|
CC1 |
Operation time of magnetrons exceeds |
Call for service to replace the parts promptly. Failure to replace |
|
CC2 |
1,250 hours. |
parts that have exceeded recommended operation time may |
|
|
|
cause failure of the microwave oven. |
|
CC4 |
Operation time of the control unit, relays, |
||
|
|||
|
switches exceeds 200,000 times. |
|
|
|
|
|
|
CC3 |
Operation time of exhaust motor exceeds |
Even though CC3 is displayed, your oven can still be operated |
|
|
3,000 hours. |
for short periods of time. Call for service to replace parts |
|
|
|
promptly. |
|
|
|
|
NOTES:
1.The CC and “ * “ indicator will appear in the display when recommended parts life is exceeded. The CC and “ * “ indicator can be cleared by pressing the STOP/CLEAR pad. Call for service to replace the parts promptly. Failure to replace parts that have exceeded recommended operation time may cause failure of the microwave oven.
2.If one maintenance mode or more than one maintenance mode occurs at the same time, the display will show CC and the numbers of the modes separated by a period. For example, if CC1 occurs, the display will show CC and 1 reciprocally or if CC2 and CC4 occur at the same time, the display will show CC and 2.4. reciprocally.
5

OVEN & CONTROLPANEL
|
|
|
|
|
1 |
13 |
|
|
|
|
|
|
|
|
9 |
|
|
|
|
|
|
8 |
|
|
|
|
|
|
|
|
|
|
1 |
|
11 |
|
|
|
|
2 |
|
|
|
17 |
3 |
5 |
14 |
|
|
10 |
4 |
|
12 |
||
|
|
|
||||
|
|
|
|
|
|
|
|
|
|
|
|
|
16 |
|
|
|
6 |
|
|
15 |
|
7 |
|
|
|
|
|
|
|
|
|
|
|
|
1. |
Touch control panels |
|
|
|
12. Service window for replacing the oven light bulb |
|
2. |
Door latch openings |
|
|
|
13. |
Ventilation openings |
3. |
Ceramic shelf |
|
|
|
14. |
Power supply cord |
4. |
Oven light |
|
|
|
15. |
Mounting plate |
5. |
Air intake openings |
|
|
|
16. Screw for mounting plate |
|
6. |
Air intake filter |
|
|
|
17. |
Splash cover |
7.Door seals and sealing surfaces
8.Door hinges
9.Oven door with see-through window
10.Door latches
11.Door handle
1 |
2 |
3 |
4 |
5 |
6 |
|
|
|
|
|
|
|
|
|
|
|
|
|
|
|
8 |
9 |
|||
7 |
5 |
||||||||
6 |
|
|
|||||||
|
|
|
|
|
|
|
|
|
|
|
|
|
|
|
|
|
|
|
|
1. |
MANUAL/REPEAT pad |
6. |
START pad |
2. |
POWER LEVEL pad |
7. |
Ten number pads |
3. |
DOUBLE/TRIPLE QUANTITY pad |
8. |
EXPRESS DEFROST pad |
4. |
CUSTOM SETTING pad |
9. |
SET MEMORY pad |
5.STOP/CLEAR pad
ON DEF. NO. CHECK LOCK FILTER
6

BEFORE OPERATION
*Before operating your new oven, make sure you read and understand this operation manual completely.
1)Plug in the oven.
*The digital display will show “ . “
2)Control panels can only be operated when the door is closed.
3)Oven light will go on for 1 minute whenever the door is opened or after cooking.
4)Your oven has 3 ways to select memory numbers. See Custom Setting 1 on page 11 to set Input Method. The factory setting is Dual Digit Input .
Cancellation:
1.Cooking data is canceled when keys are not pressed for more than three minutes when setting programming.
2.Cooking stops when the STOP/CLEAR pad is pressed and cooking data remains. However if subsequent keys are not
pressed within three minutes, cooking data will be canceled. To resume cooking press the START pad.
3.Cooking stops when the door is opened and cooking data remains. However once the door is closed, cooking data will be canceled if subsequent keys are not pressed within 3 minutes. To resume cooking press the START pad.
4.Cooking is immediately canceled by pressing the STOP/CLEAR pad twice.
Checking food:
Press the STOP/CLEAR pad then open the door, check food, close the door and press the START pad to continue cooking.
Cooking Completion:
When food is not taken out after cooking completion, End will be shown in the display until the food is taken out.
HELPFUL TIPS for the Memory Input Method
The Memory Input Method determines how to input memory numbers for Memory Cooking and Custom Setting and Saving memories, therefore follow the method below. Refer to HELPFUL TIPS below as well as in Memory cooking.
1. |
Dual Digit Input: Must input two numbers to select a |
|
The Memory Input Method |
|
||||
|
memory, even though the first number is 0. Memory |
Memory No. |
|
|
|
|
||
|
programming is limited to 0 - 99. |
|
|
|
|
|||
|
Memory |
Examples |
0 |
2 |
12 |
22 |
||
2. |
Single Digit Input: Can only input one number to select a |
|||||||
|
|
|
|
|
||||
|
memory. Memory programming is limited to 0 - 9. |
Input Method |
|
|
|
|
||
3. |
Repeat Digit Input: Input one, two, or three numbers to |
Dual Digit Input |
0, 0 |
0, 2 |
1, 2 |
2, 2 |
||
|
select a memory. Memory programming is limited to |
|||||||
|
|
|
|
|
|
|
||
|
0 - 29. |
Single Digit Input |
0 |
2 |
|
|
||
4. |
For Repeat Digit Input/Auto Start ON only, push number |
Repeat Digit Input |
0 |
2 |
2, 2 |
2, 2, 2 |
||
|
pads within one second of the previous number. |
|||||||
|
|
|
|
|
|
|
||
|
|
|
|
|
|
|
||
5.Regardless of Input Method selected, Counter Check/Clear (Custom Setting 7) and Multiplication Factor for Double/ Triple Quantity (Custom Setting 10) only use the Dual Digit Input Method. As for Custom Setting 10, enter memory number after pressing the DOUBLE/TRIPLE QUANTITY pad.
HOW TO OPERATE THE OVEN
MEMORY OPERATION
Memory Cooking
*Your oven has 100 memory banks from 0 to 99. Memory contents from memory number 0 to 29 are same in Dual and Repeat Digit Input methods.
*Memory 0 - 9 are programmed as factory settings. See the table of Programmed Memories and the Memory Input Method on the right side. Memory 10 - 99 must be programmed before using Memory Cooking. When a memory number which has not been programmed is entered, End will be shown in the display. See Saving Memories page 17 - 21 to programme a new memory.
Programmed Memories and the Memory Input Method
Memory |
Dual |
Single |
Repeat |
Cook |
Output |
|
Digit |
Digit |
Digit |
||||
No. |
time |
power |
||||
Input |
Input |
Input |
||||
|
|
|
||||
|
|
|
|
|
|
|
1 |
01 |
1 |
1 |
5 sec. |
100% |
|
|
|
|
|
|
|
|
2 |
02 |
2 |
2 |
10 sec. |
100% |
|
3 |
03 |
3 |
3 |
20 sec. |
100% |
|
|
|
|
|
|
|
|
4 |
04 |
4 |
4 |
30 sec. |
100% |
|
|
|
|
|
|
|
|
5 |
05 |
5 |
5 |
40 sec. |
100% |
|
|
|
|
|
|
|
|
6 |
06 |
6 |
6 |
50 sec. |
100% |
|
|
|
|
|
|
|
|
7 |
07 |
7 |
7 |
1 min. |
100% |
|
|
|
|
|
|
|
|
8 |
08 |
8 |
8 |
1 min. 15 sec. |
100% |
|
|
|
|
|
|
|
|
9 |
09 |
9 |
9 |
1 min. 30 sec. |
100% |
|
|
|
|
|
|
|
|
0 |
00 |
0 |
0 |
2 min. |
100% |
|
|
|
|
|
|
|
7

*Memory Cooking can be set in 6 operating ways.
There are multiple methods of selecting memories depending on the input method selected and whether or not Auto Start is turned on or off. To avoid mistakenly selecting the incorrect memory, please confirm your settings by checking Custom Setting (see Custom Setting 1 and 2 on page 11).
<6 operating ways>
1.Dual Digit Input/Auto Start OFF (memory 00 - 99)
2.Dual Digit Input/Auto Start ON (memory 00 - 99)
3.Repeat Digit Input/Auto Start OFF (memory 0 - 29)
4.Repeat Digit Input/Auto Start ON (memory 0 - 29)
5.Single Digit Input/Auto Start OFF (memory 0 - 9)
6.Single Digit Input/Auto Start ON (memory 0 - 9)
HELPFUL TIPS for the Display of Memory Input Status and the START pad
When Auto Start ON has been selected,
1.“0” should be displayed before entering memory number.
When “0” is not displayed, open the door and close to reset.
2.The START pad does not need to be pressed. Cooking will automatically start when the memory number is input.
1.Dual Digit Input/Auto Start OFF (with the Start pad)
*Suppose you want to cook with memory 2, which was programmed for 10 seconds at 100%.
Procedure
1 Place food in oven. |
0 2 |
Enter memory number. |
2Press the START pad.
2.Dual Digit Input/Auto Start ON (without the Start pad)
* Suppose you want to cook with memory 12, which was programmed for 10 seconds at 100%.
Procedure
1 Place food in the oven. |
1 2 |
Enter memory number. |
3. Repeat Digit Input/Auto Start OFF (with the Start pad)
*Suppose you want to cook with memory 2, which was programmed for 10 seconds at 100%.
Procedure
1 Place food in oven. |
2 |
Enter memory number. |
2 Press the START pad.
4.Repeat Digit Input/Auto Start ON (without the Start pad)
*Suppose you want to cook with memory 12, which was programmed for 10 seconds at 100%.
Procedure
1 Place food in oven. |
2 |
x 2 |
|
|
|
Enter memory number. |
|
|
|
|
5. Single Digit Input/Auto Start OFF (with the Start pad)
*Suppose you want to cook with memory 2, which was programmed for 10 seconds at 100%.
Procedure
1 Place food in oven. |
2 |
Enter memory number. |
2Press the START pad.
6.Single Digit Input/Auto Start ON (without the Start pad)
*Suppose you want to cook with memory 2, which was programmed for 10 seconds at 100%.
Procedure
1 Place food in oven. |
2 |
Enter memory number. |
Cooking Double/Triple Quantity with Memory
Double/Triple Quantity is a feature where the oven will automatically calculate how to cook two or three servings of a programmed food. It does not simply double or triple the time. Factory setting is multiplication factor 1.8 for double quantity and 2.6 for triple quantity. Press the DOUBLE/TRIPLE QUANTITY pad once for Double Quantity (2 servings), and twice for Triple Quantity (3 servings).
*Suppose you want to cook 3 servings with memory number 2 programmed Single Digit Input/Auto Start ON.
|
Procedure |
|
|
|
|
1 |
Place food in oven. |
|
|
x 2 |
|
x2/x3 |
|
||||
|
Press the DOUBLE/TRIPLE |
|
|||
|
|
|
|
|
|
|
QUANTITY pad twice. |
|
|
|
|
|
|
|
|
|
|
2 |
Enter memory number. |
|
|
|
|
|
|
2 |
|
||
|
|
|
|
|
|
NOTE : If your total cooking time is over the maximum time allowed, error message EE9 will be displayed. Press the STOP/CLEAR pad to clear the error message and reduce the quantity or cook without using Double/Triple Quantity. For details see Custom Setting 10 on page 15 and Maximum Cooking Time on page 21.
8
Express Defrost with
Memory
*Suppose you want to cook with memory 0, which was programmed for 10 minutes Express Defrost sequence, Single Digit Input/Auto Start ON.
Procedure
1 Place food in oven. |
0 |
Enter memory number. |
Midway through the defrosting cycle, the CHECK indicator will light in the display and an audible signal will be heard unless signal volume has been set to Mute. You may open the door, turn food over and shield any warm portions. Close the door.
Procedure
2 Press the START pad to continue defrosting.
NOTES:
1.Even though CHECK lights up in the display, your oven continues defrosting and does not stop to check.
2.Press the START pad at step 2 to continue defrosting as once the door is closed, cooking data will be canceled if the START pad is not pressed within 3 minutes.
3.See HELPFUL TIP for Express Defrost on page 10.
MANUAL OPERATION
Time Cooking
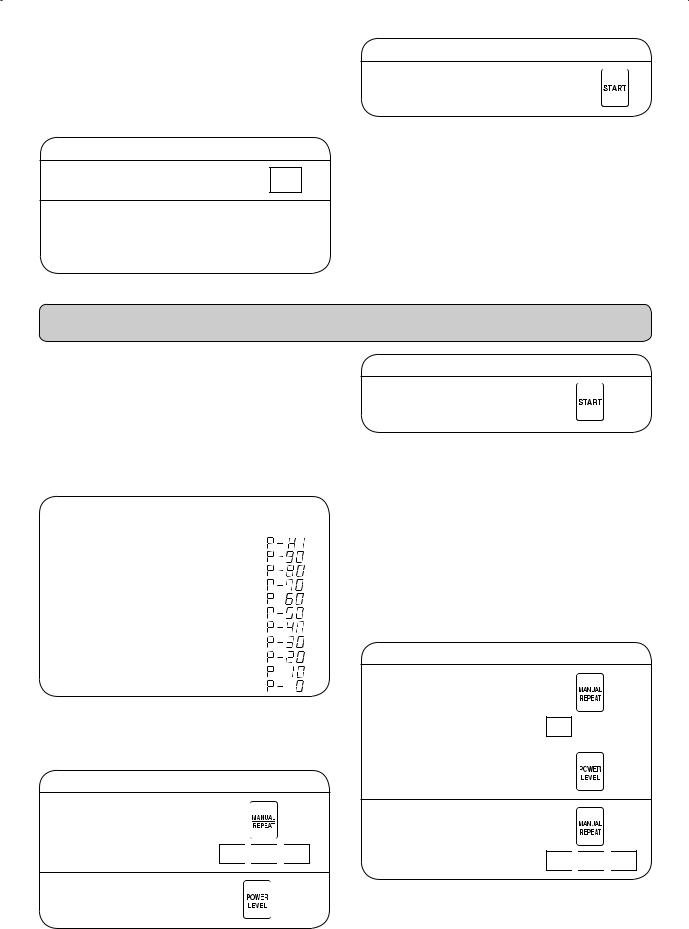
Your oven can be programmed for up to 4 cooking sequences and has 11 preset microwave power levels.
Maximum Cooking Time |
|
|
Microwave 100% - 60% |
Maximum of 60 minutes |
|
Microwave 50% - 10% |
Maximum of 120 minutes |
|
(Please see Maximum Cooking Time on page 21) |
||
Microwave Power Level |
|
|
Press the |
APPROXIMATE |
Display |
POWER LEVEL PAD |
PERCENTAGE OF |
|
once then press |
POWER |
|
POWER LEVEL |
100% |
|
9 |
90% |
|
8 |
80% |
|
7 |
70% |
|
6 |
60% |
|
5 |
50% |
|
4 |
40% |
|
3 |
30% |
|
2 |
20% |
|
1 |
10% |
|
0 |
0% |
|
Single Stage Cooking
*Suppose you want to cook for 2 minutes and 30 seconds at 50%.
Procedure
1 Place food in oven and press the MANUAL/REPEAT pad. Enter cooking time.
2 
 3
3 
 0
0
2 Press the POWER LEVEL pad
and enter power level. |
5 |
|
|
|
|
Procedure
3 Press the START pad.
NOTES:
1.It is not necessary to press the POWER LEVEL pad for 100% in Single Stage Cooking.
2.If cooking time input is over the maximum allowed time, error message EE9 will be displayed. Press the STOP/ CLEAR pad to clear the error message and reduce cooking time or power level. For details, see Maximum Cooking Time on page 21.
Multi Stage Cooking
*Suppose you want to cook for 1 minute at 70% power for 1st stage and then continue to cook for 2 minutes at 50% power for 2nd stage and to cook for 3 minutes at 100% power for 3rd stage.
Procedure
1 |
Place food in oven and press |
|
|
|
|
|
the MANUAL/REPEAT pad. |
|
|
|
|
|
Enter cooking time for 1st |
|
|
|
|
|
stage. |
|
|
|
|
|
1 |
0 |
|
0 |
|
|
|
|
|
|
|
2 |
Press the POWER LEVEL pad. |
|
|
|
|
|
Enter power level for 1st stage. |
|
|
7 |
|
|
|
|
|
|
3 Press the MANUAL/REPEAT pad. Enter cooking time for 2nd stage.
2 
 0
0 
 0
0
9
Procedure
4 Press the POWER LEVEL pad. |
|
Enter power level for 2nd stage. |
5 |
|
|
|
|
5 Press the MANUAL/REPEAT pad. Enter cooking time for 3rd stage.
3 
 0
0 
 0
0
6 Press the START pad.
NOTES:
1.It is not necessary to press the POWER LEVEL pad for 100% at the last stage in Multi Stage Cooking.
2.If the Total Cooking Time is over the maximum time allowed, error message, EE9 will be displayed. Press the STOP/CLEAR pad to clear the error message pad and reduce Total Cooking Time, power levels or stages. For details, see Maximum Cooking Time on page 21.
Repeat Cooking
Use REPEAT COOKING to re-cook in the previous manual cooking setting. The previous manual cooking setting is memorized unless the oven is unplugged.
*Suppose you want to re-cook in the previous manual cooking setting, 1 minute at 70% power for 1st stage and then continue to cook for 2 minutes at 50% power for 2nd stage and to cook for 3 minutes at 100% power for 3rd stage.
Procedure
1 Place food in oven.
Press the MANUAL/REPEAT pad.
2 Press the START pad.
Express Defrost
Use EXPRESS DEFROST to defrost meat and poultry. Calculate total defrost time using chart below. Express Defrost can be programmed for a maximum of 90 minutes.
*Suppose you want to defrost one pound of lamb chops for 3 minutes and 30 seconds.
|
Procedure |
|
|
|
|
|
|
1 |
Place food in oven. |
|
|
|
|
|
|
|
Press the EXPRESS DEFROST pad. |
|
|
|
|
|
|
|
|
|
|
|
|
|
|
2 |
Enter defrosting time. |
|
|
|
|
|
|
3 |
|
3 |
|
0 |
|
||
|
(Refer to chart below.) |
|
|
|
|||
|
|
|
|
||||
|
|
|
|
|
|
|
|
3 |
Press the START pad. |
|
|
|
|
|
|
Midway through the defrosting cycle, the CHECK indicator will light in the display and an audible signal will be heard unless signal volume has been set to Mute. You may open the door, turn food over and shield any warm portions. Close the door.
4 Press the START pad to continue defrosting.
NOTES:
1.Even though CHECK lights up the display, your oven continues defrosting and does not stop to check.
2.Press the START pad at step 4 to continue defrosting. Once the door is closed, cooking data will be canceled if subsequent keys are not pressed within 3 minutes.
HELPFUL TIP for Express Defrost
Allow foods to stand a few minutes after defrosting to equalize the temperature for better cooking results. Check food after standing. If additional time is needed, continue to defrost with manual cooking.
Foods that are the same thickness throughout defrost better. If foods have varied thickness, it may be necessary to shield the thin edges with small flat pieces of aluminum foil to prevent overdefrosting.
10

PROGRAMME & CUSTOMISE
Custom Setting
You can check your oven settings and customise your oven by changing Custom Setting settings.
The CUSTOM SETTING pad has 11 operations.
1.Selecting Memory Input Method
2.Selecting Auto Start Operation
3.Programme Lock Setting
4.Audible Signal Sound Volume Setting
5.Cooking Completion Signal Setting
6.Memory Check
7.Counter Check/Clear
8.Air Intake Filter Counter
9.Selecting Operation in case of Magnetron Failure
10.Multiplication Factors for Double/Triple Quantity
11.Express Defrost Setting
To use Custom Setting Function, press the CUSTOM SETTING pad twice within 2 seconds, and desired option pads. See detailed instructions below.
NOTE : You will hear an audible signal the second time the
CUSTOM SETTING pad is pressed to indicate that you have entered Custom Setting.
1. Selecting Memory Input Method
Your oven has 3 ways to select memory numbers.
CU11 |
: Dual Digit Input (100 memory banks) |
|
|
|
= Factory Setting |
CU12 |
: |
Single Digit Input (10 memory banks) |
CU13 |
: |
Repeat Digit Input (30 memory banks) |
To set Input Method
Press the CUSTOM SETTING pad twice within 2 seconds then enter the numbers
1,1 for Dual Digit Input
1,2 for Single Digit Input
1,3 for Repeat Digit Input
Press the START pad to save settings and the STOP/CLEAR pad to exit from the Custom Setting Function.
* Suppose you want to set Repeat Digit Input.
|
|
|
|
|
|
Procedure |
|
|
|
x 2 |
1 |
Press the CUSTOM SETTING pad |
|
|
|
|
|
twice within 2 seconds. |
||
|
|
|
|
|||
|
|
|
|
|
|
|
|
|
|
|
|
2 |
Enter 1,3 for Repeat Digit Input. |
|
1 |
|
3 |
|
||
|
|
|
|
|
||
|
|
|
|
|
|
|
3 Press the START pad to save the setting.
4 Press the STOP/CLEAR pad to exit from the Custom Setting Function.
2. Selecting Auto Start Operation
Your oven has 2 ways to start memory cooking. CU21 : Auto Start OFF = Factory Setting CU22 : Auto Start ON
The factory setting is Auto Start OFF. Under Auto Start OFF, cooking will not begin until the START pad is pressed. Under Auto Start ON, cooking will automatically start after the memory number is input.
To set AUTO START
Press the CUSTOM SETTING pad twice within 2 seconds then enter the numbers
2, 1 for Auto Start OFF
2, 2 for Auto Start ON
Press the START pad to save settings and the STOP/CLEAR pad to exit from the Custom Setting Function.
* Suppose you want to set Auto Start ON.
|
|
|
|
|
Procedure |
|
|
|
x 2 |
1 |
Press the CUSTOM SETTING pad |
|
|
|
|
twice within 2 seconds. |
|
|
|
|
|
||
|
|
|
|
|
|
|
|
|
|
2 |
Enter 2, 2 for Auto Start ON. |
|
2 |
|
2 |
||
|
|
|
|
||
|
|
|
|
|
|
|
|
|
|
3 |
Press the START pad to save the |
|
|
|
|
|
setting. |
4 Press the STOP/CLEAR pad to exit from the Custom Setting Function.
3. Programme Lock Setting
You can select Programme Lock ON or OFF
CU31 : Programme Lock OFF = Factory Setting CU32 : Programme Lock ON
Programme Lock OFF is the Factory setting. Programme Lock prevents accidental changes to settings. When the CUSTOM SETTING pad is pressed twice within 2 seconds in programme Lock ON, the LOCK indicator will light up. Turn Programme Lock OFF when you want to change the settings.
To turn Programme Lock ON/OFF
Press the CUSTOM SETTING pad twice within 2 seconds then enter the numbers
3, 1 for Programme Lock OFF 3, 2 for Programme Lock ON
Press the START pad to save settings and the STOP/CLEAR pad to exit from the Custom Setting Function.
11

* Suppose you want to set Programme Lock ON.
|
|
|
|
|
|
Procedure |
|
|
|
|
|
|
|
|
|
|
x 2 |
1 |
Press the Custom Setting pad |
|
|
|
|
|
twice within 2 seconds. |
||
|
|
|
|
|||
|
|
|
|
|
|
|
|
|
|
|
|
2 |
Enter 3, 2 for Programme Lock |
|
3 |
|
2 |
|
||
|
|
|
|
ON. |
||
|
|
|
|
|
|
|
|
|
|
|
|
|
|
|
|
|
|
|
3 |
Press the START pad to save the |
|
|
|
|
|
|
setting. |
4 Press the STOP/CLEAR pad to exit from the Custom Setting Function.
NOTE : If you select Programme Lock OFF, the LOCK indicator in the display will disappear when you press the START pad.
Operation when Programme Lock ON is set
KEY |
Custom Setting Title |
When Programme |
|
Operation |
Lock ON is set |
||
|
|||
|
|
|
|
1 |
Selecting Memory |
no operation |
|
Input Method |
|
||
|
|
||
|
|
|
|
2 |
Selecting Auto Start |
no operation |
|
Operation |
|
||
|
|
||
|
|
|
|
3 |
Programme Lock |
operation |
|
Setting |
|
||
|
|
||
|
|
|
|
4 |
Audible Signal Sound |
no operation |
|
Volume Setting |
|
||
|
|
||
|
|
|
|
5 |
Cooking Completion |
no operation |
|
Signal Setting |
|
||
|
|
||
|
|
|
|
6 |
Memory Check |
operation |
|
|
|
|
|
|
Counter Check/Clear |
check : operation |
|
7 |
|
clear : |
|
|
|
no operation |
|
|
|
|
|
|
Air Intake Filter |
check, clear : |
|
8 |
Counter |
operation |
|
|
|
set : no operation |
|
|
|
|
|
|
Selecting Operation |
no operation |
|
9 |
in case of Magnetron |
|
|
|
Failure |
|
|
|
|
|
|
|
Multiplication Factors |
check : operation |
|
x2/x3 |
for Double/Triple |
set : no operation |
|
|
Quantity |
|
|
|
|
|
|
EXPRESS |
Express Defrost |
check : operation |
|
DEFROST |
Setting |
set : no operation |
|
|
|
|
4. Audible Signal Sound Volume Setting
The volume of the audible signal can be adjusted to High, Medium, or Mute.
CU41 : High = Factory Setting CU42 : Medium
CU43 : Mute
To set cooking completion signal volume
Press the CUSTOM SETTING pad twice within 2 seconds then enter the numbers
4, 1 for High
4, 2 for Medium 4, 3 for Mute
Press the START pad to save setting and the STOP/CLEAR pad to exit from the Custom Setting Function.
NOTE : Even when errors occur, your oven will not beep in mute setting.
5. Cooking Completion Signal Setting
There is a choice of 4 different signals on your oven. CU51 : 1 long beep = Factory setting
CU52 : Repeating long beeps CU53 : 4 short beeps
CU54 : Repeating short beeps
To set the signal type
Press the CUSTOM SETTING pad twice within 2 seconds then enter the numbers
5, 1 for 1 long beep
5, 2 for repeating long beeps 5, 3 for 4 short beeps
5, 4 for repeating short beeps
Press the START pad to save settings and the STOP/CLEAR pad to exit from the Custom Setting Function.
6. Memory Check
Use this setting to check the programming for a certain memory.
*Suppose you want to know the information programmed into memory 1, programmed for 4 minutes at 60% for the 1st stage and 2 minutes at 30% at the 2nd stage programmed Dual Digit Input.
Procedure Display
 x 2 6
x 2 6
1 Press the CUSTOM SETTING |
NO. CHECK |
|
|
pad twice within 2 seconds and |
|
enter 6. |
|
12
 Loading...