


GSM TELEPHONE
SGH-U300
GSM TELEPHONE |
|
|
CONTENTS |
|
|
|
1. |
Specification |
|
|
|
|||
|
|
2. |
Exploded View and Parts list |
|
|
|
3. |
Chart of Troubleshooting |
|
|
|
4. |
Array course control |
|
|
|
5. |
Block Diagrams |
|
|
|
6. |
PCB Diagrams |
|
|
|
7. |
MAIN Electrical Parts List |
|
|
|
8. |
Reference data |
|
|
|
9. |
Safety Precautions |
|
|
|
|
10. Product Function |
|
|
|
|
|
|

|
|
|
|
GSPN (Global Service Partner Network) |
|
||
|
|
||
Country |
Web Site |
||
North America |
service.samsungportal.com |
||
|
|
||
Latin America |
latin.samsungportal.com |
||
|
|
||
CIS |
cis.samsungportal.com |
||
|
|
||
Europe |
europe.samsungportal.com |
||
|
|
||
China |
china.samsungportal.com |
||
Asia |
asia.samsungportal.com |
||
|
|
||
Mideast & Africa |
mea.samsungportal.com |
||
This Service Manual is a property of Samsung Electronics Co.,Ltd. |
Samsung Electronics Co.,Ltd. |
Any unauthorized use of Manual can be punished under applicable |
2007. 05. Rev.1.0 |
International and/or domestic law. |

Contents
1. Specification
1-1. GSM/CDMA General Specification |
...........................................................................1-1 |
|
1-2. GSM TX power class ............................................................................................... |
1-2 |
|
2. Exploded View and Parts list |
|
|
2-1. Cellular |
phone Exploded View .................................................................................. |
2-1 |
2-2. Cellular |
phone Parts list ............................................................................................ |
2-2 |
2-3. Disassembly ............................................................................................................... |
2-4 |
|
2-4. Assembly .................................................................................................................... |
2-8 |
|
3. Chart of Troubleshooting |
|
|
3-1. Baseband ............................................................................................................ |
3-1 |
|
3-1-1. |
Power ON ..................................................................................................... |
3-1 |
3-1-2. |
System Initial ................................................................................................ |
3-6 |
3-1-3. |
SIM Part ....................................................................................................... |
3-8 |
3-1-4. |
Charging Part ............................................................................................. |
3-10 |
3-1-5. |
Microphone Part ......................................................................................... |
3-13 |
3-1-6. |
Speaker Part .............................................................................................. |
3-16 |
3-1-7. |
Receiver Part ............................................................................................. |
3-20 |
3-1-8. |
Camera Part .............................................................................................. |
3-22 |
3-1-9. |
LCD ............................................................................................................. |
3-26 |
3-2. RF |
...................................................................................................................... |
3-13 |
3-2-1. ......................................................................................... |
EGSM Receiver |
3-30 |
3-2-2. ..................................................................................... |
EGSM Transmitter |
3-31 |
3-2-3. ............................................................................................ |
DCS Receiver |
3-32 |
3-2-4. ........................................................................................ |
DCS Transmitter |
3-33 |
3-2-5. ............................................................................................. |
PCS Receiver |
3-34 |
3-2-6. ......................................................................................... |
PCS Transmitter |
3-35 |
3-2-7. .......................................................................................... |
UMTS Receiver |
3-40 |
3-2-8. ...................................................................................... |
UMTS Transmitter |
3-41 |
3-2-9. .............................................................................................. |
BLUETOOTH |
3-45 |

|
|
Contents |
|
|
|
|
|
4. Array course control |
|
|
|
4-1. |
Downloading Binary Files ...................................................................................... |
4-2 |
|
4-2. |
Pre-requsite for Downloading ................................................................................ |
4-2 |
|
4-3. |
S/W Downloader Program ..................................................................................... |
4-3 |
|
5.Block Diagrams
6.PCB Diagrams
7.MAIN Electrical Parts List
8.Reference data
8-1. Reference Abbreviate .............................................................................................. |
8-1 |
9. Safety Precautions |
|
9-1. Repair Precaution ...................................................................................................... |
9-1 |
9-2. ESD(Electrostaically Sensitive Devices) Precaution ................................................ |
9-2 |
10. Product Function

1. Specification
1-1. GSM/DCS1800/PCS1900 General Specification
|
EGSM 900 |
DCS1800 |
PCS1900 |
|
|
Phase 2 |
Phase 1 |
||
|
|
|||
|
|
|
|
|
Freq. Band[MHz] |
880~915 |
1710~1785 |
1850~1910 |
|
Uplink/Downlink |
925~960 |
1805~1880 |
1930~1990 |
|
|
|
|
|
|
ARFCN range |
0~124 & 975~1023 |
512~885 |
512~810 |
|
|
|
|
|
|
Tx/Rx spacing |
45 MHz |
95 MHz |
80 MHz |
|
|
|
|
|
|
Mod. Bit rate/ |
270.833 kbps |
270.833 kbps |
270.833 kbps |
|
Bit Period |
3.692 us |
3.692 us |
3.692 us |
|
|
|
|
|
|
Time Slot |
576.9 us |
576.9 us |
576.9 us |
|
Period/Frame |
||||
4.615 ms |
4.615 ms |
4.615 ms |
||
Period |
||||
|
|
|
||
|
|
|
|
|
Modulation |
0.3 GMSK |
0.3 GMSK |
0.3 GMSK |
|
|
|
|
|
|
MS Power |
33 dBm~5 dBm |
30 dBm~0 dBm |
30 dBm~0 dBm |
|
|
|
|
|
|
Power Class |
5 pcl ~ 19 pcl |
0 pcl ~ 15 pcl |
0 pcl ~ 15 pcl |
|
|
|
|
|
|
Sensitivity |
-102 dBm |
-100 dBm |
-100 dBm |
|
|
|
|
|
|
TDMA Mux |
8 |
8 |
8 |
|
|
|
|
|
|
Cell Radius |
35 Km |
2 Km |
- |
|
|
|
|
|
1-1
SAMSUNG Proprietary-Contents may change without notice
This Document can not be used without Samsung's authorization

Specification
1-2. GSM TX power class
TX Power |
EGSM900 |
|
TX Power |
|
DCS1800 |
|
TX Power |
PCS1900 |
control level |
|
control level |
|
|
control level |
|||
|
|
|
|
|
|
|||
|
|
|
|
|
|
|
|
|
5 |
33±2 dBm |
|
0 |
|
30±3 dBm |
|
0 |
30±3 dBm |
|
|
|
|
|
|
|
|
|
6 |
31±2 dBm |
|
1 |
|
28±3 dBm |
|
1 |
28±3 dBm |
|
|
|
|
|
|
|
|
|
7 |
29±2 dBm |
|
2 |
|
26±3 dBm |
|
2 |
26±3 dBm |
|
|
|
|
|
|
|
|
|
8 |
27±2 dBm |
|
3 |
|
24±3 dBm |
|
3 |
24±3 dBm |
|
|
|
|
|
|
|
|
|
9 |
25±2 dBm |
|
4 |
|
22±3 dBm |
|
4 |
22±3 dBm |
|
|
|
|
|
|
|
|
|
10 |
23±2 dBm |
|
5 |
|
20±3 dBm |
|
5 |
20±3 dBm |
|
|
|
|
|
|
|
|
|
11 |
21±2 dBm |
|
6 |
|
18±3 dBm |
|
6 |
18±3 dBm |
|
|
|
|
|
|
|
|
|
12 |
19±2 dBm |
|
7 |
|
16±3 dBm |
|
7 |
16±3 dBm |
|
|
|
|
|
|
|
|
|
13 |
17±2 dBm |
|
8 |
|
14±3 dBm |
|
8 |
14±3 dBm |
|
|
|
|
|
|
|
|
|
14 |
15±2 dBm |
|
|
|
|
|
|
|
|
9 |
|
12±4 dBm |
|
9 |
12±4 dBm |
||
|
|
|
|
|
|
|
|
|
15 |
13±2 dBm |
|
10 |
|
10±4 dBm |
|
10 |
10±4 dBm |
|
|
|
|
|
|
|
|
|
16 |
11±3 dBm |
|
11 |
|
8±4 dBm |
|
11 |
8±4 dBm |
|
|
|
|
|
|
|
|
|
17 |
9± 3dBm |
|
12 |
|
6±4 dBm |
|
12 |
6±4 dBm |
|
|
|
|
|
|
|
|
|
18 |
7±3 dBm |
|
13 |
|
4±4 dBm |
|
13 |
4±4 dBm |
|
|
|
|
|
|
|
|
|
19 |
5±3 dBm |
|
14 |
|
2±5 dBm |
|
14 |
2±5 dBm |
|
|
|
|
|
|
|
|
|
|
|
|
15 |
|
0±5 dBm |
|
15 |
0±5 dBm |
|
|
|
|
|
|
|
|
|
|
|
1-2 |
|
|
|
|
||
|
|
|
|
|
|
|
|
|
|
SAMSUNG Proprietary-Contents may change without notice |
|
||||||
This Document can not be used without Samsung's authorization

2. Exploded View and Parts List
2-1. Cellular phone Exploded View
QFU01 |
|
|
QLC01 |
|
QKP01 |
|
|
|
|
QAU01 |
|
QMW01 |
QMI01 : GH30-00177C |
QME01 |
|
||
|
|
|
|
QMI03 |
|
QCW01 |
|
QMI01 : GH81-06085A |
|
|
|
|
QHI01 |
|
|
|
QFR01 |
|
QFL01 |
|
QSC01 |
QSC37 |
|
|
|
|
QCA01 |
|
QAN02 |
|
|
|
QHI19 |
|
|
QCR12 |
QCB01 |
|
|
|
QBA01 |
QFL04 |
QVK01 |
|
QCR32 |
|
|
|
QMP01 |
|
|
|
|
|
QSC31 |
|
|
QMO01 |
QSC29 |
|
|
QCR32 |
|
|
QRE01 |
QVO01
QIF01
QCR12 |
QCR06 |
|
 QSD01
QSD01
2-1
SAMSUNG Proprietary-Contents may change without notice
This Document can not be used without Samsung's authorization

Exploded View and Parts List
2-2. Cellular phone Parts list
Design LOC |
Description |
SEC CODE |
QAN02 |
INTENNA-SGH-U300 |
GH42-01154A |
QAU01 |
AUDIO-RECEIVER |
3009-001262 |
QBA01 |
SOFT BATTERY PACK-690MAH,BLK,E |
GH43-02812A |
QCA01 |
CAMERA MODULE |
GH59-04215A |
|
|
|
QCB01 |
AS-COXIAL CABLE |
GH81-06648A |
QCR05 |
SCREW-MACHINE |
6001-001478 |
QCR12 |
SCREW-MACHINE |
6001-001530 |
QCR12 |
SCREW-MACHINE |
6001-001530 |
|
|
|
QCR17 |
SCREW-MACHINE |
6001-001460 |
QCR32 |
SCREW-MACHINE |
6001-001700 |
QCW01 |
PMO-CAM WINDOW |
GH72-37590A |
QFL01 |
ASSY COVER-F/LOWER SUB |
GH98-03829B |
QFL04 |
ASSY DECO-F/LOWER SUB |
GH98-03868B |
QFR01 |
ASSY COVER-FR SUB |
GH98-03750B |
QFU01 |
ASSY COVER-F/UPPER |
GH98-03752B |
QHI01 |
ASSY HINGE |
GH98-03062A |
QHI19 |
IPR-HINGE BLOCK |
GH70-02395A |
QIF01 |
PMO-COVER IF |
GH72-37584B |
QKP01 |
ASSY KEYPAD-(RUSS/BLU) |
GH98-04906A |
QLC01 |
LCD-MODULE SGHU300 |
GH07-01110A |
QME01 |
KEY FPCB-SGHU300 KEY PBA |
GH59-04213A |
QMI01 |
MICROPHONE-ASSY-5.25MM |
GH30-00177C |
QMI01 |
AS-MIC SVC |
GH81-06085A |
QMI03 |
RMO-MIC HOLDER FR |
GH73-07324A |
QMI03 |
RMO-MIC HOLDER FR |
GH73-07324A |
QMO01 |
MOTOR DC-MOTOR,SPEAKER MODULE( |
GH31-00316A |
QMP01 |
PBA MAIN-SGHU300 |
GH92-03487A |
|
|
|
QMW01 |
AS-LCD WINDOW |
GH81-06234A |
QRE01 |
ASSY COVER-REAR COVER SUB |
GH98-03830B |
QSC01 |
RMO-RUBBER LOWER SCREW CAP |
GH73-09620B |
QSC29 |
RMO RUBBER-BT |
GH73-10606A |
|
|
|
QSC31 |
RMO RUBBER-RESET DOME |
GH73-10607A |
QSC37 |
RMO-RUBBER PCB BASE |
GH73-09146A |
QSD01 |
PMO-SIM COVER |
GH72-39826B |
QVK01 |
KEY FPCB-SGHU300 VOLUME KEY |
GH59-04214A |
QVO01 |
PMO-KEY VOLUME |
GH72-39356A |
2-2
SAMSUNG Proprietary-Contents may change without notice
This Document can not be used without Samsung's authorization

Exploded View and Parts List
Description |
SEC CODE |
|
|
CBF INTERFACE-DLC,X830,SIL,PCB |
GH39-00720B |
|
|
ADAPTOR-SGHE690,SIL,EU,A_TYPE |
GH44-01361B |
|
|
EARPHONE-EARPHONE,SGHE490,SIL, |
GH59-03883B |
|
|
LABEL(R)-WATER SOAK |
GH68-09361A |
|
|
TAPE INSU |
GH74-31680A |
|
|
MPR-INSU TAPE |
GH74-31681A |
|
|
MPR-SPONGE PCB A |
GH74-31689A |
|
|
MPR-TAPE FPCB |
GH74-31994A |
|
|
TAPE-GASKET BT |
GH74-33420A |
|
|
AS-LCD TAPE |
GH81-06235A |
|
|
AS-LCD SUB |
GH81-06335A |
|
|
TAPE INSU |
GH74-31679A |
|
|
TAPE INSU |
GH74-31710A |
|
|
VINYL-BOHO FOLDER UPPER |
GH74-32275A |
|
|
SPONGE-CAM |
GH74-30241A |
|
|
TAPE-GASKET BATT CONN |
GH74-33669A |
|
|
VINYL-BOHO REAR |
GH74-34439A |
|
|
S/W CD-SGHU300 PC STUDIO 3.1 |
GH46-00408A |
|
|
MANUAL-SFC |
GH68-04336A |
|
|
MANUAL USERS-EU RUSSIAN |
GH68-14481A |
|
|
BAG PE |
6902-000634 |
|
|
LABEL(P)-UNIT SEAL |
GH68-00518B |
|
|
LABEL(R)-MAIN(SER) |
GH68-14742B |
|
|
BOX(P)-UNIT MAIN(SER) |
GH69-05380B |
|
|
CUSHION-CASE(EU) |
GH69-05381A |
|
|
2-3
SAMSUNG Proprietary-Contents may change without notice
This Document can not be used without Samsung's authorization
Exploded View and Parts List
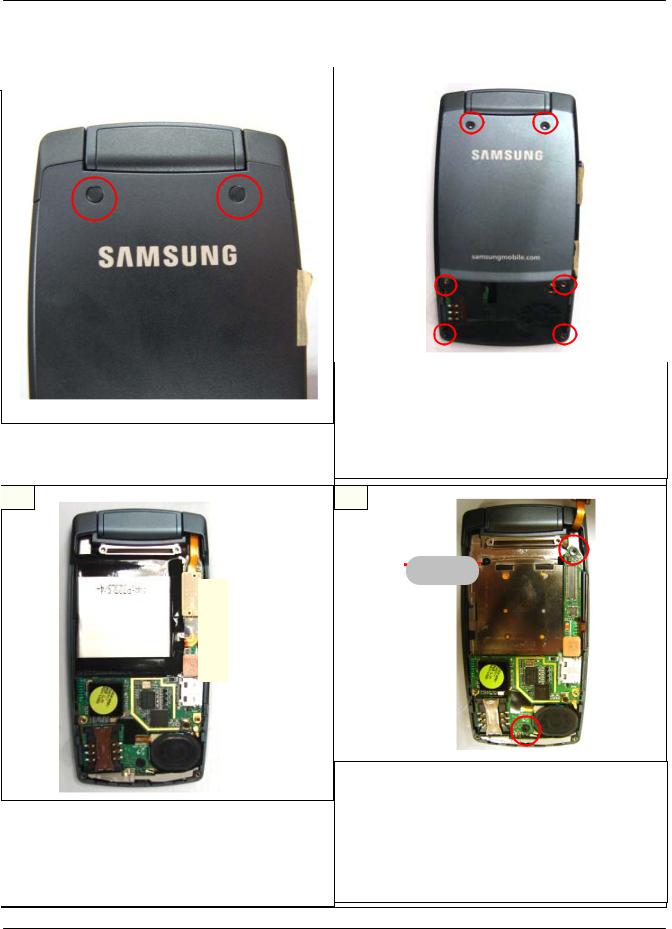
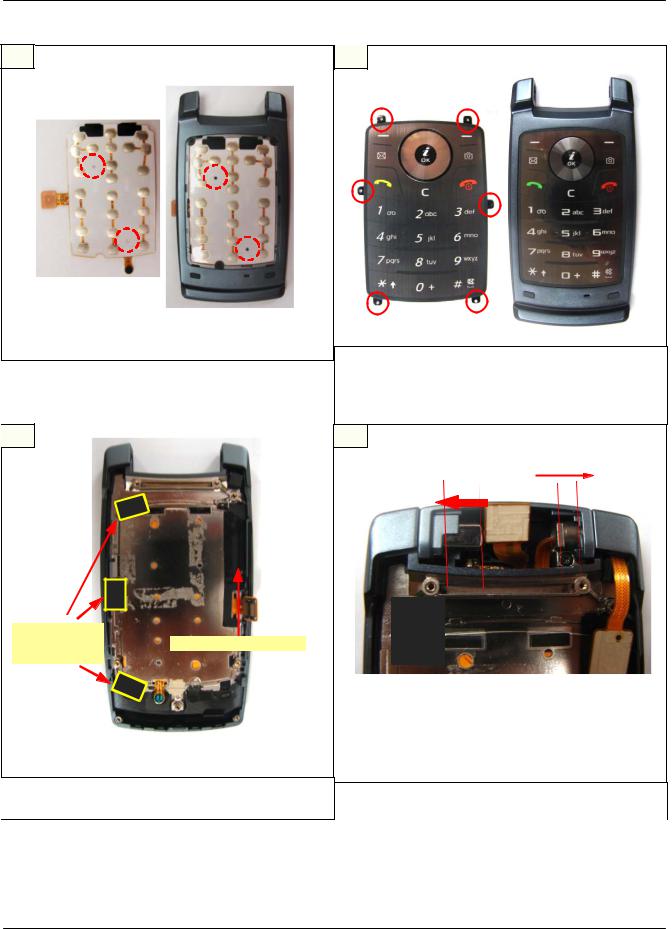
2-3. Disassembly
1 |
|
2 |
|
|
|
|
|
1) Remove the SCREW COVER on the REAR.
caution
1) Be careful of damage of cover and scratch.
1)Disassemble the SCREW 6 POINT.
2)Disassemble this set from upper part.
caution
1)Be careful of damage of cover and scratch.
2)When disassemble it, be careful not to change on the REAR.
3
1)Separate the LCD CONNECOTOR.
2)Separate the BATT. CONNECOTOR.
3)Separate the KEY FPCB CONNECOTOR.
caution
1)Be careful not to occur some damages each
LCD CONNECTOR FPCB.
4
1)Seperate the battery from the SET.
2)After disassemble the LCD CONNECTOR,
seperate a PCB fixed SCREW 2 POINT.
caution
1)When separate the battery, using a stick's no sharp side, put this stick in the picture's grey part with lever theory.
2)Be careful of damage and change a battery.
2-4
SAMSUNG Proprietary-Contents may change without notice
This Document can not be used without Samsung's authorization
Exploded View and Parts List
5 |
|
6 |
|
|
|
|
||
|
|
|
|
|
|
|
|
|
|
|
|
|
|
|
|
|
|
|
|
|
|
|
|
|
|
|
|
|
|
|
|
|
|
|
|
|
|
|
|
|
|
|
|
|
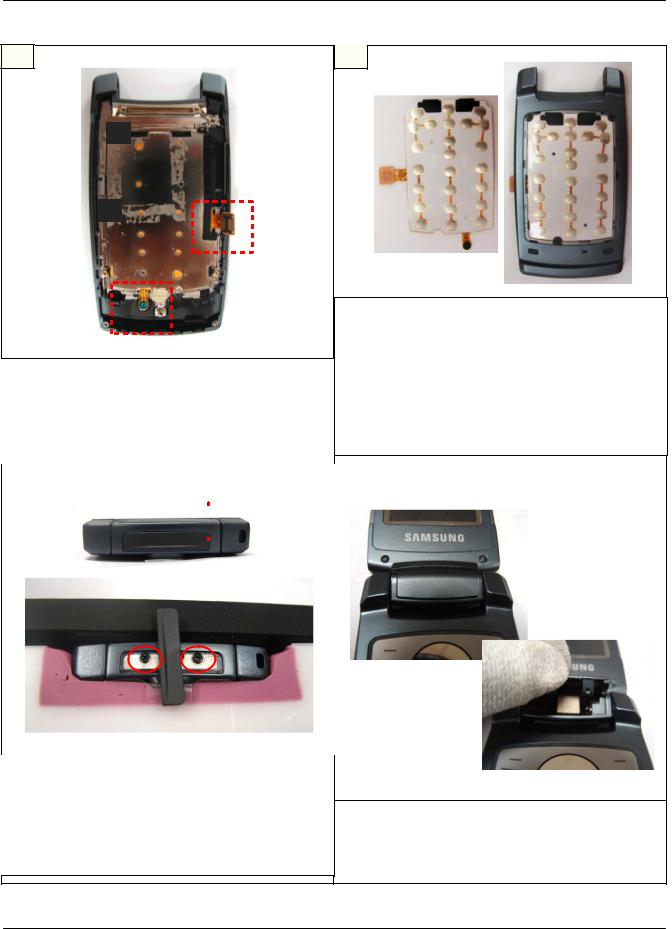
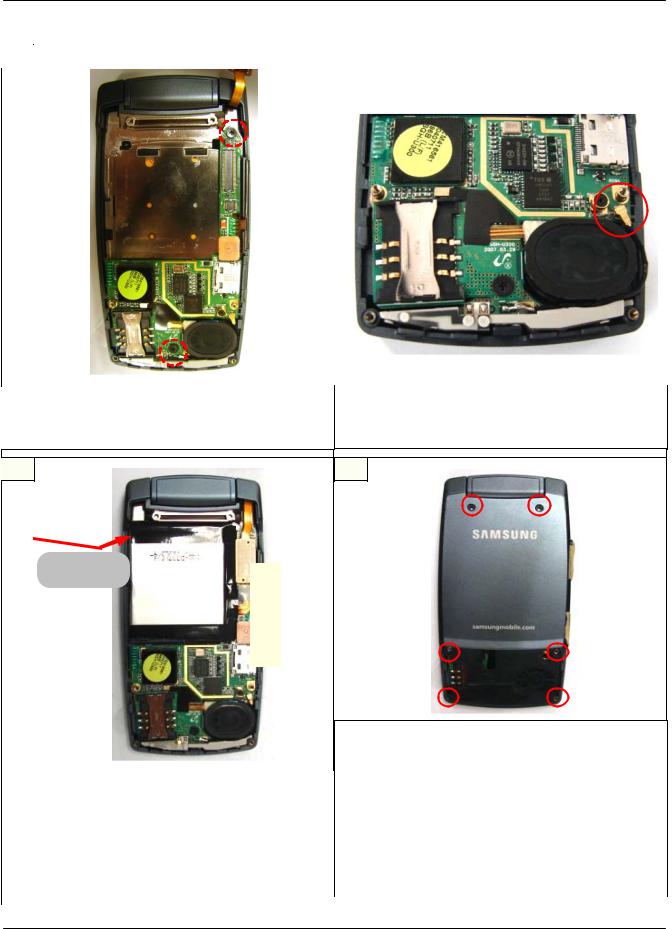
1) |
Separate a RF Cable. |
|
2) |
Separate a PCB. |
1) Separate a Intena and front Ass'y. |
|
caution |
caution |
|
1) Be careful of damage and change of cable and 1) When disassembling EL key FPCB, be careful
connector. |
not to be damaged on the FPCB. |
2) Be careful of damage of BGA components. |
1) Be careful of bending of a Cable. |
7 |
8 |
|
1) |
Take off a KEY PAD flange fixed Tape. |
1) |
Separate a KEY PAD care about flange. |
||
|
2) |
Take off a PCB RUBBER BASE. |
|
|
caution |
|
|
caution |
1) |
Be careful of damage of appearance and |
|||
|
1) |
Remove these using tweezers. |
|
|
|
scratch. |
|
2) |
Be careful of damage of appearance and |
|
|
|
|
|
2) |
Be careful of damage of a key PAD. |
||||
|
|
scratch. |
||||
|
|
|
|
|
|
|
|
|
|
|
|
|
|
|
|
|
2-5 |
|
||
|
|
|
|
|
||
|
|
SAMSUNG Proprietary-Contents may change without notice |
||||
This Document can not be used without Samsung's authorization
Exploded View and Parts List
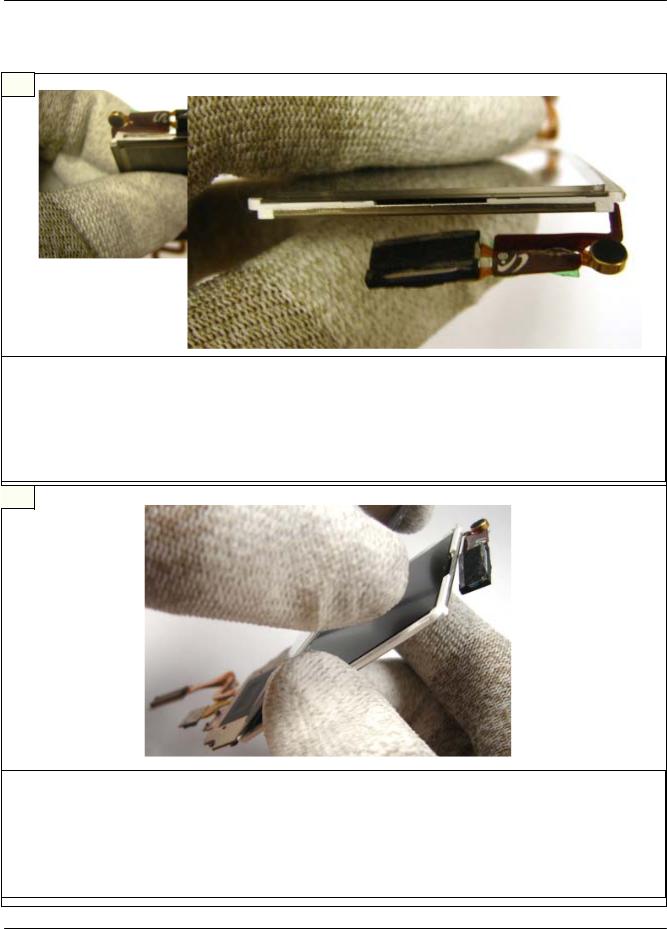
9
1) Seperate a key FPCB carefully about a connector of KEY FPCB and MIC.
caution
1)Be careful of damage of a FPCB crack and connector.
10
1)Separate the Front and Key FPCB.
caution
1)When separate it, be careful of bending of the front.
2)Be careful to be squeezed and tear a FPCB and connector.
3)Be careful of damage of appearance and
scratch.
11 |
|
|
12 |
|
|
|
|
|
|
|
|
|
|
|
|
|
|
|
|
|
|
|
|
|
|
|
|
|
|
|
|
|
|
|
|
|
|||||||||||||||||||
|
|
|
|
|
|
|
|
|
|
|
|
|
|
|
|
|
|
|
|
|
|
|
|
|
|
|
|
|
|
|
|
|
|
|
|
|
|
|
|
|
|
|
|
|
|
|
|
|
|
|
|
|
|
|
|
|
|
|
|
|
|
|
|
|
|
|
|
|
|
|
|
|
|
|
|
|
|
|
|
|
|
|
|
|
|
|
|
|
|
|
|
|
|
|
|
|
|
|
|
|
|
|
|
|
|
|
|
|
|
|
|
|
|
|
|
|
|
|
|
|
|
|
|
|
|
|
|
|
|
|
|
|
|
|
|
|
|
|
|
|
|
|
|
|
|
|
|
|
|
|
|
|
|
|
|
|
|
|
|
|
|
|
|
|
|
|
|
|
|
|
|
|
|
|
|
|
|
|
|
|
|
|
|
|
|
|
|
|
|
|
|
|
|
|
|
|
|
|
|
|
|
|
|
|
|
|
|
|
|
|
|
|
|
|
|
|
|
|
|
|
|
|
|
|
|
|
|
|
|
|
|
|
|
|
|
|
|
|
|
|
|
|
|
|
|
|
|
|
|
|
|
|
|
|
|
|
|
|
|
|
|
|
|
|
|
|
|
|
|
|
|
|
|
|
|
|
|
|
|
|
|
|
|
|
|
|
|
|
|
|
|
|
|
|
|
|
|
|
|
|
|
|
|
|
|
|
|
|
|
|
|
|
|
|
|
|
|
|
|
|
|
|
|
|
|
|
|
|
|
|
|
|
|
|
|
|
|
|
|
|
|
|
|
|
|
|
|
|
|
|
|
|
|
|
|
|
|
|
|
|
|
|
|
|
|
|
|
|
|
|
|
|
|
|
|
|
|
|
|
|
|
|
|
|
|
|
|
|
|
|
|
|
|
|
|
|
|
|
|
|
|
|
|
|
|
|
|
|
|
|
|
|
|
|
|
|
|
|
|
|
|
|
|
|
|
|
|
|
|
|
|
|
|
|
|
|
|
|
|
|
|
|
|
|
|
|
|
|
|
|
|
|
|
|
|
|
|
|
|
|
|
|
|
|
|
|
|
|
|
|
|
|
|
|
|
|
|
|
|
|
|
|
|
|
|
|
|
|
|
|
|
|
|
|
|
|
|
|
|
|
|
|
|
|
|
|
|
|
|
|
|
|
|
|
|
|
|
|
|
|
|
|
|
|
|
|
|
|
|
|
|
|
|
|
|
|
|
|
|
|
|
|
|
|
|
|
|
|
|
|
|
|
|
|
|
|
|
|
|
|
|
|
|
|
|
|
|
|
|
|
|
|
|
|
|
|
|
|
|
|
|
|
|
|
|
|
|
|
|
|
|
|
|
|
|
|
|
|
|
|
|
|
|
|
|
|
|
|
|
|
|
|
|
|
|
|
|
|
|
|
|
|
|
|
|
|
|
|
|
|
|
|
|
|
|
|
|
|
|
|
|
|
|
|
|
|
|
|
|
|
|
|
|
|
|
|
|
|
|
|
|
|
|
|
|
|
|
|
|
|
|
|
|
|
|
|
|
|
|
|
|
|
|
|
|
|
|
|
|
|
|
|
|
|
|
|
|
|
|
|
|
|
|
|
|
|
|
|
|
|
|
|
|
|
|
|
|
|
|
|
|
|
|
|
|
|
|
|
|
|
|
|
|
|
|
|
|
|
|
|
|
|
|
|
|
|
|
|
|
|
|
|
|
|
|
|
|
|
|
|
|
|
|
|
|
|
|
|
|
|
|
|
|
|
|
|
|
|
|
|
|
|
|
|
|
|
|
|
|
|
|
|
|
|
|
|
|
|
|
|
|
|
|
|
|
|
|
|
|
|
|
|
|
|
|
|
|
|
|
|
|
|
|
|
|
|
|
|
|
|
|
|
|
|
|
|
|
|
|
|
|
|
|
|
|
|
|
|
|
|
|
|
|
|
|
|
|
|
|
|
|
|
|
|
|
|
|
|
|
|
|
|
|
|
|
|
|
|
|
|
|
|
|
|
|
|
|
|
|
|
|
|
|
|
|
|
|
|
|
|
|
|
|
|
|
|
|
|
|
|
|
|
|
|
|
|
|
|
|
|
|
|
|
|
|
|
|
|
|
|
|
|
|
|
|
|
|
|
|
|
|
|
|
|
|
|
|
|
|
|
|
|
|
|
|
|
|
|
|
|
|
|
|
|
|
|
|
|
|
|
|
|
|
|
|
|
|
|
|
|
|
|
|
|
|
|
|
|
|
|
|
|
|
|
|
|
|
|
|
|
|
|
|
|
|
|
|
|
|
|
|
|
|
|
|
|
|
|
|
|
|
|
|
|
|
|
|
|
|
|
|
|
|
|
|
|
|
|
|
|
|
|
|
|
|
|
|
|
|
|
|
|
|
|
|
|
|
|
|
|
|
|
|
|
|
|
|
|
|
|
|
|
|
|
|
|
|
|
|
|
|
|
|
|
|
|
|
|
|
|
|
|
|
|
|
|
|
|
|
|
|
|
|
|
|
|
|
|
|
|
|
|
|
|
|
|
|
|
|
|
|
|
|
|
|
|
|
|
|
|
|
|
|
|
|
|
|
|
|
|
|
|
|
|
|
|
|
|
|
|
|
|
|
|
|
|
|
|
|
|
|
|
|
|
|
|
|
|
|
|
|
|
|
|
|
|
|
|
|
|
|
|
|
|
|
|
|
|
|
|
|
|
|
|
|
|
|
|
|
|
|
|
|
|
|
|
|
|
|
|
|
|
|
|
|
|
|
|
|
|
|
|
|
|
|
|
|
|
|
|
|
|
|
|
|
|
|
|
|
|
|
|
|
|
|
|
|
|
|
|
|
|
|
|
|
|
|
|
|
|
|
|
|
|
|
|
|
|
|
|
|
|
|
|
|
|
|
|
|
|
|
|
|
|
|
|
|
|
|
|
|
|
|
|
|
|
|
|
|
|
|
|
|
|
|
|
|
|
|
|
|
|
|
|
|
|
|
|
|
|
|
|
|
|
|
|
|
|
|
|
|
|
|
|
|
|
|
|
|
|
|
|
|
|
|
|
|
|
|
|
|
|
|
|
|
|
|
|
|
|
|
|
|
|
|
|
|
|
|
|
|
|
|
|
|
|
|
|
|
|
|
|
|
|
|
|
|
|
|
|
|
|
|
|
|
|
|
|
|
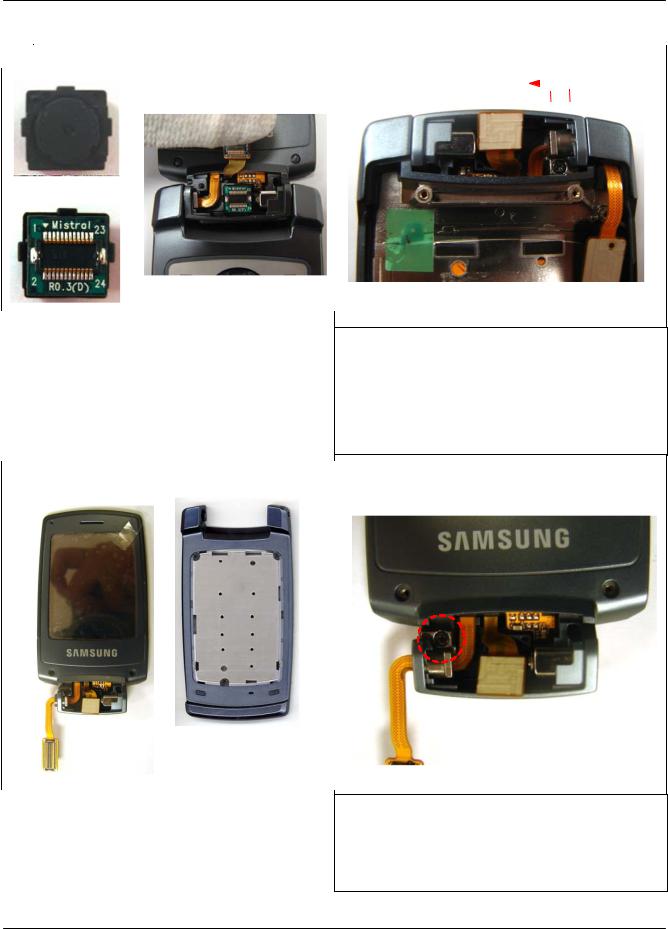
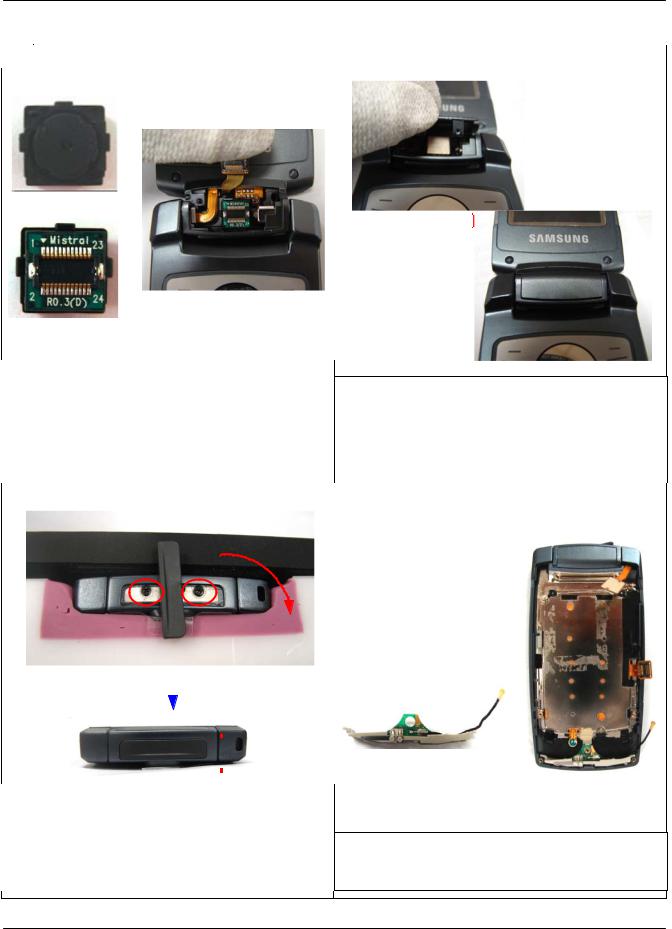
1)Put up the Folder stopper and turn.
2)Disassemble two screws.
caution
1)Remove these using tweezers.
2)Be careful of damage of appearance and scratch.
1) Take off a CAMERA COVER.
caution
1)Be careful of damage of appearance and scratch.
2-6
SAMSUNG Proprietary-Contents may change without notice
This Document can not be used without Samsung's authorization
Exploded View and Parts List
13 |
|
14 |
|
|
|
|
|
|
|
|
|
|
|
|
|
|
|
|
|
|
|
|
|
|
|
|
|
|
|
|
|
|
|
|
|
|
|
|
|
|
|
|
|
|
1) Disassemble a camera component.
caution
1)Be careful of damage of a camera component and alien substances.
2)Be careful of damage of a FPCB crack and
connector.
3)Be careful of damage of appearance and scratch.
1)Using tweezers, push a hinge and E-ring in Front.
caution
1)Be careful of damage a FPCB.
2)Be careful of damage of appearance and scratch.
|
|
|
|
|
15 |
|
16 |
|
|
|
|
|
|
|
1) Disassemble a Folder Ass'y and Front Ass'y.
caution
1)Be careful of damage of appearance and scratch.
2)Be careful of damage of a F-PCB.
1)Disassemble a screw of hinge's block.
2)Seperate a hinge's block on FOLDER LOWER.
caution
1)Be careful of damage of appearance and
scratch.
2-7
SAMSUNG Proprietary-Contents may change without notice
This Document can not be used without Samsung's authorization
Exploded View and Parts List
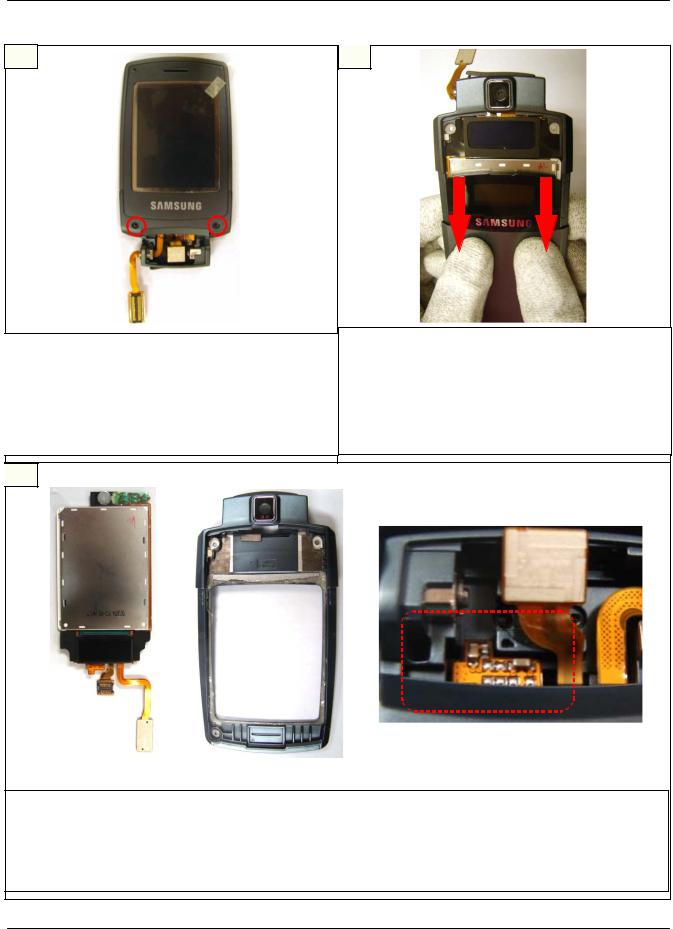
17
1)Take off screw caps.
2)At FOLDER LOWER, separate two screws.
caution
1)Be careful of damage of appearance and scratch.
2)Be careful of damage of CAMERA FPCB.
18
1)Separate Folder Lower and Folder Upper.
caution
1)Be careful of damage of appearance and scratch.
2)Separate a sub window as slightly raising and setting down.
19
1) Seperate a Folder Lower and LCD.
caution
1)Disassemble carefully with lower component of LCD.
2)Be careful of damage of appearance and scratch.
3)Be careful of damage of FPCB.
2-8
SAMSUNG Proprietary-Contents may change without notice
This Document can not be used without Samsung's authorization

Exploded View and Parts List
2-4. Assembly |
|
1 |
2 |
1) Put LCD Ass'y in Folder Lower. |
|
caution |
1) Assemble Folder Lower and Folder Upper. |
1) |
Disassemble carefully with lower component of |
caution |
||
|
LCD. |
1) |
Be careful of damage of appearance and |
|
2) |
Be |
careful of damage of appearance and |
|
scratch. |
|
scratch. |
2) |
Assemble a sub window as slightly raising and |
|
3) |
Be |
careful of damage of FPCB. |
|
setting up. |
3
1)Screw up two screws at FOLDER LOWER.
2)Put in screw caps.
caution
1)Be careful of damage of appearance and scratch.
2)Be careful of damage of FPCB.
4
1)Assemble a hinge block at FOLDER LOWER.
2)Screw up a screw.
caution
1)Be careful of damage of appearance and scratch.
2)Be careful of insertion direction of a hinge block.
2-9
SAMSUNG Proprietary-Contents may change without notice
This Document can not be used without Samsung's authorization
Exploded View and Parts List
5
1)Attach the LCD on the LCD Bracket by guide lib of LCD.
2)Solder the SPK/MOT.
7
KEY PAD
FLANGE PCB RUBBER BASE
FIXED TAPE
6
1) Assemble the LCD and the MAIN PBA.
caution
1) Connect the LCD F-PCB connector on the MAIN PBA.
8
1)Attach the fixed Tape of KEY PAD flange.
2)Attach PCB RUBBER BASE.
1)Using tweezers, fix the hinge and E-ring inner of Front.
2-10
SAMSUNG Proprietary-Contents may change without notice
This Document can not be used without Samsung's authorization
Exploded View and Parts List
9 |
|
10 |
|
|
|
|
|
|
|
|
|
|
|
|
|
|
|
|
|
|
|
|
|
|
|
|
|
|
|
|
|
|
|
|
|
|
|
|
|
|
|
|
|
|
|
|
|
|
|
|
|
|
|
|
|
|
|
|
|
|
|
|
|
|
|
|
|
|
|
|
|
|
|
|
|
|
|
|
|
|
|
|
|
|
|
|
|
|
|
|
|
|
|
|
|
|
|
|
|
|
|
|
|
|
|
|
|
|
|
|
|
|
|
|
|
|
|
|
|
|
|
|
|
|
|
|
|
|
|
|
|
|
|
|
|
|
|
|
|
|
|
|
|
|
|
|
|
|
|
|
|
|
|
|
|
|
|
|
|
|
|
|
|
|
|
|
|
|
|
|
|
|
|
|
|
|
|
|
|
|
|
|
|
|
|
|
|
|
|
|
|
|
|
|
|
|
|
|
|
|
|
|
|
|
|
|
|
|
|
|
|
|
|
|
|
|
|
|
|
|
|
|
|
|
|
|
|
|
|
|
|
|
|
|
|
|
|
|
|
|
|
|
|
|
|
|
|
|
|
|
|
|
|
|
|
|
|
|
|
|
|
|
|
|
|
|
|
|
|
|
|
|
|
|
|
|
|
|
|
|
|
|
|
|
|
|
|
|
|
|
|
|
|
|
|
|
|
|
|
|
|
|
|
|
|
|
|
|
|
|
|
|
|
|
|
|
|
|
|
|
|
|
|
|
|
|
|
|
|
|
|
|
|
|
|
|
|
|
|
|
|
|
|
|
|
|
|
|
|
|
|
|
|
|
|
|
|
|
|
|
|
|
|
|
|
|
|
|
|
|
|
|
|
|
|
|
|
|
|
|
|
|
|
|
|
|
|
|
|
|
|
|
|
|
|
|
|
|
|
|
|
|
|
|
|
|
|
|
|
|
|
|
|
|
|
|
|
|
|
|
|
|
|
|
|
|
|
|
|
|
|
|
|
|
|
|
|
|
|
|
|
|
|
|
|
|
|
|
|
|
|
|
|
|
|
|
|
|
|
|
|
|
|
|
|
|
|
|
|
|
|
|
|
|
|
|
|
|
|
|
|
|
|
|
|
|
|
|
|
|
|
|
|
|
|
|
|
|
|
|
|
|
|
|
|
|
|
|
|
|
|
|
|
|
|
|
|
|
|
|
|
|
|
|
|
|
|
|
|
|
|
|
|
|
|
|
|
|
|
|
|
|
|
|
|
|
|
|
|
|
|
|
|
|
|
|
|
|
|
|
|
|
|
|
|
|
|
|
|
|
|
|
|
|
|
|
|
|
|
|
|
|
|
|
|
|
|
|
|
|
|
|
|
|
|
|
|
|
|
|
|
|
|
|
|
|
|
|
|
|
|
|
|
|
|
|
|
|
|
|
|
|
|
|
|
|
|
|
1)Put in a camera at decided spot.
2)Assemble camera connector and camera.
caution
1)Be careful of damage of F-PCB.
2)Assemble the camera with direct direction. (Assemble that flat part is faced with below part.)
1)Assemble a camera cover.
caution
1)When assemble, be careful of direction of LCD CONNECTOR.
2)When assemble, check some click sound.
|
|
|
|
|
|
|
|
|
|
|
|
|
|
|
|
|
|
|
|
|
|
|
|
|
11 |
|
|
|
12 |
|
|||||||||||||||||
|
|
|
|
|
|
|
|
|
|
|
|
|
|
|
|
|
|
|
|
|
|
|
|
|
|
|
|
|
|
|
|
|
|
|
|
|
|
|
|
|
|
|
|
|
|
|
|
|
|
|
|
|
|
|
|
|
|
|
|
|
|
|
|
|
|
|
|
|
|
|
|
|
|
|
|
|
|
|
|
|
|
|
|
|
|
|
|
|
|
|
|
|
|
|
|
|
|
|
|
|
|
|
|
|
|
|
|
|
|
|
|
|
|
|
|
|
|
|
|
|
|
|
|
|
|
|
|
|
|
|
|
|
|
|
|
|
|
|
|
|
|
|
|
|
|
|
|
|
|
|
|
|
|
|
|
|
|
|
|
|
|
|
|
|
|
|
|
|
|
|
|
|
|
|
|
|
|
|
|
|
|
|
|
|
|
|
|
|
|
|
|
|
|
|
|
|
|
|
|
|
|
|
|
|
|
|
|
|
|
|
|
|
|
|
|
1)Screw up two screws.
2)Put up the Folder stopper and turn.
caution
1)Be careful of the damage of cover and scratch.
2)Check the loosing of stopper.
1) Assemble the fintenna.
caution
1) Be careful of the damage of cover and scratch.
2-11
SAMSUNG Proprietary-Contents may change without notice
This Document can not be used without Samsung's authorization
Exploded View and Parts List
13 |
|
14 |
|
|
|
|
|
|
|
|
|
|
|
|
1) Screw up two PCB fixed screws. |
1) |
Connect RF CABLE on the connector. |
caution |
caution |
|
1) Be careful of damage of cover and scratch. |
1) |
Keep in order RF cable around MFA. |
15 |
16 |
|
|
|
|
|
|
1) Assemble REAR from lower part.
|
|
2) Screw the six screws. |
||
|
|
3) Put screw cap in upper 2 point. |
||
1) |
Assemble the battery. |
|||
caution |
||||
2) |
Assemble the LCD CONNECOTOR. |
|||
1) |
Be careful of damage of cover and scratch. |
|||
3) |
Assemble the BATT. CONNECOTOR. |
|||
2) |
When assemble, be careful not to be chewed volume |
|||
4) |
Assemble the KEY FPCB CONNECOTOR. |
|
key and Ear Cover. |
|
caution |
3) |
upper(2 point)/lower(4 point)SCREW size is |
||
1) Be careful of damage of CONNECTOR FPCB. |
|
different. |
||
|
|
|
|
|
|
|
|
|
|
2-12
SAMSUNG Proprietary-Contents may change without notice
This Document can not be used without Samsung's authorization
Exploded View and Parts List
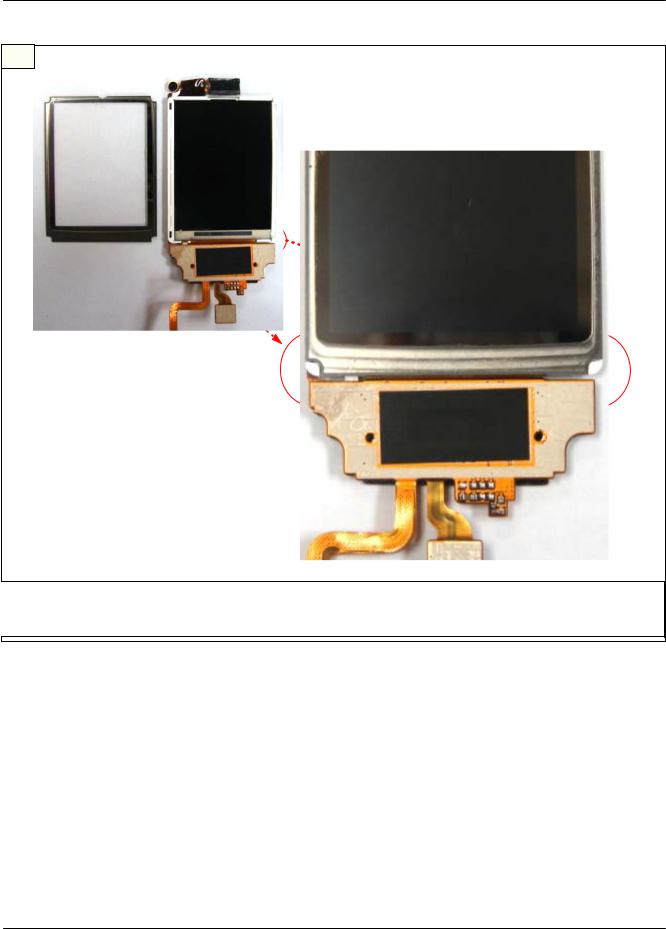
2-5. LCD Window Assembly
1
1)Check a groove between LCD MODULE and Main window.
2)Using a thin tool that is not sharp, put it in the groove and remove Main window slowly.
caution
1)Work it slowly.
2)Be careful because Main window is broken whenyou put it out suddenly.
3)when you disassemble it, be careful not to leave some a foreign substance and fingerprint on LCD window.
2
1)Be careful not to leave fingerprint on Main LCD.
caution
1)Work it slowly.
2)Be careful because Main window is broken whenyou put it out suddenly.
3)when you disassemble it, be careful not to leave some a foreign substance and fingerprint on LCD window.
2-13
SAMSUNG Proprietary-Contents may change without notice
This Document can not be used without Samsung's authorization
Exploded View and Parts List
3
1) When attach a LCD window again, Check reverse disassembly order or a assembly standard.
caution
1) Attach with a standard reference in circles.
2-14
SAMSUNG Proprietary-Contents may change without notice
This Document can not be used without Samsung's authorization
3. Flow Chart of Troubleshooting
3-1 BASEBAND
3-1-1. Power ON
'Power On' does not work
Yes
Check the current consumption more than 100mA
Yes
Check the VBAT
more than 3.3V
Yes
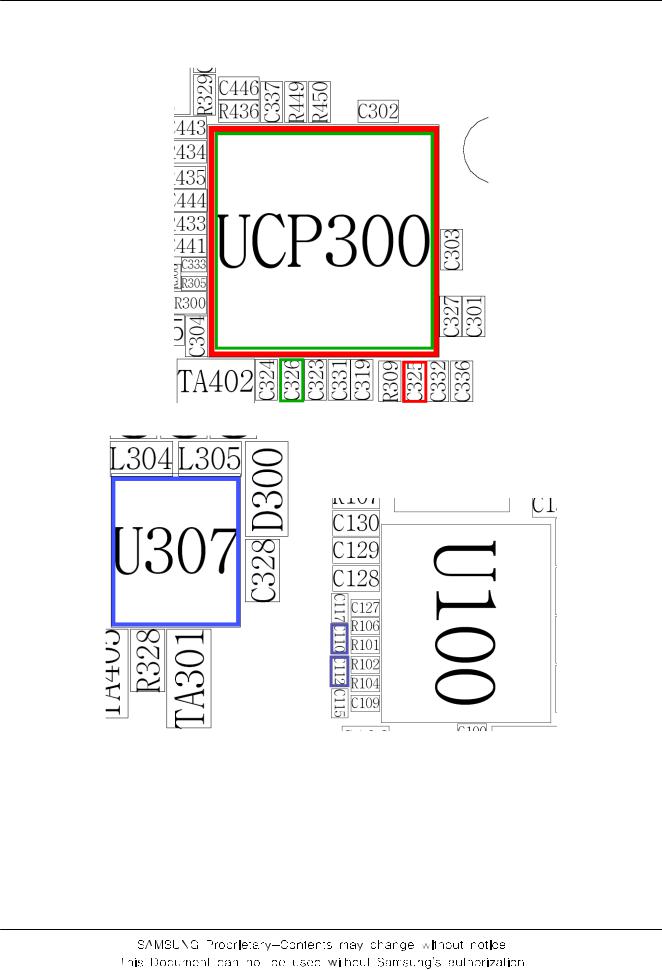
Check the
VLDO_7_1.8V of UCP300 is more
than 1.8V
 Yes
Yes
Check U201 pin 1 = 1.8V
pin 4 = 1.6V pin 7,9 = 1.5V
Yes
Check VRF of
UCP300=2.9V
Yes
Check C110 & C112
Freq = 13MHz
Vp-p > 0.8V
Yes
Check the initial operation
 Yes
Yes
END
No
Download again
No
Charge the Battery
No
Check UCP300 and C325
No
Check U307
|
|
|
|
|
|
No |
Check UCP300 |
|
|
|
and C326 |
|
|
|
No
 Check the clock C110 & C112
3-1
Flow Chart of Troubleshooting
3-2
Flow Chart of Troubleshooting
RV _F 9.2 VV CC _A 9.2 VV CC _D 8.1 VV CC _D .2 V9
|
|
|
|
|
|
|
|
V9. |
|
|
C133 |
|
|
|
|
|
|
|
|
|
|
9 |
|
2B CCV |
CH3 01 |
|
|
|
|
|
|
|
|
V5.1 CRVT |
ODVV51L1. |
|
|
23 |
|
003 HB45 RV 00 1MCNCT |
|
503 R R603 |
|
|
|
||
|
|
|
|
823C |
|
|
|
|
|
||||||
|
|
|
|
|
|
C |
|
|
|
|
|
|
|
|
|
|
|
|
V29. DCC V |
|
|
723 C 6 |
|
|
|
|
333 C |
|
|
|
|
|
|
|
V9.2 |
|
|
23C |
|
|
|
|
|
|
|
|
|
|
|
|
FRV |
|
|
4 |
|
|
|
|
|
|
|
|
|
|
|
|
V9.2 |
|
|
C23 |
|
|
|
|
|
|
|
|
|
|
|
|
A_ |
|
|
|
|
|
|
|
|
|
|
|
|
|
|
|
CCV CS |
|
|
523 C |
|
|
|
|
|
|
|
|
|
|
|
|
P |
|
|
|
|
|
|
|
|
|
|
|
|
|
|
|
V8. |
|
|
|
|
|
|
|
|
|
|
|
|
|
|
|
1 |
|
|
|
|
|
|
|
|
|
|
|
|
|
|
|
DCC V |
|
|
|
|
|
|
|
|
|
|
|
|
|
5C31 |
KL TTSAA CMSPSIC RMCCSSPSIIDMPS MOIIISSTMRS KLMCSI |
M V SI 9.2 V B CCV NE DEYLEK |
913 C |
323 C |
UUSCCSPP_KL ODDSSPUUPI |
GRH CI |
|
|
MRA LAC TR |
R930 |
Q WPEE NRTI RKPRST |
|
||
|
|
|
|
|
|
T A B |
|
|
|
|
|
|
|
|
|
|
|
|
|
|
|
V |
|
|
|
|
|
|
|
|
|
TAB V |
01C |
11C 31J 9N 01R 01P 11J 11K 41K |
21K H11 21G G31 F31 51F 21C 41A C9 01D 01B 11B A21 21B 31A 21J G11 41F |
8K 8L 7N M7 |
41E 31E E11 21F 41D |
51D 01E 01A 9E 0H1 |
|
233 C |
ABT V |
|
|||||
|
KCL TSR OPI OIM TSR KLC UP UP U SI MSI MSI |
M C V V V V 7 6 B A 5 B A 4 3 2 1 C SVI RVT RDDEL2 RDDE1L RDGRNI RDBVI OVDL ODVL S5VL S5VL ODVL S4VL S4LV ODVL ODVL ODVL ODVL CAV |
CSP CSP CSP CSP NCS CKSL ODS DSI |
TXE TAB VRD NES SER V V CHB HCI HC |
|
2XU 1XU CDAA CDAA |
NE_RGNR_BIV |
9L |
R033 |
|
|||||
|
|
43DDV 21DDV |
|
|
|
|
|
|
|
|
RFEV FERC NMAL |
|
|
|
|
|
|
5DDV |
|
|
|
|
|
|
|
|
CT |
|
|
|
|
3 |
|
|
|
|
|
|
|
|
|
|
|
|
|
|
|
31B |
76DDV |
|
|
|
|
|
|
|
|
|
QRTNI |
01L |
|
|
|
03 |
QDNG |
|
|
|
|
|
|
|
|
|
|
|
|||
8E |
|
|
|
|
|
|
|
|
RWP_PEEK |
9M |
|
|
|||
C |
DNG_1CSP |
|
|
|
|
|
|
|
|
|
|
||||
51B |
|
|
|
|
|
|
|
|
|
EDOM |
01N |
|
|
||
|
DNG_2CSP |
|
|
|
|
|
|
|
|
|
|
|
|||
|
51K |
|
|
|
|
|
|
|
|
TESER_O |
9K |
1WSP_FUB |
|
||
|
11F |
DNG_RUCH |
|
|
|
|
|
|
|
|
1WSP_FUB |
7L |
|
||
|
1DDV |
|
|
|
|
|
|
|
|
RWP_NO |
|
||||
|
3J |
|
|
|
|
|
|
|
|
RWP_N1WS |
51C |
|
|||
|
2DDV |
|
|
|
|
|
|
|
|
GIJ_NO |
|
||||
|
3M |
|
|
|
|
|
|
|
|
RWP_2WS |
41C |
|
|||
|
3DDV |
|
|
|
|
|
|
|
|
|
|
||||
|
6N |
|
|
|
|
|
|
|
|
|
|
|
PSD_TNI |
|
|
|
5N |
DDV_1OI |
|
|
|
|
|
|
|
|
|
RTNID |
3P |
|
|
|
4J |
DDV_2OI |
|
|
|
|
|
|
|
|
CDA_4XUA |
5P |
M31KLC_CM |
|
|
|
5G |
1SSV |
|
|
|
|
|
|
|
|
|
CM |
6R |
|
|
|
2SSV |
|
|
|
|
|
|
|
|
|
QANEOX |
|
|||
20 |
4K |
|
|
|
|
|
|
|
|
QANEOX |
1D |
|
|||
3SSV |
|
|
|
|
|
|
|
|
K23KLC |
|
|||||
2R |
|
|
|
|
|
|
|
|
CTR_KLC |
4N |
|
||||
3 |
4SSV |
|
|
|
|
|
|
|
|
|
|
||||
C |
6P |
|
|
|
|
|
|
|
|
|
|
|
|
|
|
DDDV |
|
|
|
|
|
|
|
|
|
ODIAD |
|
|
|
||
|
11N |
|
|
|
|
|
|
|
|
|
6M |
|
|
||
|
01M |
DDNG |
|
|
|
|
|
|
|
|
|
IDIAD |
6L |
|
|
C403 |
6A |
BDDV |
|
|
|
|
|
|
|
|
|
NRIAD |
4P |
|
C733 |
|
VDNG |
|
|
00 |
|
|
|
|
|
|
|
|
|
||
|
6F |
BDNG |
|
|
|
|
|
|
|
|
|
KCIAD |
4R |
|
|
|
11L |
VDDV |
|
|
|
|
|
|
|
|
|
NGERV |
41R |
|
|
|
31P |
DDV_LTCO |
|
|
P3C |
|
|
|
|
|
|
PGERV |
31M |
|
|
|
4C |
|
|
|
|
|
|
|
|
MCVXV |
31R |
XUA_TUO_N |
|
||
|
DNG_LTCO |
|
|
|
|
|
|
|
|
|
|||||
|
4B |
|
|
|
|
|
|
|
NTUOXUA |
|
|
||||
1 |
|
|
|
U |
|
|
|
|
|
31L |
XUA_TUO_P |
|
|||
|
|
|
|
|
|
|
|
|
|
PTUOXUA |
31K |
|
|||
|
|
|
|
|
|
|
|
|
|
XUA_NI_N |
|
||||
03 |
31D |
XUA_3CDA |
|
|
|
|
|
|
|
|
|
NNIXUA |
41L |
|
|
C |
7F |
1SDNG |
|
|
|
|
|
|
|
|
|
PNIXUA |
51M |
XUA_NI_P |
|
|
2SDNG |
|
|
|
|
|
|
|
|
|
CIM_TUO_N |
|
|||
|
8F |
|
|
|
|
|
|
|
|
NTUOCIM |
51P |
|
|||
|
3SDNG |
|
|
|
|
|
|
|
|
CIM_TUO_P |
|
||||
|
9F |
|
|
|
|
|
|
|
|
PTUOCIM |
51N |
|
|||
|
4SDNG |
|
|
|
|
|
|
|
|
CIM_NI_N |
|
||||
|
01F |
|
|
|
|
|
|
|
|
|
NNICIM |
41M |
|
||
|
5SDNG |
|
|
|
|
|
|
|
|
|
CIM_NI_P |
|
|||
|
7G |
|
|
|
|
|
|
|
|
|
PNICIM |
41N |
|
||
|
6SDNG |
|
|
|
|
|
|
|
|
|
TUOA_B_N |
|
|||
|
8G |
|
|
|
|
|
|
|
|
NBTUOA |
21P |
|
|||
|
7SDNG |
|
|
|
|
|
|
|
|
TUOA_B_P |
|
||||
|
9G |
|
|
|
|
|
|
|
|
PBTUOA |
21R |
|
|||
|
8SDNG |
|
|
|
|
|
|
|
|
TUOA_A_N |
|
||||
|
01G |
|
|
|
|
|
|
|
|
NATUOA |
21N |
|
|||
|
9SDNG |
|
|
|
|
|
|
|
|
TUOA_A_P |
|
||||
|
6H |
|
|
|
|
|
|
|
|
PATUOA |
11P |
|
|||
|
7H |
01SDNG |
|
|
|
|
|
|
|
|
|
|
|
XTR_Q_N |
|
|
11SDNG |
|
|
|
|
|
|
|
|
NQXTXR |
|
|
|||
|
8H |
|
|
|
|
|
|
|
|
6C |
|
||||
|
21SDNG |
|
|
|
|
|
|
|
|
XTR_Q_P |
|
||||
|
9H |
|
|
|
|
|
|
|
|
PQXTXR |
7C |
|
|||
|
31SDNG |
|
|
|
|
|
|
|
|
XTR_I_N |
|
||||
|
7J |
|
|
|
|
|
|
|
|
|
NIXTXR |
6D |
|
||
|
41SDNG |
|
|
|
|
|
|
|
|
|
XTR_I_P |
|
|||
|
8J |
|
|
|
|
|
|
|
|
|
PIXTXR |
7D |
|
||
|
51SDNG |
|
|
|
|
|
|
|
|
|
|
|
|||
|
9J |
|
|
|
|
|
|
|
|
|
1FERAR |
6B |
|
|
|
|
61SDNG |
|
|
|
|
|
|
|
|
|
|
|
|||
|
01J |
|
|
|
|
|
|
|
|
|
2FERAR |
5B |
|
|
|
|
71SDNG |
|
|
|
CPS WRN NREEST |
|
|
|
|
|
|
|
|||
|
01K |
|
|
|
0LOCT CTL1O OCT2L OCT3L OCT4L OCT5L OCTL6 OCTL7 |
RES1EL 2REESL DRAES CRKES |
|
|
TFR_PMARV |
633 C |
|||||
|
5DB1 DB14 DB31 DB21 DB11 DB01 DB9 DB8 DB7 DB6 DB5 DB4 B3D DB2 DB1 0DB BA8 BA7 BA6 BA5 BA4 BA3 BA2 AB1 AB0 OI| |
|
|
||||||||||||
|
1 |
5CN |
|
|
|
|
|
|
|
|
|
PXT |
7E |
|
|
|
2 |
6CN |
|
|
|
|
|
|
|
|
|
CFA |
9D |
CFA |
|
|
|
|
|
|
|
|
|
|
|
|
|
|
|||
|
|
2D 3D 3E 2E 3F F2 1F F4 G4 G3 5H 6J 5J 3K K2 K1 K5 K7 M1 2M 2N 1N 5L 1P 6K 3L 2L R3 |
E6 C5 F5 E5 4A 6G 3B 3A |
B1 2A C1 C2 |
|
|
|
|
|||||||
|
CEK HC RAE |
)51 )41)31)21 )11)01 )9)8 )7)6 )5)4 )3)2 )1)0 (BD (BDDD(B(B (BBDD( DD(B(B DD(B(B (BDD(B (BDD(B (BDD(B )) ))) )) )) P PPP PP PP PP PP PP PP 87(B(B 654(B(B(B 32(B(B B10((B SD SDSDSD SDSD SDSD DSSD SDSD SDSD SDSD APAP APAPAP APAP APAP SDDS SDDDSS SDDS SDDS |
|
|
|
|
|
|
|
|
|
|
|||
|
|
|
|
|
|
OIP NWRTES SD PER SDHS ALF |
1S2SLE NE BVBVSE L MMD A AAO TX PPM MAP |
NENE FRTX MMAAPP |
ELRTAD KLC ESRE RE S S |
|
|
|
|
|
|
||||
|
|
|
|
|
|
||||
)51 :0(B D |
)8:0 (BA |
||||||||
_PS D |
SDP |
|
|
|
|
|
|||
3-3
Flow Chart of Troubleshooting
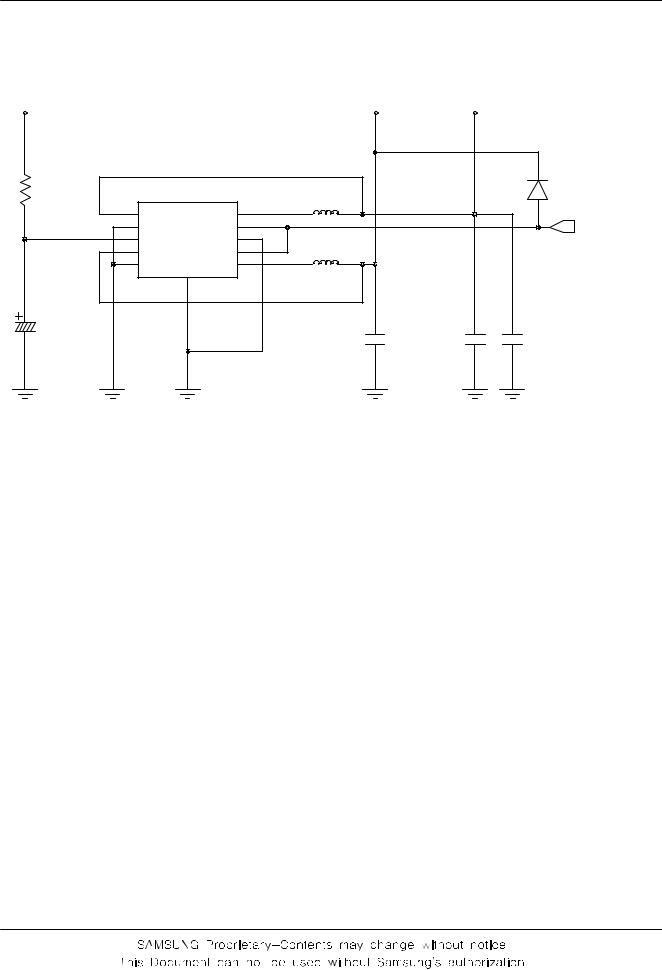
VBAT |
|
|
|
|
HP_CORE_1.6V VCCD_1.8V |
|
|
823 |
|
U307 |
|
|
L304 |
|
D300 |
R |
1 ADJ2 |
|
SW2 |
10 |
|
|
|
|
|
|
|
|
|||
|
2 MODE|DATA |
EN2 |
9 |
|
|
VLDO1_1.5V |
|
|
3 |
|
GND |
8 |
L305 |
|
|
|
4 VIN |
|
7 |
|
|
||
|
FB1 |
2 |
EN1 |
6 |
|
|
|
|
5 DEF_1 |
DN |
SW1 |
|
|
|
|
|
|
G |
|
|
|
|
|
|
|
11 |
|
|
|
|
|
|
|
|
|
|
C345 |
C344 |
C346 |
TA301 |
|
|
|
|
|
||
|
|
|
|
|
|
|
|
3-4
 Loading...