


 Loading...
InkJet Facsimile
User Guide
SF-3100/SF-3100T
Please read this guide before you use this equipment.

ELECTRONICS
Visit us at: http://www.samsungelectronics.com |
|
If you have access to this online service, you can download |
|
the User’s Guide and drivers from Samsung Electronics. |
P/N : JB68-00228A Rev. 1.00 |
Important Precautions and Safety Information
When using this fax machine, these basic safety precautions should always be followed to reduce risk of fire, electric shock, and injury to persons:
1.Read and understand all instructions.
2.Use common sense whenever operating electrical appliances.
3.Follow all warnings and instructions marked on the product and in the literature accompanying the product.
4.If an operating instruction appears to conflict with safety information, heed the safety information. You may have misunderstood the operating instruction. If you cannot resolve the conflict, contact your sales or service representative for assistance.
5.Unplug the fax machine from the AC wall socket and telephone jack before cleaning. Do not use liquid or aerosol cleaners. Use only a damp cloth for cleaning.
6.Do not place the fax machine on an unstable cart, stand, or table. It may fall, causing serious damage.
7.Your fax machine should never be placed on, near, or over a radiator, heater, air conditioner, or ventilation duct.
8.Do not allow anything to rest on the power, telephone. Do not locate your fax machine where the cords will be abused by persons walking on them.
9.Do not overload wall outlets and extension cords. This can diminish performance, and may result in the risk of fire or electric shock.
10.Do not allow pets to chew on the AC power, telephone, or PC interface cords.
11.Never push objects of any kind into the fax machine through case or cabinet openings. They may touch dangerous voltage points, creating a risk of fire or shock. Never spill liquid of any kind onto or into the fax machine.
12.To reduce the risk of electric shock, do not disassemble the fax machine. Take it to a qualified service technician when repair work is required. Opening or removing covers may expose you to dangerous voltages or other risks. Incorrect reassembly could cause electric shock when the unit is subsequently used.
13.Unplug the machine from the telephone jack, PC, and AC wall outlet, and refer servicing to qualified service personnel under the following conditions:
•When any part of the power cord, plug, or connecting cable is damaged or frayed.
•If liquid has been spilled into the product.
•If the product has been exposed to rain or water.
•If the product does not operate properly after instructions have been followed.
•If the product has been dropped, or the cabinet appears damaged.
•If the product exhibits a sudden and distinct change in performance.
14.Adjust only those controls covered by the operating instructions. Improper adjustment of other controls may result in damage, and may require extensive work by a qualified service technician to restore the product to normal operation.
15.Avoid using this fax machine during a lightning storm. There may be a remote risk of electric shock from lightning. If possible, unplug the AC power and telephone for the duration of the lightning storm.
16.If your machine is an SF-3100T, never dispose of batteries or battery packs in a fire. There is a serious risk of explosion and/or the release of highly toxic chemicals.
17.SAVE THESE INSTRUCTIONS.
In Case of Interference
In normal operation, your SAMSUNG fax machine produces and uses radio-frequency energy. In some cases, this can cause interference to other electronic equipment. Part 15 of the FCC rules establishes guidelines limiting the amount of radio-frequency energy which may be produced by electronic equipment. Tests have proven that your Samsung FAX machine meets or exceeds these guidelines, and is classified a “Class B Digital Device” for operation in a residential environment. When installed and operated according to instructions, your SAMSUNG fax machine should not cause interference to the types of equipment expected to be found in a normal residential environment.
Unauthorized changes or modifications could void the user’s authority to operate the equipment.
In the event your SAMSUNG fax machine appears to cause interference to other electronic equipment, it can often be easily remedied. First determine if the source of interference really is your FAX machine. To do this, turn its power off and on while observing the equipment experiencing the interference. If the interference disappears when you turn the FAX machine off, the following steps can be very effective in correcting interference problems:
•Connect the FAX machine to an AC outlet which is on a different circuit breaker from the equipment experiencing interference.
•Increase the distance between the FAX machine and the equipment experiencing interference.
•Cable TV amplifiers and splitters are extremely prone to interference. Be certain that they are as far as possible from the FAX machine and its AC power and telephone cords.
•Replace “twin lead” antenna wire with shielded coaxial cable, and use proper connectors and adaptors.
•Turn or relocate the receiving antenna. In most cases this is easily done by simply moving a radio. A TV antenna may need to be re-oriented or installed in another area of the building.
•Consult your dealer, a reputable radio/TV technician, or an Amateur Radio Operator for help.
*To locate an Amateur Radio Operator in your area, contact The American Radio Relay League, 610 Main St., Newington, CT 06111.
Fax Branding
The Telephone Consumer Protection Act of 1991 makes it unlawful for any person to use a computer or other electronic device to send any message via a telephone facsimile machine unless such message clearly contains in a margin at the top or bottom of each transmitted page or on the first page of the transmission the following information:
(1)the date and time of transmission
(2)identification of either business, business entity or individual sending the message; and
(3)telephone number of either the sending machine, business, business entity or individual.
See page 1.7 for instructions on how to enter this information into your Samsung FAX machine’s memory.
The Telephone Company may make changes in its communications facilities, equipment operations, or procedures where such action is reasonably required in the operation of its business and is not inconsistent with the rules and regulations in FCC Part 68. If such changes can be reasonably expected to render any customer terminal equipment incompatible with telephone company communications facilities, or require modification or alteration of such terminal equipment, or otherwise materially affect its use or performance, the customer shall be given adequate notice in writing, to allow the customer an opportunity to maintain uninterrupted service.
Telephone Company Information
FCC IDENTIFICATION NUMBER
The Ringer Equivalence Number and FCC Registration Number for this equipment may be found on the label located on the bottom or rear of the machine. In some instances you may need to provide these numbers to the telephone company.
RINGER EQUIVALENCE NUMBER
The Ringer Equivalence Number (REN) is a measure of the electrical load placed on the telephone line, and is useful for determining whether you have “overloaded” the line. Installing several types of equipment on the same telephone line may result in problems making and receiving telephone calls, especially ringing when your line is called. The sum of all Ringer Equivalence Numbers of the equipment on your telephone line should be less than five in order to assure proper service from the telephone company. In some cases, a sum of five may not be usable on your line. If any of your telephone equipment is not operating properly, you should immediately remove it from your telephone line, as it may cause harm to the telephone network.
WARNING:
FCC Regulations state that changes or modifications to this equipment not expressly approved by the manufacturer could void the user’s authority to operate this equipment.
In the event that terminal equipment causes harm to the telephone network, the telephone company should notify the customer that service may be stopped. However, where prior notice is impractical, the company may temporarily cease service, providing that they:
a)Promptly notify the customer.
b)Give the customer an opportunity to correct the equipment problem.
c)Inform the customer of the right to bring a complaint to the Federal Communication Commission pursuant to procedures set out in FCC Rules and Regulations Subpart E of Part 68.
You should also know that:
•Your Samsung FAX machine is not designed to be connected to a digital PBX system.
•Special features, such as “Call Waiting”, may interrupt FAX service, and we suggest that these services not be installed on the FAX line.
•If you intend to use a computer modem or fax modem on the same phone line as
your FAX machine, you may experience transmission and reception problems with all the equipment. It is recommended that no other equipment, except for a regular telephone, share the line with your FAX machine.
•If your area experiences a high incidence of lightning or power surges, we rec-
ommend that you install surge protectors for both the power and the telephone lines. Surge protectors can be purchased from your dealer or telephone and electronic specialty stores.
•When programming emergency numbers and/or making test calls to emergency
numbers, use a non-emergency number to advise the emergency service dispatcher of your intentions. The dispatcher will give you further instructions on how to actually test the emergency number.
•This equipment may not be used on coin service or party lines.
•This telephone provides magnetic coupling to hearing aids.
•You may safely connect this equipment to the telephone network by means of a standard modular jack, USOC RJ-11C.

Table of Contents
Chapter 1. Setup
List of Features ................................................................................................ |
1-2 |
Familiarizing Yourself with Your New Machine ................................................ |
1-3 |
Front View .................................................................................................. |
1-3 |
Rear View................................................................................................... |
1-3 |
Setting FAX Number/Name.............................................................................. |
1-7 |
FAX Number/Name (Your Number and Name) ......................................... |
1-7 |
How to Enter Letters .................................................................................. |
1-8 |
Time/Date Setup ........................................................................................ |
1-9 |
Recording TAM Message (SF-3100T only)................................................... |
1-10 |
Chapter 2. Automatic Dialling |
|
One-Touch Dialling .......................................................................................... |
2-2 |
Storing a Number for One-Touch Dialling ................................................. |
2-2 |
Dialling a One-Touch Number................................................................... |
2-3 |
Speed Dialling ................................................................................................. |
2-4 |
Storing a Number for Speed Dialling......................................................... |
2-4 |
Dialling a Speed Number .......................................................................... |
2-5 |
Group Dialling (for Multi-Address Transmission)............................................. |
2-6 |
Storing Speed Dial Numbers for Group Dialling ....................................... |
2-6 |
Using Group Dialling (Multi-Address transmission) .................................. |
2-7 |
Chapter 3. The Fax Machine |
|
Sending a Fax.................................................................................................. |
3-2 |
Loading Document .................................................................................... |
3-2 |
Setting Document Resolution and Contrast .............................................. |
3-3 |
Sending a Fax Manually (after Talking) ..................................................... |
3-4 |
Sending a Fax Automatically ..................................................................... |
3-5 |
Automatic Redial ....................................................................................... |
3-5 |
Receiving a Fax ............................................................................................... |
3-6 |
Reception Modes ...................................................................................... |
3-6 |
Receiving in FAX Mode ............................................................................. |
3-7 |
Receiving in TEL Mode.............................................................................. |
3-7 |
Receiving in AUTO Mode .......................................................................... |
3-8 |
Receiving in TAM Mode (SF-3100)........................................................... |
3-8 |
Receiving in TAM Mode (SF-3100T)......................................................... |
3-9 |
Receiving via an Extension Telephone.................................................... |
3-10 |
Cancelling Reception .............................................................................. |
3-10 |
Voice Request................................................................................................ |
3-11 |
Making a Voice Request.......................................................................... |
3-11 |
I

Table of Contents
Answering a Voice Request .................................................................... |
3-11 |
Chapter 4. The Answering Machine |
|
Recordng TAM Message (SF-3100T only) ..................................................... |
4-2 |
Checking Your TAM Greeting Message.................................................... |
4-2 |
Monitoring an Incoming Call............................................................................ |
4-3 |
Erasing Old Messages You’ve Heard.............................................................. |
4-4 |
To Erase All Recorded Messages ............................................................. |
4-4 |
To Erase a Selected Message................................................................... |
4-4 |
Playing Back Messages .................................................................................. |
4-5 |
Playing Back Newly Received Caller Messages....................................... |
4-5 |
Playing Back All Messages ....................................................................... |
4-5 |
Skipping Backward or Forward ................................................................. |
4-6 |
Message Paging.............................................................................................. |
4-7 |
Using the Answering Machine from a Remote Phone ..................................... |
4-8 |
Accessing the Machine ............................................................................. |
4-8 |
Using Remote Commands ........................................................................ |
4-9 |
Chapter 5. Advanced Fax |
|
Broadcasting ................................................................................................... |
5-2 |
Delayed FAX .................................................................................................... |
5-4 |
Polling .............................................................................................................. |
5-6 |
Setting Send Polling .................................................................................. |
5-6 |
Setting Receive Polling.............................................................................. |
5-7 |
To Cancel the Scheduled Job ......................................................................... |
5-8 |
Chapter 6. Special Features |
|
REDIAL/PAUSE................................................................................................ |
6-2 |
To Redial the Last Number Called ............................................................ |
6-2 |
To Redial the Number in Memory.............................................................. |
6-2 |
To Insert a Pause....................................................................................... |
6-3 |
Using Recall .............................................................................................. |
6-3 |
Chain Dialling................................................................................................... |
6-4 |
User Reports.................................................................................................... |
6-5 |
To Print a report ......................................................................................... |
6-6 |
User Options.................................................................................................... |
6-7 |
Setting SYSTEM/TAM(SF-3100T only) Options ......................................... |
6-7 |
System Setup Options ............................................................................... |
6-8 |
TAM Options (SF-3100T only) ................................................................ |
6-11 |
II

Table of Contents
Volume Setup................................................................................................. |
6-12 |
Clearing Memory ........................................................................................... |
6-13 |
Chapter 7. Care and Maintenance |
|
Cleaning the Document Scanner..................................................................... |
7-2 |
Replacing the Print Cartridge .......................................................................... |
7-4 |
Cleaning the Cartridge .................................................................................... |
7-6 |
Wiping the Print Nozzles and Contacts ..................................................... |
7-6 |
Cleaning the Cartridge Carrier Contacts and Deflector ............................ |
7-8 |
Cleaning the Printhead .................................................................................... |
7-9 |
Ink Level View ................................................................................................ |
7-10 |
Adjust Shading .............................................................................................. |
7-11 |
Print Cartridge Maintenance.......................................................................... |
7-12 |
LCD Error Messages ..................................................................................... |
7-13 |
Fixing Problems ............................................................................................. |
7-14 |
Print Quality Problems ............................................................................. |
7-15 |
Paper Feeding Problems......................................................................... |
7-15 |
Clearing Jams................................................................................................ |
7-16 |
Document Jams During Transmission..................................................... |
7-16 |
Paper Jams During Printing..................................................................... |
7-17 |
Chapter 8. Appendix |
|
Specifications .................................................................................................. |
8-2 |
Paper Type and Sizes (for the ASF) ................................................................ |
8-3 |
Acceptable Documents (for ADF) ................................................................... |
8-4 |
A Sample of ITU 4% Chart (reduced to 60.5%)............................................... |
8-5 |
Replacing the fitted plug ................................................................................. |
8-6 |
Important ................................................................................................... |
8-6 |
Guarantee ........................................................................................................ |
8-7 |
Limited Guarantee ..................................................................................... |
8-7 |
Exclusions.................................................................................................. |
8-7 |
III
Setup
1SETUP
1 Chapter
1-1

Setup
List of
Features
Features for both SF-3100 and SF-3100T
Features for SF-3100T only
This machine was designed using the latest technology. It is a full-featured, high-performance machine that not only meets, but exceeds industry standards. The following is a list of its many exciting features:
•Inkjet printing on plain paper
•14.4Kbps high speed faxing
•80 page holding memory
•Seven language display and report; English, German, French, Italian, Spanish, Portuguese and Dutch .
•Stand-alone, full-function fax machine
•Convenient 99 pages desk-top copier
•15 page Anti-Skew Document Feeder
•Five One-Touch and 50 Speed-Dialling locations
•Group Dialling to eliminate repetitive dialling to the same multiple destinations
•Four reception modes; TEL, FAX, AUTO and TAM1
•Broadcasting to send the same document to multiple destinations
•Delayed FAX to send the document at a later time
•Send/Receive Polling
•Voice request to signal a request to speak with the remote machine’s operator during a transmit or receive operation
•Last ten number redial
•Report management; sending confirmation, Journal report and Phonebook, etc.
•Ink save mode
•Standby mode power consumption of 10.1 watts
•Built-in digital TAM
•Answering messages for TAM mode
•Access from a remote telephone
•Message Paging (you can have the machine transfer a call when the caller leaves a message.)
•Call monitor
•Charge save
1.If your machine is SF-3100, you need to have an answering machine attached.
1-2

Familiarizing Yourself with Your New Machine
Setup
Take a moment to familiarize yourself with your new machine by looking at the pictures on the next few pages.
Front View
Paper Tray
Document Tray
Document Guide df
Control Panel
|
|
|
|
|
|
|
|
|
|
|
|
|
|
|
|
|
|
|
|
|
|
|
|
|
|
|
|
|
|
|
|
|
|
|
|
|
|
ASF |
|
Document Exit Tray |
|
|
(Automatic Sheet Feeder) |
||||
Rear View
Handset
1 Chapter
AC Power
Socket


 0
0
00
|
|
|
|
|
|
|
|
|
|
|
|
|
|
|
|
|
|
|
|
|
|
|
|
|
|
|
|
|
|
|
|
Connect extension |
|
|
|
|
|
|
|
|
|
|
|
Connect tele- |
|||
|
|
|
|
|
|
|
|
|
|
||||||
phone or TAM (Tele- |
|
|
|
|
|
|
|
|
|
|
|
phone line |
|||
|
|
|
|
|
|
|
|
|
|
||||||
phone Answering |
|
|
|
|
|
|
|
|
|
|
|
here. |
|||
|
|
|
|
|
|
|
|
|
|
|
|||||
Machine) here if |
|
|
|
|
|
|
|
|
|
|
|
|
|
||
EXT.LINE TEL.LINE HANDSET |
|
|
|||||||||||||
applicable. |
|
|
|||||||||||||
Bottom View |
|||||||||||||||
|
|
||||||||||||||
1-3
Setup
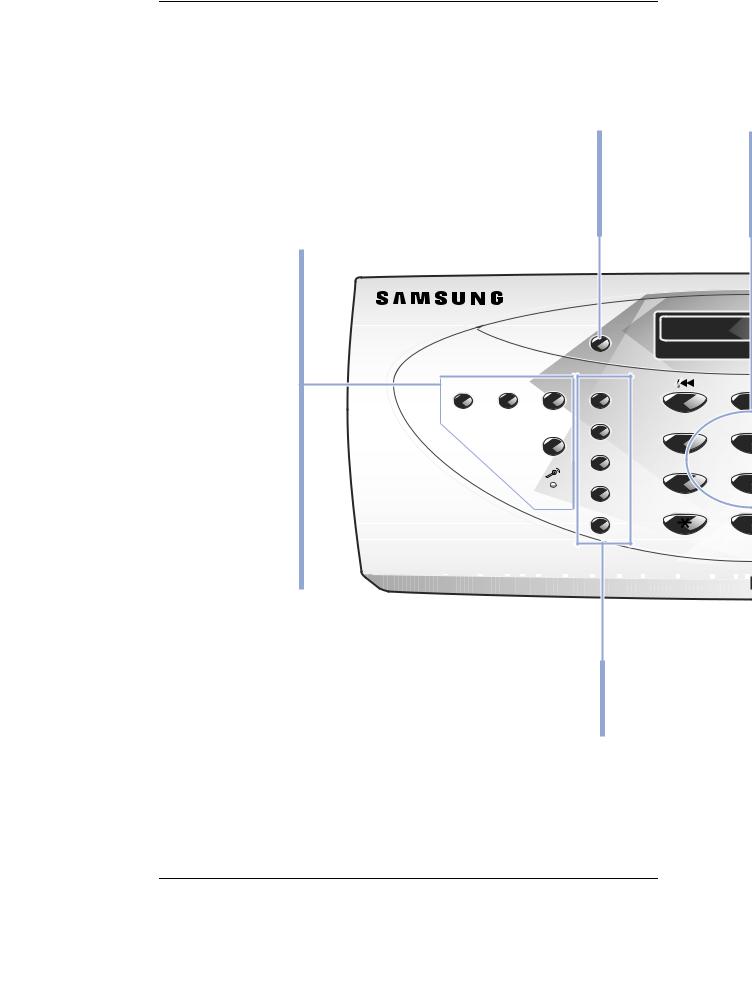
CONTROL PANEL
SF-3100T only
OGM
Use to record or play outgoing message used in TAM Mode.
Erase
Use this to erase a message or all messages.
Play
Play incoming messages.
Answer
Activates the TAM Mode on/off. It lights when in TAM Mode, and blinks when a new message is recorded.
Microphone
Use to record the outgoing message for TAM Mode.
Resolution
Improve the clarity of a document you are sending.
|
|
|
Resolution |
|
|
OGM |
Erase |
Play |
1 |
|
AB |
|
|
|
|
1 |
|
|
|
|
2 |
GHI |
JK |
|
|
Answer |
|
||
|
|
|
4 |
|
|
|
|
|
3 |
|
|
|
|
|
|
|
|
|
|
|
|
PQRS |
T |
|
|
|
4 |
7 |
|
|
|
|
|
|
|
|
|
|
5 |
|
Sym |
|
|
|
|
|
|
OneTouch Dial |
|
|
|
||
Buttons(1-5) |
|
|
|
||
Use to call most frequently used numbers with one button.
1-4

Number keypad
Dial numbers manually as you would usually do with the telephone, or enter letters while setting up your machine.
(1) (SF-3100T only)
Use to skip back to the previous message.(3) (SF-3100T only)
Use to skip forward to the next message.
Receive Mode/Contrast
This button has two functions:
When no document is loaded, pressing this button changes the Receive Mode to either TEL, FAX, AUTO, or TAM.
When a document is loaded, the pressing this button changes contrast to either NORMAL, LIGHTEN, DARKEN, or PHOTO.
|
|
Rcv.Mode/ |
|
|
|
|
Contrast |
|
|
|
|
Setup |
Advanced |
Report |
|
|
FAX |
||
BC |
DEF |
Flash |
|
|
2 |
3 |
|
|
Help |
Scroll/Volume |
|
|||
KL |
MNO |
Redial/ |
|
|
Pause |
|
|
||
5 |
6 |
|
|
|
Search/Delete |
|
|
||
UV |
WXYZ |
|
|
|
8 |
9 |
OHD/V.Req |
|
|
|
|
|
||
bols |
|
|
|
|
0 |
|
|
|
|
|
Speed |
|
|
|
Speed Dial
Use to store and dial the most frequently used 50 telephone/fax numbers with two-digit location number.
Setup
Setup
Use to choose special functions such as system setup, cartridge change and maintenance, etc.
|
Advanced FAX |
Chapter |
|||
|
Use for advanced fax features |
||||
|
|
||||
|
like broadcasting, delayed fax, |
|
|||
|
and polling, or to cancel a |
|
|||
|
scheduled job. |
|
|||
|
Report/Help |
|
|||
|
Use to print status reports or to |
1 |
|||
|
access HELP files for |
||||
|
|
||||
|
information on how to operate |
|
|||
|
your machine. |
|
|||
|
Search/Delete |
|
|||
|
Use to search for a number in |
|
|||
|
memory. Or use to delete digits |
|
|||
|
in the edit mode. |
|
|||
|
Flash |
|
|||
|
Performs a switch-hook |
|
|||
|
operation such as Call Waiting. |
|
|||
|
Redial/Pause |
|
|||
|
Use to redial the last number |
|
|||
|
called. You can also use it to add |
|
|||
|
a pause while storing a number |
|
|||
|
in memory. |
|
|||
|
Scroll/Volume and |
|
|||
|
Use to display the previous or |
|
|||
|
next menu item, to adjust the |
|
|||
|
volume, or to move the cursor to |
|
|||
|
the digit you want to edit. |
|
|||
|
|
|
|
(Copy) |
|
|
|
|
|
|
|
|
|
|
|
|
|
|
|
|
|
|
|
Use |
to copy a document. |
|
|||
|
|
|
|
(Start/Enter) |
|
Use |
to start a job or to activate |
|
|||
the selection shown in the |
|
||||
display. |
|
||||
|
|
|
|
(Stop) |
|
|
|
|
|
|
|
|
|
an operation at any time. |
|
||
Stops |
|
||||
OHD (On-Hook Dial)/ |
|
||||
V.Req. |
|
||||
Use to dial numbers without |
|
||||
picking up the handset. Also used |
|
||||
to signal a voice request after |
|
||||
sending or receiving documents. |
|
||||
1-5

Setup
You Now have learned what features each button covers. Now, let’s begin setting up your information such as fax name/number and date/time.
There are two levels of setup:
•Basic: Information such as fax name/number and date/time which must be entered before using the machine. (See page 1-7.)
•Advanced: The variables you can set up while using the machine depending on your living area and preferences such as language and ring to answer, etc. (See page 6-8.)
We strongly recommend that you do not start the Advanced setup until you have read through the User’s Guide to make yourself familiar with the machine.
1-6

Setting
FAX
Number/
Name
Setup
FAX Number/Name (Your Number and
Name)
This is very useful information for the recipient. It allows them to see who sent a fax and what number they should send a response to. You can choose from up to five IDs (Multiple ID), using different IDs for different recipients. To use Multiple ID, you must first set this option to ON. See “User Options” on page 6-7.
1 Press Setup.
2 Press ! or !to choose ‘FAX NUMBER/ NAME’ and press Start/Enter.
3 Press Start/Enter when display shows ‘FAX NUMBER’.
4 Enter the fax number to which your machine is connected.
•You can enter up to 20 digits, and include special characters (space, plus sign, etc.)
•To enter a space, press Redial/Pause or #.
•To enter plus symbol (+), press *.
•If you enter a wrong number, use or to move to the number and correct it.
5 Press Start/Enter when finished.
6 Press Start/Enter when display shows ‘FAX NAME’.
7 Enter the fax name (up to 40 characters) by using the number keypad.
You can include special characters (space, plus sign, etc.).
8 Press Start/Enter when the name in the display is correct. When Multiple ID is on and you want Multiple ID, repeat from step 7 after answering ‘Y’ to ‘ANOTHER ID?’.
The machine returns to Standby Mode when you have finished or when Stop has been pressed.
1 Chapter
1-7

Setup
How to Enter Letters
Note
Note these instructions assume that the display is asking you to enter a name.
1 Press the appropriate button for the letter you want.
The letter appears in the display.
•To enter an O, for example, press the 6 button three times. Each time you press the button, the display shows a different letter: first M, then N, and O, and finally 6.
•For a list of letters and corresponding buttons, see "Keypad Character Assignments" below.
2 Select additional letters in the same way. The blinking cursor moves right and the next letter appears in the display.
•If the additional letter is in the middle of or at the end of the letters assigned to the button you have pressed, move the cursor by pressing , then press that button.
3 Press Start/Enter when you’re finished entering letters.
Keypad Character Assignments
Key |
|
|
|
Assigned numbers, letters, or characters |
||
|
|
|
|
|
|
|
1 |
(Space) |
|
1 |
|
6 |
M N O 6 |
|
|
|
|
|
||
2 |
A B C 2 |
|
7 |
P Q R S 7 |
||
|
|
|
|
|
|
|
3 |
D E |
F |
3 |
|
8 |
T U V 8 |
|
|
|
|
|
||
4 |
G H I 4 |
|
9 |
W X Y Z 9 |
||
|
|
|
|
|
|
|
5 |
J K |
L |
5 |
|
0 (Symbols) |
+ - , . ’ / * # & 0 |
|
|
|
|
|
|
|
1-8

Setup
Time/Date Setup The current date and time are shown in the display when the machine is on and ready for use (Standby Mode). The date and time will be printed on all faxes you send.
1 Press Setup.
2 Press or to choose ‘TIME/DATE SETUP’ and press Start/Enter.
3 Press Start/Enter when the display shows ‘DATE FORMAT’.
4 Press or to select either ‘EUROPE’ or ‘USA’ and press Start/Enter.
5 Press Start/Enter when the display shows ‘TIME/DATE’.
•If you chose USA format, the date will be displayed as MM-DD-YYYY HH:MM, for example, 03-20-1999 10:20.
•If you chose EUROPE format, the date will be displayed as DD-MM-YYYY HH:MM, for example, 20- 03-1999 10:20.
6 Set the date and time. You can move the cursor by pressing or .
•If you enter an invalid number, the machine beeps and doesn’t proceed to the next step. If this happens, just re-enter the correct number.
DD (Day) = 01~31
MM (Month)= 01~12
YYYY (Year) = four digits
HH (Hour) = 00~23
MM (Minute) = 00~59
7 Press Start/Enter when the date and time appear correctly.
•The display shows the date and time you have set, then returns to Standby Mode.
1 Chapter
1-9

Setup
Recording
TAM1 Message (SF-3100T only)
The TAM (Telephone Answering Machine) message is an outgoing message (OGM) which plays whenever a call comes in and the machine is in TAM Mode. For more information about reception modes, see “Reception Modes” on page 3-6.
1 Press and hold OGM until you hear a beep. The display starts counting the recording time.
2 Speak into the microphone when ‘RECORD’ appears in the display. Make sure that you are within a 30cm range.
You can record a message which lasts up to 60 seconds.
•You are advised to record a message of less than 15 seconds in duration to prevent the incoming faxes from malfunctioning due to a long message.
•Press Stop or OGM if you want to stop recording before the time is up.
•After the message has been recorded, the machine briefly displays the date and time when the message was recorded. Then, it displays the elapsed time as the message plays back automatically.
Now, you’re ready to use the TAM reception mode. To learn more about the answering machine, see “The Answering Machine” on page 4-1.
1. Telephone Answering Machine
1-10
Automatic Dialling
2AUTOMATIC DIALLING
2 Chapter
2-1

Automatic Dialling
One-Touch
Dialling
One-Touch dialling provides you with quick access to your most frequently used numbers. Before using One-Touch dial, you must first store a number into any of five One-Touch buttons located on the left of the machine’s Control Panel.
Storing a Number for One-Touch Dialling
1 Press and hold a One-Touch button for about two seconds.
•If a number is already assigned to the button, the display briefly shows the number, then asks if you want to delete.
If you select ‘N (No)’ and press Start/Enter, the machine returns to Standby Mode with the old number untouched.
To delete old number, select ‘Y (Yes)’, press Start/ Enter and start over.
2 Enter the number you want to store (up to 46 digits).
•If you want a pause between numbers, press Redial/ Pause; a ‘P’ appears in the display.
•If you make a mistake while entering a number, use or to move the cursor under the digit, then enter the correct digit.
3 Press Start/Enter when the number appears correctly in the display.
The display asks you to enter a name.
4 Press Start/Enter to enter name.
2-2

Automatic Dialling
5 Enter the name by using the keypad.
• If you do not want a name, just skip this step. You can assign up to 20 characters to a name. For
more information, see “How to Enter Letters” on page 1-8.
6 Press Start/Enter when you’re finished.
Dialling a One-Touch Number
1 Press the desired One-Touch button. (1 through 5)
•The display briefly shows the name or number and the number is then automatically dialled. You hear the dialling process through the speaker.
•If there is no number stored, ‘NO. NOT ASSIGNED’ appears with a beep and the machine returns to Standby Mode.
•You can refer to each button’s assigned number by printing Phonebook. To learn how to print Phonebook, see “User Reports” on page 6-5.
•To stop One-Touch dialling, press Stop at any time.
•If you are making a phone call (when no document is loaded), pick up the handset when the other person answers.
•When the remote fax machine answers the phone, the machine scans the document into memory and begins to transmit if a document is loaded in the document tray. If there is no answer, the display will indicate ‘RETRY REDIAL?’. To retry press Start/Enter.
2 Chapter
2-3

Automatic Dialling
Speed
Dialling
Note
You can store up to 50 telephone or fax numbers in Speed Dial. Before using Speed Dial, you have to first store the number into the location.
Speed dialling allows you to quick dial your most frequently used numbers. You can easily access the numbers once you have stored them into two-digit Speed Dial locations.
Storing a Number for Speed Dialling
1 Press and hold Speed for about two seconds. The display asks you to enter the location you wish to assign.
2 Enter the two-digit location number (01 through 50) that you want to assign the telephone or fax number to and press Start/Enter.
•If a number is already assigned to the location, the display briefly shows the number, then asks if you want to delete.
If you select ‘N (No)’ and press Start/Enter, the machine returns to Standby Mode with the old number untouched.
To delete old number, select ‘Y (Yes)’, press Start/ Enter and try with another location number.
3 Enter the number you want to store (up to 46 digits).
•To insert a pause between numbers, press Redial/ Pause; a ‘P’ appears in the display. If you make a mistake while entering a number, use or to move the cursor under the digit, then enter the correct digit.
4 Press Start/Enter when the number appears correctly in the display.
The display asks you to enter a name.
5 Enter the name by using the keypad.
• If you do not want a name, just skip this step. You can assign up to 20 characters to a name. For
more information, see “How to Enter Letters” on page 1-8.
2-4

Automatic Dialling
6 Press Start/Enter.
To store another Speed Dial location, repeat from step 2.
7 Press Stop to exit when you’re finished.
Dialling a Speed Number
1 Press Speed.
The display asks you to enter the location number.
2 Enter a two-digit speed dial location number.
3 Press Start/Enter to dial the number. The number will be automatically dialled. You can refer to the number assigned to each location by printing Phonebook. To learn how to print Phonebook, see “User Reports” on page 6-5.
•To stop Speed Dialling, press Stop at any time.
If you are making a phone call (when no document is loaded), pick up the handset when the other person answers.
•When the remote fax machine answers the phone, the machine scans the document into memory and begins to transmit if a document is loaded in the document tray. If there is no answer, the display will indicate ‘RETRY REDIAL?’. To retry press Start/Enter.
2 Chapter
2-5

Automatic Dialling
Group
Dialling (for MultiAddress Transmissi on)
Group Dial uses the One-Touch button for quick access. Numerous Speed Dial numbers can be stored as a Group. By using the Group number, you can send a document to multiple parties through one operation. Your machine will dial the remote numbers in stored sequence. If the number is busy, your machine will dial the next stored number. After sending to all of the stored numbers, the machine will automatically redial any number(s) which was/were previously busy. Before you can use this feature, you must coordinate and store the group numbers desired.
Note
Note if the One-Touch button is used for Group Dial, you cannot store into One-Touch button.
Storing Speed Dial Numbers for Group Dialling
1 Press Setup.
2 Press!or to select ‘GROUP DIAL SETUP’ and press Start/Enter.
3 Press a One-Touch button you want to use for Group Dial.
•If the One-Touch button is previously assigned to Group Dial, the display indicates ‘ GROUP xx USED’ and ’DELETE? Y/N’ with a beep.
If you select ‘N (No)’ and press Start/Enter, the machine returns to Standby Mode with the old one untouched.
To delete old group, select ‘Y (Yes)’ and press Start/ Enter, then try with another One-Touch button.
4 Enter a two-digit Speed location Dial number you wish to include in the group.The display shows any number stored in the selected twodigit Speed Dial location.
5 Press Start/Enter.
6 Repeat steps 4 and 5 to enter more destination numbers into the Group.
2-6

Automatic Dialling
7 Press Stop when you have entered all the desired destinations.
The display asks you to enter a name .
8 Enter a name for the Group. If you don’t want to assign a name, skip this step. You can assign up to 20 characters to a name. For more information, see “How to Enter Letters” on page 1-8.
9 Press Start/Enter.
Using Group Dialling (Multi-Address transmission)
Once you have stored the Group, you can use Group Dialling for Broadcasting and Delayed fax.
Follow the instructions for the desired operation. When you come to a step in which the display requests the remote fax number:
1 Press the One-Touch button under which you stored the Group number. You can use only one Group number per operation. Then continue the procedure to complete the desired operation. Your machine automatically scans the document loaded in the document tray into memory, and will dial each of the numbers included in the Group.
•Fore more information on Broadcasting, see “Broadcasting” on page 5-2.
•Fore more information on Delayed fax, see “Delayed FAX” on page 5-4.
2 Chapter
2-7

Automatic Dialling
2-8

The Fax Machine
3THE FAX MACHINE
3 Chapter
3-1
The Fax Machine
Sending a
Fax
Sending a fax is very simple if you follow the instructions starting from here. They will describe how to load the document, set the resolution/contrast and dial the number.
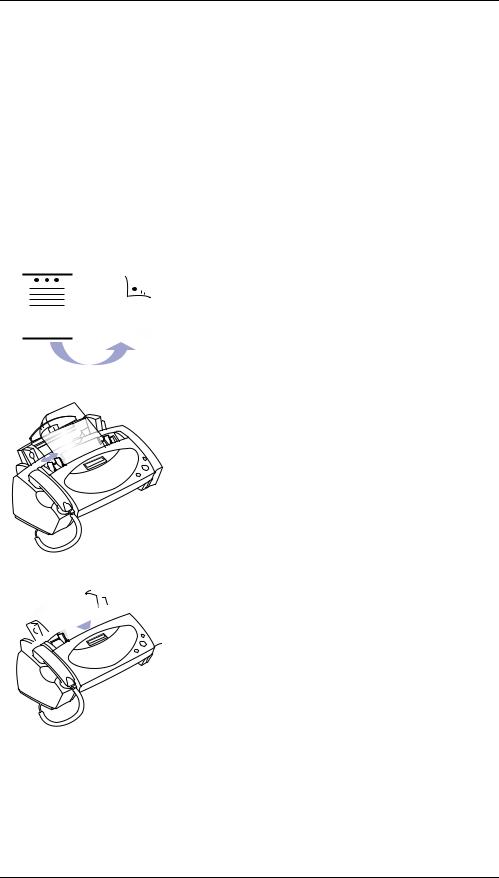
Loading Document
1
 2
2


 3
3
Turn the page face down.
Be sure that your document is dry and free of staples, paper clips, and other foreign objects. For more information on what kind of paper you can use for documents, see “Acceptable Documents (for ADF)” on page 8-4.
Adjust the document guides to match the width of the document, and load document consisting of up to 15 sheets until the Automatic Document Feeder seizes and pulls it in. The display will indicate ‘DOCUMENT READY’ when it senses that a document has been loaded.
•If you are sending more than one sheet, make sure the bottom sheet enters first. Insert the sheets with a slight push to ensure smooth feeding.
•To add pages while faxing, place them over the top sheet. If you’re loading pages that are unusually thick or thin, feed one sheet at a time. If the document doesn’t feed correctly, open the Control Panel, remove the document, and try loading it again.
Choose the proper resolution and contrast by pressing Rcv. Mode/Contrast and Resolution respectively.
•The default resolution is STANDARD and contrast is NORMAL.
•For a normal document, it is not necessary to change them.
Skip over this step. For more information on Resolution and Contrast, see “Setting Document Resolution and Contrast” on page 3-3.
3-2
Loading...