


Samsung SC-MX20, SC-MX20B, SC-MX20C, SC-MX20CH, SC-MX20EL User Manual
...Memory Camcorder
quick start guide
*Your memory camcorder comes with CD manual and Quick start guide(printed). For more detailed instructions, refer to the user manual(PDF) provided on the CD.
imagine the possibilities
Thank you for purchasing this Samsung product. To receive more complete service, please register your product at
www.samsung.com/global/register
SC-MX20
SC-MX20B SC-MX20H SC-MX20L SC-MX20R SC-MX20C SC-MX20CH SC-MX20E SC-MX20EL SC-MX20ER
POR SPA FRA ENG
getting to know your memory camcorder
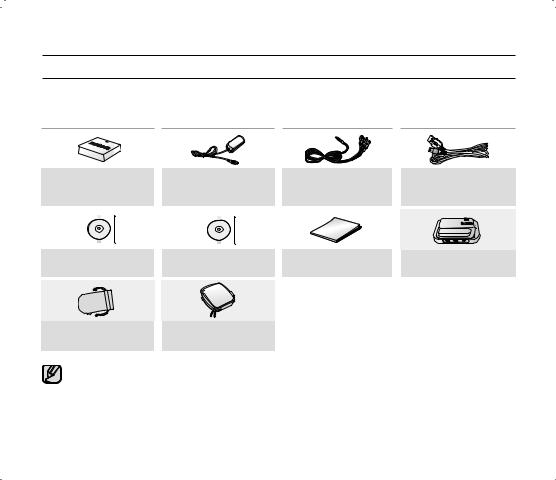
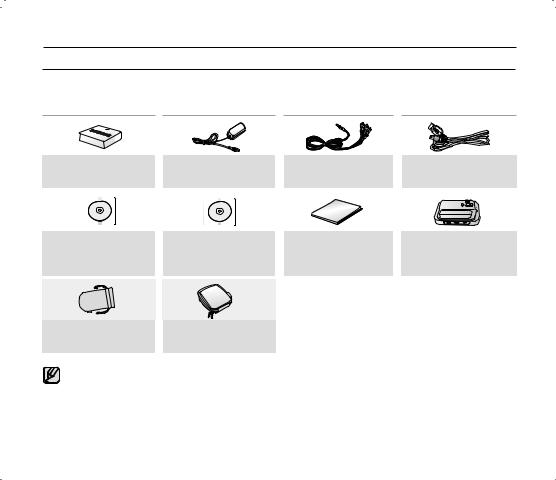
WHAT'S INCLUDED WITH YOUR MEMORY CAMCORDER
Your new memory camcorder comes with the following accessories. If any of these items is missing from your box, call Samsung’s Customer Care Center.
+ The exact shape of each item may vary by model.
Battery pack |
|
AC power adaptor |
|
|
|
|
|
|
||||||
|
|
Audio/Video Cable |
|
USB Cable |
||||||||||
(IA-BP85ST) |
|
(AA-E9 type) |
|
|
||||||||||
|
|
|
AD39-00155A |
|
AD39-00153A |
|||||||||
AD43-00180A |
|
AD44-00116B |
|
|
|
|||||||||
|
|
|
|
|
|
|
||||||||
|
|
|
|
|
|
|
|
|
|
|
|
|
|
|
|
|
|
|
|
|
|
|
|
|
|
|
|
|
|
|
|
|
|
|
|
|
|
|
|
|
|
|
|
|
Software CD |
|
User manual CD |
Quick start guide |
Cradle* |
AD46-00192A |
|
AD46-00192B |
AD68-03076B |
AD97-16073A |
|
|
|
|
|
Pouch* |
Carrying Case* |
AD69-00932A |
AD69-00929A |
•The contents can vary depending on the sales region.
•Parts and accessories are available at your local Samsung dealer and service center.
•The memory card is not included.
•You have to connect the AC power adaptor to the cradle when connecting external devices using the cradle.
•Your camcorder includes user manual CD and quick start guide(printed). For more detailed instructions, refer to the user manual (PDF) on the provided CD.
•*(Option) : This is an optional accessory. To buy this one, contact your nearest Samsung dealer.
2_English

FRONT & LEFT & REAR & BOTTOM VIEW
CLOSE
OPEN
1 2 3
4
5

6
78
1 Lens open/close switch
2 Internal microphone
3 Lens
4 MENU button
5 OK button
6 Control button (


 )
)
7 Recording start/stop button
13
910 11 12
8 LCD screen
9 Built-in speaker
10


 button
11EASY Q button
12LCD ENHANCER ( ) button
13Zoom lever (W/T)
1
2
3 |
|
|
|
|
|
|
|
|
|
|
|
|
9 |
||||||
|
|
|
|
|
|
|
|
|
|
|
|
||||||||
|
|
|
|
|
|
|
|
|
|
|
|
|
|
|
|
|
|
|
|
4 |
|
|
|
|
|
|
|
|
|
|
|
|
|
|
|
|
|
8 |
|
|
|
|
|
|
|
|
|
|
|
|
|
|
|
|
|
|
|||
|
|
|
|
|
|
|
|
|
|
|
|
|
|
|
|
||||
5 |
|
|
|
|
|
|
|
|
|
|
|
|
|||||||
|
|
|
|
|
|
|
|
|
|
|
|
||||||||
|
|
|
|
|
|
|
|
|
|
|
|
|
|
|
|
7 |
|||
|
|
|
|
|
|
|
|
|
|
|
|
||||||||
|
|
|
|
|
|
|
|
|
|
|
|
||||||||
|
|
|
|
|
|
|
|
|
|
|
6 |
||||||||
|
|
|
|
|
|
|
|
|
|
|
|||||||||
10 |
11 |
|
|
12 |
|
|
|
|
|
|
|
|
|||||||
|
|
|
|
|
|
|
|
|
|
|
|
|
|
|
|
|
|
|
|
|
|
|
|
|
|
|
|
|
|
|
|
|
|
|
|
|
|
|
|
|
|
|
|
|
|
|
|
|
|
|
|
|
|
|
|
|
|
|
|
|
|
|
|
|
|
|
|
|
|
|
|
|
|
|
|
|
|
|
|
15 |
14 |
13 |
1MODE indicator
( Record ( ) / Player (
  ))
))
2 MODE button
3 AV cable jack
4 USB jack (USB)
5 DC IN jack (DC IN)
6 Jack cover
7 Charging indicator (CHG)
8 POWER switch
9Recording start/ stop button
10Grip belt
11Swivel Hand-grip
12Grip belt hook
13Cradle receptacle
14Tripod receptacle
15Memory card/ Battery slot cover
ENG
English_3
preparation
CONNECTING A POWER SOURCE
•There are two types of power source that can be connected to your memory camcorder.
•Do not use provided power supply units with other equipment.
-The battery pack: used for outdoor recording.
-The AC power adapter : used for indoor recording and playing back.
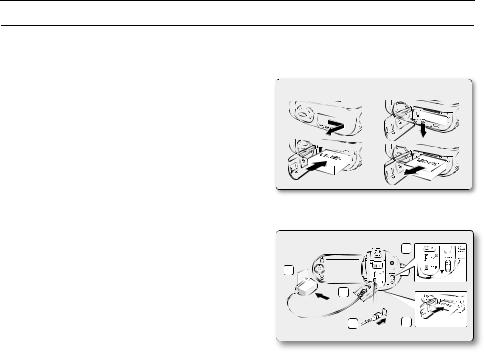
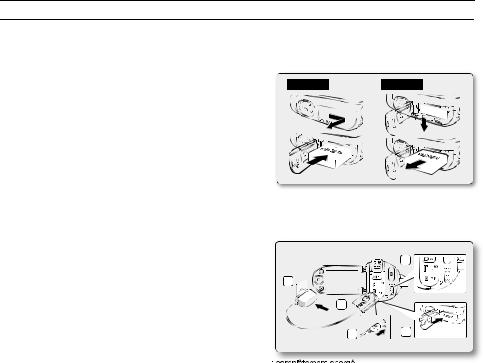
Inserting the battery pack
1. Slide and open the battery slot cover as shown in the figure. |
Insert |
|
Eject |
|
|
|
2. Insert the battery pack into the battery slot until it softly clicks.
• Make sure that the SAMSUNG logo is facing up while the set is placed as shown in the figure.
3. Slide and close the battery slot cover.
Ejecting the battery pack
1. Slide and open the battery slot cover and push the battery lock.
• Gently push the battery lock in the direction as shown in the figure to eject the battery out.
2.Pull the ejected battery out in the direction as shown in the figure.
3.Slide and close the battery slot cover.
Charging the Battery Pack
 CARD
CARD
1. |
Slide the POWER switch downward to turn off the power. |
|
|
|
1 |
|
2. |
Open the LCD screen and insert the battery pack to the |
|
|
|
||
|
|
|
|
|
||
3. |
memory camcorder. |
5 |
|
|
|
|
|
|
|
|
|||
Open the DC IN/USB/AV jack cover. |
|
|
|
|
||
|
|
|
|
|
||
|
|
|
|
|
||
4. |
Connect the AC power adapter to the DC IN jack of your |
3 |
|
|
|
|
|
memory camcorder. |
|
|
|
|
|
5. |
Connect the AC power adapter to a wall socket. |
4 |
2 |
|||
|
• The CHG (charging) indicator lights up in orange and showing |
|||||
that the battery pack is charging.
•The CHG (charging) indicator lights up in green when the battery is fully charged.
6.When the battery pack is fully charged, disconnect the AC power adapter from the memory camcorder.
•Even with the power switched off, the battery pack will still discharge if it is left attached to the memory camcorder. It is recommended that you remove the battery pack from the memory camcorder.
4_English
about the storage media
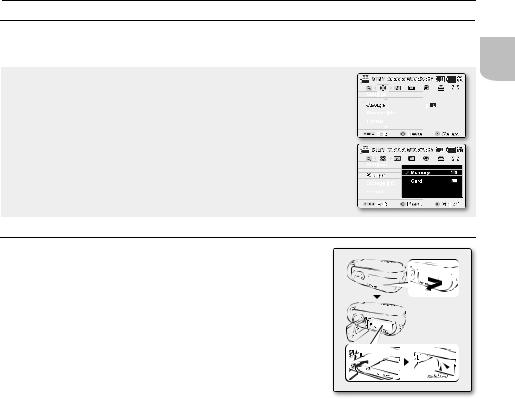
SELECTING THE STORAGE MEDIA (SC-MX20C/MX20CH/MX20E/MX20EL/MX20ER ONLY)
•You can record on the built-in memory or a memory card, so you should select the desired storage media before starting recording or playback.
•Before inserting or ejecting the memory card, turn the memory camcorder off.
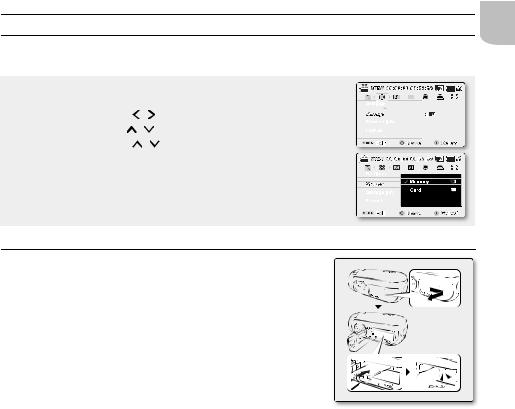
1. |
Press the MENU button. |
|
|
|
|
|
|
• The menu list will appear. |
|
|
|
|
|
2. |
Press the Control button ( |
/ |
) to select "Settings". |
|
|
|
3. |
Press the Control button ( |
/ |
) to select "Storage", then press the OK button. |
|
|
|
4. |
Press the Control button ( |
/ |
) to select "Memory" or "Card", then press |
|
|
|
|
the OK button. |
|
|
|
|
|
• "Memory": When using the built-in memory.
• "Card": When using the memory card.
5. Press the MENU button to exit.
INSERTING / EJECTING THE MEMORY CARD
Inserting a memory card
1.Turn the memory camcorder off.
2.Slide the memory card slot cover to the right to open the cover.
3.Insert the memory card into the memory card slot in the direction of the arrow shown in the figure until it softly clicks.
4.Close the cover.
Ejecting a memory card
1.Turn the memory camcorder off.
2.Slide the memory card slot cover to the right to open the cover.
3.Slightly push the memory card inwards to pop it out.
4.Pull the memory card out of the memory card slot and close the cover.
 CARD
CARD


 CARD
CARD


 CARD
CARD
ENG
English_5
recording
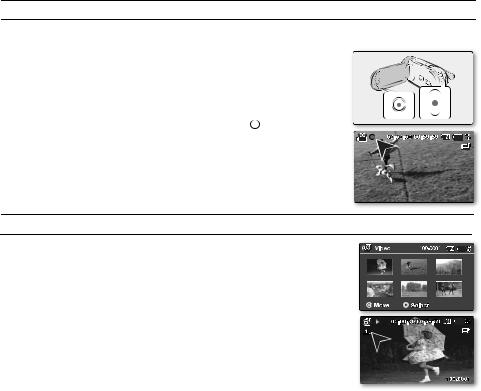
RECORDING MOVIE IMAGES
•Memory camcorder provides two Recording start/stop buttons.
One is on the rear side of the camcorder and the other one is on the LCD panel. Select the Recording start/ stop button according to the use.
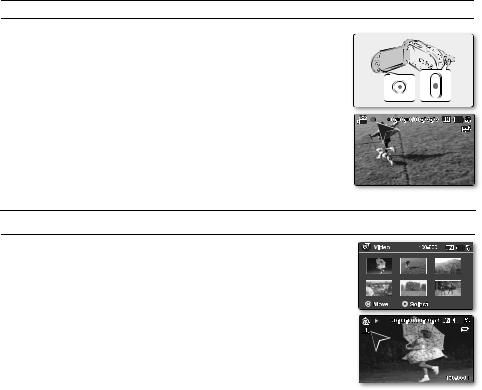
1.Turn the memory camcorder on.
•Connect a power source to the memory camcorder. (A battery pack or an AC power adapter)
•Slide the POWER switch downward to turn on the power.
•Set the appropriate storage media. (SC-MX20C/MX20CH/MX20E/MX20EL/MX20ER only) (If you want to record on a memory card, insert the memory card.)
•Set the Lens open/close switch to open (  ). ´page 3
2.Check the subject on the LCD screen.
3.Press the Recording start/stop button.
•The recording indicator (  ) will display and recording will start.
•Pressing the Recording start/stop button again during recording will set the memory camcorder to recording pause mode.
4.When recording is finished, turn the memory camcorder off.
playback
MOVIE IMAGES PLAYBACK
You can find a desired movie image quickly using thumbnail index view.
1.Turn the memory camcorder on.
•Slide the POWER switch downward to turn on the power.
•Set the appropriate storage media. (SC-MX20C/MX20CH/MX20E/MX20EL/MX20ER only) (If you want to record on a memory card, insert the memory card.)
2.Open the LCD screen.
•Adjust brightness or contrast of the LCD screen.
3.Press the MODE button.
•Switches to Movie Play mode (  ).
).
•The recorded movie images are displayed in thumbnail index view.
4.Use the Control button (  /
/  /
/  /
/  ) to select the desired movie images, and the press the OK button.
•Shortcut menu for playback will be displayed for a while.
•The selected movie images are played according to Play Option setting.
•To stop playback and return to the thumbnail index view, move the zoom lever.
6_English
connecting to a PC
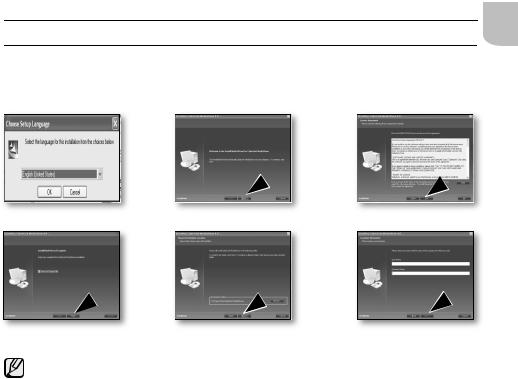
INSTALLING THE CYBERLINK MEDIASHOW4
CyberLink MediaShow4 is a software for easy of editing MPEG, AVI, and other video files, still images, and other contents for creating a movie.
Before you begin:
Quit any other software you are using. (Check that there are no other application icons on the status bar.)
¼¼
¾
»»
ENG
•If you perform installation of software that is already installed, uninstallation will start. In this case, perform the installation again after uninstallation is finished.
•This manual only refers to software installation and PC connection.
For more details on software, refer to the “Online help/Read me” on the CyberLink MediaShow4 CD.
English_7
connecting to a PC
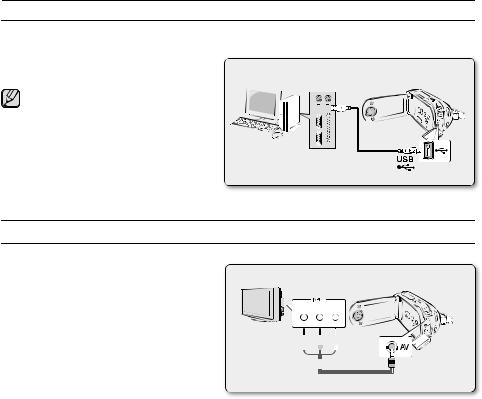
CONNECTING THE USB CABLE
Connect the USB cable to copy movie images in a recording medium to the PC and vice versa. When the USB cable is connected in Record / Play mode, the product will switch to USB mode immediately.
1. Connect the memory camcorder to the PC with a |
PC |
|
|
|
|
USB cable. |
Memory camcorder |
||||
• Don’t apply excessive force when inserting |
|
|
|
|
|
or extracting a USB jack. |
|
|
|
|
|
• Insert a USB jack after checking the |
|
|
|
|
|
|
|
|
|
|
|
direction of its insertion is correct. |
|
|
|
|
|
• It is recommended to use the AC adapter |
|
|
|
|
|
as the power supply instead of the battery |
|
|
|
|
|
pack. |
|
|
|
USB cable |
|
• When the USB cable is connected, |
|
|
|
||
|
|
|
|
|
|
turning on or off the camcorder causes |
|
|
|
|
|
malfunctions of the PC. |
|
|
|
|
|
connecting to other devices
CONNECTING TO A TV
•To playback your recordings, the television must be NTSC compatible.
•We recommend that you use the AC power
adaptor as the power source for the memory |
Normal TV |
Memory camcorder |
||
camcorder. |
|
|
||
|
|
|
|
|
Use the provided AV cable to connect the memory |
|
AUDIO |
VIDEO |
|
|
|
|||
camcorder to a TV as follows: |
|
|
||
|
R |
L |
|
|
1.Connect the end of the AV cable with the single plug to the AV jack of the memory camcorder.
2.Connect the other end with video (yellow) and left (white) / right (red) audio cables to the TV.
Red 

 Yellow
White Signal flow
AV cable
8_English

Caméscope à mémoire
Guide de démarrage rapide
*Une copie (imprimée) du Démarrage rapide et un CD sont fournis avec le caméscope. Pour plus de détails, reportez-vous au guide d’utilisation en format PDF sur le CD.
imaginez toutes les possibilités
Merci d’avoir acheté un produit Samsung.
Pour obtenir notre service complet, enregistrez votre produit sur le portail de
SC-MX20
SC-MX20B SC-MX20H SC-MX20L SC-MX20R SC-MX20C SC-MX20CH
FRA
www.samsung.com/global/register
présentation du caméscope à mémoire flash
ARTICLES COMPRIS AVEC VOTRE CAMÉSCOPE À MÉMOIRE FLASH
Votre nouveau caméscope est distribué avec les accessoires ci-après. S'il manque un accessoire dans la boîte de livraison, contactez le Centre de Service à la clientèle Samsung.
+ La forme exacte de chaque article peut varier selon le modèle.
Bloc-piles |
|
Adaptateur CA |
|
|
|
|
|
|
||||||
|
|
|
Câble vidéo |
Câble USB |
||||||||||
(IA-BP85ST) |
|
(TYPE AA – E9) |
|
|
||||||||||
|
|
|
|
|
|
|
||||||||
|
|
|
|
|
|
|
|
|
|
|
|
|
|
|
|
|
|
|
|
|
|
|
|
|
|
|
|
|
|
|
|
|
|
|
|
|
|
|
|
|
|
|
|
|
|
|
|
|
|
|
|
|
|
|
|
|
|
|
|
CD d’installation |
|
Guide d’utilisation |
Guide de démarrage |
Socle de recharge* |
des logiciels |
|
sur CD |
rapide |
|
|
|
|||
|
|
|
|
|
Étui* |
Mallette* |
|
|
|
|
•Le contenu peut varier en fonction du lieu de vente de l'appareil.
•Les pièces et les accessoires sont disponibles chez votre revendeur Samsung le plus proche et auprès du centre de service technique.
•La carte mémoire n'est pas comprise.
•Il faut relier l’adaptateur secteur au socle lors de la connexion de périphériques externes à l’aide de ce même socle.
•Votre caméscope est fourni avec un manuel d’utilisation sur CD et un guide de démarrage rapide (imprimé). Pour obtenir des instructions plus détaillées, reportez-vous au manuel d’utilisation (PDF) contenu sur le CD.
•*(En option) : Cet accessoire est en option. Contactez votre revendeur Samsung le plus près pour vous en procurer.
02_French
VUE D'AVANT ET DE GAUCHE / VUE DE CÔTÉ ET D’EN DESSOUS
FERMÉ
OUVERT
13
1 2 3
4 
5

6
7 |
8 |
9 |
10 |
11 |
12 |
1Commutateur d'ouverture/ fermeture de l'objectif
2Microphone interne
3Objectif
4Touche MENU
5Touche OK
6Touche de contrôle (


 )
)
7Touche démar./arrêt d’ enregistrement
8Écran ACL
9Haut-parleur intégré
10Touche 


11Touche EASY Q
12
Touche de l’ÉGALISATEUR PARAMÉTRIQUE D'ACL) (  )
)
13 Molette de zoom (W/T)
1
2
3 |
|
|
|
|
|
|
|
|
|
|
|
|
|
|
|
|
|
|
9 |
FRA |
|
|
|
|
|
|
|
|
|
|
|
|
|
||||||||
|
|
|
|
|
|
|
|
|
|
|
|
|
|
|
|
|
|
|
|
|
4 |
|
|
|
|
|
|
|
|
|
|
|
|
|
|
|
|
|
8 |
|
|
|
|
|
|
|
|
|
|
|
|
|
|
|
|
|
|
|
|
|||
|
|
|
|
|
|
|
|
|
|
|
|
|
|
|
|
|
||||
5 |
|
|
|
|
|
|
|
|
|
|
|
|
|
|||||||
|
|
|
|
|
|
|
|
|
|
|
|
|
||||||||
|
|
|
|
|
|
|
|
|
|
|
|
|
|
|
|
7 |
|
|||
|
|
|
|
|
|
|
|
|
|
|
|
|
||||||||
|
|
|
|
|
|
|
|
|
|
|
|
|
||||||||
|
|
|
|
|
|
|
|
|
|
|
6 |
|
||||||||
|
|
|
|
|
|
|
|
|
|
|
|
|||||||||
10 |
11 |
|
|
12 |
|
|
|
|
|
|
|
|
|
|||||||
|
|
|
|
|
|
|
|
|
|
|
|
|
|
|
|
|
|
|
|
|
|
|
|
|
|
|
|
|
|
|
|
|
|
|
|
|
|
|
|
|
|
|
|
|
|
|
|
|
|
|
|
|
|
|
|
|
|
|
|
|
|
|
|
|
|
|
|
|
|
|
|
|
|
|
|
|
|
|
|
|
|
|
|
|
|
15 |
14 |
13 |
|
|
1 |
Témoin de mode |
|
|
9 |
Touche démar./ |
|
|
(Enreg ( |
) / Lecture ( |
)) |
|
arrêt d’enregistrement |
|
|
|
|
||||
|
|
|
|
10 |
Dragonne |
|
2 |
Touche MODE |
|
|
|||
|
|
|
|
11 |
Poignée pivotante |
|
3 |
Prise du câble vidéo |
|
|
|||
|
|
|
|
|
12 |
Agrafe de dragonne |
4 |
Prise USB |
|
|
|
||
|
|
|
13 |
Fiche pour socle de recharge |
||
5 |
Prise d’entrée CC (Entrée CC) |
|||||
|
|
|
|
14 |
Emplacement pour trépied |
|
6 |
Cache-prise |
|
|
|||
|
|
|
|
15 |
|
|
7 |
Témoin de charge (CHG) |
|
|
Cache de la carte mémoire |
||
|
|
|
|
|
|
et du bloc-piles |
8 |
Touche POWER |
|
|
|
||
|
|
|
|
|||
|
|
|
|
|
|
|
French_03
prise en main
BRANCHEMENT SUR UNE SOURCE D'ALIMENTATION
•Deux types de source d'alimentation peuvent être raccordés à votre caméscope.
•N'utilisez pas les adaptateurs d'alimention compris sur d'autres appareils.
-Le bloc-piles : utilisable lorsque vous filmez en extérieur.
-L'adaptateur CA : utilisable lorsque vous filmez en intérieur ou pour la lecture.
Insertion du bloc-piles
1. Faites glisser le couvercle du logement du bloc-piles tel qu'illustré |
Insertion |
Éjection |
|
|
sur la figure.
2. Insérez le bloc-piles dans son logement jusqu'à ce que vous entendiez un léger déclic.
• Prenez soin de bien orienter le logo SAMSUNG face vers le haut lorsque vous placez l’appareil, conformément à l'illustration.
3. Faites coulisser le couvercle du logement du bloc-piles pour le refermer.
Éjection du bloc-piles
1.Faites glisser le couvercle du logement du bloc-piles pour l'ouvrir et appuyez sur le bouton de verrouillage.
• Poussez doucement le bouton de verrouillage du bloc-piles dans le sens indiqué sur l'illustration pour l'éjecter.
2.Retirez le bloc-piles dans le sens indiqué sur l'illustration.
3.Faites coulisser le couvercle du logement du bloc-piles pour le refermer.
 CARD
CARD
Charge du bloc-piles
1. |
Faites coulisser le commutateur POWER vers le bas pour éteindre |
|
|
|
1 |
|
|
l'appareil. |
|
|
|
||
2. |
|
|
|
|
|
|
Soulevez l’écran ACL et insérez le bloc-piles dans le caméscope à |
5 |
|
|
|
|
|
|
|
|
|
|||
|
mémoire flash. |
|
|
|
|
|
3. |
|
|
|
|
|
|
Soulevez le cache prise DC IN/USB/AV. |
3 |
|
|
|
||
4. |
Branchez l'adaptateur CA dans la prise DC IN du caméscope à |
|
|
|
||
|
|
|
|
|
||
5. |
mémoire flash. |
|
|
|
|
|
Branchez l’adaptateur d'alimentation CA sur une prise murale. |
4 |
2 |
||||
•Le témoin orange CHG (sous charge) s’allume pour indiquer que le chargement est en cours.
•Le témoin vert CHG (sous charge) s'allume lorsque le bloc-piles est
6.À la fin du chargement, débranchez l’adaptateur CA du caméscope à mémoire flash.
•Si le bloc-piles est laissé dans son logement, il continue de se décharger, même lorsque le caméscope à mémoire flash est hors tension. Nous vous conseillons de retirer le bloc-piles du caméscope à mémoire flash.
04_French
à propos du support de stockage
SELECTION DU SUPPORT DE STOCKAGE (SC-MX20C/MX20CH UNIQUEMENT)
• |
Il est possible d'enregistrer sur la mémoire interne ou sur une carte mémoire. Vous devez donc sélectionner le |
|
|
|
support de stockage avant de lancer un enregistrement ou d'effectuer une lecture. |
FRA |
|
• |
Avant d’insérer ou de retirer la carte mémoire, éteignez le caméscope. |
||
|
1. Appuyez sur la touche MENU.
• La liste de menus s'affiche.
2. Appuyez sur la touche de contrôle (  /
/  ) pour sélectionner "Settings"
(Réglage).
3. Appuyez sur la touche de contrôle (  /
/  ) pour sélectionner "Storage" (Mémoire), puis appuyez sur OK.
4. Appuyez sur la touche de contrôle (  /
/  ) pour sélectionner "Memory" (Mémo.) ou "Card" (Cart), puis appuyez sur OK.
• "Memory" (Mémo.) : avec la mémoire intégrée
• "Card" (Cart) : avec la carte mémoire.
5. Appuyez sur la touche MENU pour quitter.
INSÉRER / ÉJECTER UNE CARTE MÉMOIRE
Insérer une carte mémoire
1. Éteignez le caméscope.
2. Faites coulisser le cache fente sur la droite pour l’ouvrir.
3. Insérez la carte mémoire dans la fente et dans la direction indiquée par la flèche jusqu’à ce que vous entendiez un léger déclic.
4. Refermez le cache fente.
 CARD
CARD
Éjecter une carte mémoire
1.Éteignez le caméscope.
2.Faites coulisser le cache fente sur la droite pour l’ouvrir.
3.Poussez légèrement la carte mémoire vers l’intérieur jusqu’à ce qu’elle s’éjecte.
4.Sortez la carte mémoire de son compartiment et refermez le cache fente.


 CARD
CARD


 CARD
CARD
French_05
enregistrement
L'ENREGISTREMENT DE VIDÉOS
•Le caméscope à mémoire flash vous offre deux touches marche/arrêt de l’enregistrement. L'une est située à l'endos du caméscope et l'autre sur l'écran ACL. Choisissez la touche marche/arrêt de l’enregistrement en fonction de son utilisation.
1. |
Allumez le caméscope. |
|
|
• Branchez une source d’alimentation sur le caméscope à mémoire flash. |
|
|
(Un bloc-piles ou un adaptateur CA) |
|
|
• Faites coulisser le commutateur POWER vers le bas pour l’allumer. |
|
|
• Définissez le support de stockage adéquat. |
|
|
(SC-MX20C/MX20CH uniquement) |
|
|
(Si vous souhaitez enregistrer sur une carte mémoire, insérez-la maintenant.) |
|
2. |
• Réglez le commutateur de l'objectif ouvert/fermé sur ouvert ( |
). ²page 3 |
Réglez la mise au point du sujet sur l'écran ACL. |
|
|
3. |
Appuyez sur la touche marche/arrêt de l'enregistrement. |
|
•Le témoin d'enregistrement (  ) s'affiche et l'enregistrement commence.
•Si vous appuyez à nouveau sur la touche marche/arrêt de l'enregistrement
en cours d’enregistrement, le caméscope passe en mode pause d’enregistrement.
4.Éteignez le caméscope à la fin de l'enregistrement.
lecture
LECTURE DE VIDÉOS
L'index des vignettes vous permet de trouver rapidement un enregistrement vidéo.
1.Allumez le caméscope à mémoire flash.
• Faites coulisser le commutateur POWER vers le bas pour l’allumer.
• Définissez le support de stockage adéquat. (SC-MX20C/MX20CH uniquement) (Si vous souhaitez enregistrer sur une carte mémoire, insérez-la maintenant.)
2. Déployez l’écran ACL.
• Ajustez la brillance ou la couleur de l'écran ACL.
3.Appuyez sur la touche MODE.
• Bascule en mode de lecture vidéo (  ).
).
• L'index des vignettes affiche les vidéos enregistrés.
4.Appuyez sur la touche de contrôle (  /
/ /
/  /
/  ) pour sélectionner la vidéo, puis appuyez sur OK.
• Le menu des raccourcis de lecture s'affiche pendant quelques instants.
• Le mode de lecture des images vidéo sélectionnées est déterminé par le réglage "Play Option" (Option lect).
•Pour arrêter la lecture et retourner sur l’index des vignettes, déplacez le levier de zoom.
06_French

raccordement à un ordinateur
INSTALLATION DE CYBERLINK MEDIASHOW4
CyberLink MediaShow4 est un logiciel convivial pour effectuer le montage des fichiers vidéo MPEG, AVI etc., des images figées et d’autres fichiers pour créer une vidéo.
Avant de commencer: Quittez tous les programmes en cours. (Assurez-vous qu'aucun autre programme n'apparaît sur la barre d'état.)
|
¼ |
|
¼ |
|
|
|
|
|
|
¾
|
» |
|
» |
|
|
|
|
|
|
FRA
•Si vous tentez d'installer le logiciel et qu'il est déjà installé, la désinstallation est lancée. Dans ce cas, réinstallez le logiciel lorsque la désinstallation sera terminée.
•Ce manuel n'expose que l'installation du logiciel et les raccords à un ordinateur.
Pour plus de détails concernant ce logiciel, reportez-vous au guide d'aide en ligne “Online help/Readme” du CD CyberLink MediaShow4.
French_07
 Loading...