


N640CL2024
Samsung N640CL2024, N640CL2054, N640CJ2024, N640CL2034, N640CN2011 User Manual
...
Using Your Documentation
Congratulations on your purc has e of a No te bo o k comput er. Whether y ou are new
to using a portable computer or are an experienced user, this user’s manual can
help you get th e m o st from your c omputer.
Special Feature s of the User’s Manual
Three types of messages with icons appear in the manual:
A note informs y ou of special circ umstances.
A caution warns you of possible damage to equipment.
A warning indicates the possibility of personal injury.
Keys that you need to press to perform certain functions are shown in the manual
enclosed in angle brackets. For example,
<Ctrl>
indicat e s the c ontrol key (Ctrl o n th e co mp u te r ’s keyboard).
If you need to press two keys at the same time , the key names are shown joined by
a plus sign. For example,
<Fn+F11>
means that you should press the Fn ke y and h old it and then pres s the F11 key.
If you ar e new to using computers, see “Glo ssary”. Th e “Glos sa r y” explains
general co mputing terms that are u sed i n this manual and te ll s you abo ut some of
the differe n ces between noteb o ok computers an d desktop computers.
Using Your Documentation 1

Using the Software User Documenta tion
Your computer shipped f rom t he facto ry with several softwa re programs in stalle d.
The software may incl u de its own online or printe d documenta tio n . Re f e r to the
docume nt ati o n o r the Help options in the s o ftwa r e for more info rm a tion.
2 Using Your Documentation

Introducing Your Computer
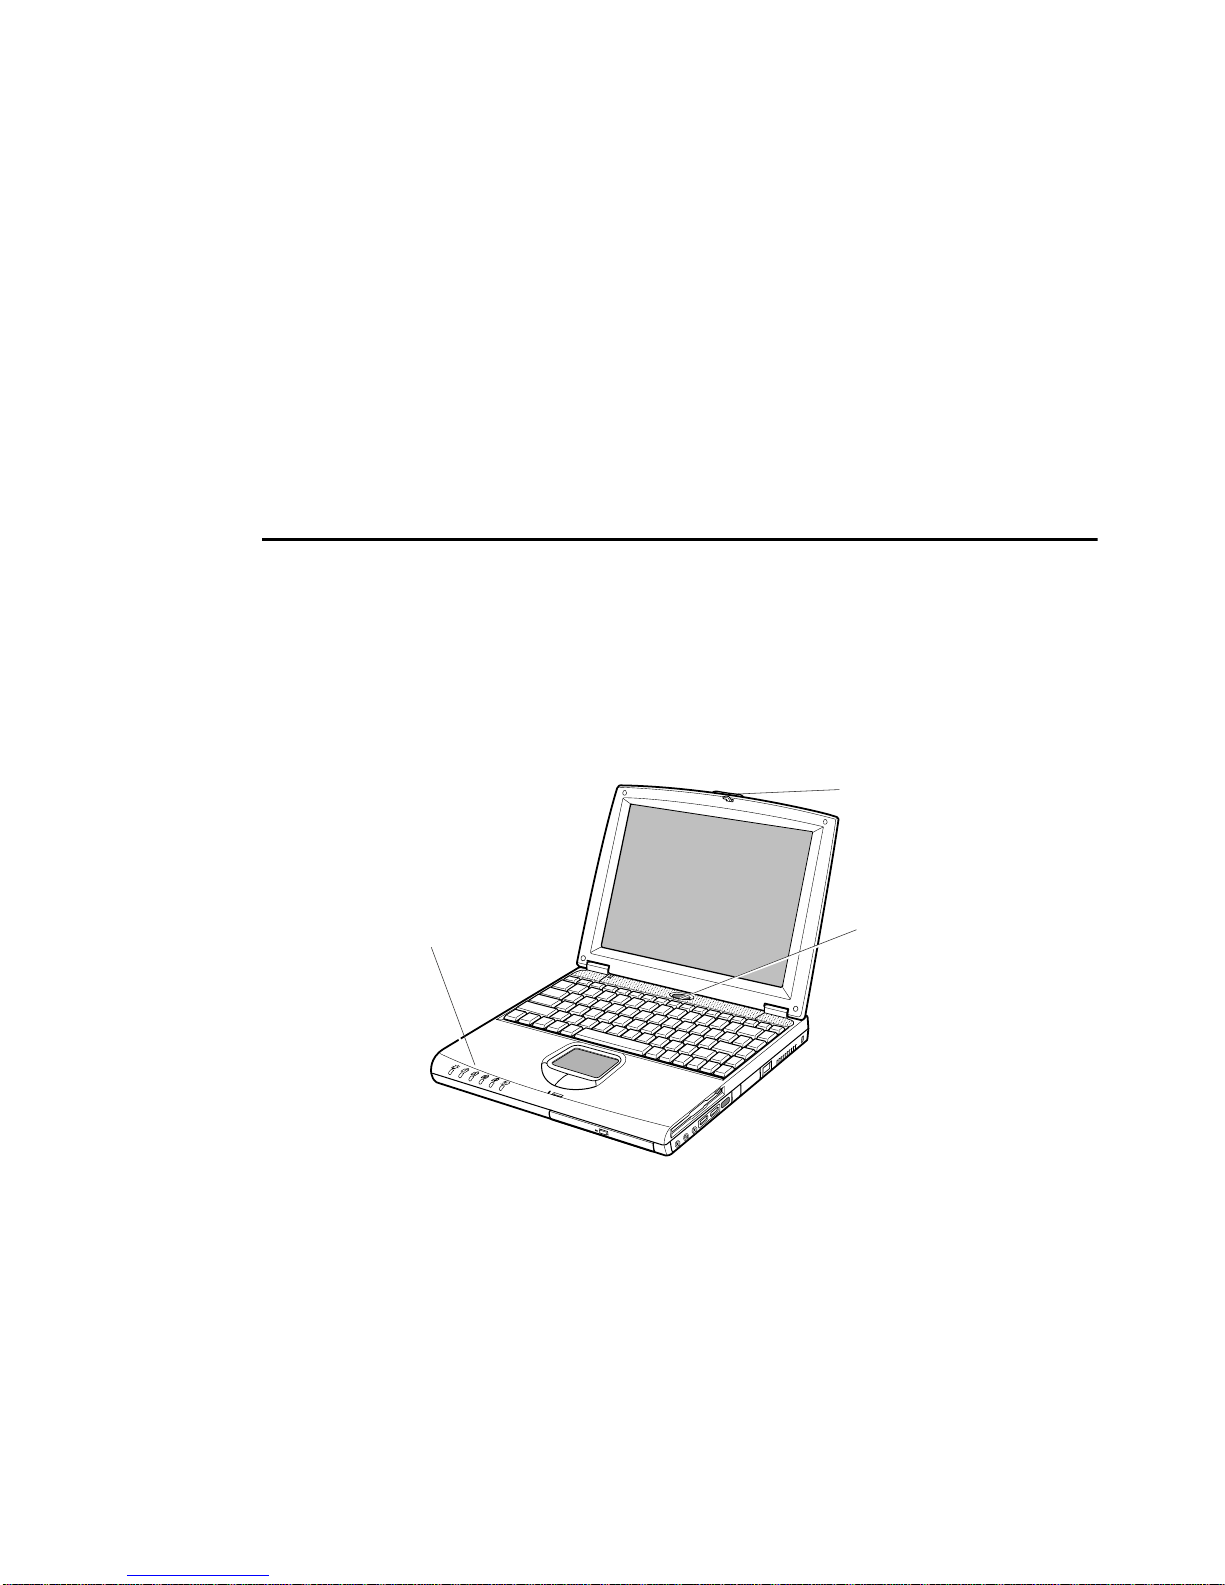
Your computer is a lightweight portable computer that includes features to meet
your c omputing need s at h o m e o r on th e road.
Your computer has a CD-ROM drive and a floppy disk drive within the computer.
Figure 1 thr ough 3 show you t he f eatu res o f your com puter.
Docking Station port, Modem port, TV-out port, IrDA is
optional, so that your computer may not have those optional
ports or functions.
Cover latch
Speaker
Touchpad
Status
lights
Microphone
Mouse
Buttons
CD-ROM drive
Figure 1. Front View of Computer
Line-in
LCD
Power button
Speaker
Kensington lock
Fan vent
Modem jack
Floppy drive
Infrared port
USB ports
External-mic jack
Headphone
jack
Introducing Your Computer 3

Power Connecto
PS/2™
mouse and
keyboard
port
Parallel port
Docking
connector
Video port
Figure 2. Back View of Computer
Flex-Bay latch
System label &
Business card holder
Serial
port
TV out
PC Card
compartment
Memory module
compartment
Battery
compartment
Hard drive
compartment
Figure 3. Bottom View of Computer
4 Introducing Your Computer

Using Your Computer for the First Time
This secti on gives you det a i led in fo rmat ion on us i ng yo ur com p uter for the first
time.
Attaching the AC Adapter
Your computer runs on power from the battery in the computer or from an
electrical outlet. The first time that you use your computer, fully charge the battery
by attaching the p o wer cord to the computer and to an electric a l outlet.
All batteries lose their charge if they sit unused for an
extended time perio d. When not used, battery can discharge
fully in 2 to 3 months. The battery may have discharged in the
time it took for the computer to go from the factory to you.
To attach the power cord:
1. Plug the AC adap ter in to the p o wer conn ector on the b ack side of the compute r
(Figure 4) .
2. Connect the power cord to the AC adapter and then to an electrical outlet.
Power connector
AC Adapter
Power cord
Figure 4. Connecting the AC Adapter
Using Your Computer for the First Time 5
The b a tt er y starts charging as soon as yo u p lu g the power cor d in to an electrical
outlet. The battery cha rges fast er if the co mp uter is tur n ed off during charging.
If the battery is f ul l y de pl eted and t h e co m p uter is turne d off, th e batter y charges
in about 3 hours. If the computer is turned on, the battery charges in about 5 hours.
When the battery is charging, the battery charge light is amber. When the battery
is fully charged, the light turns green.
See ”Using t he Battery” on page 32 fo r more informa ti on on using your
computer’s battery.
Turning On the Computer
To turn on the computer’s p o we r f o r the f irst time:
1. Push to the r ight and hold t h e c o ve r latches on the front o f the cover.
2. Lift up t he co ver.
3. Press and then rele ase th e p ower butt on ( Figure 5).
The power light is on when the computer’s power is on.
Cover latch
Power light Power button
Figure 5. Turning On the Computer’s Power
6 Using Your Computer for the First Time

Understanding POST
When you t u rn on your compu t er, a routine cal le d POST (Power-On Self-Test)
automa ti ca ll y r u ns t o test the co m put er component s. Syst e m logo ap p ears on the
screen duri ng P OST.
Screen messages are buil t into th e co mputer t o rep o rt both n or mal and abnormal
system conditions. If an error message appears, take any action suggested in the
message. If the mess a ge identifies th e e rror condition but do es not su g gest any
corre c tive action, write down the message a n d contact manufacturer or an
authoris ed se rvi ce c ente r fo r assista nce . (See ”Troubleshoo ting” on page 95.)
Adjusting the LCD Display
You may w ish to adjust the LCD (Liquid-Cr ys t al Display) when y ou begin using
your c omputer. A TFT (Thin-Film Transistor) LCD doe s not require adjustment
for contrast because the contrast is set to remain at maximum.
To a d j u st the LC D:
Press <Fn+Right Arrow> to increase the display brightness.
•
Press <Fn+Left Arrow> to decrease the display brightness.
•
Turning Off You r C omputer
If your computer has a Windows operating system, turn off
your computer by performing the shutdow n procedure
described in this section. Otherwise, you may lose data.
APM(Advanced Power Management) mode
To turn off the computer:
1. Click Start on the taskbar.
2. Click Shut Down.
3. Select the shut down option.
4. Click OK or Yes.
Using Your Computer for the First Time 7

If the operating system is Windows 98/ Me, the computer turns off.
•
If the o pera ting syst em is Windows NT, you receive a shutdown message
•
and you must press the p o we r b utton t o t ur n of f the computer.
ACPI(Advanced Configuration and Power
Interface) mode
If your operating syst em suppo rts ACPI and you wa nt t o sh ut d own the computer
just by pressin g th e p ower b u tt on, then follow next steps to se t the men u in Power
Management Properties. Also see “Using Power Management Options” on page
63 and the docum e nt ati o n acc omp any ing you r opera ting system.
To set the menu;
1. Select Power Management Properties in Control Pannel.
2. Select the operations of power button.
Standby mode : o perates as Power On Su sp en d mo de . (See ”Rest Mode” on
•
page 64 for more information.)
Hib e r n at e mode : operate s as Sa v e To Dis k m o d e. S e t Hi b e r n a t e subm en u to
•
enabled to use Hiber nate mode. (See ”Rest Mode” on page 64 for more
information.)
Restarting Your Computer
You may need to restart (reboot) your computer when installing hardware or
software or if the co mp uter does not respond to y o ur input. A warm (or sof t) boot
prompts you to save your files, turns off the computer, and then restarts the
comput er. A cold boot t ur n s off t h e co m p u te r witho ut saving your files.
To perform a warm (or soft) boot:
1. Click Start on the taskbar.
2. Click Shut Down.
3. Select the restart option.
4. Click OK or Yes.
5. Save your files if prompted. Yo ur co mputer reboots.
8 Using Your Computer for the First Time

Do not perform a cold boot unl e s s you r keyboard and
touchpad have no effect and you cannot perform a warm
boot.
When you perfo rm a co ld bo ot , you lose da ta unless it was
saved to a storage medium.
You can also perform a soft boot by saving your files and pressing
<Ctrl+A l t+ D el >. In ACPI , you can perf orm a cold(o r ha r d ) boot by pre ssing the
power but to n t o tur n t he c om pu te r off, waiting five second, an d then pressing the
power button to turn the computer on.
Tips for Using Your Computer
The following information helps you avoid potential problems as you use your
computer:
Do not try to disassemble your computer. Opening the
system chass is voids your warr anty. Only an authorised
manufacturer service center can replace or add any parts
inside the chas sis.
Follow all the instructions and cautions in y our comput er user documentation.
•
The LCD has a polarized surface and can be damaged easily. To prevent
•
damage, avoid touching the screen.
Use only approved AC adapters, auto adapters, memory modules and other
•
options.
Because a notebook computer is small and has restricted air flow around
•
components, it is more like l y to ov erh e a t th an a d es kto p computer. A fan
inside your computer runs when needed to help eliminate some heat. Make
sure the fan vent on th e right side o f yo ur computer is not blocked when you
use the computer. (See Figure 1 on page 3 and Figure 2 on page 4 for the
location of the vent.) Occasionally check the vents and remove any
accumul at ed du s t o n the out si de.
Avoid using or storing the computer in extremely hot or cold areas, such as a
•
car on a hot day. Keep the computer away from heaters and out of direct
sunlight. Exposure to excessive heat may damage computer components.
Using Your Computer for the First Time 9

If you hav e left your comp ut er in a hot pl ac e, let it cool down slow l y t o r oom
temperature (with the LCD panel open) before using it.
Do not remove the memory-module compartment door, or try to install a
•
memory module when t he com puter i s on. (See ” B o tto m View o f Co m pu t er”
on page 4 for the location of the door.)
(For informa tion on installing me mory m odules, see “Installin g a Memory
Module ” o n pag e 86.)
Set up your c om pute r work a re a to avoid physical st rain . Sit with your back
•
straight and supported by your chair. Adjust you r chair or work table so that
your arms and w r ists can remain in a relaxed posit ion, parall e l with the floor.
Avoid bending or twisting your wrists as you work. Your hand s should “float”
slightly above the keyboard. Refer to a book on office ergonomics for more
informat ion on setting up yo u r wo rk area.
Take fre quent bre ak s fr om working at the comp u t er to rest yo ur eyes and
•
stretch your muscles.
Remember to save yo ur data files frequently and to make backup copies of
•
your files.
Traveling with Your Computer
If you are traveling by airplane, follow these tips:
Take the computer with you as carry-on luggage. Do not check the computer
•
with your baggage.
Allow the computer and disks to go through the X-ray security devices. Do
•
not hand-ca r r y disks through the walk-through metal detectors, which can
cause loss of data.
Make sure that the battery is charged or the power cord is easily accessible.
•
You may be required to turn on the computer for airport securi ty personnel.
Be prep ared to t u rn off the c omputer dur i n g tak e off and land ing.
•
Contact your ai r line for inf or mation about us ing an option al ai r line a dapter to
•
power your computer while traveling by airplane.
10 Using Your Computer for the First Time

Handl in g Sp il ls
Do not s pil l anything on your c omp ut e r. The be st way to av oid spills is to avoid
eating and drinking around your computer. If you do spill something on your
computer, turn off your computer, unplug it immediately, and do the following:
If you spil l liqui d on th e key boar d, drain as much of t he li quid fr om the
•
keyboar d as possi bl e. Be carefu l no t to le t the liquid drip o nto the L C D pa nel.
Allow the system to dry for several days before trying to use it.
If you spill liquid on an external keyboard or keypad, unplug it and drain as
•
much of t he liquid a s pos sible. Al low the keyboar d to si t at r o om te m p erature
for a full day be fore t rying t o use it.
Sweet liquids leave a sticky res idue that may jam the
keyboard despite your efforts to dry it.
If you spill li q u id on the LCD panel, clean i t immed i a tely w i th a soft cloth and
•
denatu red a lc o h ol. Do not use wat er , windo w cl ea n e r, ac et o ne , arom atic
solvent, or dry, rough towels to clean it.
Some liquid s damage the polarized LCD screen. If your
screen is damaged, contact your authorized manufacturer’s
service center for a replacement.
Storing the Comp uter for Long Periods
If possi ble, leave the power c ord connected to the computer an d an e lectric al outl et
when the computer is not in use. This extends the life of the battery and keeps the
battery fully charged.
If you will not be using the comp u ter for a lo n g peri od of time (a month or more),
you should charg e t he ba t t er y unti l it is com p letely full. After you have done so,
remove the battery from the unit.
Using Your Computer for the First Time 11

Using the Keyboard
Your computer has an 87/88-key keyboard (Figure 6). By pressing designated key
combinations, you can have access to all the key functions of a full-sized keyboard.
Function and Special Purpose Hot Keys
F1
F2
F3
Esc
Prt Sc
~
1
`
Tap
Caps Lock
Shift
Ctrl
Fn
Function Key
Sys Rq
@
!
23
QWER T
A
Z
Alt
F4
Backlit
#
$
4
SD FGH
XCVBN
Figure 6. Keyboard
Although the layout of the keys on your computer’s keyboard
is different from tha t on a deskto p compu te r’s keyboard, the
keyboard feels like a full-sized keyboard when you use it. The
distance between the keys (the pitch) is the same as on a fullsize keyboard (19 mm). The travel, or space the key goes
down when pressed, is also the same (3 mm).
Embeded Numeric Keypad
F5
CRT/LCD
%
F6 F7
Gauge
F8
Mute
KeyLock
7
&
^
567
YU
Alphanumeric Keys Cursor and Screen Control Keys
F10 F11
F9
9
8
()
890
54
IOP
1
JK
23
0/
<>
M
,
F12 Num
Scroll
Rest
_
6
L:
+
;
?
.
/
Alt
Lock
+
=
{
[
"
'
Shift
Ctrl
Pause
Insert
Break
Backspace
}
]\
Enter
Delete
Home
PgUp
PgDn
End
The keys on the keyboard can be grouped into the following categories:
Full-sized Alphanumeric typew r it er keys are arranged like a st andard
•
typewrit er keyboard and are used fo r text en try. The Wind ow s keys on either
side of th e s paceb a r ope n Win d o ws menu s and perfor m oth er sp e c i al
functions.
Function keys, when pressed together with the <Fn> key, enable special
•
functions.
Cursor a n d Screen co ntrol keys mov e the cu r s o r . The y may pe r f orm other
•
functions, depending on your software.
12 Using the Keyboard

To clean the computer keyboard, use slightly damp cotton swabs. Scrub the key
and the surface around the keys.
Do not allow liquid to drip into the keyboard or you may
damage the k eyboard.
Using the Embeded Numeri c Keypad
Your ke yb o a r d in cludes a numer ic ke y p a d, w h ich is a grou p of ke ys that you can
set to type numbers and mathematical symbols, such as the plus sign (Figure 7). A
number o r s ym b ol on th e right cor n e r of each keypad key shows it s numeric
function.
Figure 7. Numeric Keypad
Press <Num Lock > to turn on the embedd e d num er i c keypad. The numeric
functions of the keypad are enabled and the Num Lock light turns on. (See ”System
Status Lights” on page 18 for the location of the Num Lock light.)
While the numeric functions are enabled, you can temporarily return a key to its
normal function by pressing <Fn> a nd t he key. For ex am ple to type the letter m,
press <Fn+m>.
To turn th e numeric keypad o ff, p ress <Num Lock> ag ain. The Num Lock light
turns off.
Using the Keyboard 13

Using Spe cial Fun ct ion Keys
The <F n > key a ct ivates special fu nc ti ons w he n it i s pres sed in com b in a tion with
another key. Table 1 shows the special key combinations.
Table 1. Description of Spe c ial Function Keys
<Fn> Key
Combination
<Fn+F1>
<Fn+F2>
<Fn+F3> This key combination can generate Euro Mark as other Eurokey.
<Fn+F4>
<Fn+F5>
<Fn+F6>
<Fn+F7>
Function
Print screen:
paste into the Paint program.
System request:
Backlight
<Fn> key) to turn the LCD backlit back on.
CRT/LCD:
monitor, and simultaneous display on both the LCD and the
external monitor.
Gauge:
your screen.
The gauge closes in a few seconds, or you can press <Esc> to
close the gauge. (See ”Monitoring the Battery Charge” on page
35 for more information on the battery gauge.)
KeyLock:
Type your password and press <Enter> to unlock the keyboard.
The <Fn+F7> key combination has no effect unless a password is
enabled in System Setup. The Num Lock, Caps Lock, and Scroll
Lock lights blink when the keyboard is locked.
Takes a picture of the open screen, which you can
Reserved for use in software programs.
: Turns the LCD backlit off. Press any key (except the
Switches the display between the LCD, the external
Displays the battery gauge in the upper-right corner of
Locks the keyboard and activates password protection.
<Fn+F8>
<Fn+F9>
<Fn+F10>
<Fn+F11>
<Fn+F12>
14 Using the Keyboard
Mute:
Turns the audio output on and off.
Volume down:
Volume up:
Rest:
Puts the computer into rest mode. To resume normal
operation from rest, press the power button. (See ”Using Power
Management Options” on page 63 for more information about the
rest mode.)
Scroll:
In some applications, sets the cursor-control keys to scroll
the page up or down while the cursor position does not change.
Pressing <Fn+F12> again turns off the scrolling function.
Decreases the audio volume.
Increases the audio volume.

<Fn+Right
Arrow>
Brightness up:
Increases the LCD brightness.
<Fn+Left
Arrow>
Brightness down:
Decreases the LCD brightness.
When you press a function key combination, the system
sound may be temporar ily muted.
If you reinstall Windows, install the Magic Keyboard for
volume control function keys on keyboard, <Fn + F8/F9/F10>.
Or use the windows volume control on your screen.
Using the Keyboard 15
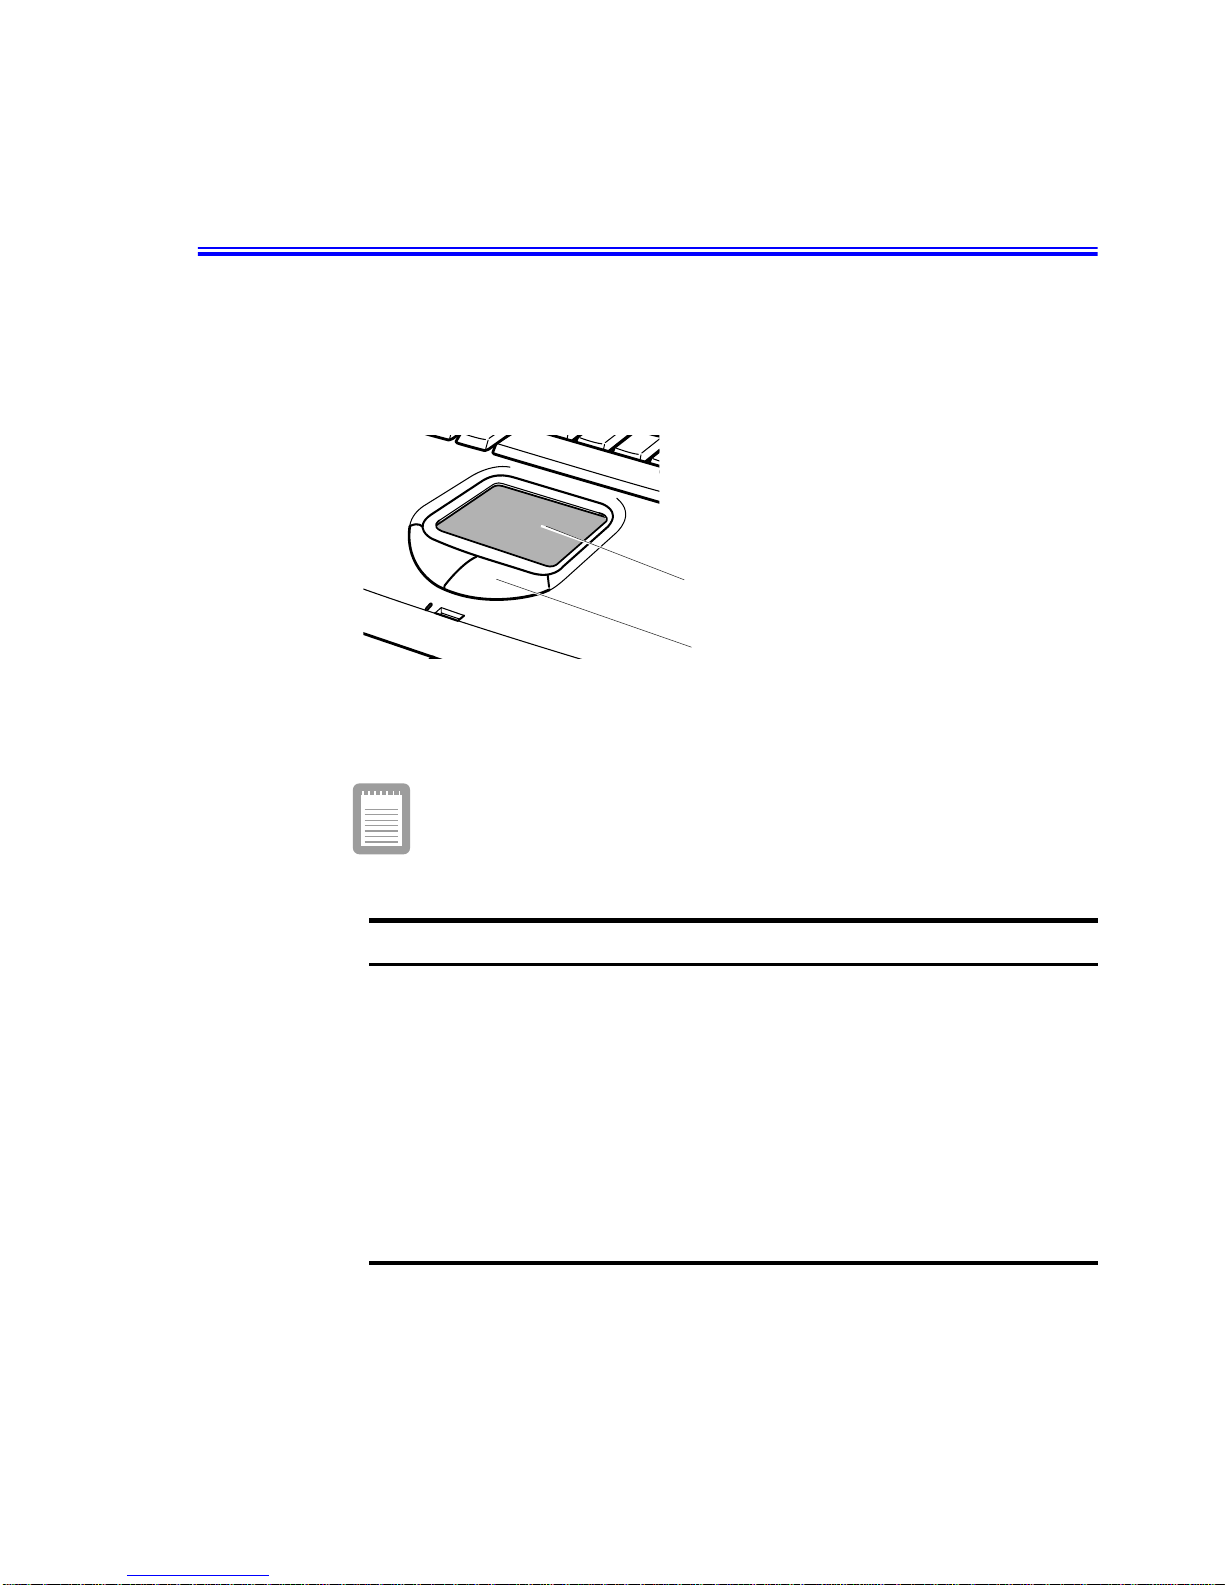
Using the Touchpad
Your computer is equipped with a touchpad, which is an integrated-pointing
device that is used to perform standard mouse functions (Figure 8). The touchpad
is an advanced and reliable pointing device that works with a touch of your finger.
Figure 8. Touchpad
Table 2 explains how to use the touchpad.
Press on the touchpad gently. The touchpad responds to light
pressure
Touchpad
Mouse buttons
Mouse Action How To
Move cursor Place your finger on the touchpad and slide your finger
Click Tap the touchpad once with your finger.
Double-click Tap the touchpad twice with one finger.
Scroll up/down Place your finger on the right hand side of the touchpad
Scroll left/right Place your finger on the bottom of the touchpad and
16 Using the Touchpad
Table 2. Using the Touchpad
in the direction you want the cursor to move. The faster
you move your finger, the faster the cursor moves
across the screen.
and slide it up or down to scroll the current window.
slide it left or right to scroll the current window.

You ca n use the button s bel ow the t o uc hp ad in the same way you would use
standard mouse buttons. For more information on these features and other features
supported by your mouse driver, see the Mouse propert i es in t he Co ntrol Panel.
For inf ormation on attaching an d us ing anoth er po inting de vi c e or keyboard with
your computer, see “Connecting Peripheral Devices” on page 20.
Using the Touchpad 17

Reading the System Status Lights
System Status lights show the status of computer functions. The lights appear on
the left edge of the computer (Figure 9).
Figure 9. System Status Lights
Table 3 describes the meaning of the light s.
Table 3. System Status Lights
Icon Function of Light
Power light:
blinks when the computer is in Power On Suspend mode. (See ”Rest
Mode” on page 64 for more information on Power On Suspend
mode.)
Num Lock light:
activated. See ”Using the Embeded Numeric Keypad” on page 13 for
a description of the keypad.
Caps Loc k li ght:
When the function is activated, all alphabetic characters you type will
be in upper case.
18 Readin g the System Status Lights
Light is green when the computer’s power is on. Light
Light is on when the embedded numeric keypad is
Light is on when the caps lock function is activated.

Scroll Lo ck ligh t:
Light is on when the scroll lock function is activated.
The scroll lock function affects cursor movement and text scrolling in
some applications. This is a software specific function. Refer to the
appropriate software manuals for a description of the <Scroll> key.
Drive light:
Light is on when the hard drive or floppy drive is being
accessed. Do not turn your computer off when this light is on. When
the light is amber, the floppy drive is being accessed. When the light
is green, the hard drive is being accessed. For a CD-ROM or DVDROM drive, check the light on the drive itself to see if the drive is
being accessed.
Battery charge light:
When the power cord is connected, light gives
information about the battery charge. Light is amber when the
battery is charging normally. Light is green when the battery is fully
charged. (See ”Charging the Battery” on page 32 for more
information about charging the battery.)
Reading the System Status Lights 19

Connecting Peripheral Devices
The c onne ct o r s on yo ur compute r e nable you t o attach peri pheral devices to the
computer (Fig ur e 10).
Turn off your computer before you connect a peripheral
device. Connecting a peripheral device with your computer
turned on may s eri ously damage the devic e or your
computer.
Headphone jack
Line-in jack
Kensington
Lock
* Modem jack
USB ports
Mic-in jack
Power
connector
PS/2 mouse and
keyboard port
Parallel port
* Docking connector
Video port
Figure 10. Peripheral Connectors
* Optional
Table 4 shows the icons locat ed near each c onnector and tells you the devi ces that
you can at tach to the connect ors.
20 Connecting Periphera l De vices
Serial port
* TV-out port (S-VHS)

Table 4. Connecting Peripheral Devices
Icon Connector
Line-in jack :
Headphone jack :
An input for external audio.
Connect stereo headphones or speakers to this
jack. Speakers connected to this jack override the internal
speakers.
Microphone jack :
Connect an external microphone to this jack.A
microphone connected to this jack overrides the internal
microphone.
USB (universa l s er i al b us) port:
Connect USB devices to this port.
USB input/output devices include keyboards, pointing devices, and
monitors.
Modem jack:
Connect a telephone line to connect to internet or
send/receive faxes, see the modem user’s manual for more
information
Power connector: Plug in the AC adapter to run the computer and
charge the battery, see “Attaching the AC Adapter” on page 5.
PS/2 (Personal System/2) mouse and keyboard port:
Connect a
PS/2-compatible mouse or external keyboard or keypad to this
port. Make sure your computer is turned off when you attach
peripherals to the port.
You can use the computer’s touchpad and a PS/2 keyboard at the
same time, see “Advanced Menu” on page 54 for more information
Docking con ne ctor:
Parallel port:
Plug a parallel device, such as a parallel printer or
Connect a docking option to this connector.
network adapter, into this 25-pin port.
Connecting Peripheral Devices 21

Serial port:
Plug a serial device, such as a serial mouse, into this 9pin port. If the device has a 25-pin connector, you need a 25-to-9pin serial adapter.
Video port:
Plug the interface cable of an external monitor into this
15-pin connector and then plug the monitor power cord into a
grounded outlet.
TV-out port:
plug a S-VHS jack into this port and the other side of
the jack into an external TV. No audio is transmitted via this port.
If your computer’ s op erating sys tem is Windows 98/ Me, you c an use t he USB
port. Th e Windows NT 4.0 operating system does not suppo rt USB.
22 Connecting Periphera l De vices

Using the Flex-Bay
Your computer includes the Flex-Bay, a peripheral bay that can hold one of the
following devices:
CD-ROM drive: shippped with your computer.
•
DVD-ROM: shippped with your computer or also available as an option.
•
Optiona l seco ndar y ha rd drive: available as an option fo r your computer.
•
Zip drive / Superdisk LS-120: available as an op t ion for your computer.
•
There is only one IDE bus in your system, HDD is connected
as a master t ype of IDE devices and CD- RO M d rive is
connected as a slave type of IDE devices. If you want to install
another IDE device to Flex-Bay, y ou must set the switch of
device to slave type.
See ”Using O ption s” on page 84 for detailed informat ion and
the location of the switch on each devices. Refer to the below
table to set the switch on devices.
Table 5. Setting the IDE type
Drive Switch 1 Switch 2
CD-RO ON ON
DVD-ROM ON ON
ZIP ON OFF
LS-120 ON OFF
2nd HDD ON ON
To remove a device from the Flex-Bay
1. Turn the computer’s power off.
2. Close the LC D panel , and turn the computer over so that the bottom o f the unit
faces up.
3. Pull up on the Flex-Bay latch and pull the device from the bay.(Figure 11)
Using the Flex-Bay 23

Flex-Bay latch
Figure 11. Removing a Device from the Flex-Bay
4. Remove the device out of the bay.
To install a device in the Flex-Bay:
1. Turn the computer’s power off.
2. Plac e the d ev ice into the bay.
3. Push the d evice in until it is flush with the chassis.
4. Push down on th e Fle x- Bay l a tc h until th e l atc h s naps i nt o place.
Your co m pu ter ’ s operating system au toma tica l ly r ec ogn i zes t he dev ice in the
Flex-Bay an d con f i g u res yo u r co m put e r accord in g ly.
24 Using the Flex-Bay

Using the Floppy Drive
Your comp uter comes with a 1.44 MB, 3.5-inch, high -de n s ity flopp y drive, which
can read, write to, and format the following disks:
A high-density, 3.5-inch disk, which stores 1.44 MB (megabytes) of data.
•
A double-density, 3.5-inch disk, which stores 720 KB (kilobytes) of data.
•
The floppy drive in your notebook co mputer is smaller, but
more p o wer -e fficient than a floppy drive in a desktop
computer. To get the best performance from your floppy drive
use high-q uality flop p y disks.
To use a floppy disk in computer, insert it into the floppy drive (Figure 12).
Floppy eject
button
Figure 12. Inserting a Floppy Disk
To remove a fl oppy di sk, p ress the eject button on the fl opp y drive.
The fl oppy d ri v e light on the computer is on when the com pute r writes to or re ads
from a floppy disk . Do not remove a disk when this light is o n.
To protect the data o n your floppy d is k s, follow t he se guidelines:
Keep disks away from e xc es siv e he at , direct sunli ght, a nd l iquids.
•
Keep magnets a n d any device t hat contains a ma gn et (l ike the telep hone)
•
away from your disks.
Magnetic fie lds can destroy the information on a disk.
Using the Floppy Drive 25

Do not write directly on a label on your disk; instead, write on a disk label first
•
and at ta ch the la b el to the disk.
Make copi es of all your important disks.
•
26 Using the Floppy Drive

Using the CD-ROM Drive
Compac t d is cs are d esi g ned so that you can easily i n sert o ne int o the co mp uter
when you need it, and then remove it:
1. Press the button on the CD-ROM drive, and the tray slides out. (Do not lean on
the tray; it does not support much weight.)
If the tray fails to slide out i t may be stuck, in which case
straighten out a paper clip, insert it into the small hole in the
front of the CD-ROM and push it until the tray ejects.
2. Insert a CD (compact disc), label side up (or remove a disc, if you have finished
using it).
3. Push the tr ay in gen tly to close the drive tray ( Fi g u re 13).
A light on the drive tray is on when the com pu t e r is reading from a CD. Do not
remove a disc when this light is on.
Figure 13. Using the CD-ROM Drive
The nam e of the C D- ROM d riv e is th e lett er f ollow i ng the letter as s igned to your
last hard drive. For instance, if you have one hard drive with two hard drive
partiti ons, the hard drive is drives C and D and the CD-ROM drive is drive E.
CD-ROM
Light
Eject Button
Emergency eject
button
Using the CD-ROM Drive 27

If necessary, you can use the emer g ency eject butt on to op en the CD - ROM drive.
To use the emergenc y ej ec t bu tton, tu rn the co mpu te r’s power off and insert a
small objec t, li ke a n unben t pape rclip, into the hole t o pr e s s the button.
Do not place reflecti ve objects in the di sc sl ot because of
possible hazardo us laser emissions.
The las er beam used in this CD-ROM drive is harmful to the
eyes . D o n o t a ttemp t to disa ss em b l e the CD -ROM d r i v e. Refe
servicing to your authorised service center.
The on-board audio hardware and software of your computer enable the computer
to play audio c om pa c t discs. If you wish to do so, you can attach ext e rn al speakers
to the Headphone jack.
To play an audio c o m pact d i sc:
1. Insert a compact disc into your CD-ROM drive:
a. Press the button o n t h e CD-ROM driv e, and its tray slides out.
b. Insert a CD, label side up.
c. Push the tray in to close the drive tray. The Windows Media Player
button appears on the taskbar.
The disc begins to play.
A light on the dr iv e tray is on when the co m p u ter plays a CD . Do no t r e move
a disc when this light is on.
2. To adjust t he sound, press t h e follo w ing key combinations:
<Fn+F9> decreases volume.
•
<Fn+F10> increases volume.
•
To remove t he CD :
1. Click th e W in dows Media Pla ye r button on t he Windows task b a r to open the
Windows Media Player window.
2. Click the Stop button in the Window s Media Pla yer Window.
3. Click the Eject button on the Windows Media Player window or press the
button on yo ur CD - ROM drive. The drive tray open s and you can remove the
disc from the CD-ROM drive.
4. For more information on playing compact discs, see the Help menu in the
Windows Media Player window.
28 Using the CD-ROM Drive

Using the DVD-ROM Drive
See ”Using the Flex-Bay” on page 23 for information on installing the DVD-ROM
drive into the Flex-Bay type computer.
The DVD- R OM drive is operated the sa me a s the CD-ROM
drive.
While you play DVD-ROM Player, the <Fn+F6>, <Fn+F7> keys
maight fail to work. So Do not use thos e k eys while playing
DVD-Player.
Your DVD-ROM drive will play DVD-ROM and CD-ROM discs.
Installing the Power DVD Player MPEG-2
Software
A DVD Software CD contain ing the Pow er DVD Player MP E G-2 software i
optionanl with DVD-ROM drives.
1. Start Windows and insert the CD Labelled DVD Player into the DVD ROM
Drive.
2. The Installation application will start automatically, so follow the on-screen
instructions to complete the installation.
3. Reboot the system.
4. Make sure that DMA access is enabled for the DVD Drive:
a. From "Control Panel" open the "System" icon.
b. Select the "Device Manager" tab.
c. Cl ick the "P lus sig n " beside the C D-ROM entry and select the DVD-
ROM dr ive.
d. Click the "Propert ies" butt on and sele ct the "Settings" tab.
e. Check the "DMA" check box.
f. Click "OK" and res tart th e sys tem.
For more information on playing DVD movies and discs, see the Help menu in the
DVD Play er window.
Using the DVD-ROM Drive 29

Using the Hard Drive
Your computer inc ludes a rem o v able ID E (I ntegrate d Dr ive Ele c tr onics) hard
drive. The IDE hard drive can store the data and programs your computer uses. The
drive plugs into a connector on the system board.
Although the storage capacity of hard drives varies according to model, any hard
drive h olds m u ch mo re than a floppy disk does. Al s o, th e co mputer reads and
works with a hard drive more rapidly than with a floppy disk.
Once inf orm at ion is saved on a h ard dr ive, it remains t he re un til it is overwritten.
Hard drive heads park automatically when y o u turn off your co m puter.
The hard drive th a t comes with your computer has already
been formatt ed. Do no t for ma t the hard drive. Doing so
destroys all data contained on the drive. If you need to format
a new drive, or want to erase all data on your existing hard
drive, refer to the manual for your operating system.
Windows 98/ Me can work with FAT-16 or FAT-32 (a 32-bit file allocation table),
your comp u t er has been supplied wit h FA T - 32. O ld e r sof twa r e that y ou may have
(16-bit soft war e) may requi r e FAT-1 6 to run . Simila rly W ind o ws NT 4.0 can use
FAT-16 or NTFS (t he Windows NT fi l e s ys tem). There are utilities include d with
Windows 98/ Me and Windows NT 4. 0 to con vert from FAT-16 to FAT-32 or
NTFS, see the documentation included with your operating system for more
information.
Removing the Hard Drive
To remove the hard drive from the computer:
30 Using the Hard Drive
It is not poss ible to convert from F AT-32 or NTF S to FAT-16
without reformatting your hard drive.
To prevent l oss o f data and damage to the disk, do not
remove t he hard drive while the computer’s power is on and
do not drop or jar the hard drive.
 Loading...