


 Loading...
Samsung N640CN2011, N640CN2015, N640CL2015, N640CP4008, N640CN2024 Manual
...Using Your Documentation
Congratulations on your purchase of a Notebook computer. Whether you are new to using a portable computer or are an experienced user, this user’s manual can help you get the most from your computer.
Special Features of the User’s Manual
Three types of messages with icons appear in the manual:
A note informs you of special circumstances.
A caution warns you of possible damage to equipment.
A warning indicates the possibility of personal injury.
Keys that you need to press to perform certain functions are shown in the manual enclosed in angle brackets. For example,
<Ctrl>
indicates the control key (Ctrl on the computer’s keyboard).
If you need to press two keys at the same time, the key names are shown joined by a plus sign. For example,
<Fn+F11>
means that you should press the Fn key and hold it and then press the F11 key.
If you are new to using computers, see “Glossary”. The “Glossary” explains general computing terms that are used in this manual and tells you about some of the differences between notebook computers and desktop computers.
Using Your Documentation 1

Using the Software User Documentation
Your computer shipped from the factory with several software programs installed. The software may include its own online or printed documentation. Refer to the documentation or the Help options in the software for more information.
2 Using Your Documentation
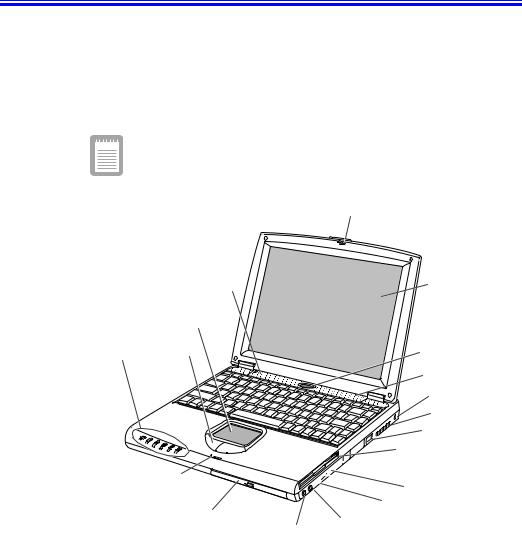
Introducing Your Computer
Your computer is a lightweight portable computer that includes features to meet your computing needs at home or on the road.
Your computer has a CD-ROM drive and a floppy disk drive within the computer.
Figure 1 through 3 show you the features of your computer.
Docking Station port, Modem port, TV-out port, IrDA is optional, so that your computer may not have those optional ports or functions.
Cover latch
Speaker |
LCD |
Touchpad
Status Mouse lights Buttons
Microphone
CD-ROM drive
Power button
Speaker
Kensington lock
Fan vent
 Modem jack Floppy drive

 Infrared port
 USB ports
External-mic jack
Line-in
Headphone jack
Figure 1. Front View of Computer
Introducing Your Computer 3

Power Connecto
PS/2™ mouse and keyboard
port Parallel port
Docking connector
Video port
Serial |
TV out |
port |
Figure 2. Back View of Computer
Flex-Bay latch
System label &
Business card holder
Figure 3. Bottom View of Computer
Battery compartment
Hard drive
compartment
PC Card compartment
Memory module compartment
4 Introducing Your Computer

Using Your Computer for the First Time
This section gives you detailed information on using your computer for the first time.
Attaching the AC Adapter
Your computer runs on power from the battery in the computer or from an electrical outlet. The first time that you use your computer, fully charge the battery by attaching the power cord to the computer and to an electrical outlet.
All batteries lose their charge if they sit unused for an extended time period. When not used, battery can discharge fully in 2 to 3 months. The battery may have discharged in the time it took for the computer to go from the factory to you.
To attach the power cord:
1.Plug the AC adapter into the power connector on the back side of the computer (Figure 4).
2.Connect the power cord to the AC adapter and then to an electrical outlet.
Power connector
AC Adapter
Power cord
Figure 4. Connecting the AC Adapter
Using Your Computer for the First Time 5

The battery starts charging as soon as you plug the power cord into an electrical outlet. The battery charges faster if the computer is turned off during charging.
If the battery is fully depleted and the computer is turned off, the battery charges in about 3 hours. If the computer is turned on, the battery charges in about 5 hours. When the battery is charging, the battery charge light is amber. When the battery is fully charged, the light turns green.
See ”Using the Battery” on page 32 for more information on using your computer’s battery.
Turning On the Computer
To turn on the computer’s power for the first time:
1.Push to the right and hold the cover latches on the front of the cover.
2.Lift up the cover.
3.Press and then release the power button (Figure 5).
The power light is on when the computer’s power is on.
 Cover latch
Power light |
Power button |
Figure 5. Turning On the Computer’s Power
6 Using Your Computer for the First Time

Understanding POST
When you turn on your computer, a routine called POST (Power-On Self-Test) automatically runs to test the computer components. System logo appears on the screen during POST.
Screen messages are built into the computer to report both normal and abnormal system conditions. If an error message appears, take any action suggested in the message. If the message identifies the error condition but does not suggest any corrective action, write down the message and contact manufacturer or an authorised service center for assistance. (See ”Troubleshooting” on page 95.)
Adjusting the LCD Display
You may wish to adjust the LCD (Liquid-Crystal Display) when you begin using your computer. A TFT (Thin-Film Transistor) LCD does not require adjustment for contrast because the contrast is set to remain at maximum.
To adjust the LCD:
•Press <Fn+Right Arrow> to increase the display brightness.
•Press <Fn+Left Arrow> to decrease the display brightness.
Turning Off Your Computer
If your computer has a Windows operating system, turn off your computer by performing the shutdown procedure described in this section. Otherwise, you may lose data.
APM(Advanced Power Management) mode
To turn off the computer:
1.Click Start on the taskbar.
2.Click Shut Down.
3.Select the shut down option.
4.Click OK or Yes.
Using Your Computer for the First Time 7

•If the operating system is Windows 98/ Me, the computer turns off.
•If the operating system is Windows NT, you receive a shutdown message and you must press the power button to turn off the computer.
ACPI(Advanced Configuration and Power Interface) mode
If your operating system supports ACPI and you want to shut down the computer just by pressing the power button, then follow next steps to set the menu in Power Management Properties. Also see “Using Power Management Options” on page 63 and the documentation accompanying your operating system.
To set the menu;
1.Select Power Management Properties in Control Pannel.
2.Select the operations of power button.
•Standby mode: operates as Power On Suspend mode. (See ”Rest Mode” on page 64 for more information.)
•Hibernate mode: operates as Save To Disk mode. Set Hibernate submenu to enabled to use Hibernate mode. (See ”Rest Mode” on page 64 for more information.)
Restarting Your Computer
You may need to restart (reboot) your computer when installing hardware or software or if the computer does not respond to your input. A warm (or soft) boot prompts you to save your files, turns off the computer, and then restarts the computer. A cold boot turns off the computer without saving your files.
To perform a warm (or soft) boot:
1.Click Start on the taskbar.
2.Click Shut Down.
3.Select the restart option.
4.Click OK or Yes.
5.Save your files if prompted. Your computer reboots.
8 Using Your Computer for the First Time

Do not perform a cold boot unless your keyboard and touchpad have no effect and you cannot perform a warm boot.
When you perform a cold boot, you lose data unless it was saved to a storage medium.
You can also perform a soft boot by saving your files and pressing <Ctrl+Alt+Del>. In ACPI, you can perform a cold(or hard) boot by pressing the power button to turn the computer off, waiting five second, and then pressing the power button to turn the computer on.
Tips for Using Your Computer
The following information helps you avoid potential problems as you use your computer:
Do not try to disassemble your computer. Opening the system chassis voids your warranty. Only an authorised manufacturer service center can replace or add any parts inside the chassis.
•Follow all the instructions and cautions in your computer user documentation.
•The LCD has a polarized surface and can be damaged easily. To prevent damage, avoid touching the screen.
•Use only approved AC adapters, auto adapters, memory modules and other options.
•Because a notebook computer is small and has restricted air flow around components, it is more likely to overheat than a desktop computer. A fan inside your computer runs when needed to help eliminate some heat. Make sure the fan vent on the right side of your computer is not blocked when you use the computer. (See Figure 1 on page 3 and Figure 2 on page 4 for the location of the vent.) Occasionally check the vents and remove any accumulated dust on the outside.
•Avoid using or storing the computer in extremely hot or cold areas, such as a car on a hot day. Keep the computer away from heaters and out of direct sunlight. Exposure to excessive heat may damage computer components.
Using Your Computer for the First Time 9

If you have left your computer in a hot place, let it cool down slowly to room temperature (with the LCD panel open) before using it.
•Do not remove the memory-module compartment door, or try to install a memory module when the computer is on. (See ”Bottom View of Computer” on page 4 for the location of the door.)
(For information on installing memory modules, see “Installing a Memory Module” on page 86.)
•Set up your computer work area to avoid physical strain. Sit with your back straight and supported by your chair. Adjust your chair or work table so that your arms and wrists can remain in a relaxed position, parallel with the floor. Avoid bending or twisting your wrists as you work. Your hands should “float” slightly above the keyboard. Refer to a book on office ergonomics for more information on setting up your work area.
•Take frequent breaks from working at the computer to rest your eyes and stretch your muscles.
•Remember to save your data files frequently and to make backup copies of your files.
Traveling with Your Computer
If you are traveling by airplane, follow these tips:
•Take the computer with you as carry-on luggage. Do not check the computer with your baggage.
•Allow the computer and disks to go through the X-ray security devices. Do not hand-carry disks through the walk-through metal detectors, which can cause loss of data.
•Make sure that the battery is charged or the power cord is easily accessible. You may be required to turn on the computer for airport security personnel.
•Be prepared to turn off the computer during take off and landing.
•Contact your airline for information about using an optional airline adapter to power your computer while traveling by airplane.
10 Using Your Computer for the First Time
Handling Spills
Do not spill anything on your computer. The best way to avoid spills is to avoid eating and drinking around your computer. If you do spill something on your computer, turn off your computer, unplug it immediately, and do the following:
•If you spill liquid on the keyboard, drain as much of the liquid from the keyboard as possible. Be careful not to let the liquid drip onto the LCD panel. Allow the system to dry for several days before trying to use it.
•If you spill liquid on an external keyboard or keypad, unplug it and drain as much of the liquid as possible. Allow the keyboard to sit at room temperature for a full day before trying to use it.
Sweet liquids leave a sticky residue that may jam the keyboard despite your efforts to dry it.
•If you spill liquid on the LCD panel, clean it immediately with a soft cloth and denatured alcohol. Do not use water, window cleaner, acetone, aromatic solvent, or dry, rough towels to clean it.
Some liquids damage the polarized LCD screen. If your screen is damaged, contact your authorized manufacturer’s service center for a replacement.
Storing the Computer for Long Periods
If possible, leave the power cord connected to the computer and an electrical outlet when the computer is not in use. This extends the life of the battery and keeps the battery fully charged.
If you will not be using the computer for a long period of time (a month or more), you should charge the battery until it is completely full. After you have done so, remove the battery from the unit.
Using Your Computer for the First Time 11
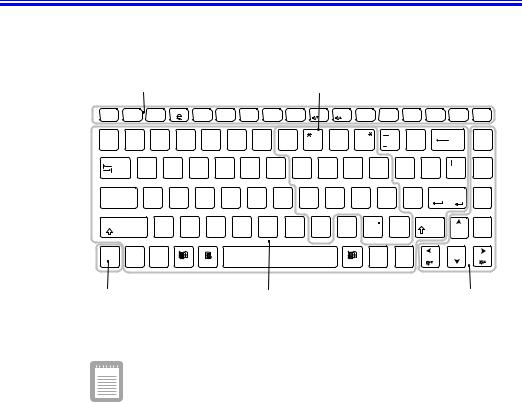
Using the Keyboard
Your computer has an 87/88-key keyboard (Figure 6). By pressing designated key combinations, you can have access to all the key functions of a full-sized keyboard.
Function and Special Purpose Hot Keys |
|
|
Embeded Numeric Keypad |
|
|
|
|||||||||||
Esc |
F1 |
F2 |
F3 |
F4 |
F5 |
F6 |
F7 |
F8 |
F9 |
F10 |
F11 |
F12 |
|
Num |
Pause Insert |
Delete |
|
|
Prt Sc |
Sys Rq |
|
Backlit |
CRT/LCD |
Gauge |
KeyLock |
Mute |
|
|
|
Rest |
Scroll |
|
Lock |
Break |
|
~ |
! |
@ |
# |
$ |
% |
^ |
& |
7 |
8 |
( |
9 |
) |
|
|
+ |
Backspace |
Home |
` |
1 |
2 |
3 |
4 |
5 |
6 |
7 |
8 |
|
9 |
|
0 |
|
|
= |
|
|
Tap |
|
Q |
W |
E |
R |
T |
Y |
U 4 |
I |
5 |
|
O 6 |
P _ |
{ |
} |
|
PgUp |
|
|
|
|
|
|
|
|
|
|
|
|
|
|
[ |
] |
\ |
|
Caps Lock |
A |
S |
D |
F |
G |
H |
J |
1 |
K 2 |
L 3 |
: + |
|
" |
Enter |
PgDn |
||
|
|
|
|
|
|
|
|
|
|
|
|
|
; |
|
' |
|
|
|
|
|
|
|
|
|
|
|
|
|
|
|
|
|
|
|
|
Shift |
|
Z |
X |
C |
V |
B |
N |
M 0 |
< |
> |
? |
|
/ Shift |
|
End |
||
|
|
|
|
|
|
|
|
|
|
|
, |
. |
/ |
|
|
|
|
Fn |
Ctrl |
Alt |
|
|
|
|
|
|
|
|
|
|
Alt |
Ctrl |
|
|
|
Function Key |
|
|
|
Alphanumeric Keys |
|
|
|
|
Cursor and Screen Control Keys |
||||||||
|
|
|
|
|
|
|
|
|
|||||||||
Figure 6. Keyboard
Although the layout of the keys on your computer’s keyboard is different from that on a desktop computer’s keyboard, the keyboard feels like a full-sized keyboard when you use it. The distance between the keys (the pitch) is the same as on a fullsize keyboard (19 mm). The travel, or space the key goes down when pressed, is also the same (3 mm).
The keys on the keyboard can be grouped into the following categories:
•Full-sized Alphanumeric typewriter keys are arranged like a standard typewriter keyboard and are used for text entry. The Windows keys on either side of the spacebar open Windows menus and perform other special functions.
•Function keys, when pressed together with the <Fn> key, enable special functions.
•Cursor and Screen control keys move the cursor. They may perform other functions, depending on your software.
12 Using the Keyboard

To clean the computer keyboard, use slightly damp cotton swabs. Scrub the key and the surface around the keys.
Do not allow liquid to drip into the keyboard or you may damage the keyboard.
Using the Embeded Numeric Keypad
Your keyboard includes a numeric keypad, which is a group of keys that you can set to type numbers and mathematical symbols, such as the plus sign (Figure 7). A number or symbol on the right corner of each keypad key shows its numeric function.
Figure 7. Numeric Keypad
Press <Num Lock> to turn on the embedded numeric keypad. The numeric functions of the keypad are enabled and the Num Lock light turns on. (See ”System Status Lights” on page 18 for the location of the Num Lock light.)
While the numeric functions are enabled, you can temporarily return a key to its normal function by pressing <Fn> and the key. For example to type the letter m, press <Fn+m>.
To turn the numeric keypad off, press <Num Lock> again. The Num Lock light turns off.
Using the Keyboard 13

Using Special Function Keys
The <Fn> key activates special functions when it is pressed in combination with another key. Table 1 shows the special key combinations.
Table 1. Description of Special Function Keys
<Fn> Key
Combination Function
<Fn+F1> Print screen: Takes a picture of the open screen, which you can paste into the Paint program.
<Fn+F2> System request: Reserved for use in software programs. <Fn+F3> This key combination can generate Euro Mark as other Eurokey.
<Fn+F4> Backlight: Turns the LCD backlit off. Press any key (except the <Fn> key) to turn the LCD backlit back on.
<Fn+F5> CRT/LCD: Switches the display between the LCD, the external monitor, and simultaneous display on both the LCD and the external monitor.
<Fn+F6> Gauge: Displays the battery gauge in the upper-right corner of your screen.
The gauge closes in a few seconds, or you can press <Esc> to close the gauge. (See ”Monitoring the Battery Charge” on page 35 for more information on the battery gauge.)
<Fn+F7> KeyLock: Locks the keyboard and activates password protection. Type your password and press <Enter> to unlock the keyboard. The <Fn+F7> key combination has no effect unless a password is enabled in System Setup. The Num Lock, Caps Lock, and Scroll Lock lights blink when the keyboard is locked.
<Fn+F8> Mute: Turns the audio output on and off. <Fn+F9> Volume down: Decreases the audio volume. <Fn+F10> Volume up: Increases the audio volume.
<Fn+F11> Rest: Puts the computer into rest mode. To resume normal operation from rest, press the power button. (See ”Using Power Management Options” on page 63 for more information about the rest mode.)
<Fn+F12> Scroll: In some applications, sets the cursor-control keys to scroll the page up or down while the cursor position does not change. Pressing <Fn+F12> again turns off the scrolling function.
14 Using the Keyboard

<Fn+Right Brightness up: Increases the LCD brightness. Arrow>
<Fn+Left Brightness down: Decreases the LCD brightness. Arrow>
When you press a function key combination, the system sound may be temporarily muted.
If you reinstall Windows, install the Magic Keyboard for volume control function keys on keyboard, <Fn + F8/F9/F10>. Or use the windows volume control on your screen.
Using the Keyboard 15
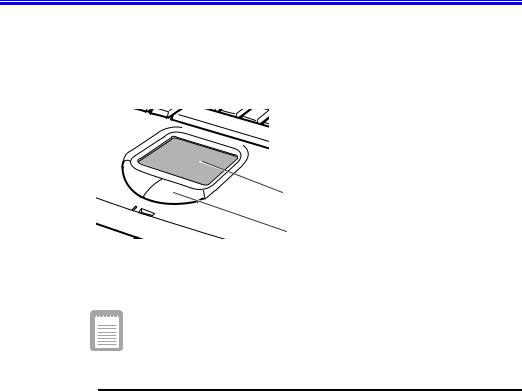
Using the Touchpad
Your computer is equipped with a touchpad, which is an integrated-pointing device that is used to perform standard mouse functions (Figure 8). The touchpad is an advanced and reliable pointing device that works with a touch of your finger.
Touchpad
Mouse buttons
Figure 8. Touchpad
Table 2 explains how to use the touchpad.
Press on the touchpad gently. The touchpad responds to light pressure
Table 2. Using the Touchpad
Mouse Action |
How To |
|
|
Move cursor |
Place your finger on the touchpad and slide your finger |
|
in the direction you want the cursor to move. The faster |
|
you move your finger, the faster the cursor moves |
|
across the screen. |
Click |
Tap the touchpad once with your finger. |
Double-click |
Tap the touchpad twice with one finger. |
Scroll up/down |
Place your finger on the right hand side of the touchpad |
|
and slide it up or down to scroll the current window. |
Scroll left/right |
Place your finger on the bottom of the touchpad and |
|
slide it left or right to scroll the current window. |
|
|
16 Using the Touchpad
You can use the buttons below the touchpad in the same way you would use standard mouse buttons. For more information on these features and other features supported by your mouse driver, see the Mouse properties in the Control Panel.
For information on attaching and using another pointing device or keyboard with your computer, see “Connecting Peripheral Devices” on page 20.
Using the Touchpad 17
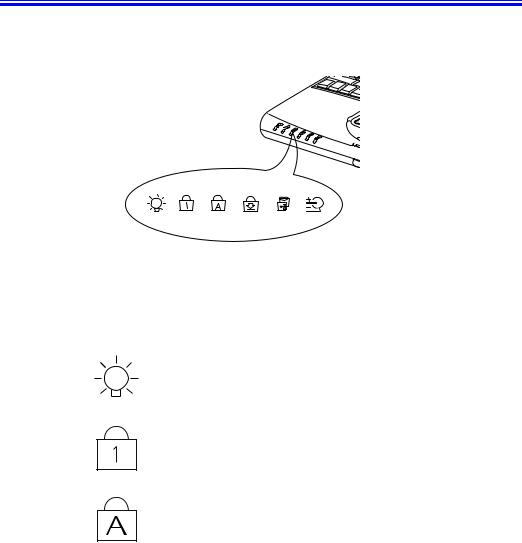
Reading the System Status Lights
System Status lights show the status of computer functions. The lights appear on the left edge of the computer (Figure 9).
Figure 9. System Status Lights
Table 3 describes the meaning of the lights.
|
Table 3. System Status Lights |
Icon |
Function of Light |
|
|
|
Power light: Light is green when the computer’s power is on. Light |
|
blinks when the computer is in Power On Suspend mode. (See ”Rest |
|
Mode” on page 64 for more information on Power On Suspend |
|
mode.) |
|
Num Lock light: Light is on when the embedded numeric keypad is |
|
activated. See ”Using the Embeded Numeric Keypad” on page 13 for |
|
a description of the keypad. |
|
Caps Lock light: Light is on when the caps lock function is activated. |
|
When the function is activated, all alphabetic characters you type will |
|
be in upper case. |
18 Reading the System Status Lights

Scroll Lock light: Light is on when the scroll lock function is activated. The scroll lock function affects cursor movement and text scrolling in some applications. This is a software specific function. Refer to the appropriate software manuals for a description of the <Scroll> key.
Drive light: Light is on when the hard drive or floppy drive is being accessed. Do not turn your computer off when this light is on. When the light is amber, the floppy drive is being accessed. When the light is green, the hard drive is being accessed. For a CD-ROM or DVDROM drive, check the light on the drive itself to see if the drive is being accessed.
Battery charge light: When the power cord is connected, light gives information about the battery charge. Light is amber when the battery is charging normally. Light is green when the battery is fully charged. (See ”Charging the Battery” on page 32 for more information about charging the battery.)
Reading the System Status Lights 19

Connecting Peripheral Devices
The connectors on your computer enable you to attach peripheral devices to the computer (Figure 10).
Turn off your computer before you connect a peripheral device. Connecting a peripheral device with your computer turned on may seriously damage the device or your computer.
Kensington
Lock
* Modem jack
USB ports
Mic-in jack
Headphone jack
Line-in jack
Power connector
PS/2 mouse and |
keyboard port |
Parallel port
* Docking connector
Video port
Serial port |
* TV-out port (S-VHS) |
|
Figure 10. Peripheral Connectors
* Optional
Table 4 shows the icons located near each connector and tells you the devices that you can attach to the connectors.
20 Connecting Peripheral Devices
Table 4. Connecting Peripheral Devices
Icon Connector
Line-in jack: An input for external audio.
Headphone jack : Connect stereo headphones or speakers to this jack. Speakers connected to this jack override the internal speakers.
Microphone jack : Connect an external microphone to this jack.A microphone connected to this jack overrides the internal microphone.
USB (universal serial bus) port: Connect USB devices to this port. USB input/output devices include keyboards, pointing devices, and monitors.
Modem jack: Connect a telephone line to connect to internet or send/receive faxes, see the modem user’s manual for more information
Power connector: Plug in the AC adapter to run the computer and charge the battery, see “Attaching the AC Adapter” on page 5.
PS/2 (Personal System/2) mouse and keyboard port: Connect a PS/2-compatible mouse or external keyboard or keypad to this port. Make sure your computer is turned off when you attach peripherals to the port.
You can use the computer’s touchpad and a PS/2 keyboard at the same time, see “Advanced Menu” on page 54 for more information
Docking connector: Connect a docking option to this connector.
Parallel port: Plug a parallel device, such as a parallel printer or network adapter, into this 25-pin port.
Connecting Peripheral Devices 21

Serial port: Plug a serial device, such as a serial mouse, into this 9- pin port. If the device has a 25-pin connector, you need a 25-to-9- pin serial adapter.
Video port: Plug the interface cable of an external monitor into this 15-pin connector and then plug the monitor power cord into a grounded outlet.
TV-out port: plug a S-VHS jack into this port and the other side of the jack into an external TV. No audio is transmitted via this port.
If your computer’s operating system is Windows 98/ Me, you can use the USB port. The Windows NT 4.0 operating system does not support USB.
22 Connecting Peripheral Devices

Using the Flex-Bay
Your computer includes the Flex-Bay, a peripheral bay that can hold one of the following devices:
•CD-ROM drive: shippped with your computer.
•DVD-ROM: shippped with your computer or also available as an option.
•Optional secondary hard drive: available as an option for your computer.
•Zip drive / Superdisk LS-120: available as an option for your computer.
There is only one IDE bus in your system, HDD is connected as a master type of IDE devices and CD-ROM drive is connected as a slave type of IDE devices. If you want to install another IDE device to Flex-Bay, you must set the switch of device to slave type.
See ”Using Options” on page 84 for detailed information and the location of the switch on each devices. Refer to the below table to set the switch on devices.
Table 5. Setting the IDE type
Drive |
Switch 1 |
Switch 2 |
|
|
|
CD-RO |
ON |
ON |
DVD-ROM |
ON |
ON |
ZIP |
ON |
OFF |
LS-120 |
ON |
OFF |
2nd HDD |
ON |
ON |
|
|
|
To remove a device from the Flex-Bay
1.Turn the computer’s power off.
2.Close the LCD panel, and turn the computer over so that the bottom of the unit faces up.
3.Pull up on the Flex-Bay latch and pull the device from the bay.(Figure 11)
Using the Flex-Bay 23

Flex-Bay latch
Figure 11. Removing a Device from the Flex-Bay
4. Remove the device out of the bay.
To install a device in the Flex-Bay:
1.Turn the computer’s power off.
2.Place the device into the bay.
3.Push the device in until it is flush with the chassis.
4.Push down on the Flex-Bay latch until the latch snaps into place.
Your computer’s operating system automatically recognizes the device in the Flex-Bay and configures your computer accordingly.
24 Using the Flex-Bay

Using the Floppy Drive
Your computer comes with a 1.44 MB, 3.5-inch, high-density floppy drive, which can read, write to, and format the following disks:
• A high-density, 3.5-inch disk, which stores 1.44 MB (megabytes) of data.
• A double-density, 3.5-inch disk, which stores 720 KB (kilobytes) of data.
The floppy drive in your notebook computer is smaller, but more power-efficient than a floppy drive in a desktop computer. To get the best performance from your floppy drive use high-quality floppy disks.
To use a floppy disk in computer, insert it into the floppy drive (Figure 12).
Floppy eject button
Figure 12. Inserting a Floppy Disk
To remove a floppy disk, press the eject button on the floppy drive.
The floppy drive light on the computer is on when the computer writes to or reads from a floppy disk. Do not remove a disk when this light is on.
To protect the data on your floppy disks, follow these guidelines:
•Keep disks away from excessive heat, direct sunlight, and liquids.
•Keep magnets and any device that contains a magnet (like the telephone) away from your disks.
Magnetic fields can destroy the information on a disk.
Using the Floppy Drive 25
•Do not write directly on a label on your disk; instead, write on a disk label first and attach the label to the disk.
•Make copies of all your important disks.
26 Using the Floppy Drive

Using the CD-ROM Drive
Compact discs are designed so that you can easily insert one into the computer when you need it, and then remove it:
1.Press the button on the CD-ROM drive, and the tray slides out. (Do not lean on the tray; it does not support much weight.)
If the tray fails to slide out it may be stuck, in which case straighten out a paper clip, insert it into the small hole in the front of the CD-ROM and push it until the tray ejects.
2.Insert a CD (compact disc), label side up (or remove a disc, if you have finished using it).
3.Push the tray in gently to close the drive tray (Figure 13).
A light on the drive tray is on when the computer is reading from a CD. Do not remove a disc when this light is on.
CD-ROM
Light
|
Emergency eject |
Eject Button |
button |
Figure 13. Using the CD-ROM Drive
The name of the CD-ROM drive is the letter following the letter assigned to your last hard drive. For instance, if you have one hard drive with two hard drive partitions, the hard drive is drives C and D and the CD-ROM drive is drive E.
Using the CD-ROM Drive 27

If necessary, you can use the emergency eject button to open the CD-ROM drive. To use the emergency eject button, turn the computer’s power off and insert a small object, like an unbent paperclip, into the hole to press the button.
Do not place reflective objects in the disc slot because of possible hazardous laser emissions.
The laser beam used in this CD-ROM drive is harmful to the eyes. Do not attempt to disassemble the CD-ROM drive. Refe servicing to your authorised service center.
The on-board audio hardware and software of your computer enable the computer to play audio compact discs. If you wish to do so, you can attach external speakers to the Headphone jack.
To play an audio compact disc:
1.Insert a compact disc into your CD-ROM drive:
a.Press the button on the CD-ROM drive, and its tray slides out.
b.Insert a CD, label side up.
c.Push the tray in to close the drive tray. The Windows Media Player button appears on the taskbar.
The disc begins to play.
A light on the drive tray is on when the computer plays a CD. Do not remove a disc when this light is on.
2.To adjust the sound, press the following key combinations:
•<Fn+F9> decreases volume.
•<Fn+F10> increases volume.
To remove the CD:
1.Click the Windows Media Player button on the Windows taskbar to open the Windows Media Player window.
2.Click the Stop button in the Windows Media Player Window.
3.Click the Eject button on the Windows Media Player window or press the button on your CD-ROM drive. The drive tray opens and you can remove the disc from the CD-ROM drive.
4.For more information on playing compact discs, see the Help menu in the Windows Media Player window.
28 Using the CD-ROM Drive

Using the DVD-ROM Drive
See ”Using the Flex-Bay” on page 23 for information on installing the DVD-ROM drive into the Flex-Bay type computer.
The DVD-ROM drive is operated the same as the CD-ROM drive.
While you play DVD-ROM Player, the <Fn+F6>, <Fn+F7> keys maight fail to work. So Do not use those keys while playing DVD-Player.
Your DVD-ROM drive will play DVD-ROM and CD-ROM discs.
Installing the Power DVD Player MPEG-2
Software
A DVD Software CD containing the Power DVD Player MPEG-2 software i optionanl with DVD-ROM drives.
1.Start Windows and insert the CD Labelled DVD Player into the DVD ROM Drive.
2.The Installation application will start automatically, so follow the on-screen instructions to complete the installation.
3.Reboot the system.
4.Make sure that DMA access is enabled for the DVD Drive:
a.From "Control Panel" open the "System" icon.
b.Select the "Device Manager" tab.
c.Click the "Plus sign" beside the CD-ROM entry and select the DVDROM drive.
d.Click the "Properties" button and select the "Settings" tab.
e.Check the "DMA" check box.
f.Click "OK" and restart the system.
For more information on playing DVD movies and discs, see the Help menu in the DVD Player window.
Using the DVD-ROM Drive 29

Using the Hard Drive
Your computer includes a removable IDE (Integrated Drive Electronics) hard drive. The IDE hard drive can store the data and programs your computer uses. The drive plugs into a connector on the system board.
Although the storage capacity of hard drives varies according to model, any hard drive holds much more than a floppy disk does. Also, the computer reads and works with a hard drive more rapidly than with a floppy disk.
Once information is saved on a hard drive, it remains there until it is overwritten. Hard drive heads park automatically when you turn off your computer.
The hard drive that comes with your computer has already been formatted. Do not format the hard drive. Doing so destroys all data contained on the drive. If you need to format a new drive, or want to erase all data on your existing hard drive, refer to the manual for your operating system.
Windows 98/ Me can work with FAT-16 or FAT-32 (a 32-bit file allocation table), your computer has been supplied with FAT-32. Older software that you may have (16-bit software) may require FAT-16 to run. Similarly Windows NT 4.0 can use FAT-16 or NTFS (the Windows NT file system). There are utilities included with Windows 98/ Me and Windows NT 4.0 to convert from FAT-16 to FAT-32 or NTFS, see the documentation included with your operating system for more information.
It is not possible to convert from FAT-32 or NTFS to FAT-16 without reformatting your hard drive.
Removing the Hard Drive
To prevent loss of data and damage to the disk, do not remove the hard drive while the computer’s power is on and do not drop or jar the hard drive.
To remove the hard drive from the computer:
30 Using the Hard Drive
Loading...