


FULL MANUAL
MX-T50
Imagine the possibilities
Thank you for purchasing this Samsung product. To receive more complete service, please register your product at www.samsung.com/register
SAFETY INFORMATION
SAFETY WARNINGS
TO REDUCE THE RISK OF ELECTRIC SHOCK, DO NOT REMOVE THE COVER (OR BACK).
NO USER-SERVICEABLE PARTS ARE INSIDE. REFER SERVICING TO QUALIFIED SERVICE PERSONNEL.
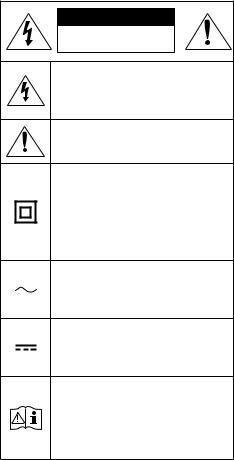
Refer to the table below for an explanation of symbols which may be on your Samsung product.
CAUTION
RISK OF ELECTRIC SHOCK.
DO NOT OPEN.
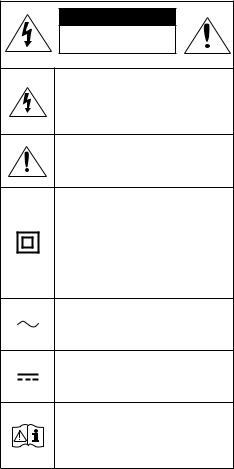
This symbol indicates that high voltage is present inside. It is dangerous to make any kind of contact with any internal part of this product.
This symbol indicates that this product has included important literature concerning operation and maintenance.
Class II product : This symbol indicates that it does not require a safety connection to electrical earth (ground). If this symbol is not present on a product with a power cord, the product MUST have a reliable connection to protective earth (ground).
AC voltage : This symbol indicates that the rated voltage marked with the symbol is AC voltage.
DC voltage : This symbol indicates that the rated voltage marked with the symbol is DC voltage.
Caution, Consult instructions for use : This symbol instructs the user to consult the user manual for further safety related information.
WARNING
•• Toreducetheriskoffireorelectricshock,do not expose this appliance to rain or moisture.
CAUTION
•• TO PREVENT ELECTRIC SHOCK, MATCH WIDE BLADE OF PLUG TO WIDE SLOT, FULLY INSERT.
•• This apparatus shall always be connected to a AC outlet with a protective grounding connection.
•• To disconnect the apparatus from the mains, the plug must be pulled out from the mains socket, therefore the mains plug shall be readily operable.
•• Do not expose this apparatus to dripping or splashing.Donotputobjectsfilledwith liquids, such as vases on the apparatus.
•• To turn this apparatus off completely, you must pull the power plug out of the wall socket. Consequently, the power plug must be easily and readily accessible at all times.
ENG - ii

PRECAUTIONS
1.Ensure that the AC power supply in your house complies with the power requirementslistedontheidentification sticker located on the rear of your product. Install your product horizontally, on a suitable base (furniture), with enough space around it for ventilation (7~10 cm). Make sure the ventilation slots are not covered. Do not placetheunitonamplifiersorother equipment which may become hot. This unit is designed for continuous use. To fully turn off the unit, disconnect the AC plug from the wall outlet. Unplug the unit if you intend to leave it unused for a long period of time.
2.During thunderstorms, disconnect the AC plug from the wall outlet. Voltage peaks due to lightning could damage the unit.
3.Do not expose the unit to direct sunlight or other heat sources. This could lead to overheating and cause the unit to malfunction.
4.Protect the product from moisture (i.e. vases),andexcessheat(e.g.afireplace)or equipment creating strong magnetic or electricfields.Unplugthepowercablefrom the AC wall socket if the unit malfunctions. Your product is not intended for industrial use. It is for personal use only. Condensation may occur if your product has been stored in cold temperatures. If transporting the unit during the winter, wait approximately
2 hours until the unit has reached room temperature before using.
5.The battery used with this product contains chemicals that are harmful to the environment. Do not dispose of the battery in the general household trash. Do not expose the battery to excess heat, direct sunlight,orfire.Donotshortcircuit, disassemble, or overheat the battery. Danger of explosion if the battery is replaced incorrectly. Replace only with the same or equivalent type.
ABOUT THIS MANUAL
The user manual has two parts: this simple paper USER MANUAL and a detailed FULL MANUAL you can download.
USER MANUAL
See this manual for safety instructions, product installation, components, connections,andproductspecifications.
FULL MANUAL
You can access the FULL MANUAL on Samsung’s on-line customer support centre by scanning the QR code. To see the manual on your PC or mobile device, download the manual in document format from Samsung’s website. (http://www.samsung.com/support)
Designandspecificationsaresubjecttochange without prior notice.
ENG - iii
CONTENTS
01 |
Checking the Components |
|
2 |
|
Inserting Batteries before using the Remote Control |
|
|
|
(AAA batteries X 2) |
-------------------------- |
2 |
02 |
Product Overview |
|
3 |
|
Top Panel of the Party Audio |
-------------------------- |
3 |
|
Rear Panel of the Party Audio |
-------------------------- |
4 |
03 |
Connecting the Party Audio |
|
6 |
|
Connecting Electrical Power |
-------------------------- |
6 |
|
How to use Audio Group |
-------------------------- |
7 |
04 |
Connecting an External Device |
|
12 |
|
Connecting using an Analogue Audio (AUX) Cable |
-------------------------- |
12 |
|
Connecting a mobile device via Bluetooth |
-------------------------- |
13 |
05 |
Connecting a USB Storage Device |
|
16 |
|
Software Update |
-------------------------- |
17 |
06 |
Using the Remote Control |
|
18 |
|
How to Use the Remote Control |
-------------------------- |
18 |
|
How to use Sound Mode |
-------------------------- |
20 |
|
How to use the DJ Effect |
-------------------------- |
20 |
ENG - iv
07 |
Using the Samsung Giga Party Audio app |
|
21 |
|
Install Samsung Giga Party Audio App |
-------------------------- |
21 |
|
Launching the Samsung Giga Party Audio App |
-------------------------- |
21 |
08 |
Troubleshooting |
|
22 |
09 |
Licence |
|
23 |
10 |
Open Source Licence Notice |
|
23 |
11 |
Important Notes About Service |
|
23 |
12 |
SpecificationsandGuide |
|
24 |
|
Specifications |
-------------------------- |
24 |
ENG - v
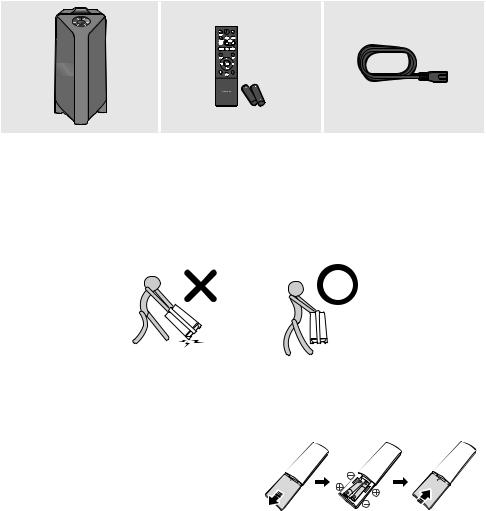
01 CHECKING THE COMPONENTS
Party Audio Main Unit |
Remote Control / Batteries |
Power Cord |
•• For more information about the power supply and power consumption, refer to the label attached to the product. (Label: Rear of the Party Audio Main Unit)
•• To purchase additional components or optional cables, contact a Samsung Service Centre or Samsung Customer Care.
•• When moving the product, do not drag or pull the product from the ground. Lift the product when moving the product.
Inserting Batteries before using the Remote Control (AAA batteries X 2)
Slide the battery cover in the direction of the arrow until it is completely removed. Insert 2 AAA batteries (1.5V) oriented so that their polarity is correct. Slide the battery cover back into position.
ENG - 2

02 |
PRODUCT OVERVIEW |
|
|
|||
Top Panel of the Party Audio |
|
|
|
|||
|
|
|
|
|
|
|
|
|
|
|
|
|
|
|
|
|
|
|
|
|
|
|
|
|
|
BASS |
|
|
|
|
|
|
||
|
|
|
|
|
|
|
|
Remote |
When operating the Party Audio system, please aim the front of the remote control at |
||||
Sensor |
the remote sensor. |
|
|
|
||
|
Display |
Displays operating messages or current status of the Party Audio system. |
|
|||
Window |
|
|||||
|
|
|
|
|
||
|
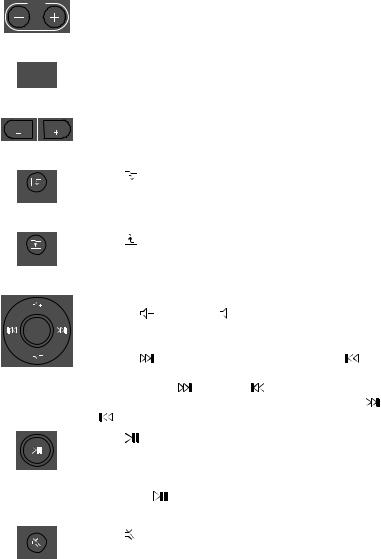
Power |
Turns the Party Audio on and off. |
|
|
||
|
Light |
Press the (Light) button to turn the Lighting Mode on. |
|
|||
Press the button repeatedly to cycle through the available lighting modes: |
|
|||||
|
|
AMBIENT, PARTY, DANCE, THUNDERBOLT, STAR or OFF. |
|
|||
|
|
Press to select a source connected to the Party Audio. |
|
|||
|
Source |
Press and hold the |
(Source) button for more than 5 seconds to enter the “BT |
|||
|
|
PAIRING” mode. |
|
|
|
|
|
|
•• |
Play/Pause |
|
|
|
|
|
|
Press the buttontopauseamusicfiletemporarily. |
|
||
|
|
|
Whenyoupressthebuttonagain,themusicfileplays. |
|
||
|
|
•• |
Demo play |
|
|
|
|
|
|
Press and hold the |
button for more than 5 seconds to start the Demo play while |
||
|
|
|
the system is turned on. “DEMO” appears on the display and it plays demo music for |
|||
|
Play/Pause |
|
60seconds. |
|
|
|
|
|
|
To cancel Demo Play, press and hold the |
button for more than 5 seconds during |
||
|
|
|
Demo Play. |
|
|
|
––If you input any commands while in demo play, 60 seconds timer is refreshed.
––All the buttons on the remote control and rear panel are disabled while in demo play. If you want to use the remote control, cancel the demo play.
––Demo play is cancelled when you change the source or power off the system.
ENG - 3
|
Volume down |
Press the |
|
(Volume down) button to lower the volume. |
|||
|
|||||||
Press and hold the |
|
(Volume down) button to quickly lower the volume. |
|||||
|
|
|
|||||
|
|
|
|
|
|
|
|
|
Volume up |
Press the (Volume up) button to raise the volume. |
|||||
Press and hold the (Volume up) button to quickly raise the volume. |
|||||||
|
|
||||||
|
|
|
|
|
|
|
|
|
|
Press the BASS button to use the powerful bass sound. |
|||||
|
BASS |
Press it again to return to the normal sound. |
|||||
Press and hold the BASS button for more than 5 seconds to turn on or off the |
|||||||
|
|
||||||
|
|
BLUETOOTH POWER function. |
|||||
|
|
|
|
|
|
|
|
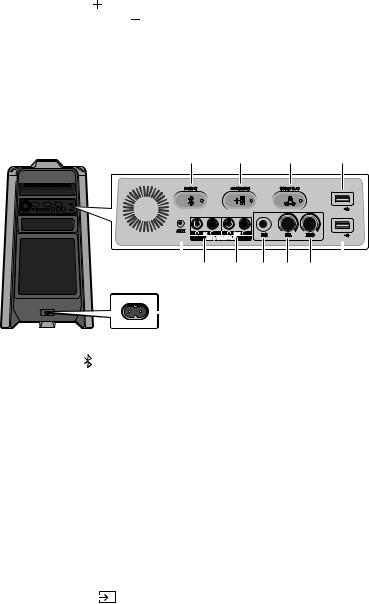
Rear Panel of the Party Audio
PAIRING |
ADD STEREO |
GROUP PLAY |
|
|
|
|
|
|
|
|
|
|
USB1 |
|
|
|
|
|
|
|
|
|
|
(5V 2.1A) |
AUX 1 |
L |
IN |
R |
L |
OUT |
R |
MIC |
VOL |
ECHO |
|
|
USB2 |
|||||||||
|
|
AUX 2 / GROUP PLAY |
|
|
|
|
(5V 0.5A) |
|||
|
|
|
|
|
|
OUT |
|
|
|
|
|
|
|
|
|
|
|
|
|
|
|
|||||
|
|
|
|
|
|
|
|
|
|
|
|
|
|
|
|
||
|
|
|
|
|
|
|
||
|
|
|
|
|
|
|
|
|
|
|
|
||||||
|
BluetoothPAIRING |
Press the PAIRING button to enter the “BT PAIRING” mode. |
||||||
You can connect the Party Audio to a new Bluetooth device in this mode by selecting the |
||||||||
|
|
Party Audio from the Bluetooth device's search list. |
||||||
|
|
|
||||||
|
|
Press the ADD STEREO button to connect to another Party Audio wirelessly. |
||||||
|
ADD |
Press the ADD STEREO button again before connecting another Party Audio to exit Stereo |
||||||
|
Group mode. When the connection is made, you can enjoy stereo sound. |
|||||||
STEREO |
||||||||
Press and hold the ADD STEREO button for more than 5 seconds to disconnect the Stereo |
||||||||
|
|
|||||||
|
|
Group mode. |
|
|
|
|
|
|
|
|
|
||||||
|
|
Press the GROUP PLAY button to connect up to ten Party Audio systems wirelessly. |
||||||
|
GROUP |
Press the GROUP PLAY button again before connecting other Party Audio to exit wireless |
||||||
|
Group Play. When the connection is made, you can use multiple Party Audio systems at |
|||||||
PLAY |
||||||||
the same time using Group Play mode. Press and hold the GROUP PLAY button for more |
||||||||
|
|
|||||||
|
|
than 5 seconds to disconnect the wireless Group Play mode. |
||||||
|
|
|
||||||
|
USB1 |
Connect a USB device to the USB1 or USB2 ports on the main unit. |
||||||
|
|
If you connect your cell phone to the USB1 port, you can charge it. |
||||||
|
USB2 |
|||||||
•• Press the |
(Source) button to select USB1 or USB2. |
|||||||
|
|
|
|
|
|
|
|
|
ENG - 4

|
|
You can give an echo effect to the sound from a connected microphone (MIC) by adjusting |
|
|
ECHO |
the ECHO knob. |
|
If you turn clockwise, the echo effect goes up, and if you turn counter-clockwise, the echo |
|||
|
|
||
|
|
effect goes down. |
|
|
|
|
|
|
|
Use the VOL knob to adjust the volume of a connected microphone (MIC). |
|
|
VOL |
If you turn clockwise, the volume goes up, and if you turn counter-clockwise, the volume |
|
|
|
goes down. |
|
|
|
|
|
|
MIC |
Connect your microphone to the MIC jack. |
Use an Audio Cable (not supplied) to connect GROUP PLAY (OUT) terminals on the main GROUP unit to Audio In on an external analogue output device.
PLAY OUT •• Be sure to match connector colours.
Terminals •• If the external analogue output device has only one Audio In jack, connect either left or right.
|
|
Use an Audio Cable (not supplied) to connect AUX2 (IN) terminals on the main unit to |
||
|
|
Audio Out on an external analogue output device. |
||
|
|
•• Be sure to match connector colours. |
||
|
AUX2/ |
•• If the external analogue output device has only one Audio Out jack, connect either left |
||
|
GROUP |
or right. |
|
|
PLAY IN |
•• Press the |
(Source) button to select AUX2. |
||
|
Terminals |
•• If the product is in AUX2 mode with no playback and no command input for more than |
||
|
|
20 minutes, the system will turn off. |
||
|
|
•• If the product is in AUX2 mode with playback for more than 8 hours and no command |
||
|
|
input, the system will turn off. |
||
|
|
|
||
|
|
Use an Audio (AUX) Cable (not supplied) to connect AUX1 jack on the main unit to Audio |
||
|
|
Out on an external device. |
||
|
AUX1 |
•• If the product is in AUX1 mode with no playback and no command input for more than |
||
20 minutes, the system will turn off. |
||||
|
|
|||
|
|
•• If the product is in AUX1 mode with playback for more than 8 hours and no command |
||
|
|
input, the system will turn off. |
||
|
|
|
||
|
Power |
Connect the power cord to the Power jack and connect the other end of the power cord to |
||
a wall socket to supply electrical power to the Party Audio. |
||||
|
|
|||
ENG - 5

03 CONNECTING THE PARTY AUDIO
Connecting Electrical Power
Use the power cord to connect the Party Audio to an electrical outlet in the following order: Connect the power cord to the Party Audio and then to a wall socket.
See the illustrations below.
•• For more information about the required electrical power and power consumption, refer to the label attached to the product. (Label: Rear of the Party Audio)
Connecting
Electrical Power
Rear of Party Audio
ENG - 6
How to use Audio Group
You can connect multiple audio systems in a group to create a party environment and produce higher sound output. Set one Party Audio as the host and any music played on it will be shared among any other Party Audio systems in the Audio group.
Connecting the wired Group Play mode
L IN R |
L OUT R |
L IN R |
L OUT R |
L IN R |
L OUT R |
AUX 2 / GROUP PLAY |
AUX 2 / GROUP PLAY |
AUX 2 / GROUP PLAY |
|||
|
|
Continue the |
|
|
connection until |
|
|
the last Party |
|
|
Audio |
1st |
2nd |
Last |
Party Audio Host |
Party Audio |
Party Audio |
Set up Group Play by connecting all the systems using audio cables (not supplied). Use the AUX or  (Source) button to change the source to AUX2 for every Party Audio system except the 1st (or host) Party Audio system.
NOTES
•• The 1st Party Audio Host can play music from any source.
•• Depending on the length or characteristics of the cable, there may be a difference in operating distance.
ENG - 7
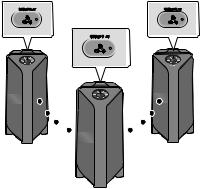
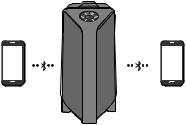
Connecting the wireless Group Play mode
You can connect up to ten Party Audio systems with the wireless Group Play function.
|
GROUP PLAY |
GROUP PLAY |
|
|
|
GROUP PLAY
Slave 1 |
Slave 2 |
Host
1.Press the GROUP PLAY button on the Host Party Audio system. The “HOST” message appears on the display of the host Party Audio and the LED blinks on the GROUP PLAY button.
2.Press the GROUP PLAY button on the 2nd Party Audio system (Slave 1). The “GROUP PLAY CONNECTED” message appears on the display and the GROUP PLAY button on both systems stops blinking.
3.Press the GROUP PLAY button on the 3rd Party Audio system (Slave 2). The “GROUP PLAY CONNECTED” message appears on the display and the GROUP PLAY button on the system stops blinking.
4.If you want to add more Party Audio systems, repeat step 3.
5.Play music on the Host Party Audio. Sound outputs from all the connected systems.
NOTES
•• The wireless Group Play connection is available for any Party Audio system.
•• Environmental conditions or other factors with connected devices may have effect on playback quality.
•• If the red LED is on the GROUP PLAY button, an error has occurred in the wireless Group Play connection. Try step 1 to step 5 again.
•• The ADD STEREO button and  PAIRING button on the slave Party Audio systems are not available while in wireless Group Play mode.
•• The ADD STEREO button on the host Party Audio system is not available while in wireless Group Play mode.
•• When adding a slave unit, if you press and hold GROUP PLAY on the slave, before the “GROUP PLAY CONNECTED” message appears, it will become the Host unit instead.
ENG - 8

•• All slave units must be connected one by one. For example, after Host is connected, press GROUP PLAY button on slave 1 to connect, and after slave 1 is connected, you should connect slave 2 and slave 3 one by one sequentially.
•• While using Group Play, currently connected Bluetooth devices are disconnected and Bluetooth connection is disabled.
•• Bluetooth devices can search and connect with the host Party Audio only.
•• When in Group Play mode, the slaves cannot connect to a Bluetooth device.
•• If you power off and then power on the Party Audio or select any source other than BT on a slave unit, in Group Play mode, the Group Play mode is disconnected.
•• This product does not support aptX audio stream with Wireless Group Play mode.
Disconnecting the wireless Group Play mode
1.Press and hold the GROUP PLAY button over 5 seconds (Host or Slaves) after Group Play is connected or press the GROUP PLAY button (Host or Slaves) before Group Play is connected.
•• “OFF-GROUP PLAY” appears on the display and the LED above the GROUP PLAY button is off.
2.If you select any source other than BT on the slave units or turn off the host Party Audio, the Group Play mode is disconnected.
•• If the disconnection is made from the host Party Audio, Group Play is disconnected.
LED Indications
LED |
STATE |
Description |
|
Green |
Blink |
Waiting for a wireless Group Play connection. |
|
|
|
||
Solid |
The wireless Group Play connection was successful. |
||
|
|||
|
|
|
|
Red |
Solid |
There is an error with the wireless Group Play connection. |
|
|
|
|
ENG - 9

Using the Stereo Group mode
You can enjoy stereo sound by connecting two Party Audio systems.
ADD STEREO |
ADD STEREO |
|
|
Left Party Audio |
Right Party Audio |
(Master) |
(Slave) |
1.Press the ADD STEREO button on the left Party Audio system. The “ADD STEREO” message appears on the display and the LED blinks on the ADD STEREO button.
2.Press the ADD STEREO button on the right Party Audio system. The “ADD STEREO” message appears on the display and the LED blinks on the ADD STEREO button.
3.When the connection is made, The “BT PAIRING” message appears on the master Party Audio system and “STEREO MODE” appears on the slave Party Audio system.
•• The master Party Audio system outputs left channel sound and the slave Party Audio system outputs right channel sound. If you want to change the sound channels of Party Audio systems, press the ADD STEREO button on the current master Party Audio system.
4.Play music on the Party Audio. Sound outputs from both Party Audio systems.
NOTES
•• To use the Stereo Group mode, both Party Audio systems must be the same model.
•• Environmental conditions or other factors with connected devices may have effect on playback quality.
•• If the red LED is on the ADD STEREO, an error has occured in the Stereo Group connection. Try step 1 and step 4 again.
•• All the buttons except ADD STEREO button and Power on the slave Party Audio systems are disabled while in Stereo Group mode.
•• The GROUP PLAY button on the host Party Audio system is not available while in Stereo Group mode.
ENG - 10

•• While in Stereo Group mode, currently connected Bluetooth devices are disconnected and Bluetooth connection is disabled.
•• If you select any source other than BT or power cycle the master Party Audio, the Stereo Group mode is disconnected.
•• This product does not support aptX audio stream with Wireless Group Play mode.
•• If you try to connect a Bluetooth device while Stereo Group is connecting, the Stereo Group mode may fail.
Disconnecting the Stereo Group mode
1.Press and hold the ADD STEREO button over 5 seconds (Master or Slave) after Stereo Group is connected or press the ADD STEREO button (Master or Slave) before Stereo Group is connected.
•• “OFF-ADD STEREO” appears on the display and the LED above the ADD STEREO button is off.
2.If you select any source other than BT on the slave units or the master Party Audio is turned off and then back on, the Stereo Group mode is disconnected.
•• If one of the Party Audio is disconnected from Stereo Group mode, another Party Audio is automatically disconnected.
LED Indications
LED |
STATE |
Description |
|
|
|
|
|
Green |
Blink |
Waiting for a Stereo Group connection. |
|
|
|
||
Solid |
The Stereo Group connection is successful. |
||
|
|||
|
|
|
|
Red |
Solid |
There is an error with the Stereo Group connection. |
|
|
|
|
ENG - 11

04 CONNECTING AN EXTERNAL DEVICE
Connect to an external device via a wired or wireless network to play the external device’s sound through the Party Audio.
Connecting using an Analogue Audio (AUX) Cable
Mobile device / MP3 / PMP
3.5 mm stereo cable (not supplied)
|
|
Rear of the Party Audio |
|
|
AUX 1 |
L OUT |
R |
|
|
||
|
|
ROUP PLAY |
|
Audio (AUX) Cable (not supplied)
R - AUDIO - L
BD / DVD player / Set-top box / Game console
3.5 mm stereo Cable (AUX1)
1.Connect AUX1 jack on the main unit to the AUDIO OUT jack of the Source Device using an 3.5 mm stereo cable .
2.Select “AUX1” mode by pressing the (Source) button on the top panel or on the remote control.
•• You can also select a source using AUX button on the remote control.
Audio Cable (AUX2)
1.Connect AUX2 (IN) terminals on the main unit to the AUDIO OUT terminals of the Source Device using an audio cable .
2.Select “AUX2” mode by pressing the (Source) button on the top panel or on the remote control.
•• You can also select a source using AUX button on the remote control.
ENG - 12
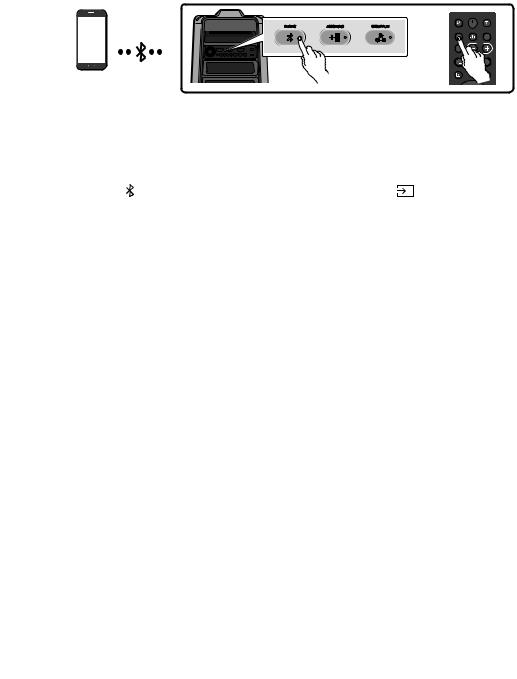
Connecting a mobile device via Bluetooth
When a mobile device is connected using Bluetooth, you can hear stereo sound without the hassle of cabling.
PAIRING |
ADD STEREO |
GROUP PLAY |
|
|
LIGHT |
OR
Bluetooth device
The initial connection
1.Press and hold the  PAIRING button on the remote control for more than 5 seconds to enter the “BT PAIRING” mode.
(OR) Press the PAIRING button on the rear panel or press and hold the |
(Source) button on |
|
|
the top panel for more than 5 seconds to enter the “BT PAIRING” mode. |
|
2. |
On your device, select “[AV] Samsung Party T50” from the list that appears. |
|
|
•• When the Party Audio is connected to the Bluetooth device, [Bluetooth Device Name]→“BT” |
|
|
appears in the front display. |
|
3. |
PlaymusicfilesfromthedeviceconnectedviaBluetooththroughthePartyAudio. |
|
If the device fails to connect
•• If a previously connected Party Audio listing (e.g. “[AV] Samsung Party T50”) appears in the list, delete it.
•• Then repeat steps 1 and 2.
What is the difference between BT READY and BT PAIRING?
•• BT READY : In this mode, you can search for previously connected TVs or connect a previously connected mobile device to the Party Audio.
•• BT PAIRING : In this mode, you can connect a new device to the Party Audio.
(Press and hold the  PAIRING button on the remote control or the
 (Source) button on top of the Party Audio for more than 5 seconds to enter the “BT PAIRING” mode.)
––You can also press the  PAIRING button on the rear of the Party Audio to enter the “BT PAIRING” mode.
ENG - 13
Bluetooth Multi connection
The Party Audio can be connected to 2 Bluetooth devices at the same time.
Bluetooth device 1 |
Bluetooth device 2 |
1.Connect the Party Audio to up to two Bluetooth devices. (See page 13)
2.If you attempt to connect a 3rd Bluetooth device, the 1st and 2nd devices will disconnect.
3.Play music from one of the connected Bluetooth devices while two devices are connected. The other device will automatically pause.
•• Depending on the device, and the content being played, playback may not be able to be automatically paused when switching from device to device.
NOTES
•• You can connect up to two Bluetooth devices at a time.
•• If asked for a PIN code when connecting a Bluetooth device, enter <0000>.
•• Environmental conditions or other factors with connected devices may have effect on playback quality.
•• The Party Audio automatically turns off after 20 minutes with no command input in the ready state.
•• The Party Audio may not perform Bluetooth search or connection correctly under the following circumstances:
––IfthereisastrongelectricalfieldaroundthePartyAudio.
––If several Bluetooth devices are simultaneously paired with the Party Audio.
––If the Bluetooth device is turned off, not in place, or malfunctions.
•• Electronic devices may cause radio interference. Devices that generate electromagnetic waves must be kept away from the Party Audio main unit - e.g., microwaves, wireless LAN devices, etc.
•• When the Party Audio is connected to your TV by Bluetooth connection, the video on the TV and audio from the Party Audio may not be synchronised because the distance between the Party Audio and the TV is too far. It is recommended to move the Party Audio closer to your TV within 1 meter.
•• When the speaker is in the Bluetooth Multi connection mode, you will need to connect the other Bluetooth device and speaker within a few minutes (Approx. 1 minute). Otherwise Bluetooth Multi connection mode will be cancelled.
ENG - 14

•• Bluetooth Multi connection may not be supported depending on the connected device’s specifications.
•• Removable/detachable Bluetooth devices (Ex:Dongle etc..) ,windows phone, laptops, TV, etc. do not support Bluetooth Multi connection.
•• After Bluetooth Multi connection pairing, there may be a slight delay before music starts playing depending on the Bluetooth devices.
•• IfyoumovetoofaroutofrangefromthePartyAudiowithoutfirstdisconnectingyourBluetooth device, it may take a few minutes to connect other Bluetooth devices. If you turn the Party Audio off and back on, you can connect other Bluetooth devices without waiting.
LED Indications
LED |
STATE |
Description |
|
Fast Blink |
BT PAIRING mode |
|
|
|
Blue |
Blink |
BT READY mode |
|
|
|
|
Solid |
A Bluetooth device is connected. |
|
|
|
Using Bluetooth Power On
When the Party Audio is turned off, you can connect your smart device via a Bluetooth connection to turn it on.
1.Press and hold the BASS button on the remote control or on the top panel to set the Bluetooth Power On function on. “ON-BLUETOOTH POWER” appears on the display.
2.When the Party Audio is off, connect your smart device via Bluetooth. (For information on Bluetooth connections, refer to your smart device’s manual.)
3.When the connection is complete, the Party Audio turns itself on automatically in Bluetooth mode.
•• Select the desired music to play from your smart device.
NOTE
•• Press and hold the BASS button for more than 5 seconds on the remote control or on the top panel to turn the Bluetooth Power On function on or off.
Each time you press the BASS button, the Party Audio displays :
ON-BLUETOOTHPOWER→OFF-BLUETOOTHPOWER
ENG - 15
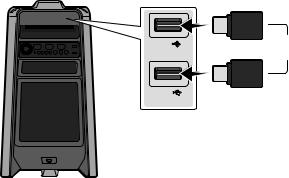
05 CONNECTING A USB STORAGE DEVICE
YoucanplaymusicfileslocatedonUSBstoragedevicesthroughthePartyAudio.
Rear of the Party Audio
USB1 |
OR |
(5V 2.1A) |
USB2
(5V 0.5A) USB storage device (not supplied)
1.Connect a USB storage device to the USB1 or USB2 jacks on your Party Audio.
2.Press the (Source) button on the top panel or on the remote control, and then select “USB1” or “USB2”.
•• You can also select a source using USB button on the remote control.
3.“USB1” or “USB2” appears in the display screen.
4.PlaymusicfilesfromtheUSBstoragedevicethroughthePartyAudio.
•• The Party Audio automatically turns off (Auto Power Down) if USB device is not connected, playback stopped, or there is no input for more than 20 minutes.
NOTES
•• ThisproductonlysupportsUSBstoragedevicesthatareformattedintheFATandFAT32file system.
•• This product does not support HDD storage or storage on mobile devices.
•• Amaximumof999filescanbeplayedperUSBstoragedevice.
•• A maximum of 256 folders can be read per USB storage device.
ENG - 16
Supported Audio Formats
File Extension |
Audio Codec |
Sampling Rate |
Bit Rate |
|
|
|
|
|
|
|
MPEG 1 Layer3 |
32 kHz ~ 48 kHz |
32 kbps ~ 320 kbps |
|
|
|
|
|
|
*.mp3 |
MPEG 2 Layer3 |
16 kHz ~ 24 kHz |
8 kbps ~ 160 kbps |
|
|
|
|
|
|
|
MPEG 2.5 Layer3 |
8 kHz ~ 12 kHz |
8 kbps ~ 160 kbps |
|
|
|
|
|
|
*.wma |
WMA7/8/9 |
8 kHz ~ 48 kHz |
32 kbps ~ 320 kbps |
|
|
|
|
|
|
|
AAC |
8 kHz ~ 96 kHz |
< 1728 kbps |
|
|
|
|
|
|
*.aac |
AAC-LC |
8 kHz ~ 96 kHz |
< 1728 kbps |
|
|
|
|
|
|
|
HE-AAC |
8 kHz ~ 96 kHz |
< 1728 kbps |
|
|
|
|
|
|
*.wav |
PCM/LPCM/ |
8 kHz ~ 192 kHz |
< 5 Mbps |
|
IMA_ADPCM |
||||
|
|
|
||
|
|
|
|
|
*flac |
- |
8 kHz ~ 192 kHz |
< 5 Mbps |
|
|
|
|
|
NOTES
•• This product does not support WMA Professional codec.
•• The above table shows supported sampling rates and bit rates. Files in formats that are not supported will not play.
•• AACfilesonlysupporttheADTSnativeformat.
Software Update
SamsungmayofferupdatesforthePartyAudio’ssystemfirmwareinthefuture.
Ifanupdateisoffered,youcanupdatethefirmwarebyconnectingaUSBdevicewiththefirmware update stored on it to the USB1 or USB2 port on your Party Audio. For more information about how to downloadupdatefiles,gototheSamsungElectronicswebsiteatwww.samsung.com/us/support/.
Then, enter or select the model number of your Party Audio, select the Software & Apps option, and then Downloads. Note that the option names can vary.
ENG - 17
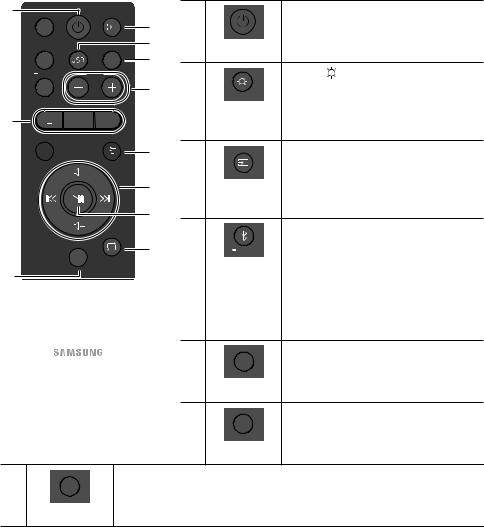
06 USING THE REMOTE CONTROL
How to Use the Remote Control


LIGHT


PAIRING
SOUND  MODE
MODE
EFFECT


DOWN


|
|
|
|
|
Turn the Party Audio on and off. |
|
|
|
|
|
|
|
|
|
|
Power |
|
USB |
AUX |
|
|
|
|
|
|
Press the (LIGHT) button to turn the |
|||
|
TEMPO |
|
|
||
|
|
|
LIGHT |
Lighting Mode on. |
|
|
|
|
|
Press the button repeatedly to cycle through |
|
|
|
|
|
LIGHT |
|
DJ |
EFFECT |
|
|
the available light modes: AMBIENT, PARTY, |
|
|
|
|
|||
|
|
|
|
|
DANCE, THUNDERBOLT, STAR or OFF. |
|
|
|
|
|
Press to select a source connected to the Party |
|
UP |
|
|
|
Audio. |
|
|
|
|
|
|
|
|
|
|
Source |
Press the button repeatedly to cycle through |
|
|
|
the available sources: BT, USB1, USB2, AUX1 or |
||
|
|
|
|
|
|
|
|
|
|
|
AUX2 . |
|
|
|
|
Press to select a source connected directly to |
|
|
|
|
|
|
|
|
|
|
|
PAIRING |
"BT" mode. |
|
|
|
Press and hold the button for more than |
||
BASS |
|
|
|
Bluetooth |
|
|
|
|
|
5 seconds to enter the "BT PAIRING" mode. |
|
|
|
|
|
PAIRING |
|
|
|
|
|
You can connect the Party Audio to a new |
|
|
|
|
|
|
Bluetooth device in this mode by selecting the |
|
|
|
|
|
Party Audio from the Bluetooth device's |
|
|
|
|
|
search list. |
|
|
|
|
USB |
Press to select the USB1 or USB2 sources |
|
|
|
|
connected to the Party Audio. |
|
|
|
|
|
USB |
|
|
|
|
|
AUX |
Press to select the AUX1 or AUX2 sources |
|
|
|
|
connected to the Party Audio. |
|
|
|
|
|
AUX |
|
|
SOUND |
Press the button repeatedly to cycle through the available sound effects: PARTY, |
|
STANDARD, HIPHOP, EDM, ROCK, LATIN, HOUSE or REGGAE. |
|||
|
MODE |
||
|
SOUND MODE |
|
ENG - 18
|
|
|
|
TEMPO |
Press the TEMPO + or TEMPO - buttons to change the tempo of the music up or down. |
|||||||
|
|
|
|
|
|
•• This function only works in the USB1 and USB2 mode. |
||||||
|
|
|
|
|
|
|
||||||
|
|
TEMPO +, - |
|
|
|
|
|
|
||||
|
|
|
|
|
|
|
|
|
|
|||
|
|
|
|
|
|
|
This function lets you turn on the DJ effect function. |
|||||
|
|
|
DJ |
|
|
|||||||
|
|
|
|
Press the button repeatedly to cycle through the available DJ sound effects: |
||||||||
|
|
|
|
|
|
|
||||||
|
|
|
|
DJ |
NOISE, FILTER, CRUSH, CHORUS, WAHWAH or OFF. |
|||||||
|
|
|
|
|
|
|
|
|
|
|||
|
|
|
|
|
|
|
|
|
|
|||
|
|
EFFECT |
EFFECT |
Press the EFFECT + or EFFECT - buttons to change the level of the each DJ sound effect |
||||||||
|
|
|
|
|
|
|
up or down. |
|
|
|
|
|
|
|
EFFECT +, - |
|
|
|
|
|
|
||||
|
|
|
|
|
|
|
|
|
|
|||
|
|
|
|
|
|
|
Press the (DOWN) button to move to the next folder in the USB device. |
|||||
|
|
|
|
DOWN |
|
|
|
|
|
|
||
|
|
Folder DOWN |
|
|
|
|
|
|
||||
|
|
|
|
|
|
|
|
|
|
|||
|
|
|
|
|
|
|
Press the (UP) button to move to the previous folder in the USB device. |
|||||
|
|
|
|
UP |
|
|
|
|
|
|
||
|
|
Folder UP |
|
|
|
|
|
|
||||
|
|
|
|
|
|
|
|
|
|
|
||
|
|
|
|
|
|
|
•• |
Volume up, Volume down |
||||
|
|
|
|
|
|
|
Press the |
|
(Volume up) or |
|
(Volume down) to adjust the volume level up or |
|
|
|
|
|
|
|
|
|
|
|
|||
|
|
|
|
|
|
|
|
down. |
|
|
|
|
|
|
|
|
|
|
|
•• |
Music Skip |
|
|
|
|
|
|
|
|
|
|
|
|
Press the |
|
buttontoselectthenextmusicfile.Pressthe button to select the |
||
|
|
Volume up, |
|
previousmusicfile. |
||||||||
|
|
|
Press and hold the button or the button for more than 3 seconds in USB play |
|||||||||
|
|
Volume down / |
|
|||||||||
|
|
|
mode to search forward or search backward. Press and hold the button or the |
|||||||||
|
|
|
|
Skip |
|
|||||||
|
|
|
|
|
button for more than 3 seconds again to get back to normal play. |
|||||||
|
|
|
|
|
|
|
|
|||||
|
|
|
|
|
|
|
|
|
|
|
||
|
|
|
|
|
|
|
Press the |
buttontopauseamusicfiletemporarily. |
||||
|
|
|
|
|
|
|
Whenyoupressthebuttonagain,themusicfileplays. |
|||||
|
|
|
|
|
|
|
•• |
Auto Power Down Function |
||||
|
|
Play / Pause |
|
|
To turn off Auto Power Down function while the unit is in AUX1, AUX2 mode, press |
|||||||
|
|
|
|
|||||||||
|
|
|
|
|
|
|
|
and hold the |
button for more than 5 seconds. ON-AUTO POWER DOWN / |
|||
|
|
|
|
|
|
|
|
OFF-AUTO POWER DOWN appears on the display. |
||||
|
|
|
|
|
|
|
|
|
|
|||
|
|
|
|
|
|
|
Press the (Mute) button to mute the sound. |
|||||
|
|
|
|
|
|
|
Press it again to unmute the sound. |
|||||
|
|
|
Mute |
|
|
|
|
|
|
|||
|
|
|
|
|
|
|
|
|
|
|
|
|
ENG - 19

|
|
Press the (Repeat) button to use the Repeat function in “USB1”and “USB2” mode. |
|
|
|
Press the button repeatedly to cycle through the available repeat functions: |
|
|
Repeat |
ONE, FOLDER, ALL, RANDOM or OFF. |
|
|
|
||
|
|
|
|
|
|
Press the BASS button to use the powerful bass sound. |
|
BASS |
Press it again to return to the normal sound. |
||
|
|||
|
|
||
|
BASS |
Press and hold the BASS button for more than 5 seconds to turn on or off the |
|
|
BLUETOOTH POWER function. |
||
|
|
||
|
|
|
How to use Sound Mode
YourPartyAudioprovidespredefinedequalisersettingsthatareoptimisedforparticularmusicgenres.
1.Press the SOUND MODE button on the Remote control.
2.Each time you press the SOUND MODE button, the Party Audio cycles through the available sound effects: PARTY, STANDARD, HIPHOP, EDM, ROCK, LATIN, HOUSE or REGGAE.
NOTES
•• Default sound mode is PARTY.
•• When turned off, press and hold the 
 button on product or remote control for more than 5 seconds to turn on in the default Sound Mode setting.
How to use the DJ Effect
The DJ Effect function lets you add DJ sound effects to your music. The level of each effect is adjustable.
1.Press the DJ button on the Remote control.
2.Each time you press the DJ button, the Party Audio cycles through the available DJ Effects:
•• NOISE:Createwhitenoiseandmixedwiththeoriginalsoundthroughthefilterandoutput.
•• FILTER : Creates an effect similar to the sound of only treble or bass.
•• CRUSH: Creates an effect that makes the original sound sharper.
•• CHORUS : Creates an effect similar to a singing chorus.
•• WAHWAH : Creates a ‘Wah~ Wah~’ effect.
•• DJ EFFECT OFF : Turns off the DJ Effect.
3.Press the EFFECT + or EFFECT - buttons to raise or lower the level of each of the DJ sound effects from -15 to +15.
NOTE
•• When turned off, press and hold the 
 button on product or remote control for more than 5 seconds to turn on in the default DJ Effect setting.
ENG - 20
07USING THE SAMSUNG GIGA PARTY AUDIO APP
Install Samsung Giga Party Audio App
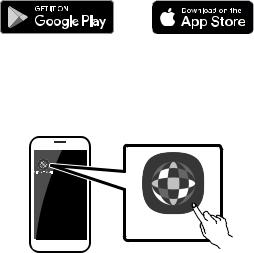
To control this product with your Smart Device and the Samsung Giga Party Audio app, download the Samsung Giga Party Audio App from the Google Play Store or Apple App Store, and install it on your Smart Device.
NOTES
•• The Samsung Giga Party Audio app is compatible with Android mobile phone devices running Android OS 6.0 or later.
•• The Samsung Giga Party Audio app is compatible with Apple mobile devices running iOS 10.0 or later.
Market search : Samsung Giga Party Audio
Launching the Samsung Giga Party Audio App
To launch and use the Samsung Giga Party Audio app, touch the Giga Party Audio icon on your smart device, and then follow the directions on the screen.
Giga Party
ENG - 21

08 TROUBLESHOOTING
Before seeking assistance, check the following.
The unit will not turn on.
Is the powercord plugged into the outlet?
;; Connect the power plug to the outlet.
A function does not work when the button is pressed.
Is there static electricityin the air?
;; Disconnect the power plug and connect it again.
Sound dropouts occur in BT mode.
;; See the Bluetooth connection sections on page 13.
Sound is not produced.
Is the Mute function on?
;; Press the (Mute) button to cancel the mute function.
Is thevolume set to minimum?
;; Adjust the Volume.
The remote control does not work.
Are the batteries drained?
;; Replace them with new batteries.
Is the distance between the remote control and PartyAudio main unit too far?
;; Move the remote control closer to the Party Audio main unit.
Stereo Group connection is not working.
Is the system inwireless Group Playmode?
;; Disconnect the wireless Group Play mode and try Stereo Group connection again.
It cannot make a Bluetooth connection.
Is the system connected to anothersystem in wireless Group Playmode orStereo Group mode?
;; Try Bluetooth connection again after disconnecting the wireless Group Play or Stereo Group connection.
Are the two Bluetooth devices already connected?
;; Try Bluetooth connection again after disconnecting other Bluetooth connections.
The  PAIRING button is not working.
Is the system inwireless Group Playmode or Stereo Group mode?
;; Try again after disconnecting the wireless Group Play or Stereo Group connection.
I want to switch the host system to the other in wireless Group Play or Stereo Group connection.
;; Disconnect Group Play mode, press the
Speakerwhichyouwantmaketohostfirst, and after it displays “HOST” message, connect the others one by one.
;; WithStereoGroupmode,hostisfixed.
You can not change others as host.
I want to play AUX1 or AUX2 more than 8 hours without control input.
;; Press and hold the 
 button for more than 5 seconds in AUX1 or AUX2 mode to disable Auto Power Down Function. Change from
ON-AUTO POWER DOWN to OFF-AUTO POWER DOWN.
ENG - 22

I can’t connect a slave to Group play.
;; After 1 hour, the host will block any additional slaves from being added. Press the GROUP PLAY button on host, after it display “HOST” message, the slave can be reconnected.
It cannot make a “Wireless/Wired Group/Add Stereo/Bluetooth” connection.
Is the distance between systems too far?
;; It is recommended to make a “Wireless/ Wired Group/Add Stereo/Bluetooth” pairing within 1 meter from the system.
;; The recommended operating distance between Party Audio systems is closer than 10 meters.
09 LICENCE
The Bluetooth® word mark and logos are registered trademarks owned by the Bluetooth SIG, Inc. and any use of such marks by Samsung Electronics Co., Ltd. is under license. Other trademarks and trade names are those of their respective owners.
Qualcomm aptX is a product of Qualcomm Technologies, Inc. and/or its subsidiaries. Qualcomm is a trademark of Qualcomm Incorporated, registered in the United States and other countries. aptX is a trademark of Qualcomm Technologies International, Ltd., registered in the United States and other countries.
10OPEN SOURCE LICENCE NOTICE
To send inquiries and requests regarding open sources, contact Samsung via Email (oss.request@samsung.com).
11IMPORTANT NOTES ABOUT SERVICE
•• Figures and illustrations in this User Manual are provided for reference only and may differ from actual product appearance.
•• An administration fee may be charged if either
(a)an engineer is called out at your request and there is no defect with the product (i.e. where the user manual has not been read).
(b)you bring the unit to a repair centre and there is no defect with the product (i.e. where the user manual has not been read).
•• You will be informed of the administration fee amount before a technician visits.
ENG - 23

12 |
SPECIFICATIONS AND GUIDE |
|||
Specifications |
|
|
||
|
|
|
|
|
Model Name |
|
MX-T50 |
||
|
|
|
|
|
USB1/USB2 |
|
USB1:5V/2.1A |
||
|
USB2:5V/0.5A |
|||
|
|
|
|
|
|
|
|
|
|
Weight |
|
|
|
11.6 kg |
|
|
|
|
|
Dimensions (W x H x D) |
|
351.0 x 651.0 x 323.0 mm |
||
|
|
|
|
|
Operating Temperature Range |
|
+5°C to +35°C |
||
|
|
|
|
|
Operating Humidity Range |
|
10 % ~ 75 % |
||
|
|
|
||
AMPLIFIER |
|
Tweeter |
65W x 2, 8 ohm |
|
Rated Output power |
|
Woofer |
185W x 2, 3 ohm |
|
|
|
|
||
WIRELESS DEVICE OUTPUT POWER |
|
|||
BT max transmitter power |
|
100mW at 2.4GHz – 2.4835GHz |
||
|
|
|
||
|
|
|||
Overall Standby Power Consumption (W) |
2.0W |
|||
|
|
|
||
Bluetooth |
|
Press and hold the BASS button for more than |
||
Port deactivation method |
|
5 seconds to turn off Bluetooth Power function. |
||
|
|
|
|
|
NOTES
•• SamsungElectronicsCo.,Ltdreservestherighttochangethespecificationswithoutnotice.
•• Weight and dimensions are approximate.
ENG - 24

•• Hereby, Samsung Electronics, declares that this equipment is in compliance with Directive 2014/53/EU.
The full text of the EU declaration of conformity is available at the following internet address: http://www.samsung.com go to Support > Search Product Support and enter the model name.
This equipment may be operated in all EU countries.
[Correct disposal of batteries in this product]
(Applicable in countries with separate collection systems)
This marking on the battery, manual or packaging indicates that the batteries in this product should not be disposed of with other household waste at the end of their working life. Where marked, the chemical symbols Hg, Cd or Pb indicate that the battery contains mercury, cadmium or lead above the reference levels in EC Directive 2006/66.
If batteries are not properly disposed of, these substances can cause harm to human health or the environment.
To protect natural resources and to promote material reuse, please separate batteries from other types of waste and recycle them through your local, free battery return system.
Correct Disposal of This Product
(Waste Electrical & Electronic Equipment)
(Applicable in countries with separate collection systems)
This marking on the product, accessories or literature indicates that the product and its electronic accessories (e.g. charger, headset, USB cable) should not be disposed of with other household waste at the end of their working life. To prevent possible harm to the environment or human health from uncontrolled waste disposal, please separate these items from other types of waste and recycle them responsibly to promote the sustainable reuse of material resources.
Household users should contact either the retailer where they purchased this product, or their local governmentoffice,fordetailsofwhereandhowtheycantaketheseitemsforenvironmentallysafe recycling.
Business users should contact their supplier and check the terms and conditions of the purchase contract. This product and its electronic accessories should not be mixed with other commercial wastes for disposal.
ForinformationonSamsung’senvironmentalcommitmentsandproductspecificregulatoryobligations e.g. REACH, WEEE, Batteries, visit: http://www.samsung.com/uk/aboutsamsung/samsungelectronics/corporatecitizenship/data_corner.html
ENG - 25
ИНФОРМАЦИЯЗАБЕЗОПАСНОСТ |
||
МЕРКИЗАБЕЗОПАСНОСТ |
ПРЕДУПРЕЖДЕНИЕ |
|
ЗАДАНАМАЛИТЕРИСКАОТТОКОВУДАР,НЕ |
•• Заданамалитерискаотпожарили |
|
електрическишок,неизлагайте |
||
СВАЛЯЙТЕКАПАКА(ИЛИЗАДНИЯКАПАК). |
||
апаратуратанадъждиливлага. |
||
ВЪТРЕНЯМАЧАСТИ,ПРЕДНАЗНАЧЕНИЗА |
||
|
||
ОБСЛУЖВАНЕОТПОТРЕБИТЕЛЯ.ЗА |
ВНИМАНИЕ |
|
СЕРВИЗНООБСЛУЖВАНЕСЕОБРЪЩАЙТЕ |
||
•• ЗАДАИЗБЕГНЕТЕТОКОВУДАР, |
||
КЪМКВАЛИФИЦИРАНСЕРВИЗЕНПЕРСОНАЛ. |
||
ПОСТАВЕТЕЩЕПСЕЛАВПОДХОДЯЩ |
||
Вижтетаблицатапо-долузаобяснениена |
||
КОНТАКТ,КАТОГОВКЛЮЧИТЕДОКРАЙ. |
||
символите,коитоможедасанавашияпродукт |
||
•• Апаратурататрябвавинагидабъде |
||
Samsung. |
||
свързанакъмпроменливотоковизточник |
||
|
||
ВНИМАНИЕ |
назахранванесъсзащитназаземителна |
|
връзка. |
||
РИСКОТТОКОВУДАРДА |
||
•• Задаизключитеприбораотзахранването, |
||
НЕСЕОТВАРЯ |
||
Тозисимволпоказва,чевътреима |
издърпайтещепселаотконтакта.Поради |
|
тазипричина,контактъттрябвадабъде |
||
високонапрежение.Опасноеда |
||
осъществяватекакъвтоидаебило |
удобен. |
|
контактсвътрешнатачастнапродукта. |
•• Апаратътнебивадабъдеизлаганна |
|
Тозисимволпоказва,чевпродуктае |
||
капенеилипръски.Непоставяйте |
||
включенаважнадокументацияза |
||
предмети,пълнистечности,напр.вази, |
||
работатаиподдръжката. |
||
върхууреда. |
||
ПродуктоткласII:Тозисимволпоказва, |
||
•• Задаизключитенапълноуреда,трябвада |
||
ченеенеобходимавръзказа |
||
безопасносткъмземята(заземяване). |
извадитещепселаназахранващиякабел |
|
Акотозисимволнеприсъствана |
отконтакта.Следователнощепселътна |
|
продуктсъсзахранващкабел, |
||
захранващиякабелтрябвадабъделесно |
||
продуктътТРЯБВАдабъденадеждно |
||
свързанкъмзащитнозаземяване. |
достъпенповсяковреме. |
|
ACнапрежение:Тозисимволпоказва, |
|
|
ченоминалнотонапрежение, |
|
|
маркираностозисимвол,еAC |
|
|
напрежение. |
|
|
DCнапрежение:Тозисимволпоказва, |
|
|
ченоминалнотонапрежение, |
|
|
маркираностозисимвол,еDC |
|
|
напрежение. |
|
|
Внимание,направетесправкав |
|
|
инструкциитезаизползване:Този |
|
|
символинструктирапотребителяда |
|
|
направисправкавръководствотона |
|
|
потребителязадопълнителна |
|
|
информациязабезопасността. |
|
|
BUL - ii |
||
 Loading...