


 Loading...
MX-H630
MX-H730
MINI-Compact System
MP3-CD/WMA-CD/CD-R/RW Playback
user manual
Imagine the possibilities
Thank you for purchasing this Samsung product. To receive more complete service,
please register your product at
www.samsung.com/register
Safety Warnings
TO REDUCE THE RISK OF ELECTRIC SHOCK, DO NOT REMOVE THE COVER (OR BACK).
NO USER-SERVICEABLE PARTS ARE INSIDE. REFER SERVICING TO QUALIFIED SERVICE PERSONNEL.
|
|
|
|
|
|
|
CAUTION |
|
|
|
|
RISK OF ELECTRIC SHOCK |
|
|
|
|
DO NOT OPEN |
|
|
|
|
|
|
|
This symbol indicates “dangerous voltage” inside |
CAUTION : TO PREVENT ELECTRIC SHOCK, |
This symbol indicates important instructions |
||
the product that presents a risk of electric shock or |
MATCH WIDE BLADE OF PLUG TO WIDE SLOT, FULLY |
accompanying the product. |
||
personal injury. |
INSERT. |
|
||
|
|
|
|
|
WARNING
•To reduce the risk of fire or electric shock, do not expose this appliance to rain or moisture.
CAUTION
CLASS 1 |
LASER PRODUCT |
KLASSE 1 |
LASER PRODUKT |
LUOKAN 1 |
LASER LAITE |
KLASS 1 |
LASER APPARAT |
PRODUCTO |
LÁSER CLASE 1 |
•Do not expose this device to dripping or splashing. Do not place items containing liquids, such as vases, on this device.
•To turn this device off entirely, you must disconnect its AC plug from the wall outlet. Consequently, the plug and AC wall outlet must be readily accessible at all times.
•Only connect this device to an AC outlet with a protective grounding connection.
•To prevent electric shock, match the wide blade of the plug to the wide slot in the wall outlet. Fully insert the plug into the wall outlet.
CLASS 1 LASER PRODUCT
This Compact Disc player is classified as a CLASS 1 LASER product.
Use of controls, adjustments or performance of procedures other than those specified herein may result in hazardous radiation exposure.
CAUTION
•INVISIBLE LASER RADIATION WHEN OPEN AND INTERLOCKS DEFEATED, AVOID EXPOSURE TO BEAM.
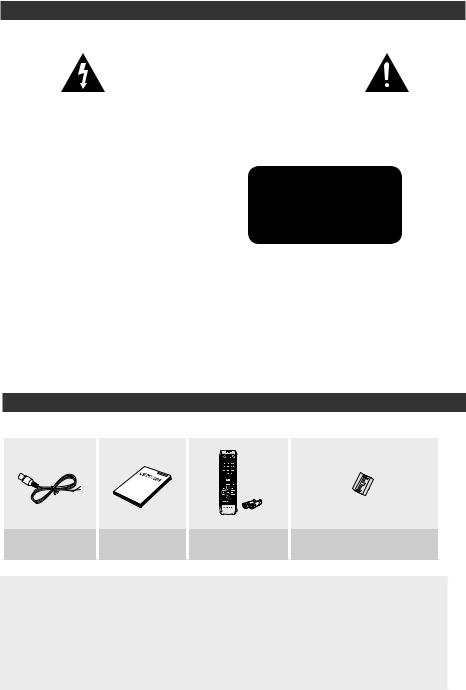
Accessories
Check for the supplied accessories below.
FM Antenna |
User's Manual |
Remote Control/Batteries |
Toroidal Ferrite core ( 1 EA) |
|
(For Power cable) (Optional) |
||||
|
|
|
•Figures and illustrations in this User Manual are provided for reference only and may differ from actual product appearance.
•An administration fee may be charged if either
a.an engineer is called out at your request and there is no defect in the product (i.e. where you have failed to read this user manual)
b.you bring the unit to a repair centre and there is no defect in the product (i.e. where you have failed to read this user manual).
•The amount of such administration charge will be advised to you before any work or home visit is carried out.
2 English

Precautions
•Ensure that the AC power in your house matches the requirements listed on the identification sticker located on the back of your product.
•Do not place the product on amplifiers or other equipment which may become hot. Make sure the ventilation slots are not covered.
•Do not stack anything on top of the product.
•Before moving the product, ensure the Disc Insert Hole is empty.
•To turn off the product completely, disconnect the AC plug from the wall outlet. Disconnect the AC plug from the wall outlet if you will leave the device unused for a long period of time.
•During thunderstorms, disconnect the AC plug from the wall outlet. Voltage peaks due to lightning could damage the product.
•Do not expose the product to direct sunlight or other heat sources. This could cause the product to overheat and malfunction.
•Protect the product from moisture and excess heat and equipment creating strong magnetic or electric fields (i.e. speakers.).
•Disconnect the power cable from the AC supply if the product malfunctions.
•This product is for personal use only. It is not intended for industrial use.
•Condensation may occur if your product or a disc has been stored in cold temperatures. If transporting the product during the winter, wait approximately 2 hours until the product has reached room temperature before using.
•The batteries used with this product contain chemicals that are harmful to the environment. Do not dispose of batteries in the general household trash.
•Maintain an open space of approximately 6 inches (15 cm) on the sides and rear of the system, for ventilation purposes.
•Place the loudspeakers at a reasonable distance on either side of the system to ensure good stereo sound.
•Direct the loudspeakers towards the listening area.
Cautions on Handling and Storing Discs
Small scratches on the disc may reduce sound and picture quality or cause skipping.
Be especially careful not to scratch discs when handling them.
Holding discs
•Do not touch the playback side of the disc.
•Hold the disc by the edges so that fingerprints will not get on the surface.
•Do not stick paper or tape on the disc.
Disc Storage
•Do not keep in direct sunlight.
•Keep in a cool, ventilated area.
•Keep in a clean, protective jacket. Store vertically.
•Do not allow the discs to become contaminated with dirt.
•Do not use cracked or scratched discs.
Handling and Storing Discs
If you get fingerprints or dirt on a disc, clean it with a mild detergent diluted in water and wipe with a soft cloth.
•When cleaning, wipe gently from the inside to the outside of the disc.
•Condensation may form if warm air comes into contact with cold parts inside the product. When condensation forms inside the product, it may not operate correctly. If this occurs, remove the disc and let the product stand for 1 or 2 hours with the power on.
Disc Types And Disc Format
This product does not support Secure (DRM) Media files.
CD-R Discs
•Some CD-R discs may not be playable depending on the disc recording device (CD-Recorder or PC) and the condition of the disc.
•Use 650MB/74 minute CD-R discs.
Do not use CD-R discs over 700MB/80 minutes as they may not be played back.
•Some CD-RW (Rewritable) media, may not be playable.
•Only CD-Rs that are properly "closed" can be fully played. If the session is closed but the disc is left open, you may not be able to fully play the disc.
CD-R MP3 Discs
•Only CD-R discs with MP3 files in ISO 9660 or Joliet format can be played.
•MP3 file names should contain no blank spaces or special characters (for example, . = +).
•Use discs recorded with a compression/decompression data rate greater than 128Kbps.
•Only files with the ".mp3" and ".MP3" extensions can be played.
•Only consecutively written multisession discs can be played. If there is a blank segment in a Multisession disc, the disc can be played only up to the blank segment.
•If a disc is not closed, it will take longer to begin playback and not all of the recorded files may be played.
•For files encoded in Variable Bit Rate (VBR) format, i.e. files encoded in both low bit rate and high bit rate (e.g., 32Kbps ~ 320Kbps), the sound may skip during playback.
•A maximum of 999 tracks can be played per CD.
•Supported audio formats: WMA 56 ~128kbps Bit Rate.
English 3

Contents
Thank you for buying this SAMSUNG mini-compact system. Please take time to read these instructions.
They will allow you how to operate your system and take full advantage of its features.
Safety Warnings........................................ |
2 |
Accessories............................................... |
2 |
Precautions............................................... |
3 |
Cautions on Handling and |
|
Storing Discs............................................. |
3 |
Disc Types And Disc Format.................... |
3 |
Contents.................................................... |
4 |
Description................................................ |
5 |
Front Panel.......................................... |
5 |
Rear Panel........................................... |
6 |
Remote Control................................... |
7 |
Attaching the toroidal ferrite core to |
|
the Power cable (optional)....................... |
7 |
Display Function....................................... |
7 |
CD/MP3/WMA-CD Playback................... |
8 |
Selecting a Track...................................... |
8 |
Searching for a Specific Music |
|
Passage on a CD...................................... |
8 |
Repeat One or All Tracks on a |
|
Compact Disc........................................... |
8 |
10 Skip Function....................................... |
9 |
CD Programming...................................... |
9 |
Checking or Editing the |
|
Programmed Tracks................................. |
9 |
Auto Change Function............................. |
9 |
Playing a USB Device............................. |
10 |
To Select a Track from |
|
a USB Device.................................... |
10 |
To Search a Folder Quickly............... |
10 |
To Use High Speed Search............... |
10 |
To Repeat.......................................... |
10 |
To Delete a File.................................. |
10 |
To Skip 10 Tracks.............................. |
10 |
Using Bluetooth...................................... |
11 |
Setting the Clock.................................... |
12 |
Timer Function........................................ |
12 |
Cancelling the Timer............................... |
13 |
Listening to Radio................................... |
13 |
Selecting a Stored Station..................... |
13 |
Recording Function................................ |
14 |
Recording Speed.................................... |
14 |
Selecting EQ Mode................................ |
15 |
Selecting LOCAL EQ Mode.................. |
15 |
Using the FOOTBALL MODE................. |
15 |
GIGA SOUND Function.......................... |
15 |
Connecting a Microphone..................... |
15 |
Troubleshooting...................................... |
16 |
Specifications......................................... |
17 |
Symbols |
Important |
Note |
|
|
|
4 English

Description |
|
Front Panel |
|
1 |
21 |
2 |
20 |
3 |
19 |
4 |
18 |
|
|
5 |
17 |
6 |
16 |
7 |
15 |
8 |
14 |
9 |
13 |
10 |
12 |
11 |
|
1. |
POWER button |
16. |
PLAY/PAUSE button |
|
|
• Press this button to switch your mini-compact |
17. |
Search/Skip button |
|
|
system on and off. |
18. |
VOLUME Control |
|
2. |
AUTO CHANGE button |
19. |
LOCAL EQ button |
|
20. |
FOOTBALL MODE button |
|||
3. |
EQ button |
|||
21. |
GIGA SOUND BLAST button |
|||
4. |
Window Display |
|||
|
|
5.Search/Skip button
6.STOP/Tuning Mode button
7.USB/BLUETOOTH button
8.MP3/CD button
9.TUNER/AUX button
10.MIC jack
11.Disc Tray
12.USB jack
13.USB REC button
14.DELETE button
15.OPEN/CLOSE button
English 5
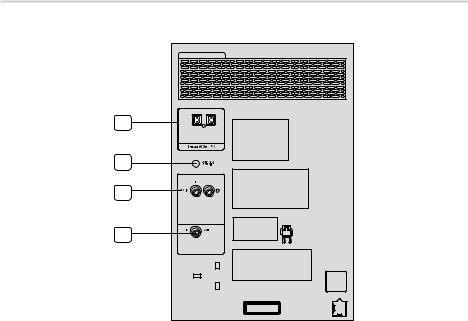
Rear Panel
1 |
2 |
3 |
4 |
1.2.0 CH Speaker Connector Terminals
The speaker connector terminals are located on the rear of the system.
1.To achieve the correct sound quality, insert the speaker connector cables identified below into the correct speaker terminals on the back of the system.
•Left speaker (marked L).
•Right speaker (marked R).
2.ONLY FOR SERVICE
•This jack is for service only. Please do not use.
3.AUX IN Terminals
1.Use an Audio Cable (not supplied) to connect AUX IN on the product to Audio Out on an external analog component.
•Be sure to match connector colors.
•If the external analog component has only one Audio Out jack, connect to either the left or right terminal.
•Press the TUNER/AUX button to select the AUX input.
•When the unit is in AUX mode, if none of
the buttons are pushed for more than 8 hours, the power will automatically turn off.
4.FM Antenna Connector Terminal
1.Connect the FM antenna (supplied) to the FM Antenna jack.
2.Slowly move the antenna wire until you find a location where reception is good, then fasten it to a wall or other rigid surface.
3.If reception is poor, you may need to install an outdoor antenna. To do so, connect an outdoor FM antenna to FM antenna jack on the rear of the system using a 75Ω coaxial cable (not supplied).
6 English
Loading...