


E-A7
Owner’s Manual (this document)
Read this rst. It explains the basic things you need to know in order to use the
E-A7.
PDF Manual (download from the Web)
5 Reference Manual
This explains all functions of the E-A7.
5 MIDI Implementation
This is detailed information about MIDI messages.
To obtain the PDF manual
1. Enter the following URL in your computer.
http://www.roland.com/manuals/
I
2. Choose “E-A7” as the product name.
Before using this unit, carefully read “USING THE UNIT SAFELY” (p. 52) and “IMPORTANT NOTES” (p. 54). After reading, keep the document(s) including those sections
where it will be available for immediate reference.
Copyright © 2015 ROLAND CORPORATION
Owner’s Manual

2
Playing with Automatic Accompaniments . . . . . . . . . . . . . . . . 21
About the Styles . . . . . . . . . . . . . . . . . . . . . . . . . . . . . . . . . . . . . . . . . 21
Using Styles. . . . . . . . . . . . . . . . . . . . . . . . . . . . . . . . . . . . . . . . . . . . . 21
Selecting Styles . . . . . . . . . . . . . . . . . . . . . . . . . . . . . . . . . . . . . . . . . 22
Adjusting the Volume and the ON/OFF Status of Style Parts . . . 23
Performing Along with a Style Accompaniment . . . . . . . . . . . . . 23
Changing the Style’s Tempo . . . . . . . . . . . . . . . . . . . . . . . . . . . . . . . 24
Muting a Specic Track ( Track Mute) . . . . . . . . . . . . . . . . . . . . . . . 24
Selecting the Track to Mute . . . . . . . . . . . . . . . . . . . . . . . . . . 25
Selecting Tones Appropriate for a Style
(One Touch Memories) . . . . . . . . . . . . . . . . . . . . . . . . . . . . . . . . . . . . 26
Selecting a One Touch Memory . . . . . . . . . . . . . . . . . . . . . . . . . . . 26
Canceling the One Touch Memories . . . . . . . . . . . . . . . . . . . . . . . 26
Locking One Touch Memories Settings (One Touch Lock) . . . . . 26
Creating Your Own One Touch Memories (One Touch Settings) 26
Editing and Saving the One Touch Settings of a Style . . . 26
Copying a User Program or One Touch Memory to
another One Touch Memory . . . . . . . . . . . . . . . . . . . . . . . . . 27
Creating Sounds . . . . . . . . . . . . . . . . . . . . . . . . . . . . . . . . . . . . . . . . . . 28
Overall Workow . . . . . . . . . . . . . . . . . . . . . . . . . . . . . . . . . . . . . . . . 28
Obtaining Waveforms . . . . . . . . . . . . . . . . . . . . . . . . . . . . . . . . . . . . 28
Connecting an External Device . . . . . . . . . . . . . . . . . . . . . . . . . . . 28
Sampling . . . . . . . . . . . . . . . . . . . . . . . . . . . . . . . . . . . . . . . . . . . . . . . 29
Importing Samples . . . . . . . . . . . . . . . . . . . . . . . . . . . . . . . . . . . . . . 29
Sample Editing . . . . . . . . . . . . . . . . . . . . . . . . . . . . . . . . . . . . . . . . . . 29
Deleting a Sample . . . . . . . . . . . . . . . . . . . . . . . . . . . . . . . . . . . . . . . 30
Creating a Multisample (Create Multisample) . . . . . . . . . . . . . . . 30
Multisample Editing . . . . . . . . . . . . . . . . . . . . . . . . . . . . . . . . . . . . . 31
Deleting a Multisample . . . . . . . . . . . . . . . . . . . . . . . . . . . . . . . . . . 31
Creating a User Tone . . . . . . . . . . . . . . . . . . . . . . . . . . . . . . . . . . . . . 31
Deleting a User Tone . . . . . . . . . . . . . . . . . . . . . . . . . . . . . . . . . . . . . 32
Exporting User Tones to a USB Flash Drive (UST Export) . . . . . . 32
Loading Exported User Tones . . . . . . . . . . . . . . . . . . . . . . . . . . . . . 33
Creating a User Drum Kit . . . . . . . . . . . . . . . . . . . . . . . . . . . . . . . . . 33
Deleting a User Drum Kit . . . . . . . . . . . . . . . . . . . . . . . . . . . . . . . . . 34
Exporting User Drum Kits to a USB Flash Drive (UDK Export) . . 34
Loading Exported User Drum Kits . . . . . . . . . . . . . . . . . . . . . . . . . 34
Increasing the Amount of Free Sample Memory . . . . . . . . . . . . . 35
Truncating a Sample . . . . . . . . . . . . . . . . . . . . . . . . . . . . . . . . 35
Sample Clean Up . . . . . . . . . . . . . . . . . . . . . . . . . . . . . . . . . . . 35
Optimizing Sample Memory . . . . . . . . . . . . . . . . . . . . . . . . . 35
Using the Pads . . . . . . . . . . . . . . . . . . . . . . . . . . . . . . . . . . . . . . . . . . . . 36
Playing the Pads . . . . . . . . . . . . . . . . . . . . . . . . . . . . . . . . . . . . . . . . . 36
Playing the Pads . . . . . . . . . . . . . . . . . . . . . . . . . . . . . . . . . . . 36
Stopping the Pad Sound . . . . . . . . . . . . . . . . . . . . . . . . . . . . 36
Pad Settings . . . . . . . . . . . . . . . . . . . . . . . . . . . . . . . . . . . . . . . . . . . . 36
Viewing the Pad Settings . . . . . . . . . . . . . . . . . . . . . . . . . . . . 36
Editing the Pad Settings . . . . . . . . . . . . . . . . . . . . . . . . . . . . 36
Saving the Pad Settings . . . . . . . . . . . . . . . . . . . . . . . . . . . . . 37
Creating a Phrase to Play from a Pad (Phrase Recording) . . . . . . 37
An Overview of the E-A7 . . . . . . . . . . . . . . . . . . . . . . . . . . . . . . . . . . 4
Basic Structure . . . . . . . . . . . . . . . . . . . . . . . . . . . . . . . . . . . . . . . . . . 4
Units of Sound . . . . . . . . . . . . . . . . . . . . . . . . . . . . . . . . . . . . . . . . . . 4
About the Memory . . . . . . . . . . . . . . . . . . . . . . . . . . . . . . . . . . . . . . 5
Eects . . . . . . . . . . . . . . . . . . . . . . . . . . . . . . . . . . . . . . . . . . . . . . . . . 5
Panel Descriptions . . . . . . . . . . . . . . . . . . . . . . . . . . . . . . . . . . . . . . . . 6
Top Panel . . . . . . . . . . . . . . . . . . . . . . . . . . . . . . . . . . . . . . . . . . . . . . . 6
Shortcut . . . . . . . . . . . . . . . . . . . . . . . . . . . . . . . . . . . . . . . . . . . . . . . . 8
Rear Panel . . . . . . . . . . . . . . . . . . . . . . . . . . . . . . . . . . . . . . . . . . . . . . 9
Connecting Your Equipment . . . . . . . . . . . . . . . . . . . . . . . . . . . . . . 10
Connecting External Audio Equipment . . . . . . . . . . . . . . . . . . . . . 10
Connecting a Microphone or External Audio Device to
the INPUT Jacks . . . . . . . . . . . . . . . . . . . . . . . . . . . . . . . . . . . . 10
Connecting an External Audio Device to the EXT IN Jack 10
Connecting MIDI Equipment . . . . . . . . . . . . . . . . . . . . . . . . . . . . . . 10
Connecting the E-A7 to a Computer . . . . . . . . . . . . . . . . . . . . . . . 11
Connecting a Separately Sold Footswitch or Hold Pedal . . . . . . 11
Installing the Music Rest . . . . . . . . . . . . . . . . . . . . . . . . . . . . . . . . . . 11
Placing the E-A7 on a Stand . . . . . . . . . . . . . . . . . . . . . . . . . . . . . . . 11
Before You Start Using E-A7 . . . . . . . . . . . . . . . . . . . . . . . . . . . . . . 12
Turning On/O the Power . . . . . . . . . . . . . . . . . . . . . . . . . . . . . . . . 12
Turning On the Power . . . . . . . . . . . . . . . . . . . . . . . . . . . . . . 12
Turning O the Power . . . . . . . . . . . . . . . . . . . . . . . . . . . . . . 12
Adjusting the Overall Volume . . . . . . . . . . . . . . . . . . . . . . . . . . . . . 12
Optimizing the Acoustic Character for the Internal Speakers . . 13
Demo of the E-A7. . . . . . . . . . . . . . . . . . . . . . . . . . . . . . . . . . . . . . . . 13
Making the Power Automatically Turn O After a Time
(Auto O) . . . . . . . . . . . . . . . . . . . . . . . . . . . . . . . . . . . . . . . . . . . . . . 13
Basic Operation of the E-A7 . . . . . . . . . . . . . . . . . . . . . . . . . . . . . . . 14
Basic Screens . . . . . . . . . . . . . . . . . . . . . . . . . . . . . . . . . . . . . . . . . . . 14
Basic Buttons . . . . . . . . . . . . . . . . . . . . . . . . . . . . . . . . . . . . . . . . . . . 14
[Balance/Value] knob . . . . . . . . . . . . . . . . . . . . . . . . . . . . . . . . . . . . 15
Adjusting the Volume Balance Between the Keyboard
Parts and the Style/Song . . . . . . . . . . . . . . . . . . . . . . . . . . . . 15
Using the Knob for the Value [-] [+] Button and Tempo [-]
[+] Button Functions . . . . . . . . . . . . . . . . . . . . . . . . . . . . . . . . 15
Adjusting the Volume of Keyboard Parts and Style Parts . . . . . . 15
Assigning Names . . . . . . . . . . . . . . . . . . . . . . . . . . . . . . . . . . . . . . . . 16
Performing . . . . . . . . . . . . . . . . . . . . . . . . . . . . . . . . . . . . . . . . . . . . . . . 17
Selecting a Tone and Playing it on the Keyboard . . . . . . . . . . . . . 17
Changing the Tone of a Keyboard Part . . . . . . . . . . . . . . . . 17
Turning Each Keyboard Part On/O and Adjusting the
Volume . . . . . . . . . . . . . . . . . . . . . . . . . . . . . . . . . . . . . . . . . . . 18
Playing Dierent Tones in the Right and Left Hands (Split) . . . . 18
Changing the Split Point . . . . . . . . . . . . . . . . . . . . . . . . . . . . 18
Specifying Lower Hold . . . . . . . . . . . . . . . . . . . . . . . . . . . . . . 18
Transposing Your Performance (Transpose) . . . . . . . . . . . . . . . . . 18
Changing the Pitch (Octave Shift) . . . . . . . . . . . . . . . . . . . . . . . . . . 19
Using the Metronome . . . . . . . . . . . . . . . . . . . . . . . . . . . . . . . . . . . . 19
Making Metronome Settings . . . . . . . . . . . . . . . . . . . . . . . . 19
Using Favorite Tones . . . . . . . . . . . . . . . . . . . . . . . . . . . . . . . . . . . . . . 20
Recalling a Favorite Tone . . . . . . . . . . . . . . . . . . . . . . . . . . . . . . . . . 20
Registering Favorite Tones . . . . . . . . . . . . . . . . . . . . . . . . . . . . . . . . 20
Contents

3
Contents
Using the E-A7 as a Song Player . . . . . . . . . . . . . . . . . . . . . . . . . . 38
Preparing to Use the E-A7 as a Song Player . . . . . . . . . . . . . . . . . 38
Selecting a Song . . . . . . . . . . . . . . . . . . . . . . . . . . . . . . . . . . . . . . . . 38
Playing Back a Song . . . . . . . . . . . . . . . . . . . . . . . . . . . . . . . . . . . . . 38
Changing the Song’s Tempo . . . . . . . . . . . . . . . . . . . . . . . . . . . . . . 39
Muting a Selected Track (Track Mute) . . . . . . . . . . . . . . . . . . . . . . 39
Playing Back All Songs Consecutively . . . . . . . . . . . . . . . . . . . . . . 39
Loop Function . . . . . . . . . . . . . . . . . . . . . . . . . . . . . . . . . . . . . . . . . . 40
Using the Mark and Jump Function (SMF Songs Only) . . . . . . . . 40
Creating/Deleting Markers . . . . . . . . . . . . . . . . . . . . . . . . . . 40
Saving a Song that Contains Markers . . . . . . . . . . . . . . . . . 41
Using Markers to Perform . . . . . . . . . . . . . . . . . . . . . . . . . . . 41
Center Cancel . . . . . . . . . . . . . . . . . . . . . . . . . . . . . . . . . . . . . . . . . . . 41
Recording and Playing Back a Performance . . . . . . . . . . . . . . 42
Recording Audio (WAV Format) . . . . . . . . . . . . . . . . . . . . . . . . . . . 42
Saving the Song . . . . . . . . . . . . . . . . . . . . . . . . . . . . . . . . . . . 42
Discarding the Recorded Content . . . . . . . . . . . . . . . . . . . . 42
Listening to the Recorded Content . . . . . . . . . . . . . . . . . . . . . . . . 42
Using File Utility . . . . . . . . . . . . . . . . . . . . . . . . . . . . . . . . . . . . . . . . . . 43
Displaying the File List . . . . . . . . . . . . . . . . . . . . . . . . . . . . . . . . . . . 43
Renaming a File or Folder (Rename). . . . . . . . . . . . . . . . . . . . . . . . 43
Copying a File or Folder (Copy) . . . . . . . . . . . . . . . . . . . . . . . . . . . . 43
Deleting a File or Folder (Delete) . . . . . . . . . . . . . . . . . . . . . . . . . . 43
Creating a New Folder (Create Folder) . . . . . . . . . . . . . . . . . . . . . . 43
Searching for a Song/Style (Finder) . . . . . . . . . . . . . . . . . . . . . . . 44
Searching for a Song/Style . . . . . . . . . . . . . . . . . . . . . . . . . . . . . . . . 44
User Program (UPG) . . . . . . . . . . . . . . . . . . . . . . . . . . . . . . . . . . . . . . 45
User Programs (UPG) and User Program Sets (UPS) . . . . . . . . . . . 45
Loading a UPS . . . . . . . . . . . . . . . . . . . . . . . . . . . . . . . . . . . . . . . . . . 45
Recalling the UPG . . . . . . . . . . . . . . . . . . . . . . . . . . . . . . . . . . . . . . . 45
Direct Selection with the UPG Buttons . . . . . . . . . . . . . . . . 45
Selecting from the UPG List Screen . . . . . . . . . . . . . . . . . . . 45
Saving Settings as a User Program . . . . . . . . . . . . . . . . . . . . 46
Recalling My Setup . . . . . . . . . . . . . . . . . . . . . . . . . . . . . . . . . . . . . . 46
Saving Settings as My Setup . . . . . . . . . . . . . . . . . . . . . . . . . 46
Other Functions Related to the UPS List . . . . . . . . . . . . . . . . . . . . 46
Renaming a User Program Set (UPS) (Rename UPS) . . . . . 46
Deleting a User Program Set (UPS) (Delete UPS) . . . . . . . . 46
Creating a New User Program Set (UPS) (Make New UPS) 46
Copying a User Program Set (UPS) (Copy UPS) . . . . . . . . . 46
Using a UPS File Created by the Roland BK Series . . . . . . . 47
Other Functions Related to the UPG List . . . . . . . . . . . . . . . . . . . . 47
Deleting a User Program (UPG) (Delete UPG) . . . . . . . . . . 47
Moving a User Program (UPG) (Move UPG) . . . . . . . . . . . . 47
Renaming a User Program (UPG) (Rename UPG) . . . . . . . 47
Copying a User Program (UPG) (Copy UPGs) . . . . . . . . . . . 48
Saving an Edited User Program Set (Save UPS) . . . . . . . . . 48
Locking the UPG Settings . . . . . . . . . . . . . . . . . . . . . . . . . . . . . . . . . 48
Various Settings (Menu) . . . . . . . . . . . . . . . . . . . . . . . . . . . . . . . . . . 49
Main Specications . . . . . . . . . . . . . . . . . . . . . . . . . . . . . . . . . . . . . . . 50
Index . . . . . . . . . . . . . . . . . . . . . . . . . . . . . . . . . . . . . . . . . . . . . . . . . . . . . 51
USING THE UNIT SAFELY . . . . . . . . . . . . . . . . . . . . . . . . . . . . . . . . . . 52
IMPORTANT NOTES . . . . . . . . . . . . . . . . . . . . . . . . . . . . . . . . . . . . . . . 54

4
An Overview of the E-A7
Basic Structure
Broadly speaking, the E-A7 consists of a controller section, a sound generator section, an arranger/song player section, and a sampler section.
Controller Section
The controller section is what you perform on. For example, the performer’s actions such as “playing the keyboard” are sent from the controller
section to the sound generator section, causing it to produce sound.
The controller section includes the keyboard, assignable lever, the panel sliders and buttons, and the pedals connected to the rear panel.
Sound Generator Section
This section produces the sound. It receives performance data from the controller section, the arranger/song player section, and external MIDI
devices, and produces a variety of sounds in response to this data.
Arranger/Song Player Section
The arranger detects chords by analyzing the operations from the keyboard controller, and plays the appropriate style data.
The song player plays back audio les or sends MIDI messages from SMF data to the sound generator.
Sampler Section
The sampler captures sounds from an audio device or mic connected to the input jacks, or audio les (WAV les) from a USB ash drive, and saves
them as User Samples.
You can use these user samples to create user sounds (User Tones, User Drum Kits).
Units of Sound
Tone
Tones are the units of sound with which you perform.
Tones that you created by editing the built-in tones, or by loading a waveform (User Sample) you created using the sampling function, are called
“User Tones.”
Drum Kit
A drum kit is a group of percussion instrument sounds.
In a drum kit, a dierent percussion instrument sound is played by each key (note number) you press.
The sounds (mainly percussion instrument sounds) that are assigned to each note of the internal drum kits are called Drum Inst.
The drum inst of the internal drum kits or waveforms (user samples) that you captured using the sampling function can be freely assigned to the
keyboard to create your own original drum kit.
A drum kit created by the user in this way is called a “User Drum Kit.”
User Sample
A waveform captured by the sampling function is called a “User Sample.”
User samples are the material from which you can create user sample tones and user drum kits.
User Program (UPG)
A User Program (UPG) contains tone settings for the four parts that are assigned as the Keyboard Parts (Upper1, Upper2, Upper3, Lower). The style
and song settings, as well as all settings that are loaded with them (for example, the intro and ending status, and settings for the selected variation),
are also handled together within the user program (UPG).
You can store one hundred UPGs as a User Program Set (UPS).

5
An Overview of the E-A7
About the Memory
The state of the E-A7’s parameters and the data that you create are held in memory.
This memory is divided into three categories: “temporary memory,” “rewritable memory,” and “non-rewritable memory.”
Temporary memory (Temporary area)
A user program (UPG) that you load during a performance, and the panel settings that you modify while performing, are held in temporary memory
(the temporary area).
When you edit a User Tone or user drum kit, this data is also held in the temporary area during that time.
Settings in the temporary area are temporary, and will be lost when you turn o the power or recall other settings. If you want to keep the settings
that are in the temporary area, you must save them to rewritable memory.
Rewritable memory
Internal Storage
The memory that lets you store data inside the E-A7 is called Internal Storage.
This holds user programs sets (UPS), user styles, User Tone settings, and user drum kit settings.
External Storage
You can insert a USB ash drive and store data outside the E-A7. Such external memory (a USB ash drive) is called External Storage, and can be used
in the same way as internal storage.
External storage can also be used as an audio recording destination, or to back up data.
System Memory
System Memory is located inside the E-A7, and stores system settings that determine the overall operation of the E-A7.
User Sample Memory
This is memory that stores user samples that were captured by sampling or that were imported by the sample import function.
Non-rewritable memory
Preset Memory
This memory holds parameters for the internal sounds, internal styles, and Music Assistant. Its data cannot be rewritten.
Preset Wave Memory
This memory contains waveform data used by the internal sounds. Its data cannot be rewritten.
Eects
The E-A7 contains the following eects units. You can make settings independently for each of them.
MFX (Multi Eects)
This is a general-purpose multi-eect that modies the sound itself, potentially giving it a completely dierent tonal character.
A wide variety of types are provided, and you can choose the type that’s most appropriate for your purpose.
There are a total of three MFX units: one unit dedicated to the keyboard part, and two units for backing.
Chorus
Chorus is an eect that adds depth and spaciousness to the sound. You can choose whether to use this eect unit as chorus or as delay.
The depth of chorus can be adjusted individually for each part.
Reverb
Reverb is an eect that gives the sound a spatial ambience that’s characteristic of a performance in a hall.
Several types are provided, and you can choose the type that’s most appropriate for your purpose.
The depth of reverb can be adjusted individually for each part.
Input EFX
This unit can apply reverb or other eects to the sound from the input jacks.
Mastering Tools
The mastering tools consist of a mastering compressor and equalizer that are applied to all parts.
6
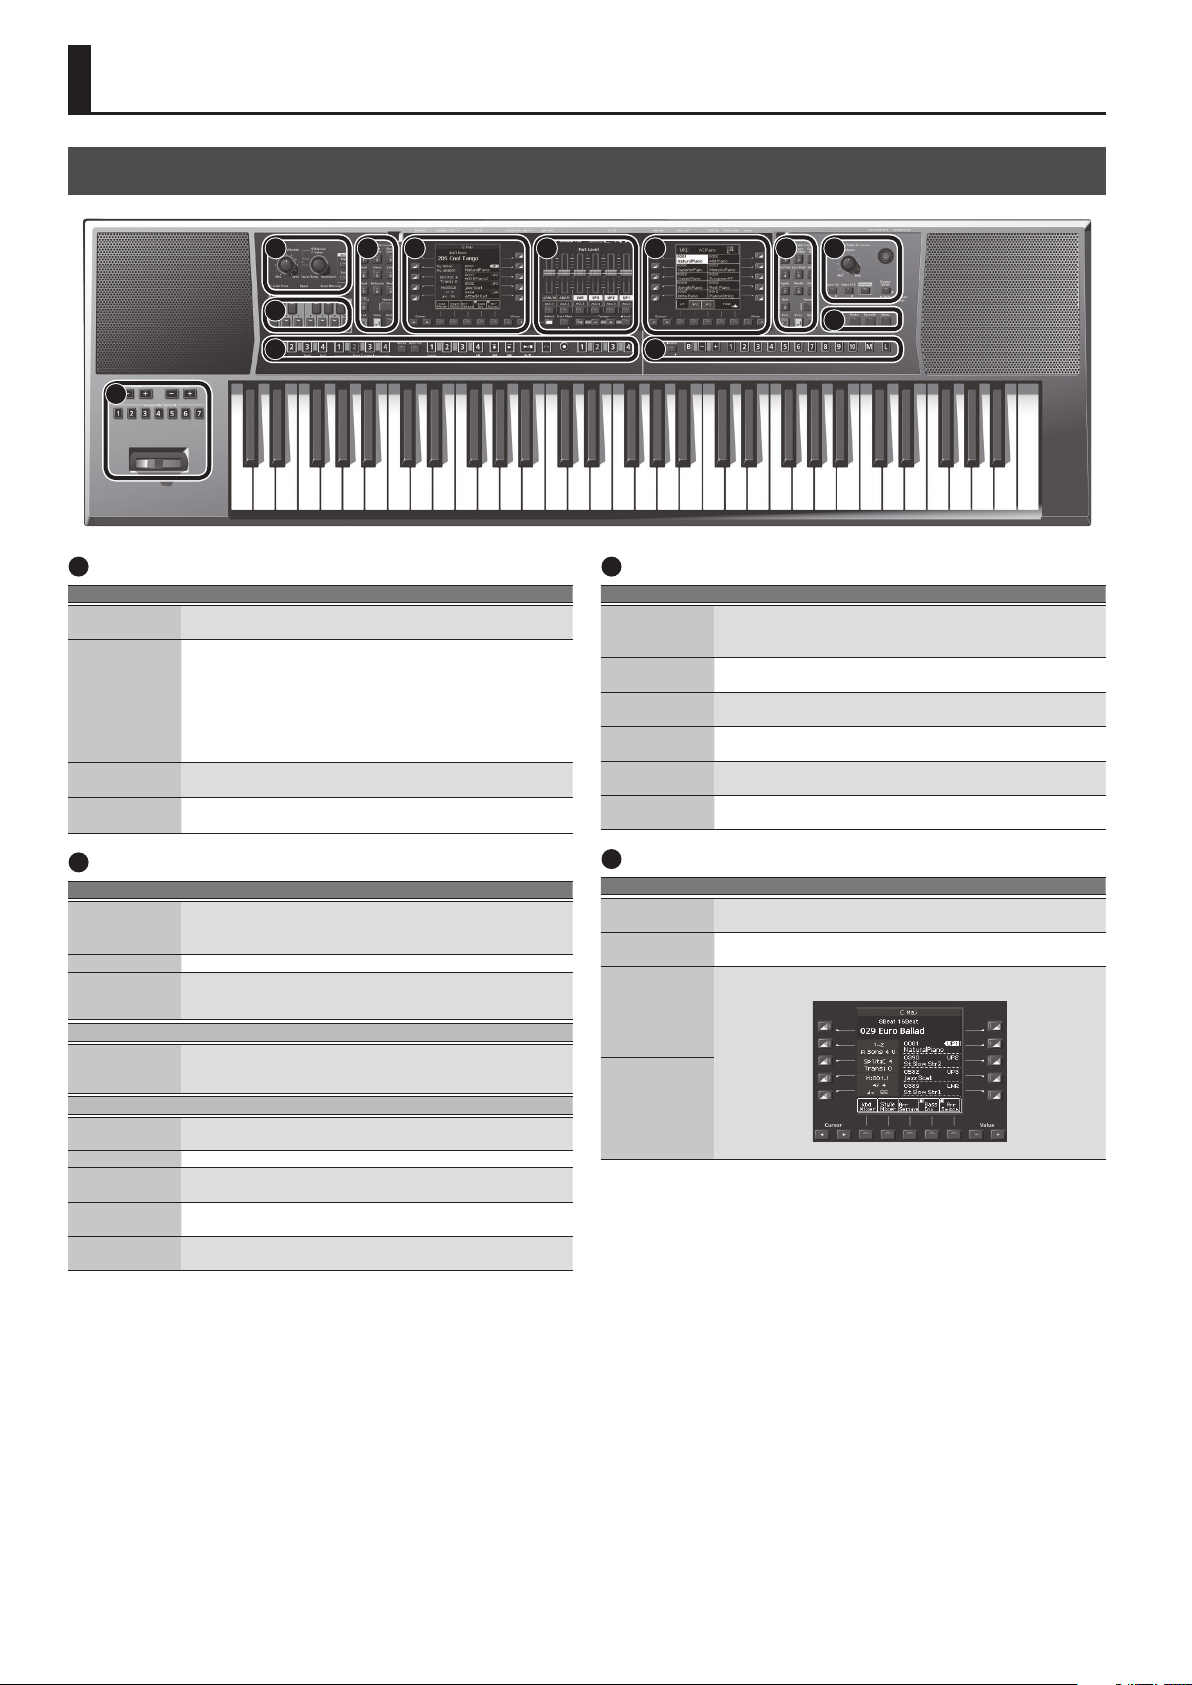
Panel Descriptions
1
Master Volume/ Balance
Controller Explanation
[Master Volume]
knob
Adjusts the overall volume (the sound that is output from the
speakers and the PHONES/OUTPUT jacks).
[Balance/Value]
knob
Press this knob to switch it between the Balance function (lit) and
the Value function (unlit).
Balance function (lit):
This knob adjusts the volume balance between your keyboard
performance and the backing performance (e.g., Style or Song).
Value function (unlit):
This knob edits the value in the right screen, left screen or tempo.
Mode [Style]
button
Selects Style mode.
If Style mode is selected, the button is lit (Style Mode).
Mode [Song]
button
Selects Song mode.
If Song mode is selected, the button is lit (Song Mode).
2
Scale Tune/Pad, Keyboard Buttons
Controller Explanation
[Scale Tune/Pad]
button
Switches the function of the keyboard buttons.
Scale Tune function (lit)
Pad function (unlit)
[Equal] button Sets the Scale Tune to equal temperament.
Scale Memory [
I ]–[III] buttons
Sets the Scale Tune to “Scale Memory I–III.”
* Long-press this button to save the Scale Tune settings that are specied
for the keyboard buttons.
Scale Tune (PDF)
Keyboard
buttons
You can use the keyboard buttons to edit the Scale Tuning as
desired.
* Long-press these buttons to access the Scale Tune edit screen.
Pad (p. 36)
Pad [1]–[6]
buttons
These play phrases or sound eects (p. 36).
Pad [Stop] button Stops the sound of all Pads.
Pad [View]
button
This lets you audition the phrases or sound eects that are
assigned to the pads.
Pad [Setting]
button
Accesses the setting screen for each pad.
Pad [Sync Start]
button
Turns on/o the setting (Sync Start) that makes the pads play in
synchronization with the start of a style or song.
3
Style
Controller Explanation
Style [0]–[9]
buttons
Use these buttons to select the Style category (p. 22).
When you press a button, the styles included in that category are
displayed.
Style [User]
button
Press this button to select the user styles.
Left side
[Numeric] button
After pressing this button, you can use the Style [0]–[9] buttons to
enter a numeric value (p. 14).
Left side [Exit]
button
Returns to the next higher level of screen (left screen).
* Long-press this button to return to the main screen.
Left side [Enter]
button
Use this button to conrm a value or execute an operation (left
screen).
Left side [Option]
button
Displays a context menu for the page that is currently open in the
left screen.
4
Left Display
Controller Explanation
Left side Cursor
[
K
] [
J
] buttons
Move the cursor position (left screen).
Left side Value [-]
[+] buttons
Edit the parameter value at the cursor location (left screen).
Left side direct
buttons ([L1]–
[L5] [R1]–[R5]
buttons)
These buttons are assigned to the items or functions shown in the
screen.
[L1]
[F1]
[R1]
[L2]
[F2]
[R2]
[L4]
[F4]
[R4]
[L3]
[F3]
[R3]
[L5]
[F5]
[R5]
Left side function
buttons ([F1]–
[F5] buttons)
Top Panel
6 7 8
9
10 11
12
4 1
2
5 3
For details on each functions, refer to “Reference Manual (English)” (PDF).
7
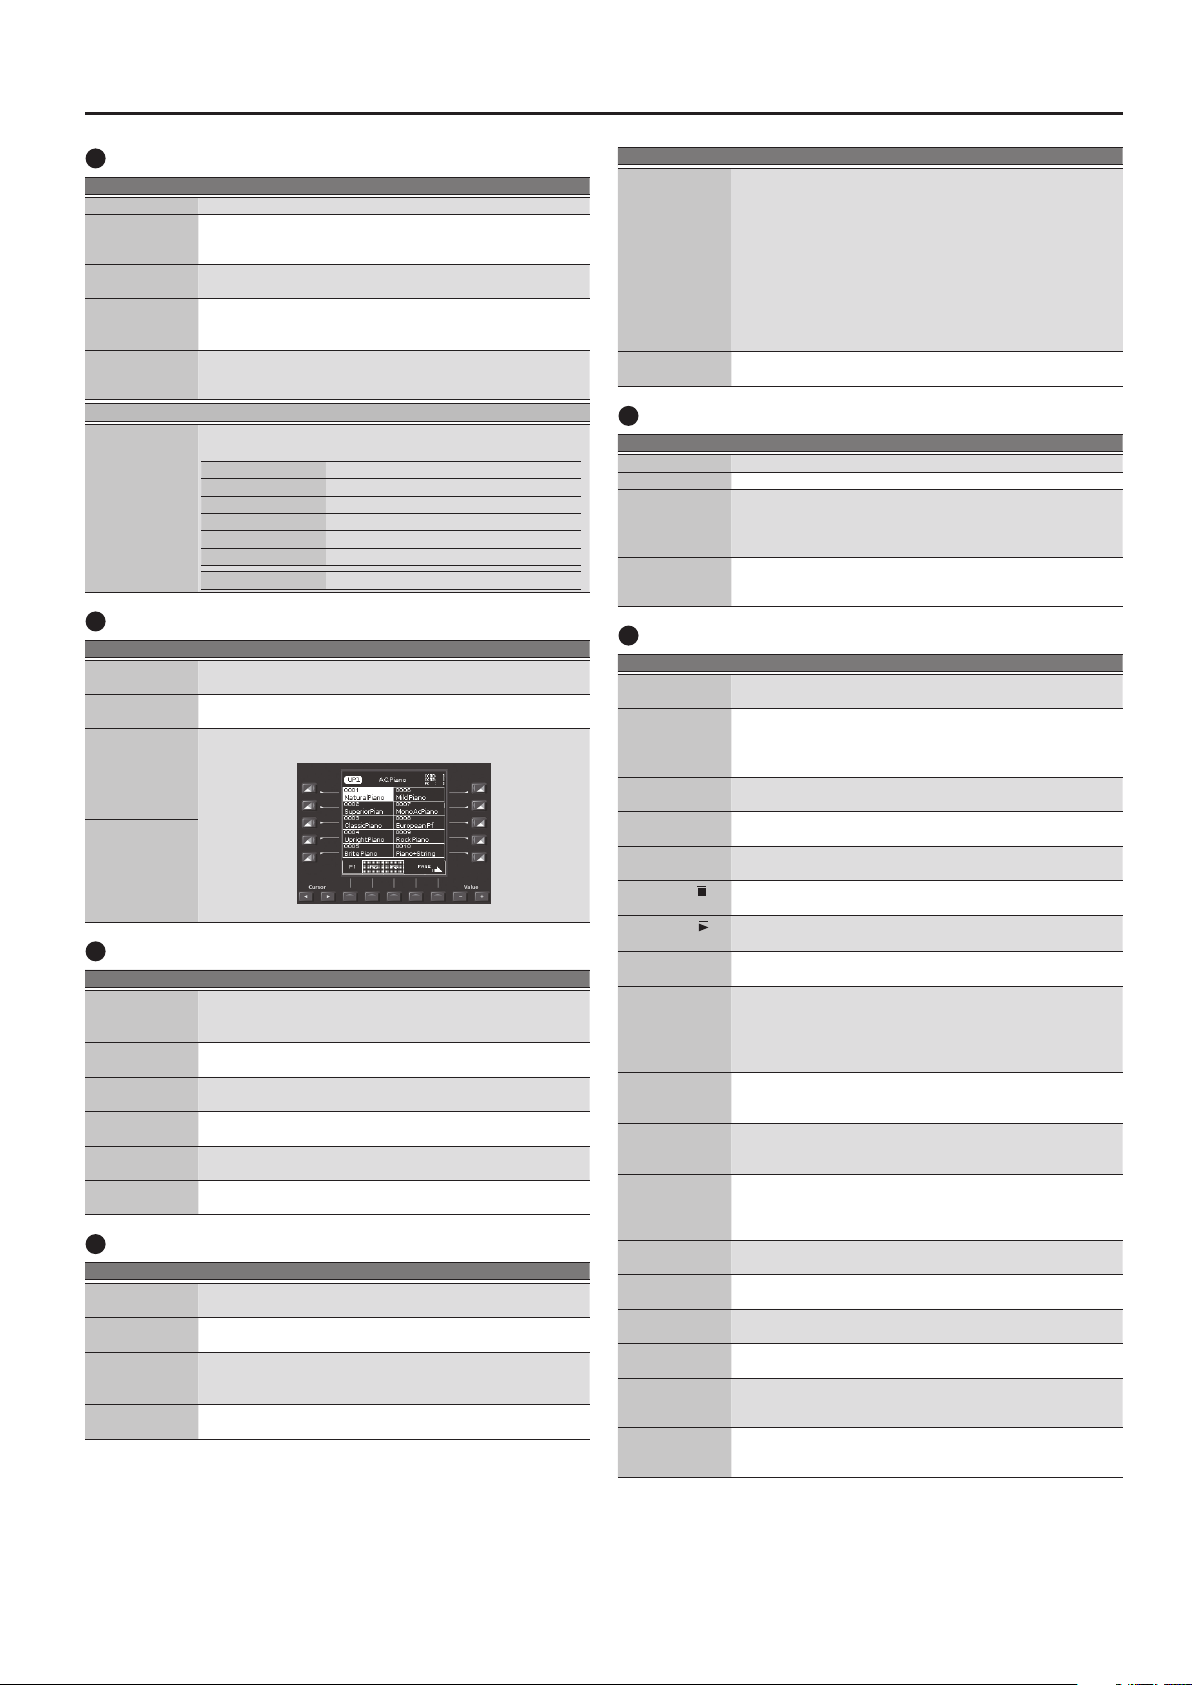
Panel Descriptions
5
Part Level
Controller Explanation
[Select] button Switches the function of the Part Level sliders and buttons.
[Track Mute]
button
Use this to mute specic tracks of the selected Style or song.
* Long-press this button to access a screen where you can select the mute
track of the SMF or Style.
Tempo [Tap ]
button
You can change the tempo of the current Style or song by
repeatedly pressing this button at the desired interval.
Tempo [-] [+]
buttons
Change the tempo of the currently selected Style or song.
If you press the two buttons simultaneously, the original tempo
specied for the Style or song is restored.
Tempo [Lock]
button
Press this button to lock the current tempo setting. The tempo
does not change even if you select another style (of a dierent
tempo).
Part Level
Part sliders/Part
buttons
Adjust the volume of the parts (Parts sliders).
Turn the parts on/o (Part buttons).
[A DRUM] Accompaniment drum part
[A BASS] Accompaniment bass part
[LWR] Lower part
[UP3] Upper 3 part
[UP2] Upper 2 part
[UP1] Upper 1 part
[ACC1]–[ACC6] Accompaniment part 1–6
6
Right Display
Controller Explanation
Right side Cursor
[
K
] [
J
] buttons
Move the cursor position (right screen).
Right side Value
[-] [+] buttons
Edit the parameter value at the cursor location (right screen).
Right side direct
buttons ([L1]–
[L5] [R1]–[R5]
buttons)
These buttons are assigned to the items or functions shown in the
screen.
[L1]
[F1]
[R1]
[L2]
[F2]
[R2]
[L4]
[F4]
[R4]
[L3]
[F3]
[R3]
[L5]
[F5]
[R5]
Right side
function buttons
([F1]–[F5]
buttons)
7
Tone
Controller Explanation
Tone [0]–[9]
buttons
Use these to select tones.
When you press a button, the tones in that category are shown
(p. 17).
Tone [User]
button
Use this to select User Tones (PDF).
Right side
[Numeric] button
After pressing this button, you can use the Tone [0]–[9] buttons to
enter a numeric value (p. 14).
Right side [Exit]
button
Returns to the previous screen (right screen).
* Long-press this button to return to the Main screen.
Right side [Enter]
button
Use this button to conrm a value or execute an operation (right
display).
Right side
[Option] button
Displays a context menu for the page that is currently open in the
right display.
8
Input/Sampling
Controller Explanation
Mic/Line In
[Volume] knob
Adjusts the volume of the signal being input to the INPUT jacks.
[Input On]
button
Turns on/o the signal from the INPUT jacks.
* Long-press this button to access a screen of input-related settings.
[Input EFX]
button
Turns on/o the eect that’s applied to the signal from the INPUT
jacks.
* Long-press this button to access a screen of input-related settings.
[Sampling]
button
Displays the sampling menu screen (p. 29).
Controller Explanation
[Output Mode]
button
Switches the acoustical character of the sound that is output from
the Phones jack/Output jacks and the E-A7’s speakers.
When the button is lit: Settings are optimized for the response of
the E-A7’s speakers.
When the button is unlit: The Mastering Tools function’s
Compressor and Equalizer settings will be
enabled. The factory settings (Type: Standard)
or the User settings are applied.
* The “Standard” compressor and equalizer type settings are optimal for
use when the Phones jack or Output jacks are connected to an external
speaker or PA system.
[
L
] (power)
button
Turns the power on (p. 12).
* Long-press this button to turn the power o (p. 12).
9
Menu/Utility
Controller Explanation
[Write] button Saves settings.
[Finder] button Use this button to search for a User Style or Song (p. 44).
[Favorite] button
Displays the Favorite screen.
Here you can recall Favorite tones (p. 20).
* To play the demo songs, hold down the [Menu] button and press the
[Favorite] button.
[Menu] button
Displays a menu screen.
* To play the demo songs, hold down the [Menu] button and press the
[Favorite] button.
10
Style/Song Control
Controller Explanation
Intro [1]–[4]
buttons
Use these to select the Style’s intro (Each Style can have up to four
dierent intros).
Variation [1]–[4]
buttons
Use these to select the Style’s variation (Each Style can have up to
four dierent variations).
You can use these when you want the arrangement of the
selected Style to be simpler or more complex.
[Break] button
Mutes the Style’s playback until the end of the currently-playing
measure.
[Auto Fill] button
Turns on the Auto Fill-in function. If this is on, a ll-in plays before
the new Style variation is played back.
Ending [1]–[4]
buttons
Select the Style’s ending (Each Style can have up to four endings).
Sync [Stop] (
)
button
If the Synchro Stop function is on, style playback will stop when
you play and release a single note or chord.
Sync [Start] (
)
button
If the Synchro Start function is on, Style playback starts when you
play a single note or chord.
[Start/Stop]
button
Plays/stops the Style.
If a song is selected, pressing this button plays or pauses the song.
[Fade In/Out]
button
If the Style is stopped, pressing this button starts the Style and
gradually raises the volume from 0 (Fade In).
If the Style is playing, pressing this button gradually lowers the
volume and then automatically stops the song or Style playback
when the volume reaches 0 (Fade Out).
[Loop Start]
button
If a song is selected, this button species the loop start point for
the loop play function. If the loop point is already specied, this
button turns loop play on/o (p. 40).
[Loop End]
button
If a song is selected, this button species the loop end point for
the loop play function. If the loop point is already specied, this
button clears the loop point.
Mark & Jump [1]–
[4] buttons
When playing an SMF in which marks have been assigned, these
buttons jump to the assigned playback point (p. 40).
* If you long-press one of these buttons, the Mark & Jump function setting
screen appears.
[Center Cancel]
button
Minimizes the vocal or other sound that is panned to the center of
an audio le (WAV or MP3).
Song Player [
u
]
button
Returns the playback position to the beginning of the song.
Song Player [
x
]
button
Rewinds the song.
Song Player [
y
]
button
Fast-forwards the song.
[Rec] button
Records a style or song (audio).
* In the record-ready condition (indicator blinking), long-pressing this
button cancels record-ready.
One Touch [1]–[4]
buttons
Use these buttons to recall One Touch memories (p. 26).
* You can long-press one of these buttons to access a screen where you can
edit and save One Touch memories.
8
Panel Descriptions
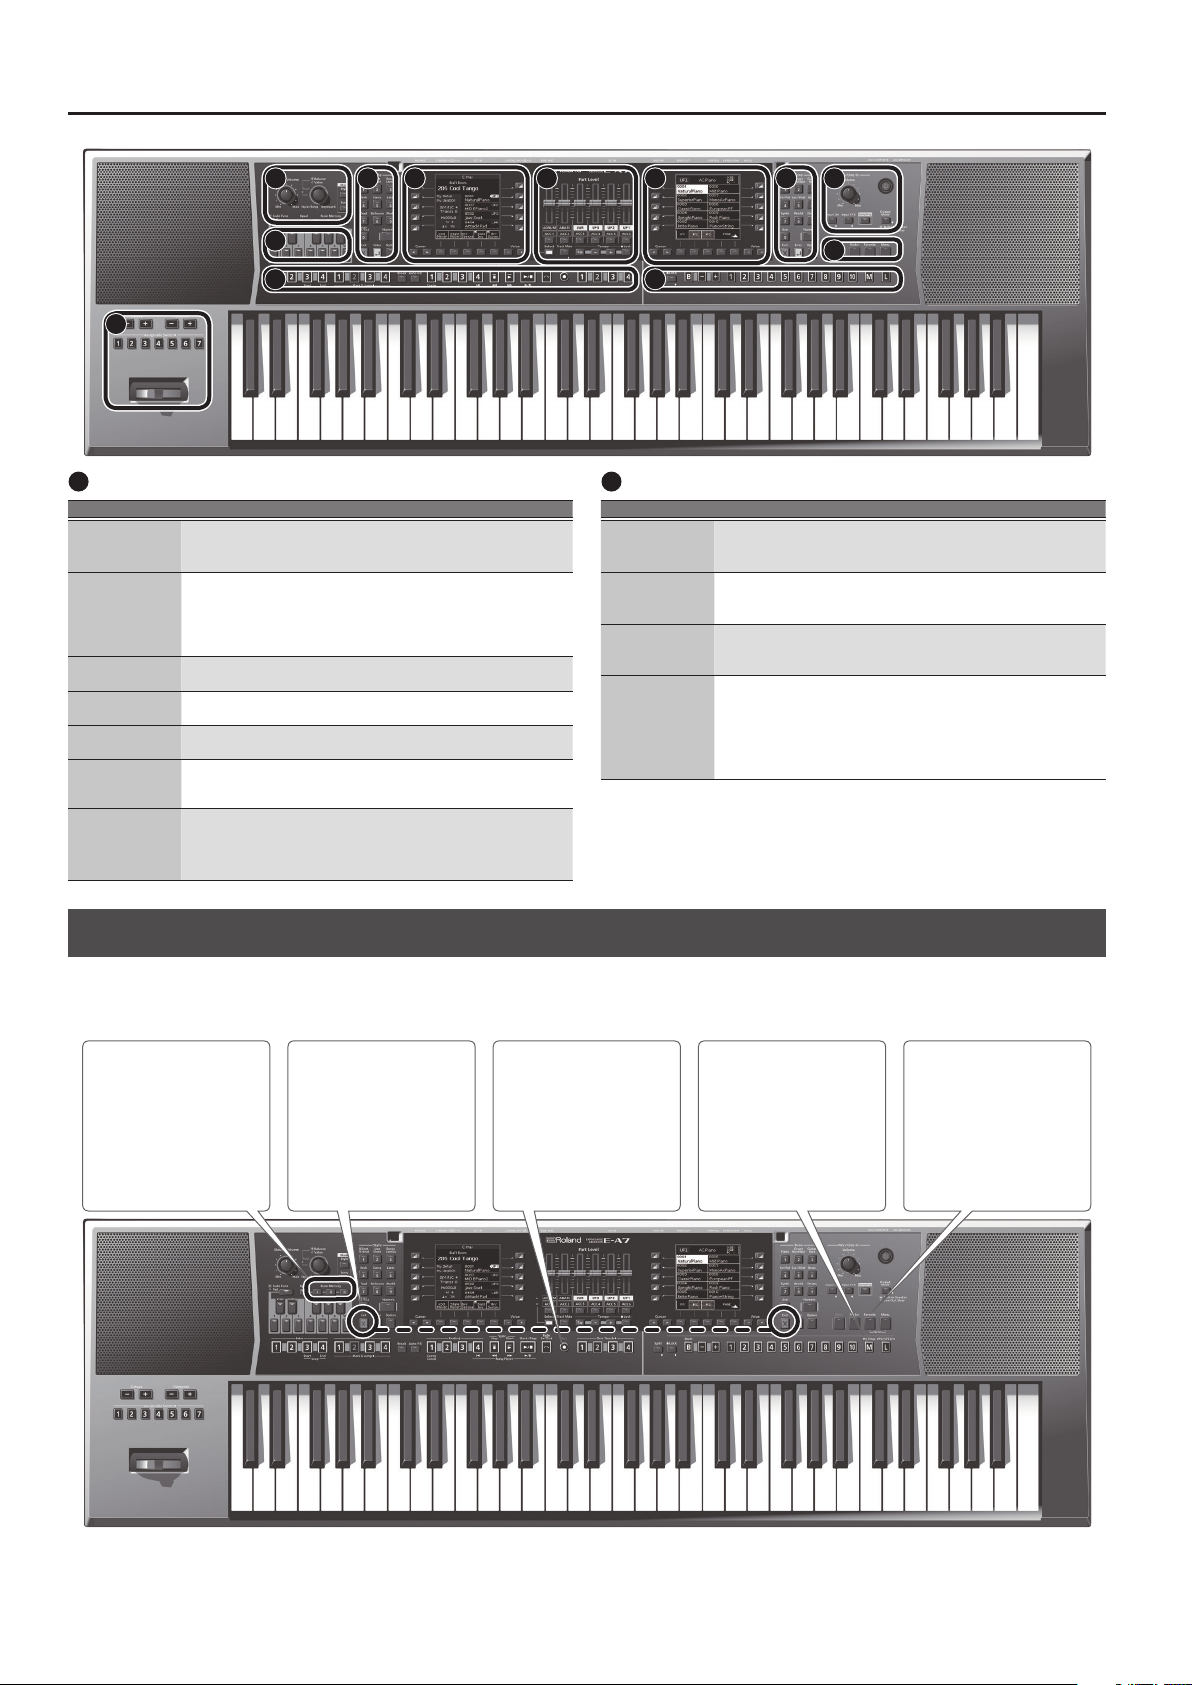
11
User Program
Controller Explanation
[Split] button
Divides the keyboard into left and right, allowing you to play
dierent tones in each region (p. 18).
* If you long-press this button, the split setting screen appears.
UPG [Lock]
button
Allows you to prevent settings from changing (lock) when you
switch user programs.
&
“Locking the UPG Settings” (p. 48)
* If you long-press this button, the User Program Lock setting screen
appears.
UPG Bank [B]
button
Press this button if you want to use User Program [1]–[10] buttons
to specify the bank.
UPG Bank [-] [+]
buttons
Switch the user program bank.
UPG [1]–[10]
buttons
Switch the user program.
My Setup [M]
button
Switches to My Setup (p. 46).
* If you long-press this button, the Write screen appears, allowing you to
save the current settings in My Setup.
UPG/UPS List [
L
]
button
Displays the UPS list or UPG list.
The UPS or UPG list switches each time you press this button.
* User Programs are abbreviated as UPG.
* User Program Sets are abbreviated as UPS.
12
Octave/Transpose/Assignable
Controller Explanation
Octave [-] [+]
buttons
Shift the pitch of the keyboard part in units of one octave (p. 19).
Press these two buttons simultaneously to return to the original
octave settings.
Transpose [-] [+]
buttons
Transpose the Style, song, and keyboard parts.
Press these two buttons simultaneously to return the transpose
setting to 0.
Assignable
Switch [1]–[7]
buttons
These buttons perform the functions that you’ve assigned.
* If you long-press one of these buttons, the assignable settings screen
appears, allowing you to assign various functions to the buttons.
Assignable lever
With the factory settings, moving the lever to the left while you
play the keyboard lowers the pitch, and moving the lever to the
right raises the pitch. Moving the lever away from yourself applies
vibrato.
A variety of functions can be assigned to this lever as well.
&
[Menu]
0
“Global”
Shortcut
You can also long-press any panel button marked with a diamond symbol (
;
) to jump to the corresponding parameter screen for that button.
You can also reach the parameter screen via the menu.
As noted below, you can access a save screen or other screen by long-pressing certain buttons.
Long-press [Exit] button
If a screen within the menu
hierarchy is displayed, takes
you back to the main screen.
The right [Exit] button does
the same.
Long-press [My Setup]
button
Displays the My Setup save
screen.
Long-press [Favorite]
button
Displays the Favorite save
screen.
Long-press Scale Memory
[ I ]–[III] buttons
Saves the current scale tune
state in a Scale Memory
[ I ]–[III].
Long-press [Rec] button
If you long-press this button
while in the record-ready
state (indicator blinking),
record-ready is canceled. (If
you decide not to record, you
can use this button to cancel.)
6 7 8
9
10 11
12
4 1
2
5 3
9
Panel Descriptions
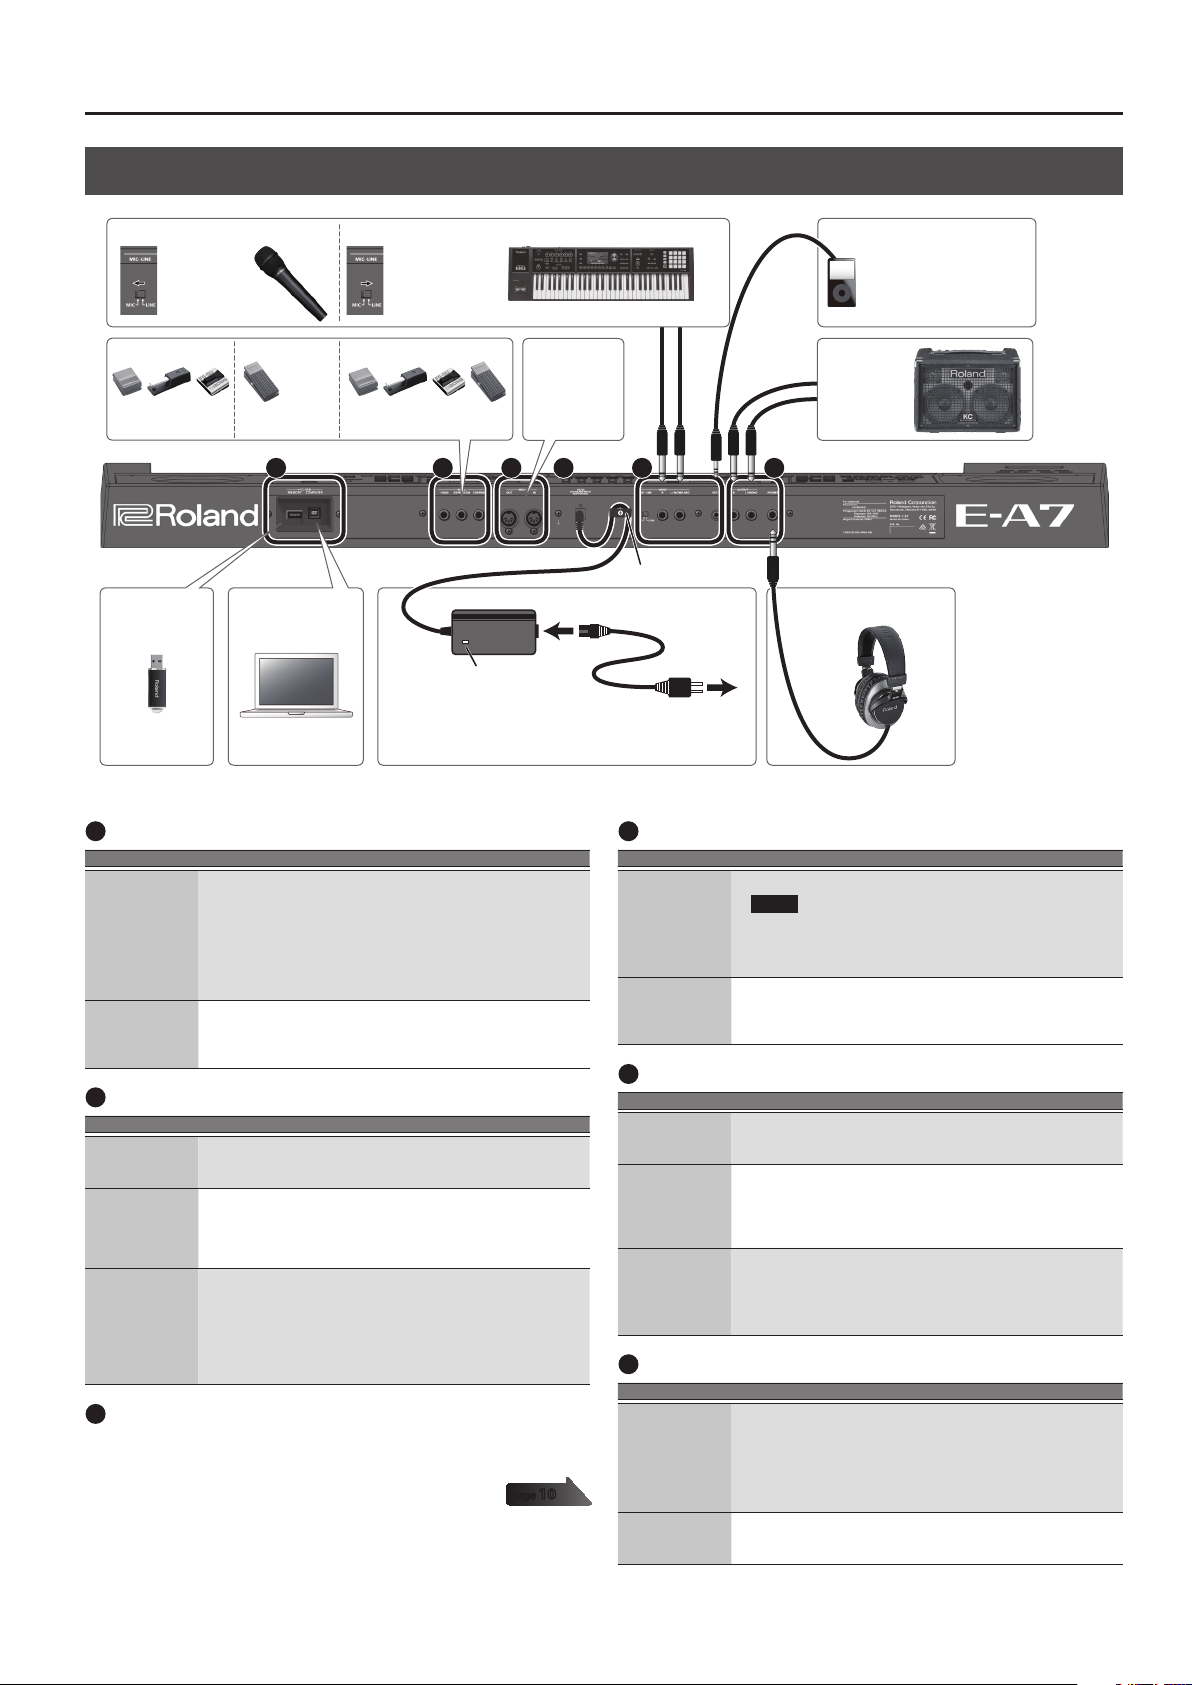
Rear Panel
A B C D E F
* To prevent malfunction and equipment failure, always turn down the volume, and turn o all the units before making any connections.
Headphones
* Place the AC adaptor so the side with the indicator (see illustration)
faces upwards and the side with textual information faces downwards.
The indicator will light when you plug the AC adaptor into an AC
outlet.
AC adaptor
Indicator
Power Cord
AC Outlet
Connect MIDI
equipment
(p. 10).
Use a stereo mini-plug to
connect an audio player
or similar device.
Connect an
amplied
speaker.
Cord hook
ComputerUSB ash drive
Option: EV-5
EXPRESSION
Option: DP series,
BOSS FS-5U, EV-5
CONTROL
Option: DP series,
BOSS FS-5U
HOLD
If connecting a microphone
Set the MIC-
LINE select
switch to MIC.
If connecting an audio device, synthesizer, or similar device
Set the MIC-LINE
select switch to
LINE.
A
USB port
Jack Explanation
USB MEMORY
port
Connect a USB ash drive (separately sold) for use as external
storage.
* Carefully insert the USB ash drives all the way in—until it is rmly in
place.
* Use a USB ash drive sold by Roland. We cannot guarantee operation if
any other USB ash drive is used.
* We do not recommend using a USB hub, regardless of whether it is an
active or a passive hub. Connect only one USB ash drive to this port.
USB COMPUTER
port
If you use a commercially available USB cable to connect the
E-A7’s USB COMPUTER por t to a USB port on your computer, you’ll
be able to produce and edit music using the E-A7 in conjunction
with MIDI-enabled software.
B
Foot Pedal jack
Jack Explanation
Pedal HOLD jack
If a separately sold pedal switch (Roland DP series) is connected to
this jack, you can use it to sustain the sound of the keyboard part.
This function is called “sustain” or “damper.”
Pedal
EXPRESSION jack
Connect a separately sold expression pedal (Roland EV-5) to this
jack.
* Use only the specied expression pedal (EV-5; sold separately). By
connecting any other expression pedals, you risk causing malfunction
and/or damage to the unit.
Pedal CONTROL
jack
Connect a separately sold pedal switch (Roland DP series) or
separately sold expression pedal (Roland EV-5) to this jack.
You can assign a function suitable for the pedal that’s connected.
&
“Reference Manual” (PDF)
* Use only the specied expression pedal (EV-5; sold separately). By
connecting any other expression pedals, you risk causing malfunction
and/or damage to the unit.
C
MIDI port
These connectors can be connected to other MIDI devices to receive and
transmit MIDI messages.
D
DC IN jack
Jack Explanation
DC IN jack
Connect the included AC adaptor here.
NOTE
5 Use only the AC adaptor that is included with the product.
5 If you won’t be using the E-A7 for an extended period of time,
disconnect the AC adaptor from the AC outlet.
Cord hook
To prevent the inadvertent disruption of power to your unit
(should the plug be pulled out accidentally), and to avoid
applying undue stress to the jack, anchor the power cord using
the cord hook, as shown in the illustration.
E
INPUT jack
Jack Explanation
MIC-LINE select
switch
Set this switch to the appropriate position depending on whether
you connect a microphone (MIC) or a line-level device such as an
instrument (LINE).
INPUT
L/MONO, MIC,
R jacks
Connect a microphone, or the outputs of your audio equipment,
synthesizer, or similar device.
* If you connect a microphone, connect it to the L/MONO, MIC jack.
Condenser microphones are not supported.
* If you want to input in monaural, connect to the L/MONO, MIC jack.
EXT IN jack
This is an audio input jack. If you use a stereo mini-plug to connect
your audio player or similar device, the sound of the connected
device is heard from the E-A7.
* Eects are not applied to the sound that is input from the EXT IN jack.
* Adjust the volume on the connected device (e.g., audio player).
F
Output jack
Jack Explanation
OUTPUT L/
MONO, R jacks
Connect speakers.
5 If you want to output in monaural, connect your system to the
L/MONO jack.
5 If you’ve connected the output jacks to external speakers or a
PA system, we recommend that you leave the [Output Mode]
button o (button unlit).
PHONES jack
Connect separately sold headphones (Roland RH series).
If a cable is connected to this jack, the internal speakers are
automatically muted.
page
10
10
Connecting Your Equipment
Connecting External Audio Equipment
The E-A7 is equipped with two types of input jack: the INPUT jacks
and the EXT IN jack. Use whichever is suitable for your needs.
Jack Explanation
INPUT jacks
Eects such as reverb can be applied to the audio input.
Use this jack if you want to sing along with your performance,
or record a sample.
EXT IN jack
The audio input of this jack is output without change from
the OUTPUT jacks or the speakers. It is not possible to apply
eects or adjust the volume.
Use this jack if you want to perform while playing back an
audio player.
NOTE
To prevent malfunction and equipment failure, always turn
down the volume, and turn o all the units before making any
connections.
Connecting a Microphone or External Audio
Device to the INPUT Jacks
Connect your microphone or device (e.g., synthesizer) to the INPUT
jacks.
You can sample the audio from these external audio inputs.
1. Turn the [Mic/Line In] knob all the way to the left,
minimizing the volume.
2. Connect your microphone or the outputs of your audio
device (e.g., synthesizer) to the E-A7’s INPUT jacks.
3. Set the INPUT-MIC select switch to MIC if connecting a
microphone, or to LINE if connecting a synthesizer or
other audio device.
4. Press the [Input On] button to make it light; the input
turns on.
5. Turn the [Mic/Line In] knob to adjust the input level.
6. If you want to apply an eect such as reverb to the
audio input, press the [Input EFX] button to turn Input
EFX on.
MEMO
5 If you long-press the [Input EFX] button, the Input EFX screen
appears, allowing you to make settings for Input EFX.
For more about the input eects, refer to “Reference Manual”
(PDF).
5 If you connect a mic, connect it to the L/MONO, MIC jack.
Condenser microphones are not supported.
Connecting an External Audio Device to the EXT
IN Jack
You can connect an audio player or similar device to the EXT IN jack.
1. Minimize the volume of your external audio device.
2. Connect your audio player to the E-A7’s EXT IN jack.
3. Adjust the volume using the controls of the connected
audio device.
NOTE
5 The sound that’s input from this jack cannot be sampled.
5 Noise may occur if you connect or disconnect a cable at the
EXT IN jack while the E-A7 is powered-on, but this is not a
malfunction.
Connecting MIDI Equipment
If MIDI equipment is connected, it can exchange performance
information with the E-A7.
What is MIDI?
MIDI, short for “Musical Instrument Digital Interface,” was developed
as a universal standard for the exchange of performance data among
electronic musical instruments and computers.
The E-A7 is equipped with MIDI connectors to let it exchange
performance data with external devices. These connectors can be used to
connect the unit to an external device for even greater versatility.
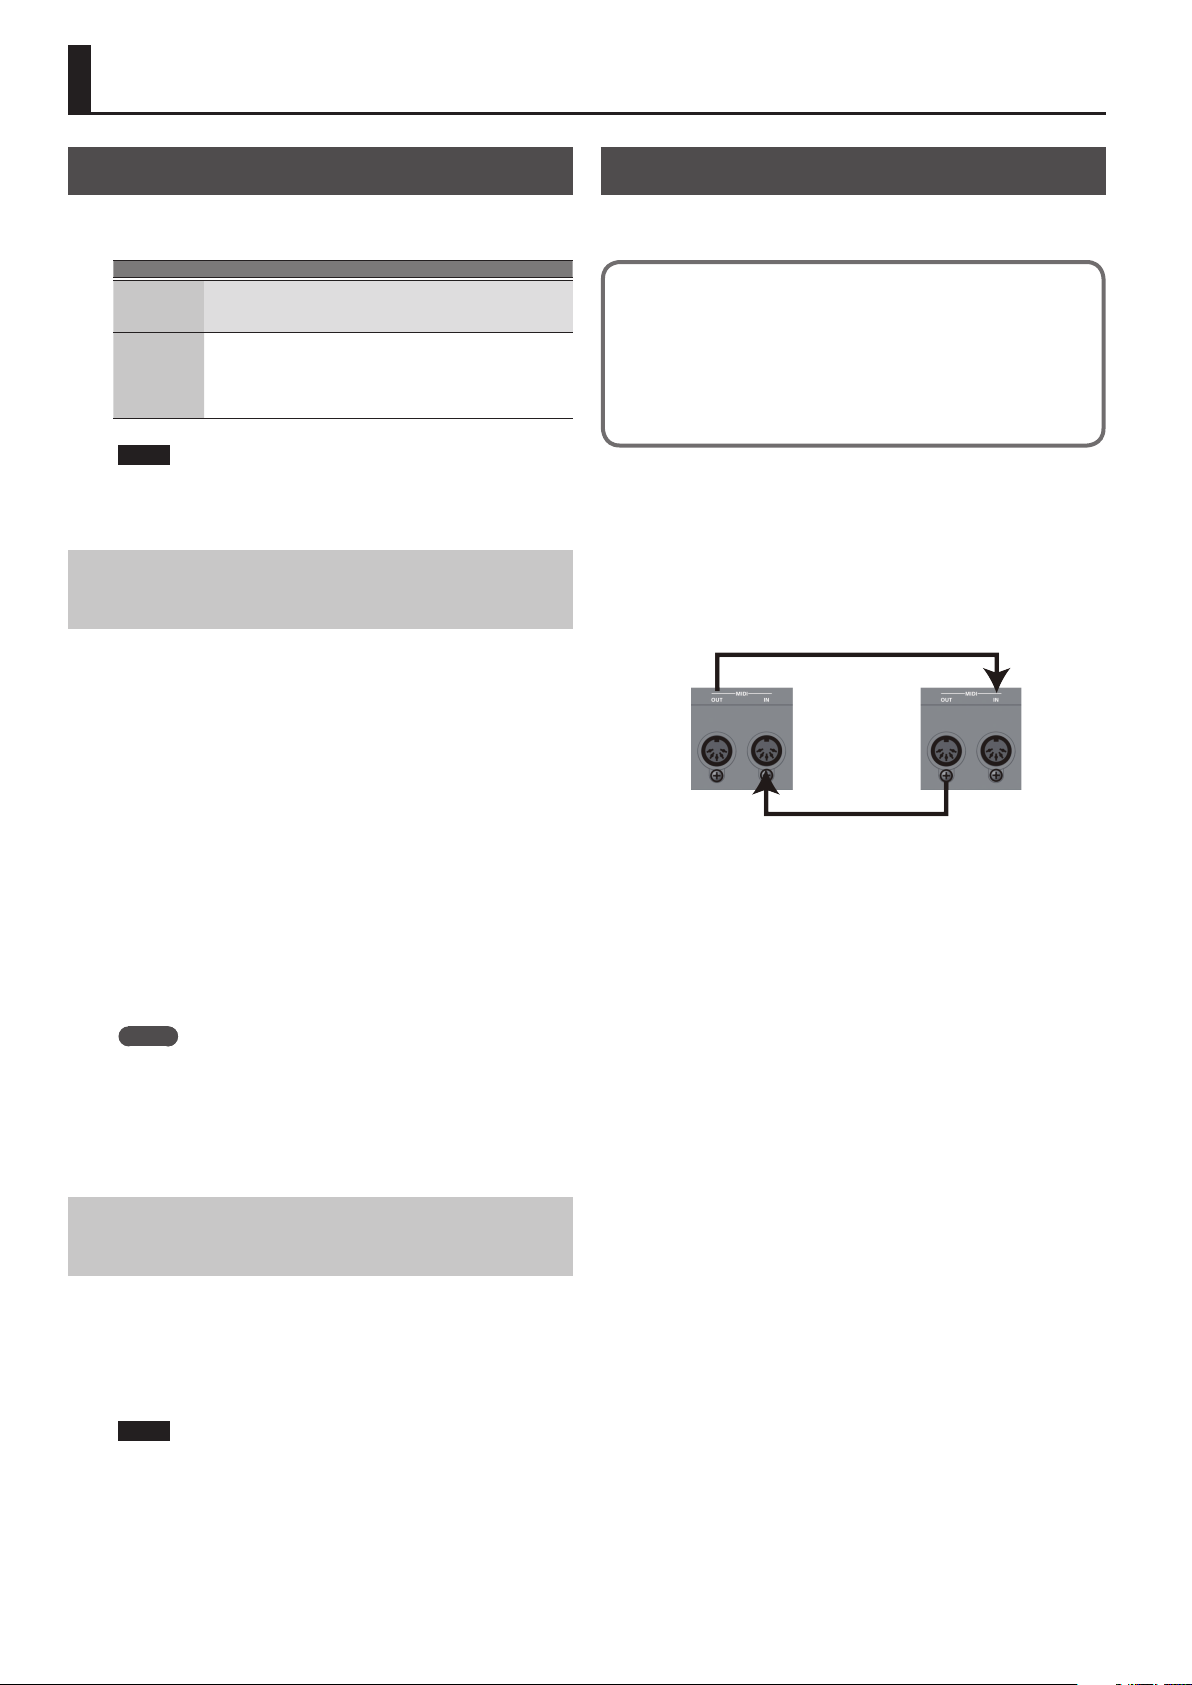
Connection example
If you use a MIDI cable to connect the E-A7’s MIDI OUT connector to
the MIDI IN connector of your external MIDI device, you’ll be able to
produce sound on your external MIDI device by playing the E-A7’s
keyboard. As necessary, set the receive channel of your external MIDI
device to match the E-A7’s transmit channel.
E-A7
MIDI sound module /
sequencer
The MIDI sequencer plays the sounds of the E-A7.
Use the E-A7 to play the MIDI sound module.
MIDI channels
MIDI uses sixteen channels: 1–16. Even if two MIDI devices are
connected, they won’t be able to select or play each other’s sounds if
the two devices are set to dierent MIDI channels.
The E-A7 can receive all channels 1 through 16.
&
For details on MIDI settings, refer to “Reference Manual
(English)” (PDF).
11
Connecting Your Equipment
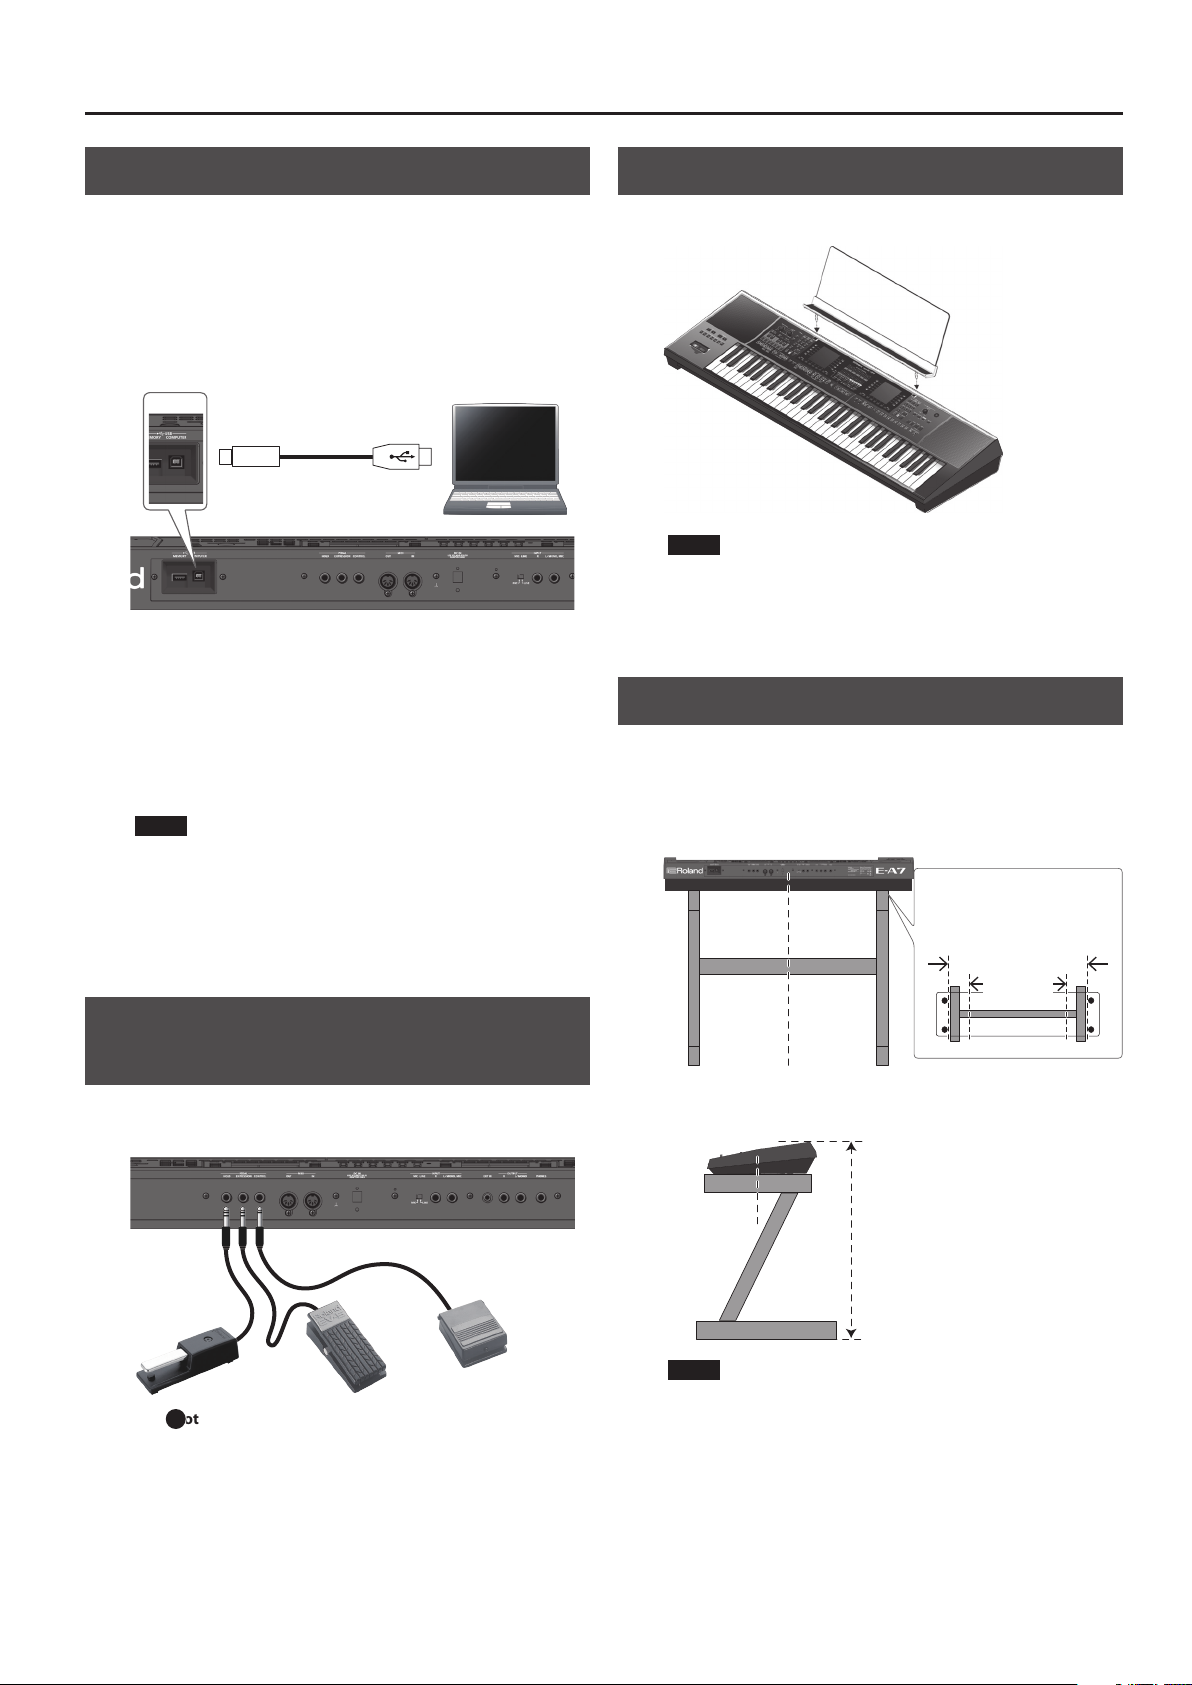
Connecting the E-A7 to a Computer
If a USB cable (sold separately) is connected between the E-A7’s rear
panel USB COMPUTER port and a USB port of your computer, you’ll
be able to do the following things.
5 Use the E-A7 as a sound module.
5 Produce and edit music by transferring MIDI data between the E-A7
and your sequencer.
1. Use a standard USB cable (sold separately: A
0
B type
cable) to connect the E-A7 to your computer.
If the computer does not recognize the E-A7
When connecting the E-A7 to your computer, there is normally no
need to install a driver. If you experience problems, or if the speed is
too slow, you may be able to solve the problem by installing Roland’s
dedicated driver.
For details on downloading and installing the dedicated driver, refer
to the Roland website.
http://www.roland.com/support/
NOTE
5 Only MIDI data is transmitted and received via the USB cable.
The audio data cannot be transmitted or received via USB.
5 Power-on the E-A7 before you start the MIDI application on
your computer. Never power-on or power-o the E-A7 while
the MIDI application is running.
&
For details on USB settings, refer to “Reference Manual
(English)” (PDF).
Connecting a Separately Sold Footswitch
or Hold Pedal
You can connect a pedal switch (sold separately: DP series) or
expression pedal (sold separately: EV-5) to the E-A7’s PEDAL jacks.
&
“ Foot Pedal jack” (p. 9)
Installing the Music Rest
1. Install the music rest as shown in the illustration.
NOTE
5 When moving the E-A7, be sure to remove the music rest as a
safety precaution.
5 Do not apply excessive force to the music rest.
5 The music rest is not designed to accept the placement of
laptops or other heavy objects.
Placing the E-A7 on a Stand
If you want to place the E-A7 on a stand, use the Roland KS-18Z.
Be careful not to pinch your ngers when setting up the stand.
Place the instrument on the stand as follows.
Rear view
Place the E-A7
so that it is in
the center of
the stand
Adjust the outer width of the stand
within the range shown below.
800 mm–between the rubber feet
of the E-A7
Top view
Between the rubber feet
800 mm or
more
Side view
Place the E-A7
so that it is in
the center of
the stand
Adjust so that the height does not
exceed 1 meter (Adjust the stand
to a level no higher than the third
level from the bottom).
NOTE
5 When placing the E-A7 on a stand, take care not to pinch your
ngers between the instrument and the stand.
5 Using any other combination of instrument and stand
could produce an unstable situation, possibly causing the
instrument to fall or tip over and cause injury.
5 If the instrument is not placed correctly, it will be unstable,
possibly causing the instrument to fall or tip over and cause
injury.
5 For details on assembling the stand, refer to the owner’s
manual of the stand.
B
12
Before You Start Using E-A7
Turning On/O the Power
Once everything is properly connected (p. 9), be sure to follow the
procedure below to turn on their power. If you turn on equipment in
the wrong order, you risk causing malfunction or equipment failure.
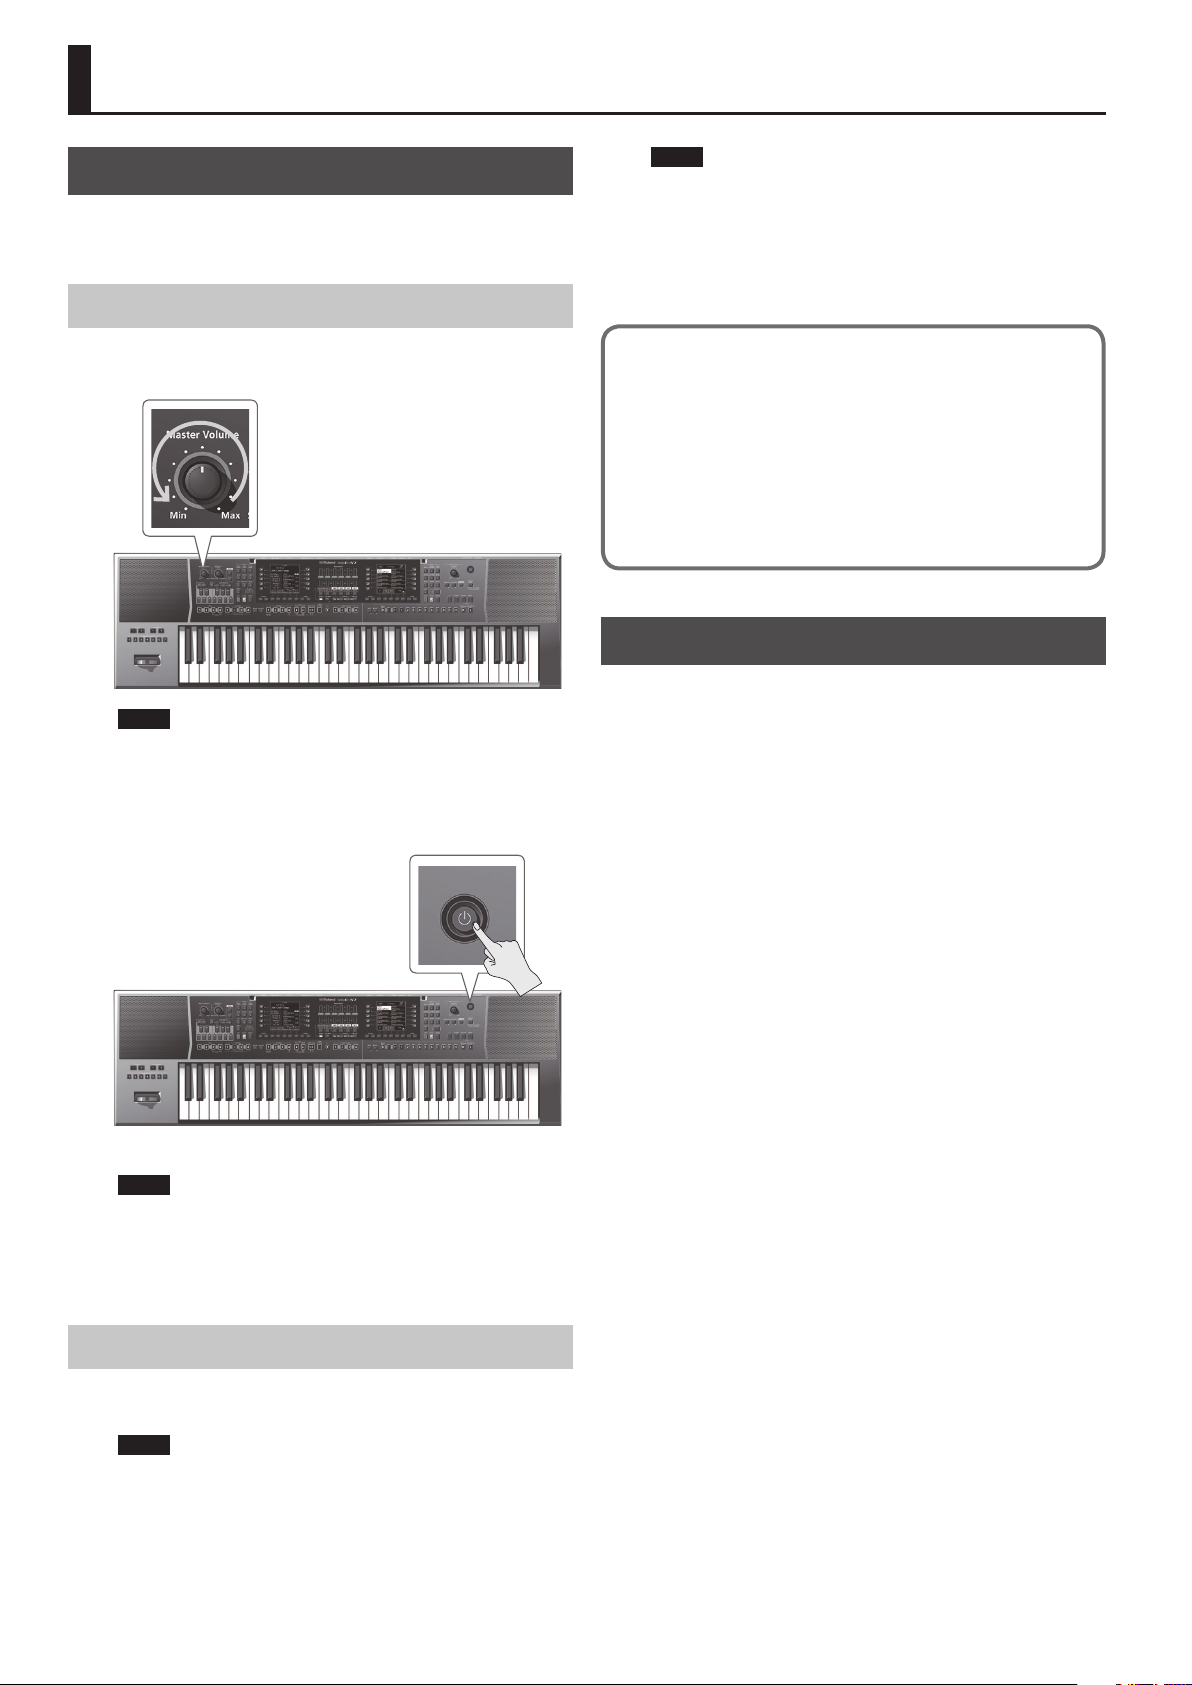
Turning On the Power
1. Turn the [Master Volume] knob all the way to the left,
minimizing the volume.
NOTE
Before turning the unit on/o, always be sure to turn the volume
down. Even with the volume turned down, you might hear some
sound when switching the unit on/o. However, this is normal
and does not indicate a malfunction.
2. Press the [
L
] (power) switch to turn on the power.
3. Use the [Master Volume] knob to adjust the volume.
NOTE
5 This unit is equipped with a protection circuit. A brief interval (a
few seconds) after turning the unit on is required before it will
operate normally.
5 To ensure proper operation of the assignable lever, make sure not
to touch the lever when turning the E-A7’s power on.
Turning O the Power
1. Turn the [Master Volume] knob all the way to the left,
minimizing the volume.
NOTE
Never power-o the E-A7 during playback or recording or while
data is being read or written on a USB ash drive.
2. Continue holding down the [
L
] button until the screen
indicates “POWER OFF.”
Release the button, and the power turns o.
NOTE
5 When you turn o the power of the E-A7, the contents of the
loaded (currently edited) UPS (User Program Set) are lost. Save
any important data before you turn o the power.
5 If you need to turn o the power completely, press the [
L
]
(power) switch; after the unit’s power switch has been turned
o, disconnect the plug from the AC outlet.
If you don’t want the power to turn o automatically,
change the “ Auto O ” setting to “O ”
The power to this unit will be turned o automatically after a predetermined
amount of time has passed since it was last used for playing music, or its
buttons or controls were operated (Auto O function).
If you do not want the power to be turned o automatically, disengage the
Auto O function (p. 13).
* Any settings that you are in the process of editing will be lost when the power is turned
o. If you have any settings that you want to keep, you should save them beforehand.
* To restore power, turn the power on again.
Adjusting the Overall Volume
Here’s how to adjust the volume of your keyboard playing or the
playback volume of an internal song.
If headphones are connected, use the [Master Volume] knob to
adjust the headphone volume.
1. Turn the [Master Volume] knob to adjust the overall
volume.
Adjust the volume while you play the keyboard to produce sound.
Turning the knob toward the right will increase the volume, and
turning it toward the left will decrease the volume.

13
Before You Start Using E-A7
Optimizing the Acoustic Character for the
Internal Speakers
If you turn on the [Output Mode] button, the output sound is
adjusted optimally for the response of the E-A7’s built-in speakers.
1. Press the [Output Mode] button to make it light.
MEMO
You can specify whether the [Output Mode] button will be on or
o when the E-A7 starts.
&
“Reference Manual” (PDF)
2. To turn the [Output Mode] button o, press the [Output
Mode] button once again (the button goes dark).
The Mastering Tools’ Equalizer and Compressor settings will be
enabled.
MEMO
With the factory settings, Mastering Tools’ Type is set to
“Standard.” The Type “Standard” settings are optimal when
connecting the Phones/Output jacks to external speakers or a PA
system.
You can also change the settings that are used when the [Output
Mode] button is o.
&
“Reference Manual” (PDF)
0
“Mastering Tools Function”
Demo of the E-A7
Your E-A7 contains a demo that introduces all of its highlights. It
might be a good idea to try it out now. The demo is self-explanatory,
so we’ll just show you how to start and stop it.
1. Press the [Favorite] button and [Menu] button
simultaneously.
Playback starts automatically with the demo song.
2. Press the [Exit] button to leave the demo function.
NOTE
5 No data for the music that is played will be output from the
MIDI OUT connector and the USB COMPUTER port.
5 All rights reserved. Unauthorized use of this material for
purposes other than private, personal enjoyment is a violation
of applicable laws.
Making the Power Automatically Turn O
After a Time (Auto O)
The power to this unit will be turned o automatically after a
predetermined amount of time has passed since it was last used
for playing music, or its buttons or controls were operated (factory
setting).
If you don’t need the power to turn o automatically, set “Auto O”
to the “OFF” setting as described below.
1. Press the [Menu] button to make it light.
The Menu screen appears.
2. Use the direct buttons to select “Global.”
3. Use the function buttons to move the pages.
4. Use the direct buttons to select “Auto O.”
5. Use the Value [-] [+] buttons to select “OFF.”
6. Press the [Exit] button to return to the previous screen.
MEMO
The settings are automatically saved in the Global parameters
when you exit the screen.
14
Basic Operation of the E-A7
Basic Screens
In keeping with its emphasis on smooth realtime operability during
live performance, the E-A7 features dual displays in the left and right
sides of the panel. The left display shows style-related information,
and the right display shows mainly tone-related information.
This means that even if you are switching styles in the left
destination while switching tones in the right destination, you won’t
need to switch screens within a display.
* The explanations in this manual include illustrations that depict
what should typically be shown by the display. Note, however,
that your unit may incorporate a newer, enhanced version of the
system (e.g., includes newer sounds), so what you actually see in
the display may not always match what appears in the manual.
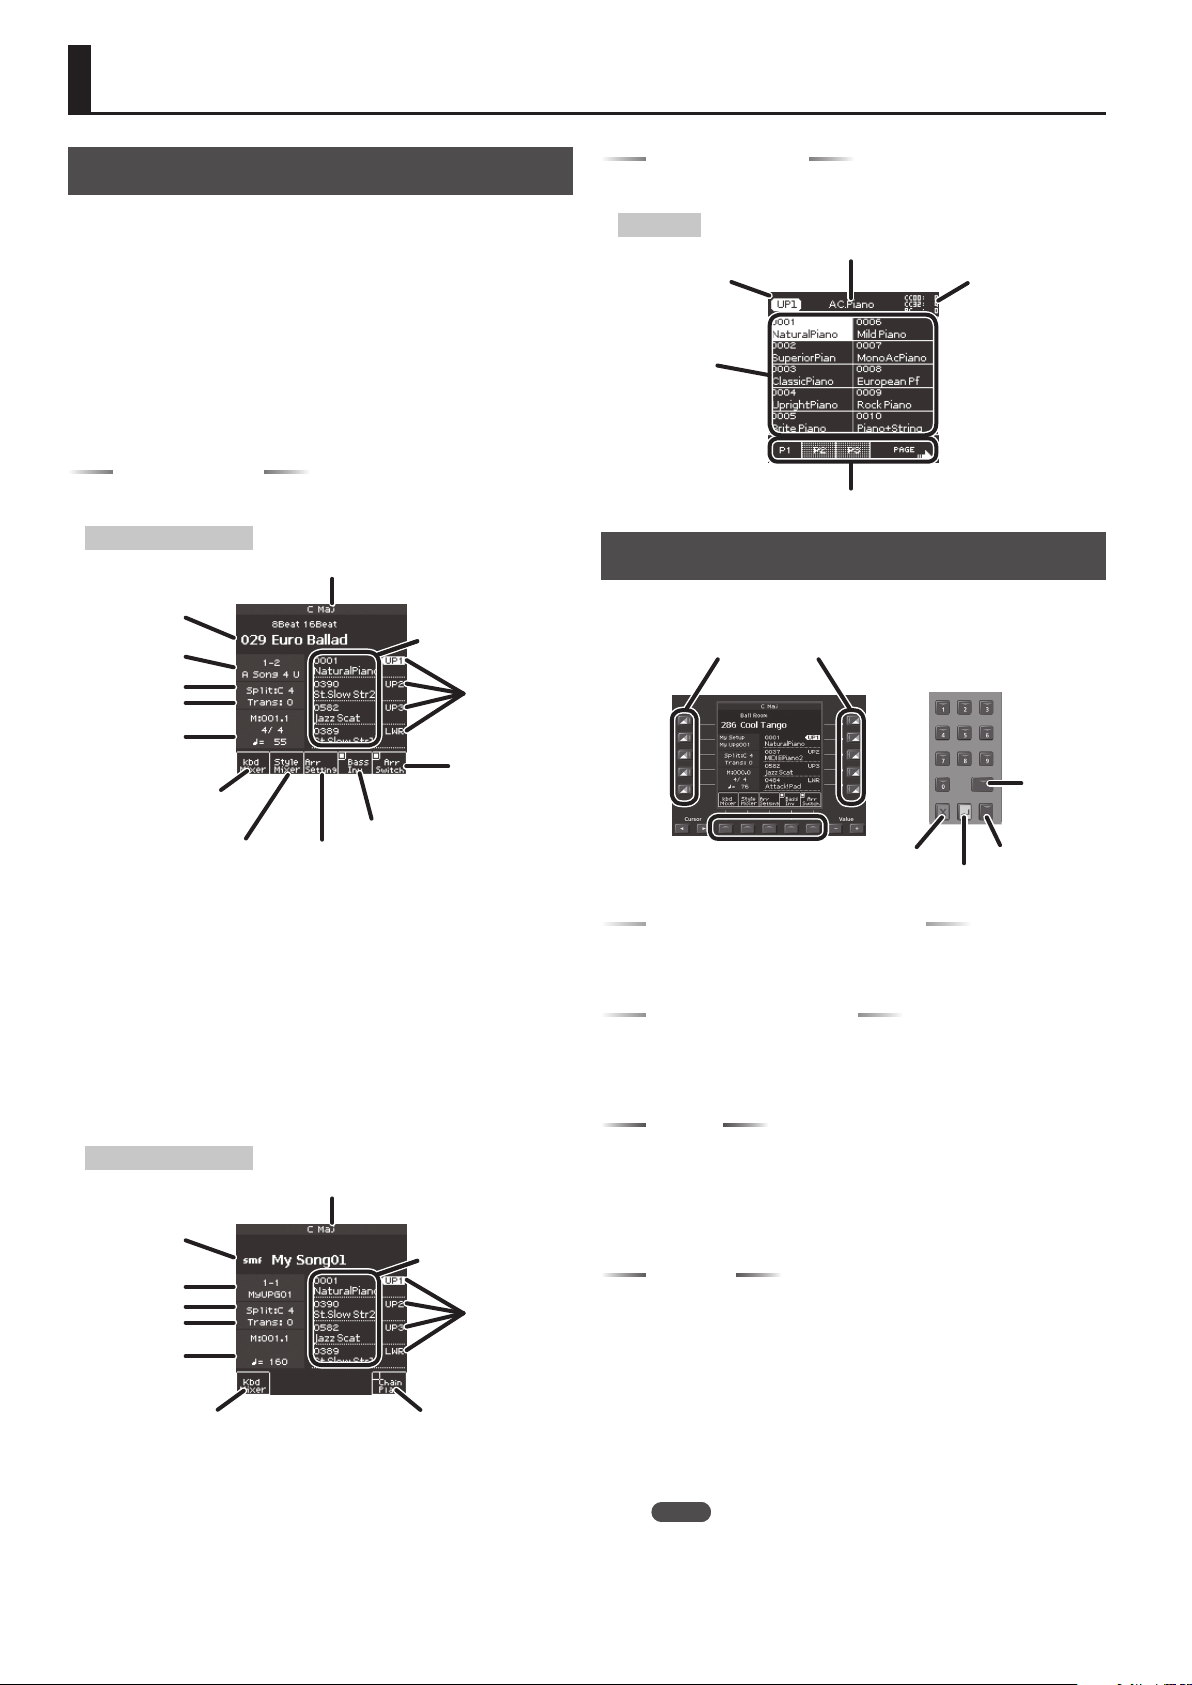
Main page (left)
The display diers between Style mode and Song mode.
Main page (in Style Mode)
Current performance
position (measure
and beat or
remaining time), tempo
Name of the last chord you played
Transpose
Split Point
Bank, number, and
name of the selected
UPG
Tone number and
name selected for each
keyboard part
Arranger Switch
on/o
Bass Inversion on/o
Displays the Arranger Setting screen.
Displays the Style Part Mixer
screen.
Displays the Keyboard Part
Mixer screen.
Indicates the
keyboard part. Use
the direct buttons
to select a part.
Name, number, and category
of the selected Style
Bass Inv (Bass Inversion) Function
Turns the bass inversion function on/o.
If Bass Inv is o, the style’s bass part always sounds the note played
by the performer or the root note of the chord.
Example: When you play the chord E-G-C (C maj), the bass part
sounds the “C” note.
If Bass Inv is on, the rhythm’s bass part sounds the lowest note that
you play on the keyboard.
Example: When you play the chord E-G-C (C maj), the bass part
sounds the “E” note.
Main page (in Song Mode)
Chain Play on/oDisplays the Keyboard Part
Mixer screen.
Current performance
position (measure
and beat or
remaining time), tempo
Name of the last chord you played
Transpose
Split Point
Bank, number, and
name of the selected
UPG
Tone number and name
selected for each keyboard
part
Indicates the
keyboard part. Use
the direct buttons
to select a part.
Name and le type of the
selected song
Main page (right)
The main screen in the right display shows a tone list.
Right page
Tone sub-category name
Tone list
Switch pages
Name of the selected
part
Control change
number and program
change number
assigned to the
selected tone
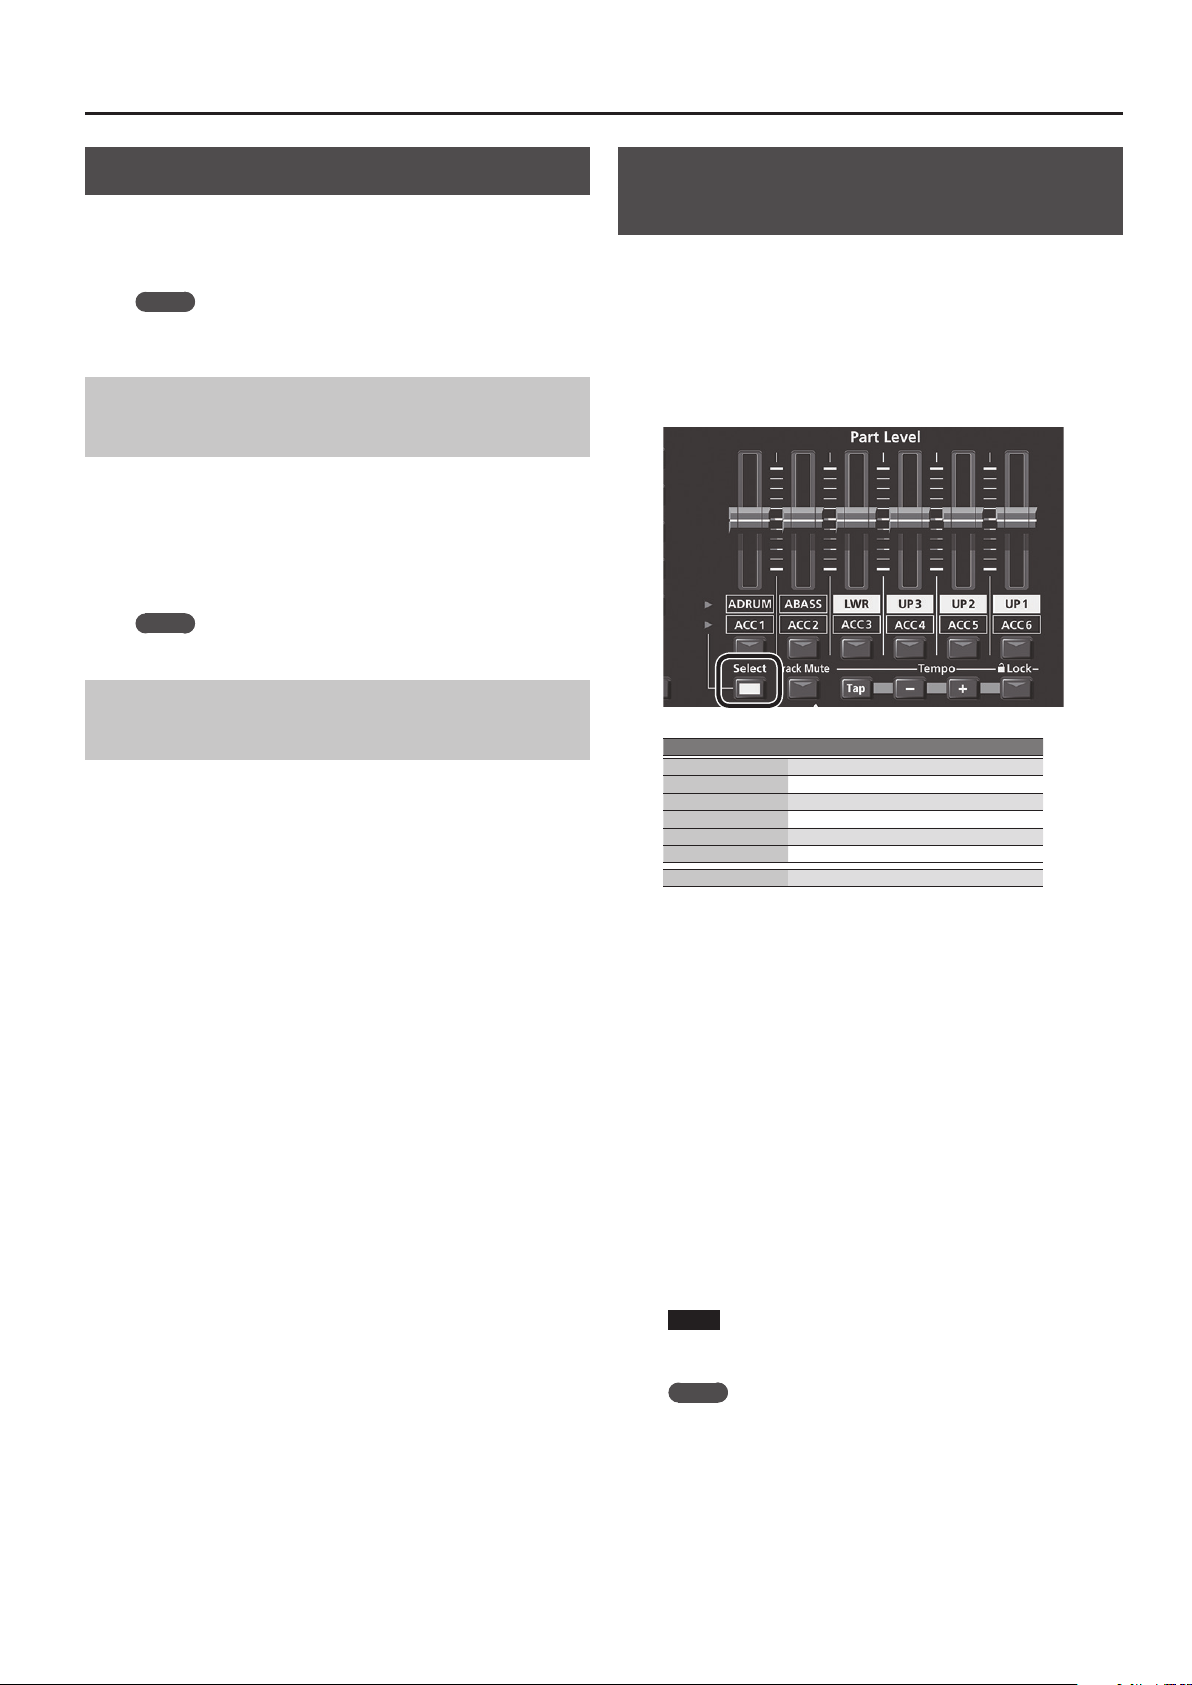
Basic Buttons
There are two each of these basic buttons, just as there are two
displays at the left and right.
[L1]
[F1]
[R1]
[L2]
[F2]
[R2]
[L4]
[F4]
[R4]
[L3]
[F3]
[R3]
[L5]
[F5]
[R5]
Function buttons
Direct buttons
[Numeric]
[Option]
[Enter]
[Exit]
Direct buttons, Function buttons
Around the display are placed direct buttons and function buttons
that are linked with the contents of the display.
Cursor, Value, Enter, Exit
These buttons are provided for each of the left and right displays,
allowing you to perform basic operations in each display such as
moving the cursor, editing values, and conrming or canceling.
Option
The Option buttons are also placed by the left and right displays.
The Option button is used to select functions that are related to the
functions and operations shown in each display.
This means that their function will depend on the screen that’s
shown.
Numeric
You can use the numeric buttons to select tones, or styles by
entering a number.
This method is convenient if you remember the number that you
want to select.
Here’s how to select a tone by number.
1. Press the Tone [Numeric] button to open the Numeric
window.
Tone [0]–[9] buttons light.
2. Use the Tone [0]–[9] buttons to enter a number.
MEMO
If you decide to cancel, press the [Exit] button.
3. Press the [Enter] button to conrm.
The Numeric screen closes, and the page of the selected tone or style
appears.
15
Basic Operation of the E-A7
[Balance/Value] knob
The [Balance/Value] knob has the two functions of Balance and
Value.
These functions alternate each time you press the [Balance/Value]
knob.
MEMO
If the Balance function is active, the LED at the left of the
[Balance/Value] knob is lit.
Adjusting the Volume Balance Between the
Keyboard Parts and the Style/Song
1. Make sure that the Balance LED beside the [Balance/
Value] knob is lit.
If it’s not lit, press the [Balance/Value] knob once.
2. Turn the [Balance/Value] knob.
The Balance screen opens.
You can view the current setting while you adjust it.
MEMO
After a time, the screen closes automatically.
Using the Knob for the Value [-] [+] Button and
Tempo [-] [+] Button Functions
When using the Value [-] [+] buttons to edit a value in a parameter
screen or an edit screen, you can also use this knob to edit the value.
When the Tempo screen is open, you can use the knob to change the
tempo.
1. Make sure that the Balance LED beside the [Balance/
Value] knob is unlit.
If it’s lit, press the [Balance/Value] knob once.
2. Turn the [Balance/Value] knob.
Adjusting the Volume of Keyboard Parts
and Style Parts
If the volume of the Style or song is too loud or too soft in
comparison to your performance, you can adjust the volume balance
as follows.
You can use the Part Level sliders to easily adjust the volume of each
keyboard part and style part.
1. Each time you press the [Select] button, the parts
assigned to the sliders and buttons will change in the
following combinations.
Button Part
[A DRUM] Accompaniment drum part
[A BASS] Accompaniment bass part
[LWR] Keyboard lower part
[UP3] Keyboard upper 3 part
[UP2] Keyboard upper 2 part
[UP1] Keyboard upper 1 part
[ACC1]–[ACC6] Accompaniment part 1–6
2. Move the slider for each part.
5 Moving the [UP1] [UP2] [UP3] or [LWR] sliders adjusts the
volume of the corresponding Keyboard Part.
5 Moving the [A BASS] slider adjusts the volume of the Style
performance’s Bass part.
5 Moving the [A DRUM] slider adjusts the volume of the Style
performance’s Drum part.
5 Moving the [ACC1]–[ACC6] sliders adjusts the volume of the Style
performance’s ACC1–6 parts.
3. Turn each part’s button on/o.
5 Pressing the [UP1] [UP2] [UP3] or [LWR] buttons turns the
corresponding Keyboard Part on/o.
5 Pressing the [A BASS] button turns the Style performance’s Bass
part on/o.
5 Pressing the [A DRUM] button turns the Style performance’s
Drum part on/o.
5 Pressing the [ACC1]–[ACC6] buttons turns each of the Style
performance’s ACC1–6 parts on/o.
NOTE
You can’t use the Style Part [A DRUM] [A BASS] and [ACC1]–
[ACC6] sliders or buttons while a song is selected.
MEMO
5 You can also make this setting in the Mixer screen.
&
Keyboard Part (p. 18)
&
Style Part (p. 23)
5 Slider settings are remembered even if you switch styles or One
Touch. They are reset if you switch the UPG.
16
Basic Operation of the E-A7
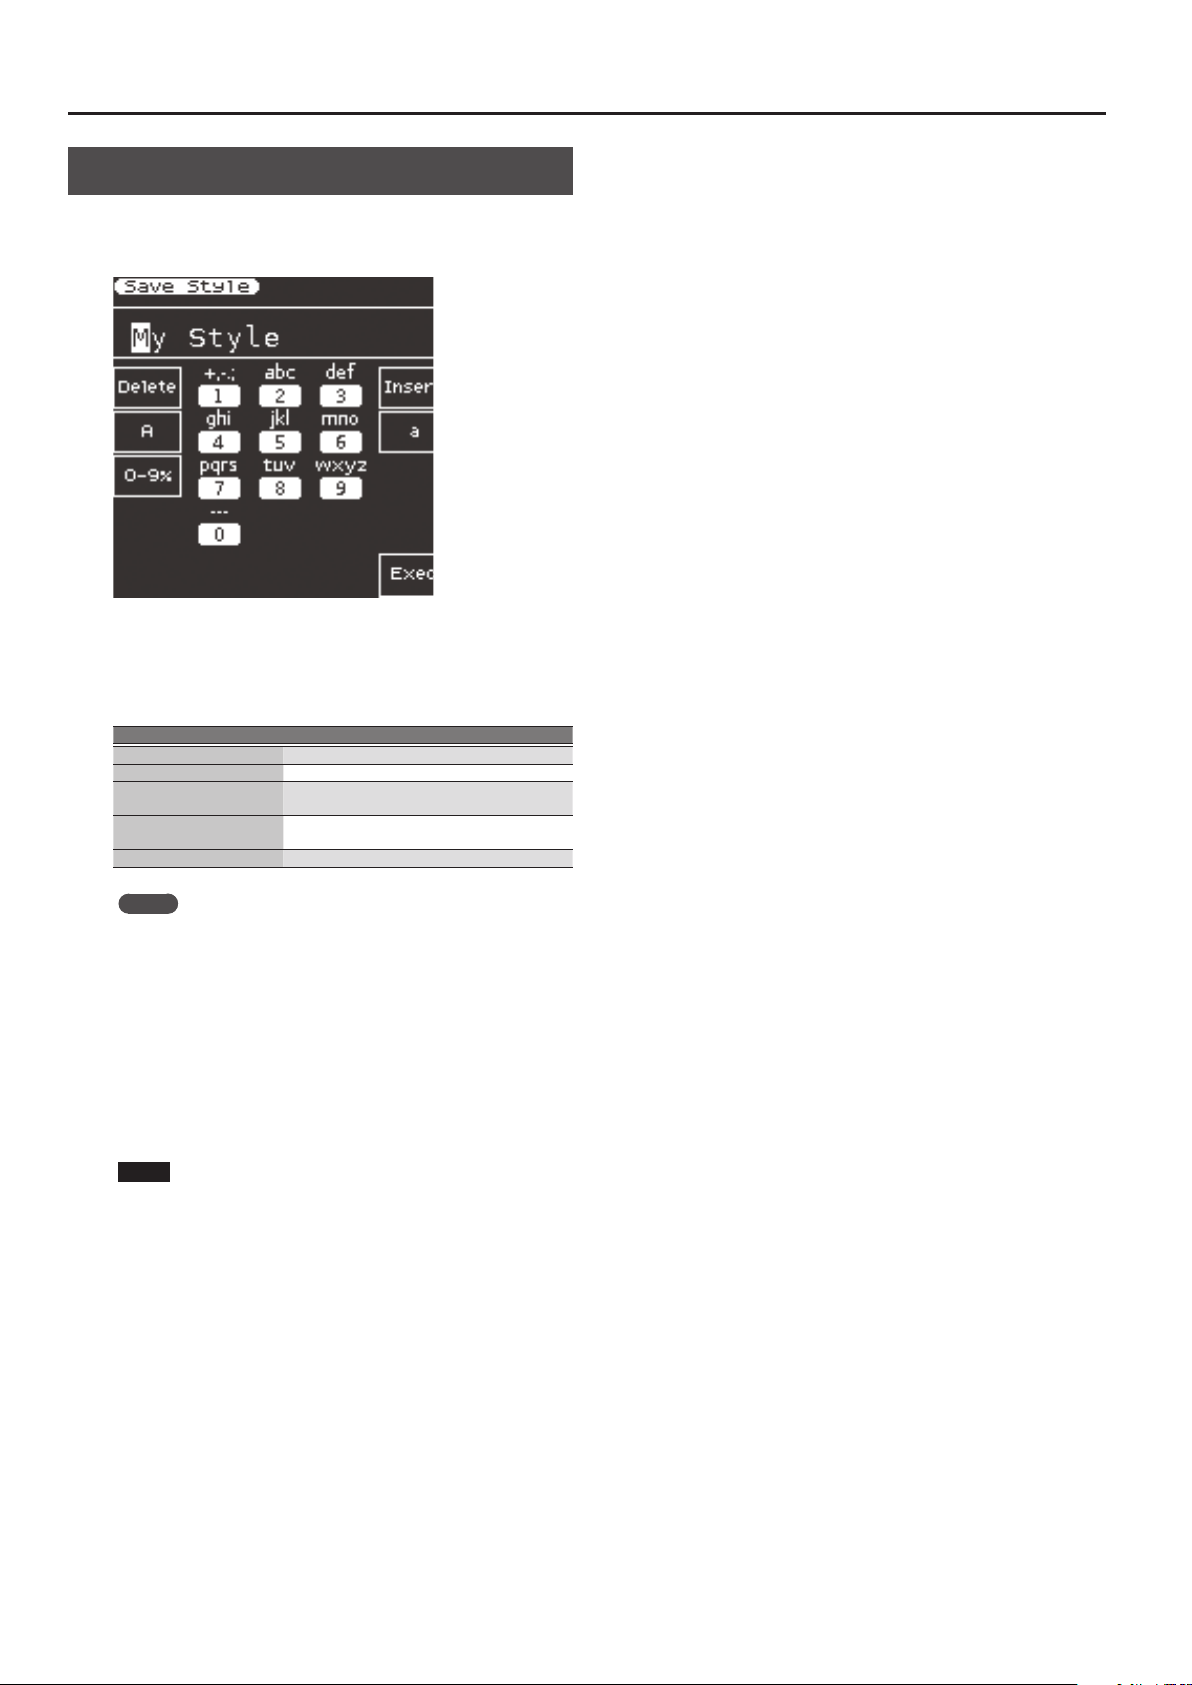
Assigning Names
The E-A7 lets you assign a name to a style or user program when you
save it.
Regardless of what you’re naming, the procedure is the same.
1. Use the Cursor [
K
] [
J
] buttons to move the cursor to the
position where you want to input a character.
2. Use the Value [-] [+] buttons to specify the character
that you want to input.
Button Explanation
Direct button [L2] Deletes one character
Direct button [R2] Inserts one space
Direct button [L3]
Selects uppercase alphabetical characters for
input
Direct button [R3]
Selects lowercase alphabetical characters for
input
Direct button [L4] Selects symbols/numerals for input
MEMO
You can also specify characters using the Style or Tone category
buttons (numeric keypad).
Use the category buttons to input the characters that are
assigned to the numeric keypad display in the center of the
screen.
For example each time you press the category button
corresponding to the icon marked “ABC,” the character switches
in the order of “A”
0
“B”
0
“C”
0
“A”...
3. Use the function buttons to select “Exec.”
A conrmation message appears.
4. If you decide to cancel the input, press the [Exit] button.
NOTE
Depending on what you’re saving, there may be limitations on
the number of type of characters that you can use.
17
Performing
Selecting a Tone and Playing it on the
Keyboard
On the E-A7, the sounds that can be assigned to each part are
called “tones.” Tones are assigned to the tone buttons according to
category, and each tone button is also divided into sub-categories.
For example the [Piano] button lets you select piano tones and
electric piano tones, and the [World] button lets you select tones
that are suitable for the music of various countries and regions. To
select a sub-category, press the same tone button two or more times.
The [User] button lets you switch between User Tone (p. 31) and User
Drum Kit (p. 33) tones.
The E-A7 has four keyboard parts (UP1, UP2, UP3, LWR), and one tone
can be assigned to each part.
The currently selected Part name is shown in the upper left of the
Tone screen located in the right side of the panel. Operations in the
Tone screen change the tone for that Part.
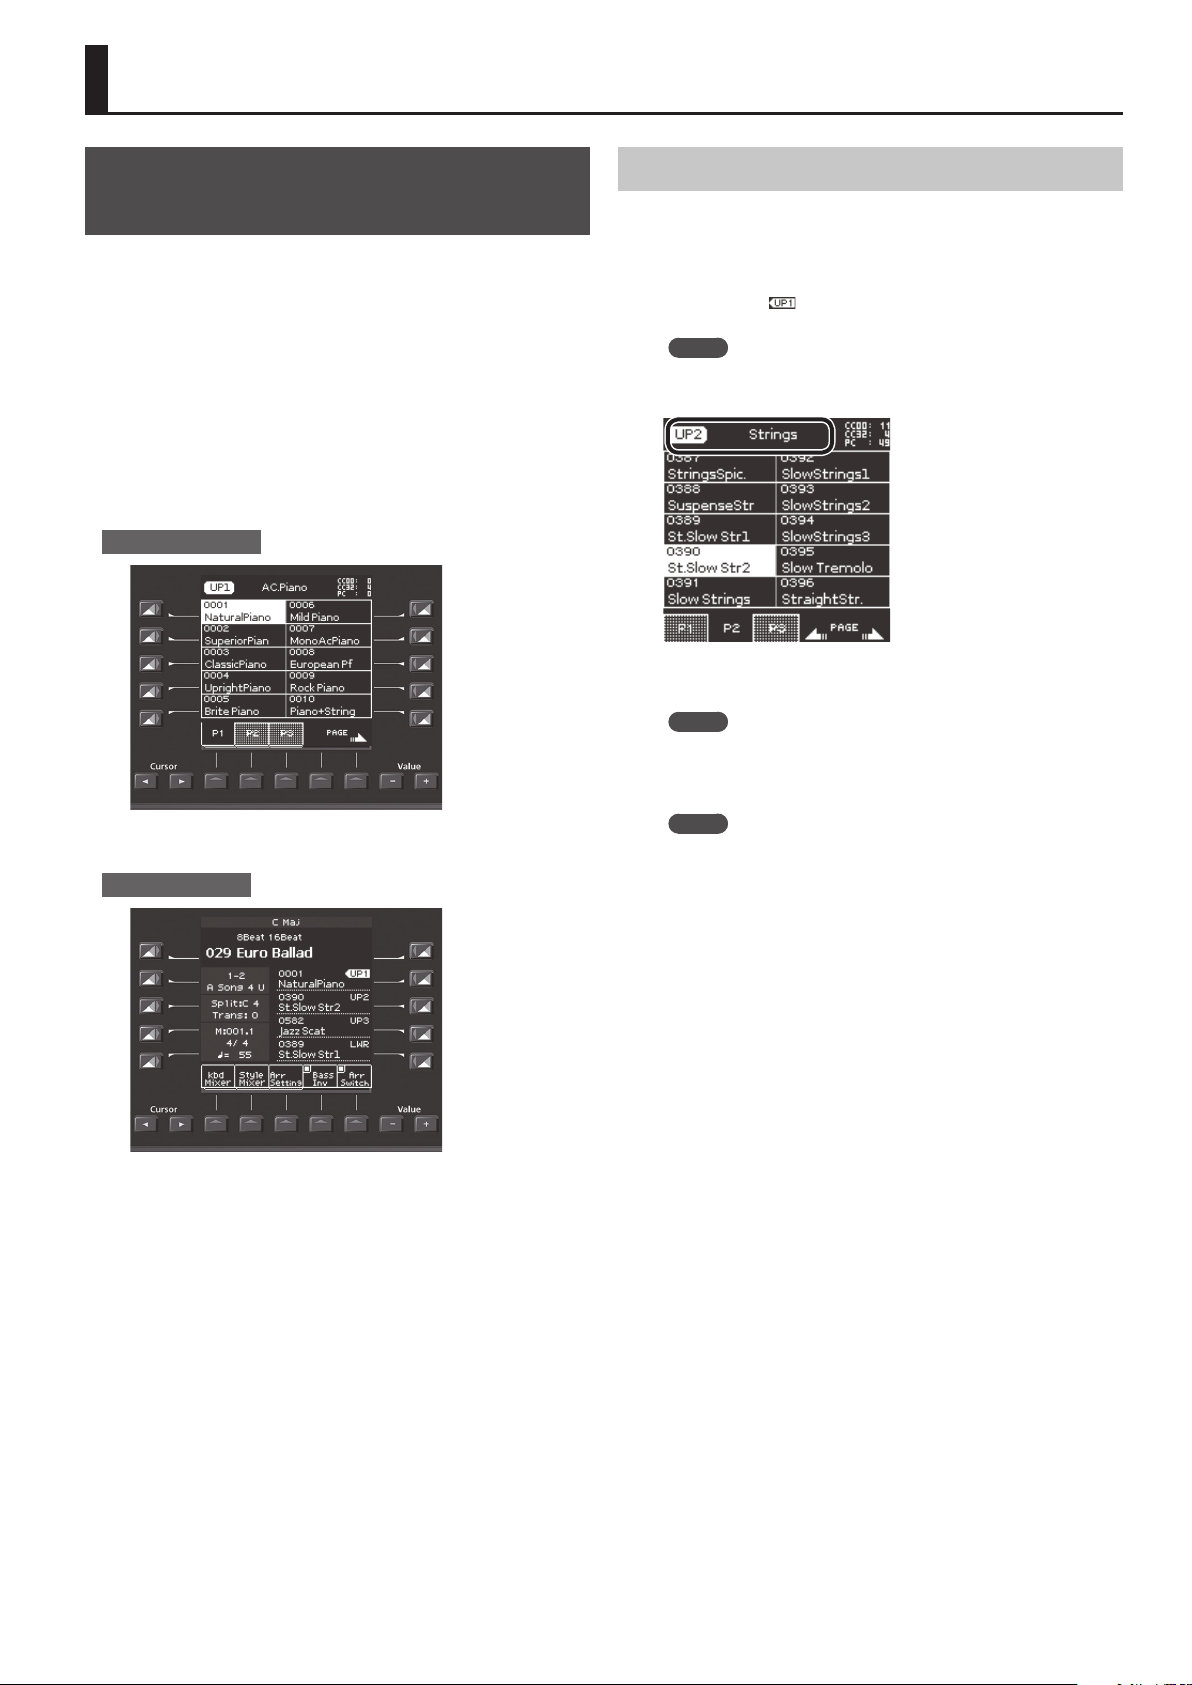
Main screen (right)
To switch the Part so that you can change the tone of a dierent part,
use the main screen at the left to switch Parts.
Main screen (left)
The main screen shows the tone names of the four keyboard parts.
You can use the direct buttons to switch parts. The selected part
number is highlighted.
Changing the Tone of a Keyboard Part
To select each part (Upper1, Upper2, Upper3, Lower), press the direct
buttons ([R2]–[R5] buttons) corresponding to the keyboard parts.
1. Select a part by pressing one of the direct buttons
([R2]–[R5] buttons) in the left Main screen.
The indication “ ” is shown at the selected keyboard part.
The Main screen (right) shows a tone list for the selected part.
MEMO
The name of the selected part is shown at the top of the Tone
screen.
2. Use the Tone [0]–[9] buttons to select a tone category.
The selected tone category page appears.
MEMO
By continuing to press the same Tone category button, you can
step through the rst sound in each sub-category of the category.
3. Press a direct button to select a tone.
MEMO
5 The selected tone is highlighted.
5 Use the function buttons to switch pages.
5 You can also select from favorite tones (p. 20).
5 Depending on the Part Switch or Part Level settings, you
might not hear any sound (p. 15).
5 You can also select a tone by pressing the [Numeric] button
and specifying a number (p. 14).
4. Play the keyboard.
You’ll hear the sound of the selected instrument.

18
Performing
Turning Each Keyboard Part On/O and
Adjusting the Volume
Using the Part Level Sliders/Buttons
&
“Adjusting the Volume of Keyboard Parts and Style Parts”
(p. 15)
Using the Mixer Screen
If you display the Keyboard Part Mixer screen, you will also be able
to adjust the “Reverb Send,” “Chorus Send,” and “Panpot” of the
Keyboard Parts (UP1, UP2, UP3, LWR) as well as the “Volume” and
“Part Switch.”
1. Display the Main screen.
2. Press the [F1] (Keyboard Part Mixer) button.
The Keyboard Part Mixer screen appears.
3. Use the Cursor [
K
] [
J
] buttons or the direct buttons to
navigate to the parameter that you want to edit.
4. Use the Value [-] [+] buttons to edit the value.
For details on the parameters that you can edit, refer to the reference
manual.
MEMO
5 You can also edit the setting by [Menu]
0
“User Program Edit”
0
“Keyboard Part Mixer.”
5 These parameters are saved in the UPG.
&
“Saving Settings as a User Program” (p. 46)
Playing Dierent Tones in the Right and
Left Hands (Split)
1. Press the [Split] button.
The [Split] button lights, and the keyboard is divided at middle C
(C4) into left and right areas.
Use the left-hand area to specify the chord for Style performance, or
to play the tone of the Lower part.
Use the right-hand area to play a melody using the tone of the
Upper1, Upper2, and Upper3 part.
C4
(Factory setting)
Lower
Upper
Split point
MEMO
When you choose the Split setting, the Arranger Setting “Type”
parameter is automatically set to “Intelligent.”
Changing the Split Point
You can change the keyboard split point.
1. Long-press the [SPLIT] button.
The Split setting screen appears.
2. Use the Value [-] [+] buttons to specify the split point.
MEMO
5 You can also specify the split point by pressing a note on the
keyboard.
5 You can also make this setting by [Menu]
0
“User Program
Edit”
0
“Split.”
Specifying Lower Hold
This function makes the lower note continue sounding until you
press a dierent key in the left-hand keyboard area.
This function is enabled only if the [Split] button is lit.
1. Long-press the [SPLIT] button.
The Split setting screen appears.
2. Press the function button that corresponds to Lower
Hold; a check mark appears in the check box.
MEMO
5 You can also make this setting by [Menu]
0
“User Program
Edit”
0
“Split.”
5 This parameter is saved in the UPG.
&
“Saving Settings as a User Program” (p. 46)
Transposing Your Performance (Transpose)
You can transpose the keyboard in semitone steps.
1. Use the Transpose [-] [+] buttons to specify the desired
key.
Value
-6–0–+5 (semitone steps)
If you’ve specied a key other than “0,” the Transpose [-] [+] button
indicator is lit.
The Transpose screen disappears after several seconds. If you want to
close the screen immediately, press the [Exit] button.
MEMO
5 If you press both Transpose [-] [+] buttons simultaneously, the
value returns to 0.
5 If you transpose the keyboard part, the Style that’s playing is also
transposed in the same way.
5 You can select or clear the function button “Song” and
“Keyboard” check boxes to specify what is aected by
transposition, for example transposing only the song or only the
keyboard.
5 The transpose setting is saved in the UPG.
&
“Saving Settings as a User Program” (p. 46)
 Loading...