


 Loading...
Raytech RNS V6.1
User’s Guide
Document Number: 81260_2
October 2008
Trademarks and registered trademarks
Autohelm, HSB, Raymarine, RayTech, Sail Pilot, SeaTalk and Sportpilot are registered trademarks of Raymarine Limited. Apelco is a registered trademark of Raymarine Holdings Limited (Registered in all major marketing territories).
AST, Autoadapt, Auto GST, Autoseastate, Autotrim, Bidata, Marine Intelligence, Maxiview, On Board, Raychart, Raynav, Raypilot, Raystar, ST40, ST60, Seaclutter, Smart Route, Tridata and Waypoint Navigation are trademarks of Raymarine Limited.
Windows and NT are registered trademarks of Microsoft Inc.
Pentium is a registered trademark of Intel.
NVIDIA and GeForce are trademarks or registered trademarks of NVIDIA Corp.
Maptech is a registered trademark of Maptech.
C-Map and C-Map NT+ are registered trademarks of C-Map SRL.
Navionics is a registered trademark of Navionics SpA.
All other product names mentioned are trademarks or registered trademarks (if applicable) of their respective companies.
© Raymarine plc 2008
Contents |
|
Contents ............................................................. |
i |
Important information .................................... |
1 |
Safety notices ......................................................................... |
1 |
Intended use .......................................................................... |
1 |
Disclaimers ............................................................................. |
1 |
The limits of electronic navigation ......................................... |
2 |
About this manual.................................................................. |
2 |
Conventions used ................................................................... |
3 |
Product use ............................................................................ |
3 |
System integration ................................................................. |
3 |
Technical accuracy ................................................................. |
3 |
Copyright................................................................................ |
3 |
System overview and features..................... |
5 |
Introduction .......................................................................... |
5 |
What do I get in the box? ..................................................... |
5 |
System overview ................................................................... |
6 |
System features .................................................................... |
6 |
Easy marine navigation ....................................................... |
6 |
Chart formats ...................................................................... |
6 |
Comprehensive Weather/ Oceanographic reporting ............ |
7 |
Advanced graphical user interface ...................................... |
7 |
Navionics Platinum chart card............................................. |
7 |
Sailboat racing .................................................................... |
7 |
Fishing (US market only) ..................................................... |
7 |
System requirements..................................... |
9 |
|
i |
Introduction ........................................................................... |
9 |
System requirements ............................................................. |
9 |
Minimum system requirements ............................................ |
9 |
Optimum system requirements ............................................ |
9 |
Is my PC ready to use RayTech? ............................................ |
10 |
Upgrading drivers and adapters ............................................ |
12 |
Driver update ....................................................................... |
12 |
DirectX ................................................................................. |
13 |
Useful websites.................................................................... |
14 |
Getting started ............................................... |
15 |
Introduction ........................................................................... |
15 |
Installing RayTech ................................................................. |
15 |
Installation from a CD-ROM................................................. |
15 |
Installation from the Internet ............................................... |
15 |
Starting to use RayTech ......................................................... |
16 |
License keys ......................................................................... |
16 |
Running RayTech for the first time....................................... |
17 |
Using RayTech on a new computer ...................................... |
19 |
Continuing To Use RayTech ................................................... |
19 |
Operating modes ................................................................. |
19 |
Simulator ............................................................................. |
19 |
Raytech Planner - Simulate mode. ....................................... |
20 |
RayTech Planner only operates in ‘Simulate mode’. If you want to change the Simulator’s automatic settings, you can taylor the menu to suit your needs. The Simulator menu is available to edit:
20 |
|
Setting up RayTech ................................................................ |
20 |
ii |
|
Installing instruments to RayTech .......................................... |
21 |
RayTech Tools ...................................................................... |
21 |
File/Setup/Instruments feature ............................................. |
21 |
Installing charts ..................................................................... |
25 |
C-MapNT+/PC charts from CD-ROM .................................... |
25 |
Maptech cartography ........................................................... |
25 |
Navionics cartography.......................................................... |
26 |
RayTech chart installer ......................................................... |
26 |
The user interface and controls .................. |
27 |
Introduction ........................................................................... |
27 |
The screen ............................................................................. |
27 |
Interface controls ................................................................... |
27 |
Drop down menus ................................................................ |
28 |
Toolbars ............................................................................... |
28 |
Softkeys................................................................................ |
28 |
Right mouse menus.............................................................. |
28 |
Pathfinder panel................................................................... |
29 |
Displaying information .......................................................... |
29 |
Selection dialog box ............................................................. |
29 |
Action box............................................................................ |
30 |
Data box............................................................................... |
30 |
Alert and information dialog box ......................................... |
30 |
Application information box................................................. |
30 |
Changing what you see on the screen ................................... |
31 |
Moving around a split page ................................................. |
31 |
Using charts..................................................... |
33 |
Introduction ........................................................................... |
33 |
RayTech RNS V6.1 - Users Guide |
|
Use your charts safely .......................................................... |
33 |
The chart screen .................................................................... |
33 |
Opening a chart ..................................................................... |
33 |
Moving around the chart ....................................................... |
34 |
Chart panning ...................................................................... |
34 |
Zooming............................................................................... |
34 |
Finding your boat on the chart............................................. |
34 |
Choosing a chart type ........................................................... |
34 |
Chart layers.......................................................................... |
35 |
Chart order........................................................................... |
35 |
Chart quilting ....................................................................... |
36 |
Using Platinum cartography ........................ |
39 |
Introduction ........................................................................... |
39 |
2D cartography .................................................................... |
39 |
3D bathymetric charts.......................................................... |
39 |
New 2D chart features .......................................................... |
40 |
Aerial photo overlay............................................................. |
40 |
Pilot book............................................................................. |
41 |
2D chart enhancements ......................................................... |
42 |
Business services information .............................................. |
42 |
Find nearest ......................................................................... |
42 |
Search port by name ............................................................ |
43 |
Wrecks data ......................................................................... |
43 |
Coastal roads ....................................................................... |
44 |
US inland waterways ........................................................... |
44 |
3D bathymetric chart application .......................................... |
45 |
The application .................................................................... |
46 |
The controls......................................................................... |
46 |
The operating modes........................................................... |
46 |
Using 2D and 3D charts together ........................................ |
49 |
Navigating with 3D Charts .................................................. |
49 |
Working with waypoints ............................... |
51 |
Introduction .......................................................................... |
51 |
What is a waypoint? ............................................................. |
51 |
Placing a waypoint ............................................................... |
51 |
...at the cursor’s current position......................................... |
51 |
... at the boat’s current position .......................................... |
51 |
... at a known position ........................................................ |
51 |
Placing a man overboard marker .......................................... |
53 |
Changing a waypoint symbol ............................................... |
53 |
Navigating to a waypoint ..................................................... |
54 |
...using the WAYPT button .................................................. |
54 |
...using the cursor................................................................ |
54 |
...using the waypoints list ................................................... |
54 |
Moving a waypoint ............................................................... |
54 |
Edit waypoint details ............................................................ |
55 |
Organizing waypoints ........................................................... |
55 |
Deleting a waypoint or waypoint folder? .............................. |
56 |
Waypoint recycle bin ............................................................ |
56 |
Transferring route and waypoint data .................................. |
57 |
Working with routes ...................................... |
61 |
Introduction .......................................................................... |
61 |
What is a route? ................................................................... |
61 |
Creating a route .................................................................... |
61 |
|
iii |
Add a waypoint to a route ................................................... |
62 |
Deleting a waypoint............................................................. |
63 |
Choosing a route.................................................................. |
64 |
Following route.................................................................... |
64 |
Monitoring the course ........................................................... |
64 |
Restart XTE .......................................................................... |
65 |
Next Leg and Previous Leg................................................... |
65 |
Using tides and currents................................ |
67 |
Introduction ........................................................................... |
67 |
Setting the region ................................................................ |
67 |
Tides ...................................................................................... |
68 |
Open nearest tides ............................................................... |
68 |
Currents ................................................................................. |
69 |
Open nearest currents.......................................................... |
69 |
Working with radar (Analog)........................ |
71 |
Introduction ........................................................................... |
71 |
Displaying radar in a new page ............................................. |
71 |
The radar picture ................................................................... |
71 |
Changing how the radar picture is shown ............................. |
72 |
Head - up (H-UP).................................................................. |
72 |
North - up (N-UP)................................................................. |
72 |
Course - up (C-UP) ............................................................... |
72 |
Getting the best radar picture ............................................... |
72 |
Gain .................................................................................... |
72 |
FTC....................................................................................... |
73 |
Sea mode ............................................................................. |
73 |
Gain mode ........................................................................... |
73 |
iv |
|
Tune ..................................................................................... |
73 |
Making targets clearer? ......................................................... |
74 |
Interference rejection ........................................................... |
74 |
Expansion............................................................................. |
74 |
Wakes .................................................................................. |
74 |
Setting up the radar display ................................................... |
74 |
Short range scales ................................................................ |
74 |
Long range scales................................................................. |
74 |
Changing the displayed range.............................................. |
75 |
Marking a position on-screen ................................................ |
75 |
Using radar to help avoid a collision ..................................... |
75 |
Range rings .......................................................................... |
75 |
VRMs/EBLs. .......................................................................... |
76 |
Guard zones ......................................................................... |
77 |
Placing a guard zone............................................................ |
78 |
MARPA .................................................................................. |
78 |
Safety Notices ...................................................................... |
78 |
What is MARPA?.................................................................. |
78 |
Target and vector history ..................................................... |
79 |
Target history ....................................................................... |
80 |
MARPA targets..................................................................... |
80 |
Using the Radar (Digital)............................... |
83 |
Radar setup ........................................................................... |
83 |
Select scanner ...................................................................... |
83 |
Scanner setup....................................................................... |
83 |
Powering on/off the various scanner operating modes .......... |
84 |
Radar range and image quality ............................................. |
85 |
RayTech RNS V6.1 - Users Guide |
|
Range................................................................................... |
85 |
Image quality ....................................................................... |
86 |
Side lobes............................................................................. |
86 |
Indirect echoes..................................................................... |
87 |
Multiple echoes.................................................................... |
87 |
Blind sectors ........................................................................ |
87 |
Sea clutter............................................................................ |
87 |
Rain or snow clutter............................................................. |
88 |
Mutual radar interference .................................................... |
88 |
Radar window overview ........................................................ |
89 |
Your position ....................................................................... |
89 |
Operation modes ................................................................. |
89 |
Other vessels or objects ....................................................... |
89 |
Factors affecting echo strength............................................ |
89 |
Using waypoints with the radar ............................................ |
90 |
Radar display options ............................................................ |
90 |
Orientation........................................................................... |
90 |
Setting the motion mode ..................................................... |
92 |
Tuning the radar display: ....................................................... |
93 |
Gain ..................................................................................... |
93 |
Gain presets ......................................................................... |
93 |
Manually adjusting gain settings ......................................... |
93 |
Gain ..................................................................................... |
93 |
Color Gain............................................................................ |
94 |
Radar colors ......................................................................... |
94 |
Rain clutter .......................................................................... |
94 |
Sea clutter............................................................................ |
94 |
Super HD adjustments ........................................................... |
94 |
Antenna boost..................................................................... |
94 |
Power boost ........................................................................ |
95 |
Tuning the radar display: ENHANCE ECHOES ....................... |
95 |
Interference rejection .......................................................... |
95 |
Expansion............................................................................ |
95 |
Wakes ................................................................................. |
95 |
Radar range .......................................................................... |
96 |
Synchronizing radar range and chart scale.......................... |
96 |
Measuring distance, range and bearing ............................... |
96 |
Range rings ......................................................................... |
96 |
Bearing and range............................................................... |
97 |
The Variable Range Marker (VRM) and Electronic Bearing Line |
|
(EBL).................................................................................... |
97 |
Variable Range Marker........................................................ |
97 |
Electronic Bearing Marker ................................................... |
98 |
Combined range and bearing .............................................. |
99 |
Tracking a target with a VRM or EBL .................................. |
99 |
Floating VRM and EBL......................................................... |
99 |
Using radar to track objects .................................................. |
100 |
Guard zones ........................................................................ |
100 |
MARPA................................................................................ |
101 |
Displaying vessel identity (AIS)............................................ |
104 |
Automatic Identification System (AIS)........ |
105 |
Introduction .......................................................................... |
105 |
What is AIS? ......................................................................... |
105 |
Classes of AIS data.............................................................. |
105 |
What do I need to run AIS? .................................................. |
106 |
|
v |
AIS baud rate selection .......................................................... |
106 |
Selecting the AIS function ..................................................... |
107 |
How is AIS data displayed? ................................................... |
108 |
AIS Target symbols............................................................... |
109 |
Viewing target information .................................................. |
109 |
MARPA and AIS options ...................................................... |
110 |
Safety messages................................................................... |
111 |
AIS Alarms ............................................................................. |
111 |
AIS Layer Setup Menu ........................................................... |
111 |
Working with sonar........................................ |
113 |
Introduction ........................................................................... |
113 |
The sonar screen ................................................................... |
113 |
Displaying sonar in a new page ........................................... |
113 |
Presets ................................................................................... |
113 |
Changing the screen view ..................................................... |
114 |
Background color ................................................................. |
114 |
Scrolling speed ..................................................................... |
114 |
Target depth ID .................................................................... |
115 |
Improving the underwater view ............................................ |
115 |
Changing the range ............................................................. |
116 |
Selecting the operating frequency........................................ |
116 |
Making the picture clearer .................................................... |
117 |
Gain mode ........................................................................... |
117 |
Color gain mode .................................................................. |
117 |
TVG ...................................................................................... |
118 |
Color Threshold.................................................................... |
118 |
Getting a clear picture of the bottom .................................... |
120 |
vi |
|
Getting a live image from below the boat ............................. |
122 |
Isolating objects near the bottom .......................................... |
125 |
Getting a closer view ........................................................... |
125 |
Marking an on-screen position .............................................. |
125 |
Measuring an object’s depth and distance ............................ |
127 |
Sonar alarms .......................................................................... |
128 |
Shallow water alarm ............................................................ |
128 |
Deep water alarm................................................................. |
128 |
Fish alarm ............................................................................ |
129 |
Sonar data recording and playback ....................................... |
129 |
RayTech advanced features.......................... |
133 |
Introduction ........................................................................... |
133 |
Weather information ............................................................. |
133 |
Advanced Weather and Satellite Fishing Maps .................... |
133 |
The screen ............................................................................ |
134 |
Getting weather information from the internet.................... |
135 |
Getting weather, Sea Surface Temperature (SST) and Plankton |
|
information by E-mail........................................................... |
136 |
3rd Party GRIB (Weather) files ............................................. |
137 |
Viewing a weather file ......................................................... |
137 |
Configuring the Weather Layer ............................................ |
137 |
Viewing an SST and Plankton file......................................... |
137 |
Configuring the Fishing Layer (SST and Plankton)................ |
138 |
Animating weather files ....................................................... |
139 |
Measuring distances on a chart ............................................. |
141 |
Creating and modifying databoxes ........................................ |
143 |
Modifying a databox ............................................................ |
143 |
RayTech RNS V6.1 - Users Guide |
|
Creating a databox .............................................................. |
145 |
Modifying a channel ............................................................ |
145 |
Using the font selector......................................................... |
145 |
Polar plotting ........................................................................ |
147 |
Data collection ..................................................................... |
147 |
Entering and editing data .................................................... |
147 |
Graphing and reading a polar plot....................................... |
151 |
Instrument calibration for accurate data.............................. |
153 |
DataTrak ................................................................................ |
154 |
Pre-start display .................................................................... |
157 |
Route optimization ................................................................ |
160 |
Navigation numbers .............................................................. |
163 |
Engine panel ......................................................................... |
164 |
Using video .................................................... |
167 |
Introduction ........................................................................... |
167 |
The user interface .................................................................. |
167 |
RNS mode ........................................................ |
171 |
Introduction ........................................................................... |
171 |
USB navigation keyboard ...................................................... |
171 |
The controls ......................................................................... |
171 |
Installing the RNS keyboard .................................................. |
173 |
Setting up RayTech for use with the RNS keyboard ............... |
173 |
Troubleshooting RayTech ............................. |
175 |
Introduction ........................................................................... |
175 |
Technical support .................................................................. |
182 |
Charts .......................................................................... |
183 |
Vector .................................................................................. |
183 |
Raster .................................................................................. |
183 |
Aerial imagery ..................................................................... |
184 |
Radar .......................................................................... |
185 |
Scanner ............................................................................... |
185 |
Standard range scales ......................................................... |
186 |
Identifying false echo returns .............................................. |
187 |
Sonar .......................................................................... |
191 |
Boat speed .......................................................................... |
192 |
Target depth........................................................................ |
192 |
Target size........................................................................... |
192 |
Transducer frequency .......................................................... |
192 |
Installation Guidelines............................................. |
195 |
Suppression Ferrites ............................................................ |
195 |
Connections to other equipment ......................................... |
195 |
System integration ................................................................ |
196 |
What is System Integration? ............................................... |
196 |
NMEA basics ....................................................................... |
197 |
RS-232 basics ...................................................................... |
197 |
Connecting RayTech to your instruments ............................ |
199 |
Connecting directly to an NMEA GPS.................................. |
199 |
Connecting directly to NMEA equipped instruments ........... |
200 |
SeaTalkhs ............................................................................ |
200 |
SeaTalk devices ................................................................... |
204 |
RayTech SeaTalk/PC/NMEA Interface: ................................ |
205 |
Mounting the interface box................................................. |
205 |
RayTech SeaTalk/PC/NMEA Interface box troubleshooting . 206 |
|
Connecting NMEA direct to Raymarine Pathfinder displays: 206 |
|
Connecting an hsb2 PCMCIA PC kit .................................... |
207 |
|
vii |
PCI to PCMCIA cardbus adapter .......................................... |
208 |
Connecting an hsb2 to USB2.0 interface.............................. |
208 |
Connecting to B & G Instruments......................................... |
208 |
Connecting to KVH Instruments ........................................... |
209 |
Connecting to Ockam Instruments ....................................... |
209 |
Connecting a USB C-Card Reader ........................................ |
210 |
Fully integrated system ........................................................ |
210 |
Integrated system checks ..................................................... |
210 |
Toolbars...................................................................... |
213 |
Main menu........................................................................... |
213 |
Standard toolbar .................................................................. |
218 |
Routes and waypoints toolbar ............................................. |
219 |
Charting toolbar................................................................... |
219 |
Animation toolbar................................................................ |
220 |
Alarms toolbar ..................................................................... |
221 |
Tides/Currents toolbar.......................................................... |
221 |
3D toolbar ............................................................................ |
222 |
Fishing toolbar ..................................................................... |
223 |
Yacht racing toolbar............................................................. |
223 |
Pre-start toolbar................................................................... |
224 |
Weather toolbar................................................................... |
224 |
Databox toolbar ................................................................... |
225 |
List of abbreviations ................................................ |
227 |
Glossary of terms...................................................... |
229 |
viii |
RayTech RNS V6.1 - Users Guide |
Important information |
1 |
|
|
Important information
Safety notices
WARNING
Navigation aid
When this product is used within a navigation system, it is only an aid to navigation. It’s accuracy can be affected by many factors, including equipment failure or defects, environmental conditions and improper use or handling. It is the user’s responsibility to exercise common prudence and navigational judgements. This product should not be relied upon as a substitute for such prudence and judgement. Always maintain a permanent watch so that you can respond to situations as they develop.
WARNING
Product installation
This equipment must be installed and operated in accordance with the Raymarine instructions provided within this guide. Failure to do so could result in poor product performance, personal injury, and/or damage to your boat.
CAUTION
Navionics CF Card Reader
The Navionics CF card reader has been designed and tested for home and dockside planning use only and has not been tested to marine standards for ruggedness or interference with other devices on board the vessel. Raymarine cannot accept responsibility or liability for any damage to the card reader, associated systems and equipment or compatibility issues arising from its use while underway.
Intended use
RayTech V6.1 is intended for recreational marine use. Users should note that only authorized government charts and associated Notices to Mariners contain all the information required for safe navigation
Disclaimers
This electronic chart is an aid to navigation designed to facilitate the use of authorized government charts, not to replace them. Only official government charts and notices to mariners contain all of the current information needed for the safety of navigation, and the Captain is responsible for their prudent use.
2 |
RayTech RNS V6.1 - Users Guide |
|
|
This program and its charts do not excuse the user from carrying the required official charts and documents.
Raymarine does not warrant that this product is error free or that it is compatible with products manufactured by any person or entity other than Raymarine.
This product utilizes digital chart data, and electronic information from the Global Positioning System (GPS) and weather information which may contain errors. Raymarine does not warrant the accuracy of such information and you are advised that errors in such information may cause the product to malfunction or give incorrect readings. Raymarine is not responsible for damages or injuries caused by your use or inability to use the product, by the interaction of the product with products manufactured by others, or by errors in chart data or information utilized by the product provided by third parties.
Except for the limited warranty regarding the magnetic media contained in the license agreement accompanying the product, this product is provided ‘AS IS’ without warranty of any kind, either express or implied, including but not limited to the implied warranties of merchantability and fitness for a particular purpose, and any others which may arise from course of performance, course of dealing, or usage of trade.
The limits of electronic navigation
Experienced navigators know not to rely on a single method of navigation for determining their position. Two or more methods should be used to determine position and guard against errors placing you or your boat in a dangerous position. Global Positioning System (GPS) based electronic navigation is an amazing application of technology, but like all other technology, has limits. A wise navigator will understand these limits and how they affect the safety of their boat and crew.
The Global Positioning System is made up of components starting with ground based computers to monitor and maintain the system made up of 24 satellites in orbit around the earth. The system ends at your boat’s receiver.
Like all systems it is not perfect and any part of it can fail. GPS accuracy varies between 2 and 50 meters.
NMEA 0183 1.0 / 1.5 only supports 2 digits of latitude and longitude, giving a precision of approximately 60 feet.
NMEA 2.0 / 2.1 supports 3 digits of latitude and longitude, giving a precision of approximately 6 feet.
Another limitation to the system accuracy is digital charts. These electronic charts are made by highly skilled cartographers. Surveys on which the cartography is based, were in some cases, made over 50 years ago. So despite everyone’s best efforts, it may be possible to have errors in the final product.
Lastly, RayTech software was developed by highly skilled and talented software engineers and underwent a rigorous test and quality assurance program before being released. However, it is possible that software issues or malfunctions may remain undetected in the software. While Raymarine make every effort to find, fix and repair software issues as they are discovered, this product is specifically not promised to be issue free.
About this manual
This manual describes how to install and operate RayTech V6.1 marine navigation software. It assumes that the personal computer (PC) on which the software is to be installed meets the requirements for running this version of RayTech, and that all peripheral equipment intended to be operated with it is compatible and has been correctly installed.
This manual is intended for users with varying technical and marine abilities, but assumes a general level of knowledge of PC use and nautical terminology and practices.
This manual gives an overview of RayTech V6.1, and details the main functions and how to operate them. There are several ways that a task can be
Important information |
3 |
|
|
completed, experiment, find the way of using RayTech that best suits your way of working.
Conventions used
In this manual the following conventions will be used:
•RayTech refers to RayTech V6.1.
•The names of keyboard keys are printed in boldface, such as Enter.
•Italics are used to show names, such as Open Chart, or softkeys such as Find Vessel, except with notes.
•Instructions using menu options are written as menu option/submenu option. For example, the instructions might read ‘Select File/ Layers’. This means go to the File menu on the drop-down menus and select it. A submenu will appear that contains the Layers option for you to select.
•‘Click’ refers to clicking the mouse button. Unless otherwise stated, it refers to the left mouse button once.
•‘Right click’ refers to clicking the right mouse button once.
•‘Double click’ means to click the left mouse button twice quickly.
Product use
You may not use this product unless you agree to the terms and conditions of the license agreement.
In accepting these terms and conditions, you agree to be bound by the terms of the license agreement and to release and hold Raymarine harmless from and against any and all claims, obligations and liabilities with respect to the product, except those specifically reserved in the license agreement.
If you do not agree to the terms and conditions of the license agreement, you may return the program within thirty (30) days of the date of purchase by following the instructions contained within the license agreement.
System integration
RayTech V6.1 has been designed to work transparently with Raymarine’s
SeaTalk or SeaTalkhs data communication networks, or any other device that outputs data in National Marine Electronics Association (NMEA) 0183 format. These protocols allow information such as heading, wind speed and direction, sea temperature and other information to be accessed and displayed within RayTech. Information generated by RayTech can also be displayed on your boat’s standard on-board instruments.
If you intend to run RayTech on a laptop computer as part of an integrated system you should read “Installation Guidelines” on page 195 to ensure correct connectivity into the system.
Technical accuracy
The technical information contained within this manual, to the best of our knowledge, was correct at the time of printing. However, Raymarine cannot accept liability for any inaccuracies or omissions it may contain.
In addition Raymarine’s policy of continuous product improvement may change specifications without notice. As a result Raymarine cannot accept liability for any differences between the product and the manual.
Copyright
Under copyright laws use of this manual is intended for the original licensee.
No portion of this manual may be reproduced or transmitted in any form by any means, electronic or mechanical, including photocopying, recording, or information storage and retrieval systems, for any purpose other than the licensee’s use, without the express written permission of Raymarine, and provided in the licensing agreement between you and Raymarine.
4 |
RayTech RNS V6.1 - Users Guide |
|
|
Chapter 1: System overview and features |
5 |
|
|
Chapter 1: System overview and features
1.1 Introduction
This chapter introduces RayTech and covers the following:
•What’s in the box.
•System overview.
1.2 What do I get in the box?
When you open the box containing RayTech, you will find various components, depending on which package you have purchased.
RayTech V6.1 - Part No.E112111
Component |
Part No. |
RayTech CD-ROM with license key decal |
47001-2 |
RayTech accessory list |
47015-1 |
RayTech User’s Manual |
81260-1 |
Navionics CF Chart Reader |
E86026 |
If any of the components are missing, you should contact, in the first instance, the Raymarine dealer where you purchased your package, or Raymarine Customer Support, the details of which can be found in the Technical Support section of this handbook, on page 182.
Accessories
The following accessories are available for RayTech:
Component |
Raymarine Part No. |
|
Navionics CF Chart Reader |
E86026 |
|
C-Map USB C-Card Reader |
E86008 |
|
SeaTalk to PC Interface |
E85001 |
|
hsb2 |
PC (PCMCIA) Kit V6.1 |
E86023 |
hsb2 |
PC (USB) Kit V6.1 |
E85005 |
Serial data cable, DB-9 |
E86001 |
|
RayTech V6.1 Manual |
81260-2 |
|
SeaTalkhs crossover coupler |
E55060 |
|
Note: The use of the PCMCIA to hsb 2 kit, hsb 2 to USB 2.0 and C-map USB C-card reader are limited to use on platforms running on Windows 2000 or XP only.
6 |
RayTech RNS V6.1 - Users Guide |
|
|
CAUTION
Navionics CF Card Reader
The Navionics CF card reader has been designed and tested for home and dockside planning use only and has not been tested to marine standards for ruggedness or interference with other devices on board the vessel. Raymarine cannot accept responsibility or liability for any damage to the card reader, associated systems and equipment or compatibility issues arising from its use while underway.
Subscription services
Technical Support, comprehensive weather reporting and fishing updates require online registration and subscription at www.raymarine.com.
1.3 System overview
RayTech operates within a standard Windows environment, and enables you to utilize the latest digital charts and Global Positioning System (GPS) instrumentation to help you navigate your boat virtually anywhere in the world. RayTech easily interfaces with your boats onboard navigational systems, offering you the flexibility to allow RayTech to autopilot your boat to any destination you chose to plot.
RayTech also incorporates the capability to download the latest weather and oceanographic information and display it on any chart. Advanced features are included that will enhance RayTech’s route plotting and fishfinding performance making it an ideal choice for the serious sailor or fisherman.
1.4 System features
RayTech has been designed for ease of use and incorporates the following features:
Easy marine navigation
RayTech takes the guesswork out of marine navigation by enabling easy and accurate planning and plotting of simple or complex routes. These can be stored and re-used, even changed whilst in use to take changing weather conditions or other factors into account.
Chart formats
RayTech uses the latest digitized versions of the paper charts traditionally used in marine navigation, and supports the following chart formats:
•Navionics Silver and Gold+.
•Navionics Platinum and Platinum Plus.
•Navionics HotMaps.
•Navionics Fish ‘n’ Chip (US market only).
•C-Map NT and NT Plus.
•Maptech BSB v2.0/v3.0/v4.0 & NOAA RNC.
•Maptech PCX.
•Maptech Photo Regions and Topographical charts.
•SoftCharts Nautical charts and PhotoNavigator.
•NDI/CHS charts.
Note: Support for viewing Navionics cartography within RayTech is only possible if the Navionics cartography is contained on a Compact Flash card, and is served by either a Raymarine Multifunctional display/network or a Navionics Multi-card reader.
Chapter 1: System overview and features |
7 |
|
|
Comprehensive Weather/ Oceanographic reporting
RayTech offers you the capability to download and display the latest weather and ocean conditions, and then superimpose this information upon your charts in several layers. Weather and oceanographic charts (in GRIB format) can be downloaded directly from the Internet or requested via e-mail. These files can be animated to show predicted weather conditions over a specified period of time. Typical weather files contain information covering a period of several days, giving you a comprehensive presentation of atmospheric and marine conditions.
These features require online registration at www.raymarine.com.
Advanced graphical user interface
RayTech is operated via an easy-to-use Graphical User Interface (GUI) complete with many customizable toolbars, softkeys and ‘floating’ data boxes. Using an intuitive menu hierarchy, you can display only those tools that you commonly use, or customize screens to show you only pertinent information, with just a few mouse clicks. RayTech’s flexible GUI enables you to quickly and easily tailor its powerful resources to suit your needs.
Navionics Platinum chart card
Compatibility with Navionics Platinum chart card provides you with enhanced 2D cartography features, and introduces an easy to use 3D chart format that provides you with a graphical view of land and sea contours around your boat. Much of the information available on a conventional chart can be shown in three dimensions, giving you an accurate easy-to-view image of the area around.
To read Navionics Platinum Chart cards you will need to install a Navionics
Multicard reader - Part No. E86026, or have RayTech connected via SeaTalkhs to an E-Series display.
Sailboat racing
The sail racer features are targeted towards the professional sailboat racer, and include
•DataTrak.
•Polars.
•Route Optimization.
•Advanced weather routing.
•Pre-start display.
•Navigation numbers.
•Specialized racing toolbar.
Fishing (US market only)
The fishing features are targeted towards the serious fisherman. Raymarine offers subscription services to support the following fishing features:
•Ocean plankton - using data from the Orb View 2 satellite.
•Sea surface temperature (SST) - using data from U.S. Government weather satellites.
These features require online registration at www.raymarine.com.
8 |
RayTech RNS V6.1 - Users Guide |
|
|
Chapter 2: System requirements |
9 |
|
|
Chapter 2: System requirements
2.1 Introduction
This section deals with making sure that your PC is ready to install and run RayTech and details:
•System requirements.
•Whether your PC is ready to install RayTech.
•Upgrading drivers and adapters.
2.2 System requirements
Before you can begin installing RayTech, you need to make sure that the PC you intend to use meets the minimum hardware requirements for running the software. Whilst RayTech will run successfully on the minimum requirement, for best performance, the optimum requirements are recommended.
The minimum and optimum requirements are:
Minimum system requirements
The minimum system requirements are:
•Pentium IV processor.
•256MB RAM.
•XP with SP2 (Service Pack 2).
•CD-ROM drive.
•Monitor - capable of displaying 1024 x 768 resolution, 16 bit color.
IMPORTANT - In addition to the minimum/optimum requirements you will also require 1 or more of the following, depending on how RayTech is to be connected to your instruments system/network:
•Serial port - for connecting to NMEA 0183 or SeaTalk.
•Ethernet port - for connecting to a G or E-Series display using SeaTalkhs.
•PCMCIA port - for connecting to an hsb2 system using a PCMCIA to hsb2 adaptor.
•USB 2.0 port - for connecting to a hsb2 system using a USB 2.0/ PCMCIA adaptor.
•USB or USB 2.0 port - for Navionics Multicard Reader or of Serial to USB adapter.
Note: The use of the PCMCIA to hsb 2 kit, hsb 2 to USB 2.0 and C-map USB C-card reader are limited to use on platforms running on Windows 2000 or XP only.
Optimum system requirements
The optimum system requirements are:
•Pentium IV 2GHz processor or equivalent.
•1GB RAM or higher.
•NVIDIA GeForce graphics card.
•Windows XP SP2.

10 |
RayTech RNS V6.1 - Users Guide |
|
|
2.3 Is my PC ready to use RayTech?
An upgrade is required. Is the processor at least a 2GHz Pentium IV? 

 NO Visit www.raymarine.com for
details of recommended PCs and adapters
YES |
An upgrade is required. Does the PC have at least 256 mb RAM? 
 NO Visit www.raymarine.com for
details of recommended PCs and adapters
YES |
Is the PC running Windows XP? |
|
|
NO |
RayTech RNS requires Windows XP |
||
|
|
|||||
|
|
|
|
|
|
|
|
|
|
|
|
|
|
YES |
Does the PC have an NVIDIA |
|
|
NO |
||
|
|
||||
GeForce graphics adapter? |
|
|
|||
|
|
|
|||
|
|
|
|
|
|
|
|
|
|
|
|
|
|
|
|
|
|
YES |
Does the PC have a serial (RS232) port? |
|
|
NO |
||
|
|
||||
|
|
|
|
|
|
|
|
|
|
|
|
YES |
Raymarine recommends NVIDIA graphics adapters for best performance
D8820_2
A USB-serial adaptor is required if connecting to NMEA or SeaTalk
Visit www.raymarine.com for details of recommended PCs and adapters
Chapter 2: System requirements |
11 |
|
|
Is the PC a laptop?* |
|
|
NO |
|||
|
|
|||||
|
|
|
|
|
|
|
|
|
|
|
|
|
|
YES |
Does the PC have an USB 2.0 port? |
|
|
NO |
|||
|
|
|||||
|
|
|
|
|
|
|
|
|
|
|
|
|
|
YES |
Does the PC have an available Ethernet port |
|
|
NO |
||
|
|
||||
|
|
|
|
|
|
|
|
|
|
|
|
YES |
You will need a PCI-PCMCIA adaptor if connecting to hsb2 display via an hsb2 PC kit. Visit www.raymarine.com for
details of recommended PCs and adapters
You will need a USB 2.0 port if connecting to an hsb2 display using the hsb2to USB 2.0 interface
You will need an Ethernet port for interfacing SeaTalk hs
Is the PC's software up-to-date? |
NO |
Get the latest software updates for your PC from |
|
http://windowsupdate.microsoft.com |
|||
|
|
||
|
|
and the manufacturer of your graphics adapter |
|
YES |
|
(e.g. http://www.nvidia.com) or PC. |
|
|
|
||
|
|
D8821_1 |
|
Your PC is now ready for RayTech RNS |
|
|
Note: *If you are not planning to buy the Pathfinder PC kit, or use RayTech’s hsb2 networking capability for chart, radar, sonar sharing, you can skip this check.
12
D6966_1
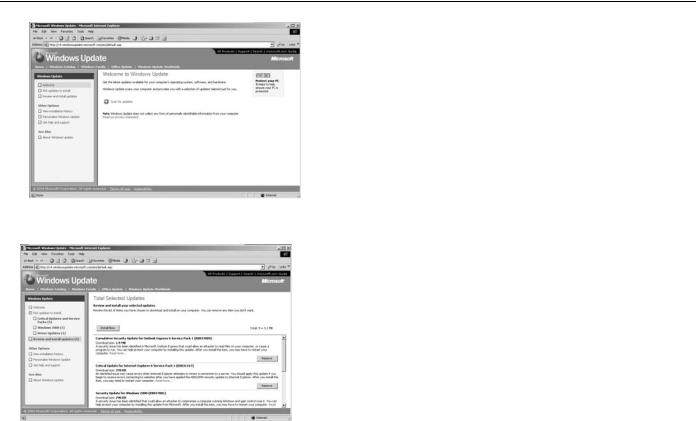
Figure 2-1: Welcome to Windows Update.
D6968_1
Figure 2-2: Review Updates screen.
RayTech RNS V6.1 - Users Guide
2.4 Upgrading drivers and adapters
Prior to installing RayTech, Raymarine strongly recommend updating your PC display drivers and verifying that you have the latest versions of Microsoft DirectX and your Display adapter driver installed.
Note: It will be necessary to have the PC connected to the Internet for these checks and updates to be carried out.
Driver update
To ensure that your PC is current with regard to Windows operating system patches you should execute the Windows Update utility.
To run the Windows Update utility:
1.On the computer taskbar, click Start. The pop-up menu is displayed.
2.Select and click Windows Update. The PC will connect to the Microsoft Windows Update site.
3.The Welcome screen is displayed. See Figure 2-1
4.Click Scan for Updates.
5.Your computer is scanned to find which update patches are required. The screen updates to show the progress of the scan. When the scan is complete the Review Updates screen is displayed. See Figure 2-2
6.Click Review and Install Updates. The available updates are displayed.
7.Click Install Now. Installation of the updates starts, with progress being shown on screen.
8.Upon completion of the installation a dialog box appears. This will tell you that installation is complete and that you need to restart your computer for the updates to be activated.
9.Check Restart Now. Click OK. Your computer will restart and Windows will be updated.
10.Repeat Steps 1-9 until all applicable updates have been installed.
Chapter 2: System requirements
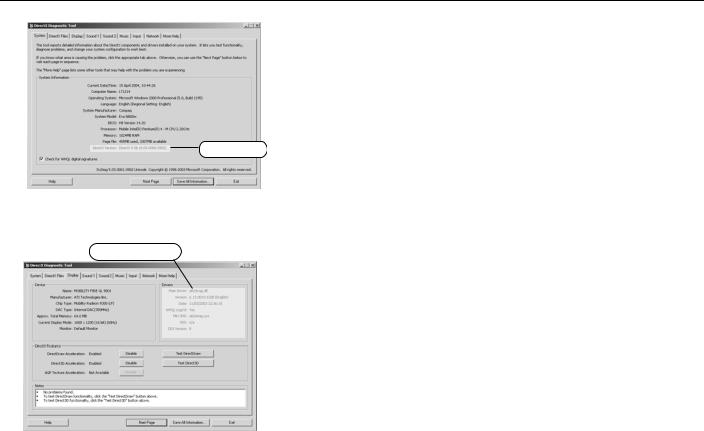
Version number
D6971_1
Figure 2-3: Direct X Diagnostics screen 1.
Display adapter details
D6972_1
13
Note: Windows update does not always update all drivers. Raymarine recommend that you check your PC/Hardware manufacturers web site to check for relevant driver updates.
DirectX
To ensure that you have the latest version of DirectX installed you should run the DirectX diagnostics utility.
To run DirectX diagnostics utility:
1.On the computer taskbar, click Start. The pop-up menu is displayed.
2.Select and click Run. The Run dialog box is displayed.
3.Type in, dxdiag. Click OK. The DirectX diagnostic tool will be displayed. See Figure 2-3
4.Make a note of the version number installed on your computer.
5.Click the Display or Display 1 tab. The display adapter screen is displayed. See Figure 2-4
6.Make a note of the display adapter name, manufacturer, chip type and driver version installed on your computer (highlighted in the picture above).
7.Point your Internet browser to - http:// www.microsoft.com/windows/ directx/downloads/default.asp and check the current version of DirectX. If the version installed is not current, download and install the latest version.
8.Point your Internet browser to the display adapter manufacturer’s site and check the current version available. If the version installed is not current, download the latest version.
Note: Laptop users should check their PC Manufacturers web site for rele- vant video driver updates.
Figure 2-4: Direct X Diagnostics screen 2.
14 |
RayTech RNS V6.1 - Users Guide |
|
|
Useful websites
You may find the following websites useful when ensuring your PC has the latest drivers and adapters available:
PC manufacturers |
|
Manufacturer |
Web site |
Acer |
www.acer.com |
Dell |
www.dell.com |
Fujitsu-Siemens |
www.fujitsu-siemens.com |
HP |
www.hp.com |
IBM |
www.ibm.com |
Samsung |
www.samsung.com |
Sony |
www.sony.com |
Toshiba |
www.toshiba.com |
Software and graphics manufacturers
Manufacturer |
Website |
AMD software |
www.amd.com |
ATI graphics |
www.ati.com |
Intel software |
www.intel.com |
NVIDIA graphics |
www.nvidia.com |
SIS software |
www.sis.com.tw |
VIA software |
www.viarena.com |
Chapter 3: Getting started |
15 |
|
|
Chapter 3: Getting started
3.1 Introduction
Having made sure that your computer meets the operating requirements and has the latest drivers installed. See “System requirements” on page 9, you are now ready to install and run RayTech. This section deals with:
•Installing and setting up RayTech.
•Installing charts.
3.2 Installing RayTech
Having checked that your computer meets the operating requirements, and upgraded its drivers and adapters as necessary your computer is now ready for installing RayTech.
You are now ready to install RayTech. There is a choice of how RayTech can be installed on your computer:
•from a CD-ROM.
•from the Internet.
Installation from a CD-ROM
To install RayTech using a CD-ROM:
1.Insert the RayTech CD into the CD-ROM drive of the computer on which you want to install the software.
2.The CD will automatically run and the Install Shield Wizard Welcome screen appears.
3.Follow the on-screen instructions.
If the Install Shield Wizard does not automatically run:
1.Select Start/Run from the computer taskbar and type e:\main.exe. (Substitute the drive letter of your CD-ROM drive for ‘e’ if it is different). After a few moments the Install Shield Wizard welcome screen is displayed.
2.Click Install Software. The Install Shield Wizard Welcome screen is displayed.
3.Follow the on-screen instructions.
Installation from the Internet
To install RayTech from the Internet:
1.Point your Internet browser to http://www.raymarine.com/RayTech software.
2.Click RayTechupgrade/Download and install the application here.
3.Click Download RNS 6.1 (Registration required). The registration screen appears.
4.Complete the registration form
5.Click Submit. The download instruction page opens.
6.Click Proceed to Download. The Download security dialog box appears.
7.Click Save. You are now prompted to select a location to save the file.
8.Select the location and click OK. File download begins.
Note: RayTech is a very large file (130MB). Dial-up connections are not recommended for this operation. A CD-ROM can be purchased from Raymarine if you prefer.
16
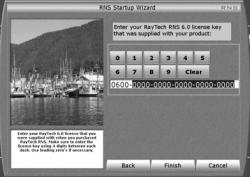
D9095_1
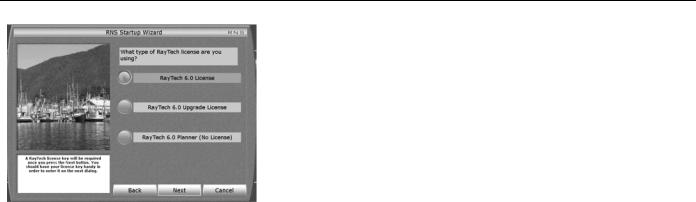
Figure 3-1: RayTech Startup Wizard Screen
 D9096_1
RayTech RNS V6.1 - Users Guide
After you have downloaded the file, it must be opened onto your computer as follows:
1.Open the location where the file is stored.
2.Double-click the RayTech icon.
3.Click Run. The Install Shield Wizard is displayed.
4.Follow the on-screen instructions.
Note: Raymarine recommends that you save the downloaded installation executable file by burning it to a CD-ROM and storing with your RayTech documentation.
3.3 Starting to use RayTech
Now that you have successfully installed RayTech on your computer the following steps explain how to start using the product.
License keys
Before using RayTech for the first time you will need to enter a license key.
Note: RayTech Planner does not require a licence key. See “Raytech Planner - Simulate mode.” on page 20.
There are two types of license key for RayTech:
•V6.1 Upgrade License key - required if you are upgrading to RayTech V6.1 from an earlier version.
•V6.1 License key - included when you purchase RayTech V6.1
Both keys can be purchased from http://www.raymarine.com/
RayTech.
Figure 3-2: RayTech Startup Wizard on-screen keyboard
Chapter 3: Getting started
D6912_1
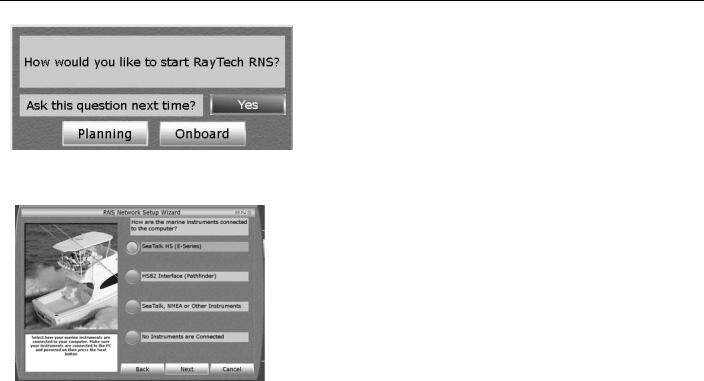
Figure 3-3: RayTech mode dialog box
Figure 3-4: RNS Network Set up Wizard
17
Entering license key segments of less than 4 characters
You may have a license key that contains segments of less than four numbers. To enable RayTech it is necessary to enter the license key and pad the numbers as follows, for example:
Your key is: 600-1-23-456-7-89.
This should be entered as: 0600-0001-0023-0456-0007-0089.
Running RayTech for the first time
To run RayTech for the first time:
1.Select Start/All Programs/Raymarine RayTech Navigator from the Windows task bar. RayTech will load and the RNS Startup Wizard is displayed. See Figure 3-1on page 16
2.Click the button next to the type of license key you want to enter.
Note: RayTech Planner user’s should skip to section 4.4 and refer to the Simulator section.
3.Click Next. The on-screen keyboard appears. See Figure 3-2on page 16 For details of license key types refer to “License keys” on page 16.
4.Enter your license key using the on-screen keyboard by moving the cursor over the required number and clicking.
5.Click Finish. The dialog box closes, and the RayTech splash screen appears.
The splash screen closes and the RayTech mode dialog box appears - “RayTech mode dialog box” on page 17.
You now have a choice of which mode RayTech opens in:
•Planning - Instrument connection is not required - see “Click the soft key for the mode you want RayTech to open.” on page 19.
•Onboard - enables you to configure your network settings.
18 |
RayTech RNS V6.1 - Users Guide |
|
|
Configure network settings
IMPORTANT: If you do not choose SeaTalkhs, make sure you have the PC on which RayTech is running connected to your boats instruments the first time you run RayTech in Onboard mode. The instruments must also be switched ON.
Note: The following section shows how to configure a SeaTalkhs network. To configure other types of network click the button next to the network type and follow the on-screen instructions.
To configure the network settings:
1.Follow Steps 1 through 6 of “Starting to use RayTech” on page 16.
2.Click Onboard. The RNS Network Setup Wizard appears - Figure 3-4on page 17.
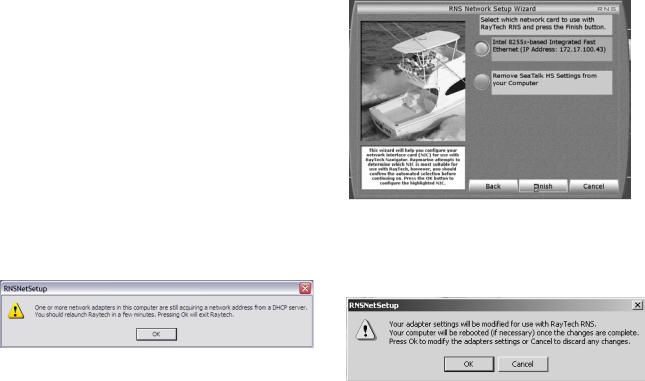
Note: If any network adapter is acquiring a network address from a DHCP server when Raytech is booting into ‘Onboard’ mode the following message will appear. You should then try to run Raytech once the network adapter has completed acquiring the necessary network address.
6.Click the button next to the network card description you wish to use with RayTech. This card will be configured to talk to your E-Series display.
7.Click Finish. The RNSNetSetup dialog box appears.
3.Click the button next to SeaTalkhs (E-Series).
4.Click the button corresponding to whether the PC is currently connected to your onboard instruments.
5.Click Next. The following screen appears:
D10747_1
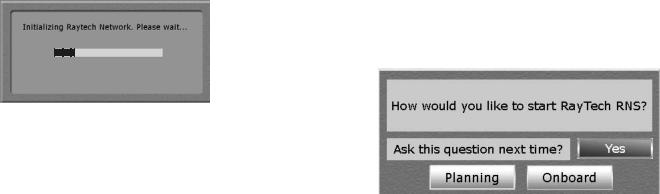
8.Click OK. RayTech starts to open and the network initialization progress box appears.
Chapter 3: Getting started |
19 |
|
|
D9097_1
As the initialization process is carried out RayTech will open and the Open New Page dialog box is displayed.
9.Highlight the icon for the page type you want to open and click OK. The new page opens.
10.You can now continue to work in RayTech.
Note: Raymarine recommends that you register your RayTech software on the Raymarine website. This ensures that you can recover your license key in the event of loss or failure of your PC’s hard drive
Using RayTech on a new computer
If you install the upgrade version of RayTech on a new computer, a dialog box may appear after entering the upgrade key asking you to enter your original RayTech V3.0/V4.x/V5.0 or V6.x license key. This should be entered in the same way as before using the on-screen keyboard that appears. Make sure the license key type is set to the correct version number.
To display the license keyboard:
1.Select File/Setup. The Setup dialog box is displayed.
2.Double-click the License icon. The on-screen license entry keyboard is displayed.
3.Enter your license key as described in“To run RayTech for the first time:” on page 17, Steps 7 through 9.
3.4 Continuing To Use RayTech
You will only need to enter a license key number the first time that you use RayTech after installing it. each time that you open RayTech, the following dialog box will appear:
D6912_1
Click the soft key for the mode you want RayTech to open.
Operating modes
RayTech can be operated in either of the following modes:
Planning
Enables you to work in a simulated mode, away from your boat if you want to. Useful for planning and learning purposes.
Onboard
Enables you to work in real-time mode onboard your boat with data being collected and used from all the instruments that you have connected to RayTech.
Simulator
RayTech includes a simulator mode which enables you to practise operating the software with simulated data of GPS, Radar, Fishfinder.

20 |
RayTech RNS V6.1 - Users Guide |
|
|
To Select The Simulator Mode:
1.Select File/setup. The ‘Set Up’ Dialog Box Is displayed.
2.Double-click The Instruments Icon. The Instruments Dialog Box Is displayed.
3.Click The Simulator Icon To set It to the required status.
Raytech Planner - Simulate mode.
RayTech Planner only operates in ‘Simulate mode’. If you want to change the Simulator’s automatic settings, you can taylor the menu to suit your needs. The Simulator menu is available to edit:
1.Select File/Setup. The Set Up Dialog Box Is Displayed.
2.Select Instruments.
3.Select Simulator is ON.
4.Taylor the menu to suit your needs/requirements by clicking the options, as pictured below.
Note: RayTech must be restarted for these changes to take effect!
The Vessels position can be edited to anywhere in the world, simply Rightmouse click, and select ‘Move Boat Here’ from the drop down menu.
3.5 Setting up RayTech
Once you have installed and started using RayTech, you can enter specific information for your boat and change default settings to your personal preferences that suit the way you work.
To set up RayTech:
1.With RayTech running select File/Setup. The set up dialog box is displayed.
1 _ D6915
D10912_1
2.Click on the icon of the setting you want to change.
3.Click OK. The dialog box for that setting will be displayed.
Loading...