

Page 1
Owner’s Manual
Cat. No. 20-514
200-Channel VHF/Air/UHF/800 MHz
Handheld Race Scanner
Please read before using this equipment.
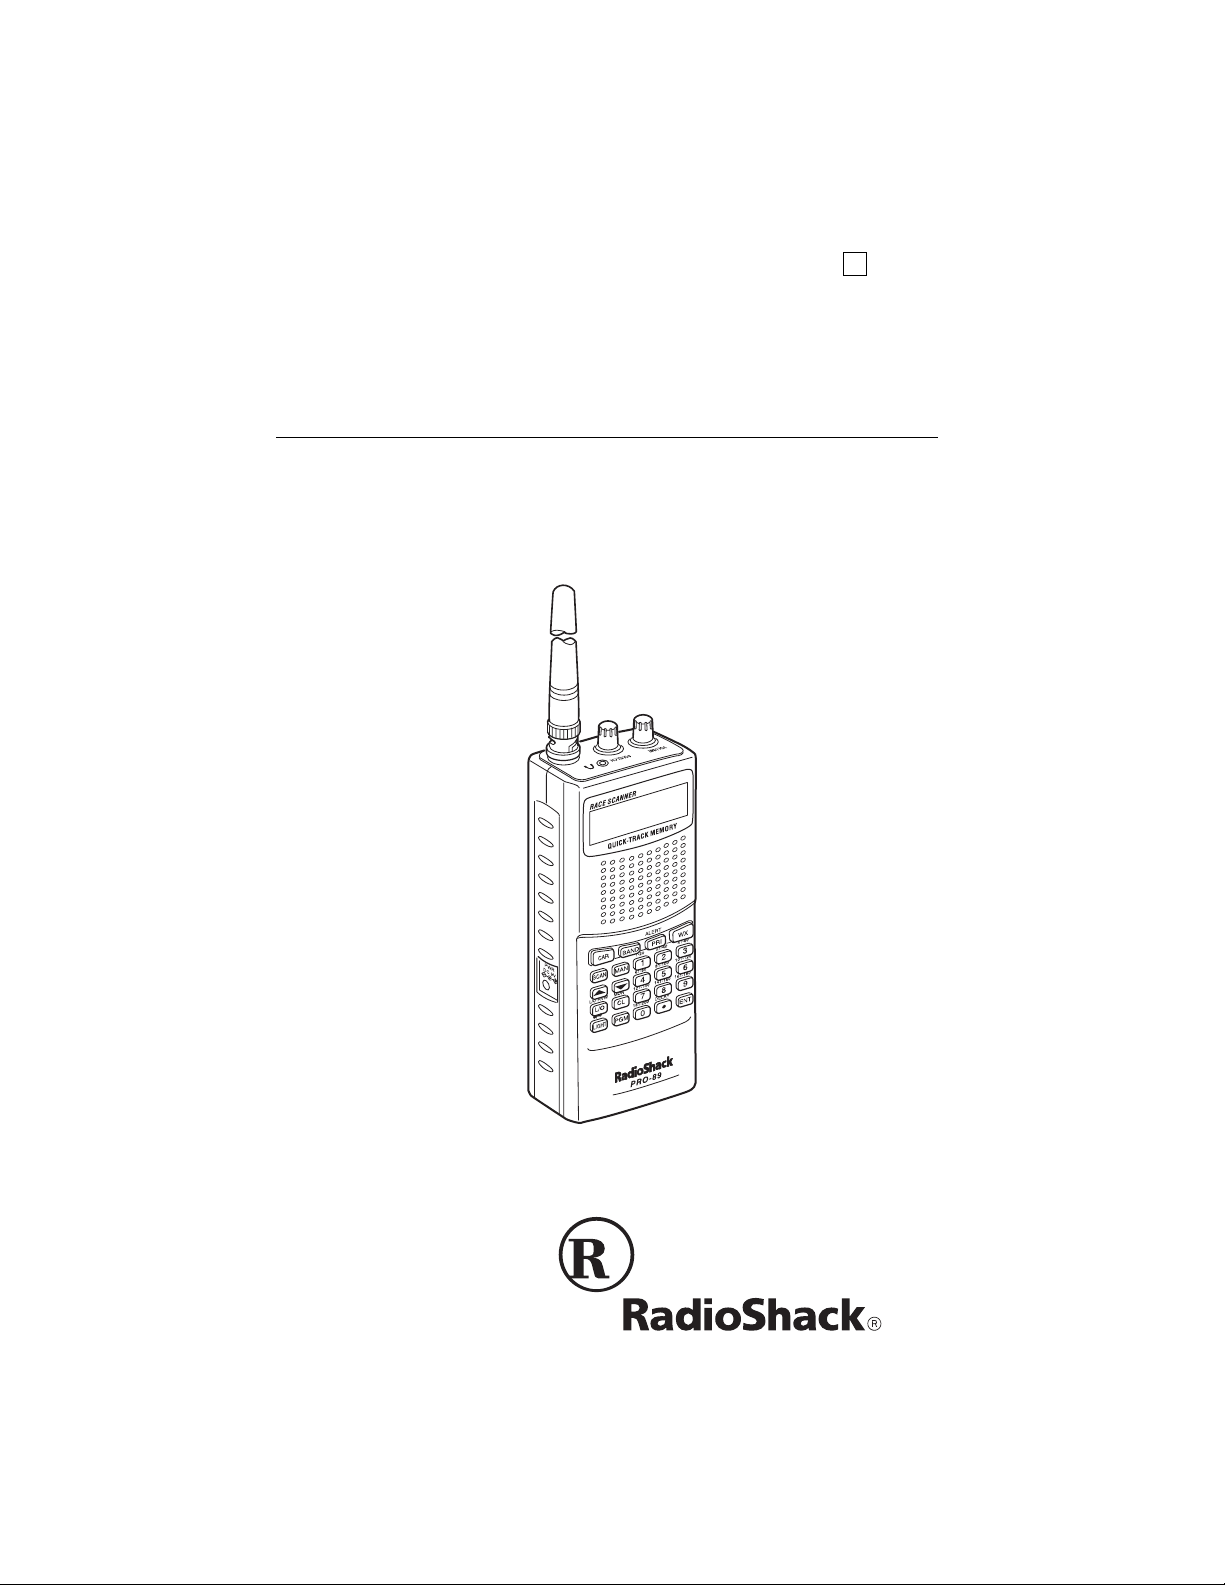
A
PRO-89
Page 2

INTRODUCTION
Your new RadioShack 200-Channel VHF/Air/UHF/800 MHz
Handheld Race Scanner lets you in on all the action in the pits
or on the track at the big race. This scanner gives you direct
access to over 33,500 frequencies, including those used by
participants and staff at auto races, police and fire departments, ambulance services, and amateur radio services. You
can select up to 200 channels to scan, and you can change
your selection at any time.
Your scanner also has these special features:
Five Service Banks
— lets you search preset frequencies in
separate fire/police, air, ham radio, auto race, and marine
banks, to make it easy to locate specific types of calls.
Two-Second Scan/Search Delay
— delays scanning for 2
seconds before moving to another channel, so you can hear
more replies.
Ten Channel-Storage Banks
— you can store up to 20 channels in each of 10 different banks, to group channels so you
can more easily identify calls.
20 Monitor Memories
— let you temporarily save up to 20 frequencies you locate during a search, so you can move selected frequencies to channel storage later.
Memory Backup
— keeps the channel frequencies stored in
memory for about 1 hour during a power loss.
Triple Conversion Superheterodyne Receiver
— virtually
eliminates any interference from intermediate frequency (IF)
images, so you hear only the frequency you select.
HyperSearch
and HyperScan
— let you set the scanner
to search at up to 50 steps per second and scan at up to 25
channels per second, to help you quickly find interesting transmissions.
Duplicate Frequency Check
— automatically notifies you if
you are about to store a frequency you have already stored, to
help avoid wasting storage space.
2001 RadioShack Corporation.
©
RadioShack is a registered trademark used by RadioShack Corporation.
HyperSearch, HyperScan, and Adaptaplug are trademarks used by
2
All Rights Reserved.
RadioShack Corporation.
Page 3

Direct Search
— lets you search for new and unlisted frequen-
cies starting from a specified frequency.
Priority Channel
— lets you designate a channel to be
scanned every two seconds so you do not miss important calls.
Weather Band Key
— scans seven preprogr ammed weather
frequencies to keep you informed about correct weather conditions.
Weather Alert
— automatically sounds the alarm tone to advise of hazardous weather conditions when it detects the alert
signal on the local NOAA weather channel.
Lock-Out Function
— lets you set the scanner to skip over
specified channels or frequencies when scanning or searching.
Key Lock
— lets you lock the scanner’s keys to help prevent
accidentally changing the scanner’s programming.
Two Supplied Antennas with BNC Connector
— lets you
select the antenna that best meets your needs. The supplied
stub antenna helps your scanner receive strong local signals
and makes the scanner easy to carry and use at events. The
supplied flexible antenna provides excellent reception of weaker signals and is designed to help prevent antenna breakage.
Liquid Crystal Display
— makes it easy to view and change
programming information.
Display Backlight
— makes the scanner easy to read in low
light situations.
Three Power Options
— let you power the scanner from in ternal batteries (non-rechargeable batteries, rechargeable Ni-MH
(nickel-metal hydride) or regular or high-capacity Ni-Cd ( nickelcadmium) batteries), external AC power (using optional adapters), or vehicle battery power (using optional adapters).
3
Page 4

Your scanner can receive all of these frequencies:
• 29–54 MHz
• 108–136.9875 MHz
• 137–174 MHz
• 380–512 MHz
• 806–823.9875 MHz
• 849–868.9875 MHz
• 894–960 MHz
This Owner’s Manual also includes the section “A General
Guide to Scanning” on Page 52 to help you target frequency
ranges in your service area so you can search for a wide variety of transmissions.
FCC NOTICE
Your scanner might cause TV or radio interference even when
it is operating properly. To determine whether your scanner is
causing the interference, turn of f your scanner. If the interference goes away, your scanner is causing it. Try to eliminate
the interference by:
• moving your scanner away from the receiver
• connecting your scanner to an outlet that is on a different
electrical circuit from the receiver
• contacting your local RadioShack store for help
If you cannot eliminate the interference, the FCC requires that
you stop using your scanner.
This device complies with Part 15 of the
is subject to the following conditions: (1) This device must not
cause harmful interference, and (2) this device must accept
any interference received, including interference that may
cause undesired operation.
Note:
Mobile use of this scanner is unlawful or requires a per-
mit in some areas. Check the laws in your area.
4
FCC Rules
. Operation
Page 5

SCANNING LEGALLY
Your scanner covers frequencies used by many different
groups including police and fire departments, ambulance services, government agencies, private companies, amate ur radio
services, military operations, pager services, and wireline (telephone and telegraph) service providers. It is legal to listen to
almost every transmission your scanner can receive. However,
there are some transmissions you should never intentionally
listen to. These include:
• telephone conversations (cellular, cordless, or other private means of telephone signal transmission)
• pager transmissions
• any scrambled or encrypted transmissions
According to the Electronic Communications Privacy Act (ECPA), you are subject to fines and possible imprisonment for intentionally listening to, using, or divulging the contents of such
a transmission unless you have the consent of a party to the
communication (unless such activity is otherwise illegal).
This scanner has been designed to prevent reception of illegal
transmissions. This is done to comply with the legal requirement that scanners be manufactured so as to not be easily
modifiable to pick up those transmissions. Do not open your
scanner’s case to make any modifications that could allow it to
pick up transmissions that it is not legal to listen to. Doing so
could subject you to legal penalties.
We encourage responsible, legal scanner use.
5
Page 6

CONTENTS
Preparation ........................................................................... 8
Installing Batteries ........................................................... 8
Using AC Power ............................................................... 9
Using Vehicle Battery Power ......................................... 10
Charging Rechargeable Batteries ................................. 10
Connecting an Antenna ...................................... ... ........ 11
Connecting a Supplied Antenna ........... .... ... ... ... .... ... . 11
Connecting an Outdoor Antenna ............................... 12
Connecting an Earpho n e/ He ad ph o nes ........................ . 13
Listening Safely ........................................ ... ... ... .... ... . 13
Traffic Safety ............................................................. 14
Connecting an Extension Speaker ................................ 14
Understanding the Scanner ................................ ... ... .... ... . 15
A Look at the Keypad ............ ....................................... . 15
A Look at the Display ................... .... ... ... ... .... ... .............. 17
Understanding Banks .................................................... 20
Channel Storage Banks ............................................. 20
Service Banks ............................................................ 21
Monitor Memories .......................................................... 25
Operation ............................................................................ 26
Turning On the Scanner/Setting Volume and Squelch .. 26
Storing Known Frequencies into Channels .................... 26
Finding and Storing Active Frequencies ........................ 27
Searching the Service Banks .................................... 27
Using Direct Search ................................................... 30
Using Monitor Memor y .......................... ... .... ... ... ........... 31
Listening to a Monitor Memory .............................. ... . 31
Moving a Frequency from a Monitor Memory
to a Channel ................................................ .............. 32
Scanning the Stored Channels ...................................... 32
Turning Channel-Storage Banks Off and On ................. 33
Monitoring a Stored Channe l ....... .... ... ........................... 34
Clearing a Stored Channel ............................................ 34
Clearing all Stored Channels ......................................... 34
Clearing all Locked-Out Channels ................................. 35
Listening to the Marine Bank ......................................... 35
Listening to the Weather Band ...................................... 35
WX Alert .................................................................... 36
Scanning at the Races ....................................................... 37
Storing a Car Number and Frequency ........................... 37
Adding Frequencies to a Car Number ........................... 38
Adding a Car Number to the Channel ........................... 39
6
Page 7

Changing the Stored Car Number ................................ 39
Viewing Frequencies Associated with a Car Number ... 39
Deleting a Frequency from a Car Number .................... 40
Scanning by Car Number .............................................. 40
Finding Car Numbers Associated With Channels ......... 41
Special Features ........... .... ... ... ... ....................................... . 42
Delay .................................................. ........................... 42
Locking Out Channels or Frequencies .......................... 42
Locking Out Channels ............................................... 42
Clearing All Lockouts from Channels ........................ 43
Locking Out Frequencies .......................................... 43
Reviewing Locked-Out Frequencies ......................... 43
Removing a Lockout From a Frequency ................... 44
Removing Lockouts From All Frequencies ............... 44
Removing Lockouts From All Frequencies in
All Service Banks ...................................................... 44
Using Priority ................................................................ 45
Using Power Save ......................................................... 46
Using the Display Backlight ........................................... 46
Turning the Key Tone On and Off .................................. 46
Using the Key Lock ....................................................... 47
Resetting/Initializing the Scanner . ... .............................. 47
Resetting the Scanner .............................................. 48
Initializing the Scanner ....................................... ... ... . 48
Wired/On-Air Programming ...... ... .... ... ... ... .... ... ... ... .... ... ... . 49
Using Wired Programming ............................................ 49
Wired Programming Specifications ........................... 50
Using On-Air Programming ........................................... 50
On-Air Programming Specifications .......................... 51
A General Guide to Scanning ........................................... 52
Guide to Frequencies .................................................... 52
National Weather Frequencies .................................. 52
Birdie Frequencies .................................................... 52
Guide to the Action Bands ............................................ 53
Typical Band Usage (MHz) ....................................... 53
Primary Usage .......................................................... 53
Band Allocation ............................................................. 54
Frequency Conversion .................... ... ... .... ... ... .............. 58
Troubleshooting ................ ...... ...... ....... ...... .......... ....... ...... . 59
Care and Maintenance ...................................................... 60
Specifications .................................................................... 61
7
Page 8

PREPARATION
INSTALLING BATTERIES
You can power your scanner with four AA batteries (not supplied). For the best performance and longest life, we recommend RadioShack alkaline batteries.
You can use either the black non-rechargeable battery holder
or the yellow rechargeable battery holder (both supplied) to
hold the batteries. If you use the yellow battery holder, we recommend nickel-cadmium or nickel-metal hydride batteries (not
supplied).
Cautions:
• Use only fresh batteries of the required size and recommended type.
• Do not mix old and new batteries, different types of batteries (standard, alkaline, or rechar geable), or rechargeable
batteries of different ca pacities.
Warning:
low rechargeable battery holder. Non-rechargeable batteries
can get hot or explode if you try to recharge them.
Follow these steps to install batteries.
1. Press down on the battery compartment cover then slide
2. If you are using non-rechargeable batteries, place them
3. Place the battery holder into the battery compartment.
4. Replace the cover.
When flashes on the display and the scanner beeps, or if
the scanner stops operating properly, replace the batteries.
Never install non-rechargeable batteries in the yel-
the cover in the direction of the arrow to remove it.
into the black holder, as indicated by the polarity symbols
(+ and –) marked on the holder. Or, if you are using
rechargeable batteries, place them into the yellow holder
as indicated by the polarity symbols (+ and –) marked on
the holder.
Caution:
battery compartment. Do not force it.
The battery holder fits only one way inside the
B
8
Page 9

Warning:
not burn or bury them.
Dispose of old batteries promptly and properly. Do
Caution:
for a month or more, remove the batteries. Batteries can leak
chemicals that can destroy electronic parts.
If you do not plan to use the scanner with batteries
USING AC POWER
You can power the scanner using a 9V, 300-mA AC adapter
and a size C Adaptaplug adapter (neither supplied). Both are
available at your local RadioShack store.
Cautions:
You must use a Class 2 power source that supplies 9V DC and delivers at least 300 mA. Its cen-
!
ter tip must be set to positive and its plug must fit
the scanner's
not meet these specifications could damage the scanner
or the adapter.
• Always connect the AC adapter to the scanner before you
connect it to AC power. When you finish, disconnect the
adapter from AC power before you disconnect it from the
scanner.
PWR DC 9V
jack. Using an adapter that does
To power the scanner using an AC a dap te r, at ta ch t he Ada pt aplug to the AC adapter so the tip reads positive (+), then insert
the Adaptaplug into the scanner’s
the other end of the adapter to a standard AC outlet.
PWR DC 9V
jack. Connect
9
Page 10

USING VEHICLE BATTERY POWER
You can power the scanner from a vehicle’s 12V power source
(such as a cigarette-lighter socket) using a 9V, 300-mA DC
adapter and a size C Adaptaplug (neither supplied). Both are
available at your local RadioShack store.
Cautions:
You must use a power source that supplies regulated 9V DC and delivers at least 300 mA. Its cen-
!
ter tip must be set to positive and its plug must fit
the scanner's
not meet these specifications could damage the scanner
or the adapter.
• Always connect the DC adapter to the scanner before you
connect it to the power source. When you finish, disconnect the adapter from the power sour ce bef o re you disconnect it from the scanner.
To power the scanner using a DC adapter, attach the Adaptaplug to the DC adapter so the tip reads positive (+), set the
adapter’s voltage switch to 9V, then insert the Adaptaplug into
the scanner’s
adapter into your vehicle’s cigarette-lighter socket.
PWR DC 9V
PWR DC 9V
jack. Using an adapter that does
jack. Plug the other end of the DC
Note:
If you use a cigarette-lighter power cable and your vehicle’s engine is running, you might hear electrical noise fr om the
engine while scanning. This is normal.
CHARGING RECHARGEABLE
BATTERIES
Your scanner has a built-in charging circuit that lets yo u charge
rechargeable batteries while they are in the scanner. To
charge rechargeable batteries, you need to use an AC adapter
which supplies 9V (RadioShack Cat. No. 273-1767) or a DC
adapter which supplies 10V (Cat. No. 273-1830). Connect a
size C Adaptaplug to the adapter’s cable with the tip set to positive then insert the Adaptaplug into the scanner’s
jack.
10
PWR DC 9V
Page 11

Note:
Do not overcharge Ni-Cd batteries. Overcharging caus-
es them to get hot and shortens their life.
It takes between 14 and 16 hours to recharge Ni-MH or 7 and 8
hours to recharge Ni-Cd batteries that are fully discharged.
You can operate the scanner while recharging the batteries,
but charging takes longer.
Note:
Ni-Cd batteries last longer and deliver more power if you
occasionally let them fully discharge. To do this, simply use the
scanner until flashes on the display and the scanner
B
beeps. Then fully charge the batteries.
Important:
Seal on the nickel-cadmium (Ni-Cd) battery indicates
RadioShack is voluntarily participating in an industry
program to collect and recycle these batteries at the end
of their useful life, when taken out of service in the United States or Canada. The RBRC program provides a conveni ent alternative to placing used Ni-Cd batteries into the trash or the
municipal waste stream, which may be illegal in your area. Please
call 1-800-THE-SHACK (1-800-843-7422) for information on Ni-Cd
battery recycling and disposal bans/restrictions in your area.
RadioShack’s involvement in this program is part of the company’s
commitment to preserving our environment and conserving our natural resources.
The EPA certified RBRC® Battery Recycling
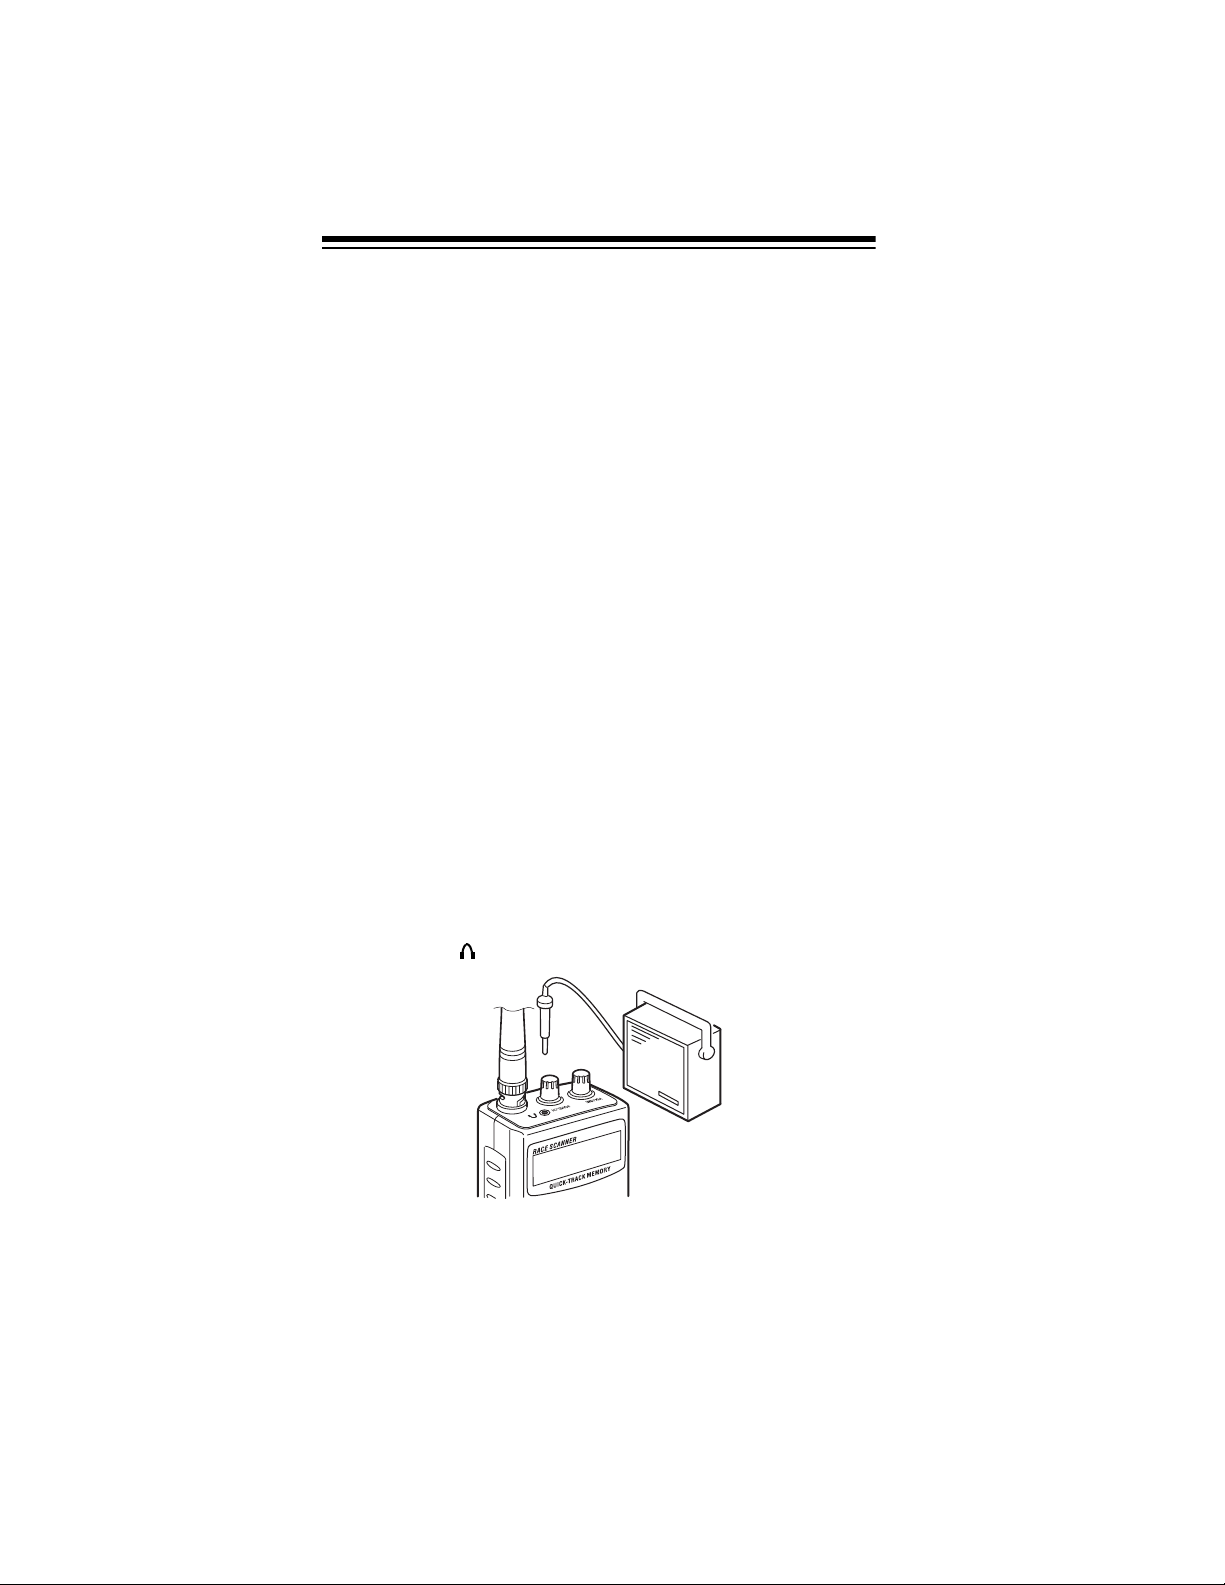
CONNECTING AN ANTENNA
Connecting a Supplied Antenna
You must install an antenna before you can operate the scanner.
The supplied stub antenna helps your
scanner receive most strong transmissions at events and makes the scanner
easier to carry and use. The supplied
flexible antenna provides slightly better
reception and helps your scanner receive strong local signals. Follow these
steps to attach either antenna to the
scanner.
11
Page 12

1. Align the slots around the antenna’s connector with the
tabs on the antenna jack.
2. Press the antenna down over the jack and turn the
antenna’s base clockwise until it locks into place.
Connecting an Outdoor Antenna
Instead of a supplied antenna, you can connect an outdoor
base-station or mobile antenna (not supplied) to your scanner
using a BNC connector. Your local RadioShack store sells a
variety of antennas. Choose the one that best meets your
needs.
When deciding on a mobile or base-station antenna and its location, consider these points:
• The antenna should be as high as possible on the vehicle
or building.
• The antenna and its cable should be as far as possible
from sources of electrical noise, such as appliances or
other radios.
• The antenna should be vertical for the best performance.
Always use 50 Ohm coaxial cable, such as RG-58 or RG-8, to
connect the base-station or mobile antenna. For lengths over
50 feet, use RG-8 low-loss dielectric coaxial cable. If the antenna cable’s connector does not fit in the scanne r’s antenna ja ck,
you might also need a PL-259-to-BNC antenna plug adapter.
Your local RadioShack store carries a wide var iety of coaxial
antenna cable and connectors.
Once you choose an antenna, follow the
mounting instructions supplied with the antenna, after removing a supplied antenna.
Then route the antenna’s cable to the scanner and connect the cable to the scanner’s
antenna jack.
12
Page 13

Cautions:
• Do not run the cable over shar p edges or mo ving par ts that
might damage it.
• Do not run the cable next to power cables or othe r anten na
cables.
Warning:
an outdoor antenna. If the antenna starts to fall, let it go! It
could contact overhead power lines. If the antenna touches a
power line, contact with the antenna, mast, cable, or guy
wires can cause electrocution and death. Call the power co mpany to remove the antenna. DO NOT attempt to do so yourself.
Use extreme caution when you install or remove
CONNECTING AN EARPHONE/
HEADPHONES
For private listening, you can connect an earphone or headphones with a
the scanner. (Your local RadioShack store carries a wide selection of earphones and headphones). Connecting an earphone or headphones automatically disconnects the internal
speaker.
1
/8-inch (3.5-mm) plug to the jack on the top of
Listening Safely
To protect your hearing, follow these guidelines when you use
an earphone or headphones.
• Set the volume to the lowest setting before you begin listening. After you begin listening, adjust the volume to a
comfortable level.
13
Page 14
• Do not listen at extremely high volume levels. Extended
high-volume listening can lead to permanent hearing loss.
• Once you set the volume, do not increase it. Over time,
your ears adapt to the volume level, so a volume level that
does not cause discomfort might still damage your hearing.
Traffic Safety
• Do not use an earphone or headphones with your scanner
when operating a motor vehicle or riding a bicycle in or
near traffic. Doing so can create a traffic hazard and could
be illegal in some areas.
• If you use an earphone or headphones with your scanner
while riding a bicycle, be very careful. Do not listen to a
continuous transmission. Even though some earphones or
headphones let you hear some outside sounds when listening at normal volume levels, they still can present a traffic hazard.
CONNECTING AN EXTENSION SPEAKER
In a noisy area, an amplified extension speaker (available at
your local RadioShack store) might provide more comfortable
listening. Plug the speaker cable’s
your scanner’s jack.
Note:
Connecting an external speaker disconnects the scan-
ner’s internal speaker.
14
1
/8-inch (3.5-mm) plug into
Page 15

UNDERSTANDING THE SCANNER
Once you understand a few simple terms used in this manual
and familiarize yourself with your scanner’s features, you can
put the scanner to work for you. You simply determine the type
of communications you want to receive, then set the scanner to
scan them.
frequency
A
kHz or MHz). To find active frequencies, you can use the
search
is the tuning location of a station (expressed in
function.
You can also search the
preset groups of frequencies categorized by type of service.
When you find a frequency, you can store it into a programmable memory location called a
your other channels in a
scan
the channel-storage banks to see if there is activity on
the frequencies stored there. Each time the scanner finds an
active frequency, it stays on that channel until the transmission
ends.
service-search banks
channel
channel-storage bank
, which is grouped with
, which are
. You can then
A LOOK AT THE KEYPAD
If your scanner’s keys seem confusing at first, the following illustration and information should help you understand each
key’s function.
Note:
Some of the scanner’s keys perform more than one
function and are marked with more than one label. The steps in
this Owner’s Manual show only the label on the key appropriate to the action being performed.
15
Page 16

CAR
BAND
Lets you store car numbers and frequencies in
the scanner’s channels, add and delete frequencies from car numbers, display car numbers, and listen to the channel where a car
number is stored.
,
Each time you press
CAR
you see the following
information in the following order:
– Manual Mode
– Car Number Input Mode
– Car Number Display Mode
– Car Number Input Mode
– Manual Mode
Lets you search the scanner’s preprogrammed
service-search banks.
PRI/ALERT
WX
SCAN
MAN
Number Keys
▼
/▲
L/O RVW/L/O
16
Turns the priority feature on and off; turns the
WX alert mode on and off.
Scans the seven preprogrammed weather
channels.
Scans any programmed channels.
Stops scanning and lets you directly enter a
channel number.
Each key has single-digit (0 to 9) and a ra nge of
numbers. Use the single digits to enter a channel or frequency. The range of numbers above
the key (21–40 for example) indicate the channels that make up a channel-storage bank. See
“Understanding Banks” on Page 20.
Searches up or down for active frequencies or
selects the direction when scanning channels.
Reviews locked-out frequencies; lets you lock
out selected channels or frequencies.
Page 17
MON/CL
Lets you listen to frequencies stored in the 20
monitor memories; clears an incorrect entry.
LIGHT/
Locks and unlocks the keypad to prevent accidental entries; turns the backlight on and off.
PGM
DELAY
/
•
Programs frequencies into channels.
Programs a 2-second delay for the selected
channel; enters a decimal point.
ENT
(enter) Enters frequencies into channels.
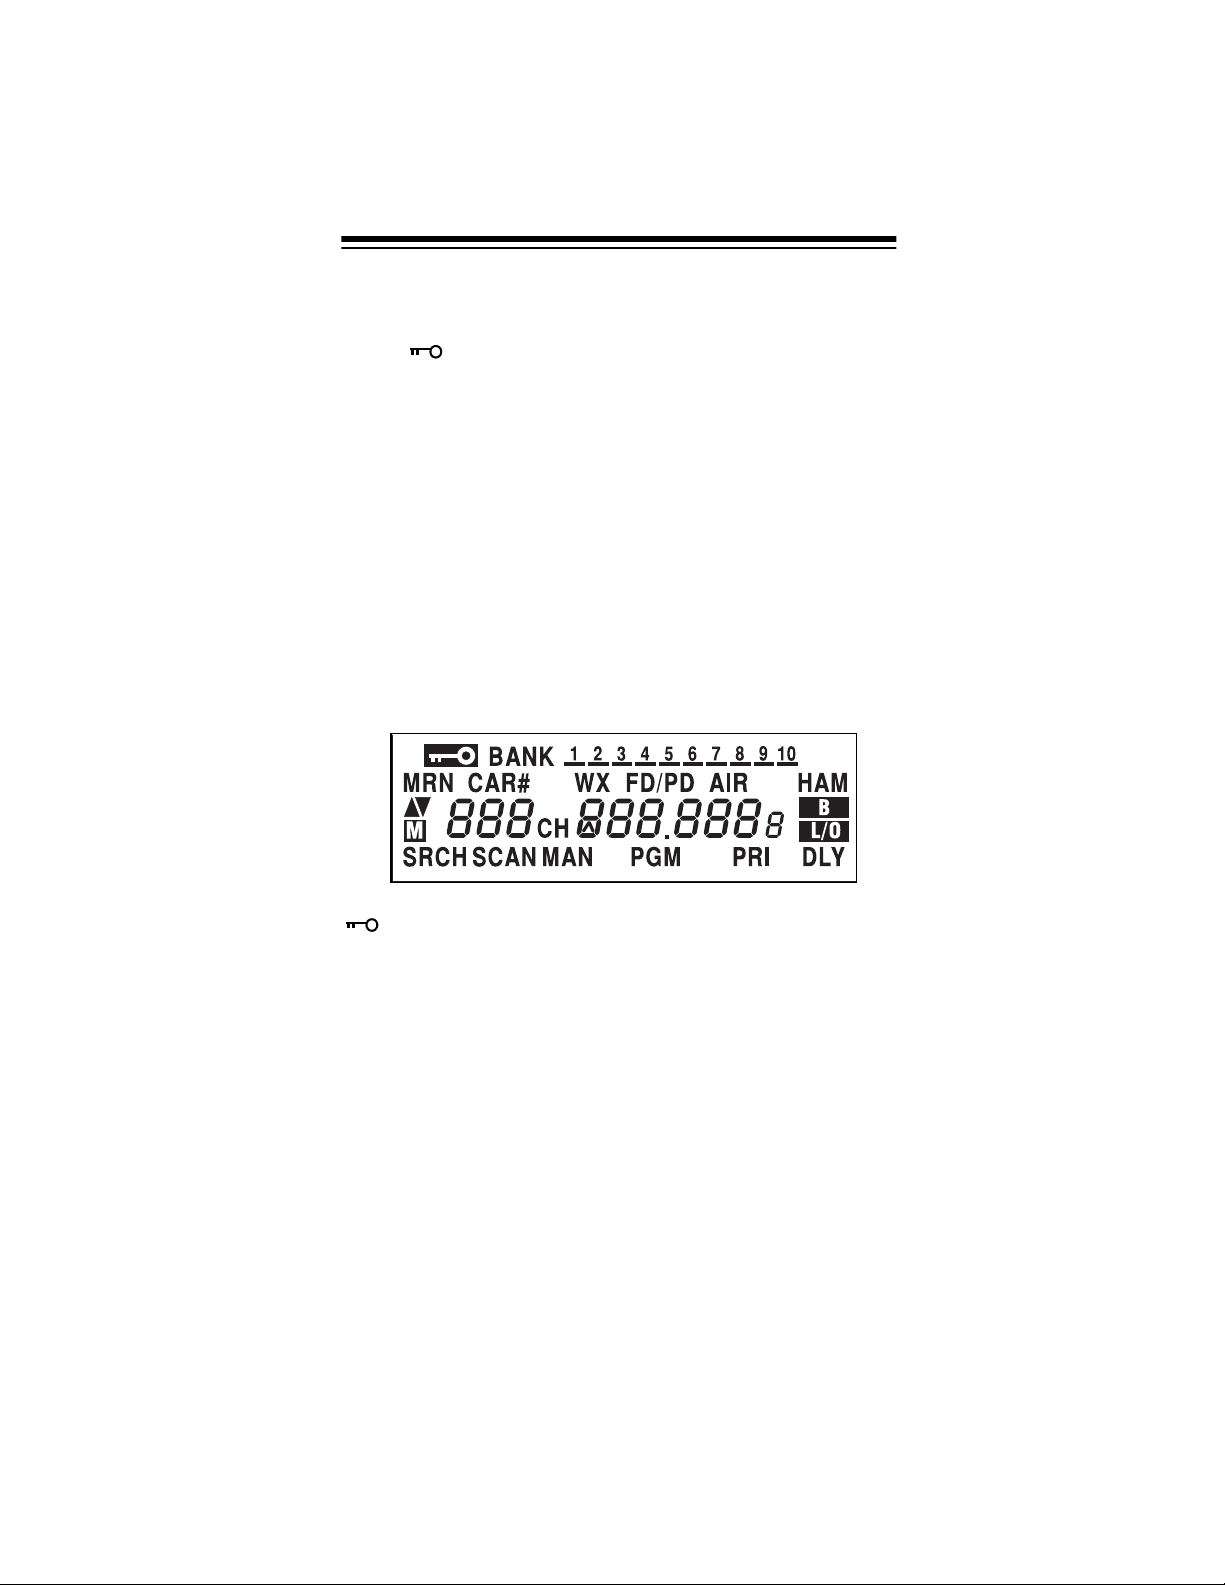
A LOOK AT THE DISPLAY
The display has indicators that show the scanner’s curr ent operating status. This quick look at the display will help you understand how your scanner operates.
Appears when you lock the keypad.
BANK
MRN
CAR#
WX
Appears with numbers (1–10) to indicate the
scan bank. Bank numbers with a bar under
them show which banks are turned on fo r scan ning (see “Understanding Banks” on Page 20).
Indicates that the scanner is searching the marine service bank.
Appears when you store car numbers and frequencies into the scanner’s channels, add and
delete frequencies from car numbers, display
car numbers, and move to the channel where a
car number is stored.
Indicates that the scanner is searching the
weather channels.
17
Page 18

FD/PD
AIR
HAM
/▼
▲
Indicates that the scanner is searching the fire/
police service bank.
Indicates that the scanner is searching the air
service bank.
Indicates that the scanner is searching the amateur radio service bank.
Indicates the search or scan direction.
M
CH
B
L/O
SRCH
SCAN
MAN
PGM
PRI
DLY
(lockout)
Flashes with a number (1–20) to show which
monitor memory you are listening to.
and a frequen-
Appears with digits (1–200) or
cy
to show which channel the scanner is tuned
to.
Appears when the batteries are low.
Appears when you manually select a channel
that was previously locked out during scanning
or when you review a locked-out frequency.
Appears during service bank and direct frequency searches.
Appears when the scanner scans channels.
Appears when you manually select a channel.
Appears when you program frequencies into
the scanner’s channels.
Appears when the priority feature is turned on.
Appears when you program a 2-second delay.
P
Error
-dUPL-
-d-
-b-
18
Appears when you make an entry error.
Appears when you try to store a frequency that
is already stored in another channel.
Appears during a direct frequency search.
Appears during a service bank frequency
search (except auto race and marine bank).
Page 19

CAr
Appears when you listen to the car race
service bank.
CAr No.
Ch-FULL
F L-out
FLo-FULL
L-r
dEFAULt
_ _ _
FLo ALL-CL
L-o Ch0000
Appears when you input the car number.
Appears when you try to enter a frequency
into a channel during a search when all
channels are full.
Appears when you start a direct search
from a locked-out frequency.
Appears when you try to lock out a frequency during a search when 50 frequencies are already locked out.
Appears when you review the locked-out
frequencies.
Appears when you remove all the lockouts from the service bank frequencies.
Appears when you remove all the lockedout frequencies during a service bank or
direct search.
Appears when you clear all locked-out
channels.
Lo ALL-CL
ALL Ch0000
P
ALErt
On Air
WirEd
Appears when you remove all lockouts
from channels.
Appears when you clear all stored channels.
Appears when the scanner is tuned to the
priority channel.
Appears when the weather alert is on.
Appears when you set on-air program-
ming mode to program frequencies into
your scanner.
Appears when you set wired programming
mode to program frequencies into your
scanner.
19
Page 20

StArt
Appears when the scanner starts wired or
on-air programming.
C-Err
d-Err
End
oFF tonE
on tonE
P.-SA
on P.-SA
oFF P.-SA
Appears when the scanner receives a checksum error during wired or on-air programming.
Appears when the scanner receives a data
error during wired or on-air programming.
Appears when the scanner has finished
wired or on-air programming.
Appears when you turn off the key tone.
Appears when you turn on the key tone.
Appears when the power save function is
turned on.
Appears when you turn on power save.
Appears when you turn off power save.
UNDERSTANDING BANKS
Channel Storage Banks
To make it easier to identify and select the channels you want
to listen to, channels are divided into 10 banks of 20 channels
each. Use each channel-storage bank to group frequencies,
such as those used by the police department, fire department,
ambulance services, or aircraft (see “Guide to the Action
Bands” on Page 53).
For example, the police department might use four frequencies, one for each side of town. You could pro gram the police
frequencies starting with Channel 1 (the first channel in bank 1)
and program the fire department frequencies starting with
Channel 21 (the first channel in bank 2).
20
Page 21

Service Banks
The scanner is preprogrammed with the frequencies allocated
by auto racing, fire/police, aircraft, ham radio, and marine services. This is handy for quickly finding active frequencies instead of searching through an entire band (see “Searching the
Service Banks” on Page 27).
Note:
The frequencies in the scanner’s service banks are pre-
set. You cannot change them.
Auto Racing
Group Frequency Range (MHz)
1 150.995–151.995 5
152.870–153.725 5
154.490–154.625 5
2 460.000–470.000 12.5
3 851.0375
851.6625
852.0375
852.1875
853.1625
853.2625
853.4875
854.2625
854.2875
854.7875
855.0375
855.2875
855.5125
855.5625
855.5875
855.7375
855.7875
856.7875
856.9125
857.8375
858.7375
858.7875
858.8375
859.8375
Step
(kHz)
–
21
Page 22

Group Frequency Range (MHz)
Step
(kHz)
Fire/Police
Group Frequency Range (MHz)
3 865.6125
865.6625
865.7125
936.2125
937.1500
937.2000
937.2875
Step
(kHz)
1 33.420–33.980 20
37.020–37.420 20
39.020–39.980 20
42.020–42.940 20
44.620–45.860 40
45.880 –
45.900 –
45.940–46.060 40
–
22
46.080–46.500 20
2 153.770–154.130 60
154.145–154.445 15
154.650–154.950 15
155.010–155.370 60
155.415–155.700 15
155.730–156.210 60
158.730–159.210 60
166.250 –
170.150 –
Page 23

Group Frequency Range (MHz)
3 453.0375–453.9625 12.5
4 856.2125–860.9875 25
Air
Frequency Range (MHz) Step (kHz)
Amateur Radio
Step
(kHz)
458.0375–458.9625 12.5
460.0125–460.6375 12.5
465.0125–465.6375 12.5
866.0125–868.9875 12.5
108.000–136.9875 12.5
Marine
Group Frequency Range (MHz)
1 29.000–29.700 5
2 50.000–54.000 5
3 144.000–148.000 5
4 420.000–450.000 12.5
Channel Frequency (MHz)
06 156.3000
07 156.3500
08 156.4000
09 156.4500
10 156.5000
Step
(kHz)
23
Page 24

Channel Frequency (MHz)
11 156.5500
12 156.6000
13 156.6500
14 156.7000
15 156.7500
16 156.8000
17 156.8500
18 156.9000
19 156.9500
20 157.0000/161.6000
21 157.0500
22 157.1000
23 157.1500
24 157.2000/161.8000
25 157.2500/161.8500
24
26 157.3000/161.9000
27 157.3500/161.9500
28 157.4000/162.0000
64 156.2250
65 156.2750
66 156.3250
67 156.3750
68 156.4250
69 156.4750
70 156.5250
71 156.5750
Page 25

Channel Frequency (MHz)
72 156.6250
73 156.6750
74 156.7250
77 156.8750
78 156.9250
79 156.9750
80 157.0250
81 157.0750
82 157.1250
83 157.1750
84 157.2250/161.8250
85 157.2750/161.8750
86 157.3250/161.9250
87 157.3750/161.9750
88 157.4250
Note:
Both frequencies (transmission and reception) are
shown for marine channels used for duplex transmission.
MONITOR MEMORIES
The scanner has 20 monitor memories that you can use to
temporarily store frequencies while you decide whether t o save
them into channels. This is handy for quickly storing an active
frequency when you are searching through an entire band.
You can store a frequency into a monitor memor y dur ing a se rvice bank or direct search. See “Finding and Storing Active
Frequencies” on Page 27.
You can select monitor memories manually, but you cannot
scan them. See “Listening to a Monitor Memory” on Page 31.
25
Page 26

OPERATION
TURNING ON THE SCANNER/SETTING
VOLUME AND SQUELCH
1. Turn
2. To turn on the scanner, turn
3. Turn
4. To turn off the scanner when you finish, turn
SQUELCH
turn on the scanner.
hear a hissing sound.
SQUELCH
stops.
Notes:
• To listen to a weak or distant station, turn
counterclockwise. If reception is poor, turn
clockwise to cut out weak transmissions.
SQUELCH
• If
sound, the scanner will not scan or search properly.
counterclockwise to
until the indicator points to
VOLUME
clockwise, just until the hissing sound
is adjusted so you always hear a hissing
OFF
.
MIN
before you
clockwise until you
SQUELCH
SQUELCH
VOLUME
STORING KNOWN FREQUENCIES INTO
CHANNELS
Good references for active frequencies are the RadioShack
Police Call Guide including Fire and Emergency Services, Official Aeronautical Frequency Directory
cy Directory
sure to get a current copy.
Follow these steps to store frequencies into channels.
1. Press
want to store a frequency, then press
26
. We update these directories every year, so be
MAN
, enter the channel number (1–200) where you
Maritime Frequen-
, and
PGM
.
Page 27

2. Use the number keys and • to enter the frequency (including the decimal point) you want to store.
3. Press
4. To program the next channel in sequence, press
ENT
to store the frequency into the channel.
Notes:
• If you made a mistake in Step 2,
the scanner beeps three times when you press
Simply start again from Step 2.
• Your scanner automatically rounds the entered fre-
quency down to the closest valid frequency. For example, if you enter a frequency of 151.473, your scanner
accepts it as 151.470.
• If you entered a frequency that is already stored in
another channel, the scanner beeps three times and displays the lowest channel number where th e frequen cy is
already stored, and
flashes. If you want to store the frequency anyway,
ENT
press
•Press
onds on this channel before it proceeds to the next
channel after a transmission ends (see “Delay” on
Page 42). The scanner also stores this setting in the
channel.
repeat Steps 2 and 3.
again. Press
DELAY
if you want the scanner to pause 2 sec-
–dUPL–
MON/CL
Error
then the frequency
to clear the frequency.
appears and
PGM
ENT
and
.
FINDING AND STORING ACTIVE
FREQUENCIES
Searching the Service Banks
Your scanner contains groups of preset frequencies called service banks. Each service bank is associated with a specific activity (see “Service Banks” on Page 21). You can search for
fire/police, air, ham, auto race, and marine transmissions even
if you do not know the specific frequencies that are used in
your area. Then you can store the frequencies you found into
the scanner’s channels or monitor memories.
27
Page 28

Notes:
• You ca n use the scanner’s delay feature while search ing
the service banks, see “Delay” on Page 42.
• The following steps show you how to listen to the HAM,
FD/PD, CAR, and AIR service banks. To listen to the MRN
bank, see “Listening to the Marine Bank” on Page 35.
1. Press
HAM
BAND
SRCH, -b-
),
. The last selected band name (such as
, frequency and the group number (if
any) appear.
Note:
-b-
does not appear if the CAR service bank is
selected.
2. To select a different band, repeatedly press
BAND
until the
desired band name appears on the display. After about 2
seconds, the scanner begins searching rapidly in that band
for an active frequency.
Notes:
• To reverse the search direction at any time, hold down
▲
or ▼ for about 1 second.
• To search up or down the band in small increments,
repeatedly press ▲ or ▼. ▲ or ▼ disappears. (See “Service Banks” on Page 21 for frequency steps).
• To pause the search while receiving a signal, press ▲ or
▼. ▲
or ▼ disappears. To resume searching, hold down
▲
or ▼.
• To quickly move up or down through the frequencies,
hold down ▲ or ▼. The scanner tunes through the frequencies until you release ▲ or ▼.
3. If necessary, select a search group from the list with “Service Banks” on Page 21 then use the number keys to enter
the desired search group. The scanner searches for an
active frequency.
4. When the scanner finds an active frequency, it stops
searching and displays the frequency’s number. To store
the displayed frequency in the lowest available channel,
press
PGM
then
ENT
. The channel and frequency flash
twice, and the scanner stores the displayed f requency. The
scanner then continues to search for frequencies.
28
Page 29

Or, to store the displayed frequency in a channel you
PGM
select, press
, use the number keys to enter the chan-
nel number you want to use to store the frequency, then
PGM
press
again. The channel number flashes.
If a channel number you entered is already programmed
with a frequency, the channel number and the programmed frequency appear for about 2 seconds. Then the
channel number flashes and the new frequency appears.
ENT
Press
to program the new frequency or press
to cancel. If you press
ENT
, the channel and frequency
CL/MON
flash twice, and the scanner stores the displayed frequency. The scanner then continues to search for f reque ncies.
Notes:
• If there is no empty channel,
you press
PGM
. To store more frequencies, you must
Ch-FULL
appears after
clear some channels. See “Clearing a Stored Channel”
on Page 34. To continue searching after
Ch-FULL
appears, hold down ▲ or ▼. To remain on the frequency
after
Ch-FULL
appears, press
MON/CL
Ch-FULL
.
disappears.
• If you entered a frequency that is already stored in
another channel,
-dUPL-
(duplicate) and the lowestnumbered channel containing the duplicate frequency
flash for about 3 seconds. If you want to store the frequency anyway, press
store the frequency, press
ENT
again. If you do not want to
MON/CL
. The scanner continues to search. You can then delete the frequency later.
See “Clearing a Stored Channel” on Page 34.
5. To store the displayed frequency in a monitor memory,
MON/CL
press
. The monitor memory number, , and the
M
frequency flash twice.
6. To search for another active frequency in the selected
band, hold down ▲ or ▼ for about 1 second. To select a
different band and search for another active frequency,
repeat Steps 2–5.
29
Page 30

Using Direct Search
During a direct search, the scanner searche s up or down, star ting from a frequency you specify. Follow these steps to use direct search.
Note:
You can use the scanner’s delay feat ure while using di-
rect search.
1. Press
MAN
then enter the frequency (including the decimal
point) you want to use as a starting point for the search.
Note:
To start from a frequency already stored in one of
MAN
MAN
and enter the desired
again.
your scanner’s channels, press
channel number, then press
2. Hold down ▲ or ▼ for about 1 second to search up or
–d–, SRCH
down.
, and ▲ or ▼ appear.
Notes:
• To reverse the search direction at any time, hold down
▲
or ▼ for about 1 second.
• To search up or down the selected band in small increments (5 or 12.5 kHz steps), repeatedly press ▲ or ▼.
• To pause the se arch, press ▲ or ▼. To resume searching, hold down ▲ or ▼.
• To quickly move up or down through the frequencies,
hold down ▲ or ▼. The scanner tunes through the frequencies until you release ▲ or ▼.
3. When the scanner finds an active frequency, it stops
searching and displays the frequency’s number. To store
the displayed frequency in the lowest available channel,
press
PGM
then
ENT
. The channel and frequency flash
twice, and the scanner stores the displayed f requency. The
scanner continues to search for frequencies.
Or, to store the displayed frequency in a channel you
select, press
30
PGM
, use the number keys to enter the chan-
Page 31

nel number you want to use to store the frequency, then
PGM
press
again. The channel number flashes.
If a channel number you entered is already programmed
with a frequency, the channel number and the programmed frequency appear for about 2 seconds. Then the
channel number flashes and the new frequency appears.
ENT
Press
MON
to program the new frequency, or press
to cancel. If you press
ENT
, the channel and fre-
CL/
quency flash twice and the scanner stores the displayed
frequency. The scanner then continues to search for frequencies.
Notes:
• If there is no empty channel,
Ch-FULL
appears. To
store more frequencies, you must clear some channels.
See “Clearing a Stored Channel” on Page 34. To continue searching after
Ch-FULL
appears, hold down
or ▼. To remain on the frequency after
appears, press
MON/CL
Ch-FULL
.
disappears.
Ch-FULL
▲
• If you entered a frequency that is already stored in
another channel,
-dUPL-
(duplicate) and the lowestnumbered channel containing the duplicate frequency
flash on the display for about 3 seconds. Then the
lowest-available channel number and frequency flashes.
If you want to store the frequency anyway, press
ENT
again. If you do not want to store the frequency, press
MON/CL
. The scanner continues to search.
4. To store the displayed frequency in a monitor memory,
MON/CL
press
. , the monitor memory number, and the
M
frequency flash twice.
5. To search for another active frequency, hold down ▲ or
for about 1 second.
USING MONITOR MEMORY
Listening to a Monitor Memory
To recall a frequency stored in a moni tor memory, press
MON/CL
then
and the stored frequency appears.
. , the monitor memory number, and CH flash
M
▼
MAN
31
Page 32

Note:
See Step 5 under “Searching the Service Banks” on
Page 27 for more information about storing a frequency in a
monitor memory.
To select other monitor memories, enter the desired monitor
memory’s number (1–20), then press
edly press
MON/CL
.
MON/CL
again or repeat-
Moving a Frequency from a Monitor Memory to a
Channel
1. Press
2. Press
3. Enter the desired monitor memory’s number (1–20), then
4. Press
5. To move another monitor memory frequency to the next
MAN
, enter the channel number where you want to
store the frequency, then press
MON/CL
flash, and the frequency in the selected monitor memory
appears.
MON/CL
press
quency appears.
ENT
selected channel.
channel, press
. , a monitor memory number, and
M
again. The selected monitor memory’s fre-
. The scanner stores the frequency in the
PGM
and repeat Steps 2–4.
PGM
.
CH
SCANNING THE STORED CHANNELS
To set the scanner to continuously scan through all channels
with stored frequencies, simply press
pear, the scanner begins to rapidly scan until it finds an active
frequency, and a bar flashes beneath the bank being scanned.
SCAN
SCAN
.
and ▲ ap-
If the scanner finds an active frequency, it stops and displays
that channel and frequency number, then it automatically begins scanning again when the transmission on that frequency
ends.
32
Page 33

Notes:
• To reverse the scanning direction, press ▲ or ▼.
• To set the scanner to remain on the current channel for 2
seconds after the transmission ends, see “Delay” on
Page 42.
• To set the scanner to remain on the current channel, even
after the transmission stops, press
the transmission so
(see “Monitoring a Stored Channel” on Page 34).
• To lock out channels so the scanner does not stop for a
transmission on those channels, see “Locking Out Channels or Frequencies” on Page 42.
MAN
appears and
MAN
at any time during
SCAN
disappears
TURNING CHANNEL-STORAGE BANKS
OFF AND ON
Channel-storage banks (1–10) are on when they have a bar
underneath them and off when no bar appears underneath
them. To turn off a channel-storage bank, press that bank’s
number key during scanning. The bar under the bank’s number
disappears.
Note:
The scanner does not scan an y of the channels within
the banks you have turned off.
To turn on a channel-storage bank (1–10) during scanning,
press the bank’s number key. A bar appears under the bank’s
number.
Notes:
• You ca nnot turn off all banks. There must be at least one
active bank.
• You can manually select any channel in a bank, even if the
bank is turned off.
• When you turn on a bank during scanning, the scanner
moves to the selected bank and scans it. If no transm ission is found, the scanner continues to scan through all
selected banks.
33
Page 34

MONITORING A STORED CHANNEL
You can continuously monitor a specific channel without scanning. This is useful if you hear an emergency transmission on a
channel and do not want to miss any details — even though
there might be periods of silence — or if you simply want to
monitor that channel.
Follow these steps to manually select a channel.
1. Press
2. Enter the channel number (1–200).
3. Press
MAN
MAN
.
again.
CLEARING A STORED CHANNEL
If you no longer want a frequency stored in a channel (and you
do not want to replace that frequency with a different one), follow these steps to clear the stored frequency.
1. Press
2. To select the desired channel number, use the number
3. Press
4. Press
5. To clear another channel, use the number keys to enter
MAN
to stop searching or scanning.
keys to enter that channel number (1–200).
PGM
PGM
.
appears.
0
then
000.0000
that channel number (1–200), then press
repeatedly press
appears. Then repeat Step 4.
ENT
. The frequency number changes to
to indicate the channel is cleared.
PGM
until the desired channel number
PGM
again. Or
CLEARING ALL STORED CHANNELS
PGM
1. Press
2. While holding down
3. Press
34
PGM
.
appears.
MON/CL
appears.
ENT
. The scanner clears all channels. Or, if you do
not want to clear all channels, press
, press 0.
MON/CL
ALL Ch0000
.
Page 35

CLEARING ALL LOCKED-OUT
CHANNELS
PGM
1. Press
PGM
.
appears.
2. While holding down
Ch0000
3. Press
if you do not want to clear the channels, press
appears.
ENT
. The scanner clears all locked-out channels. Or,
MON/CL
, press
L/O RVW/L/O
MON/CL
.
L-o
.
LISTENING TO THE MARINE BANK
until
MRN
To listen to the marine bank, repeatedly press
appears.
To change the channel manually, press ▲ or ▼.
To scan through the marine bank, hold down ▲ or ▼ for about
2 seconds.
change the scanning direction, press ▲ or ▼.
To stop scanning the channels, hold down ▲ or ▼ for about 2
seconds.
You can select a marine channel directly when the scanner is
not scanning the marine bank. Use the number keys to enter
the two-digit channel number.
MAN
disappears and
SCAN
disappears and
SCAN
and ▲ or ▼ appear. To
MAN
appears.
BAND
LISTENING TO THE WEATHER BAND
To hear your local forecast and regional weather information,
WX
press
band.
Your scanner should stop within a few seconds on your local
weather broadcast. If the broadcast is weak, you can press
again to resume scanning.
. Your scanner begins to scan through the weather
WX
Channel Frequency (MHz)
1 162.400
2 162.425
35
Page 36

3 162.450
4 162.475
5 162.500
6 162.525
7 162.550
WX Alert
Your scanner’s WX alert warns you of serious weather conditions by sounding an alarm if a National Weather Service
broadcaster in your area broadcasts a weather alert tone.
To set the scanner so it sounds an alarm when a weather alert
tone is broadcast, press
the WX channel.
ALErt
weather alert, it sounds an alarm. Press any key to turn off the
alarm. To cancel the weather alert operation, press
again.
PRI/ALERT
while you are listening to
appears. If the scanner detects the
PRI/ALERT
36
Page 37

SCANNING AT THE RACES
Your scanner is specially designed to help you listen to communications at auto races. Drivers and their pit crews and corner watchers, pace car drivers, security officers, emergency
personnel, track officials, and representatives of governing organizations such as NASCAR, SCCA, and NHRA all use radios to communicate with each other during a race. You might
also hear transmissions from the news media and reporters,
local police departments, and paramedics and doctors at the
local hospital. You can even listen to transmissions by parking
lot employees at the track, so you can find the best possible
parking place when you arrive.
You can store a car number and frequ ency in each of t he scanner’s channels, associate one or more frequencies stored in
channels with a car number, and recall any frequencies associated with that car number by simply entering the number. You
can store one car number and frequency, or one frequency by
itself, in each channel (for up to 200 car numbers and frequencies).
For example, if you want to listen to comm unications between
the driver of car number 24 and that driver’s pit crew, you find
all the frequencies used by the driver’s team by using any of
the following options:
• the steps in “Searching the Service Banks” on Page 27
• the supplied frequency guide
• “Using Direct Search” on Page 30
• frequencies you already know
Then, you store a car number and the frequencies associated
with that car number in the scanner’s channels and display the
car number as you scan those frequencies by using the information in “Scanning by Car Number” on Page 40.
STORING A CAR NUMBER AND
FREQUENCY
You can store a car number and frequency in each of the scanner’s channels, and you can recall any frequencies associated
with the car number by entering the number. You can store
one car number in each channel (for up to 200 car numbers).
37
Page 38

Note:
After you store a car number and a frequency, you can
store additional frequencies then associate those frequencies
with the same car number. See “Adding Frequencies to a Car
Number.”
Follow these steps to store a car number and frequency.
CAR#
1. Press
flashes.
2. Enter the car number. If the number is one or two digits,
enter the number then press
digits, enter the number only. The car number and
. _ _ _
Notes:
• If you add one or more leading zeros to a single-digit car
CAR
.
appear.
number, your scanner recognizes them as different car
numbers. For example, you can enter 5 f or one car number, 05 for another car number, and 005 for another car
number.
and
CAr No.
CAR
appear and
. If the number is three
_ _ _
_ _ _
• To clear the display (if you make a mistake), press
MON
before you press
3. Enter the frequency (including the decimal point) you want
to associate with the car number by using the number keys
DELAY
and
4. Press
quency are stored in the first available channel.
.
/
•
ENT
to store the frequency. The car number and fre-
CAR
.
CL/
ADDING FREQUENCIES TO A CAR
NUMBER
Follow these steps to select a car number then associate additional frequencies with that car number.
CAR#
1. Press
flashes.
2. Use the number keys to enter the car number if the number is three digits. If the car number is less than three digits, enter the car number then press
and the first frequency associated with that number
appear.
3. Repeatedly press ▲ or ▼ until
CAR
.
and
CAr No.
_ _ _._ _ _
appear and
CAR
. The car number
_ _ _
appears.
38
Page 39

4. Enter the frequency (including the decimal point) you want
to associate with the displayed car number by using the
number keys and
5. Press
ENT
to store the frequency. The frequency is associ-
ated with the car number you entered.
DELAY
.
/
•
ADDING A CAR NUMBER TO THE
CHANNEL
You can assign the car number after you program the frequency into the channel.
CAR
1. If a car number appears on the disp lay, press
channel number appears.
2. Select the channel you want to use to stor e the ca r number
by using the number keys and
MAN
.
twice. A
3. Press
4. While holding down
5. Enter the car number by using the number keys.
6. Press
CAR
twice.
ENT
to store the new car number.
CAR#
PGM
appears.
, press
CAR
---
.
flashes.
CHANGING THE STORED CAR NUMBER
1. Press
2. Hold down
3. Enter the car number by using the number keys, then
CAR
then use the number keys to enter the car number. If n ecessary, repeatedly press ▲ or ▼ to select the frequency .
flashes.
press
PGM
then hold down
ENT
to store the car number.
CAR
. The car number
VIEWING FREQUENCIES ASSOCIATED
WITH A CAR NUMBER
1. Press
_ _
flashes.
MAN
then
CAR
CAR#
.
and
CAr No.
appear and
_
2. Enter the car number. If the number is one or two digits,
enter the number then press
digits, enter the number only. One of the car number’s frequencies appears.
CAR
. If the number is three
39
Page 40

3. Repeatedly press ▲ or ▼ to view each of the car numbers
you entered. As you press ▲ or ▼, you see all associated
frequencies and
_ _ _._ _ _
.
DELETING A FREQUENCY FROM A CAR
NUMBER
1. Recall the car number.
2. Repeatedly press ▲ or ▼ until the frequency you want to
delete appears.
3. Press
4. Press
PGM
0
then
.
ENT
.
SCANNING BY CAR NUMBER
Once you store car numbers into channels, you can set the
scanner so it displays the car numbers you assigned to the
channels as it scans them.
until
_ _ _
BANK
appears
and
To scan by car number, repeatedly press
CAR#
appear, then press
nels, the car numbers you stored appear in channe l order, from
the lowest to the highest channel.
Notes:
• If no car number is assigned to a channel,
instead of the car number.
SQUELCH
• If
sound, the scanner does not scan properly.
When you finish scanning by car number, repeatedly press
CAR
until
is adjusted so you always hear a hissing
CAR#
disappears.
SCAN
. As the scanner scans chan-
CAR
40
Page 41

FINDING CAR NUMBERS ASSOCIATED
WITH CHANNELS
If you are listening to a channel and want to know what car
CAR
number you are hearing, simply press
ber has been associated with this frequency, the car number
CAR
and frequency appear. Press
mal channel listening.
twice again to return to nor-
twice. If a car num-
To see what car numbers are stored , pres s
ENT
peatedly press
number to highest) appear.
. The car numbers (from lowest channel
CAR
twice, then re-
41
Page 42

SPECIAL FEATURES
DELAY
Many agencies use a two-way radio system that has a period
of several seconds between a query and a reply. To avoid
missing a reply, you can program a 2-second delay into any
channel or frequency. When your scanner stops on a channel
or frequency with a programmed delay,
scanner continues to monitor that frequency for 2 seconds after the transmission stops before resuming scanning or
searching.
You can program a 2-second delay in any of these ways:
• If the scanner is scanning and stops on an active channel,
quickly press
• If the desired channel is not selected, manually select the
channel, then press
• If the scanner is searching, press
and the scanner automatically adds a 2-second delay to
every transmission it stops on in that band.
DELAY
before it resumes scanning.
/
•
DELAY
.
/
•
DLY
appears and the
DELAY
DLY
.
/
•
appears
To turn off the 2-second delay in a channel or fr eque ncy, p ress
DELA Y
quency.
while the scanner is monitoring that channel or fre-
/
•
DLY
disappears.
LOCKING OUT CHANNELS OR
FREQUENCIES
You can increase the effective scanning or search speed by
locking out individual channels or frequencies that have a continuous transmission, such as a weather channel (see “National Weather Frequencies” on Page 52) or a birdie frequency
(see “Birdie Frequencies” on Page 52).
Locking Out Channels
To lock out a channel during scanning, press
when the scanner stops on the channel.
To manually lock out a channel, select the chann el then press
L/O/L/O RVW
42
L/O
.
appears.
L/O/L/O RVW
Page 43

To remove the lockout from a channel, manually select that
channel again, then press
Notes:
• Your scanner automatically locks out empty channels.
• You can still manually select locked-out channels.
L/O/L/O RVW
L/O
.
disappears.
Clearing All Lockouts from Channels
MAN
1. Press
MAN
.
appears.
2. While holding down
ALL-CL
3. Press
channels. Or, if you do not want to clear, press
appears.
ENT
. The scanner clears all locked-out tags from
MON/CL
, press
L/O RVW/L/O
MON/CL
.
Lo
.
Locking Out Frequencies
To lock out a frequency during a service bank or direct search,
L/O/L/O RVW
press
The scanner locks out the frequency then continues searching.
You can lock out frequencies in both d irect se arch an d service
bank searches.
Note:
You can lock out as many as 50 frequencies during a
search. If you try to lock out m ore,
“Reviewing Locked-Out Frequencies” and “Removing Lockouts From All Frequencies” on Page 44).
when the scanner stops on that frequency.
FLo -FULL
appears (see
Reviewing Locked-Out Frequencies
To review the frequencies you locked out, hold down
RVW
for about 2 seconds during a search, then repeatedly
press ▲ or ▼. The scanner beeps if there are no locked-out
frequencies, or
locked out frequencies as you press ▲ or ▼. When you reach
the highest locked-out frequency, the scanner beeps twice and
returns to the lowest locked-out frequency.
L-r
appears and the scanner displays all
L/O/L/O
43
Page 44

Removing a Lockout From a Frequency
1. Start a service bank or direct search.
2. Hold down
appears.
3. Repeatedly press ▲ or ▼ until the desired frequency
appears.
4. Press
another locked-out frequency, it appears instead. Or, if
there are no more locked-out frequencies,
000.0000
L/O/L/O RVW
L/O/L/O RVW
appears.
for about 2 seconds.
. The frequency disappears. If there is
L-r
L-r
Removing Lockouts From All Frequencies
1. Hold down
vice bank or direct search.
2. While holding down
ALL-CL
3. Press
quencies (except in the marine service bank). Or, if you do
not want to clear the lockouts, press
L/O/L/O RVW
appears.
ENT
. The scanner clears any lockouts from all fre-
for about 2 seconds during a ser-
L-r
appears.
MON/CL
, hold down
L/O/L/O RVW
MON/CL
.
.
Flo
Removing Lockouts From All Frequencies in All
Service Banks
Notes:
44
• These steps do not clear any lockouts in the marine service bank.
• If you locked out frequencies within the range of any of the
service banks during a direct search, the scanner also
removes those locked-out frequenci es when you use these
steps. For example, if you lock out 29.000 MHz during
direct search, the scanner rem oves it since 29.000 MHz is
one of the frequencies in the ham radio service bank.
1. Hold down
vice bank or direct search.
2. While holding down
each of the service bands (except
L/O/L/O RVW
MON/CL
for about 2 seconds during a ser-
L-r
appears.
, press
BAND
MRN
dEFAULt
.
) appears.
and
Page 45

3. Press
ENT
. The scanner clears any lockouts from all frequencies in all service banks. Or, if you do not want to
clear the lockouts, press
MON/CL
.
USING PRIORITY
The priority feature lets you scan through channels and still not
miss important or interesting calls on a frequency you select.
You can program one frequency into the priority channel. As
the scanner scans, if the priority feature is turned on, the scanner checks the priority channel for activity every 2 seconds.
1. Press
2. Enter the frequency you want to enter into the priority
If you listen to a channel or frequency and you want to move
this frequency to the priority channel, hold down
press
Notes:
• You cannot move a frequency to the priority channel while
• Wait until
To turn on the priority feature, press
ning.
every 2 seconds and stays on the channel if there is activity.
PCH
the priority channel.
To turn off the priority feature, press
pears.
PGM
, then press
the previously-stored frequency appear.
channel, then press
PCH
PRI
.
and the frequency flash twice.
the scanner is in its programming mode.
PCH
and the frequency stop flashing before
pressing additional keys.
PRI
appears. The scanner checks the priority channel
and the frequency appear whenever the scanner is set to
PRI/ALERT
ENT
. The display flashes twice.
PCH
.
PRI/ALERT
PRI/ALERT
000.000
and
during scan-
.
ENT
PRI
or
then
disap-
Note:
channel and the scanner detects a WX alert tone on that frequency (see “WX Alert” on Page 36), the scanner sounds the
alert tone and
alarm.
If you program a weather frequency into the priority
ALErt
flashes. Press any key to turn off the
45
Page 46

USING POWER SAVE
If the scanner does not detec t a signal within 5 seconds after
you manually select a channel, the scanner enters the powersaving standby mode and
P.–SA
mode, the scanner rests for 1 second then checks for a signal
1
2
/
second, using only 40 percent of the power norm ally con-
for
sumed. The scanner continues this until you press any button
or it receives a signal.
appears. In the standby
on P.-SA
appears if power save is on.
oFF P.-SA
appears
if power save is off.
Follow these steps to turn power save mode on or off.
1. If the scanner is on, turn
VOLUME
counterclockwise until it
clicks to turn it off.
3
2. While you hold down
3
3. Release
and
ENT
.
and
ENT
, turn on the scanner.
USING THE DISPLAY BACKLIGHT
You can turn on the display’s backlight for easy viewing in the
dark. Press
the light sooner, press
Press both
an extended period of time. To turn it off, press both
LIGHT
LIGHT
PGM
, or press
to turn on the light for 5 seconds. To turn off
LIGHT
again.
LIGHT
and
LIGHT
to turn on the display’s backlight for
PGM
.
and
TURNING THE KEY TONE ON AND OFF
The scanner is preset to sound a tone each time you press one
of its keys (except
LIGHT
). You can turn the key tone off or
back on.
1. If the scanner is on, turn
VOLUME
counterclockwise until it
clicks to turn it off.
2
2. While you hold down
3. When
46
oFF tonE
or on
and
tonE
ENT
, turn on the scanner.
appear, release 2 and
ENT
.
Page 47

USING THE KEY LOCK
Once you program your scanner, you can protect it from accidental program changes by turning on the keylock feature.
When the keypad is locked, the only controls that operate are
SCAN, MAN, LIGHT, PGM, VOLUME
Note
: The keylock does not prevent the scanner from scanning
channels or monitoring a single channel, whichever feature
you last selected.
To turn on the keylock, hold down until the scanner
beeps three times and appears. To turn it off, hold down
until the scanner beeps three times and disappears.
, and
SQUELCH
.
RESETTING/INITIALIZING THE SCANNER
If the scanner’s display locks up or does not work properly after
you connect a power source, you might need to reset or initialize the scanner.
Important:
(see “Resetting the Scanner” on Page 48). If that does not
work, you can initialize the scanner (see “Initializing the Scanner” on Page 48); however, this clears all information stored in
your scanner’s memory.
If you have problems, first try to reset the scanner
47
Page 48

Resetting the Scanner
1. Turn off the scanner, then turn it on again.
2. Insert a pointed object such as a straightened paper clip
into the reset opening on the side of the scanner (as
shown), then gently press the reset butt on inside t he opening.
Note:
If the scanner still does not work properly, you might
need to initialize the scanner (see “Initializing the Scanner”).
Initializing the Scanner
Important:
This procedure clears all information you stored in
the scanner’s memory. Initialize the scanner only when you are
sure the scanner is not working properly.
1. Turn off the scanner, then turn it on again.
2. Hold down
3. While holding down
MON/CL
.
MON/CL
, insert a pointed object (such
as a straightened paper clip) into the reset opening on the
side of the scanner, then gently press the reset button
inside the opening. The display should turn off.
4. When the display turns on again, release
Note:
You must release the reset button bef ore releasing
CL
; otherwise the memory might not clear.
48
MON/CL
.
MON/
Page 49

WIRED/ON-AIR PROGRAMMING
You can program your scanner using data you transfer from
your personal computer to the scanner using an optional PC
cable (called
scanner by receiving data transmitted on a frequency your
scanner can receive (called
You can use wired or on-air programming to sto re the following
data into the scanner:
• Channel number (from 1 to 200)
• Frequency (any frequency the scanner can receive)
• Car number (from 0 to 999, in cluding 00, 0 00, 0 1, and 001)
• Channel lockout setting (ON or OFF)
• Channel delay setting (ON or OFF)
Notes:
• The scanner receives only the data shown above during
wired/on-air programming.
d-Err
•
channel number equal to 0 or frequency data which is out
of the range of frequencies the scanner can receive.
wired programming
(data error) appears if the scanner receives a
). You can also program your
on-air programming
).
USING WIRED PROGRAMMING
Note:
Wired programming stops if the scanner receives an
empty channel number.
1. Turn off the scanner.
2. Connect the scanner to the PC using a PC cable.
3. While pressing
WirEd
and the data being received by the scanner appears in the
order it is received.
Notes
• If the scanner receives no data from the PC for more
• If the scanner did not receive a start bit from the PC,
appear. Then send the data from the PC.
:
than 20 seconds or if you press any key, wired programming stops.
StArt
ENT
and 9, turn on the scanner.
does not appear.
PGM
StArt
and
49
Page 50

4. When the scanner successfully receives all data,
FiniSh
receiving data,
received a checksum error while receiving data,
and a number appear. The number shown next to
indicates the packet number where the error occurred.
Note:
PC,
appear. If the scanner received an error while
End
If the scanner did not receive an end bit from the
End
does not appear.
and
d-Err
appear. If the scanner
End
C-Err
C-Err
and
Wired Programming Specifications
Interface .................................................................... RS-232C
Data Format ...................................................... Asynchronous
Data Length ...................................................................... 8-bit
Parity ............................ ................................................... None
Stop Bit ........................... ... .... ... ... ..................................... 2-bit
Baud Rate ................................................................. 4800 bps
Data Transmission Direction ............ One Way (Receive Only)
Flow Control ........................... None (2 Lines, RXD and GND)
USING ON-AIR PROGRAMMING
1. Turn off the scanner.
Air
ENT
PGM
ENT
and 8, turn on the scanner. On
On Air
StArt
PGM
.
flashes. Then use the number keys
ENT
then press CL.
and the data being
and the fre-
2. While pressing
PGM
and
154.600 MHz in FM mode. Then
quency alternate.
3. Send the data from the PC.
received by the scanner appears in the order it is rece ived.
Note:
StArt
4. If you do not want to use 154.600 M Hz to r eceive pr ogramming, press
to enter the frequency you want to receive and press
To change the frequency back to the default (154.600
MHz), hold down
Note:
gramming. Do not enter a frequency between 108.000 and
136.9875 MHz in Step 4.
50
appear and the scanner automatically receives
If the scanner did not receive a start bit from the PC,
does not appear.
You cannot use an AM frequency during on-air pro-
.
Page 51

5. When the scanner successfully receives all data,
FiniSh
receiving data,
received a checksum error while receiving data,
and a number appear. The number shown next to
indicates the packet number where the erro r occ ur re d.
Note:
If the scanner did not receive an end bit from the PC,
End
does not appear.
appear. If the scanner received an error while
End
and
d-Err
appear. If the scanner
End
C-Err
C-Err
and
On-Air Programming Specifications
Interface ...................... AFSK (Audio Frequency Shift Key ing )
Modulation ................................. MSK (Minimum Shift Keying)
Mark Frequency ............. ....................................... ... .. 1200 Hz
Space Frequency ..................................... ... .... ... ... ..... 180 0 Hz
Data Format ..................................................... Asynchronous
Data Length ...................................................................... 8-bit
Parity ............................................................................... None
Stop Bit ............................................................................. 2-bit
Baud Rate ................................................................ 1200 bps
Data Transmission Direction ............ One Way (Receive Only)
51
Page 52

A GENERAL GUIDE TO SCANNING
Reception of the frequencies covered by your scanner is mainly “line-of-sight.” That means you usually cannot hear stations
that are beyond the horizon.
GUIDE TO FREQUENCIES
National Weather Frequencies
162.400 162.425 162.450 162.475
162.500 162.525 162.550
Birdie Frequencies
Every scanner has birdie frequencies. Birdies are signals created inside the scanner’s receiver. These operating frequencies might interfere with transmissions on the same
frequencies. If you program one of these frequencies, you hear
only noise on that frequency. If the interference is not severe,
you might be able to turn
birdie. This scanner’s birdie frequencies (in MHz) are
SQUELCH
clockwise to cut out the
:
32.035 32.100 40.040 41.890
48.050 112.625 120.125 128.1375
136.1375 144.150 150.150 152.150
160.165 166.200 171.550 384.400
392.4125 400.4125 416.4375 424.4375
429.050 432.450 440.4625 448.4625
464.4875 473.0375 480.500 488.500
496.5125 504.525 808.8375 816.850
822.950 849.8625 856.8875 864.900
897.9625 904.9375 912.950 920.9625
930.0375 944.050 953.000
To find the birdies in your individual scanner, begin by disconnecting the antenna and moving it away from the scanner.
Make sure that no other nearby radio or TV sets are turned on
near the scanner. Use the search function and search every
frequency range from its lowest frequency to the highest. Occasionally, the searching will stop as if it had found a signal, often without any sound. That is a birdie. Make a list of all the
birdies in your scanner for future reference.
52
Page 53

GUIDE TO THE ACTION BANDS
Typical Band Usage (MHz)
VHF Band
Low Range
6-Meter Amateur
Aircraft
U.S. Government
2-Meter Amateur
High Range
UHF Band
Military Aircraft
U.S. Government
70-Centimeter Amateur
Low Range
FM-TV Audio Broadcast, Wide Band
800 Band Law Enforcement
Conventio nal Systems
Conventional/Trunked Systems
Public Safety
Trunked Private/General
108.00–136.00
137.00–144.00
144.00–148.00
148.00–174.00
380.00–384.00
406.00–420.00
420.00–450.00
450.00–470.00
470.00–512.00
806.00–824.00
851.00–856.00
856.00–861.00
866.00–869.00
894.00–960.00
29.00–50.00
50.00–54.00
Primary Usage
As a general rule, most of the radio activity is concentrated on
the following frequencies:
VHF Band
Activities Frequencies (MHz)
2-Meter Amateur Band 144.000–148.000
Government, Police, and Fire 153.785–155.980
Emergency Services 158.730–159.460
Railroad 160.000–161.900
UHF Band
Activities Frequencie s (M Hz)
70-Centimeter Amateur Band
FM Repeaters
Land-Mobile “Paired” Frequencies 450.000–470.000
420.000–450.000
53
Page 54

Activities Frequencies (MHz)
Base Stations 451.025–454.950
Mobile Units 456.025–459.950
Repeater Units 460.025–464.975
Control Stations 465.025–469.975
Note:
Remote control stations and mobile units operate at 5
MHz higher than their associated base stations and relay repeater units.
BAND ALLOCATION
To help decide which frequency ranges to scan , use the f ollowing listing of the typical services that use the frequencies your
scanner receives. These frequencies are subject to change,
and might vary from area to area. For a more complete listing,
refer to the
gency Services
Abbreviations Services
AIR . . . . . . . . . . . . . . . . . . . . . . . . . . . . . . . . . . . . . . . . . . . . . Aircraft
BIFC . . . . . . . . . . . . . . . . . . . . . . Boise (ID) Interagency Fire Cache
BUS . . . . . . . . . . . . . . . . . . . . . . . . . . . . . . . . . . . . . . . . . . . Business
CAP . . . . . . . . . . . . . . . . . . . . . . . . . . . . . . . . . . . . . . . Civil Air Patrol
CCA . . . . . . . . . . . . . . . . . . . . . . . . . . . . . . . . . . . . . Common Carrier
CSB . . . . . . . . . . . . . . . . . . . . . . . . . . . . . . . . . Conventional Systems
CTSB . . . . . . . . . . . . . . . . . . . . . . . . . Conventional/Trunked Systems
FIRE . . . . . . . . . . . . . . . . . . . . . . . . . . . . . . . . . . . . Fire Department
HAM . . . . . . . . . . . . . . . . . . . . . . . . . . . . . . . . Amateur (Ham) Radio
GOVT . . . . . . . . . . . . . . . . . . . . . . . . . . . . . . . . Federal Government
GMR . . . . . . . . . . . . . . . . . . . . . . . . . . . . . . . . General Mobile Radio
GTR . . . . . . . . . . . . . . . . . . . . . . . . . . . . . . . . . . . . . General Trunked
IND . . . . . . . . . . . . . . . . . . . . . . . . . . . . . . . . . . . . Industrial Services
MAR . . . . . . . . . . . . . . . . . . . . . . . . . . . . . . . Military Amateur Radio
MARI . . . . . . . . . . . . . . . . . . . . . . . . . . . . . . . Maritime Limited Coast
MARS . . . . . . . . . . . . . . . . . . . . . . . . . Military Affiliate Radio System
MED . . . . . . . . . . . . . . . . . . . . . . . . . . Emergency/Medical Services
MIL . . . . . . . . . . . . . . . . . . . . . . . . . . . . . . . . . . . . . . . . . U.S. Military
MOV . . . . . . . . . . . . . . . . . . . . . . . . . . Motion Picture/Video Industry
NEW . . . . . . . . . . . . . . . . . . . . . . . . . . . . . . . . . . New Mobile Narrow
NEWS . . . . . . . . . . . . . . . . . . . . Relay Press (Newspaper Reporters)
OIL . . . . . . . . . . . . . . . . . . . . . . . . . . . . . . . . . Oil/Petroleum Industry
POL . . . . . . . . . . . . . . . . . . . . . . . . . . . . . . . . . . . . Police Department
PUB . . . . . . . . . . . . . . . . . . . . . . . . . . . . . . . . . . . . . . Public Services
PSB . . . . . . . . . . . . . . . . . . . . . . . . . . . . . . . . . . . . . . . . Public Safety
54
Police Call Radio Guide including Fire and Emer-
, available at your local RadioShack store.
(Manufacturing, Construction, Farming, Forest Products)
(Coast Guard, Marine T elephone,
Shipboard Radio, Private Stations)
(Public Safety, Local Government, Forestry Conservation)
Page 55

PTR . . . . . . . . . . . . . . . . . . . . . . . . . . . . . . . . . . . . . . Private Trunked
ROAD . . . . . . . . . . . . . . . . . . . . . . . . Road & Highway Maintenance
RTV . . . . . . . . . . . . . . . . . . . . . . Radio/TV Remote Broadcast Pickup
TAXI . . . . . . . . . . . . . . . . . . . . . . . . . . . . . . . . . . . . . . . . Taxi Services
TELB . . . . . . . . . . . . . . . . . . . . . . . . . . . . . . . . . . . Mobile Telephone
TELM . . . . . . . . . . . . . . . . . . . . . . . . . . . . . . Telephone Maintenance
TOW . . . . . . . . . . . . . . . . . . . . . . . . . . . . . . . . . . . . . . . . Tow Trucks
TRAN . . . . . . . . . . . . . . . . . . . . . . . . . . . . . . . Transportation Services
TSB . . . . . . . . . . . . . . . . . . . . . . . . . . . . . . . . . . . . . Trunked Systems
TVn . . . . . . . . . . . . . . . . . . . . . . . . . . . . . . . FM-TV Audio Broadcast
USXX . . . . . . . . . . . . . . . . . . . . . . . . . . . . . . . Government Classified
UTIL . . . . . . . . . . . . . . . . . . . . . . . . . . . . . . . . Power & Water Utilities
WTHR . . . . . . . . . . . . . . . . . . . . . . . . . . . . . . . . . . . . . . . . . . Weather
(Aircraft, Radio Common Carrier, Landline Companies)
(Trucks, Tow Trucks, Buses, Railroad, Other)
HIGH FREQUENCY (HF) — (3 MHz–30 MHz)
10-Meter Amateur Band (2 8. 0– 2 9.7 MHz)
29.000–29.700 . . . . . . . . . . . . . . . . . . . . . . . . . . . . . . . . . . . . . HAM
VERY HIGH FREQUENCY (VHF) — (30 MHz–300 MHz)
VHF Low Band (29.7–50 MHz—in 5 kHz steps)
29.700–29.790 . . . . . . . . . . . . . . . . . . . . . . . . . . . . . . . . . . . . . . IND
29.900–30.550 . . . . . . . . . . . . . . . . . . . . . . . . . . . . . . . . . GOVT, MIL
30.580–31.980 . . . . . . . . . . . . . . . . . . . . . . . . . . . . . . . . . . IND, PUB
32.000–32.990 . . . . . . . . . . . . . . . . . . . . . . . . . . . . . . . . . GOVT, MIL
33.020–33.980 . . . . . . . . . . . . . . . . . . . . . . . . . . . . . BUS, IND, PUB
34.010–34.990 . . . . . . . . . . . . . . . . . . . . . . . . . . . . . . . . . GOVT, MIL
35.020–35.980 . . . . . . . . . . . . . . . . . . . . . . . BUS, PUB, IND, TELM
36.000–36.230 . . . . . . . . . . . . . . . . . . . . . . . . . . . . . . . . . GOVT, MIL
36.230–36.990 . . . . . . . . . . . . . . . . . . Oil Spill Cleanup, GOVT, MIL
37.020–37.980 . . . . . . . . . . . . . . . . . . . . . . . . . . . . . . . . . . PUB, IND
38.000–39.000 . . . . . . . . . . . . . . . . . . . . . . . . . . . . . . . . . GOVT, MIL
39.020–39.980 . . . . . . . . . . . . . . . . . . . . . . . . . . . . . . . . . . . . . . PUB
40.000–42.000 . . . . . . . . . . . . . . . . . . . . . . . . . . . GOVT, MIL, MARI
42.020–42.940 . . . . . . . . . . . . . . . . . . . . . . . . . . . . . . . . . . . . . . POL
42.960–43.180 . . . . . . . . . . . . . . . . . . . . . . . . . . . . . . . . . . . . . . IND
43.220–43.680 . . . . . . . . . . . . . . . . . . . . . . . . . . . . TELM, IND, PUB
43.700–44.600 . . . . . . . . . . . . . . . . . . . . . . . . . . . . . . . . . . . . . TRAN
44.620–46.580 . . . . . . . . . . . . . . . . . . . . . . . . . . . . . . . . . POL, PUB
46.600–46.990 . . . . . . . . . . . . . . . . . . . . . . . . . . . . . . . . . . . . GOVT
47.020–47.400 . . . . . . . . . . . . . . . . . . . . . . . . . . . . . . . . . . . . . . PUB
47.420 . . . . . . . . . . . . . . . . . . . . . . . . . . . . . . . . American Red Cross
47.440–49.580 . . . . . . . . . . . . . . . . . . . . . . . . . . . . . . . . . . IND, PUB
49.610–49.990 . . . . . . . . . . . . . . . . . . . . . . . . . . . . . . . . . . . . . . MIL
6-Meter Amateur Band (50–54 MHz)
50.00–54.00 . . . . . . . . . . . . . . . . . . . . . . . . . . . . . . . . . . . . . . . HAM
Aircraft Band (108–136.975 MHz)
108.000–121.490 . . . . . . . . . . . . . . . . . . . . . . . . . . . . . . . . . . . . AIR
121.500 . . . . . . . . . . . . . . . . . . . . . . . . . . . . . . . . . . . AIR Emergency
121.510–136.975 . . . . . . . . . . . . . . . . . . . . . . . . . . . . . . . . . . . . AIR
55
Page 56

U.S. Government Band (137–144 MHz)
137.000–144.000 . . . . . . . . . . . . . . . . . . . . . . . . . . . . . . . GOVT, MIL
2-Meter Amateur Band (144–148 MHz)
144.000–148.000 . . . . . . . . . . . . . . . . . . . . . . . . . . . . . . . . . . . HAM
VHF High Band (148–174 MHz)
148.050–150.345 . . . . . . . . . . . . . . . . . . . . . . . . . . . CAP, MAR, MIL
150.775–150.790 . . . . . . . . . . . . . . . . . . . . . . . . . . . . . . . . . . . MED
150.815–150.980 . . . . . . . . . . . . . . . . . . . . . TOW, Oil Spill Cleanup
150.995–151.475 . . . . . . . . . . . . . . . . . . . . . . . . . . . . . . ROAD, POL
151.490–151.955 . . . . . . . . . . . . . . . . . . . . . . . . . . . . . . . . IND, BUS
151.985 . . . . . . . . . . . . . . . . . . . . . . . . . . . . . . . . . . . . . . . . . . . TELM
152.0075 . . . . . . . . . . . . . . . . . . . . . . . . . . . . . . . . . . . . . . . . . . MED
152.030–152.240 . . . . . . . . . . . . . . . . . . . . . . . . . . . . . . . . . . . TELB
152.270–152.480 . . . . . . . . . . . . . . . . . . . . . . . . . . . IND, TAXI, BUS
152.510–152.840 . . . . . . . . . . . . . . . . . . . . . . . . . . . . . . . . . . . TELB
152.870–153.020 . . . . . . . . . . . . . . . . . . . . . . . . . . . . . . . IND, MOV
153.035–153.725 . . . . . . . . . . . . . . . . . . . . . . . . . . . . IND, OIL, UTIL
153.740–154.445 . . . . . . . . . . . . . . . . . . . . . . . . . . . . . . . PUB, FIRE
154.490–154.570 . . . . . . . . . . . . . . . . . . . . . . . . . . . . . . . . IND, BUS
154.585 . . . . . . . . . . . . . . . . . . . . . . . . . . . . . . . . . . Oil Spill Cleanup
154.600–154.625 . . . . . . . . . . . . . . . . . . . . . . . . . . . . . . . . . . . . BUS
154.655–156.240 . . . . . . . . . . . . . . . . . . . . MED, ROAD, POL, PUB
156.255–157.425 . . . . . . . . . . . . . . . . . . . . . . . . . . . . . . . OIL, MARI
157.450 . . . . . . . . . . . . . . . . . . . . . . . . . . . . . . . . . . . . . . . . . . . MED
157.470–157.515 . . . . . . . . . . . . . . . . . . . . . . . . . . . . . . . . . . . TOW
157.530–157.725 . . . . . . . . . . . . . . . . . . . . . . . . . . . . . . . . IND, TAXI
157.740 . . . . . . . . . . . . . . . . . . . . . . . . . . . . . . . . . . . . . . . . . . . . BUS
157.770–158.100 . . . . . . . . . . . . . . . . . . . . . . . . . . . . . . . . . . . TELB
158.130–158.460 . . . . . . . . . . . . . . . . . BUS, IND, OIL, TELM, UTIL
158.490–158.700 . . . . . . . . . . . . . . . . . . . . . . . . . . . . . . . . . . . TELB
158.730–159.465 . . . . . . . . . . . . . . . . . . . . . . . . . POL, PUB, ROAD
159.480 . . . . . . . . . . . . . . . . . . . . . . . . . . . . . . . . . . . . . . . . . . . . . OIL
159.495–161.565 . . . . . . . . . . . . . . . . . . . . . . . . . . . . . . . . . . . TRAN
161.580–162.000 . . . . . . . . . . . . . . . . . . . . . . . . . . . OIL, MARI, RTV
162.0125–162.35 . . . . . . . . . . . . . . . . . . . . . . . . . GOVT, MIL, USXX
162.400–162.550 . . . . . . . . . . . . . . . . . . . . . . . . . . . . . . . . . . WTHR
162.5625–162.6375 . . . . . . . . . . . . . . . . . . . . . . . GOVT, MIL, USXX
162.6625 . . . . . . . . . . . . . . . . . . . . . . . . . . . . . . . . . . . . . . . . . . MED
162.6875–163.225 . . . . . . . . . . . . . . . . . . . . . . . . GOVT, MIL, USXX
163.250 . . . . . . . . . . . . . . . . . . . . . . . . . . . . . . . . . . . . . . . . . . . MED
163.275–166.225 . . . . . . . . . . . . . . . . . . . . . . . . . GOVT, MIL, USXX
166.250 . . . . . . . . . . . . . . . . . . . . . . . . . . . . . . . . . GOVT, RTV, FIRE
166.275–169.400 . . . . . . . . . . . . . . . . . . . . . . . . . . . . . GOVT, BIFC
169.445–169.505 . . . . . . . . . . . . . . . . . . . . . Wireless Mikes, GOVT
169.55–169.9875 . . . . . . . . . . . . . . . . . . . . . . . . . GOVT, MIL, USXX
170.000–170.150 . . . . . . . . . . . . . . . . . . . . BIFC, GOVT, RTV, FIRE
170.175–170.225 . . . . . . . . . . . . . . . . . . . . . . . . . . . . . . . . . . GOVT
170.245–170.305 . . . . . . . . . . . . . . . . . . . . . . . . . . . Wireless Mikes
170.350–170.400 . . . . . . . . . . . . . . . . . . . . . . . . . . . . . . . GOVT, MIL
170.425–170.450 . . . . . . . . . . . . . . . . . . . . . . . . . . . . . . . . . . . BIFC
170.475 . . . . . . . . . . . . . . . . . . . . . . . . . . . . . . . . . . . . . . . . . . . . PUB
170.4875–173.175 . . . . . . . . . . . . . . . . GOVT, PUB, W ireless Mikes
173.225–173.5375 . . . . . . . . . . . . . . . . . . . MOV, NEWS, UTIL, MIL
173.5625–173.5875 . . . . . . . . . . . . . . . . . MIL Medical/Crash Crews
173.60–173.9875 . . . . . . . . . . . . . . . . . . . . . . . . . . . . . . . . . . GOVT
56
Page 57

ULTRA HIGH FREQUENCY (UHF) — (300 MHz–3 GHz)
U. S. Government Band (406–420 MHz)
406.125–419.975 . . . . . . . . . . . . . . . . . . . . . . . . . . . . . GOVT, USXX
70-Centimeter Amateur Band (420–450 MHz)
420.000–450.000 . . . . . . . . . . . . . . . . . . . . . . . . . . . . . . . . . . . HAM
Low Band (450–470 MHz)
450.050–450.925 . . . . . . . . . . . . . . . . . . . . . . . . . . . . . . . . . . . . RTV
451.025–452.025 . . . . . . . . . . . . . . . . . . . . . . IND, OIL, TELM, UTIL
452.0375–453.00 . . . . . . . . . . . . . . . IND, TAXI, TRAN TOW, NEWS
453.0125–454.000 . . . . . . . . . . . . . . . . . . . . . . . . . . . . . . . PUB, OIL
454.025–454.975 . . . . . . . . . . . . . . . . . . . . . . . . . . . . . . . . . . . TELB
455.050–455.925 . . . . . . . . . . . . . . . . . . . . . . . . . . . . . . . . . . . . RTV
457.525–457.600 . . . . . . . . . . . . . . . . . . . . . . . . . . . . . . . . . . . . BUS
458.025–458.175 . . . . . . . . . . . . . . . . . . . . . . . . . . . . . . . . . . . MED
460.0125–460.6375 . . . . . . . . . . . . . . . . . . . . . . . . FIRE, POL, PUB
460.650–462.175 . . . . . . . . . . . . . . . . . . . . . . . . . . . . . . . . . . . . BUS
462.1875–462.450 . . . . . . . . . . . . . . . . . . . . . . . . . . . . . . . BUS, IND
462.4625–462.525 . . . . . . . . . . . . . . . . . . . . . IND, OIL, TELM, UTIL
462.550–462.925 . . . . . . . . . . . . . . . . . . . . . . . . . . . . . . . GMR, BUS
462.9375–463.1875 . . . . . . . . . . . . . . . . . . . . . . . . . . . . . . . . . MED
463.200–467.925 . . . . . . . . . . . . . . . . . . . . . . . . . . . . . . . . . . . . BUS
FM-TV Audio Broadcast, UHF Wide Band (470–512 MHz)
(Channels 14 through 20 in 6 MHz steps)
475.750 . . . . . . . . . . . . . . . . . . . . . . . . . . . . . . . . . . . . . . Channel 14
481.750 . . . . . . . . . . . . . . . . . . . . . . . . . . . . . . . . . . . . . . Channel 15
487.750 . . . . . . . . . . . . . . . . . . . . . . . . . . . . . . . . . . . . . . Channel 16
493.750 . . . . . . . . . . . . . . . . . . . . . . . . . . . . . . . . . . . . . . Channel 17
499.750 . . . . . . . . . . . . . . . . . . . . . . . . . . . . . . . . . . . . . . Channel 18
505.750 . . . . . . . . . . . . . . . . . . . . . . . . . . . . . . . . . . . . . . Channel 19
511.750 . . . . . . . . . . . . . . . . . . . . . . . . . . . . . . . . . . . . . . Channel 20
Note:
Some cities use the 470–512 MHz band for land/mobile
service.
Conventional Systems Band
851.0125–855.9875 . . . . . . . . . . . . . . . . . . . . . . . . . . . . . . . . . . CSB
Locally Assigned
—
Conventional/Trunked Systems Band — Locally Assigned
856.0125–860.9875 . . . . . . . . . . . . . . . . . . . . . . . . . . . . . . . . . CTSB
Trunked System Band — Locally Assigned
861.0125–865.9875 . . . . . . . . . . . . . . . . . . . . . . . . . . . . . . . . . . TSB
Public Safety Band — Locally Assigned
866.0125–868.9875 . . . . . . . . . . . . . . . . . . . . . . . . . . . . . . . . . . PSB
33-Centimeter Amateur Band (902–928 MHz)
902.000–928.000 . . . . . . . . . . . . . . . . . . . . . . . . . . . . . . . . . . . HAM
57
Page 58

Private Trunked Band
935.0125–939.9875 . . . . . . . . . . . . . . . . . . . . . . . . . . . . . . . . . . PTR
General Trunked Band
940.0125–940.9875 . . . . . . . . . . . . . . . . . . . . . . . . . . . . . . . . . . GTR
FREQUENCY CONVERSION
The tuning location of a station can be expressed in frequency
(kHz or MHz) or in wavelength (meters). The following information can help you make the necessary conversions.
1 MHz (million) = 1,000 kHz (thousand)
• To convert MHz to kHz, multiply the number of megahertz
by 1,000:
30.62 (MHz) × 1000 = 30,620 kHz
• To convert from kHz to MHz, divide the number of kilohertz
by 1,000:
127,800 (kHz) ÷ 1000 = 127.8 MHz
• To convert MHz to meters, divide 300 by the number of
megahertz:
58
300 ÷ 50 MHz = 6 meters
Page 59

TROUBLESHOOTING
If your scanner is not working as it should, these suggestions
might help you eliminate the problem. If the scanner still does
not operate properly, take it to your local RadioShack store for
assistance.
PROBLEM POSSIBLE CAUSE REMEDY
Scanner is
totally inoperative.
Poor or no
reception
Keypad does
not work.
Scanner is on
but will not
scan.
The AC or DC
adapter is not connected.
The batteries are
dead.
An antenna is not
connected or is
connected incorrectly.
Programmed frequencies are the
same as “birdie”
frequencies.
Keylock is turned
on.
The scanner might
need to be reset or
initialized.
SQUELCH
correctly adjusted.
Only one channel is
(or no channels
are) stored.
is not
Be sure the adapter’s barrel plug is fully inserted
into the
Replace the batteries with
fresh ones, or recharge the
rechargeable batteries.
Make sure an antenna is
properly connected to the
scanner.
Avoid programming frequencies listed under
“Birdie Frequencies” on
Page 52 or only listen to
them manually.
Turn off the keylock.
Turn the scanner off then
on again, or reset/initialize
the scanner (see “Resetting/Initializing the Scanner” on Page 47.
Adjust
wise.
Store frequencies into
more than one channel.
PWR DC 9V
SQUELCH
jack.
clock-
During scanning, the scanner locks on
frequencies
that have an
unclear transmission.
Programmed frequencies are the
same as “birdie”
frequencies.
Avoid programming frequencies listed under
“Birdie Frequencies” on
Page 52 or only listen to
them manually.
59
Page 60

CARE AND MAINTENANCE
Your RadioShack
held Race Scanner
craftsmanship. The following suggestions will help you care for
your scanner so you can enjoy it for years.
Keep the scanner dry. If it gets wet, wipe it dry immediately. Liquids might contain minerals that can
corrode the electronic circuits.
Use and store the scanner only in normal temperature environments. Temperature extremes can
shorten the life of electronic devices, damage batteries, and distort or melt plastic parts.
Keep the scanner away from dust and dirt, which
can cause premature wear of parts.
Handle the scanner gently and carefully. Dropping it
can damage circuit boards and cases and can
cause the scanner to work improperly.
Use only fresh batteries of the required size and
recommended type. Batteries can leak chemicals
that damage your scanner’s electronic parts.
200-Channel VHF/Air/UHF/800 MHz Hand-
is an example of superior design and
Wipe the scanner with a damp cloth occasionally to
keep it looking new. Do not use harsh chemicals,
cleaning solvents, or strong detergents to clean the
scanner.
Modifying or tampering with the scanner’s internal components
can cause a malfunction and might invalidate its warranty and
void your FCC authorization to operate it. If your scanner is not
performing as it should, take it to your local RadioShack store
for assistance.
60
Page 61

SPECIFICATIONS
Frequency Coverage (MHz):
10 Meter Amateur Radio ................ 29–29.7 (in 5 kHz steps)
VHF Lo ........................................... 29.7–50 (in 5 kHz steps)
6 Meter Amateur Radio ..................... 50–54 (in 5 kHz steps)
Aircraft ............................. 108–136.9875 (in 12.5 kHz steps)
Government ..... .... ... ... ... .... ............. 137–144 (in 5 kHz ste p s)
2 Meter Amateur Radio ................. 144–148 (in 5 kHz step s)
VHF Hi ........................................... 148–174 (in 5 kHz step s)
Amateur Radio/Government ..... 380–450 (in 12.5 kHz steps)
UHF Standard .......................... 450–470 (in 12.5 kHz steps)
UHF “T” .................................... 470–512 (in 12.5 kHz steps)
UHF Hi ............................. 806–823.9875 (in 12.5 kHz steps)
849–868.9875 (in 12.5 kHz steps)
894–960 (in 12.5 kHz steps)
Channels of Operation .... 200 channels/20 monitor memories
Sensitivity (20 dB S/N):
29–54 MHz .................................................................. 0.3 µV
108–136.9875 MHz ..................................................... 1.0 µV
137–174 MHz .............................................................. 0.5 µV
380–512 MHz .............................................................. 0.5 µV
806-960 MHz ............................................................... 0.5 µV
Spurious Rejection (FM @154 MHz) .............................. 40 dB
Selectivity:
–6 dB ........................................................................ ±10 kHz
–50 dB .................................... ... ... ............................ ±18 kHz
Search Speed ............................................Up to 50 Steps/Sec
Scan Speed ........................................ Up to 25 Channels/Sec
Delay Time ............................................................. 2 Seconds
IF Frequencies:
1st IF .................................................................... 257.5 MHz
2nd IF ........ ... ... ....................................... ... .... ......... 21.4 MHz
3rd IF ....................................................................... 455 kHz
IF Rejection (257.5 MHz) ............ ... ............ 60 dB at 154 MHz
Priority Sampling .................................................... 2 Seconds
Squelch Sensitivity:
Threshold .................................................................... 0.3 µV
Tight (FM) .................................................... (S + N)/N=30 dB
Tight (AM) .................................................... (S + N)/N=20 dB
61
Page 62

Antenna Impedance .. ... ... ... .... ................................... 50 Ohms
Audio Output Power (10% THD) .................. 190 mW Nominal
(using batteries, 240 mW using external power (DC 9V))
3
8
Built-In Speaker ......................... 1
/
Inches (36 mm), 8 Ohms
(–10
°
to 140°F
°
to 60°C)
Operating Temper a tur e .......... ... ... ... ......................14
Power Requirements ..................... 6 Volts DC, 4 AA Batteries
AC Adapter ...........................................9V, 300-mA/size C
Adaptaplug adapter
DC Adapter ............................ ... ............9V, 300-mA/s ize C
(When charging: 10V, 300 mA/size C Adaptaplug adapter)
Current Drain (Squelched) .............. ... .... ... .................... 75 mA
Dimensions (HWD) ............................ 5
11
1
2
/
× 1
3
8
/
Inches
16
×
/
2
(145 × 63 × 34 mm)
Weight (without antenna and belt clip) ........................... 7.4 oz
(210 g)
Supplied Accessories ................ Antennas (2), Battery Holder,
Rechargeable Battery Holder, Frequency Guide,
Removable Belt Clip
Specifications are typical; individual units might vary. Specifications are subject to change and improvement without notice.
62
Page 63

NOTES
63
Page 64

Limited One-Year Warranty
This product is warranted by RadioShack against manufacturing defects in mat erial and
workmanship under normal use for one (1) year from the date of purchase from RadioShack company-owned stores and authorized RadioShack franchisees and dealers.
EXCEPT AS PROVIDED HEREIN, RadioShack MAKES NO EXPRESS WARRANTIES
AND ANY IMPLIED WARRANTIES, INCLUDING THOSE OF MERCHANTABILITY
AND FITNESS FOR A PARTICULAR PURPOSE, ARE LIMITED IN DURATION TO
THE DURATION OF THE WRITTEN LIMITED WARRANTIES CONTAINED HEREIN.
EXCEPT AS PROVIDED HEREIN, RadioShack SHALL HAVE NO LIABILITY OR RESPONSIBILITY TO CUSTOMER OR ANY OTHER PERSON OR ENTITY WITH RESPECT TO ANY LIABILITY, LOSS OR DAMAGE CAUSED DIRECTLY OR
INDIRECTLY BY USE OR PERFORMANCE OF THE PRODUCT OR ARISING OUT
OF ANY BREACH OF THIS WARRANTY, INCLUDING, BUT NOT LIMITED TO, ANY
DAMAGES RESULTING FROM INCONVENIENCE, LOSS OF TIME, DATA, PROPERTY, REVENUE, OR PROFIT OR ANY INDIRECT, SPECIAL, INCIDENTAL, OR
CONSEQUENTIAL DAMAGES, EVEN IF RadioShack HAS BEEN ADVISED OF THE
POSSIBILITY OF SUCH DAMAGES.
Some states do not allow limitations on how long an implied warranty lasts or the exclusion or limitation of incidental or consequential dama ges, so t he above li mita tio ns or exclusions may not apply to you.
In the event of a product defect during the warranty period, take the pr oduct and the RadioShack sales receipt as proof of purchase date to any RadioShack st ore. RadioSha ck
will, at its option, unless otherwise provided by law: (a) correct the defect by product repair without charge for parts and labor; (b) replace the product with one of the same or
similar design; or (c) refund the purchase price. All replaced parts and products, and
products on which a refund is made, become the property of RadioShack. New or reconditioned parts and products may be used in the performance of warranty service.
Repaired or replaced parts and products are warranted for the remainder of the original
warranty period. Y ou wil l be charged f or repair or replacemen t of the pr oduct made after
the expiration of the warranty period.
This warranty does not cover: (a) damage or failure caused by or attributable to acts of
God, abuse, accident, misuse, improper or abnormal usage, failure to follow instructions, improper installation or maintenance, alteration, lightni ng or other incidence of excess voltage or current; (b) any repairs other than those provided by a RadioShack
Authorized Service Facility; (c) consumables such as fuses or batteries; (d) cosmetic
damage; (e) transportation, shipping or insurance costs; or (f) costs of product removal ,
installation, set-up service adjustment or reinstallation.
This warranty gives you specific legal rights, and you may also have other rights which
vary from state to state.
RadioShack Customer Relations, 200 Taylor Street, 6th Floor, Fort Worth, TX 76102
We Service W hat We Sell
12/99
RadioShack Corporation
Fort Worth, Texas 76102
03A01 Printed in Hong Kong
GE-99D-3489A
 Loading...