

Poly-Tex 3000 User Manual
Assembly Instructions
13mm
x2
0 1 2
Instructions de montage
Montageanleitung
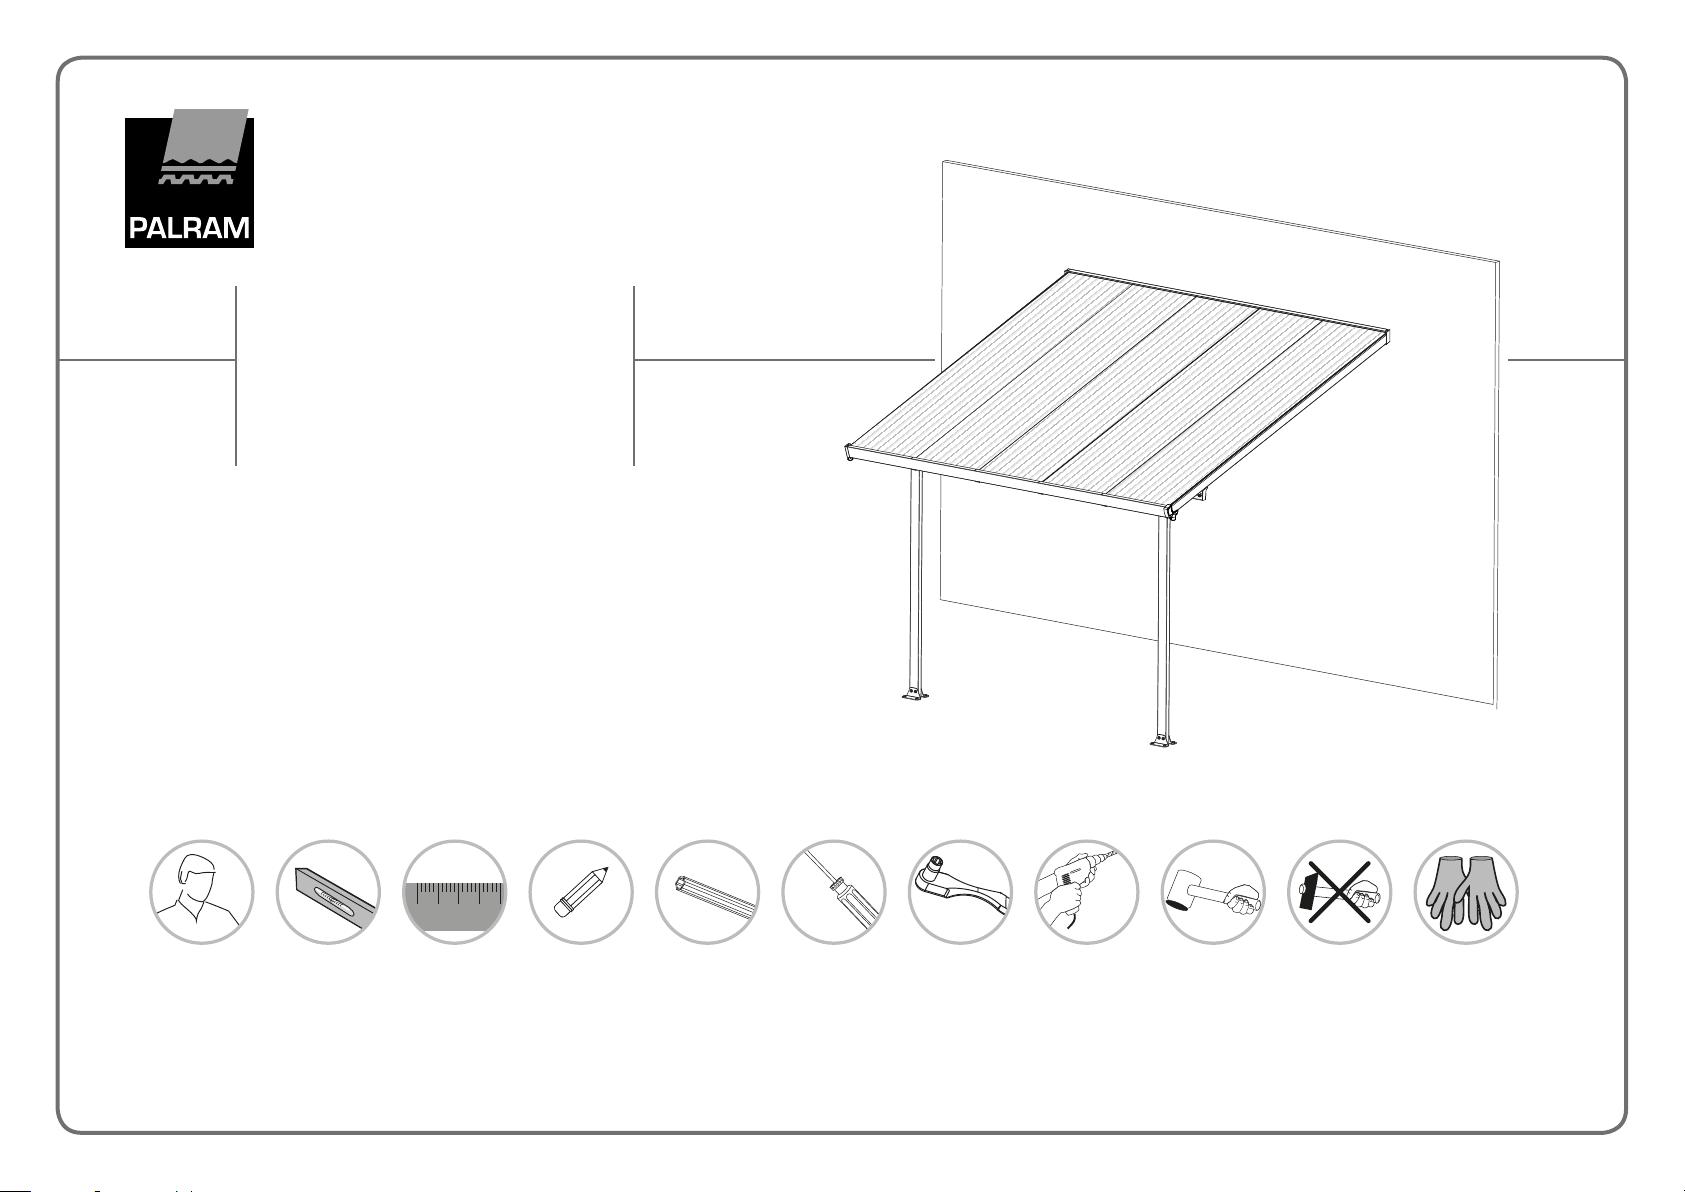
Feria - Patio Cover 3000
300 L x 300 W cm / 118”L x 118”W
Email: infoA@palram.com I www.palramapplications.com

EN
IMPORTANT
Please read these instructions carefully before you start to assemble this patio cover.
Please carry out the steps in the order set out in these instructions.
Keep these instructions in a safe place for future reference.
a Care and Safety advice
Please follow the instructions as listed in this manual.
•
Sort the parts and check the list of contents.
•
For safety purposes we strongly recommend that the product will be assembled
•
by at least two people.
Some parts have metal edges. Please be careful when handling components.
•
Always wear gloves, shoes and safety goggles during assembly.
Do not attempt to assemble the product in windy or wet conditions.
•
Dispose of all plastic bags safely – keep them out of reach of small children.
•
Keep children away from the assembly area.
•
Do not attempt to assemble the product if you are tired, have taken drugs,
•
medications or alcohol, or if you are prone to dizzy spells.
When using a stepladder or power tools, ensure that you follow the manufacturer’s
•
safety advice.
Do not climb or stand on the roof.
•
Heavy articles should not be leaned against the poles.
•
Do not hang or lay on the profiles.
•
Please consult your local authorities if any permits are required to construct the product.
•
Keep roof and gutter clean of snow, dirt & leaves.
•
Heavy amounts of snow on roof can damage the product making it unsafe to stand
•
below or nearby.
This product was designed and produced to be a patio cover only.
•
Some versions of this product are painted.
If color was scratched during assembly it can be fixed with the following tints:
White – RAL 9016
Gray – RAL 7012
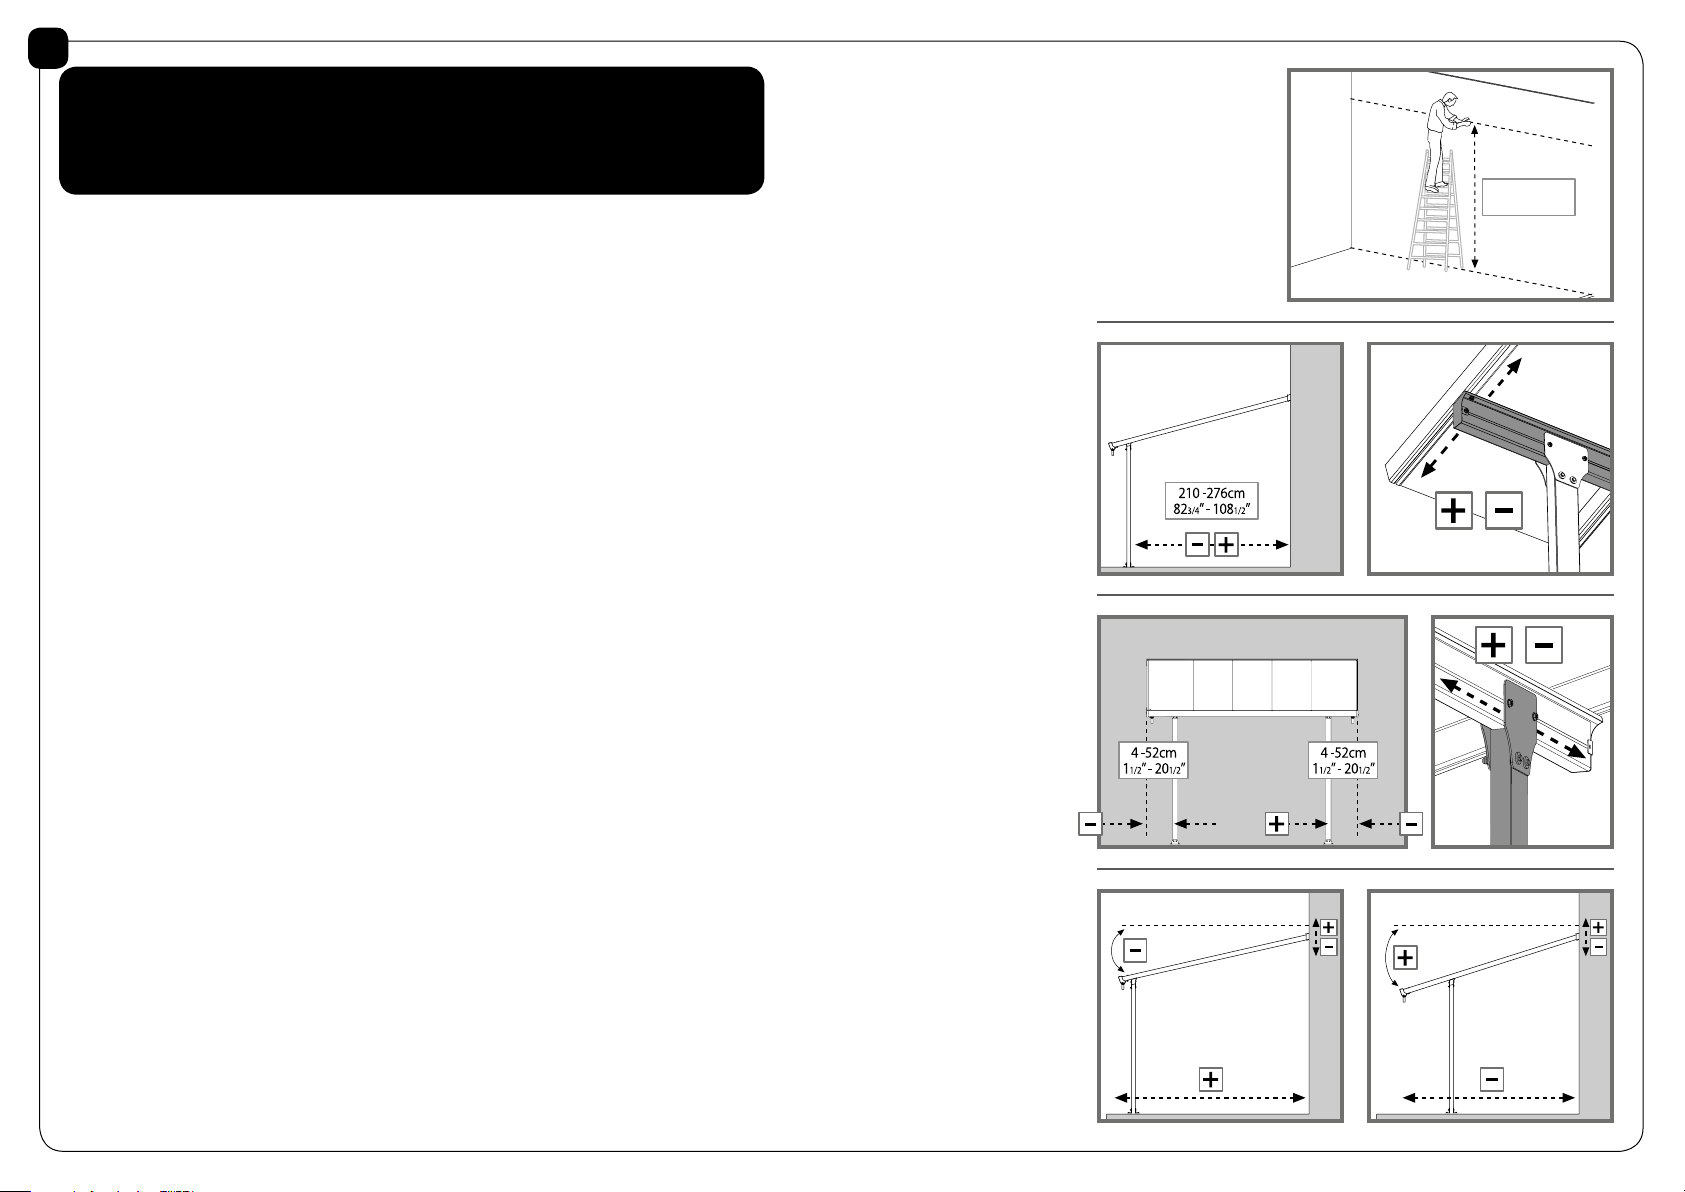
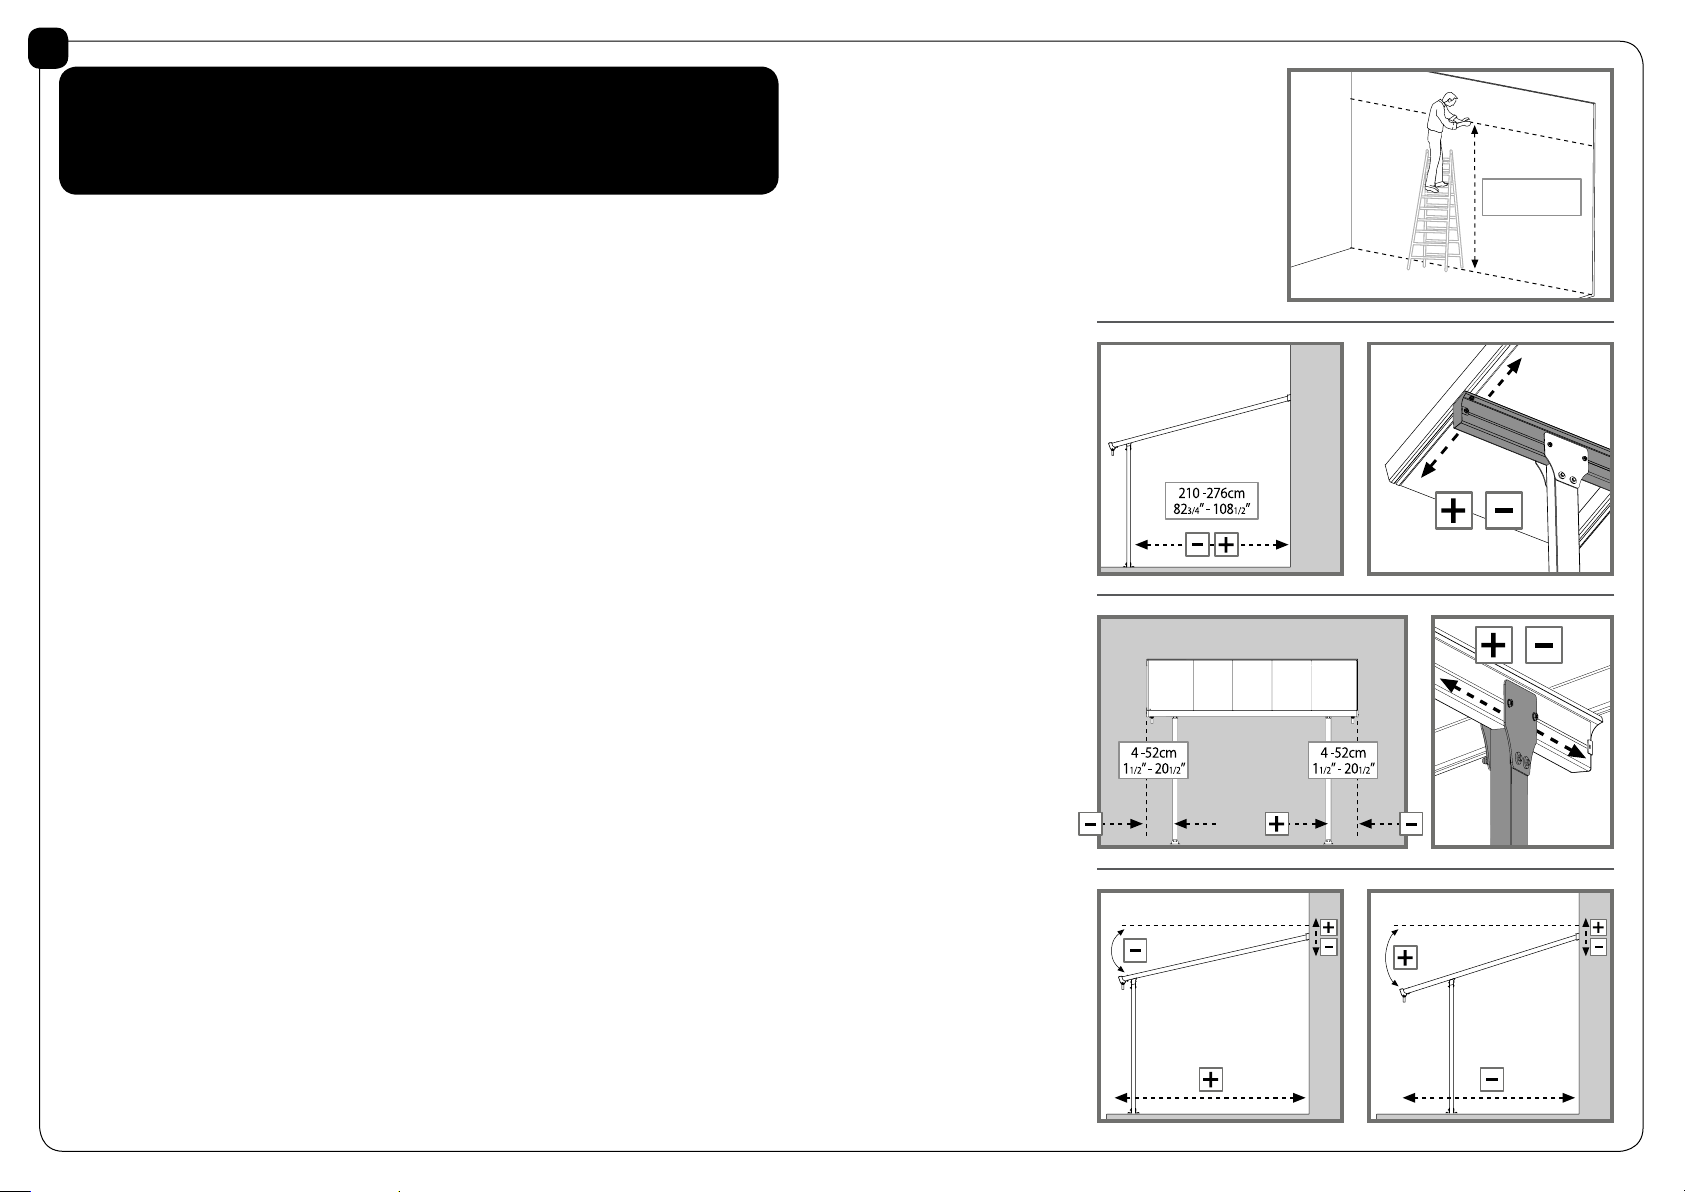
a Product dimensions adjusting
Product dimensions can be adjusted to your specific
needs.
1. The wall-mounting profile (top-back) can be adjusted
from 275 to 295 cm (108¼” to 116¼”) above ground.
The adjusting is done when measuring and drilling
(step 8).
2. Poles distance from the wall
can be adjusted from 210 to
276 cm (82¾” to 108½”).
The adjusting is done after
assembly and before anchoring
(step 23) by sliding poles and
profile 1041 at channels of roof
profiles.
3. Poles distance from the side
edges can be adjusted from
4 to 52 cm (1½” to 20½”).
The adjusting is done after
assembly and before anchoring
(step 23) by sliding poles and
connectors 937 at channel of
profile 1041.
275-295cm
108¼” - 116¼”
a Cleaning instructions
When your product needs cleaning, use a mild detergent solution and rinse with cold
clean water.
Do not use acetone, abrasive cleaners, or others special detergents to clean the panel.
a Before starting assembly
This product must be assembled on a solid base (such as concrete).
•
Choose your site carefully before beginning assembly.
•
Site surface (mainly below poles) needs to be level.
During assembly use a soft platform below the parts to avoid scratches and damages.
•
Note: Wall mounting and
distance from the wall determine
the roof angle and the total
depth of the product
(distance of gutter from the wall).
Higher wall mounting
and shorter distance between
wall and poles increase the roof
angle and shorten the total depth.
º
13
280 cm
110¼”
º
17
300 cm
118”
FR
IMPORTANT
Lire attentivement ces instructions avant de commencer le montage de cette
couverture de patio.
Suivez bien les étapes indiquées dans l’ordre indiqué.
Conservez ce mode d’emploi dans un endroit sûr pour référence ultérieure.
a Recommandations d’entretien et de sécurité
Suivez les instructions dans l’ordre indiqué dans ce manuel.
•
Vérifiez que le paquet contient bien toutes les pièces.
•
Pour raison de sécurité, nous recommandons vivement que le produit soit assemblé par
•
deux personnes au minimum.
Certaines pièces comportent des arêtes en métal. Soyez prudent en manipulant les pièces.
•
Toujours porter des gants, des chaussures et des lunettes de sécurité pendant le montage.
•
N’essayez pas de procéder au montage s’il y a du vent ou s’il pleut.
•
Se défaire de tous les emballages en plastique en veillant à ne pas les laisser à portée
•
des enfants.
Eloignez les enfants du site de montage.
•
N’essayez pas de monter le produit si vous êtes fatigué, si vous avez pris des
•
médicaments ayant un effet sur votre état d’éveil, des drogues ou si vous avez bu de
l’alcool, ni si vous êtes sujet à des vertiges.
Lorsque vous utilisez une échelle ou des outils électriques, veillez à suivre le mode
•
d’emploi et les conseils de sécurité du fabricant des appareils.
Ne pas grimper ni se tenir sur le toit.
•
Ne pas adosser des objets lourds contre les poteaux.
•
Ne pas accrocher ou poser des objets sur les profils.
•
Veuillez vérifier auprès des autorités locales si des permis de construire ou autres
•
autorisations sont requis avant l’installation du produit.
Veillez à ce que le toit et les gouttières soient toujours propres en en retirant la neige,
•
les feuilles mortes et la poussière.
Le produit pourrait subir des dommages en cas de grosses chutes de neige sur le toit,
•
il serait alors dangereux de vous tenir sous le toit ou à proximité.
Ce produit a été conçu et fabriqué pour servir exclusivement de couverture de patio.
•
Certaines versions de ce produit sont peintes.
Si la peinture a été égratignée pendant le montage, elle peut être réparée avec
les coloris suivants: Blanc – RAL 9016 Gris – RAL 7012
a Réglage des dimensions du produit
Les dimensions du produit peuvent être ajustées selon
les besoins.
1. Le profil de montage des parois (haut- arrière) peut
être ajusté de 275 à 295 cm (108¼” à 116¼”) au dessus
du sol.
Le réglage se fait au moment des mensurations et des
perforations (étapes 8)
2. La distance entre les piliers et le
mur peut être ajustée entre 210 et
276 cm (entre 82¾” et 108½”).
Le réglage se fait après le montage
et avant l’étape 23 d’ancrage en
faisant coulisser les piliers et les
profils 1041 dans les rails des profils
du toit.
3. La distance des piliers aux
extrémités des côtés peut être
réglée entre 4 et 52 cm (1½” à 20½”).
Le réglage se fait après le montage
et avant l’ancrage (étape 23) en
faisant coulisser les piliers et les
connecteurs 937 dans les rainures
du profil 1041.
275-295cm
108¼” - 116¼”
a Instructions de nettoyage :
Lorsqu’il vous faut nettoyer le produit, utilisez un détergeant léger et rincez à l’eau froide propre.
Ne pas utiliser d’acétone, de produits abrasifs ni d’autres détergents spéciaux pour
nettoyer le panneau.
a Avant de procéder au montage :
ce produit doit être monté sur une base solide (comme une dalle en béton).
•
choisissez avec soin le site avant le montage. La surface du site, surtout sous les piliers
•
doit être égalisée.
pendant le montage utilisez une surface de base souple sous les pièces pour éviter
•
toute égratignure ou dégât.
Note: le montage du mur et le
réglage de la distance du mur
déterminent l’angle du toit et la
profondeur totale (distance de la
gouttière du mur). Si le mur est
monté plus en hauteur et si la
distance entre le mur et les piliers
est diminuée, l’angle du toit
augmente et la profondeur totale
est diminuée.
º
13
280 cm
110¼”
º
17
300 cm
118”
DE
WICHTIG
Bitte lesen Sie diese Hinweise sorgfältig, bevor Sie mit der Montage dieses PatioAbdeckungsystems starten.
Bitte führen Sie die Schritte in der Reihenfolge aus, wie sie in dieser Anleitung
vorgegeben sind. Bewahren Sie diese Anleitung an einem sicheren Ort auf.
a Pflege und Sicherheitshinweise
Bitte folgen Sie die in diesem Handbuch aufgeführten Anweisungen.
•
Sortieren Sie die Teile und überprüfen Sie die Inhaltsliste.
•
Aus Sicherheitsgründen empfehlen wir dringend, dass das Produkt von mindestens
•
zwei Menschen zusammengebaut wird.
Einige Teile haben Metallkanten. Bitte seien Sie vorsichtig beim Umgang mit den Komponenten.
•
Tragen Sie immer Handschuhe, Schuhe und Schutzbrille bei der Montage.
•
Versuchen Sie nicht, das Produkt bei windigen oder nassen Bedingungen zu montieren.
•
Entsorgen Sie alle Plastiktüten sicherheitsgemäß – bewahren Sie sie außerhalb der
•
Reichweite von kleinen Kindern auf.
Halten Sie Kinder vom Montagebereich fern.
•
Versuchen Sie nicht ein Produkt zusammen zu bauen, wenn Sie müde sind, Drogen,
•
Medikamente oder Alkohol genommen haben, oder wenn Sie zu Schwindelanfällen neigen.
Bei Verwendung einer Stehleiter oder Elektrowerkzeugen, stellen Sie sicher, dass Sie die
•
Sicherheitshin weise und Anweisungen des Herstellers befolgen.
Steigen oder stehen Sie nicht auf dem Dach.
•
Schwere Gegenstände dürfen nicht an den Polen angelehnt werden.
•
Hängen Sie sich nicht an die Profile.
•
Fragen Sie bei Ihrer örtlichen Behörde nach, ob irgendwelche Genehmigungen
•
erforderlich sind, um das Produkt zu konstruieren.
Halten Sie Dach - und Dachrinne frei von Schnee, Schmutz und Blättern.
•
Dieses Produkt wurde entwickelt, um großen Mengen von Schnee stand zu halten.
•
Trotzdem sollte das Dach aus Sicherheitsgründen von Schnee regelmäßig gereinigt
werden. Andernfalls können extreme Mengen von Schnee auf dem Dach zu unsicheren
Bedingungen in der Umgebung führen.
Dieses Produkt wurde entwickelt und hergestellt als Patio - Abdeckungsystem
•
und darf nur als solches benutzt zu werden.
Einige Versionen dieses Produkts sind lackiert. Sollte die Farbe bei der Montage
verkratzten, kann es mit den folgenden Farben nachlackiert werden:
Weiss - RAL 9016 Grau - RAL 7012
a Pflegeanleitung
Wenn Sie Ihr Produkt reinigten müssen, verwenden Sie ein mildes Reinigungsmittel
und reinigen Sie mit kaltem Wasser. Verwenden Sie kein Aceton, Scheuermittel oder
andere spezielle Reinigungsmittel um das Paneel zu reinigen.
a Vor Beginn der Montage
Dieses Produkt muss auf einer festen Unterlage (z.B. Beton) montiert werden.
•
Wählen Sie Ihren Ort sorgfältig aus, bevor Sie mit der Montage beginnen.
•
Als Untergrund sollte eine ebene Fläche gewählt werden (vorallem unterhalb der Pfosten).
•
Bei der Montage nehmen Sie eine weiche Plattform und stellen Sie diese unterhalb
•
der Teile, um Kratzer und Beschädigungen zu vermeiden.
a Einstellung der Produktmaße
Die Produktgröße kann auf Ihre speziellen Bedürfnisse
angepasst werden.
1. Bei der Wandmontage kann das Profil von 275 cm
bis auf 295 cm (108¼” bis 116¼”) über dem Boden
angepasst werden.
Die Anpassung erfolgt bei der Messung und beim
Bohren (Schritt 8).
2. Wählen Sie den Pfostenabstand
von der Wand zwischen 210 cm
und 276 cm (82¾” bis 108½”).
Die Einstellung wird nach der
Montage und vor der Ankerung
gemacht (Schritt 23), indem die
Pfosten und Profil 1041 an den
Kanälen des Dach Profils
eingeführt werden.
3. Pfostenabstand von den
Seitenkanten kann von 4 bis auf
52 cm eingestellt werden
(1½” auf 20½”).
Die Einstellung wird nach der
Montage und vor der Ankerung
gemacht (Schritt 23), indem die
Pfosten und Verbindungsstück
937 an Profilkanal 1041
eingeführt werden.
Hinweis: Wandmontage und
Abstand von der Wand bestimmen
die Dachneigung und die gesamte
Tiefe des Produktes (Abstand der
Dachrinne von der Wand). Höhere ֿ
Wandmontage und kürzeren
Abstand zwischen Wand und
Pfosten erhöhen die Dachneigung
und verkürzen die gesamte Tiefe.
º
13
280 cm
110¼”
275 - 295cm
104¼” - 116¼”
º
17
300 cm
118”
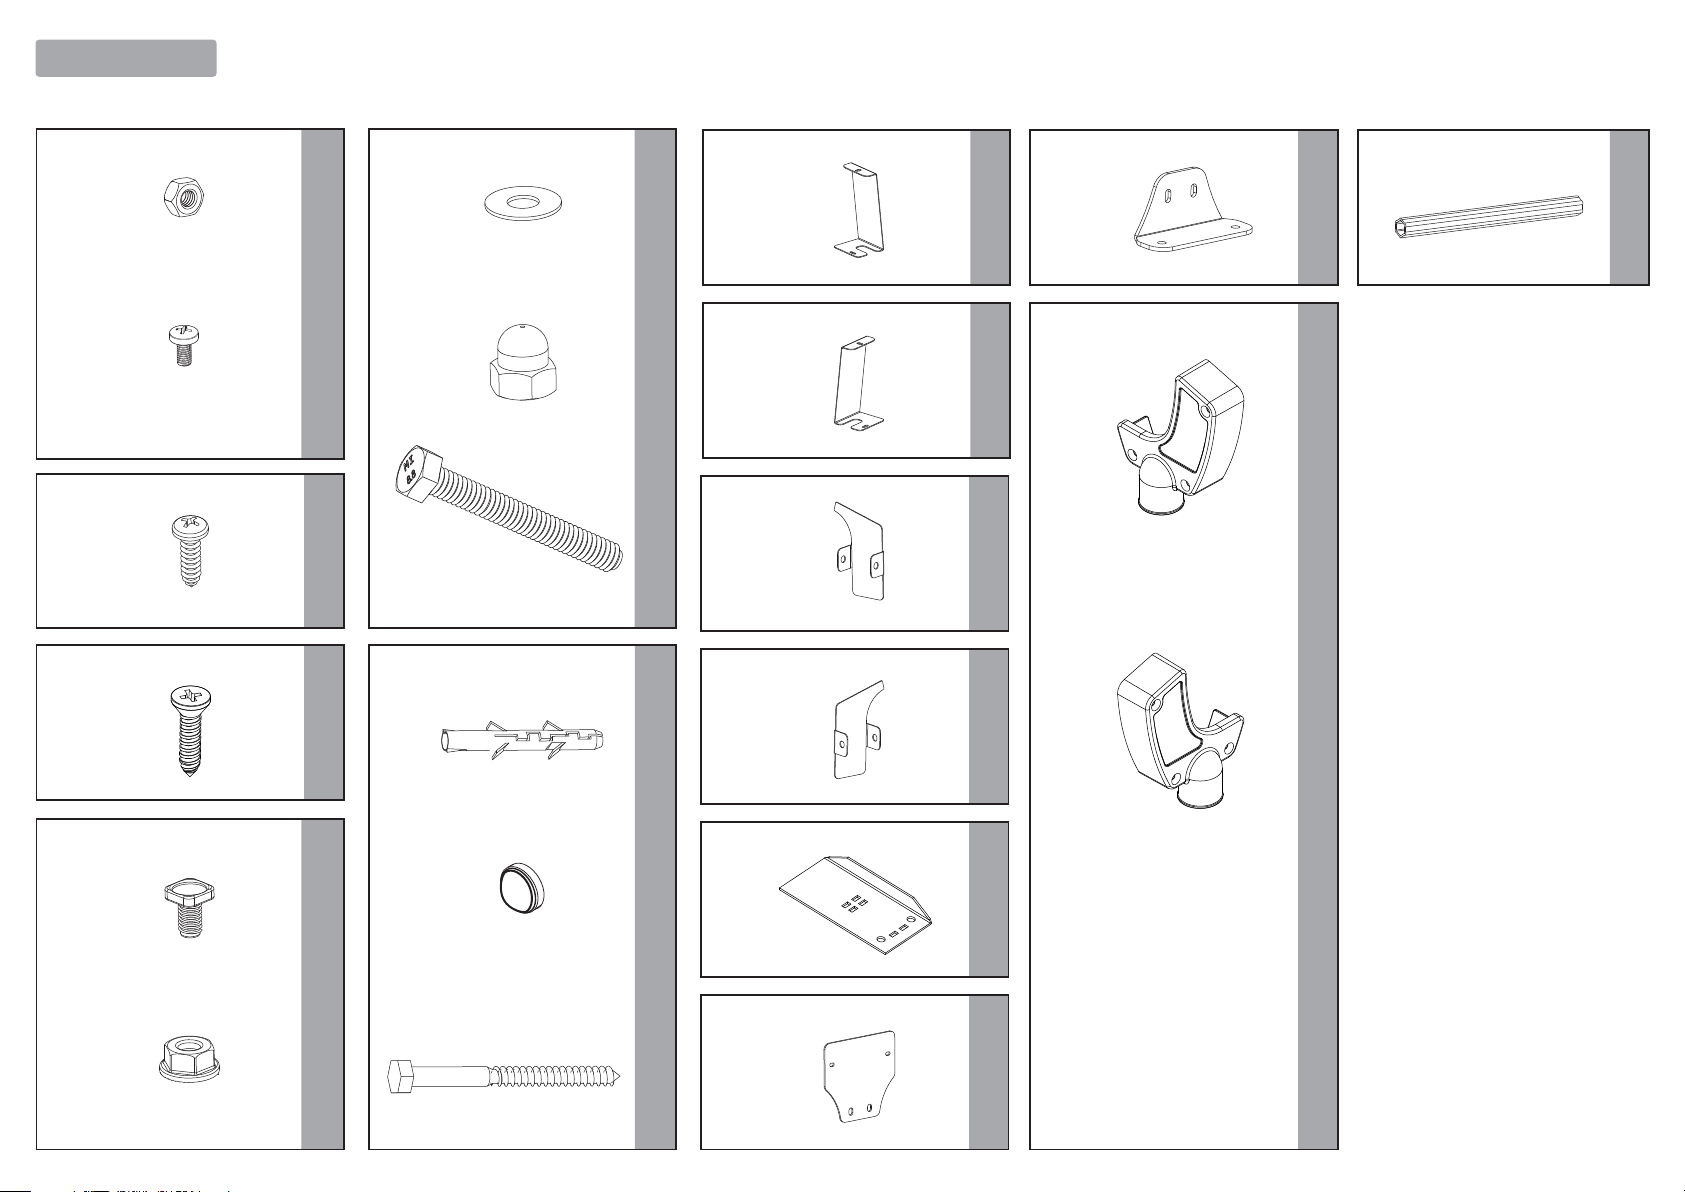
Conten ts
Item Qty. Item Qty.Qty. Item Qty.Item
422
M4
4
(+1)
433 31
(+1)
M8
950 1 212 4 T001 1
414 8
465 4
M4
(+1)
447 8
(+1)
(+1)
M8
4042 8
M8
(+1)
951 1
947 1
7028 1
7027 1
8708 6
(+1)
4010 14
(+1)
948 1
Item
Qty.
411 30
(+4)
M6
466 30
(+4)
M6
5000 12
4000 14
(+1)
7038 4
937 4
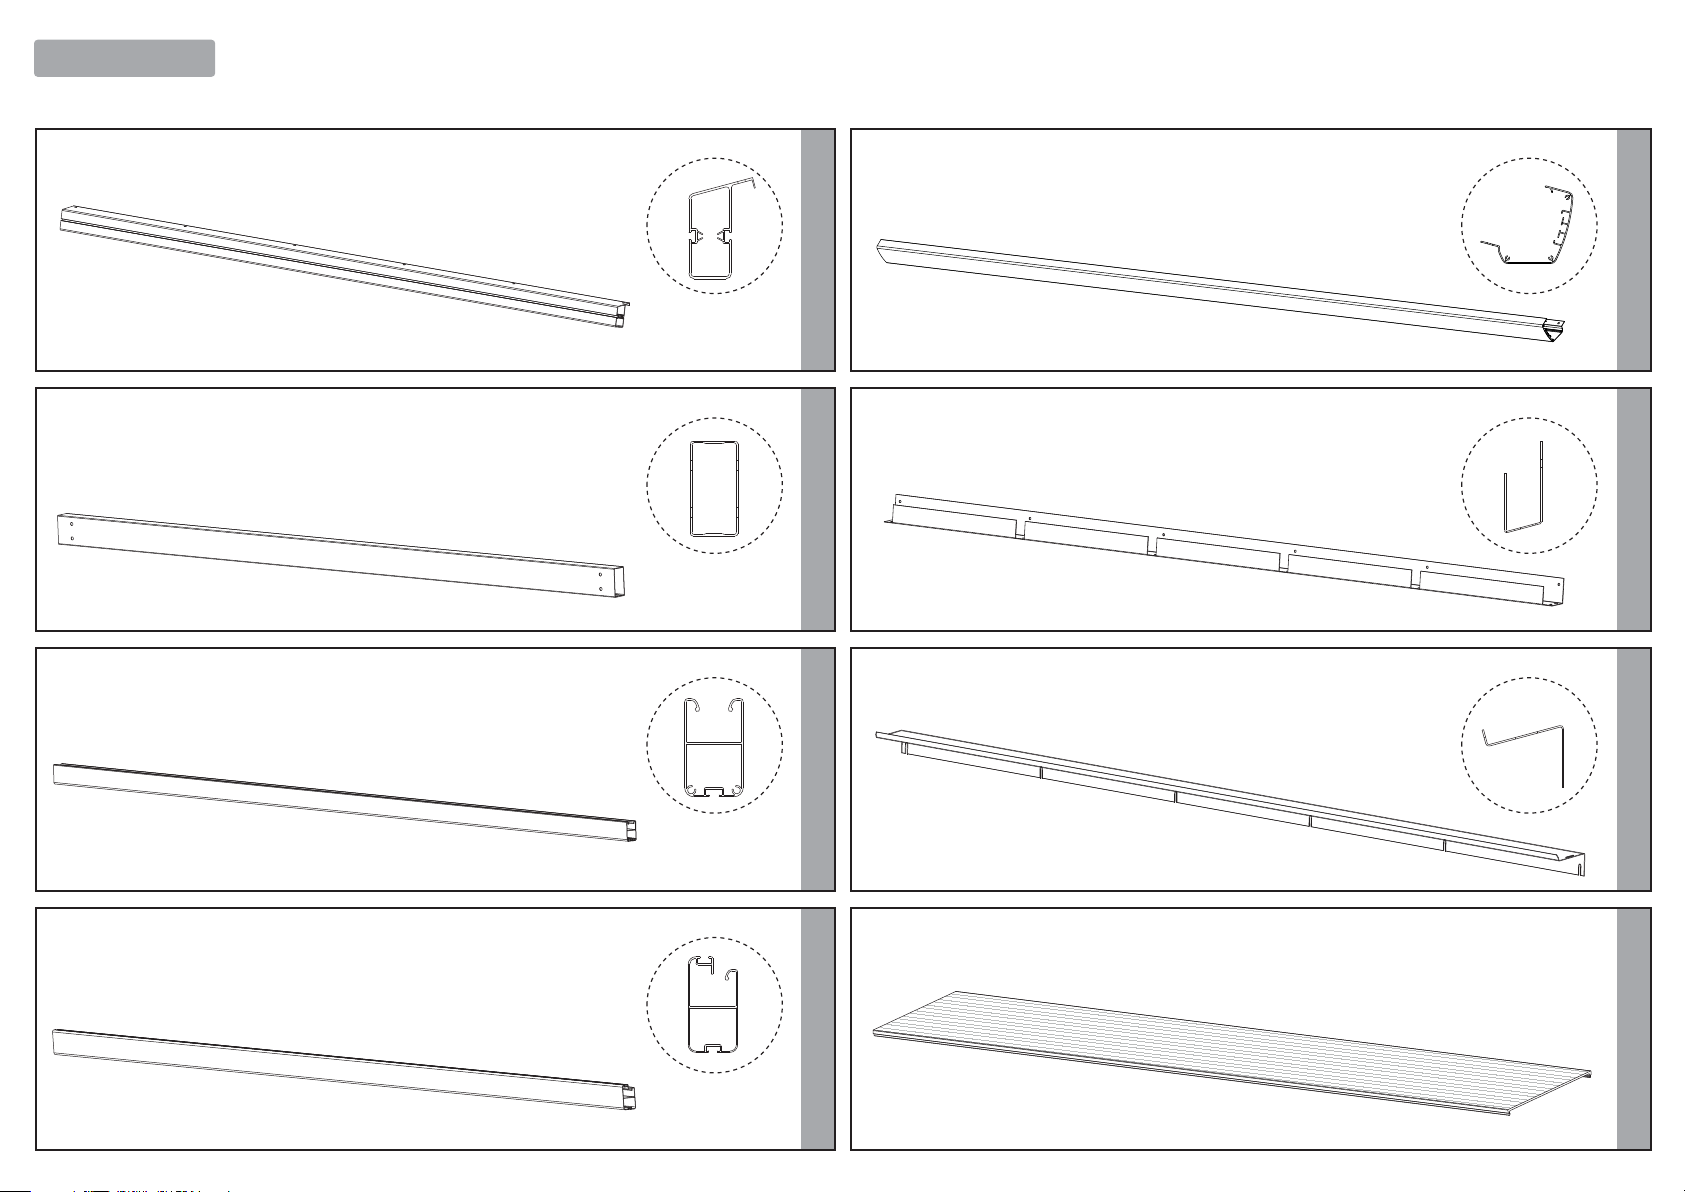
Co n t ents
Item
1041 1
1042 2
1043 4
Qty.
Item
900 1
953 1
954 1
Qty.
1044 2
3018 5
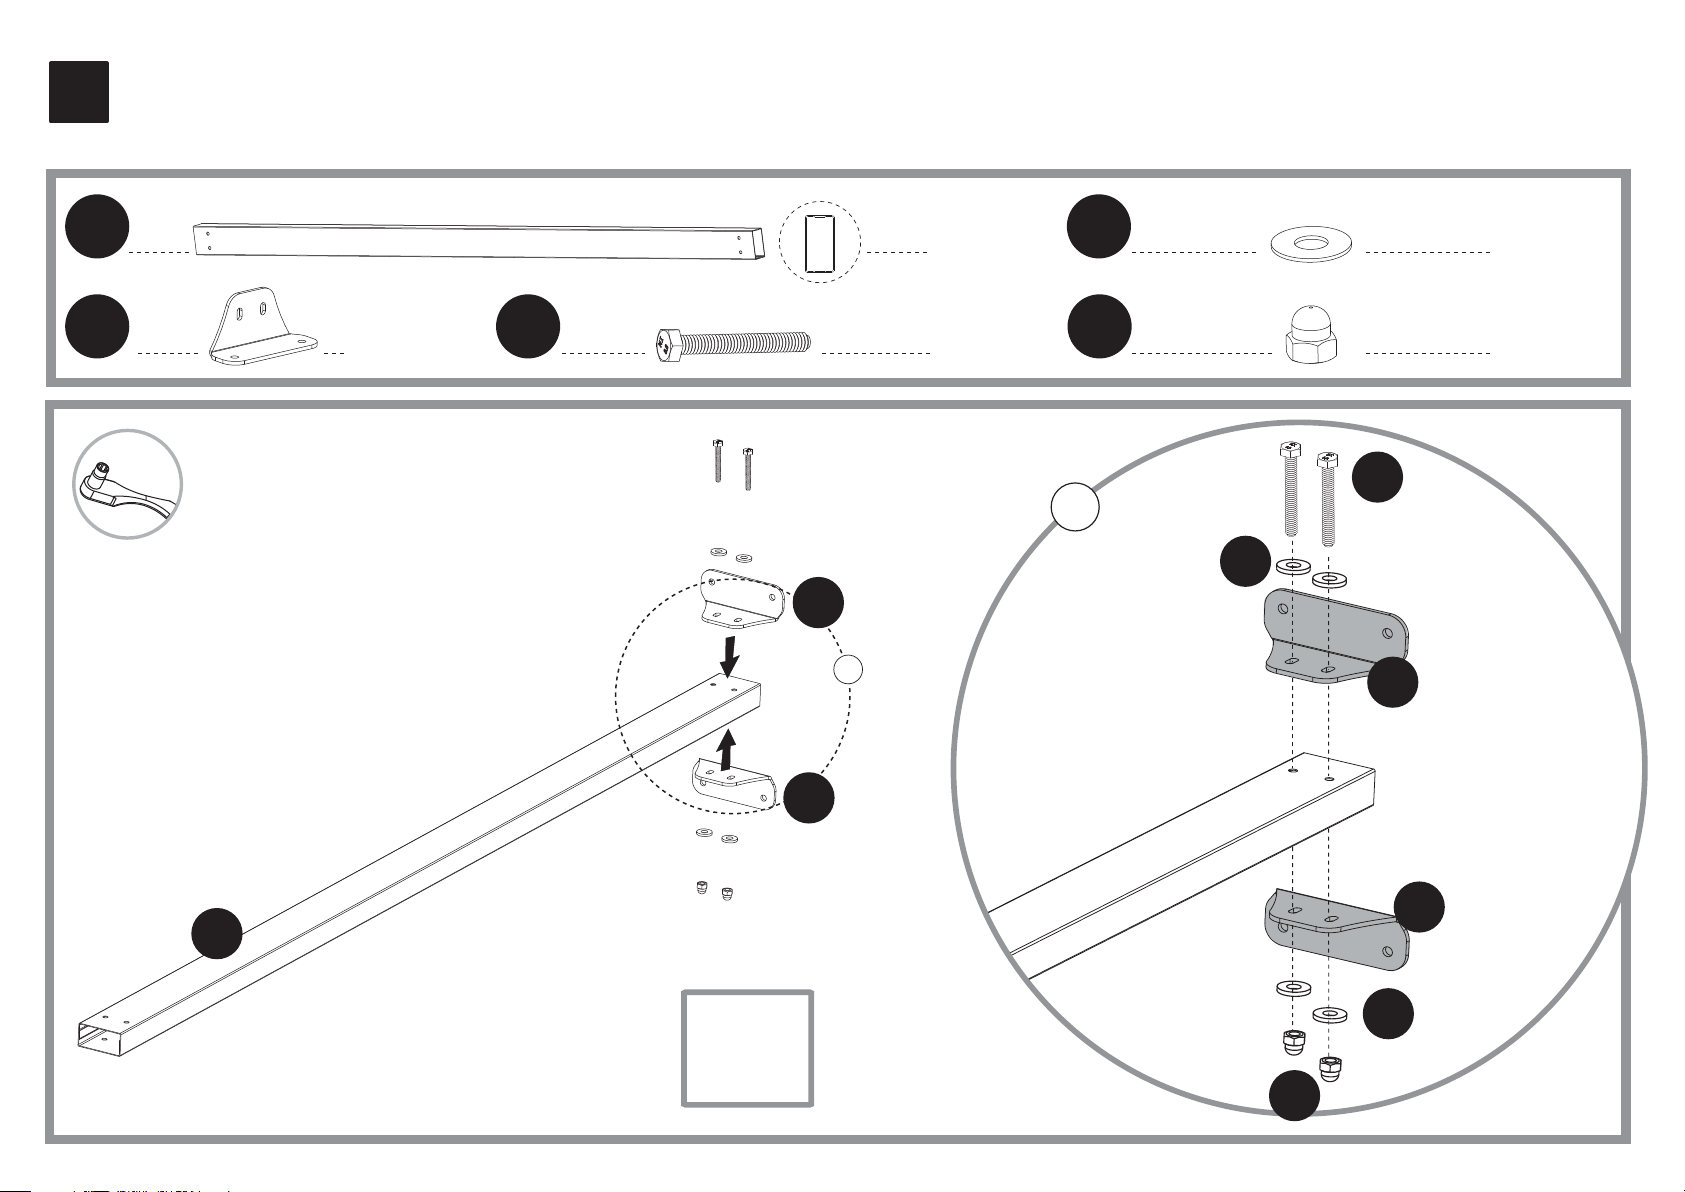
1
13mm
1042
x2
212 4042 414
x4
x4
433
a
212
a
212
x8
x4
4042
433
212
212
1042
433
x2
414
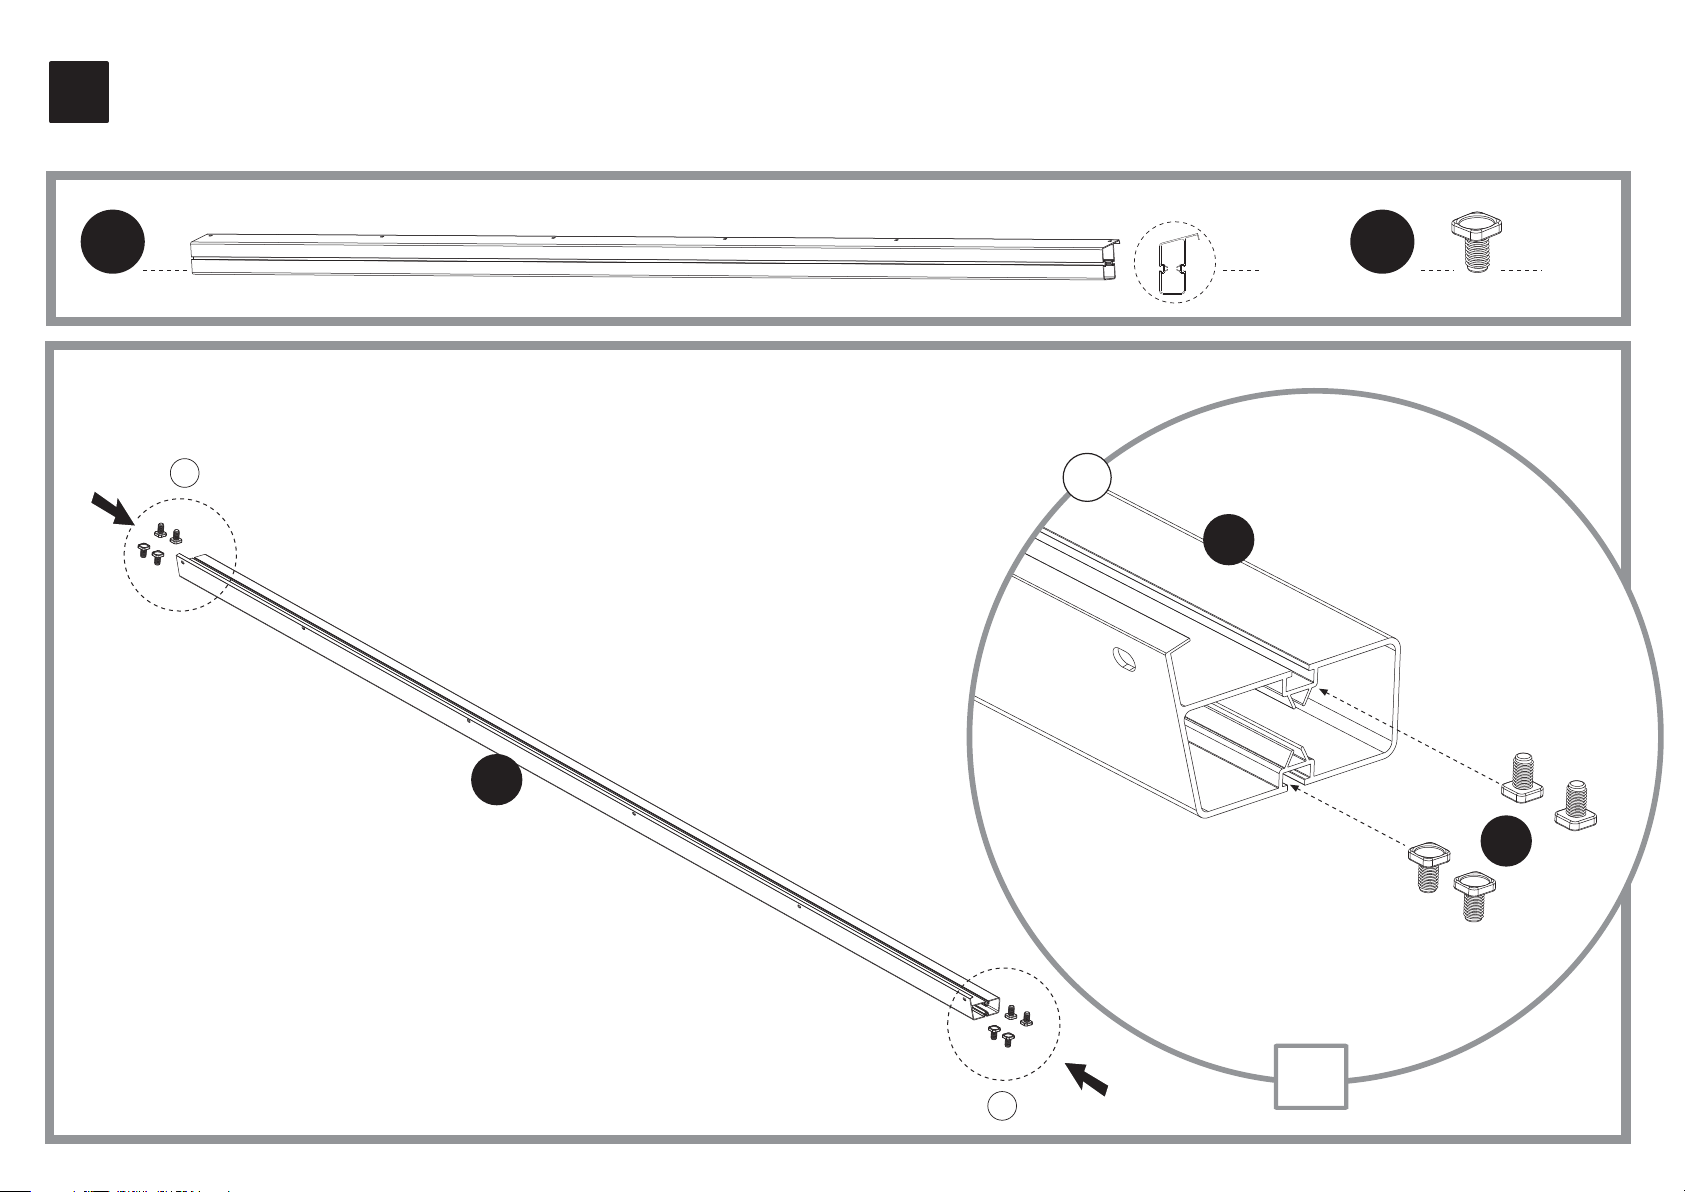
2
4111041
x1 x8
a
1041
a
1041
411
a
x2
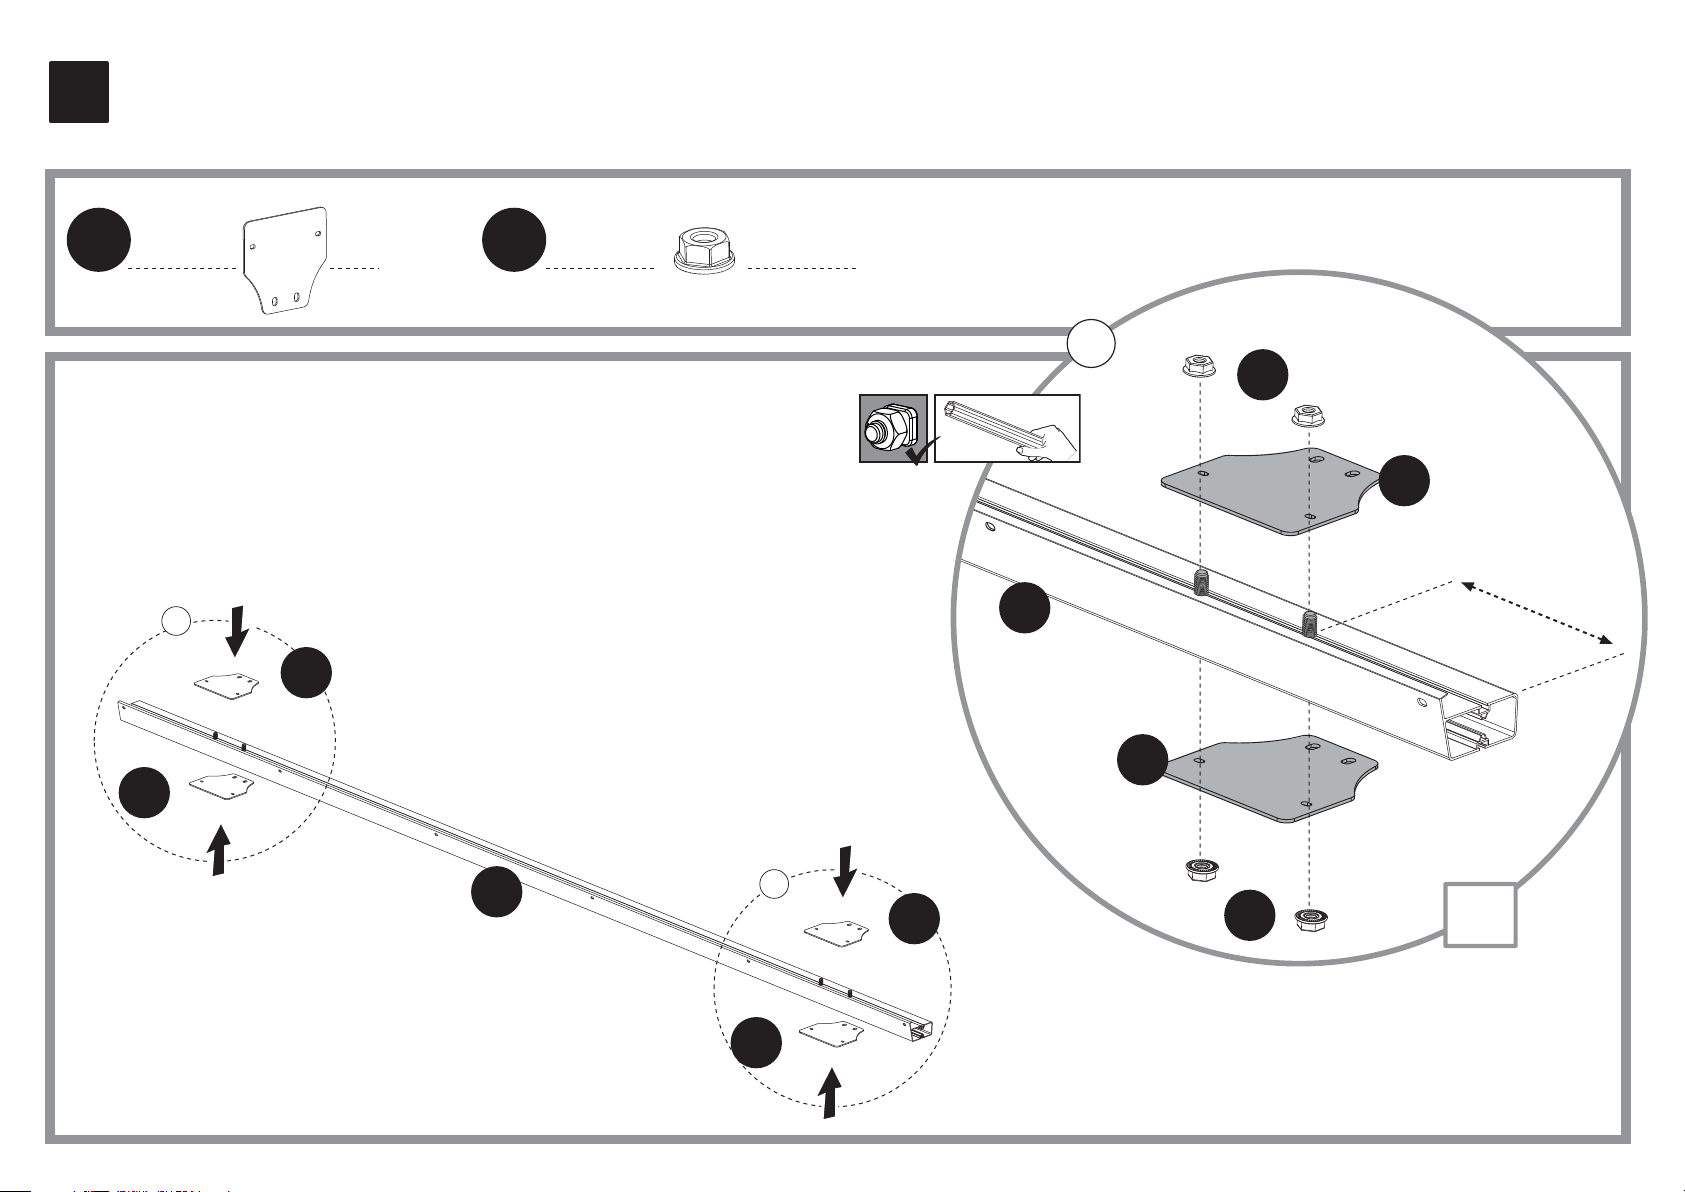
3
937 466
x4 x8
a
937
1041
a
466
937
4 -52cm
1/2
1
” - 20
1/2
”
937
1041
937
937
a
937
466
x2
 Loading...