


N-30AE
Language select / Sélection de la langue / Selección de idioma / Selezione lingua /
Sprachauswahl / Taal selecteren / Выбор языка
English |
|
Français |
|
Español |
|
|
|
|
|
Italiano |
|
Deutsch |
|
Nederlands |
|
|
|
|
|
Русский

> Before Start > Part Names > Install > Initial Setup > Playback
NETWORK AUDIO PLAYER
N-30AE
Instruction
Manual
Advanced Setup | Firmware Update | Others
Before Start |
|
|
What's in the box .................................................................... |
2 |
E |
Part Names |
|
N |
Front Panel ............................................................................. |
3 |
|
Rear Panel .............................................................................. |
4 |
|
Remote Controller .................................................................. |
5 |
|
Display .................................................................................... |
6 |
|
Install |
|
|
Connections with an amplifier ................................................. |
7 |
|
Connecting the power cord, etc. ............................................. |
9 |
|
Initial Setup |
|
|
Power On & Initial Setup ...................................................... |
10 |
|
Playback |
|
|
USB Storage Device/HDD .................................................... |
12 |
|
Internet Radio ....................................................................... |
14 |
|
Spotify ................................................................................... |
15 |
|
AirPlay® ................................................................................ |
16 |
|
Music Server ......................................................................... |
17 |
|
Entering text ......................................................................... |
19 |
|
Advanced Setup |
|
|
Advanced Settings................................................................. |
20 |
|
Firmware Update |
|
|
Firmware Update .................................................................. |
23 |
|
Others |
|
|
Troubleshooting .................................................................... |
25 |
|
General Specifications .......................................................... |
27 |
|
License and Trademark Information ..................................... |
28 |
|
> Before Start > Part Names > Install > Initial Setup > Playback
Advanced Setup | Firmware Update | Others
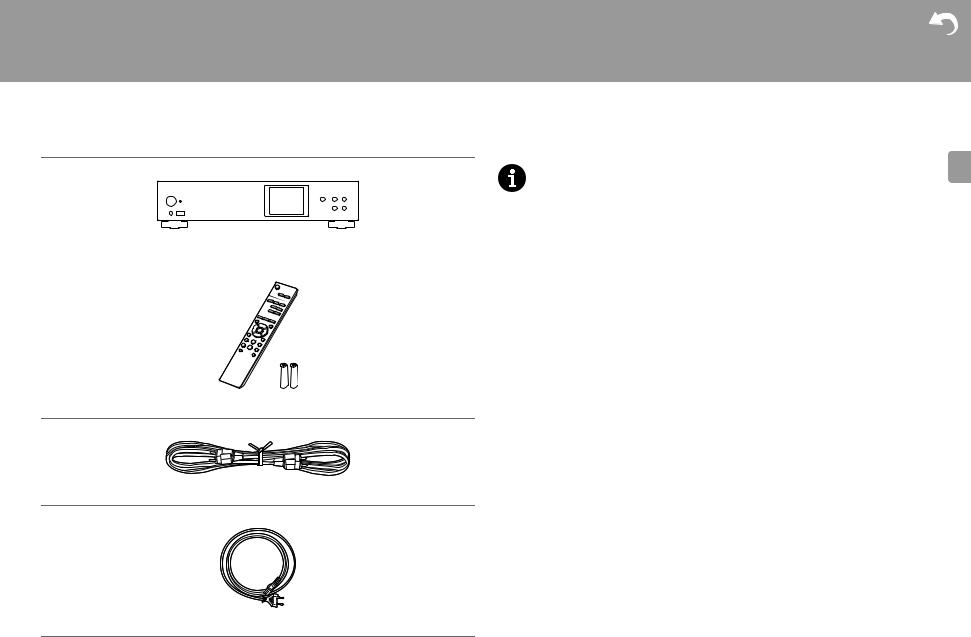
What's in the box
E
N
|
|
|
|
|
|
|
|
|
0 |
The power cord must be connected only after all other cable connections are completed. |
|
|
|
|
|
|
|
|
|
0 |
We will not accept responsibility for damage arising from the connection of equipment |
|
|
|
|
|
|
|
|
|
||
|
|
|
|
|
|
|
|
|
||
Main unit (1) |
|
manufactured by other companies. |
||||||||
0 |
Functionality may be introduced by firmware updates and service providers may cease |
|||||||||
|
|
|
|
|
|
|
|
|
|
services, meaning that some network services and content may become unavailable in |
|
|
|
|
|
|
|
|
|
|
|
|
|
|
|
|
|
|
|
|
|
the future. |
|
|
|
|
|
|
|
|
|
0 |
Specifications and appearance are subject to change without prior notice. |
Remote controller (RC-944E) (1), Batteries (AAA/R03) (2)
Analog audio cable (1)
Power cord (1)
2
> Before Start > Part Names > Install > Initial Setup > Playback
Advanced Setup | Firmware Update | Others
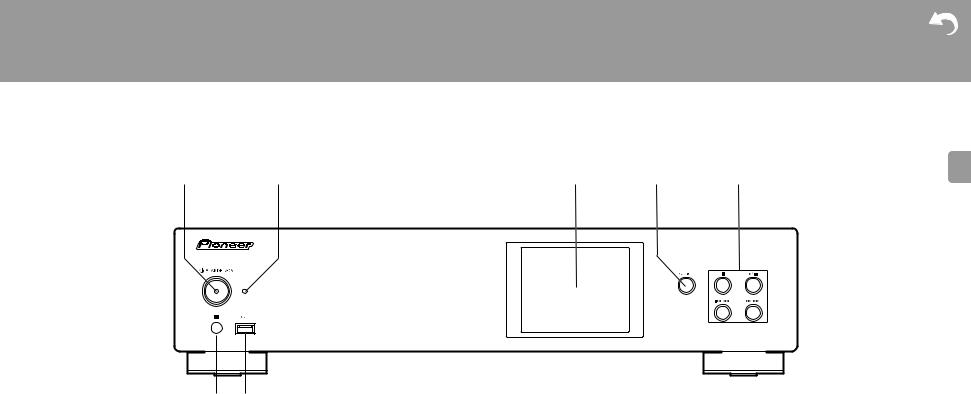
Front Panel
|
|
|
|
|
E |
|
|
|
|
|
N |
1.Í STANDBY/ON button: Turns the unit on or to standby mode.
2.STANDBY/ON indicator: This lights red when this unit is on standby and blue when it is on.
3.Display (P6)
4.SOURCE button: Switches the input to be played.
5.Play button:
∫ : This button stops playback.
1/; : This button pauses the playback. :6 : Move to the previous track. 59 : Move to the next track.
0Depending on the input, the operation may not start.
6.Remote control sensor
7.USB port: Connect a USB storage device or HDD (hard disk drive) to play music files. You can also supply power (maximum 5 V/0.5 A) to USB devices with a USB cable.
0When connecting a HDD that requires more than 5 V/0.5 A, connect to the USB port
(maximum 5 V/1 A) on the rear of the unit.
3
> Before Start > Part Names > Install > Initial Setup > Playback
Advanced Setup | Firmware Update | Others
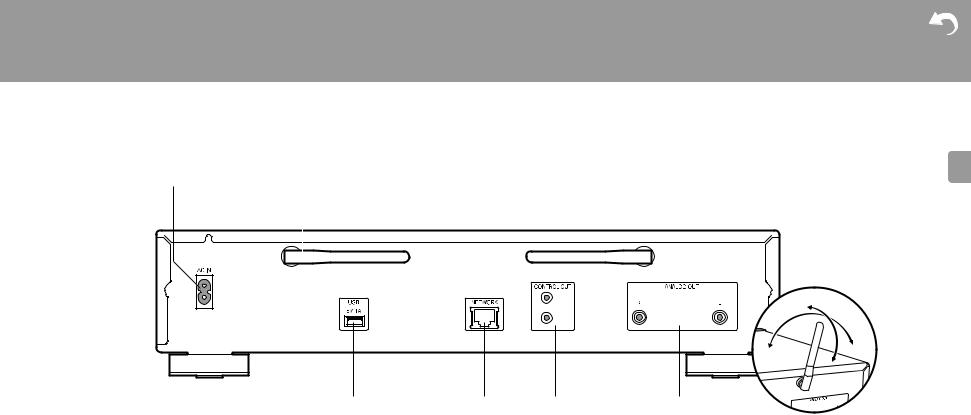
Rear Panel
|
|
|
|
|
|
|
E |
|
|
N |
|||||
|
|
|
|
|
|
|
|
|
|
|
|
|
|
|
|
|
|
|
|
|
|
|
|
|
|
|
|
|
|
|
|
|
|
|
|
|
|
|
|
|
|
|
|
|
|
|
|
|
|
|
|
|
|
|
|
1 |
90° |
|
|
||
2 |
|
180° |
|
|
|
|
1.AC IN: Connect the supplied power cord.
2.Wireless antenna: Used for Wi-Fi connection. Adjust their angles according to the connection status.
3.USB port: Connect a USB storage device or HDD (hard disk drive) to play music files. You can also supply power (maximum 5 V/1 A) to USB devices with a USB cable.
4.NETWORK jack: Connect to the network with an ethernet cable.
5.CONTROL OUT jack: By connecting Pioneer brand amplifiers and CD players, centralized control is possible, for example you can control the amplifiers and CD players from the Pioneer Remote App.
6.ANALOG OUT jacks: Use the supplied analog audio cable to connect an integrated amplifier, for example.
4
> Before Start > Part Names > Install > Initial Setup > Playback
Advanced Setup | Firmware Update | Others
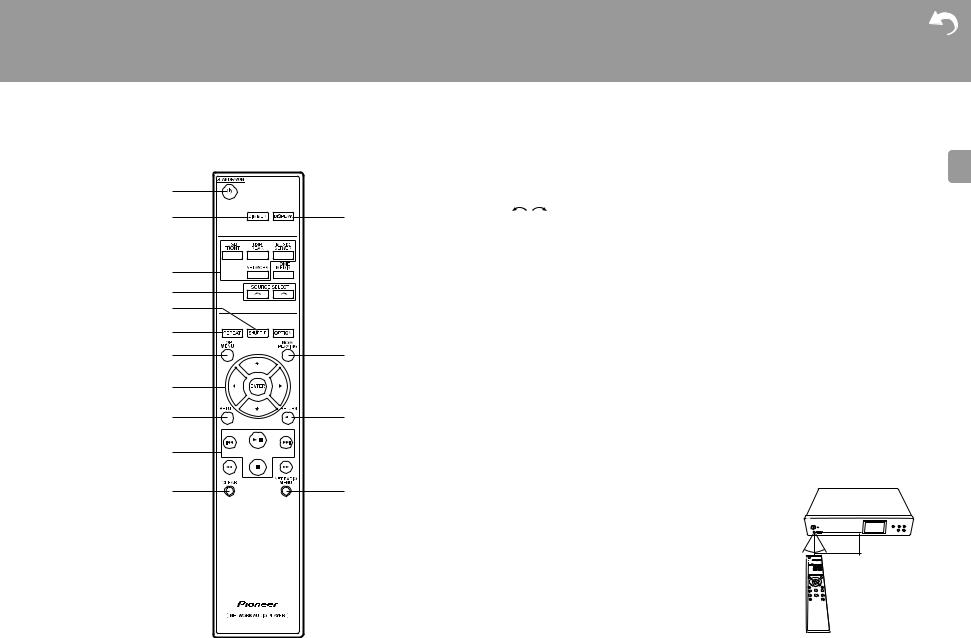
Remote Controller
1.Í STANDBY/ON button: Turns the unit on or into standby mode.
2.DIMMER button: Switch the display off or adjust the brightness of the display in three
|
|
|
steps. |
|
|
|
3. |
INPUT SELECTOR buttons: Switches the input to be played. |
|
|
|
|
|
|
|
||
|
|
4. |
button: Input source played switches each time you press one of these buttons. |
||
5. |
SHUFFLE button: Set shuffle play. |
|
|
||
|
|
|
|
||
|
|
6. |
REPEAT button: Set repeat play. |
|
|
|
|
7. |
TOP MENU button: Move to the top menu of the selected input. |
|
|
|
|
8. |
Cursors, ENTER button: Select the item with the cursors and press ENTER to confirm. |
||
|
|
9. |
SETUP button: Displays the Setup menu. |
|
|
|
|
10.Play buttons: |
|
|
|
|
|
:: Move to the track before the one being played. |
|
|
|
|
|
|
|
|
|
|
|
/;: Play or pause play. |
|
|
|
|
|
|
9: Move to the next track. |
|
|
|
|
∫: Stop playback. |
|
|
|
|
|
|
0 Depending on the input, the operation may not start. |
|
|
11. CLEAR button: Used when entering text, etc. |
|
|
|||
|
|
|
|
||
|
|
12.DISPLAY button: Press to turn off the display of this unit. Press again to turn the display |
|||
|
|
|
on. |
|
|
|
|
13.NOW PLAYING button: When you have changed the display during play, for example, this |
|||
|
|
|
button returns the display to show information about the file being played. |
|
|
14.RETURN button: Returns the display to the previous state. |
|
|
|||
|
|
|
|
||
|
|
15.NET RADIO MENU button:Use this when playing the internet radio. |
|
||
|
|
0 HOME MEDIA, OPTION, 22, and 11 are not used. |
|
|
|
|
|
|
|
||
|
|
|
|
|
|
|
|
|
30° |
30° |
Approx.7 m |
5
E N
> Before Start > Part Names > Install > Initial Setup > Playback
Advanced Setup | Firmware Update | Others
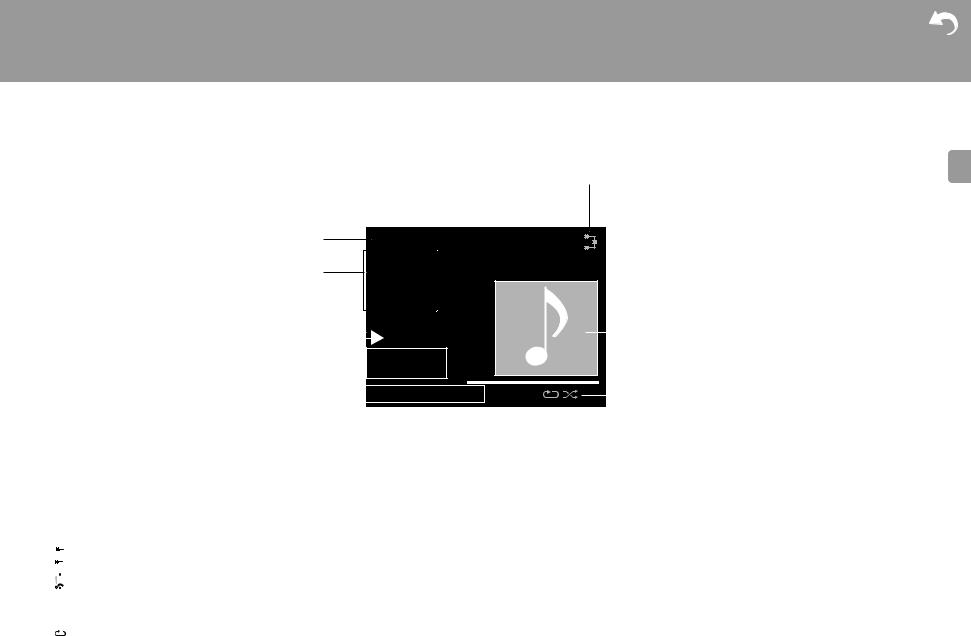
Display
USB Front
Song
Artist
Album
|
|
|
|
|
|
|
|
|
|
|
|
|
|
|
|
|
|
|
|
||
|
|
|
|
|
|
|
|
|
|
|
|
|
|
|
|
|
|
|
|
||
|
|
|
|
FLAC |
|
|
|
|||
|
|
|
44.1kHz/24bit |
|
|
|
|
|
|
|
|
|
|
|
|
|
|
|
|||
|
|
|
|
|
|
|
|
|||
|
|
|
|
|
|
|
|
|
|
|
|
|
|
|
|
|
|
|
|
||
|
|
|
00:01:45 / 00:03:23 |
|
|
|
|
|||
|
|
|
||||||||
1.The input mode is displayed.
(USB Front / USB Rear / Music Server / Network)
2.The name of the file, artist, album, etc., is displayed.
3.Displays the play status.
4.Displays file format, sampling frequency, and quantization bit information.
5.The file play status is displayed. This may not be displayed depending on the input or file.
6.Lights in the following conditions.


 : When the connection setting on the unit is "Wired" and the unit is connected to the network.

 : When the connection setting on the unit is "Wired" and the unit is not connected to the network.
 : When the connection setting on the unit is "Wi-Fi" and the unit is connected to the network.
 : When the connection setting on the unit is "Wi-Fi" and the unit is not connected to the network.
7.If an album jacket is recorded for the file being played, it is displayed here.
8.Lights in the following conditions.
 : When all track repeat play is on 1 : When one track repeat play is on
 : When shuffle play is on
0When DISPLAY on the remote controller is pressed to turn off the display, the unit may appear the same as if you had unplugged the unit from the power outlet, but electricity is still being supplied to the unit. To completely cut the unit off from the power supply, you need to unplug the power plug (shutoff device) unit from the power outlet.
E N
6
> Before Start > Part Names > Install > Initial Setup > Playback
Advanced Setup | Firmware Update | Others
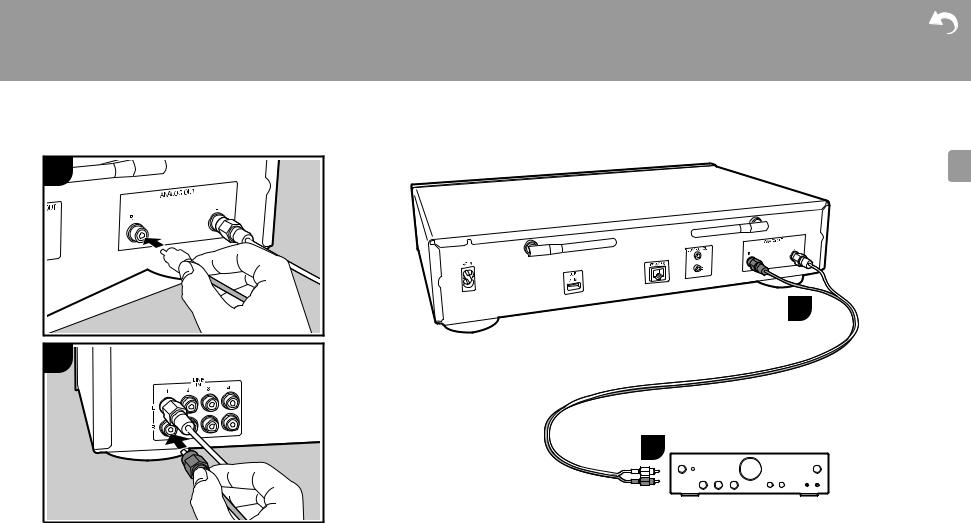
Connections with an amplifier
1 |
N-30AE |
a

1
E N
2 |
a |
|
|
|
2 |
|
a |
Integrated amplifier, AV receiver, etc.
Connection with an analog audio cable
You can play the audio from network features such as internet radio through speaker systems connected to integrated amplifiers or AV receivers. To connect, use the supplied analog audio cable to connect from the ANALOG OUT jack on this unit to the LINE IN input on an integrated amplifier, AV receiver, etc.
a Analog audio cable
7
> Before Start > Part Names > Install > Initial Setup > Playback
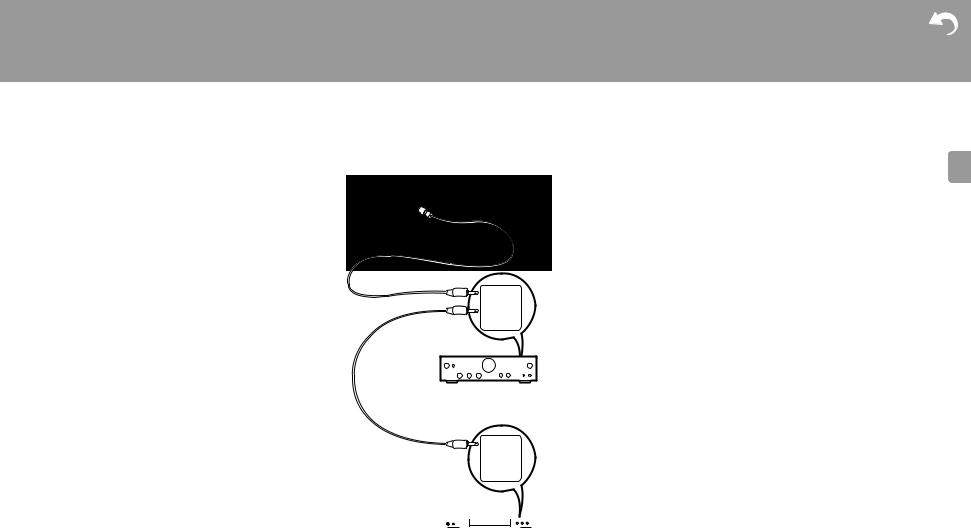
The control jack
By connecting Pioneer brand amplifiers or CD players, for example, that have control jacks using monaural miniplug cables (without resistors), you can centralize control of the devices using the Pioneer Remote App.
Furthermore, even when the other devices are put in places where the remote control signal is unable to reach, you can enable operation of the other components through the remote control sensor of this unit.
0 Also make sure to connect with the analog audio cable. Centralized control cannot work correctly with only the control jack connection.
0 With this connection, the remote control sensors on the amplifier and CD player stop working. Point the remote controller at remote control sensor of this unit.
N-30AE
 IN
IN
 OUT
OUT
CONTROL
a |
Amplifier |
|
 IN
IN
 OUT
OUT
CONTROL
 CD player
a Monaural miniplug cables (without resistors)
8
Advanced Setup | Firmware Update | Others
E
N
> Before Start > Part Names > Install > Initial Setup > Playback
Advanced Setup | Firmware Update | Others
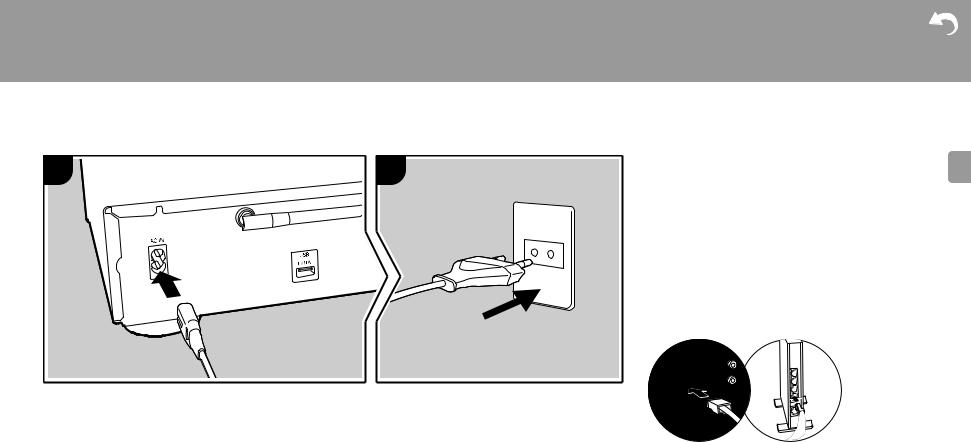
Connecting the power cord, etc.
1  2
2
a
a
a Power cord
Power cord connection |
E |
This model includes a removable power cord. |
N |
The power cord must be connected only after all other |
|
connections are completed. Make sure you first connect the |
|
power cord to AC IN terminal of the unit and then connect to |
|
the outlet. Always disconnect the outlet side first when |
|
disconnecting the power cord. |
|
Ethernet cable connection |
|
To connect to the network with an ethernet cable, use the |
|
NETWORK jack. When using Wi-Fi connection, make |
|
settings in initial settings (P10). You can enjoy features |
|
such as internet radio and AirPlay by connecting to the |
|
network. |
|
9

> Before Start > Part Names > Install > Initial Setup > Playback
Advanced Setup | Firmware Update | Others
Power On & Initial Setup
1 |
2 |
|
Starting up: When you press Í STANDBY/ON, the power |
|
indicator on the main unit slowly blinks blue, then "Hello" is |
||
|
displayed on the display about 20 seconds later. After this, |
||
|
|
BLUE BLINKING |
the display goes blank, then after the Pioneer logo is |
|
|
displayed, you can start operating the unit. |
|
|
|
|
|
|
|
|
Wi-Fi connection settings |
|
|
|
When you first turn the power on, the initial setup screen is |
|
|
|
displayed automatically, allowing you to easily make Wi-Fi |
|
|
|
connection settings. |
|
|
|
Initial Setup |
|
|
|
Selects the method of network |
|
|
|
connection |
|
|
|
Wi-Fi |
|
|
|
Wired (Exit) |
3 |
|
|
To set, select the item with the cursors on the remote |
|
|
controller and press ENTER to confirm. To return to the |
|
|
|
|
previous display, press RETURN. |
To make Wi-Fi settings, select "Wi-Fi". If you have connected with an ethernet cable, select "Wired(Exit)" and confirm. If you select "Wi-Fi", select the method for setting in the next screen (for example "Scan Networks").
10
E N
> Before Start > Part Names > Install > Initial Setup > Playback
Advanced Setup | Firmware Update | Others
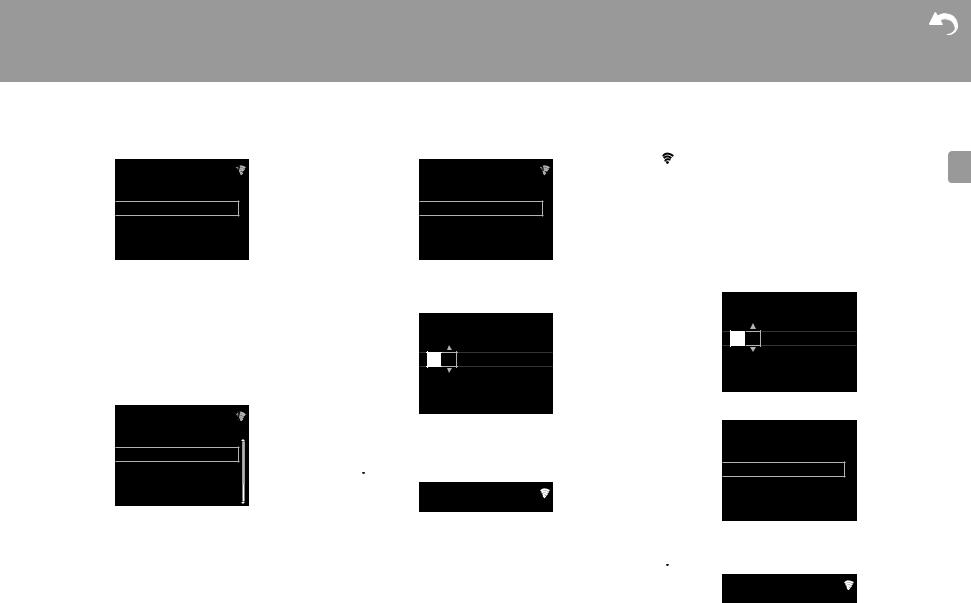
Wireless
Scan Networks
Use iOS Device
Input SSID
0 To redo the initial settings, press SETUP on the remote controller, select "Wi-Fi" in "Network Setting" - "Connection", then select "Wi-Fi Setup".
∫ Scan Networks
From the list of SSID for access points such as wireless LAN routers, select the required SSID and make the settings.
1.Select the SSID of the access point you want to connect and then confirm.
Wireless
aaaaaaaaaaaaaaaa
bbbbbbbbbbbbbbbbb
ccccccccccccccccccc ddddddddddddddddd
2.Select either "Enter Password" or "Push Button" and confirm. If the access point has an automatic setting button, by selecting "Push Button" you can connect without entering a password.
Wireless
Enter Password
Push Button
3.If you select "Enter Password", enter the password of the access point and press ENTER. For details on how to enter text, refer to "Entering text" (P19).
Password
A

[REPEAT] Change Text
[CLEAR] Delete One Character
If you select "Push Button", then after pressing and holding the automatic setting button on the access point for the required amount of time, press ENTER on the remote controller.
4.  is displayed when the settings are complete.
∫ Use iOS Device
Set by sharing the iOS device's Wi-Fi settings with this unit.
1.Connect the iOS device by Wi-Fi.
2.Select this device in the "SET UP NEW AIRPLAY SPEAKER..." item on the screen of the iOS device and select "Next".
0 This unit is displayed as "Pioneer N-30AE XXXXXX".
3.After establishing the connection, select "Done" on the screen of the iOS device.
4. |
is displayed on the display of the unit when the |
E |
||
|
settings are complete. |
N |
||
|
|
|
|
|
∫ Enter SSID of the access point
Set by entering the SSID of the access point you want to connect.
1.Enter the SSID. For details on how to enter text, refer to "Entering text" (P19).
SSID
A

[REPEAT] Change Text
[CLEAR] Delete One Character
2. Select and confirm the authentication method.
Security Method
None
WEP
WPA
WPA2
0If you select "None", proceed to step 3. If you select "WEP", "WPA", or "WPA2", enter the password and confirm.
3. is displayed when the settings are complete.
11
> Before Start > Part Names > Install > Initial Setup > Playback
Advanced Setup | Firmware Update | Others
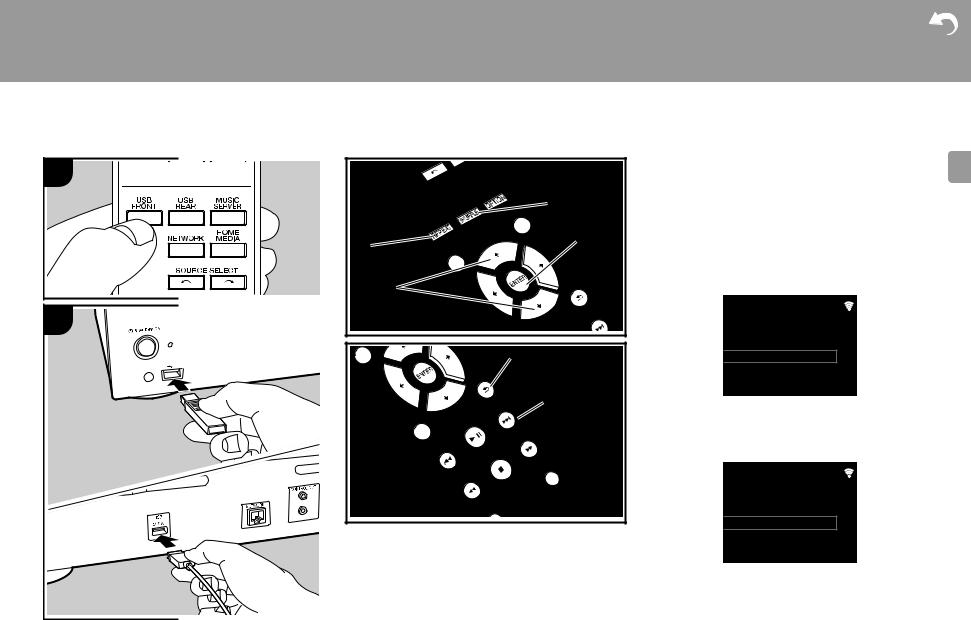
USB Storage Device/HDD
1 |
|
Basic operations |
E |
|
You can play music files by connecting a USB storage |
N |
|
|
c |
device or HDD (hard disk drive) to the USB port on the front |
|
|
or rear of the unit. |
|
|
|
|
0 The USB port on the front supports a maximum 5 V/0.5 A |
|
a |
d |
power supply. If the HDD requires more than this, |
|
|
connect to the USB port (maximum 5 V/1 A) on the rear |
|
|
|
|
of the unit. |
|
|
|
1. Turn the unit on. |
|
|
b |
2. Press USB FRONT or USB REAR. |
|
USB Front
2
e
f
USB
 No Storage
3.Plug your USB storage device or HDD into the USB port on the front or rear.
4.Folders and music files are displayed on the display when loading is complete.
USB Front
USB
 USB Storage
5. Select the folder or music file with the cursors (b) of the remote controller and press ENTER (d) to confirm. To return to the previous display, press RETURN (e).
6. Use play buttons (f) to stop play or choose tracks to play. 0 The display of album name, artist name, and album art is supported with MP3/WMA/Apple Lossless/FLAC/AAC/
12

> Before Start > Part Names > Install > Initial Setup > Playback
Advanced Setup | Firmware Update | Others
DSD (DSF only) format music files. The formats for embedded images are JPEG and PNG.
0 Characters that cannot be displayed by this unit appear as "¢".
0 The USB port of this unit conforms with the USB 2.0 standard. The transfer speed may be insufficient for some content you play, which may cause some interruption in sound.
Repeat play
1.Repeatedly press REPEAT (a) during play to display  or 1 on the display.
 : Repeat play of all tracks.
1 : Repeat play of the selected individual track.
To cancel repeat play, press REPEAT (a) several times until the icons disappear.
Shuffle play
1.Repeatedly press SHUFFLE (c) during play to display  on the display.
 : Play tracks in a folder randomly.
To cancel shuffle play, press SHUFFLE (c) several times until the icon disappears.
USB Storage / HDD Device Requirements
0 Note that operation is not guaranteed with all USB storage devices or HDD.
0 This unit can use USB storage devices that comply with the USB mass storage device class standard. (However, there are still devices that cannot be played by this unit even if they comply with the USB mass storage class standard.)
0 The unit is also compatible with USB storage devices using the FAT16 or FAT32 file system formats. Other formats such as exFAT, NTFS, and HFS cannot be
played by this unit.
0If the USB storage device has been partitioned, each section will be treated as an independent device.
0Up to 20,000 tracks per folder can be displayed, and folders may be nested up to 16 levels deep.
0USB hubs and USB storage devices with hub functions are not supported. Do not connect these devices to the unit.
0USB storage devices with security function are not supported on this unit.
0If the USB storage device or HDD comes with an AC adapter, we recommend that you use its AC adapter to power it.
0Media inserted to the USB card reader may not be available in this function. Furthermore, depending on the USB storage device, proper reading of the contents may not be possible.
0We accept no responsibility whatsoever for the loss or damage to data stored on a USB storage device when that device is used with this unit. We recommend that you back up your important music files beforehand.
Supported Audio Formats
For server playback and playback from a USB storage device, this unit supports the following music file formats. Note that sound files that are protected by copyright cannot be played on this unit.
MP3 (.mp3/.MP3):
0Supported formats: MPEG-1/MPEG-2 Audio Layer 3
0Supported sampling rates: 44.1 kHz, 48 kHz
0Supported bitrates: Between 8 kbps and 320 kbps and VBR.
WMA (.wma/.WMA):
0Supported sampling rates: 44.1 kHz, 48 kHz
0Supported bitrates: Between 5 kbps and 320 kbps and VBR.
0WMA Pro/Voice/WMA Lossless formats are not supported
WAV (.wav/.WAV):
WAV files include uncompressed PCM digital audio.
0Supported sampling rates: 44.1 kHz, 48 kHz, 88.2 kHz, 96 kHz, 176.4 kHz, 192 kHz
0Quantization bit: 8 bit, 16 bit, 24 bit
AIFF (.aiff/.aif/.aifc/.afc/.AIFF/.AIF/.AIFC/.AFC):
AIFF files include uncompressed PCM digital audio.
0Supported sampling rates: 44.1 kHz, 48 kHz, 88.2 kHz, 96 kHz, 176.4 kHz, 192 kHz
0Quantization bit: 8 bit, 16 bit, 24 bit
AAC (.aac/.m4a/.mp4/.3gp/.3g2/.AAC/.M4A/.MP4/.3GP/
.3G2):
0Supported formats: MPEG-2/MPEG-4 Audio
0Supported sampling rates: 44.1 kHz, 48 kHz, 88.2 kHz, 96 kHz
0Supported bitrates: Between 8 kbps and 320 kbps and VBR.
FLAC (.flac/.FLAC):
0Supported sampling rates: 44.1 kHz, 48 kHz, 88.2 kHz, 96 kHz, 176.4 kHz, 192 kHz
0Quantization bit: 8 bit, 16 bit, 24 bit
Apple Lossless (.m4a/.mp4/.M4A/.MP4):
0Supported sampling rates: 44.1 kHz, 48 kHz, 88.2 kHz, 96 kHz, 176.4 kHz, 192 kHz
0Quantization bit: 16 bit, 24 bit
DSD (.dsf/.dff/.DSF/.DFF):
0Supported formats: DSF/DSDIFF
0Supported sampling rates: 2.8 MHz, 5.6 MHz, 11.2 MHz
E N
13
> Before Start > Part Names > Install > Initial Setup > Playback
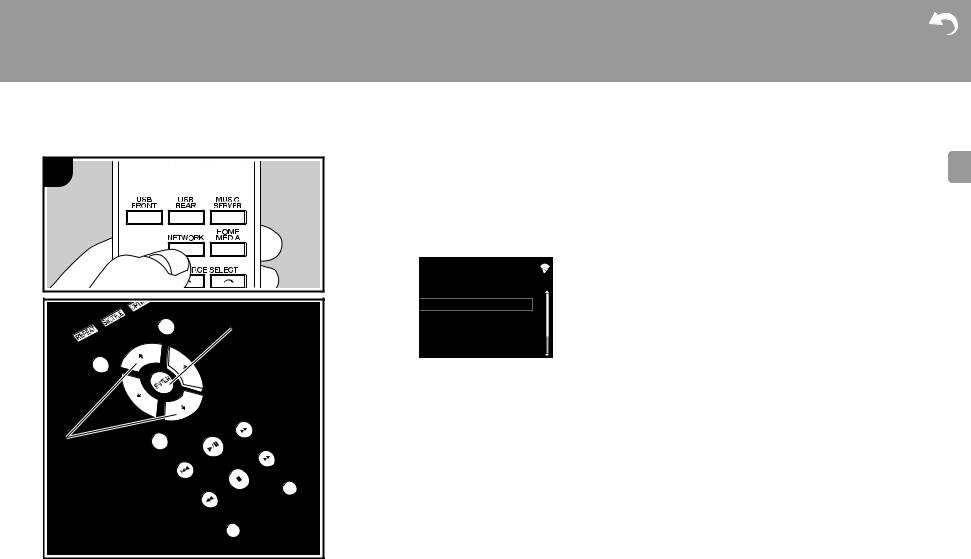
Internet Radio
1
c


 d
d
a
b 
Basic operations
When this unit is connected to a network, you can listen to TuneIn or other preregistered Internet radio services. Depending on the internet radio service, the user may need to register from their computer first.
1.Turn the unit on.
2.Press NETWORK.
Network
TuneIn Radio
Spotify
Deezer
TIDAL
3.Select "TuneIn Radio" with the cursors (a) of the remote controller and press ENTER (c) to confirm. After switching the display to the internet radio service, you can select stations with the cursors (a) on the remote controller and press ENTER (c) to confirm. To return to the previous display, press RETURN (d).
TuneIn
You can register a station you have played as a favorite.
1.Press NET RADIO MENU (b) while playing TuneIn.
2.Select "Add to My Presets" on the display and confirm.
3.To play a favorite, in the top screen of TuneIn, select the registered station in "My Presets" and confirm. To delete favorites, press NET RADIO MENU (b) during play, select "Remove from My Presets" and confirm.
14
Advanced Setup | Firmware Update | Others
E
N
> Before Start > Part Names > Install > Initial Setup > Playback
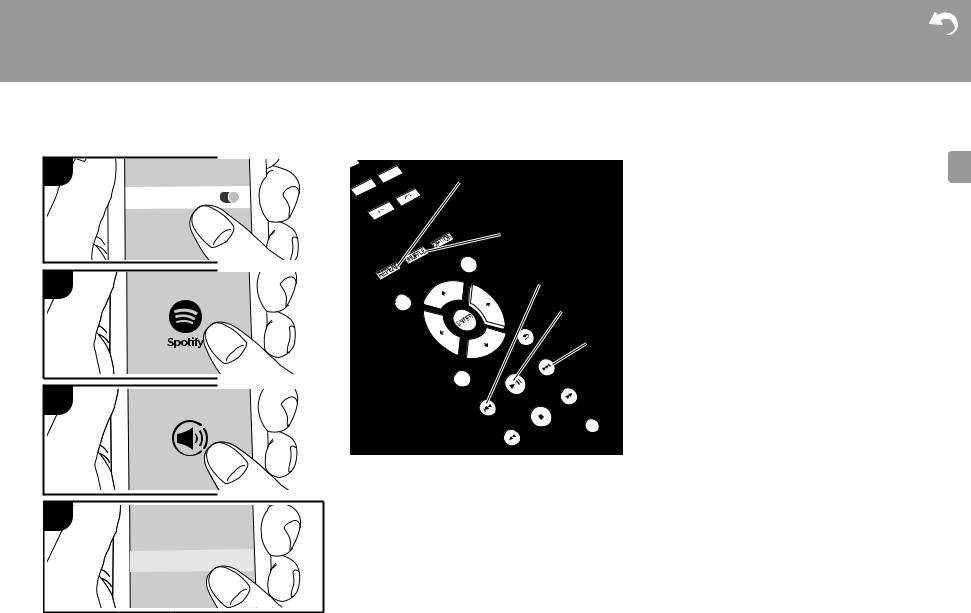
Spotify
1
Wi-Fi
2
3
4
PioneerN-30AE
Advanced Setup | Firmware Update | Others
|
Basic Operation |
E |
a |
Spotify Connect play is possible by connecting this unit to |
N |
the same network as a smart phone or tablet. To enable Spotify Connect, install the Spotify application on your smartphone or tablet and create a Spotify premium account.
b1. Connect the smartphone to the network that this unit is
|
connected to. |
|
2. Click the Connect icon in the track play screen of the |
c |
Spotify app. |
3. Select this unit. |
|
d |
0 This unit is displayed as "Pioneer N-30AE XXXXXX” |
4. This unit turns on automatically and the input selector |
|
|
changes to NETWORK and streaming of Spotify starts. |
e |
0 If "Option Setting" - "Power Off Setting" - "Network |
Standby" is set to "Off" in the Setup menu, manually |
|
|
turn the unit on and then press NETWORK on the |
|
remote controller. |
|
0 Refer to the following for Spotify settings: |
|
www.spotify.com/connect/ |
|
0 The Spotify software is subject to third party licenses |
|
found here: |
|
www.spotify.com/connect/third-party-licenses |
|
The following remote controller operations are also |
|
possible. |
|
(a) This button starts repeat play. |
|
(b) This button starts shuffle play. |
|
(c) This button plays the previous track. |
|
(d)Pressed during play this button pauses playback. |
|
Pressed while paused, and it restarts play. |
|
(e)This button plays the next track. |
15
> Before Start > Part Names > Install > Initial Setup > Playback
Advanced Setup | Firmware Update | Others
AirPlay®
1 |
3 |
Wi-Fi

 iPhone
 Pioneer N-
2
4
Basic Operation
You can wirelessly enjoy the music files on an iPhone®, iPod touch®, or iPad® connected to the same access point as this unit. Update the OS version on your iOS device to the latest version.
1.Turn the unit on.
2.Connect the iOS device to the same network as this unit.
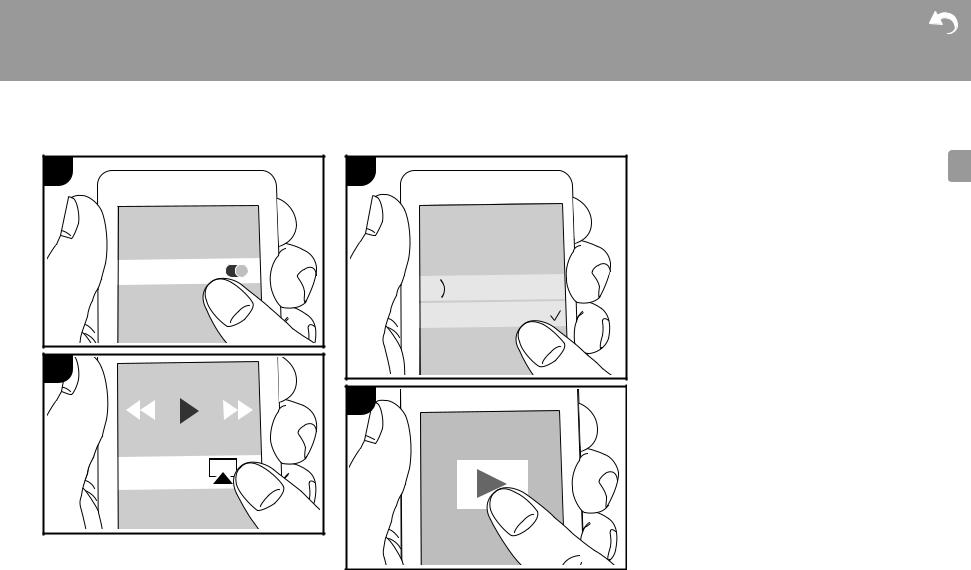
3.Tap the AirPlay icon in the control center of the iOS device and select this unit from the list of devices displayed, and tap "Done".
0 This unit is displayed as "Pioneer N-30AE XXXXXX". 0 If an "AirPlay Password" has been set on this unit, enter the password you set.
4.Play the music files on the iOS device.
0In the Setup menu displayed by pressing SETUP on the remote controller, when "Option Setting" - "Power Off Setting" - "Network Standby" is set to "On", when play of AirPlay starts, this unit turns on automatically and play starts.
0Due to the characteristics of AirPlay wireless technology, the sound produced on this unit may slightly be behind the sound played on the AirPlay-enabled device.
0SHUFFLE and REPEAT on the remote controller do not work. Operate from the iOS device.
You can also play the music files on a computer with iTunes (Ver. 10.2.2 or later). Make sure this unit and the computer are connected to the same network, click the AirPlay icon  in iTunes, select this unit from the list of devices displayed, and start play of a music file.
E N
16
> Before Start > Part Names > Install > Initial Setup > Playback
Advanced Setup | Firmware Update | Others
Music Server
1 |
|
It is possible to stream music files stored on PCs or NAS |
|
|
devices connected to the same network as this unit. The |
||
|
network servers this unit is compatible with are those PCs |
||
|
|
with players installed that have the server functionality of |
|
|
|
Windows Media® Player 11 or 12, or NAS that are |
|
|
|
compatible with home network functionality. You may need |
|
|
|
to make some settings in advance to use Windows Media® |
|
|
|
Player 11 or 12. Note that only music files registered in the |
|
|
|
library of Windows Media® Player can be played. |
|
|
|
Configuring Windows Media® Player |
|
b |
|
∫ Windows Media® Player 11 |
|
|
|
1. |
Turn on your PC and start Windows Media® Player 11. |
|
|
2. |
In the "Library" menu, select "Media Sharing" to display a |
|
|
|
dialog box. |
|
|
3. |
Select the "Share my media" check box, and then click |
|
c |
4. |
"OK" to display the compatible devices. |
|
|
Select this unit, and then click "Allow". |
|
|
|
|
0 When it is clicked, the corresponding icon is checked. |
a |
|
5. |
Click "OK" to close the dialog. |
|
0 |
Depending of the version of Windows Media® Player, |
|
|
|
|
there may be differences in the names of items you can |
|
|
|
select. |
|
|
∫ Windows Media® Player 12 |
|
|
|
1. |
Turn on your PC and start Windows Media® Player 12. |
|
|
2. |
In the "Stream" menu, select "Turn on media streaming" |
|
|
|
to display a dialog box. |
|
|
0 |
If media streaming is already turned on, select "More |
|
|
|
streaming options..." in the "Stream" menu to list players |
|
|
|
in the network, and then go to step 4. |
|
|
3. |
Click "Turn on media streaming" to list players in the |
|
|
|
network. |
|
|
4. |
Select this unit in "Media streaming options" and check |
|
|
|
that it is set to "Allow". |
|
|
5. |
Click "OK" to close the dialog. |
|
|
0 |
Depending of the version of Windows Media® Player, |
there may be differences in the names of items you can |
E |
select. |
N |
Playing
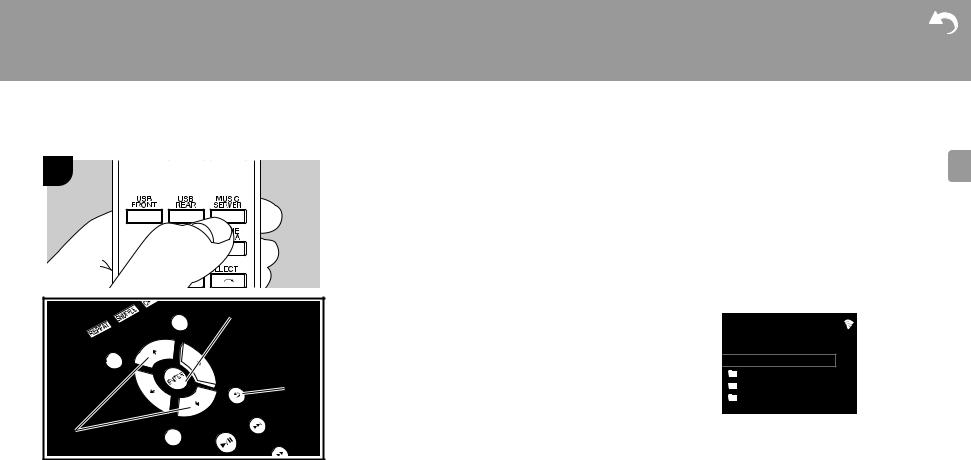
1.Turn the unit on.
2.Start the server (Windows Media® Player 11, Windows Media® Player 12, or NAS device) containing the music files to play.
3.Make sure that the PCs and/or NASs are properly connected to the same network as this unit.
4.Press MUSIC SERVER.
Music Server
Music Server
 aaa
aaa
 bbb
bbb
 ccc
ccc  ddd
ddd
5.Select the server and music file with / (a) and press ENTER (b) to confirm. To return to the previous display, press RETURN (c).
0If "No Server" is displayed, check whether the network is properly connected.
0Depending on the server being used and the files played, elapsed play time and remaining play time may not be displayed.
0For music files on a server, there can be up to 20,000 tracks per folder, and folders may be nested up to 16 levels deep.
17

> Before Start > Part Names > Install > Initial Setup > Playback
Advanced Setup | Firmware Update | Others
Controlling Remote Playback from a PC
You can use this unit to play music files stored on your PC by operating the PC inside your home network. The unit supports remote playback with Windows Media® Player 12.
1.Turn on your PC and start Windows Media® Player 12.
2.Open the "Stream" menu and check that "Allow remote control of my Player..." is checked. Click "Turn on media streaming" to list players in the network.
3.Select and right-click the music file to play with Windows Media® Player 12. To remotely play a music file on another server, open the target server from "Other Libraries" and select the music file to play.
4.Select this unit in "Play to" to open the "Play to" window of Windows Media® Player 12 and start playback on the unit. If your PC is running on Windows® 8.1, click "Play
to", and then select this unit. If your PC is running on Windows® 10, click "Cast to Device", and select this unit.
Operations during remote playback are possible from the "Play to" window on the PC.
0 Remote playback is not possible when using a network service or playing music files on a USB storage device.
0Depending of the version of Windows Media® Player, there may be differences in the names of items you can select.
Supported Audio Formats
For server playback and playback from a USB storage device, this unit supports the following music file formats. 0 Note that playback via wireless LAN of sampling rates of
88.2 kHz or higher, and DSD are not supported.
0 Remote play of FLAC, and DSD is also not supported.
0Variable bit-rate (VBR) files are supported. However, playback times may not be displayed correctly.
0Remote playback does not support the gapless playback.
MP3 (.mp3/.MP3):
18
0Supported formats: MPEG-1/MPEG-2 Audio Layer-3
0Supported sampling rates: 44.1 kHz, 48 kHz
0Supported bitrates: Between 8 kbps and 320 kbps and VBR.
WMA (.wma/.WMA):
0Supported sampling rates: 44.1 kHz, 48 kHz
0Supported bitrates: Between 8 kbps and 320 kbps and VBR.
0WMA Pro/Voice/WMA Lossless formats are not supported.
WAV (.wav/.WAV):
WAV files include uncompressed PCM digital audio.
0Supported sampling rates: 44.1 kHz, 48 kHz, 88.2 kHz, 96 kHz, 176.4 kHz, 192 kHz
0Quantization bit: 8 bit, 16 bit, 24 bit
AIFF (.aiff/.aif/.aifc/.afc/.AIFF/.AIF/.AIFC/.AFC):
AIFF files include uncompressed PCM digital audio.
0Supported sampling rates: 44.1 kHz, 48 kHz, 88.2 kHz, 96 kHz, 176.4 kHz, 192 kHz
0Quantization bit: 8 bit, 16 bit, 24 bit
AAC (.aac/.m4a/.mp4/.3gp/.3g2/.AAC/.M4A/.MP4/.3GP/
.3G2):
0Supported formats: MPEG-2/MPEG-4 Audio
0Supported sampling rates: 44.1 kHz, 48 kHz, 88.2 kHz, 96 kHz
0Supported bitrates: Between 8 kbps and 320 kbps and VBR.
FLAC (.flac/.FLAC):
0Supported sampling rates: 44.1 kHz, 48 kHz, 88.2 kHz, 96 kHz, 176.4 kHz, 192 kHz
0Quantization bit: 8 bit, 16 bit, 24 bit
LPCM (Linear PCM):
0Supported sampling rates: 44.1 kHz, 48 kHz
0Quantization bit: 16 bit
Apple Lossless (.m4a/.mp4/.M4A/.MP4): |
E |
||
N |
|||
0 |
Supported sampling rates: 44.1 kHz, 48 kHz, 88.2 kHz, |
||
|
96 kHz, 176.4 kHz, 192 kHz |
|
|
0 |
Quantization bit: 16 bit, 24 bit |
|
|
DSD (.dsf/.dff/.DSF/.DFF):
0Supported formats: DSF/DSDIFF
0Supported sampling rates: 2.8 MHz, 5.6 MHz, 11.2 MHz

> Before Start > Part Names > Install > Initial Setup > Playback
Entering text
Text entry, for passwords, etc., uses the following remote controller buttons.
dREPEAT button (a): Each press changes text type in the
|
|
|
order upper case → lower case → numbers → symbols. |
|
|
e |
/ buttons (b): Move the position (cursor position) where |
a |
|
the character is to be entered. |
|
|
|
||
|
|
/ buttons (e): Each press changes the character. |
|
|
|
|
|
|
|
|
f |
|
|
|
ENTER button (d): Confirms the entered content. |
b |
|
|
RETURN button (f): Cancels input and returns you to the |
|
|
previous display. |
|
|
|
|
CLEAR button (c): Deletes the character in the cursor |
|
|
|
position. |
|
|
|
Password |
|
c |
|
A |
|
|
|
|
|
|
|
[REPEAT] Change Text |
|
|
|
[CLEAR] Delete One Character |
Advanced Setup | Firmware Update | Others
E
N
19
> Before Start > Part Names > Install > Initial Setup > Playback
Advanced Setup | Firmware Update | Others
Advanced Settings
1 |
The unit allows you to configure advanced settings to provide you with an even better |
E |
|
experience. |
N |
||
1. |
Press SETUP on the remote controller. |
|
|
|
|
Setup |
|
|
|
Network Setting |
|
|
|
Option Setting |
|
|
|
System Info |
|
|
|
Factory Reset |
|
|
2. |
After the Setup screen is displayed, select the content or the setting with the cursors on |
|
|
|
the remote controller and press ENTER to confirm your selection. To return to the |
|
|
|
previous screen, press RETURN. |
|
|
3. |
To exit the settings, press SETUP. |
|
Network Setting
∫ Connection
Select the type connection to the network. "Wi-Fi": To connect via wireless LAN
"Wired" (Default Value): To connect via wired LAN Perform "Wi-Fi Setup" if you select "Wi-Fi".
∫ Wi-Fi Setup
Make Wi-Fi connection settings. (P10)
This can be set only when "Wi-Fi" is selected in "Connection".
20

> Before Start > Part Names > Install > Initial Setup > Playback
0You can make Wi-Fi connection settings using a web browser on a computer. For details, refer to “Web Setup” (P22).
∫ DHCP
"On (Default Value)": Auto configuration by DHCP "Off": Manual configuration without DHCP
If selecting "Off", you must set "IP Address", "Subnet Mask", "Gateway", and "DNS Server" manually.
∫ IP Address
Displays/Sets the IP address.
∫ Subnet Mask
Displays/Sets the subnet mask.
∫ Gateway
Displays/Sets the gateway.
∫ DNS Server
Displays/Sets the primary DNS server.
∫ Proxy URL
Displays/Sets the proxy server URL.
∫ Proxy Port
Displays/Sets the proxy server port number when you enter "Proxy URL".
∫ Friendly Name
Change the device name for this unit which is shown on other devices connected to the network to an easily recognized name. You can input up to 31 characters. For details on how to enter text, refer to "Entering text" (P19). After finishing input, press ENTER.
∫ AirPlay Password
You can set a password of up to 31 characters so that only registered users can use AirPlay. For details on how to enter text, refer to "Entering text" (P19). After finishing input, press ENTER.
Advanced Setup | Firmware Update | Others
∫ Network Check |
E |
|
N |
||
|
You can check the network connection.
Option Setting
∫ Power Off Setting
Auto Standby |
This setting places the unit on standby automatically after 20 |
|
minutes of inactivity without any audio input. |
|
"On" (Default Value): The unit will automatically enter standby |
|
mode. |
|
"Off": The unit will not automatically enter standby mode. |
|
|
Network Standby |
When this feature is turned "On", you can turn on the power of the |
|
unit via the network using an application that can control this unit. |
|
0 Setting to "On" (Default Value) increases the power |
|
consumption even when the unit is on standby. |
|
0 "Network Standby", which suppresses power consumption, |
|
may be disabled when the network connection is lost. |
|
|
∫ Digital Filter
"Slow": Soft and fluid sound
"Sharp" (Default Value): Sound with more structure and firmness "Short": Sound that starts quick and seems to move forward "Short"
∫ Language
Select the language displayed on the display.
English (Default Value), German, French, Spanish, Italian, Dutch, Swedish, Russian, Chinese
System Info
The MAC address of this unit and the current firmware version will be displayed.
21

> Before Start > Part Names > Install > Initial Setup > Playback
Factory Reset
Reset the settings of this unit to the status at the time of shipment. We recommend that you take a note of the settings you have changed before going ahead with a factory reset. Select "Start" and confirm to go ahead. The unit will be placed on standby automatically when initializing is completed.
Update
"Update" is not displayed if there are no firmware updates.
∫ via Network
Press ENTER to select when you want to update the firmware via network.
∫ via USB
Press ENTER to select when you want to update the firmware via USB.
Web Setup
You can make Wi-Fi connection settings using a web browser on a computer. Be sure your computer is connected to the router wirelessly.
If this unit is connected to the router using ethernet cable, you can not do this setting.
1.Turn the unit on.
2.Press SETUP on the remote controller, select "Wi-Fi" in "Network Setting" - "Connection", then select "Wi-Fi Setup".
3.Press / to select "Use iOS Device" and press ENTER.
4.In the list of wireless LAN connections on your computer, select SSID of this unit (softap_0009B0xxxxxx).
0 "xxxxxx" in SSID is the lower three bytes of the MAC address.
5.Open the web browser on your computer and access http://192.168.200.1.
6.The "Web Setup" menu is displayed. Make network settings for this unit.
0 Depending on the equipment being used or connection environment, this function may not work.
0Consult the appropriate operating instructions for information regarding operation of the computer.
0Since this kind of connection is not encoded, a minor security risk may be involved.
22
Advanced Setup | Firmware Update | Others
E
N

> Before Start > Part Names > Install > Initial Setup > Playback
Advanced Setup | Firmware Update | Others
Firmware Update
The updating function on this unit
This unit has functionality to update the firmware (the system software) over a network or by the USB port. This enables us to make improvements to a variety of operations and to add features.
For details about the updated play features, see here.
How to update
There are two methods for updating the firmware: via network and via USB. The update may take about 5 minutes to complete for either method: via network or via USB. Furthermore, existing settings are guaranteed regardless of the method used for update.
0For the latest information on updates, visit our company’s website. There is no need to update the firmware on this unit if there is no update available.
0When performed over the network, it may take even more time depending on the connection status.
0During an update, do not
–Disconnect and reconnect any cable or USB storage device, or perform any operation on the component such as turn off its power
–Accessing this unit from a PC or smartphone using an application
Disclaimer: The program and accompanying online documentation are furnished to you for use at your own risk. We will not be liable and you will have no remedy for damages for any claim of any kind whatsoever concerning your use of the program or the accompanying online documentation, regardless of legal theory, and whether arising in tort or contract.
In no event will we be liable to you or any third party for any special, indirect, incidental, or consequential damages of any kind, including, but not limited to, compensation, reimbursement or damages on account of the loss of present or prospective profits, loss of data, or for any other reason whatsoever.
Updating the Firmware via Network
0Check that the unit is turned on, and the connection to the Internet is secured.
0Turn off the controller component (PC etc.) connected to the network.
0 Stop any playing Internet radio, USB storage device, or |
E |
server content. |
N |
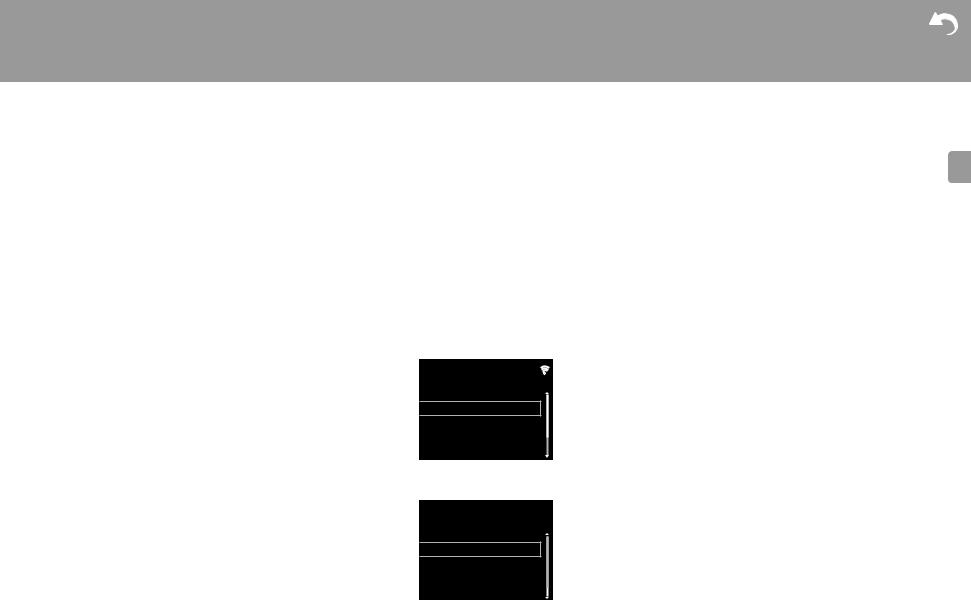
1.The setup screen is displayed on the display when SETUP on the remote controller is pressed.
Setup
Network Setting
Option Setting
System Info
Factory Reset
2.Press / and ENTER to select "Update" - "via Network" in order.
Setup
Update
0 "Update" is not displayed if there are no firmware updates.
3. Press ENTER to start the firmware update.
0 "COMPLETE" is displayed when the update is complete.
4.Press Í STANDBY/ON on the main unit to switch the unit to standby. The process is completed and your firmware is updated to the latest version.
23
> Before Start > Part Names > Install > Initial Setup > Playback
Advanced Setup | Firmware Update | Others
If an error message is displayed: When an error occurs, " - Error!" is displayed on the display of this unit. (" " represents an alphanumeric character.) Check the following:
0-01, -10: Ethernet cable not found. Connect the Ethernet cable properly.
0-02, -03, -04, -05, -06, -11, -13, -14, - 16, -17, -18, -20, -21: Internet connection error. Check the following:
–The router is turned on
–This unit and the router are connected via the network Try to disconnect and then connect again the power to the unit and router. This may solve the problem. If you are still unable to connect to the Internet, the DNS server or proxy server may be temporarily down. Check the service status with your ISP provider.
0Others: Disconnect then reconnect the AC power cord, then repeat from the beginning.
Updating via USB
0 Prepare a 128 MB or larger USB storage device. FAT16 or FAT32 file system format.
0 Delete any data stored on the USB storage device.
0 Turn off the controller component (PC etc.) connected to the network.
0 Stop any playing Internet radio, USB storage device, or server content.
0 Some USB storage devices may take long to load, may not be loaded correctly, or may not be correctly fed depending on the device or their content.
0 We will not be liable whatsoever for any loss or damage of data, or storage failure arising from the use of the USB storage device with this unit. Thank you for your understanding.
1.Connect the USB storage device to your PC.
2.Download the firmware file from our company’s website to your PC and unzip.
Firmware files are named in the following way:
PIONAP _ _ .zip
Unzip the file on your PC. The number of unzipped files and folders varies depending on the model.
3.Copy all unzipped files and folders to the root folder of the USB storage device.
0 Make sure to copy the unzipped files.
4.Connect the USB storage device to the USB port of this unit.
0 If you connect a USB hard disk drive to the USB port of the unit, we recommend that you use its AC adapter to power it.
0 If the USB storage device has been partitioned, each section will be treated as an independent device.
5.The setup screen is displayed on the display when SETUP button on the remote controller is pressed.
Setup
Network Setting
Option Setting
System Info
Factory Reset
6.Press / and ENTER to select "Update" - "via USB" in order.
Setup
Update
0"Update" is not displayed if there are no firmware updates.
7.Press ENTER to start the firmware update.
0 "COMPLETE" is displayed when the update is complete.
8.Press Í STANDBY/ON on the main unit to switch the unit to standby. The process is completed and your firmware is updated to the latest version.
9.Remove the USB storage device from this unit.
If an error message is displayed: When an error occurs, " - Error!" is displayed on the display of this unit. Check the following:
0-01, -10: USB storage device not found. Check whether the USB storage device or USB cable is correctly inserted to the USB port of this unit. Connect the USB storage device to an external power source if it has its own power supply.
0-05, -13, -20, -21: The firmware file is not present in the root folder of the USB storage device, or the firmware file is for another model. Retry from the download of the firmware file.
0Others: Disconnect then reconnect the AC power cord, then repeat from the beginning.
E N
24

> Before Start > Part Names > Install > Initial Setup > Playback
Advanced Setup | Firmware Update | Others
Troubleshooting
Before starting the procedure
When operation is unstable, problems may be solved by simply turning the power on or to standby or disconnecting/ connecting the power cord, rather than reviewing settings and operations. Try the simple measures on both the unit and the connected device. If the problem isn't fixed after referring to " Troubleshooting", resetting the unit to the status at the time of shipment may solve the problem. Note that your settings will also be initialized when you reset, so we recommend that you note down your settings before doing the following.
Resetting the unit (this resets the unit settings to the default)
1.Press SETUP on the remote controller, select "Factory Reset" - "Start" in the Setup screen and press ENTER.
2.Press ENTER.
3.The unit switches to standby and the settings are reset.
∫ Power
Cannot turn on the unit
0 Unplug the power cord from the wall outlet, wait 5 seconds or more, then plug it in again.
The unit turns off unexpectedly
0 The unit automatically switches to standby when the "Option Setting" - "Power Off Setting" - "Auto Standby" setting in the Setup menu functions.
∫ The display doesn't light
0 It is possible that the display has been turned off by pressing DISPLAY. Press DISPLAY to turn the display on.
∫ Wi-Fi Connection
0Try plugging/unplugging the power supply of wireless LAN router and the unit, check the wireless LAN router power-on status, and try reboot of the wireless LAN router.
Cannot connect to the access point
0Check that the setting of SSID and encryption (WEP, etc.) is correct. Make sure the network settings of the unit is properly set.
0Connection to an SSID that includes multi-byte characters is not supported. Name the SSID of the wireless LAN router using single-byte alphanumeric characters only and try again.
0When the wireless LAN router setting is at stealth mode (mode to hide the SSID key) or when ANY connection is off, the SSID is not displayed. Change the setting and try again.
Connected to an SSID different to the SSID selected
0Some access points allow you to set multiple SSIDs for one unit. If you use the automatic setting button on such a router, you may end up connecting with a different SSID from the SSID you wanted to connect to. Use the connection method requiring you to enter a password if this happens.
Playback is interrupted and communication does not work
0Shorten the distance from the access point or remove obstacles to improve visibility, and try again. Place the unit away from microwave ovens or other access points. It is recommended to place the access point and the unit in the same room.
0If there is a metallic object near the unit, wireless LAN connection may not be possible as the metal can effect on the radio wave.
0When other access point are used near the unit, several issues such as interrupted playback and communication
may occur. You can avoid these issues by changing the channel of the access point. For instructions on changing channels, see the instruction manual provided with the access point.
∫ Cannot Play USB storage device / HDD
0Check whether the USB storage device or USB cable is correctly inserted to the USB port of the unit.
0Disconnect the USB storage device from the unit, and then try reconnecting.
0This unit may not recognize USB storage devices and HDDs as proper devices sometimes. Try switching this unit to standby and then turning it on again.
0Depending on the type of format, the playback may not be performed normally. Check the type of the file formats that is supported. (P13)
0Cautions regarding USB and HDD devices (P13)
∫ Network function
0If you cannot select a network service, it will become selectable when the network function is started.
0Try plugging/unplugging the power supply of this unit and the router, and try rebooting the router.
Cannot access the Internet radio
0Certain network service or contents available through the unit may not be accessible in case the service provider terminates its service.
0Make sure that your modem and router are properly connected, and make sure they are both turned on.
0Depending on ISP, setting the proxy server is necessary.
0Make sure that the used router and/or modem is supported by your ISP.
Cannot access the network server
0This unit needs to be connected to the same router as the network server.
E N
25

> Before Start > Part Names > Install > Initial Setup > Playback
0This unit is compatible with Windows Media® Player 11 or 12 network servers or NAS that are compatible with home network functionality. Furthermore, when using a PC, only music files registered in the Windows Media Player library can be played.
Playback stops while listening to music files on the network server
0When the PC is serving as the network server, try quitting
any application software other than the server software (Windows Media® Player 12, etc.).
0If the PC is downloading or copying large files, the playback may be interrupted.
The album names and artist names for the Music Server are not displayed
0 Meta data, such as album names and artist names, needs to be recognized on the server for distribution to this unit, so this depends on the specifications of the NAS or server you are using.
0 The file formats supported depend on the NAS or server software. For details, contact the manufacturer of NAS or the server software.
Album art in Music Server is displayed sometimes but not other times
0Music Server depends on the specifications of the server software.
0The formats supported depend on the server software.
0For details, contact the manufacturer of the server software.
26
Advanced Setup | Firmware Update | Others
E
N

> Before Start > Part Names > Install > Initial Setup > Playback
General Specifications
∫ Analog audio output
Rated Output Level and Impedance
0 RCA OUT : 2 Vrms (1 kHz, 0 dB)/500 h
Frequency Response
0 4 Hz - 70 kHz (-3 dB)
Signal to Noise Ratio
0 110 dB (A-weighting/RCA OUT)
Dynamic Range
0 100 dB (24 bit, 32 bit)
THD+N
0 0.002 %
Channel Separation
0 100 dB (1 kHz)
∫ Digital Audio Input
Front/Rear USB
0 Type A, USB2.0 High Speed
DC Output
0 5 V 1 A (Rear)/5 V 0.5 A (Front)
∫ Network Section
Wired LAN
0 Ethernet Jack
0 10BASE-T/100BASE-TX
Wireless LAN (Wi-Fi)
0 IEEE 802.11 a/b/g/n standard
0 5 GHz/2.4 GHz band
∫ Others
Control out
0 ‰3.5 mini jack (monaural) a 2
∫ General
Power supply
0 AC 220 - 240 V, 50 Hz/60 Hz
Power Consumption
019.0 W
00.2 W (in standby)
01.9 W (in standby, Network Standby: On/Network Setting: Wired)
02.5 W (in standby, Network Standby: On/Network Setting: Wi-Fi)
Auto standby
0 On (20 minutes)/Off
Dimensions (W k H k D)
0 435 mm k 103 mm k 300 mm
Mass (main unit only)
0 3.4 kg
Advanced Setup | Firmware Update | Others
E
N
27
> Before Start > Part Names > Install > Initial Setup > Playback
Advanced Setup | Firmware Update | Others
License and Trademark Information
The Wi-Fi CERTIFIED Logo is a certification mark of Wi-Fi Alliance®.
AirPlay, iPad, iPhone, and iPod touch are trademarks of Apple Inc., registered in the U.S. and other countries.
iPad Air and iPad mini are trademarks of Apple Inc.
“Made for iPod”, “Made for iPhone” and “Made for iPad” mean that an electronic accessory has been designed to connect specifically to iPod, iPhone, or iPad, respectively, and has been certified by the developer to meet Apple performance standards. Apple is not responsible for the operation of this device or its compliance with safety and regulatory standards.
Please note that the use of this accessory with iPod, iPhone or iPad may affect wireless performance.
AirPlay works with iPhone, iPad, and iPod touch with iOS 4.3.3 or later, Mac with OS X Mountain Lion or later, and PC with iTunes 10.2.2 or later.
Google Cast and the Google Cast badge are trademarks of Google inc.
 BLACKFIRE
This Mark Certifies that this product is compliant with the BLACKFIRE ALLIANCE Standard.
Please refer to WWW.BLACKFIREALLIANCE.COM for more information. BLACKFIRETM is a Registered Trademark (No. 85,900,599) of BLACKFIRE RESEARCH CORP. All rights reserved.
E
N
The product with this logo is conformed to Hi-Res Audio standard defined by
Japan Audio Society. This logo is used under license from Japan Audio Society.
This product is protected by certain intellectual property rights of Microsoft. Use or distribution of such technology outside of this product is prohibited without a license from Microsoft.
Windows and the Windows logo are trademarks of the Microsoft group of companies.
DSD and the Direct Stream Digital logo are trademarks of Sony Corporation.
MPEG Layer-3 audio coding technology licensed from Fraunhofer IIS and
Thomson.
“All other trademarks are the property of their respective owners.”
“Toutes les autres marques commerciales sont la propriété de leurs détenteurs respectifs.”
“El resto de marcas comerciales son propiedad de sus respectivos propietarios”.
“Tutti gli altri marchi di fabbrica sono di proprietà dei rispettivi proprietari.”
“Alle anderen Warenzeichen sind das Eigentum ihrer jeweiligen Eigentümer.”
“Alle andere handelsmerken zijn eigendom van de desbetreffende rechthebbenden.”
“Все товарные знаки являются собственностью соответствующих владельцев.”
FireConnectTM is technology powered by BlackFire Research.
28

2-3-12 Yaesu, Chuo-ku, Tokyo 104-0028 JAPAN
<U.S.A.>
18 PARK WAY, UPPER SADDLE RIVER, NEW JERSEY 07458, U.S.A. Tel: 1-201-785-2600 Tel: 1-844-679-5350
<Germany>
Hanns-Martin-Schleyer-Straße 35, 47877 Willich, Germany Tel: +49(0)2154 913222
<UK>
Anteros Building, Odyssey Business Park, West End Road, South Ruislip, Middlesex, HA4 6QQ United Kingdom
Tel: +44(0)208 836 3612
<France>
6, Avenue de Marais F - 95816 Argenteuil Cedex FRANCE Tel: +33(0)969 368 050
Корпорация О энд Пи 2-3-12, Яэсу, Чуо-ку, г. Токио, 104-0028, ЯПОНИЯ
Register your product on
http://www.pioneer.eu (Europe)
©2016 Onkyo & Pioneer Corporation. All rights reserved.
©2016 Onkyo & Pioneer Corporation. Tous droits de reproduction et de traduction réservés.


 http://www.pioneer-audiovisual.com/privacy/
 “Pioneer” is a trademark of Pioneer Corporation, and is used under license.
Printed in Malaysia / Imprimé en Malaisie / Напечатано в Малайзии
SN 29402667
E
N
F1609-0
* 2 9 4 0 2 6 6 7 *
 Loading...