


The illustrations show the silver model.
Before connecting, operating or adjusting this product, please read these instructions completely.
Please keep this manual for future reference.
Operating Instructions
Portable Stereo
Component System
Model No. RX-VT80
Table of contents |
|
|
Supplied accessories .......................................... |
|
2 |
Precautions........................................................... |
|
2 |
Attaching or detaching the speakers |
................. |
3 |
Use of batteries .................................................... |
|
3 |
The remote control............................................... |
|
3 |
Connection ........................................................... |
|
4 |
Control guide........................................................ |
|
5 |
CDs ........................................................................ |
|
6 |
CD selection................................................................ |
|
6 |
Basic play.................................................................... |
|
6 |
Television OSD indicators (On Screen Display) ......... |
7 |
|
CD display................................................................... |
|
7 |
Resume play ............................................................... |
|
7 |
Zoom function ............................................................. |
|
7 |
CD Play Modes ........................................................... |
|
8 |
Program play............................................................... |
|
8 |
A-B repeat ................................................................... |
|
8 |
To find a particular scene using a |
|
|
video index number................................................... |
|
9 |
To find a particular scene using |
|
|
the time (TIME ACCESS).......................................... |
|
9 |
Multi screen functions ................................................. |
|
9 |
Using menus to play MP3 discs ................................ |
|
10 |
The radio ............................................................. |
|
11 |
To improve reception ................................................ |
|
11 |
Tapes................................................................... |
|
11 |
Recording ........................................................... |
|
12 |
Recording tips ........................................................... |
|
12 |
Recording through the built-in microphone (MIC) ..... |
12 |
|
Equalizer ............................................................. |
|
13 |
Using an external unit........................................ |
|
13 |
Maintenance ....................................................... |
|
13 |
Using headphones ............................................. |
|
13 |
Specifications..................................................... |
|
13 |
Troubleshooting guide ....................... |
Back cover |
|
|
|
|
|
|
|
|
RQT7801-G |
|
|
GC |
|
GU |
|
GS |
Dear customer
Thank you for purchasing this product.
For optimum performance and safety, please read these instructions carefully.
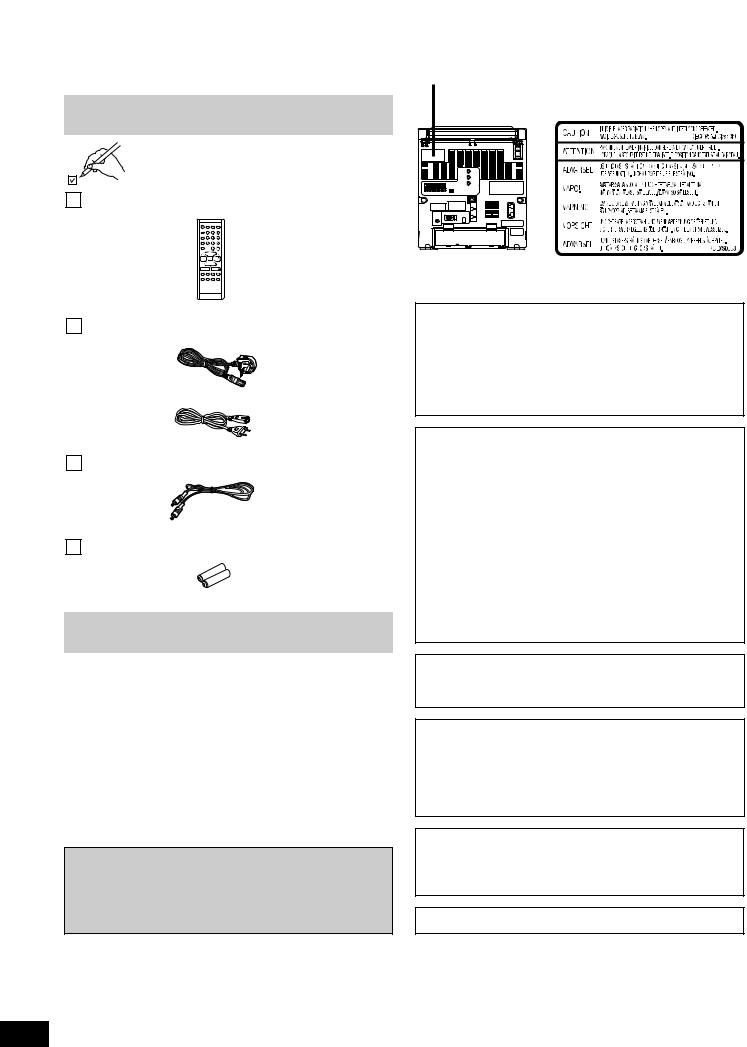
Supplied accessories
Please check and identify the supplied accessories.
Remote control transmitter .................................................. |
1 pc. |
(N2QAGB000033) |
|
AC power supply cord ........................................................ |
1 pc. |
For Saudi, Kuwait |
|
For others
Video connection cable ..................................................... |
1 pc. |
Batteries ........................................................................... |
2 pcs. |
Precautions
•Avoid using or placing this unit near sources of heat. Do not leave it in an automobile exposed to direct sunlight for a long time with the doors and windows closed as this may deform the cabinet.
•Avoid cuts, scratches, or poor connections in the AC power supply cord, as they may result in possible fire or electric shock hazard.
Also, excessive bending, pulling or splicing of the lead should be avoided.
•Do not unplug the AC power supply cord by pulling on the lead. To do so may cause premature failure or shock hazard.
•Do not operate this unit in a bathroom, as a potential shock hazard may result.
•When not in use, disconnect the AC power supply cord from the household AC outlet.
CAUTION!
Change the voltage setting to suit the AC voltage in your area. See page 4.
Note that the unit will be seriously damaged or fail to operate correctly if this setting is not made correctly.
|
|
|
|
|
|
|
|
|
|
|
|
|
|
|
|
|
|
|
|
|
|
|
|
|
|
|
|
|
|
|
|
|
|
|
|
|
|
|
|
|
|
|
|
|
|
|
|
|
|
|
|
|
|
|
|
|
|
|
|
|
|
|
|
|
|
|
|
|
|
|
|
|
|
|
|
|
|
|
|
|
|
|
|
|
|
|
|
|
|
|
|
|
|
|
|
|
|
|
|
|
|
|
|
|
|
|
|
|
|
|
|
|
|
|
|
|
|
|
|
|
|
|
|
|
|
|
|
|
|
|
|
|
|
|
|
|
|
|
|
|
|
|
|
|
|
|
|
|
|
|
|
|
|
|
|
|
|
|
|
|
|
|
|
|
|
|
|
|
|
|
|
|
|
|
|
|
|
|
|
|
|
|
|
|
|
|
|
|
|
|
|
|
|
|
|
|
|
|
|
|
|
|
|
|
|
|
|
|
|
|
|
|
|
|
|
|
|
|
|
|
|
|
|
|
|
|
|
|
|
|
|
|
|
|
|
|
|
|
|
|
|
|
|
|
|
|
|
|
|
|
|
|
|
|
|
|
|
|
|
|
|
|
|
Back of product |
|
|
|
|
|
|
|
|
|
|
|
|
|
|
|
|
|
|
Inside of product |
|||||||||||||
CAUTION!
THIS PRODUCT UTILIZES A LASER.
USE OF CONTROLS OR ADJUSTMENTS OR PERFORMANCE OF PROCEDURES OTHER THAN THOSE SPECIFIED HEREIN MAY RESULT IN HAZARDOUS RADIATION EXPOSURE.
DO NOT OPEN COVERS AND DO NOT REPAIR YOURSELF. REFER SERVICING TO QUALIFIED PERSONNEL.
CAUTION!
•DO NOT INSTALL OR PLACE THIS UNIT IN A BOOKCASE, BUILT-IN CABINET OR IN ANOTHER CONFINED SPACE. ENSURE THE UNIT IS WELL VENTILATED. TO PREVENT RISK OF ELECTRIC SHOCK OR FIRE HAZARD DUE TO OVERHEATING, ENSURE THAT CURTAINS AND ANY OTHER MATERIALS DO NOT OBSTRUCT THE VENTILATION VENTS.
•DO NOT OBSTRUCT THE UNIT’S VENTILATION OPENINGS WITH NEWSPAPERS, TABLECLOTHS, CURTAINS, AND SIMILAR ITEMS.
•DO NOT PLACE SOURCES OF NAKED FLAMES, SUCH AS LIGHTED CANDLES, ON THE UNIT.
•DISPOSE OF BATTERIES IN AN ENVIRONMENTALLY FRIENDLY MANNER.
The socket outlet shall be installed near the equipment and easily accessible or the mains plug or an appliance coupler shall remain readily operable.
WARNING:
TO REDUCE THE RISK OF FIRE, ELECTRIC SHOCK OR PRODUCT DAMAGE, DO NOT EXPOSE THIS APPARATUS TO RAIN, MOISTURE, DRIPPING OR SPLASHING AND THAT NO OBJECTS FILLED WITH LIQUIDS, SUCH AS VASES, SHALL BE PLACED ON THE APPARATUS.
This product may receive radio interference caused by mobile telephones during use. If such interference is apparent, please increase separation between the product and the mobile telephone.
THIS UNIT IS INTENDED FOR USE IN TROPICAL CLIMATES.
2
RQT7801

Attaching or detaching the speakers
Before attaching or detaching the speakers,
 Be sure to set [SELECTOR] to
TAPE/ |
OPR OFF . |
SELECTOR |
|
|
|||
• The function selector switch does |
CD |
||
RADIO |
|||
not separate entire unit from mains |
|||
TAPE/ |
|||
even |
if in “TAPE/ OPR OFF ” |
||
|
|||
position.
 Be sure to disconnect the speaker cords.
Attaching the speakers
Align the speaker with the main unit as shown in the figure below, interlock the grooves and press down.
Use of batteries
• Do not use rechargeable type batteries.
Do not:
•mix old and new batteries.
•use different types at the same time.
•heat or expose to flame.
•take apart or short-circuit.
•attempt to recharge alkaline or manganese batteries.
•use batteries if the covering has been peeled off.
•keep together with metallic objects such as necklaces.
Mishandling of batteries can cause electrolyte leakage which can damage items the fluid contacts and may cause a fire.
If electrolyte leaks from the batteries, consult your dealer.
Wash thoroughly with water if electrolyte comes in contact with any part of your body.
Remove batteries if you do not plan to use the unit or the remote control for long period of time. Store them in a cool, dark place.
Use only the supplied speakers.
The main unit and speakers supplied provide the best possible sound quality. Using other speakers can damage the unit and sound quality will be negatively affected.
Detaching the speakers
The remote control (included)
Batteries (included)
Insert so the poles (+ and –) match those in the remote control.
AA/R6/LR6
ENGLISH
RELEASE |
RELEASE |
Unlock the speaker release levers by pulling them in the direction shown above, and then slide each speaker up.
If irregular coloring occurs on your television
These speakers are designed to be used close to a television, but the picture may be affected with some televisions and set-up combinations.
If this occurs, turn the television off for about 30 minutes.
The television’s demagnetizing function should correct the problem. If it persists, move the speakers further away from the television.
Caution
•Use the speakers only with the recommended system. Failure to do so may lead to damage to the amplifier and/or the speakers, and may result in the risk of fire.
Consult a qualified service person if damage has occurred or if you experience a sudden change in performance.
•Do not attach these speakers to walls or ceilings.
Use |
|
|
Remote control |
|
|
signal sensor |
|
|
30˚ |
30˚ |
|
Transmission |
About 7 meters in front of the |
|
window |
||
signal sensor |
||
|
Aim at the sensor, avoiding obstacles, at a maximum range of 7 meters directly in front of the unit.
•Keep the transmission window and the unit’s sensor free from dust.
•Operation can be affected by strong light sources, such as direct sunlight, and the glass doors on cabinets.
•Replace if the unit does not respond to the remote control even when held close to the front panel.
Do not:
•put heavy objects on the remote control.
•take the remote control apart.
•spill liquids onto the remote control.
3
RQT7801

Connection
Connect the AC power supply cord only after all other connections have been made.
Preparation
• Be sure to set [SELECTOR] to TAPE/ OPR OFF .
|
|
|
|
To TV |
|
1 Speaker cords |
|
||||
|
|
|
|
Red (+) |
|
3 |
1 |
2 |
|
Black (–) |
|
|
L |
||||
|
R |
|
Black (–) |
||
|
(IMP |
4Ω) |
|||
SPEAKERS |
Red (+) |
||||
|
|
||||
|
|
|
|||
2 Video connection cable (included)
 Connect the video connection cable from the VIDEO OUT terminal of the rear panel of this unit to the VIDEO IN terminal of the TV.
 Set the VIDEO SWITCH to match the television set to be connected.
PAL : When connecting to a PAL system TV.
NTSC : When connecting to a NTSC system TV.
For details, refer to the TV operating instructions.
VIDEO
OUT
VIDEO
SWITCH
PAL NTSC
To household
AC outlet
When connecting the car battery cord
(not included)
DC IN (12-13.2V)
1
2
Disconnect the AC power supply cord.
 Insert the plug into the DC IN
Jack.
 Plug the other end into the cigarette lighter socket in your car.
4 AC power supply cord (included)

 Approx.
Appliance inlet
Connector 
Insertion of connector
Even when the connector is perfectly inserted, depending on the type of inlet used, the front part of the connector may jut out as shown in the drawing.
There is however no problem using the unit.
Note
The included AC power supply cord is for use with this unit only.
Do not use it with other equipment.
4
When using batteries (not included)
Insert batteries in numbered order.
6 |
8 |
7 |
|
|
|
R20/LR20, UM-1 |
|||
3 |
5 |
4 |
||
|
||||
|
2 |
1 |
|
Disconnect the AC power supply cord.
Replace the batteries when
OPERATION/BATT goes dim during play.
OPERATION/BATT OPERATION / BATT
Removal
Insert your finger into the slot ( a ) at the bottom of the unit and push out the batteries.
a
RQT7801
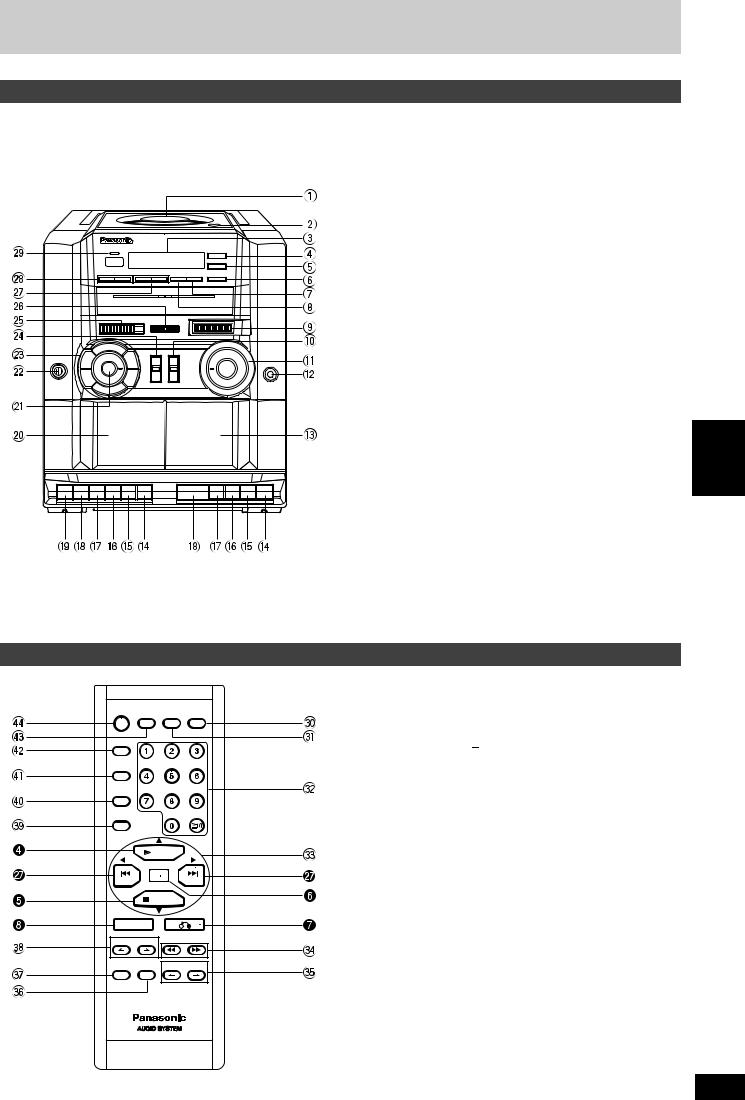
Control guide
Main unit
 CD lid
 CD lid open/close button (
  CD OPEN/CLOSE)
 Display
 CD play, select button (
  SELECT, PLAY)
  Stop/program clear, PBC on/off button
(  PBC/CLEAR, STOP)
 CD pause button (
  PAUSE)
 Return button (
  )
)
 Enter button (ENTER)
 Tuning control (TUNING)
 Function selector (SELECTOR)
 Volume control (VOLUME)
 Headphones jack (PHONES)
 DECK 2 cassette holder (DECK 2)
 Pause button (
  PAUSE)
 Stop/eject button (
 STOP/EJECT)
 Fast forward/cue button (
  FF/CUE)
 Rewind/review button (
  REW/REV)
 Playback button (
  PLAY)
PLAY)
 Recording button (
  REC)
REC)
 DECK 1 cassette holder (DECK 1)
 XBS adjustor (XBS)
 Built-in microphone (MIC)
 Preset equalizer buttons
 Editing speed/FM mode/beat proof selector (EDIT/FM MODE/BP)
 Band selector (BAND)
 Fine tuning control (FINE TUNING)
 CD skip, previous, next buttons (
  PREV), (
  NEXT)
NEXT)
 Album skip, menu selection buttons (
  ALBUM
ALBUM  , – MENU + )
 Operation /battery indicator (OPERATION/BATT)
ENGLISH
Remote control
OSD |
MULTI SCREEN |
DISPLAY |
TIME ACCESS |
ZOOM |
|
|
|
PLAY MODE |
|
|
|
A-B REP |
|
|
|
PROGRAM |
|
|
|
|
SELECT |
|
|
PREV |
|
NEXT |
|
|
PBC / CLEAR |
|
|
ENTER |
|
|
|
ALBUM |
|
|
|
SHIFT |
RESUME |
V-INDEX |
|
The shaded buttons, such as  , function in exactly the same way as the buttons on the main unit.
 Time access button (TIME ACCESS)
 CD display button (DISPLAY)
 Numbered buttons (
  10, 1–9, 0)
 Cursor buttons (
  ,
,  ,
,  ,
,  )
)
 CD search buttons (
  ), (
), (  )
)
 Video index buttons (
  V-INDEX
  )
)
 Resume play button (RESUME)
 Shift button (SHIFT)
 Album skip (
  ALBUM
ALBUM  )
)
 Program button (PROGRAM)
 A-B repeat button (A-B REP)
 Play mode select button (PLAY MODE)
 Zoom button (ZOOM)
 Multi screen button (MULTI SCREEN)
  On-screen display button (OSD)
5
RQT7801
 Loading...