


Operating Instructions
FS Multi Air Conditioner
|
|
|
|
|
|
Model No. |
|
|
|
|
|
|
|
|
|
|
|
|
|
|
|
Indoor Unit |
Outdoor Unit |
|
|
|
|
|
|
S-22KA1E5 |
U-4LA1E5 |
|
|
|
|
|
|
S-28KA1E5 |
U-5LA1E5 |
|
|
|
|
|
|||
|
|
|
|
|
|||
|
|
|
|
|
|
S-36KA1E5 |
U-6LA1E5 |
|
|
|
|
|
|||
|
|
|
|
|
|
S-45KA1E5 |
U-4LA1E5-1 |
|
|
|
|
|
|
S-56KA1E5 |
U-5LA1E5-1 |
|
|
|
|
|
|
S-63KA1E5 |
U-6LA1E5-1 |
|
|
|
|
|
|
S-71KA1E5 |
* U-4LA1E5-1P |
|
|
|
|
|
|
S-22KA1E5S |
* U-5LA1E5-1P |
|
|
|
|
|
|
S-28KA1E5S |
* U-6LA1E5-1P |
|
|
|
|
|
|
S-36KA1E5S |
|
|
|
|
|
|
|||
|
|
|
|
|
|||
|
|
|
|
|
|
S-45KA1E5S |
|
|
|
||||||
|
|
|
|
|
|||
ENGLISH |
2 ~ 13 |
||||||
Before operating the unit, read these operating instructions thoroughly and keep them for future reference. |
|
||||||
* Available to selected country |
|
||||||
B.MALAYSIA |
14 ~ 25 |
||||||
Sebelum menggunakan unit ini, baca arahan operasi ini dengan teliti dan simpan untuk rujukan masa depan. |
|||||||
* Beli untuk negara khas |
|
||||||
|
26 ~ 37 |
||||||
|
|
||||||
* |
|
||||||
|
38 ~ 49 |
||||||
. |
|
||||||
* |
|
||||||
B.INDONESIA |
51 ~ 64 |
||||||
Sebelum mengoperasikan unit, baca terlebih dahulu petunjuk penggunaan secara teliti dan simpan untuk referensi |
|||||||
selanjutnya. |
|
||||||
* Pembelian untuk negara khusus |
|
||||||
ESPAÑOL (L.AMERICA) |
66 ~ 77 |
||||||
Antes de utilizar la unidad, sírvase leer atentamente estas instrucciones de funcionamiento y conservarlas como |
|||||||
futuro elemento de consulta. |
|
||||||
* Compre para un país especial |
|
||||||
РУCCKИЙ |
79 ~ 92 |
||||||
Перед началом эксплуатации данного устройства внимательно прочитайте инструкции по эксплуатации и |
|||||||
сохраните их. |
|
||||||
* Покупка в конкретной стране |
|
||||||
УKPAΪHCBKA |
93 ~ 106 |
||||||
Уважно прочитайте цю інструкцію перед експлуатацією кондиціонера і збережіть її для довідок у майбутньому. * Покупка у конкретній країні
QUICK GUIDE / PANDUAN SEGERA
/
PEDOMAN CEPAT / GUÍA RÁPIDA /
КОРОТКА ІНСТРУКЦІЯ / ШВИДКИЙ ПОСІБНИК
© Panasonic HA Air-Conditioning (M) Sdn. Bhd. 2010. Unauthorized copying and distribution is a violation of law.
F567764

Thank you for purchasing Panasonic Air Conditioner
TABLE OF CONTENTS
SAFETY PRECAUTIONS
2~3
INFORMATION
4
MULTI AIR CONDITIONER
FUNCTION
5
PRODUCT OVERVIEW & OPERATIONS (WIRELESS REMOTE
CONTROL)
6~7
PRODUCT OVERVIEW & OPERATIONS
(WIRED REMOTE
CONTROL)
8~10
CARE & CLEANING
11
TROUBLESHOOTING
12~13
QUICK GUIDE
BACK COVER
NOTE
The illustrations in this manual are for explanation purposes only and may differ from the actual unit. It is subjected to change without notice for future improvement.
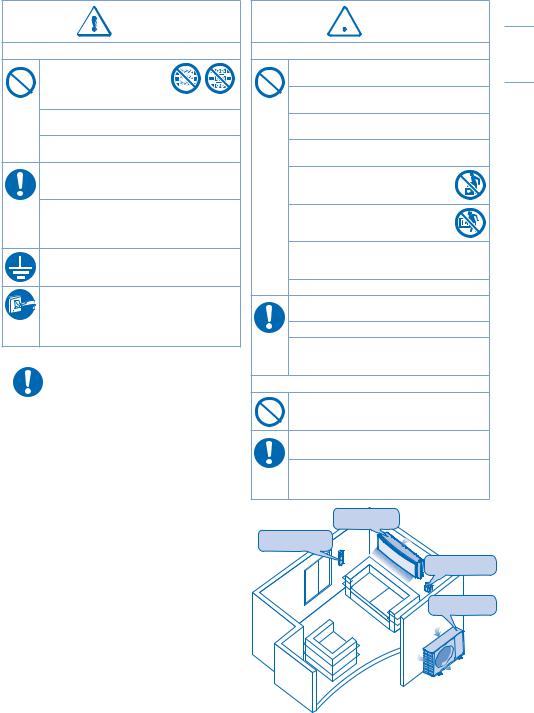
SAFETY PRECAUTIONS
To prevent personal injury, injury to others, or property damage, please comply with the following.
Incorrect operation due to failure to follow instructions below may cause harm or damage, the seriousness of which is classified as below:
WARNING |
This sign warns of death or serious injury. |
CAUTION |
This sign warns of injury or damage to property. |
The instructions to be followed are classified by the following symbols:
This symbol denotes an action that is
PROHIBITED.
This symbol denotes an action that is
COMPULSORY.
 WARNING
INDOOR UNIT AND OUTDOOR UNIT
This appliance is not intended for use by persons (including children) with reduced physical, sensory or mental capabilities, or lack of experience and knowledge, unless they have been given supervision or instruction concerning use of the appliance by a person responsible for their safety. Children should be supervised to ensure that they do not play with the appliance.
Please consult authorized dealer or specialist to repair, install, remove and reinstall the unit. Improper installation and handling will cause leakage, electric shock or fire.
Do not install the unit in a potentially explosive or flammable atmosphere. Failure to do so could result in fire.
Do not insert your fingers or other objects into the air conditioner indoor or outdoor unit, rotating parts may cause injury.
Do not touch the outdoor unit during lightning, it may cause electric shock.
REMOTE CONTROL
Do not allow infants and small children to play with the remote control to prevent them from accidentally swallowing the batteries.
2
WARNING
POWER SUPPLY
Do not use modified cord, joint cord, extension cord or unspecified cord to prevent overheating and fire.
Do not share the same power outlet with other equipment to prevent overheating and fire.
Do not operate with wet hands to prevent electric shock.
If the supply cord is damage, it must be replaced by the manufacturer, its service agent or similarly qualified persons in order to avoid a hazard.
It is strongly recommended to be installed with Earth Leakage Circuit Breaker (ELCB) or Residual Current Device (RCD) to prevent electric shock or fire.
This equipment must be earthed to prevent electrical shock or fire.
Prevent electric shock by switching off the power supply when:
- Before cleaning or servicing.
-Extended non-use.
-Abnormally strong lightning activity.
|
Stop using the product when any |
|
abnormality/failure occurs and disconnect |
|
the power plug or turn off the power |
|
switch and breaker. |
|
(Risk of smoke/fire/electric shock) |
|
• The ELCB trips frequently. |
|
• Burning smell is observed. |
|
• Abnormal noise or vibration of the unit is |
|
observed. |
Examples of |
• Water leaks from the indoor unit. |
abnormality/ |
• Power cord or plug becomes abnormally hot. |
failure |
• Fan speed cannot be controlled. |
|
• The unit stops running immediately even if it is |
|
switched on for operation. |
|
• The fan does not stop even if the operation |
|
is stopped. |
|
Contact immediately your local dealer for |
|
maintenance/repair. |
 CAUTION
INDOOR UNIT AND OUTDOOR UNIT
Do not wash the indoor unit with water, benzene, thinner or scouring powder.
Do not use for other purpose such as preservation of food.
Do not use any combustible equipment in front of the airflow outlet to avoid fire propagation.
Do not expose yourself directly to cold air for a long period.
Do not sit or step on the unit, you may fall down accidentally.
Do not touch the sharp aluminium fin, sharp parts may cause injury.
Do not switch ON the indoor unit when waxing the floor. After waxing, aerate the room properly before operating the unit.
Do not install the unit in oily and smoky areas.
Ensure drainage pipe is connected properly.
Otherwise, leakage may occur.
Aerate the room regularly.
After long period of use, make sure the installation rack is not deteriorate to prevent the unit from falling down.
REMOTE CONTROL
Do not use rechargeable (Ni-Cd) batteries.
It may damage the remote control.
Remove the batteries if the unit is not going to be used for a long period of time.
New batteries of the same type must be inserted following the polarity stated to prevent malfunction of the remote control.
Indoor Unit
Remote Control |
Air Inlet |
Power Supply
Air Outlet
Outdoor Unit
Air Inlet
Air Inlet
Air Outlet
ENGLISH
3
|
|
|
|
|
|
|
|
|
INFORMATION |
|
|
|
|||
|
|
|
|
|
|
|
|
OPERATION CONDITION |
|
|
|
|
|
||
|
Use this air conditioner under the following temperature range |
|
|
|
|||
|
|
|
|
|
|
|
|
|
Temperature (°C) |
|
Indoor |
Outdoor |
|
||
|
|
|
|
|
|
|
|
|
COOLING |
|
Maximum |
|
32 |
43 |
|
|
|
Minimum |
|
21 |
-5 |
|
|
|
|
|
|
|
|||
|
HEATING |
|
Maximum |
|
27 |
24 |
|
|
|
Minimum |
|
16 |
-15 |
|
|
|
|
|
|
|
|||
NOTICE: • This unit is still able to operate as a cooler with outdoor temperature as low as -5°C in a non-living room, such as a computer room, with a room temperature of 21°C or above, and room humidity up to 80%.
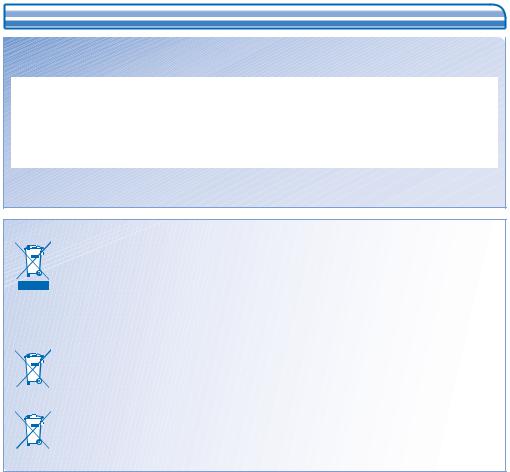
Information for Users on Collection and Disposal of Old Equipment and used Batteries
These symbols on the products, packaging, and/or accompanying documents mean that used electrical and
electronic products and batteries should not be mixed with general household waste.
For proper treatment, recovery and recycling of old products and used batteries, please take them to
applicable collection points, in accordance with your national legislation and the Directives 2002/96/EC and
2006/66/EC.
By disposing of these products and batteries correctly, you will help to save valuable resources and prevent any potential negative effects on human health and the environment which could otherwise arise from inappropriate waste handling.
For more information about collection and recycling of old products and batteries, please contact your local municipality, your waste disposal service or the point of sale where you purchased the items.
Penalties may be applicable for incorrect disposal of this waste, in accordance with national legislation.
For business users in the European Union
If you wish to discard electrical and electronic equipment, please contact your dealer or supplier for further information.
[Information on Disposal in other Countries outside the European Union]
These symbols are only valid in the European Union. If you wish to discard these items, please contact your
local authorities or dealer and ask for the correct method of disposal.
Note for the battery symbol (bottom two symbol examples):
Pb This symbol might be used in combination with a chemical symbol. In this case it complies with the requirement set by the Directive for the chemical involved.
4

MULTI AIR CONDITIONER FUNCTION
DEFINITION
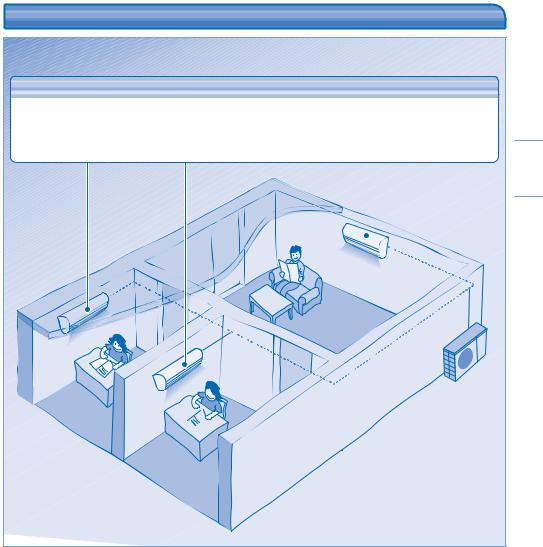
Multi air conditioner system has one outdoor unit connected to multiple indoor units.
INDOOR UNIT
•It is possible to operate the indoor units individually or simultaneously.
•The operation mode priority is given to the first unit that turned on.
•During operation, heating and cooling mode could not be activated at the same time for different indoor unit.
•The power indicator blinks to indicate the indoor unit is standing by for different operation mode.
Room C
Outdoor Unit
Room A
Room B
ENGLISH
5

PRODUCT OVERVIEW & OPERATIONS (WIRELESS REMOTE CONTROL)
Air Filters
Front panel
Auto OFF/ON button
•To operate the unit if the wireless remote control is misplaced or malfunctioning.
Action |
Mode |
|
Press once. |
Auto |
|
Press and hold until you hear 1 |
Cooling |
|
beep, then release. |
||
|
||
1.Press and hold until you hear 2 |
|
|
beeps then release. |
Heating |
2.Press the SET button for 5 seconds.
Press the button to turn off.

 Error Code Display (For servicing use only)
Horizontal airflow direction louver
• Manually adjustable.
Vertical airflow direction louver
• Do not adjust by hand.
Remote control display
MODE |
AIR |
|
|
SW |
|
|
ING |
FAN |
|
|
SPEED |
OFF/ON
INDICATOR
(Green)
(Orange)

 FILTER (Red)
Receiver
Transmitter
Maximum distances: 8m
Remote Control Preparation |
|
|
|
1 |
Press and pull out |
4 |
Set time |
2 |
Insert AAA or R03 batteries |
5 |
Confirm |
(can be used ~ 1 year) |
|||
3 |
Press CLOCK |
6 |
Close the cover |
3
6
MODE
|
|
|
|
FILTER |
|
AUTO |
SWING |
|
RESET |
|
|
MANUAL |
|
|
|||
|
|
FAN |
|
||
SELECT |
|
|
|
SPEED |
4 |
|
|
|
SET |
||
CLOCK |
|
|
|
5 |
|
|
|
|
|
||
|
TIMER |
CANCEL |
|||
|
|
|
|
||
RC
ADDRESS
AC RESET

 2 6
2 6 
1
CZ-RWS1 (Heat-pump model)
CZ-RWC1 (Cooling model)
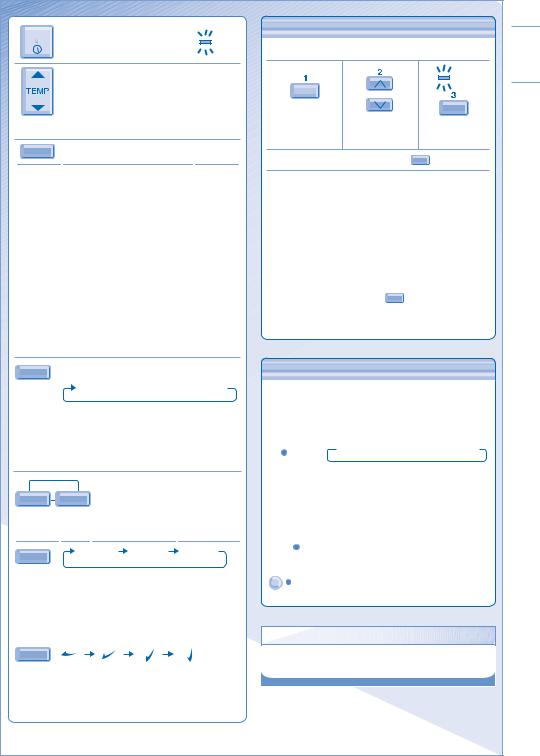
OFF/ON |
TO TURN ON OR OFF THE |
POWER |
|
|
|
|
UNIT |
|
TO SET TEMPERATURE
• Selection range: 16°C ~ 31°C.
MODE TO SELECT OPERATION MODE
AUTO mode - For your convenience
•Unit selects operation mode according to temperature setting, outdoor and room temperature.
HEAT mode - To enjoy warm air
• Unit takes a while to warm up.
FAN mode - To enables air circulation in the room COOL mode - To enjoy cool air
DRY mode - To dehumidify the environment
•Unit operates at low fan speed to give a gentle cooling operation.
•During soft dry operation, the indoor fan operates at a low fan speed.
•The louvers movement might not align with the remote control display.
FAN SPEED TO SELECT FAN SPEED (3 OPTIONS)
AUTO  LOW
LOW  MEDIUM
  HIGH
HIGH
•For AUTO, the indoor fan speed is automatically adjusted according to the operation mode.
•If the operation mode is set to Fan, the fan speed will be fixed at MEDIUM regardless of the temperature setting.
AIR SWING |
TO ADJUST AIRFLOW |
|
|
AUTO MANUAL DIRECTION |
|
•Keeps the room ventilated.
•The air is discharge evenly through 4 output vents.
AUTO |
AUTO 1 |
AUTO 2 AUTO 3 |
|
|
•There are 3 options for auto vertical airflow direction but with same swing angles.
•The vertical airflow louver swings up and down automatically.
•Do not adjust the vertical airflow direction louvers by hand.
MANUAL
•There are 4 options for manual vertical airflow direction.
•The airflow direction can be adjusted as desired by using remote control.
TO SET DAILY TIMER
• To turn ON or OFF the unit at a preset time.
|
|
TIMER |
SELECT |
|
|
|
|
SET |
Select ON or |
Set the time. |
Confirm. |
OFF timer. |
|
|
•To cancel ON or OFF timer, press CANCEL .
•When ON timer is set, the unit may start early before the actual set time in order to achieve the desired temperature on time.
•Timer operation is based on the clock set in the remote control and repeats daily once set. For clock setting, please refer to Remote Control preparation.
•The timer closest to the current time will be activated first.
•If timer is cancelled manually, you can restore the
previous setting by pressing SET .
•If the main power is switched off for an hour or more, the clock and timer will need to be set again.
OPTIONAL SETTINGS
•To avoid unintentional operation, you can assign a different address to each indoor unit.
•Press repeatedly to select your desired
address setting.
 Group
Group  Address 1
  Address 2
  Address 3
ADDRESS |
• By default, ADDRESS 1 is selected. You |
|
|
|
do not need to change this setting for |
|
normal operation. |
|
• If the address is set to GROUP, more |
|
than one indoor unit can be operated at |
|
the same time. |
|
Press to restore the remote control’s default |
RC RESET |
setting. |
|
|
SET AC RESET Not used in normal operations. |
|
HINT
•Use curtains to screen off sunlight and outdoor heat to reduce power consumption during cool mode.
ENGLISH
7

PRODUCT OVERVIEW & OPERATIONS (WIRED REMOTE CONTROL)
Air Filters
Front panel
Horizontal airflow direction louver
• Manually adjustable.
Vertical airflow direction louver
•Do not adjust by hand.
FAN SPEED AUTO
MON TUE WED THU FRI SAT SUN AUTO
ON
AIR SWING
AUTO 123
Error Code Display (For servicing use only)
INDICATOR
(Green)
(Orange)

 FILTER (Red)
ECONOMY
•For normal operation, the ODOUR WASH ,  , VENTILATION and TEST RUN buttons are not in use.
|
|
OFF / ON |
|
|
3 |
|
CZ-RT1 |
|
|
|
|
TEMP/ |
|
TIMER/CLOCK |
|
|
|
|
||
|
|
FAN |
|
A/C No. |
|
|
MODE |
UP |
SET |
SPEED |
MODE |
UP |
|
SELECT |
DOWN CANCEL |
AUTO |
MANUAL |
DOWN |
2 |
|
|
|
ECONOMY |
AIR SWING |
|
|
|
|
|
|
|
|
|
|
CHECK ODOUR WASH |
|
VENTILATION |
TEST RUN FILTER RESET |
|
||
|
|
|
|
|
|
1 |
|
|
CZ-RT1 |
|
|
|
|
Remote Control Preparation
1Press SELECT
2Press to set day
3Confirm
4Repeat steps 2 and 3 to set the current time.
8

OFF / ON |
TO TURN ON OR OFF THE UNIT |
|
|
UP |
|
DOWN |
TO SET TEMPERATURE |
• Selection range: 16°C ~ 31°C.
MODE
TO SELECT OPERATION MODE
AUTO mode - For your convenience
•Unit selects operation mode according to temperature setting, outdoor and room temperature.
HEAT mode - To enjoy warm air
• Unit takes a while to warm up.
FAN mode - To enables air circulation in the room COOL mode - To enjoy cool air
DRY mode - To dehumidify the environment
•Unit operates at low fan speed to give a gentle cooling operation.
•During soft dry operation, the indoor fan operates at a low fan speed.
•The louvers movement might not align with the remote control display.
FAN |
|
|
|
|
SPEED |
TO SELECT FAN SPEED (3 OPTIONS) |
|||
|
||||
|
AUTO |
LO |
MED |
HI |
•For AUTO, the indoor fan speed is automatically adjusted according to the operation mode.
•If the operation mode is set to Fan, the fan speed will be fixed at MED regardless of the temperature setting.
AUTO MANUAL |
TO ADJUST AIRFLOW |
AIR SWING |
DIRECTION |
|
•Keeps the room ventilated.
•The air is discharge evenly through 4 output vents.
AUTO
•The vertical airflow louver swings up and down automatically.
•Do not adjust the vertical airflow direction louvers by hand.
MANUAL
•There are 4 options for manual vertical airflow direction.
•The airflow direction can be adjusted as desired by using remote control.
TO SET DAILY TIMER
• To turn ON or OFF the unit at a preset time.
1 |
2 |
MODE |
SELECT |
Enter daily timer mode. |
Select ON or OFF timer. |
3 |
4 |
UP |
|
|
SET |
DOWN |
|
Set the time. |
Confirm. |
•To cancel ON or OFF timer, press CANCEL .
•When ON timer is set, the unit may start early before the actual set time in order to achieve the desired temperature on time.
•Timer operation is based on the clock set in the remote control and repeats daily once set. For clock setting, please refer to Remote Control preparation.
•The timer closest to the current time will be activated first.
•If timer is cancelled manually, you can restore the previous setting by pressing SET .
•If the main power is switched off for an hour or more, the clock and timer will need to be set again.
HINT
•Use curtains to screen off sunlight and outdoor heat to reduce power consumption during cool mode.
ENGLISH
9

TO SET WEEKLY TIMER
|
MON TUE WED THU FRI |
|
|
OFF / O |
|
|
ON |
|
|
|
|
|
|
|
CZ-RT1 |
|
|
|
|
|
TIMER/CLOCK |
|
|
CZ-RT1 |
|
|
MODE |
UP |
SET |
|
|
|
|
|
|
TIMER/CLOCK |
|
|
|
|
|
MODE |
UP |
SET |
|
|
|
SELECT |
DOWN CANCEL |
SELECT |
DOWN CANCEL |
||
|
|
ECONOMY |
|
|
|
CHECK ODOUR WASH |
|
|
|
ECONOMY |
|
|
|
|
CHECK ODOUR WASH |
VE |
|
Will light up if Timer operation is selected
|
6 different programs can |
|
|
be set in a day (1 ~ 6) |
|
TIMER |
1 2 3 4 5 6 |
Indicate the |
MONTUE WEDTHU FRI SAT SUN |
selected day |
|
ON |
|
Time to be |
OFF |
|
selected (Interval |
|
|
10 minutes) |
 OFF-Timer. To automatically switch “OFF” the unit.
 ON-Timer. To automatically switch “ON” the unit.
  Day to be selected
Change Display
1.Press  MODE for 3 seconds to change the display to weekly timer.
Select days to run timer
2.Press SELECT to enter day setting.
3.Press
 to select your desired day.
The selected day will be highlighted with . Press SET to deselect or select
  mark. Repeat this step includes other day.
Select ON/OFF Timer
4.Press SELECT to enter Timer 1.
5.Press
 to choose ON or OFF.
6.Press SET to confirm the selection.
Select Timer
7.Press 
 to select your desired time.
If you want to set together with your desired
UP
temperature, press DOWN to select the temperature. 8. Press SET to confirm the setting.
•Repeat steps 5 to 8 to set Timer 2 to 6, or press CANCEL to cancel the related timers.
10
OPERATION DETAILS
• Weekly timer is only applicable for wired remote
control, press MODE for 3 seconds to select daily timer or weekly timer.
•Daily timer and weekly timer could not be set at the same time.
•Promotes energy saving by allowing you to set up to 6 timers in any given day.
•Same timer program cannot be set on the same day.
Check Timer
 1. Enter timer mode.
 MODE UP SET
2. Select the day.
SELECT DOWN CANCEL
3.The display will show the program for each of the selected day.
Modify Or Add Timer
•Perform check timer operation to select the day. Repeat steps 4 to 8 to modify existing timer program, or add any new timer program.
Cancel Timer
•Perform the step below to cancel the timer program for a particular day.
 1. Enter timer mode.
 MODE UP SET
2. Select the day.
SELECT DOWN CANCEL
 3. Press to enter day setting.
 4. Press to cancel the timer set.
Disable Weekly Timer
• |
To disable weekly timer setting, press MODE , then |
|
press CANCEL . |
Enable Weekly Timer |
|
• |
To enable previous weekly timer setting, press MODE , |
|
then press SET . |
|
|
|
|
|
|
CARE & CLEANING |
|
|
|
|
|
|
|
|
|
• Switch off the power supply before cleaning. |
|||
|
CAUTION • Do not touch the aluminium fin, sharp parts may cause injury. |
|||
|
|
|
HINTS |
|
|
CLEANING INSTRUCTIONS |
|||
|
|
|
• Clean the filter regularly for best performance and to |
|
|
• Do not use benzene, thinner or scouring powder. |
|||
|
|
reduce power consumption. |
|
|
|
• Use only soap ( pH7) or neutral household detergent. |
|
|
|
|
|
• Please consult your nearest dealer for seasonal |
|
|
|
• Do not use water hotter than 40°C. |
|
|
|
|
|
inspection. |
|
|
|
|
|
|
|
|
|
|
|
|
ALUMINIUM FIN
Remove
AIR FILTERS
•Air filters cleaning is needed every two weeks.
•Wash/rinse the filters gently with water to avoid damage to the filter surface.
•Dry the filters thoroughly under the shade, away from fire or direct sunlight.
•Replace any damage filter.
Air Filter Maintenance
Cleaning is needed when:
FAN SPEED |
AUTO |
FAN |
AUTO |
|
FILTER |
|
COOL DRY RESET |
|
AIR SWING |
|
|
AUTO 123 |
|
|
|
|
(Green) |
|
|
(Orange) |
|
FILTER |
(Red) |
“FILTER RESET” appears on the remote control display. (For wired remote control)
“FILTER” lights up on the indicator display.
(For wireless remote control)
FRONT PANEL
Remove Front Panel
• Raise and pull to remove the front panel.
• Wash gently and dry.
Close Front Panel
• Press down both ends of the front panel to close it securely.
INDOOR UNIT
Wipe the unit gently with a soft, dry cloth.
•lt is recommended to clean the air filter every 6 weeks.
• After the air filter is cleaned, press |
/ FILTER RESET to |
reset. |
FILTER RESET |
|
•Do not operate without an air filter.
•Wash/rinse the air filter gently with water to avoid damage to the air filter surface.
•Do not dry the part with a hair dryer or a stove.
•Replace any damaged air filter.
ENGLISH
11

TROUBLESHOOTING
The following symptoms do not indicate malfunction.
|
|
|
Symptom |
Cause |
|
|
|
|
Mist emerges from indoor unit. |
• Condensation effect due to cooling process. |
|
Water flowing sound during operation. |
• |
Refrigerant flow inside the unit. |
The room has a peculiar odour. |
• |
This may be due to damp smell emitted by the wall, carpet, furniture or |
|
|
clothing. |
Indoor fan stops occasionally during automatic fan speed setting.
Operation is delayed a few minutes after restart.
•This helps to remove the surrounding odours.
•The delay is a protection to the unit’s compressor.
Outdoor unit emits water/steam. Timer indicator is always on.
Indoor fan stops occasionally during heating operation.
Cracking sound can be heard during operation.
Unit switch to FAN operation and air become humid.
Outdoor unit emits noise during heating operation.
Operation does not stop immediately after pressed the OFF/ON button.
Operation stops occasionally. (“DEFROST” appears on the remote control display)
Airflow does not start immediately after operation is started. (“PRE HEAT” appears on the remote control display)
Operation starts after power resumes. During dry mode, cold air blow out.
•Condensation or evaporation occurs on pipes.
•The timer setting repeats daily once set.
•To avoid unintended cooling effect.
•Changes of temperature cause the expansion/contraction of the unit.
•This happens when the room temperature reaches the set temperature, operation switches to FAN mode and the humidity increase.
•This is due to changes inflow of refrigerant gas when operation stops and starts.
•Discharging heat is in process. Operation will stops automatically after approximately 60 seconds.
•The unit is in defrosting mode, and the melted frost is drained from the outdoor unit.
•The unit is warming up to provide warm air.
•Auto restart is in function and operates under previous setting.
•The unit is running cooling operation with low fan speed to dehumidify the room.
Fan speed change occasionally during heating mode.
Outdoor unit emits steam during heating mode.
•The room temperature has reached the remote control setting. When the room temperature drops again, the fan speed will resume to the remote control settings.
•This is due to defrost operation happens at the heat exchanger.
12
Check the following before calling for servicing.
Symptom |
Check |
|
|
|
|
Heating/Cooling operation is not working |
• |
Set the temperature correctly. |
efficiently. |
• |
Close all doors and windows. |
|
• |
Clean or replace the filters. |
|
• |
Clear any obstruction at the air inlet and air outlet vents. |
Heating mode cannot be operated.
Noisy during operation.
Remote control does not work.
(Wireless remote control display is dim or transmission signal is weak.)
The unit does not work.
The unit does not receive the signal from the remote control.
The unit stopped and TIMER indicator blinks.
•The unit is forced to operate at cooling mode only in a non-living room, such as a computer room.
•Check if the unit has been installed at an incline or the intake grille is not closed properly.
•Insert the batteries correctly.
•Replace weak batteries.
•Check if the circuit breaker is tripped.
•Check if timers have been set.
•Make sure the receiver not obstructed.
•Make sure the address is set correctly.
•Make sure the remote control signal transmission is within the range.
•Certain fluorescent lights may interfere with signal transmitter. Please consult your nearest dealer.
•Turn OFF the power supply to reset the unit (TIMER indicator stop blinking).
•Turn ON the power supply and restart the unit.
•If TIMER indicator blinks again, please consult your nearest dealer.
FOR SEASONAL INSPECTION AFTER EXTENDED NON-USE
•Checking of remote control batteries (wireless remote control).
•No obstruction at air inlet and air outlet vents.
•Use Auto OFF/ON button to select Cooling/Heating operation, after 15 minutes of operation, it is normal to have the following temperature difference between air inlet and air outlet vents:
Cooling: ≥ 8°C |
Heating: ≥ 14°C |
FOR EXTENDED NON-USE
•Activate Heat Mode for 2~3 hours to remove moisture left in the internal parts thoroughly to prevent mould growth.
•Turn off the power supply.
•Remove the remote control batteries (wireless remote control).
NON SERVICEABLE CRITERIAS
TURN OFF POWER SUPPLY then CALL Authorized Distributor under the following conditions:
•Abnormal noise during operation.
•Water/foreign particles have entered the remote control.
•Water leaks from Indoor unit.
•Circuit breaker switches off frequently.
•Power cord becomes unnaturally warm.
•Switches or buttons are not functioning properly.
ENGLISH
13

Terima kasih kerana telah membeli Alat Penyaman Udara Panasonic
JADUAL KANDUNGAN
PERINGATAN KESELAMATAN
14~15
MAKLUMAT
16
FUNGSI ALAT PENYAMAN UDARA BERBILANG
17
GAMBARAN KESELURUHAN PRODUK & OPERASI
(ALAT KAWALAN JAUH TANPA DAWAI)
18~19
GAMBARAN KESELURUHAN PRODUK & OPERASI
(ALAT KAWALAN JAUH TERDAWAI)
20~22
PENJAGAAN &
PEMBERSIHAN
23
MENGESAN MASALAH
24~25
PANDUAN SEGERA
HALAMAN BELAKANG
NOTA
Ilustrasi dalam arahan operasi ini adalah untuk tujuan penerangan sahaja dan mungkin berbeza dengan unit sebenar. Perubahan bagi tujuan pembaikan akan dibuat tanpa sebarang notis.
PERINGATAN KESELAMATAN
Untuk mengelakkan kecederaan diri sendiri, kecederaan orang lain, atau kerosakan harta benda, sila patuhi peraturan di bawah.
Penggunaan yang tidak betul kerana gagal mematuhi arahan akan menyebabkan kemalangan atau kerosakan, bahaya tersebut dikelaskan seperti berikut:
AMARAN |
Ini adalah amaran tentang perkara yang boleh |
|
mengakibatkan maut atau cedera parah. |
||
|
Ini adalah amaran tentang perkara yang boleh AWAS mengakibatkan kecederaan atau kerosakan pada
harta benda.
Arahan-arahan yang harus dipatuhi dikelaskan mengikut simbol-simbol berikut:
Simbol ini menandakan perbuatan yang
DILARANG.
Simbol ini menandakan perbuatan yang
MESTI DIPATUHI.
 AMARAN
UNIT DALAMAN DAN UNIT LUARAN
Peralatan ini bukan untuk kegunaan individu (termasuk kanak-kanak) yang kurang keupayaan fizikal, deria atau mental, atau kurang pengalaman dan pengetahuan, melainkan mereka diawasi atau diberi arahan tentang cara menggunakan peralatan oleh orang yang bertanggungjawab atas keselamatan mereka. Kanak-kanak harus diawasi bagi memastikan mereka tidak bermain dengan alat ini.
Sila rujuk kepada pengedar yang bertauliah atau pakar untuk membaiki, memasang, mengalih dan memasang semula alat ini. Pemasangan dan pengendalian yang tidak betul akan menyebabkan kebocoran, kejutan elektrik atau kebakaran.
Jangan pasang alat ini di atmosfera yang berpotensi meletup atau mudah bakar. Kegagalan berbuat demikian boleh mengakibatkan kemalangan api.
Jangan masukkan jari anda atau objek lain ke dalam unit dalaman atau luaran alat penyaman udara, komponen yang berputar boleh menyebabkan kecederaan.
Jangan sentuh unit luaran semasa kilat, ia mungkin menyebabkan kejutan elektrik.
ALAT KAWALAN JAUH
Jangan biarkan bayi dan kanak-kanak kecil bermain dengan alat kawalan jauh bagi mengelakkan mereka tertelan bateri secara tidak sengaja.
14

AMARAN
BEKALAN KUASA
Jangan gunakan wayar yang
diubah suai, wayar yang disambung-sambung, wayar penyambung atau wayar
yang tidak ditentukan untuk mengelakkan kepanasan lampau dan kebakaran.
Jangan berkongsi saluran keluar kuasa yang sama dengan peralatan lain untuk mengelakkan kepanasan lampau dan kebakaran.
Jangan mengoperasikan alat ini dengan tangan yang basah untuk menghalang kejutan elektrik.
Jika wayar bekalan kuasa rosak, ia perlu diganti oleh pembuat, ejen servis atau orang yang mempunyai kelayakan yang serupa bagi mengelakkan bahaya.
Amat disyorkan untuk memasang Pemutus Litar Bocoran Bumi (ELCB) atau Alat Arus Baki (RCD) untuk mengelakkan kejutan elektrik atau kebakaran.
Peralatan ini perlu dibumikan untuk mengelakkan kejutan elektrik atau kebakaran.
Elakkan kejutan elektrik dengan mematikan bekalan kuasa apabila:
- Sebelum membersihkan atau menservis.
-Tempoh tidak digunakan berlanjutan.
-Aktiviti kilat yang kuat.
Berhenti daripada menggunakan produk jika berlaku sebarang keabnormalan/ kegagalan dan cabut palam kuasa
atau matikan suis kuasa dan pemutus (Risiko asap/kebakaran/kejutan elektrik)
|
• ELCB kerap terbelantik. |
|
|
• Terdapat bau terbakar. |
|
|
• Terdapat bunyi atau gegaran abnormal |
|
|
pada unit. |
|
Contoh |
• Air bocor daripada unit dalaman. |
|
• Kord atau palam kuasa menjadi panas yang |
||
keabnormalan/ |
||
kegagalan |
abnormal. |
|
• Kelajuan kipas tidak boleh dikawal. |
||
|
• Unit berhenti serta-merta walaupun suis |
|
|
dipasang untuk operasi. |
|
|
• Kipas tidak berhenti walaupun operasi |
|
|
dihentikan. |
|
|
Hubungi pengedar di tempat anda untuk |
|
|
penyelenggaraan/pembaikan. |
 AWAS
AWAS
UNIT DALAMAN DAN UNIT LUARAN
Jangan bersihkan unit dalaman ini dengan air, benzena, bahan pencair atau serbuk sental.
Jangan gunakan alat ini untuk tujuan lain seperti mengawet makanan.
Jangan gunakan sebarang peralatan yang mudah terbakar di depan saluran keluar udara untuk mengelakkan daripada merebakkan api.
Jangan duduk terlalu lama di depan aliran udara sejuk.
Jangan duduk atau pijak unit ini, anda mungkin terjatuh.
Jangan sentuh kepingan aluminium, bahagian yang tajam boleh menyebabkan kecederaan.
Jangan HIDUPKAN suis unit dalaman semasa menggilap lantai dengan penggilap berlilin. Selepas menggilap, alirkan udara bilik dengan sempurna sebelum memulakan operasi unit.
Jangan pasang unit di kawasan berminyak dan berasap.
Pastikan paip aliran air disambung dengan betul. Jika tidak, kebocoran boleh berlaku.
Bilik hendaklah selalu dianginkan.
Selepas digunakan dalam tempoh yang lama, pastikan rak pemasangan tidak menjadi rosak untuk mengelakkan unit daripada terjatuh.
ALAT KAWALAN JAUH
Jangan guna bateri yang boleh dicas semula (Ni-Cd).
Ia boleh merosakkan alat kawalan jauh.
Keluarkan bateri jika alat ini tidak digunakan untuk jangka masa yang lama.
Bateri baru yang sama jenis mesti dimasukkan mengikut arah kutub bateri yang dinyatakan untuk mengelakkan alat kawalan jauh tidak berfungsi.
Unit Dalaman
Alat Kawalan Jauh |
Salur udara masuk |
Bekalan Kuasa
Salur udara keluar
Unit Luaran
Salur udara masuk Salur udara masuk 
Salur udara keluar
B.MALAYSIA
15

MAKLUMAT
KEADAAN OPERASI
Gunakan alat penyaman udara ini mengikut julat suhu berikut
|
Suhu (°C) |
Dalam |
Luar |
|
|
|
|
|
|
PENYEJUKAN |
|
Maksimum |
32 |
43 |
|
Minimum |
21 |
-5 |
|
|
|
|||
PEMANASAN |
|
Maksimum |
27 |
24 |
|
Minimum |
16 |
-15 |
|
|
|
|||
NOTIS: • Unit ini masih boleh beroperasi sebagai penyejuk dengan suhu di luar serendah -5°C di dalam bilik selain bilik rehat, seperti bilik komputer, dengan suhu bilik 21°C atau lebih tinggi, dan kelembapan bilik sehingga 80%.
Maklumat untuk Pengguna tentang Pungutan dan Pelupusan Peralatan Lama dan Bateri terpakai
|
|
|
|
Simbol-simbol ini pada produk, bungkusan, dan/atau dokumen yang disertakan bermaksud bahawa produk |
|
|
|
|
|
|
|
|
|
|
|
|
|
|
elektrik dan elektronik dan bateri terpakai tidak harus dicampurkan dengan bahan buangan umum rumah. |
|
|
|
|
|
|
|
|
|
Untuk pengendalian, pemulihan dan pengitaran semula produk lama dan bateri terpakai dengan cara yang |
|
|
|
|
betul, sila bawanya ke tempat pengumpulan yang berkenaan, menurut undang-undang kebangsaan anda dan |
|
|
|
|
Arahan 2002/96/EC dan 2006/66/EC. |
|
|
|
|
|
|
|
|
|
Dengan melupuskan produk dan bateri ini dengan cara yang betul, anda membantu menjaga sumber bernilai |
|
|
|
|
dan mengelakkan sebarang kemungkinan kesan negatif pada kesihatan manusia dan alam sekitar yang boleh |
|
|
|
|
timbul daripada pengendalian bahan buangan yang tidak sempurna. |
|
|
|
|
Untuk mendapatkan maklumat lanjut tentang pengumpulan dan pengitaran semula produk dan bateri lama, sila |
|
|
|
|
hubungi majlis perbandaran tempatan anda, perkhidmatan pelupusan bahan buangan anda atau tempat jualan |
|
|
|
|
di mana anda membeli item tersebut. |
|
|
|
|
|
|
|
|
|
Denda boleh dikenakan atas pelupusan bahan buangan ini jika dibuat dengan cara yang salah, menurut |
|
|
|
|
|
|
|
|
|
undang-undang kebangsaan. |
|
|
|
|
Bagi pengguna perniagaan di Kesatuan Eropah |
|
|
|
|
Jika anda ingin membuang peralatan elektrik dan elektronik, sila hubungi pengedar atau pembekal anda untuk |
|
|
|
|
mendapatkan maklumat lanjut. |
|
|
|
|
[Maklumat tentang Pelupusan di Negara lain di luar Kesatuan Eropah] |
|
|
|
|
|
|
|
|
|
Simbol-simbol ini hanya sah dalam Kesatuan Eropah. Jika anda ingin membuang alat ini, sila hubungi pihak |
Pb |
berkuasa tempatan atau pengedar anda dan tanyakan tentang kaedah pelupusan yang betul. |
|||
Nota untuk simbol bateri (contoh dua simbol di bawah): |
||||
|
|
|
|
Simbol ini mungkin digunakan bersama-sama dengan simbol kimia. Dalam kes ini ia mematuhi keperluan yang |
|
|
|
|
ditetapkan oleh Arahan untuk bahan kimia yang terlibat. |
16

FUNGSI ALAT PENYAMAN UDARA BERBILANG
DEFINISI
Sistem penyaman udara berbilang mempunyai satu unit luaran yang disambungkan kepada berbilang unit dalaman.
UNIT DALAMAN
•Boleh mengoperasi unit-unit dalaman secara berasingan atau serentak.
•Keutamaan mod pengoperasian diberi kepada unit yang paling dahulu dihidupkan.
•Semasa pengoperasian, mod pemanasan dan penyejukan tidak dapat diaktifkan serentak bagi unit dalaman yang berlainan.
•Penunjuk kuasa berkelip untuk menunjukkan unit dalaman sedang menunggu sedia bagi mod operasi yang berbeza.
Bilik C
Unit Luaran
Bilik A
Bilik B
B.MALAYSIA
17

GAMBARAN KESELURUHAN PRODUK & OPERASI (ALAT KAWALAN JAUH TANPA DAWAI)
Penapis udara
Panel depan
Ram arah aliran udara mendatar
• Boleh dilaras secara manual.
Ram arah aliran udara menegak
• Jangan laras dengan tangan.
Butang HIDUP/MATI automatik
•Untuk mengoperasikan unit jika alat kawalan jauh tanpa dawai hilang atau rosak.
Tindakan |
Mod |
Tekan sekali. |
Auto |
Tekan sehingga anda |
Penyejukan |
mendengar 1 bip, kemudian |
|
lepaskan. |
|
1.Tekan sehingga anda mendengar 2 bip kemudian
lepaskan. Pemanasan
|
2.Tekan butang SET selama 5 |
|
saat. |
|
Tekan butang untuk mematikan. |
|
PENUNJUK |
|
(Hijau) |
Penerima |
(Jingga) |
FILTER (Merah) |
Paparan Kod Ralat
(Untuk kegunaan baik pulih sahaja)
Jarak Maksimum pemancar: 8m
3
18
MODE |
AIR |
|
|
SW |
|
|
ING |
FAN |
|
|
SPEED |
OFF/ON
Persediaan Alat Kawalan Jauh
1Tekan dan tarik keluar
2Masukkan bateri AAA atau R03 (boleh digunakan ~ 1 tahun)
3Tekan CLOCK (JAM)
MODE
|
|
|
|
FILTER |
|
AUTO |
SWING |
|
RESET |
|
|
MANUAL |
|
|
|||
|
|
FAN |
|
||
SELECT |
|
|
|
SPEED |
4 |
|
|
|
SET |
||
CLOCK |
|
|
|
5 |
|
|
|
|
|
||
|
TIMER |
CANCEL |
|||
|
|
|
|
||
RC
ADDRESS
AC RESET

 2 6
2 6 
1
CZ-RWS1 (Model pemanasan)
CZ-RWC1 (Model penyejukan)
4Tetapkan masa
5Sahkan
6Tutup penutup

OFF/ON |
UNTUK MENGHIDUPKAN |
POWER |
|
||
|
ATAU MEMATIKAN UNIT |
|
|
|
UNTUK MENETAPKAN SUHU
• Julat pilihan: 16°C ~ 31°C.
MODE UNTUK MEMILIH MOD OPERASI
Mod AUTO – Untuk kemudahan anda
•Unit memilih mod operasi mengikut tetapan suhu, suhu luaran dan suhu bilik.
Mod HEAT – Untuk menikmati udara panas
• Unit mengambil sedikit masa untuk pemanasan.
Mod FAN – Untuk membolehkan peredaran udara di dalam bilik
Mod COOL – Untuk menikmati udara sejuk
Mod DRY – Untuk menyahlembapkan persekitaran
•Unit beroperasi pada kelajuan kipas yang rendah untuk memberikan operasi penyejukan yang lembut.
•Ketika operasi kering lembut, kipas dalaman beroperasi pada kelajuan kipas yang rendah.
•Pergerakan ram mungkin tidak sejajar dengan paparan alat kawalan jauh.
FAN SPEED |
UNTUK MEMILIH KELAJUAN KIPAS |
|||
(3 PILIHAN) |
|
|
|
|
|
|
|
|
|
|
AUTO |
LOW |
MEDIUM |
HIGH |
•Untuk AUTO, kelajuan kipas dalaman dilaraskan secara automatik mengikut mod operasi.
•Jika mod operasi ditetapkan pada FAN, kelajuan kipas akan ditetapkan pada MEDIUM tanpa mengambil kira tetapan suhu.
AIR SWING |
UNTUK MELARAS |
AUTO MANUAL ARAH ALIRAN UDARA |
|
•Mengekalkan aliran udara bilik.
•Udara dikeluarkan dengan sama rata melalui 4 salur keluar.
AUTO |
AUTO 1 |
AUTO 2 AUTO 3 |
|
|
•Terdapat 3 pilihan untuk arah aliran udara menegak automatik tetapi dengan sudut ayunan yang sama.
•Ram aliran udara menegak berayun ke atas dan ke bawah secara automatik.
•Jangan melaras ram arah aliran udara menegak dengan tangan.
MANUAL
•Terdapat 4 pilihan untuk arah aliran udara menegak manual.
•Arah aliran udara boleh dilaraskan seperti yang diinginkan dengan menggunakan alat kawalan jauh.
UNTUK MENETAPKAN PEMASA HARIAN
•Untuk MENGHIDUPKAN atau MEMATIKAN unit pada masa yang telah ditetapkan terlebih dahulu.
|
TIMER |
SELECT |
|
|
SET |
Pilih ON(HIDUP) Tetapkan masa. |
Sahkan. |
atau OFF(MATI) |
|
pemasa. |
|
• Untuk membatalkan HIDUP atau MATI pemasa, tekan
CANCEL .
•Apabila pemasa HIDUP ditetapkan, unit mungkin dimulakan lebih awal sebelum masa tetapan sebenar bagi mencapai suhu yang dikehendaki pada masa yang ditetapkan.
•Operasi pemasa berdasarkan jam yang ditetapkan pada alat kawalan jauh dan diulang setiap hari selepas ditetapkan. Untuk penetapan jam, sila rujuk persediaan Alat Kawalan Jauh.
•Pemasa yang paling hampir dengan waktu semasa akan diaktifkan terlebih dahulu.
•Jika pemasa dibatalkan secara manual, anda boleh
mengembalikan tetapan sebelumnya dengan menekan
SET .
•Jika kuasa utama dimatikan selama satu jam atau lebih, jam dan pemasa perlu ditetapkan semula.
PENETAPAN PILIHAN
•Untuk mengelakkan operasi yang tidak disengajakan, anda boleh peruntukkan alamat berbeza untuk setiap unit dalaman.
•Tekan berulang kali untuk memilih
tetapan alamat yang dikehendaki.
 Group
Group  Address 1
  Address 2
  Address 3
ADDRESS
•Secara asalnya, ADDRESS 1 dipilih. Anda tidak perlu mengubah tetapan ini untuk operasi biasa.
•Jika alamat ditetapkan kepada GROUP, lebih daripada satu unit dalaman boleh beroperasi pada masa yang sama.
|
Tekan untuk mengembalikan tetapan asal |
RC RESET |
alat kawalan jauh. |
SET AC RESET Tidak digunakan untuk operasi biasa.
PETUA
•Gunakan langsir untuk menghalang cahaya matahari dan haba dari luar bagi mengurangkan penggunaan kuasa semasa mod sejuk.
B.MALAYSIA
19

GAMBARAN KESELURUHAN PRODUK & OPERASI (ALAT KAWALAN JAUH TERDAWAI)
Penapis udara
Panel depan
Ram arah aliran udara mendatar
• Boleh dilaras secara manual.
Ram arah aliran
udara menegak
• Jangan laras dengan tangan.
Paparan Kod Ralat (Untuk kegunaan baik pulih sahaja)
PENUNJUK
(Hijau)
(Jingga)

 FILTER (Merah)
FAN SPEED AUTO
MON TUE WED THU FRI SAT SUN AUTO
ON
AIR SWING
AUTO 123
|
|
OFF / ON |
|
|
3 |
|
CZ-RT1 |
|
|
|
|
TEMP/ |
|
TIMER/CLOCK |
|
|
|
|
||
|
|
FAN |
|
A/C No. |
|
|
MODE |
UP |
SET |
SPEED |
MODE |
UP |
|
SELECT |
DOWN CANCEL |
AUTO |
MANUAL |
DOWN |
12 |
|
|
|
ECONOMY |
AIR SWING |
|
|
|
|
|
|
|
|
|
|
CHECK ODOUR WASH |
|
VENTILATION |
TEST RUN FILTER RESET |
|
||
|
|
|
|
|
|
1 |
|
|
CZ-RT1 |
|
|
|
|
• Untuk operasi biasa, butang ODOUR WASH , |
ECONOMY |
, |
|
VENTILATION and TEST RUN tidak digunakan. |
|
Persediaan Alat Kawalan Jauh
1Tekan SELECT
2Tekan untuk menetapkan hari
3Sahkan
4Ulangi langkah 2 dan 3 untuk menetapkan waktu semasa.
20
OFF / ON |
UNTUK MENGHIDUPKAN ATAU |
|
MEMATIKAN UNIT |
UP |
|
DOWN |
UNTUK MENETAPKAN SUHU |
• Julat pilihan: 16°C ~ 31°C.
MODE
UNTUK MEMILIH MOD OPERASI
Mod AUTO – Untuk kemudahan anda
•Unit memilih mod operasi mengikut tetapan suhu, suhu luaran dan suhu bilik.
Mod HEAT – Untuk menikmati udara panas
• Unit mengambil sedikit masa untuk pemanasan.
Mod FAN – Untuk membolehkan peredaran udara di dalam bilik
Mod COOL – Untuk menikmati udara sejuk
Mod DRY – Untuk menyahlembapkan persekitaran
•Unit beroperasi pada kelajuan kipas yang rendah untuk memberikan operasi penyejukan yang lembut.
•Ketika operasi kering lembut, kipas dalaman beroperasi pada kelajuan kipas yang rendah.
•Pergerakan ram mungkin tidak sejajar dengan paparan alat kawalan jauh.
FAN
SPEED UNTUK MEMILIH KELAJUAN KIPAS
(3 PILIHAN)
AUTO |
LO |
MED |
HI |
•Untuk AUTO, kelajuan kipas dalaman dilaraskan secara automatik mengikut mod operasi.
•Jika mod operasi ditetapkan pada FAN, kelajuan kipas akan ditetapkan pada MED tanpa mengambil kira tetapan suhu.
AUTO MANUAL |
UNTUK MELARAS |
|
|
AIR SWING |
ARAH ALIRAN UDARA |
|
•Mengekalkan aliran udara bilik.
•Udara dikeluarkan dengan sama rata melalui 4 salur keluar.
AUTO
•Ram aliran udara menegak berayun ke atas dan ke bawah secara automatik.
•Jangan melaras ram arah aliran udara menegak dengan tangan.
MANUAL
•Terdapat 4 pilihan untuk arah aliran udara menegak manual.
•Arah aliran udara boleh dilaraskan seperti yang diinginkan dengan menggunakan alat kawalan jauh.
UNTUK MENETAPKAN PEMASA HARIAN
•Untuk MENGHIDUPKAN atau MEMATIKAN unit pada masa yang telah ditetapkan terlebih dahulu.
1 |
2 |
MODE |
SELECT |
Masukkan mod pemasa |
Pilih ON(HIDUP) atau |
harian. |
OFF(MATI) pemasa. |
3 |
4 |
UP |
|
|
SET |
DOWN |
|
Tetapkan masa. |
Sahkan. |
• Untuk membatalkan HIDUP atau MATI pemasa, tekan
CANCEL .
•Apabila pemasa HIDUP ditetapkan, unit mungkin dimulakan lebih awal sebelum masa tetapan sebenar bagi mencapai suhu yang dikehendaki pada masa yang ditetapkan.
•Operasi pemasa berdasarkan jam yang ditetapkan pada alat kawalan jauh dan diulang setiap hari selepas ditetapkan. Untuk penetapan jam, sila rujuk persediaan Alat Kawalan Jauh.
•Pemasa yang paling hampir dengan waktu semasa akan diaktifkan terlebih dahulu.
•Jika pemasa dibatalkan secara manual, anda boleh
mengembalikan tetapan sebelumnya dengan menekan
SET .
•Jika kuasa utama dimatikan selama satu jam atau lebih, jam dan pemasa perlu ditetapkan semula.
PETUA
•Gunakan langsir untuk menghalang cahaya matahari dan haba dari luar bagi mengurangkan penggunaan kuasa semasa mod sejuk.
B.MALAYSIA
21

UNTUK MENETAPKAN PEMASA MINGGUAN |
BUTIRAN OPERASI |
||||||||
|
|
|
|
|
|
|
• Pemasa mingguan hanya digunakan untuk alat |
||
|
|
|
|
|
|
|
kawalan jauh terdawai sahaja, tekan MODE selama |
||
|
|
MON TUE WED THU FRI |
|
|
OFF / O |
3 saat untuk memilih pemasa harian atau pemasa |
|||
|
|
ON |
|
|
|
|
mingguan. |
|
|
|
|
|
|
CZ-RT1 |
|
|
|
|
|
|
|
|
|
TIMER/CLOCK |
|
|
• Pemasa harian dan pemasa mingguan tidak boleh |
||
|
CZ-RT1 |
|
|
MODE |
UP |
SET |
|||
|
TIMER/CLOCK |
|
|
|
|
|
ditetapkan pada masa yang sama. |
||
|
MODE |
UP |
SET |
|
|
|
• Menggalakkan penjimatan tenaga dengan |
||
|
|
DOWN |
ECONOMY |
SELECT |
DOWN CANCEL |
||||
|
SELECT |
CANCEL |
|
|
|
||||
|
CHECK ODOUR WASH |
|
|
|
ECONOMY |
membenarkan anda menetapkan sehingga 6 pemasa |
|||
|
|
|
|
CHECK ODOUR WASH |
VE |
pada mana-mana hari. |
|||
|
|
|
|
|
|
|
• Program pemasa yang sama tidak boleh ditetapkan |
||
Akan menyala jika operasi |
|
|
|
pada hari yang sama. |
|||||
Pemasa dipilih |
|
6 program berbeza boleh |
Periksa Pemasa |
|
|||||
|
|
|
|
||||||
|
|
|
ditetapkan dalam satu |
|
|
1. Masukkan mod |
|||
|
|
|
hari (1 ~ 6) |
|
|
MODE |
UP |
pemasa. |
|
TIMER |
|
|
|
|
|
|
SET |
||
1 2 3 |
4 5 6 |
Menunjukkan hari |
|
|
2. Pilih hari. |
||||
MONTUE WEDTHU FRI SAT SUN |
yang dipilih |
SELECT |
DOWN CANCEL |
||||||
|
|
|
|
|
|
|
|||
ON |
|
|
|
Waktu untuk dipilih |
|
|
|
||
OFF |
|
|
|
(Selang 10 minit) |
3. Paparan akan menunjukkan program bagi setiap hari |
||||
|
|
|
|
|
|
|
|||
|
MATI-Pemasa. Untuk MEMATIKAN |
yang dipilih. |
|
||||||
|
Ubah Suai Atau Tambah Pemasa |
||||||||
|
unit secara automatik. |
|
|
||||||
HIDUP-Pemasa. Untuk MENGHIDUPKAN unit |
• Jalankan pemeriksaan operasi pemasa untuk memilih |
||||||||
hari. |
|
|
|||||||
secara automatik. |
|
|
|
|
|
|
|||
|
|
|
|
Ulangi langkah 4 hingga 8 untuk mengubah suai |
|||||
Hari untuk dipilih |
|
|
|
|
|
||||
|
|
|
|
|
program pemasa sedia ada, atau tambah sebarang |
||||
|
|
|
|
|
|
|
|||
Ubah Paparan |
|
|
|
|
|
|
program pemasa baru. |
||
1. Tekan |
MODE |
selama 3 saat untuk mengubah paparan |
Batalkan Pemasa |
|
||
|
• Lakukan langkah di bawah untuk membatalkan |
|||||
kepada pemasa mingguan. |
|
|||||
|
program pemasa untuk hari yang tertentu. |
|||||
Pilih hari untuk menjalankan pemasa |
|
|
|
1. Masukkan mod |
||
2. Tekan SELECT untuk memasukkan tetapan hari. |
MODE |
UP SET |
pemasa. |
|||
3. Tekan |
|
untuk memilih hari yang dikehendaki. |
|
|
2. Pilih hari. |
|
Hari yang dipilih akan serlahkan dengan |
. |
SELECT |
DOWN CANCEL |
|
||
Tekan SET untuk membuang pilihan atau memilih |
|
|
3. Tekan untuk |
|||
tanda |
. |
|
|
|
|
|
Ulangi langkah ini untuk memasukkan hari lain. |
|
|
memasukkan tetapan |
|||
|
|
hari. |
||||
Pilih Pemasa ON/OFF |
|
|
|
|||
|
|
|
|
|||
4. Tekan SELECT untuk memasukkan Pemasa 1. |
|
|
|
4. Tekan untuk |
||
5. Tekan |
|
untuk memilih HIDUP atau MATI. |
|
|
membatalkan tetapan |
|
|
|
|
pemasa. |
|||
6. Tekan SET untuk mengesahkan pilihan.
Pilih Pemasa |
|
Lumpuhkan Pemasa Mingguan |
|
|||
7. Tekan |
untuk memilih waktu yang dikehendaki. |
• Untuk melumpuhkan tetapan pemasa mingguan, |
||||
Jika anda ingin menetapkan bersama dengan suhu |
tekan |
MODE |
, kemudian tekan |
CANCEL |
. |
|
|
|
|||||
|
UP |
|
|
|||
yang anda kehendaki, tekan DOWN untuk memilih |
Bolehkan Pemasa Mingguan |
suhu. |
• Untuk membolehkan tetapan pemasa mingguan |
8. Tekan SET untuk mengesahkan pilihan. |
terdahulu, tekan MODE , kemudian tekan SET . |
•Ulangi langkah 5 hingga 8 untuk menetapkan Pemasa 2 hingga 6, atau tekan CANCEL untuk membatalkan pemasa berkaitan.
22

PENJAGAAN & PEMBERSIHAN |
|
|
• Matikan bekalan kuasa sebelum pembersihan. |
|
• Jangan sentuh kepingan aluminium, bahagian yang tajam boleh |
AWAS |
menyebabkan kecederaan. |
|
|
ARAHAN PEMBASUHAN
•Jangan gunakan benzena, bahan pencair atau serbuk sental.
•Gunakan sabun ( pH7) atau bahan pencuci rumah yang neutral sahaja.
•Jangan gunakan air yang lebih panas daripada 40°C.
PETUA
•Bersihkan penapis selalu untuk prestasi terbaik dan untuk mengurangkan penggunaan kuasa.
•Sila rujuk kepada pengedar terdekat anda untuk pemeriksaan bermusim.
KEPINGAN ALUMINIUM
Alih keluar
PENAPIS UDARA
PANEL HADAPAN
Alih Keluar Panel Hadapan
•Angkat dan tarik untuk alih keluar panel hadapan.
•Basuh dengan berhati-hati dan keringkan.
Tutup Panel Hadapan
•Tekan kedua-dua hujung panel hadapan untuk menutupnya dengan rapat.
UNIT DALAMAN
Lap unit perlahan-lahan dengan kain lembut, kering.
•Penapis udara perlu dibersihkan setiap dua minggu.
•Gunakan air untuk membasuh/membilas penapis dengan cermat untuk mengelakkan kerosakan pada permukaan penapis.
•Keringkan penapis dengan sempurna di bawah tempat teduh, jauh daripada api atau di bawah cahaya matahari secara terus.
•Gantikan sebarang penapis yang rosak.
Penyelenggaraan Penapis Udara
Pembersihan diperlukan apabila:
FAN SPEED |
AUTO |
FAN |
AUTO |
|
FILTER |
|
COOL DRY RESET |
|
AIR SWING |
|
|
AUTO 123 |
|
|
|
|
(Hijau) |
|
|
(Jingga) |
|
FILTER |
(Merah) |
“FILTER RESET” (SET SEMULA PENAPIS) muncul pada paparan alat kawalan jauh. (Untuk alat kawalan jauh terdawai)
“FILTER” menyala pada paparan penunjuk.(Untuk alat kawalan jauh tanpa dawai)
•Disyorkan anda membersihkan penapis udara setiap 6 minggu.
• Setelah penapis udara dibersihkan, tekan |
/ |
FILTER RESET untuk menetapkan semula. |
FILTER RESET |
|
•Jangan mengoperasikan unit tanpa penapis udara.
•Gunakan air untuk membasuh/membilas penapis dengan cermat untuk mengelakkan kerosakan pada permukaan penapis.
•Jangan keringkan bahagian tersebut dengan menggunakan pengering rambut atau alat pemanas.
•Gantikan sebarang penapis yang rosak.
B.MALAYSIA
23

MENGESAN MASALAH
Tanda-tanda berikut tidak menandakan kerosakan.
|
|
|
Tanda |
Sebab |
|
|
|
|
|
|
|
Kabus keluar dari unit dalaman. |
• Pemeluwapan akibat proses penyejukan. |
|
Bunyi air mengalir semasa pengoperasian. |
• |
Bahan pendingin mengalir dalam unit. |
Bilik berbau. |
• |
Ini mungkin disebabkan oleh bau hapak daripada dinding, permaidani, |
|
|
perabot atau pakaian. |
Kipas unit dalaman berhenti sekali-sekala semasa penetapan kelajuan kipas automatik.
Operasi lewat beberapa minit selepas dihidupkan semula.
Unit luaran mengeluarkan air/wap. Penunjuk pemasa sentiasa hidup.
Kipas unit dalaman berhenti sekali-sekala semasa operasi pemanasan.
Bunyi keriat-keriut boleh didengar semasa operasi.
Unit bertukar ke operasi FAN dan udara menjadi lembap.
Unit luaran mengeluarkan bunyi semasa operasi pemanasan.
Operasi tidak berhenti serta merta setelah ditekan butang OFF/ON.
Operasi terhenti sekali-sekala. (“DEFROST” (NYAHBEKU) muncul pada paparan alat kawalan jauh)
Aliran udara tidak bermula serta merta selepas operasi dimulakan. (“PRE HEAT” (PRAPEMANASAN) muncul pada paparan alat kawalan jauh)
Operasi bermula setelah bekalan kuasa disambung semula.
Semasa mod kering, udara sejuk dikeluarkan.
Kelajuan kipas sekali-sekala berubah semasa mod pemanasan.
Unit luaran mengeluarkan wap semasa mod pemanasan.
•Ini membantu membuang bau persekitaran.
•Kelewatan adalah bagi melindungi alat pemampat unit.
•Pemeluwapan atau penyejatan berlaku pada paip.
•Tetapan pemasa diulang setiap hari selepas ditetapkan.
•Untuk mengelakkan kesan penyejukan yang tidak dimaksudkan.
•Perubahan suhu menyebabkan pengembangan/penguncupan unit.
•Ini berlaku apabila suhu bilik mencapai suhu yang ditetapkan, operasi bertukar kepada mod FAN dan kelembapan meningkat.
•Ini terjadi akibat perubahan pengaliran masuk gas penyejuk apabila operasi berhenti dan bermula.
•Pengeluaran haba sedang dalam proses. Operasi akan berhenti secara automatik selepas 60 saat.
•Unit berada dalam mod penyahbekuan, dan fros yang cair disalirkan keluar dari unit luaran.
•Unit mula memanas untuk membekalkan udara panas.
•Mula semula automatik sedang berfungsi dan beroperasi mengikut tetapan sebelumnya.
•Unit menjalankan operasi penyejukan dengan kelajuan kipas yang rendah untuk menyahlembapkan bilik.
•Suhu bilik telah mencapai tetapan alat kawalan jauh. Apabila suhu bilik jatuh sekali lagi, kelajuan kipas akan dimulakan pada tetapan alat kawalan jauh.
•Hal ini disebabkan oleh operasi nyahbeku yang berlaku pada penukar haba.
24

Periksa yang berikut sebelum memanggil untuk dibaiki.
Tanda |
Periksa |
|
|
Operasi pemanasan/penyejukan tidak |
• Tetapkan suhu dengan betul. |
berfungsi dengan cekap. |
• Tutup semua pintu dan tingkap. |
|
• Bersihkan atau gantikan penapis. |
|
• Bersihkan apa-apa halangan pada lubang salur masuk udara dan salur |
|
keluar udara. |
Mod pemanasan tidak boleh beroperasi.
Bunyi bising semasa beroperasi.
Alat kawalan jauh tidak berfungsi. (Paparan alat kawalan jauh tanpa dawai
malap atau isyarat penghantarannya lemah.) Unit tidak berfungsi.
Unit tidak menerima isyarat daripada alat kawalan jauh.
Unit terhenti dan penunjuk TIMER berkelip.
•Unit ini dipaksa beroperasi pada mod penyejukan hanya di dalam bilik selain bilik rehat, seperti bilik komputer.
•Periksa sama ada unit telah dipasang senget atau geriji tempat masuk udara tidak ditutup betul.
•Masukkan bateri degan betul.
•Ganti bateri yang lemah.
•Periksa sama ada pemutus litar terbelantik.
•Periksa sama ada pemasa telah ditetapkan.
•Pastikan penerima tidak terhalang.
•Pastikan alamat ditetapkan dengan betul.
•Pastikan isyarat penghantaran alat kawalan jauh berada dalam julatnya.
•Sesetengah lampu pendarflour boleh mengganggu penghantaran isyarat. Sila rujuk kepada pengedar terdekat anda.
•Matikan bekalan kuasa untuk menetapkan semula unit (penunjuk TIMER berhenti berkelip).
•HIDUPKAN bekalan kuasa dan mulakan semula unit.
•Jika penunjuk TIMER berkelip semula, sila rujuk kepada pengedar terdekat anda.
UNTUK PEMERIKSAAN BERMUSIM SELEPAS LAMA TIDAK DIGUNAKAN
•Periksa bateri alat kawalan jauh (alat kawalan tanpa dawai).
•Tiada halangan pada lubang salur masuk udara dan salur keluar udara.
•Gunakan butang Automatik HIDUP/MATI untuk memilih operasi Penyejukan/Pemanasan, selepas beroperasi selama 15 minit, adalah menjadi perkara biasa terdapat perbezaan suhu berikut antara salur masuk udara dan salur keluar udara:
Penyejukan: ≥ 8°C |
Pemanasan: ≥ 14°C |
UNTUK TEMPOH TIDAK DIGUNAKAN
BERLANJUTAN
•Aktifkan Mod Panas selama 2~3 jam untuk menyingkirkan sepenuhnya lembapan yang ada di dalam bahagian dalam untuk mengelakkan pertumbuhan kulapuk.
•Matikan bekalan kuasa.
•Keluarkan bateri alat kawalan jauh (alat kawalan tanpa dawai).
KRITERIA TIDAK BOLEH DIBAIKPULIH OLEH PENGGUNA
MATIKAN BEKALAN KUASA kemudian PANGGIL Pengedar Sah dalam keadaan berikut:
•Bunyi luar biasa semasa pengoperasian.
•Air/benda asing terperangkap dalam alat kawalan jauh.
•Air menitis dari unit dalaman.
•Pemutus litar selalu terpadam.
•Wayar bekalan kuasa menjadi lebih panas daripada biasa.
•Suis atau butang tidak berfungsi dengan betul.
B.MALAYSIA
25

Panasonic
26~27
28
29
30~31
32~34
35
36~37
|
|
|
|
|
|
|
|
|
|
|
|
|
|
|
|
|
|
|
|
|
|
|
|
|
|
|
|
|
|
|
|
|
|
|
|
|
|
|
|
|
|
|
|
|
|
|
|
|
|
|
|
|
|
|
|
26

|
|
|
|
|
|
|
|
|
|
|
ELCB |
RCD |
|
|
|
- |
- |
- |
/ |
|
|
( / / ) |
|
• (ELCB) |
|
|
|
|
|
• |
|
|
• |
|
/ |
• |
|
• |
||
|
||
• |
• 準備操作。
•,
/
|
|
|
|
|
|
|
|
|
|
|
|
|
|
|
|
|
|
|
|
|
|
|
|
|
|
|
|
|
|
|
|
|
|
|
|
|
|
|
|
|
|
|
|
|
|
|
|
|
|
|
|
|
|
|
|
|
|
|
|
|
|
|
Ni-Cd |
|
|
|
|
|
|
|
|
|
|
|
|
|
|
|
|
|
|
|
|
|
|
|
|
|
|
|
|
|
|
|
|
|
|
|
|
|
|
|
|
|
|
|
|
27

|
|
|
|
|
|
|
|
|
(°C) |
|
|
|
32 |
43 |
|
|
|
|
21 |
-5 |
|
27 |
24 |
|
|
|
|
16 |
-15 |
• 21 °C 80% -5°C |
||
|
|
|
|
|
|
/
2002/96/EC
2006/66/EC
或購買產品的銷售點。
[ ]
Pb
28
•
•
•
• 
C

 A
A 
B
29

|
|
|
|
|||||||||
|
|
|
|
|
|
|
|
|
/ |
|
|
|
|
|
|
|
|
|
• |
||||||
|
|
|
|
|
|
|
|
|
||||
|
|
|
|
|
|
|
|
|
|
|
||
|
|
|
|
|
|
|
|
|
|
|
|
|
|
|
|
|
|
|
|
|
|
|
|
||
|
|
|
|
|
|
|
|
|
“ ” |
|||
|
|
|
|
|
|
|
|
|
|
|||
|
|
|
|
|
|
|
|
1. 2 |
|
|||
|
|
|
|
|
|
|
|
|
|
|||
|
|
|
|
|
|
|
|
|
“ ” |
|
||
|
|
|
|
|
|
|
|
|
2. SET 5 |
|||
|
|
|
|
|
|
|
|
|
|
|||
|
|
|
|
|
|
|
|
|
|
|
|
|
|
|
|
|
|
|
|
|
|
|
|
||
|
|
|
|
|
|
|
|
|
|
|||
|
|
|
|
|
|
|
|
|
|
|
|
|
|
|
|
|
|
|
|
|
|
|
|
( |
) |
|
|
|
|
|
|
|
|
|
|
|
( |
) |
|
|
|
|
|
|
|
|
|
|
FILTER ( |
) |
|
• |
|
|
|
|
|
|
|
|
|
|
||
|
|
|
|
|
|
|
|
|
|
|
|
|
|
|
|
|
|
|
|
|
|||||
|
|
|
|
|
|
|
||||||
|
• |
|
|
|
|
|
||||||
|
|
|
|
|
|
|
|
:8m |
|
|
|
|
|
|
|
|
|
|
|
|
|
|
|
|
|
|
|
|
|
MODE |
|
|
|
|
|
|
||
|
|
|
|
AIR |
|
|
|
|
|
|
|
|
|
|
|
|
|
|
|
|
|
|
|
|
|
|
|
|
|
|
SW |
|
|
|
4 |
|
|
|
|
|
|
|
|
|
ING |
FAN |
1 |
|
|
|
|
|
|
|
|
|
|
|
SPEED |
|
|
|
||
|
|
|
|
|
|
|
|
|
||||
|
|
|
|
|
|
|
|
2 |
AAA R03 |
5 |
|
|
|
|
|
|
|
|
|
|
1 |
|
|||
|
|
|
|
|
|
|
|
3 |
CLOCK |
6 |
|
|
|
|
OFF/ON |
|
|
|
|
|
|
|
|
|
|
|
MODE |
|
|
|
|
|
|
|
|
|
|
|
|
|
|
|
|
FILTER |
|
|
|
|
|
|
|
|
AUTO |
SWING |
RESET |
|
|
|
|
|
|
|||
|
|
MANUAL |
|
|
|
|
|
|
|
|
||
|
|
|
FAN |
|
|
|
|
|
|
|
||
|
SELECT |
|
|
|
SPEED |
|
4 |
|
|
|
|
|
3 |
|
|
SET |
|
|
|
|
|
|
|||
CLOCK |
|
|
|
|
5 |
|
|
|
|
|||
|
|
CANCEL |
|
|
|
|
|
|
||||
|
TIMER |
|
|
|
|
|
|
|||||
|
|
|
|
|
|
|
|
|
|
|||
RC |
ADDRESS |
|
|
|
|
|
|
|
|
|
|
|
|
AC |
|
|
|
|
|
|
|
|
|||
|
|
|
|
|
|
|
|
|
|
|
||
|
|
|
|
RESET |
2 |
|
|
|
|
|
|
|
|
|
|
|
|
|
|
|
|
|
|
|
|
6 |
|
|
|
|
|
|
|
|
|
|
|
|
|
|
|
1 |
|
|
|
|
|
|
|
|
|
|
|
|
|
|
|
|
CZ-RWS1 |
|
|
|
||
|
|
|
|
|
|
|
CZ-RWC1 |
|
|
|
||
30 |
|
|
|
|
|
|
|
|
|
|
|
|
 Loading...