


RX-DS11
Table of contents
 Loading...
Panasonic'
Portable Stereo CD System
RX-DS11
Operating Instructions
Note:
The “EB” indication shown on the packing case indicates
United Kingdom.
Before connecting, operating or adjusting this product,
please read these instructions completely. Please save this
manual.
EB GN
n COMPACT
aloSI
DIGJTAL AUDIO
RQT3646-B
Dear customer
Table of Contents
Thank you for purchasing this product.
For optimum performance and safety, please read these
instructions carefully.
CLASSI
LASER PRODUCT
DANGER
ADVAfiSEL
VARO!
VARNING
AOVARSEL
VORSICHT
IlfVISlBLE LASER RADIAIlOK WHE/J OPEN i’Jtö ItJTESLOCK DEf EATED.
AWIDDIRECTEOTSURETOfiMl
USYNIIG lASERSTflAEII'JG VED ABf!l№, WAR SIKKERHEDSAFSRYOERE
£R UDE AF fUFiKlLON. UNDOA UDSfTTELSE FOR STRALING.
AVATlAESSAJASUOJAlUKnUSDHITETTAESSAOlErALTTLIMA
FJAKVMÄTÜHTALASERSÄTEILmE. ALAKATSOSATEESEBJ.
0
SVNL1G LASEflSTFALNING nAR DENWADaAF ÜPPNA0 OCH
SPARBEMAflURKOPPLAD. BETHAKIAEJETRALEM.
USiNLlG LASERSTRALING HAP DEKSEL APHES OG SIMflHEDSLAS
BRYTES. LtftNGAEStSPOFIEfilNGFORSTPALEN.
UNSICHTBARE lAS£RSTRAHUIfIG,WENN i^DECKUflG GEOFRIEI
UNO SICHERHEiTSVERRIEGaUilG ÜBERBflÜCKT.
NICHTDEAI STRAHL AUSEETIEN.
{Inside of product)
(Indersiden at apparatet)
(Tuotteen sisällä)
(Apparatens instda)
(Produktets innstde)
(im Inneren des Gerätes)
CAUTION!
THIS PRODUCT UTILIZES A LASER.
USE OF CONTROLS OR ADJUSTMENTS OR
PERFORMANCE OF PROCEDURES OTHER
THAN THOSE SPECIFIED HEREIN MAY
RESULT IN HAZARDOUS RADIATION EX
POSURE.
DO NOT OPEN COVERS AND DO NOT
REPAIR YOURSELF. REFER SERVICING TO
QUALIFIED PERSONNEL
Precautions
Supplied Accessory................................................. 2
Caution for AC Mains Lead
Location of Controls
Power Sources ....................................................... 5
Common Operations
Listening to CDs .....................................................
Listening to Tapes
Listening to the Radio ............................................. 8
Recording Radio Programs
Recording Compact Discs....................................... 9
Troubleshooting Guide
Concerning Compact Discs
Concerning Cassette Tapes
Maintenance................................................Back cover
Technical Specifications .............................Back cover
.............................................................
.....................................
...............................................
...............................................
..................................................
..................................
..........................................
...................................
..................................
2
3
4
5
6
7
8
10
11
11
Precautions
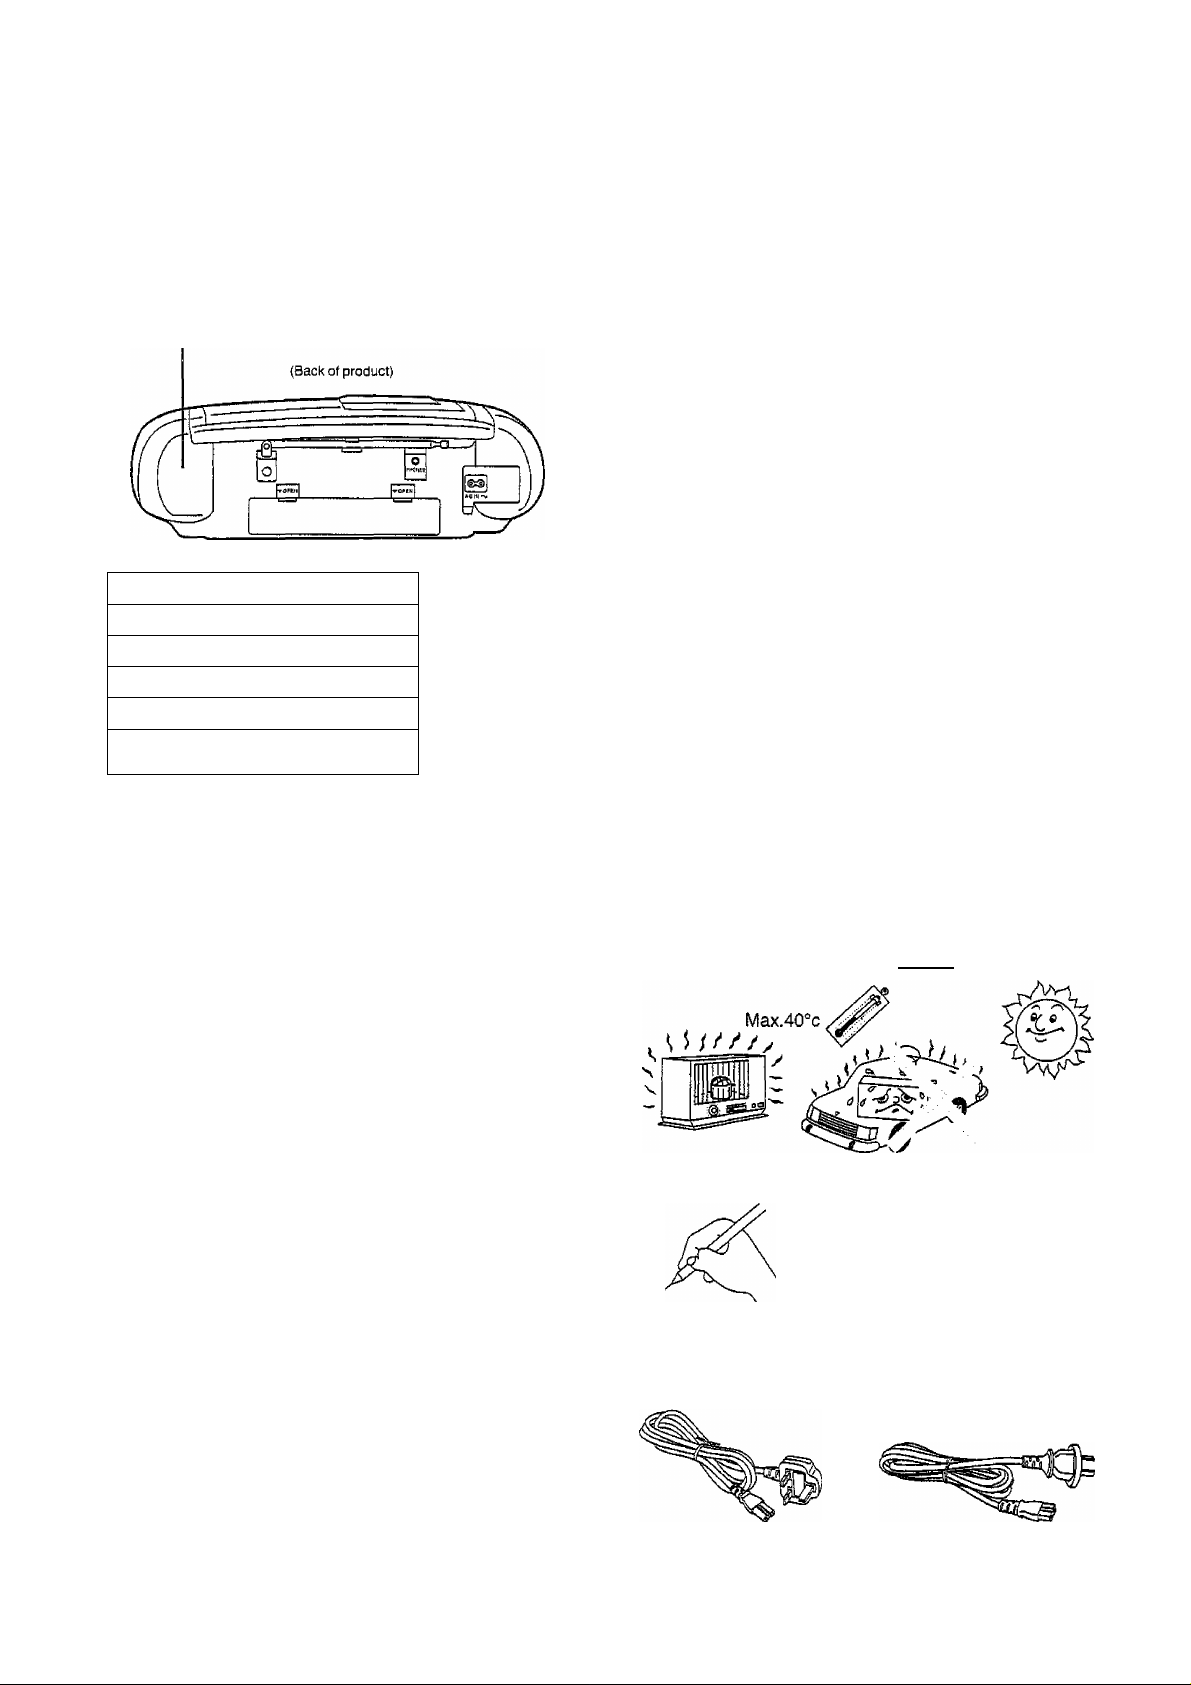
«If this unit is not used for a long period of time or is
used only from an AC power source, remove all the
batteries to prevent potential damage due to possible
battery leakage.
•Avoid using or placing this unit near sources of heat. Do
not leave it in an automobile exposed to direct sunlight for
a long time with the doors and windows closed as this may
deform the cabinet.
•Avoid cuts, scratches, or poor connections in the AC power
cord, as they may result in possible fire or electric shock
hazard. Also, excessive bending, pulling or splicing of the
cord should be avoided.
• Do not unplug the AC power cord by pulling on the cord. To
do so may cause premature failure or shock hazard.
• Do not operate this unit on AC power in a bathroom, as.a
potential shock hazard may result.
•When not in use, disconnect the AC power cord from the
household AC outlet.
•The Function Selector switch does not separate entire unit
from mains even if in “TAPE/BfaidJ” position.
CAUTION!
DO NOT INSTALL OR PLACE THIS UNIT IN A
BOOKCASE, BUILT IN CABINET OR IN ANOTH
ER CONFINED SPACE IN ORDER TO KEEP
WELL VENTILATED CONDITION. ENSURE THAT
CURTAINS AND ANY OTHER MATERIALS DO
NOT OBSTRUCT THE VENTILATION CONDITION
TO PREVENT RISK OF ELECTRIC SHOCK OR
FIRE HAZARD DUE TO OVERHEATING.
WARNING:
TO REDUCE THE RISK OF FIRE, ELECTRIC
SHOCK OR PRODUCT DAMAGE, DO NOT
EXPOSE THIS APPLIANCE TO RAIN,
SPLASHING, DRIPPING OR MOISTURE.
Supplied Accessory
Please check and identify the supplied
accessories.
13
AC power cable
(For United Kingdom)
VJA0733
Use numbers indicated in parentheses when asking for re
placement parts.
................................................
(For Australia and New
Zealand)
RJA0035-A
1 pc
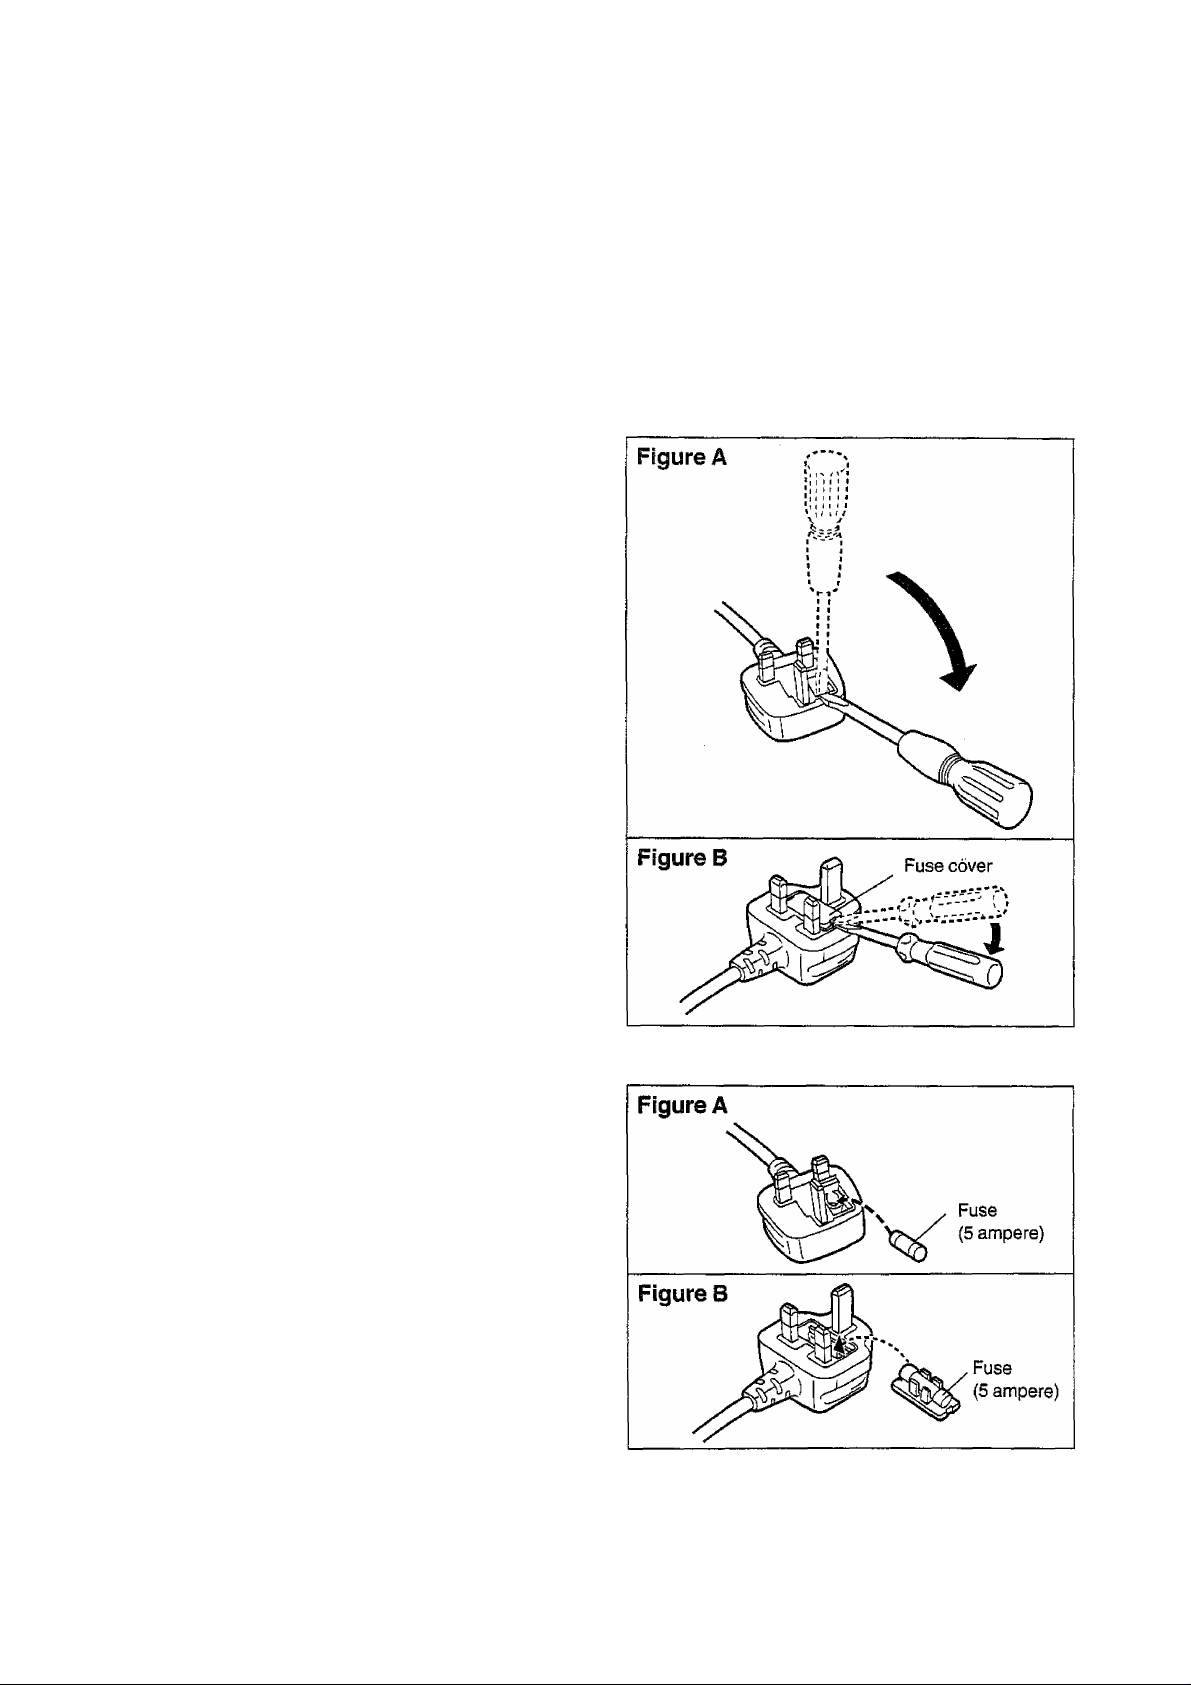
CautionJcfrAC Mains Ijead
(For United Kingdom)
(“EB” area code mode! only)
For your safety, please read the following text carefully.
This appliance is supplied with a moulded three pin mains
plug for your safety and convenience.
A 5-ampere fuse is fitted in this plug.
Should the fuse need to be replaced please ensure that the
replacement fuse has a rating of 5-ampere and that it is
approved by ASTA or BSI to BS1362.
Check for the ASTA mark <%> or the BSI mark ^ on the body
of the fuse.
if the plug contains a removable fusecoveryou must ensure
that it is refitted when the fuse is replaced.
If you lose the fuse cover the plug must not be used until a
replacement cover is obtained.
A replacement fuse cover can be purchased from your local
dealer.
CAUTION!
IF THE FITTED MOULDED PLUG IS UNSUITABLE
FOR THE SOCKET OUTLET IN YOUR HOME
THEN THE FUSE SHOULD BE REMOVED AND
THE PLUG CUT OFF AND DISPOSED OF SAFELY.
THERE IS A DANGER OF SEVERE ELECTRICAL
SHOCK IF THE CUT OFF PLUG IS INSERTED
INTO ANY 13-AMPERE SOCKET.
Before use
Remove the connector cover.
How to replace the fuse
The location of the fuse differ according to the type of AC
mains plug (figures A and B). Confirm the AC mains plug
fitted and follow the instructions below,
illustrations may differ from actual AC mains plug.
1. Open the fuse cover with a screwdriver.
If a new plug is to be fitted please observe the wiring code as
shown below.
If in any doubt please consult a qualified electrician.
IMPORTANT
The wires in this mains lead are coloured in accordance with
the following code;
Blue: Neutral, Brown: Live.
As these colours may not correspond with the coloured
markings identifying the terminals in your plug, proceed as
follows:
The wire which is coloured Blue must be connected to the
terminal which is marked with the letter N or coloured Black
or Blue.
The wire which is coloured Brown must be connected to the
terminal which is marked with the letter L or coloured Brown
or Red.
WARNING; DO NOT CONNECT EITHER WIRE TO THE
EARTH TERMINAL WHICH IS MARKED WITH THE LET
TER E, BY THE EARTH SYMBOL 4^ OR COLOURED
GREEN OR GREENA^ELLOW.
THIS PLUG IS NOT WATERPROOF—KEEP DRY.
2. Replace the fuse and close or attach the fuse cover.
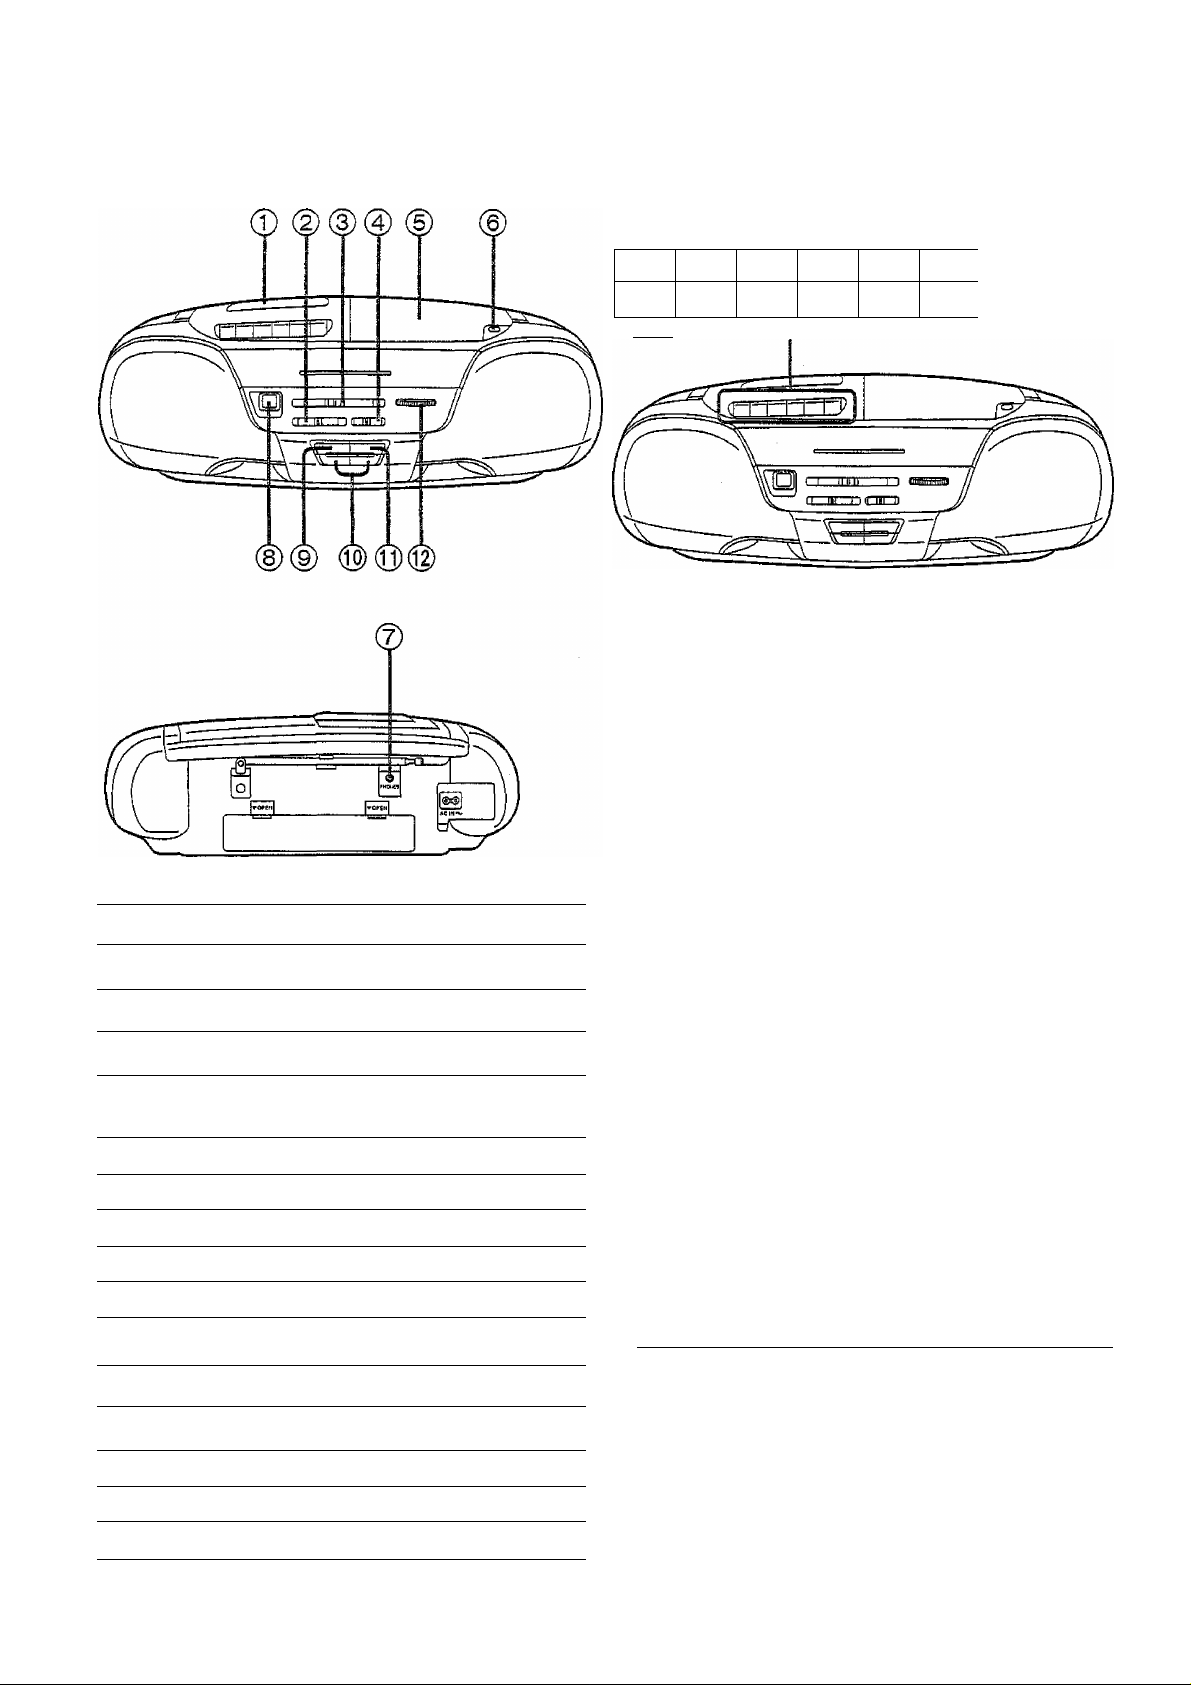
L^caMon of Controls
© ©
r
Ss?ga PLAY REW/HEV FF/CUE STOP/EJECT PAUSE
©
a/A
®
No. Name
Ref. page
Basic controls
® Cassette lid
(D Function selector/operation switch
(SELECTOR)
® Volume control (VOLUME)
@ XBS switch (XBS)
6-9
(5) Disc lid
d) Disc lid open button (ik CD) 6
® Headphones jack (PHONES)
CD controls
(D Display pane! 6
d) Stop button (B CD)
No.
Name
Ref. page
Tuner controls
7
5
5
6
5
6
® Tuning dial (TUNING)
8
Cassette deck controls
@ Recording button (• SSSS)
@ Playback button PLAY)
© Rewind/review button REW/REV) 7
® Fast forward/cue button (►► FF/CUE) 7
® Stop/eject button (M/^ STOP/EJECT) 7-9
® Pause button (E E PAUSE) 7
8,9
® Skip/search buttons (, »\)
® Play/pause button (CD ►/B B)
6
6
Loading...