


Supplied accessories
Please check and identify the supplied accessories.
Use numbers indicated in parentheses when asking for replacement parts.
AC mains lead ........................................................................ 1pc.
For United Kingdom, Saudi Arabia and Kuwait: (RJA0053-2X) For Australia and New Zealand: (RJA0035-X)
For others: (RJA0019-2K)
For the United Kingdom and Republic of Ireland
shop@ 


www.panasonic.co.uk (for UK customers only)
•Order accessory and consumable items for your product with ease and confidence by telephoning our Customer Care Centre Mon– Friday 9:00 am–5:30 pm. (Excluding public holidays.)
•Or go on line through our Internet Accessory ordering application.
•Most major credit and debit cards accepted.
•All enquiries transactions and distribution facilities are provided directly by Panasonic UK Ltd.
•It couldn’t be simpler!
Customer Care Centre
For UK customers: 08705 357357
For Republic of Ireland customers: 01 289 8333
Technical Support
For UK customers: 0870 1 505610
This Technical Support Hot Line number is for Panasonic PC software related products only.
For Republic of Ireland, please use the Customer Care Centre number listed above for all enquiries.
For all other product related enquiries, please use the Customer Care Centre numbers listed above.
Portable Stereo CD System
Operating Instructions
Model No. RX-D26
Note
“EB” on the packaging indicates the United Kingdom.
Dear customer
Thank you for purchasing this product.
Before connecting, operating or adjusting this product, please read these instructions completely.
Please keep this manual for future reference.
EB 
 E
E 
 GN
GN
 GU
GU
 GC
GC
 GS
GS
Precautions
•Avoid using or placing this unit near sources of heat. Do not leave it in an automobile exposed to direct sunlight for a long time with the doors and windows closed as this may deform the cabinet.
•Avoid cuts, scratches, or poor connections in the AC mains lead, as they may result in possible fire or electric shock hazard. Also, excessive bending, pulling or splicing of the lead should be avoided.
•Do not unplug the AC mains lead by pulling on the lead. To do so may cause premature failure or shock hazard.
•Do not operate this unit in a bathroom, as a potential shock hazard may result.
•When not in use, disconnect the AC mains lead from the household mains socket.
Use of batteries
•If this unit is not used for a long period of time or is used only from an AC power source, remove all the batteries to prevent potential damage due to possible battery leakage.
•Align the poles (+ and –) properly when inserting the batteries.
•Do not mix old and new batteries or different types of batteries.
•Do not recharge ordinary dry cell batteries.
•Do not heat or disassemble the batteries. Do not allow them to contact flame or water.
•Do not keep together with metallic objects such as necklaces.
•Do not use rechargeable type batteries.
•Do not use batteries if the covering has been peeled off.
Mishandling of batteries can damage other items, cause damage to the unit, and may cause a fire through short-circuiting or electrolyte leakage.
If electrolyte leaks from the batteries, consult your dealer.
Wash thoroughly with water if electrolyte comes in contact with any part of your body.
Memory back-up
When the power supply is interrupted, radio stations you have set are saved if you have inserted back-up batteries (not included). These batteries do not power the unit.
(R6/LR6, AA, UM-3)
When to change the batteries
The batteries last about a year.
Connect the unit to AC power before replacing the batteries.
Before connecting or disconnecting the AC mains lead, press [TAPE/OFF] and stop the tape to turn the unit off. The memory batteries are worn out faster if the cord is disconnected with the power still on.
Removing the batteries
Open the battery cover and insert your finger in the hole on the bottom of the unit and push out.
(Remove the power batteries first.)
RQTT0622-1B

Power sources
Using a household mains socket
FOR UNITED KINGDOM ONLY
READ THE CAUTION FOR THE AC MAINS LEAD ON PAGE 7 BEFORE CONNECTION.
For areas except for |
VOLT ADJ |
|
United Kingdom, |
||
|
Continental Europe,
Australia and
New Zealand
AC mains lead (included)
To household mains socket
For areas except for United Kingdom, Continental Europe, Australia and New Zealand
Set the voltage before connection.
Use a flat head screwdriver to turn [VOLT ADJ] to the voltage setting for your area.
Note that the unit will be seriously damaged or fail to operate correctly if this setting is not made correctly.
Connect the AC mains lead firmly to the unit and the outlet.
Note
The included AC mains lead is for use with this unit only. Do not use it with other equipment.
Using batteries (not included)
The unit cannot be powered by batteries if the AC mains lead is connected.
(R14/LR14, C, UM-2) |
Inner row |
 Outer row
When to change the batteries
When the battery indicator begins flashing, replace all 6 of the batteries. It is also a good idea to replace all the batteries before recording.
Note
Before playing starts the battery indicator may flash although the batteries are not drained. It appears correctly once you start play.
Removing the batteries
Open the battery cover and insert your finger in the hole on the bottom of the unit and push out.
Controls
 CD stop/clear/FM mode select button (
 /CLEAR FM MODE)
 Tuner mode/band select/auto preset button (TUNER/BAND –AUTO PRESET)
 CD lid
 Tune mode select/CD play mode select/program button
(TUNE MODE •CD PLAY MODE –PGM )
Tape mode/standby switch (TAPE/OFF)
Press [TAPE/OFF] and stop the tape to turn the unit off.
The unit is in the standby condition when the AC power supply cord is connected.
The primary circuit is always “live” as long as the power cord is connected to an electrical outlet.
 Pause button (
 PAUSE)
 Stop/eject button (
 STOP/EJECT)
 Speaker
These speakers do not have magnetic shielding. Do not place them near televisions, personal computers or other devices easily influenced by magnetism.
2
 Display
 Tuning/CD skip, search buttons (
 ,
,  )
)
 Sound equalizer select /sound virtualizer button
(• SOUND EQ –S.VIRTUALIZER)
 CD play/pause button ( CD
  )
)
 CD Iid open/close
( CD OPEN/CLOSE)
Volume control buttons (VOLUME  , )
, )
 Cassette deck
 Record button (
 )
)
 Tape play button (
 PLAY)
PLAY)
 Rewind/review button (
 REW/REV)
 Fast-forward/cue button (
 FF/CUE)
RQTT0622
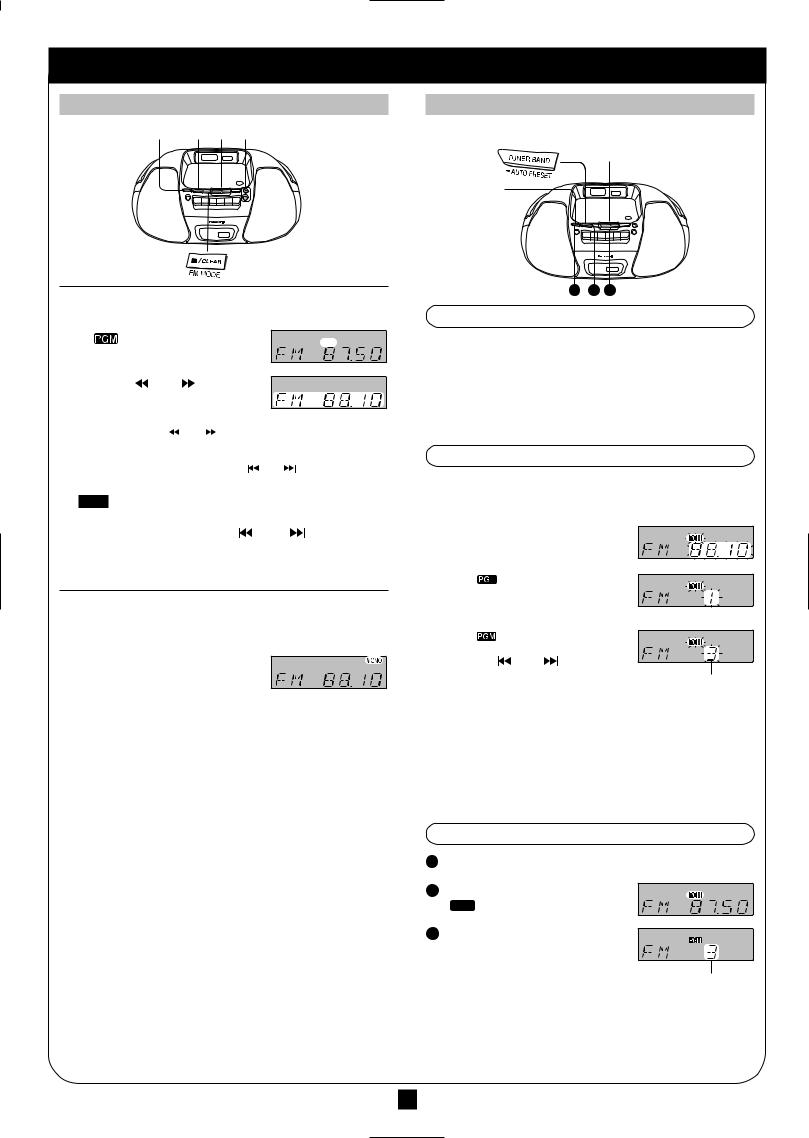
The radio
Normal tuning
2 1 3 4
1 |
Press [TUNER/BAND] to select “FM” or “AM”. |
||||||||||
|
(Unit comes on.) |
|
|
|
|
|
|||||
2 |
If “ |
” is on the display, press |
|||||||||
|
[TUNE MODE] to clear it. |
||||||||||
3 |
Press [– / |
|
] or [ |
|
|
/ +] to tune |
|||||
|
|
||||||||||
|
|
||||||||||
|
to the desired station. |
||||||||||
|
Automatic tuning |
|
|
|
|
|
|||||
|
Press and hold [– / |
|
|
] or [ |
|
/ +] then release when the frequency |
|||||
|
|
|
|||||||||
display starts to change. A station with good reception is automatically selected and the process stops.
To stop automatic tuning, press [– / |
] or [ / +] again. |
Note
Automatic tuning may stop on a frequency where there is no station if there is interference. Press [– / ] and [ / +] to tune if this occurs.
4 Adjust the volume.
To improve reception
FM: Extend the whip antenna and adjust its direction. AM: Adjust the position of the unit.
If noise is excessive in the FM stereo mode
Press [FM MODE]. (“MONO” lights up.)
Sound will be produced in monaural, but this also reduces noise. Press the button again to cancel. (“MONO”
goes out.)
For area except for United Kingdom and Continental Europe
AM allocation setting
Before receiving AM broadcasts, be sure to select the correct allocation setting (either 9 kHz or 10 kHz) for your area.
First press [TUNER/BAND] to select AM. Next, press and hold
[  / CLEAR]. The display changes in a few seconds to show the current lowest AM frequency. Continue to hold down the button.
When the minimum frequency changes, release the button. Changing the step erases all preset stations.
Repeat the above to change the step back.
Preset tuning
Preset the stations (20 FM and 12 AM) to make tuning simpler.
3
1 · 2 · 4
2 1 3
Automatic presetting
Do the following once each for FM and AM.
Preparations: Press [TUNER/BAND] to select “FM” or “AM”.
Press and hold [–AUTO PRESET] until “AUTO” is displayed.
The tuner presets stations it can receive into the channels.
Manual Presetting
Presets one station at a time. Preparations: Tune to the desired station.
(Perform steps 1-3 on the left.)
1 Press and hold [–PGM].
2 While “  ” and the frequency display are flashing
Press [–PGM].
While “ |
” and the preset channel are |
|
3 flashing |
|
|
Press [–/ |
] or [ |
/+] to select |
the desired channel. |
Preset channel |
|
|
|
|
4 Press [–PGM]. |
|
|
Repeat the above to preset other stations.
The station occupying a channel is erased if another station is preset in that channel.
To listen to preset channels
1 Press [TUNER/BAND] to select “FM” or “AM”.
2 Press [TUNE MODE] to display “
 ”.
”.
3 Press [– /  ] or [
 / +] to
select the desired channel. (FM:1-20, AM:1-12)
Preset channel
3
RQTT0622
 Loading...