


Operating Instructions |
|
|
|
Portable Stereo CD System |
|
CD |
|
Model No. RX-ES29 |
|
|
RX-ES23 |
Table of Contents |
|
Supplied Accessories........................................... |
2 |
Precautions .......................................................... |
2 |
Maintenance......................................................... |
3 |
CD Selection ........................................................ |
3 |
Location of Controls ............................................. |
4 |
Use of Batteries.................................................... |
6 |
Power Sources ..................................................... |
6 |
Memory Batteries ................................................. |
6 |
The Radio............................................................. |
7 |
CDs and MP3 ....................................................... |
8 |
Cassette Tape Play............................................. |
10 |
Cassette Tape Recording ................................... |
10 |
Setting the Clock ................................................ |
12 |
The Play and Record Timer ............................... |
12 |
The Sleep Timer................................................. |
13 |
Sound Quality..................................................... |
14 |
3-D Sound with the Sound Virtualizer ................ |
14 |
Troubleshooting .................................................. |
15 |
Specifications ..................................................... |
15 |
Before connecting, operating or adjusting this product, please read these instructions completely. Please keep this manual for future reference.
[GC] [GS] |
RQT7914-2G |

Dear Customer
Thank you for purchasing this product.
For optimum performance and safety, please read these instructions carefully.
Supplied Accessories
Please check and identify the supplied accessories. Use numbers indicated in parentheses when asking for replacement parts.
Remote control transmitter (N2QAHB000048)............... |
1 pc. |
AC power supply cord .................................................... |
1 pc. |
Note:
≥The included AC power supply cord is for use with this unit only.
Do not use it with other equipment.
For Saudi Arabia and Kuwait
For others
Precautions
≥Avoid using or placing this unit near sources of heat. Do not leave it in an automobile exposed to direct sunlight for long time with the doors and windows closed as this may deform the cabinet.
≥Avoid cuts, scratches, or poor connections in the AC power supply cord, as they may result in possible fire or electric shock hazard. Also, excessive bending, pulling or splicing of the cord should be avoided.
≥Do not unplug the AC power supply cord by pulling on the cord. To do so may cause premature failure or shock hazard.
≥Do not operate this unit on AC outlet in a bathroom, as a potential shock hazard may result.
≥When not in use, disconnect the AC power supply cord from the household AC outlet.
RQLS0218 |
Inside of product |
CAUTION!
THIS PRODUCT UTILIZES A LASER.
USE OF CONTROLS OR ADJUSTMENTS OR PERFORMANCE OF PROCEDURES OTHER THAN THOSE SPECIFIED HEREIN MAY RESULT IN HAZARDOUS RADIATION EXPOSURE.
DO NOT OPEN COVERS AND DO NOT REPAIR YOURSELF. REFER SERVICING TO QUALIFIED PERSONNEL.
WARNING:
TO REDUCE THE RISK OF FIRE, ELECTRIC SHOCK OR PRODUCT DAMAGE, DO NOT EXPOSE THIS APPARATUS TO RAIN, MOISTURE, DRIPPING OR SPLASHING AND THAT NO OBJECTS FILLED WITH LIQUIDS, SUCH AS VASES, SHALL BE PLACED ON THE APPARATUS.
This product may receive radio interference caused by mobile telephones during use. If such interference is apparent, please increase separation between the product and the mobile telephone.
THIS UNIT IS INTENDED FOR USE IN TROPICAL CLIMATES.
CAUTION:
Change the voltage setting to suit the AC voltage in your area. See page 6. Note that the unit will be seriously damaged or fail to operate correctly if this setting is not made correctly.
2
RQT7914
CAUTION!
≥DO NOT INSTALL OR PLACE THIS UNIT IN A BOOKCASE, BUILT-IN CABINET OR IN ANOTHER CONFINED SPACE. ENSURE THE UNIT IS WELL VENTILATED. TO PREVENT RISK OF ELECTRIC SHOCK OR FIRE HAZARD DUE TO OVERHEATING, ENSURE THAT CURTAINS AND ANY OTHER MATERIALS DO NOT OBSTRUCT THE VENTILATION VENTS.
≥DO NOT OBSTRUCT THE UNIT’S VENTILATION OPENINGS WITH NEWSPAPERS, TABLECLOTHS, CURTAINS, AND SIMILAR ITEMS.
≥DO NOT PLACE SOURCES OF NAKED FLAMES, SUCH AS LIGHTED CANDLES, ON THE UNIT.
≥DISPOSE OF BATTERIES IN AN ENVIRONMENTALLY FRIENDLY MANNER.
The socket outlet shall be installed near the equipment and easily accessible or the mains plug or an appliance coupler shall remain readily operable.
Note on AC power supply cord (For Saudi Arabia and Kuwait only)
Before use
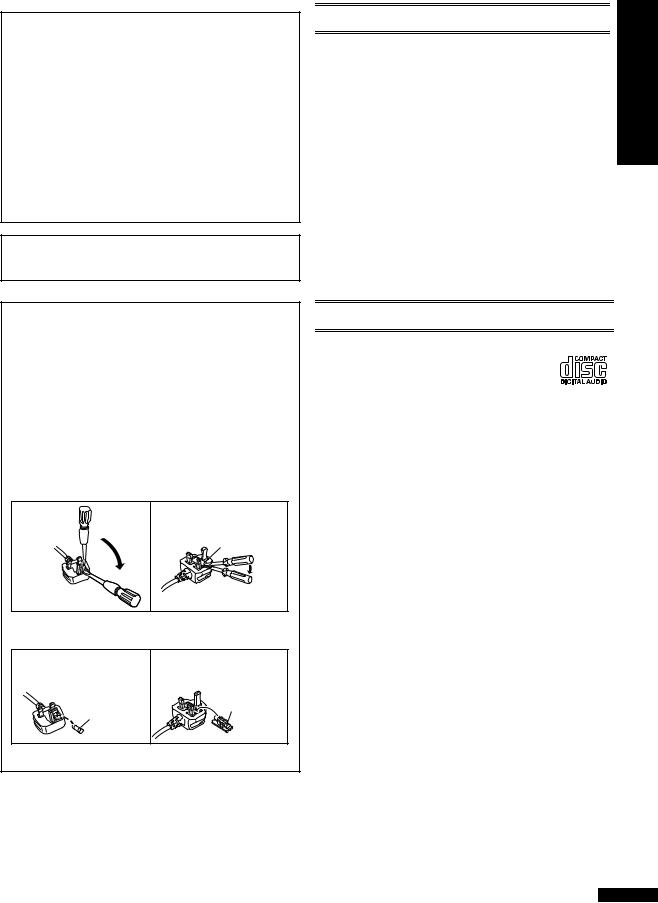
Remove the connector cover.
How to replace the fuse
The location of the fuse differ according to the type of AC mains plug (figures A and B). Confirm the AC mains plug fitted and follow the instructions below. Illustrations may differ from actual AC mains plug.
1. Open the fuse cover with a screwdriver.
Figure A |
Figure B |
Fuse cover
2. Replace the fuse and close or attach the fuse cover.
Figure A |
Figure B |
Fuse
Fuse
(5 ampere)
(5 ampere)
Maintenance
If the surfaces are dirty
To clean this unit, wipe with a soft, dry cloth.
≥Never use alcohol, paint thinner or benzine to clean this unit.
≥Before using chemically treated cloth, read the instructions that comes with the cloth carefully.
For a cleaner crisper sound
Clean the heads after every 10 hours of use to assure good quality playback and recording.
Use a cleaning tape (not included).
Cassette tape care
≥Tapes exceeding 100 minutes are thin and can break or get caught in the mechanism.
≥Tape slack can get caught up in the mechanism and should be taken up before the tape is played.
≥Endless tapes can get caught up in the deck’s moving parts if used incorrectly.
CD Selection
Choose CDs with this mark: (A).
This unit can play CD-DA (digital audio) A format audio CD-R and CD-RW that have
been finalized (a process that enables CD-R/CD-RW players to play audio CD-R
and CD-RW) upon completion of recording. It may not be able to play some CD-R or CD-RW due to the condition of the recording.
Do not
≥use CDs in irregular shape.
≥use CDs with labels and stickers that are coming off or with adhesive exuding from under labels and stickers.
≥attach scratch-proof covers or any other kind of accessory.
≥write anything on the CD.
≥clean CDs with liquids. (Wipe with a soft, dry cloth.)
≥use CDs printed with label printers available on the market.
ENGLISH
3
RQT7914

Location of Controls
Main Unit
1 Deck |
|
2 Deck eject button (< DECK) ................................. |
(l 10) |
•Press [< DECK] to open the deck.
(The unit comes on.)
Then, load a cassette and close the deck by hand.
3 Record/record pause button (¥/;) ................ |
(l 10, 11) |
4 Cassette play button (1TAPE).............................. |
(l 10) |
• Press [1TAPE] to start play. |
|
5 Band button (TUNER BAND) ................................... |
(l 7) |
• Press [TUNER BAND] to select “FM” or “AM”. |
|
6 CD play/pause button (CD 1/;)......................... |
(l 8, 9) |
•Press [CD 1/;] to start play.
Plays to the end of the CD and stops.
•Press [CD 1/;] to pause halfway during play.
Press again to resume play.
7 CD recording mode button (CD REC MODE) |
....... (l 11) |
|||||||
8 Play timer/record timer button ( |
|
PLAY/REC) (l |
13) |
|||||
|
||||||||
9 Clock/timer button (CLOCK/TIMER) ............... |
( l 12, |
13) |
||||||
: CD program/clear, tuner preset button |
|
|
||||||
( |
|
MEMORY |
|
CLEAR) |
(l 7, 9) |
|||
|
|
|||||||
|
|
|||||||
;Speaker Note:
•These speakers do not have magnetic shielding.
Do not place them near televisions, personal computers or other devices easily influenced by magnetism.
<Standby/on switch ( )
)
Press to switch the unit from on to standby mode or vice versa. In standby mode, the unit is still consuming a small amount of power.
= Sound equalizer button (SOUND EQ) |
................... (l |
14) |
> Tuning/CD search, Rewind/fast-forward, Album skip |
||
buttons (REW/–/6, 5/+/FF)..................... |
( l 7, 8, |
10) |
Remote Control
1Transmission window
Aim at the sensor, avoiding obstacles, at a maximum range of 7 meters directly in front of the unit.
2 |
Sleep timer button (SLEEP)................................... |
(l 13) |
3 |
Numeric buttons............................................... |
(l 7, 8, 9) |
4 |
CD/MP3 play mode/FM mode button |
|
|
(PLAY MODE).............................................. |
(l 7, 8, 9, 11) |
5 |
Auto scan button (AUTO SCAN).............................. |
(l 7) |
6 |
Display select button (DISPLAY)..................... |
(l 10, 12) |
|
• Press [DISPLAY] to display the clock on the Display |
|
|
panel B. |
|
7 |
Preset channel select/album skip buttons |
|
|
(C/: ALBUM, ALBUM9/D)....................... |
(l 7, 8) |
8 |
Tuning/CD skip, search/MP3 track skip/clock/timer |
|
|
adjust buttons (–/:, 9/+)................... |
(l 7, 8, 9, 12) |
9 |
MP3 intro play button (INTRO) ................................ |
(l 9) |
: Tape counter reset button (C.RESET) .................. |
(l 10) |
|
•Press [C.RESET] to reset the tape counter.
The counter resets to “000”.
;Tape rewind/fast-forward buttons
(6/REW, 5/FF ) ................................................ |
(l 10) |
< Sound virtualizer button (S.VIRTUALIZER).......... |
(l 14) |
4
When the unit is supplied with AC Power, the button such as 4 function in the same way as the controls on the main unit. To save power, the unit cannot be turned on from the remote control when batteries are used.
2 |
|
< |
8 |
: |
9 |
|
|
4 |
|
5 |
3 |
|
|
6 |
|
6 |
|
5 |
4 |
? |
|
A |
|
7 |
8 |
9 |
; |
|
|
< |
: |
|
|
= |
|
RQT7914
? Tape/CD mode select/stop button |
|
(∫ TAPE/CD) ............................................. |
(l 8, 9, 10, 11) |
• Press [∫ TAPE/CD] to stop play.
@Time adjust, Preset channel select/CD track select dial
(TIME/PRESET TUNE |
|
TRACK SKIP |
|
)........ |
(l 7, 8, 9, 11, 12) |
|
|
||||
A Volume control buttons (+, – VOLUME)........ |
(l 7, 8, 10) |
||||
•Press [+, – VOLUME] to adjust to the desired volume for CD, Tuner or Cassette.
B Display panel
e.g. CD
CCD tray open/close button (< CD) ................... (l 8, 11)
•Press [< CD] to open the tray.
(The unit comes on.)
Load a CD and press [< CD] to close the tray.
DStandby indicator (Í) (RX-ES29)
When the unit is connected to the AC mains supply, this indicator lights up in standby mode and goes out when the unit is turned on.
Standby/on indicator (Í/I) (RX-ES23)
The indicator lights green when the unit is turned on. When the AC power supply is used, it functions as an AC connection indicator. (The indicator colour changes to red when the unit is turned off.)
E CD tray
F Remote control signal sensor (SENSOR)
Use
≥Keep the transmission window and the unit’s sensor free from dust.
≥Operation can be affected by strong light sources, such as direct sunlight, and the glass doors of cabinets.
7 m
30° 30°
PHONES 
To Use Headphones (not included)
Reduce volume before connection.
Plug type: 3.5 mm stereo
Note:
≥Avoid listening for prolonged periods of time to prevent hearing damage.
5
RQT7914

Use of Batteries
≥If this unit is not used for a long period of time or is used only from an AC power source, remove all the batteries to prevent potential damage due to possible battery leakage.
≥Align the poles (+ and –) correctly when inserting the batteries.
≥Do not mix old and new batteries or different types of batteries.
≥Do not recharge ordinary dry cell batteries.
≥Do not heat or disassemble the batteries. Keep them away from flame or water.
≥Do not keep together with metallic objects such as necklaces.
≥Do not use rechargeable type batteries.
≥Do not use batteries if the covering has peeled off.
Mishandling of batteries can damage other items, cause damage to the unit, and may cause a fire through short-circuiting or electrolyte leakage.
If electrolyte leaks from the batteries, consult your dealer. Wash thoroughly with water if electrolyte comes in contact with any part of your body.
Power Sources
To operate the unit on AC power (1)
[1]Use a flat head screwdriver to turn [VOLT ADJ] to the voltage setting for your area.
[2]Connect the AC power supply cord. For areas except Saudi Arabia and Kuwait:
Use the plug adaptor (not included) if necessary (1).
2: Household AC outlet
3: AC power supply cord (included)
To use batteries (not included) (2)
Disconnect the AC power supply cord from unit to operate on battery power.
The remote control cannot turn the unit on when batteries are used.
To remove the batteries [A]
Open the battery cover, insert a finger into the hole at the bottom of the unit and push the batteries out.
Battery life
“  ” flashes on the display when the batteries are running down.
Then, the unit turns itself off and displays “U01”. Replace all the batteries with new ones.
Memory Batteries
Memory batteries retain memory (clock/timer/CD/radio settings) during power supply interruption.
These batteries do not power the unit.
§ Memory batteries are not included.
To replace the batteries (3)
≥The memory batteries last for about 1 year.
≥Connect the unit to AC power before replacing the batteries.
≥Extend the memory battery life by always pressing [ ] to turn the unit off before disconnecting the unit from the AC power source or replacing the power batteries.
To remove the batteries (4)
Lift the negative end of the number 4 battery to remove batteries.
(1)
3
AC IN


 2
2
VOLT ADJ |
VOLT ADJ |
VOLT ADJ |
110 – 127V |
110 – 127V |
110 – 127V |
1
OFF |
220– |
OFF |
220– |
OFF |
220– |
|
240V |
|
240V |
|
240V |
|
OFF |
110-127 V |
220-240 V |
||
(3) (R6/LR6, AA, UM-3) |
|
|||||
|
1 |
2 |
|
|
|
|
|
3 |
4 |
|
|
|
|
|
|
|
|
|
|
|
(2) |
(R20/LR20, D, UM-1) |
inner |
||||
|
1 |
2 |
|
4 |
3 |
row |
|
7 |
|
8 |
6 |
5 |
|
|
|
|
|
|
|
|
|
|
|
|
|
|
outer |
|
|
|
|
|
|
row |
[A] |
(4)
1 |
2 |
|
4 |
||
3 |
||
|
6
RQT7914
VOLUME
REW
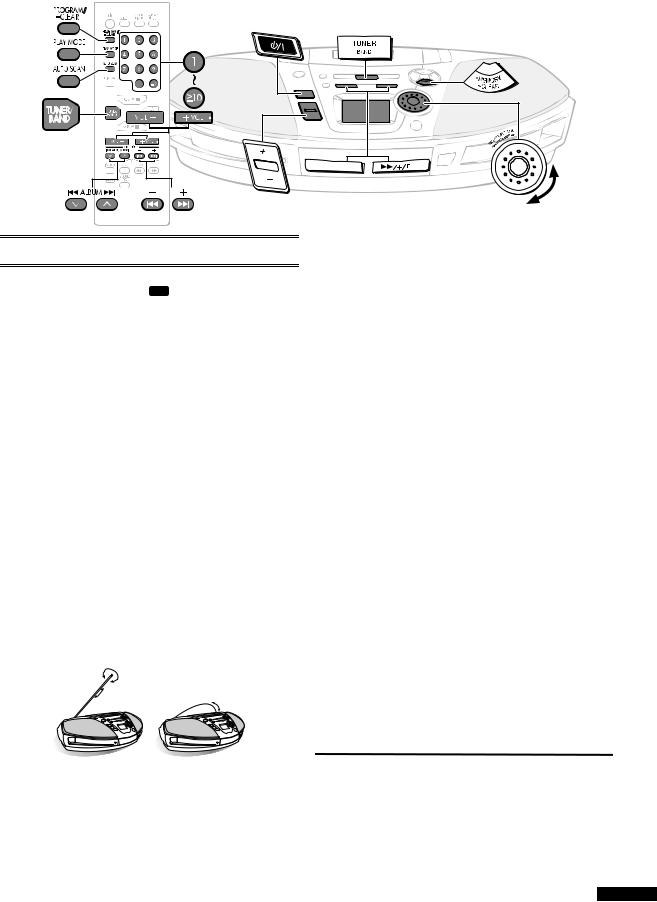
The Radio
Preparation:
≥When using batteries, press [ ].
].
≥Press [TUNER BAND] to select “FM” or “AM”.
Manual tuning
[1]Press [REW/–/6] or [5/+/FF] to select a station.
To tune automatically
Press and hold [REW/–/6] or [5/+/FF] until the frequency starts changing rapidly.
≥Auto tuning may be interrupted when there is excessive interference.
≥To cancel auto tuning, press [REW/–/6] or [5/+/FF] once again.
[2]Press [+, – VOLUME] to adjust volume.
To use auto scan
You can search for a station by listening to all tuned-in stations for 8 seconds each.
[1]Press [AUTO SCAN].
[2]Press [AUTO SCAN] when you find the desired station.
Auto scan ends when it reaches the original frequency again. To stop during the process, press [AUTO SCAN].
To improve FM sound quality
Press [PLAY MODE] to display “  ”.
”.
Monaural sound is selected and noise reduces when reception is weak.
Press [PLAY MODE] again to cancel the mode.
≥To improve reception
FM : Change the length and direction of the antenna. AM : Change the facing of the unit.
FM |
AM |
≥AM reception is briefly interrupted if [< DECK] is pressed.
≥To improve reception when using the unit in a building or vehicle, place it near a window.
AM allocation setting
Only from the main unit
Before receiving AM broadcasts, be sure to select the correct allocation setting (either 9 kHz or 10 kHz) for your area.
1 Press [TUNER BAND] to select FM.
2Press and hold [TUNER BAND] for approximately 5 seconds.
The frequency display will be returned to the minimum frequency of the AM band and the display will begin to flash. Keep holding for approximately 5 more seconds.
3When the display stops flashing and indicates a different frequency number, release [TUNER BAND].
To return to the original frequency, repeat steps 1 to 3 above.
Note:
≥After changing the “allocation” setting, the frequencies you previously preset into the memory will be cleared.
Preset tuning
Up to 16 stations can be set in the FM and AM band.
[1]Press [REW/–/6] or [5/+/ FF] to tune to the required station.
[2]Press [ MEMORY
 CLEAR].
[3]While “ ” is flashing
Turn [TIME/PRESET TUNE TRACK SKIP
 ] to select the channel and press [
 MEMORY
 CLEAR] or on remote control, press the numeric buttons to select channels.
≥For channels 1 to 9, press the corresponding number.
≥For channels 10 to 16, press [S10], then the two digits.
If “ ” goes off during presetting, return to step [1].
To select channels
Turn [TIME/PRESET TUNE TRACK SKIP
 ] to select the channel or on remote control, press the numeric buttons to select channels.
To use preset scan
You can search for a station by listening to all preset channels
[1] Press and hold [C : ALBUM] or [ALBUM 9
D] until “PS” appears/ on the display. /
[2] Press [C/: ALBUM] or [ALBUM 9/D] when you find the desired channel.
Preset scan ends after searching through each preset channel once. To stop during the process, press [C/: ALBUM] or
[ALBUM 9/D].
To skip the preset channel,
1 Select the desired station.
2 Press [ MEMORY
 CLEAR].
3 While “ ” is flashing
Turn [TIME/PRESET TUNE TRACK SKIP
 ] to display “– –”. 4 Press [
 MEMORY
 CLEAR].
To select the skipped channel,
Press the numeric buttons.
7
RQT7914

TAPE ⁄ CD |
CD |
REW
VOLUME
|
Advanced CD and MP3 Functions |
|
|
||
CDs and MP3 |
||
Preparation: |
||
|
Press [∫ TAPE/CD] to switch to CD mode. |
|
To play a disc [CD-DA] [MP3] |
||
|
[1]Press [< CD] to open the tray.
(The unit comes on.)
≥Label must face upward (l right).
≥Load a CD and press [< CD] to close the tray.
[2]Press [CD 1/;] to start play.
Plays to the end of the CD and stops.
When playing MP3, “MP3” is displayed.
A: Track number B: Elapsed play time
AB
e.g. MP3
[3] Press [+, – VOLUME] to adjust volume.
One touch play (when using AC power)
When a CD is loaded, press [CD 1/;].
To |
Operations |
stop play |
Press [∫ TAPE/CD]. |
pause play |
Press [CD 1/;] during play. |
skip tracks § |
Turn [TIME/PRESET TUNE |
|
TRACK SKIP ] clockwise |
|
(forward) or counter-clockwise |
|
(backward). On remote control, |
|
press [–/:] or [9/+]. |
search through tracks |
Press and hold [REW/–/6] or |
[CD-DA] |
[5/+/FF] during play. |
|
On remote control, press and hold |
|
[–/:] or [9/+] during play. |
skip album [MP3] § |
Press [REW/–/6] or [5/+/FF]. |
|
On remote control, press [C/: |
|
ALBUM] or [ALBUM 9 /D]. |
§For skip tracks and skip album,
Press [CD 1/;] to start play if in the stop mode.
Note:
≥Keep this unit away from radios and televisions if interference occurs.
[CD-DA] [MP3]
≥Starts play from a selected track.
≥Press the numeric buttons to select and play your desired track.
For 2-digits number: press [S10] once, then the 2 digits. For 3-digits number: press [S10] twice, then the 3 digits.
[CD-DA]
≥ Repeat : plays a track or all tracks repeatedly.
≥ Random : plays each track once in the random order.
Press [PLAY MODE] to select the desired mode.
,n |
: (1 trackrepeat) # : (All-track repeat) ] |
|
] === (No display) (=== |
, n |
|
≥Press [CD 1/;] to start play if in the stop mode.
≥Random can only be selected in the stop mode.
≥The play mode is also cancelled if the CD tray is opened.
To |
Operations |
|
|
repeat the desired |
Press [PLAY MODE] to select |
||
track |
“ |
”. |
|
|
|
||
|
|
||
repeat programmed |
1 Start program play. (l 9) |
||
tracks |
2 Press [PLAY MODE] to select |
||
|
“ |
”. |
|
|
|
||
cancel repeat play |
Press [PLAY MODE] until |
||
|
“ |
” and “ |
” are cleared. |
|
|
||
cancel random play |
Press [PLAY MODE] to clear |
||
|
“ |
”. |
|
|
If cancelled during play, play |
||
|
continues to the end of the CD. |
||
|
|
|
|
Notes: (For Random Play)
≥Random play cannot be used together with program play.
≥Search can only be done during the current playing tracks.
≥During play you cannot select tracks with the numeric buttons
and skip to tracks which have already been played.
8
RQT7914

Repeat play and Album play [MP3]
You can play ( ) or repeat play (
 ) tracks only in the selected album.
Press [PLAY MODE] before or during playback to select the desired mode.
, |
# # |
# |
] |
|
OFF (no indication) (====n |
||
≥ ( ): play all tracks in the selected album one time.
≥ (
 ): play all tracks in the selected album repeatedly.
≥You can select another album with album skip.
≥You cannot use random play with MP3.
MP3 Intro play
Intro functions allow you to start playing the 1st track of all albums for 10 seconds each in the stop mode.
Press [INTRO] to start intro play.
Intro function is cancelled after playing the 1st track of last album in the disc. To stop during the process, press [INTRO] or [∫ TAPE/CD].
This unit can play MP3, a method of compressing audio without affecting audio quality.
ª When creating MP3 files to play on this unit
Disc format: ISO9660 level 1 and level 2 (except for extended formats)
Title names and album names are not displayable on this unit.
ª Limitation on MP3
≥This unit is compatible with multi-session but if there are a lot of sessions it takes more time for play to start. Keep the number of sessions to a minimum to avoid this.
≥This unit cannot play files recorded using packet write.
≥If a CD-ROM format CD contains MP3 and files other than MP3, only the MP3 files will be playable.
≥Depending on how you create MP3 files, they may not play in the order you numbered them or may not play at all.
MPEG Layer-3 audio decoding technology licensed from Fraunhofer IIS and Thomson multimedia.
Program play [CD-DA] [MP3]
You can program up to 24 tracks.
On the main unit
Preparation:
Press [∫ TAPE/CD] to switch to CD stop mode.
[1]Turn [TIME/PRESET TUNE TRACK SKIP
 ] to select the track.
[2]Press [ MEMORY
 CLEAR].
C: Programmed track D: Play sequence
[3]Repeat step [1] and [2] to program other tracks.
[4]Press [CD 1/;] to start play.
On the remote control
Preparation:
Press [STOP ∫] to switch to CD stop mode.
CD
e.g. MP3
[1]Press [PROGRAM/ CLEAR].
“ ” appears on the display.
[2]Press the numeric button(s) to select the desired track.
For 2-digits number: press [S10] once, then the 2 digits. For 3-digits number: press [S10] twice, then the 3 digits. Repeat this step to program other tracks.
[3]Press [CD 1/;] to start play.
The program remains intact even if play is stopped or the unit is turned off. “Cd-P” for [CD-DA] or “P” for [MP3] appears when play is stopped to indicate the contents are in the memory.
To |
Operations |
|
cancel § |
Press and hold [ MEMORY |
|
|
CLEAR] in the CD stop mode |
|
|
until “CLEAR” is displayed. |
|
|
On remote control, press and |
|
|
hold [PROGRAM/ |
CLEAR]. |
|
|
|
check the program |
Turn [TIME/PRESET TUNE |
|
contents (while |
TRACK SKIP |
]. |
“Cd-P” for [CD-DA] or |
On remote control, press |
|
“P” for [MP3] is |
[–/:] or [9/+]. |
|
displayed) |
|
|
|
|
|
§ The mode is also cancelled if the CD tray is opened.
Notes:
≥ “FULL” is displayed
If 24 tracks have already been programmed.
≥You can still program and play tracks if the total elapsed play
time of the program exceeds 200 minutes. “– –:– –” is displayed [CD-DA].
9
RQT7914
 Loading...