


Dear customer
Thank you for purchasing this product.
For optimum performance and safety, please read these instructions carefully.
These operating instructions fundamentally explain the operation of RX-D25.
Supplied accessories
Please check and identify the supplied accessories.
Use numbers indicated in parentheses when asking for replacement parts.
AC mains lead .......................................................................... |
1pc. |
||
For United Kingdom: (RJA0053-2X) |
|
||
For Australia and New Zealand: (RJA0035-X) |
|
||
For others: (RJA0019-2K) |
|
||
Remote control transmitter |
RX-D25 only |
............................. |
1pc. |
(EUR648258) |
|
|
|
|
|
||
For the United Kingdom and Republic of Ireland |
|
||
shop@ 


www.panasonic.co.uk (for UK customers only)
•Order accessory and consumable items for your product with ease and confidence by telephoning our Customer Care Centre Mon–Friday 9:00 am– 5:30 pm.
(Excluding public holidays.)
•Or go on line through our Internet Accessory ordering application.
•Most major credit and debit cards accepted.
•All enquiries transactions and distribution facilities are provided directly by Panasonic UK Ltd.
•It couldn’t be simpler!
Customer Care Centre
For UK customers: 08705 357357
For Republic of Ireland customers: 01 289 8333
Technical Support
For UK customers: 0870 1 505610
This Technical Support Hot Line number is for Panasonic PC software related products only.
For Republic of Ireland, please use the Customer Care Centre number listed above for all enquiries.
For all other product related enquiries, please use the Customer Care Centre numbers listed above.
Portable Stereo
CD System
Operating Instructions
Model No. RX-D25
RX-D21
The illustrations show RX-D25.
Note:
“EB” on the packaging indicates the United Kingdom.
Before connecting, operating or adjusting this product, please read these instructions completely.
Please keep this manual for future reference.
E 
 EB
EB 
 GN
GN
|
|
|
Power sources |
|
|
|
|
|
|
||||||||||||||||||||||||||||||||||||
|
|
|
|
|
|
|
|
|
|
|
|
|
|
|
|
|
|
|
|
|
|
|
|
|
|
|
|
|
|
|
|
|
|
|
|
|
|
|
|
Memory back-up |
|||||
|
Using a household AC outlet |
|
Using batteries (not included) |
|
|||||||||||||||||||||||||||||||||||||||||
|
|
|
During power supply interruption, memory back- |
||||||||||||||||||||||||||||||||||||||||||
|
|
|
|
|
|
|
|
|
|
|
|
|
|
|
|
|
|
|
|
|
|
|
|
|
|
|
|
|
|
|
|
|
|
|
|
|
|
|
|
||||||
|
|
|
The unit cannot be powered by batteries if the |
up batteries (not included) save CD programs and |
|||||||||||||||||||||||||||||||||||||||||
|
FOR UNITED KINGDOM ONLY |
|
|||||||||||||||||||||||||||||||||||||||||||
|
|
radio stations you have set. |
|||||||||||||||||||||||||||||||||||||||||||
|
|
AC mains lead is connected. |
|||||||||||||||||||||||||||||||||||||||||||
|
READ THE CAUTION FOR THE AC MAINS |
|
These batteries do not power the unit. |
||||||||||||||||||||||||||||||||||||||||||
|
|
|
|
|
|
|
|
|
|
|
|
|
|
|
|
|
|
|
|
|
|
|
|
|
|
|
|
|
|
|
|
|
|
|
|
|
|
|
|||||||
|
LEAD ON PAGE 7 BEFORE CONNECTION. |
|
|
|
|
|
|
|
|
|
|
|
|
|
|
|
|
|
|
|
|
|
|
|
|
|
|
|
|
|
|
|
|
|
|
|
|
|
|
|
|
|
|
|
|
|
|
|
|
|
|
|
|
|
|
|
|
|
|
|
|
|
|
|
|
|
|
|
|
|
|
|
|
|
|
|
|
|
|
|
|
|
|
|
|
|
|
|
|
||
|
|
|
|
|
|
|
|
|
|
|
|
|
|
|
|
|
|
|
|
|
|
|
|
|
|
|
|
|
|
|
|
|
|
|
|
|
|
|
|
|
|
|
|
|
|
|
|
|
|
|
|
|
|
|
|
|
|
|
|
|
|
|
|
|
|
|
|
|
|
|
|
|
|
|
|
|
|
|
|
|
|
|
|
|
|
|
|
|
|
|
|
Connect the AC mains lead firmly to the unit and the outlet.
To household AC outlet |
Inner row |
(R20/LR20, D, UM-1) |
|
|
(R6/LR6, AA, UM-3) |
|
|
Outer row |
|
|
|
|
AC mains lead |
|
When to change the batteries |
When to change the batteries |
|||
(included) |
|
|||||
|
|
Sound quality and operations are affected when |
The batteries last about a year. |
|||
|
|
Connect the unit to AC power before replacing |
||||
|
|
the batteries are running low. Replace all six |
||||
|
|
the batteries. |
|
|||
|
|
batteries. It is also a good idea to replace all the |
|
|||
|
|
• Before connecting or disconnecting the AC |
||||
|
|
batteries before recording. |
||||
Note |
|
|
mains |
lead, stop the |
tape and switch |
|
|
Removing the batteries |
[ |
] to “TAPE/ |
” to turn the unit off. |
||
• The included AC mains lead is for use with |
||||||
The memory batteries are worn out faster if |
||||||
this unit only. Do not use it with other |
Open the battery cover |
|||||
the cord is disconnected with the power still |
||||||
and insert your finger in |
||||||
equipment. |
|
|||||
|
on. |
|
|
|||
|
the hole on the bottom |
|
|
|||
|
|
|
|
|||
• The function selector switch does not separate |
Removing the batteries |
|
||||
of the unit and push out. |
|
|||||
entire unit from mains even if in “TAPE/ |
” |
|
Press the negative end of the number 4 battery |
|||
position. |
|
|
and remove the batteries. (Remove the power |
|||
|
|
batteries first.) |
|
|||
|
|
|
|
|||
RQT6744-B

Controls
Main unit:
 RX-D25 only
 FM mode select/CD stop /program clear button (
 FM MODE/CLEAR)
Remote control RX-D25 only :
The functions of the buttons without descriptions are the same as on the main unit.
H.E.S. XBS
TUNER
CD
/


 /
/
/CLEAR |
–/ |
/+ |
Concerning the remote control
RX-D25 only
Battery installation
Insert the batteries (not included)
R6, AA, UM-3
observing the correct polarities (e,d).
1
2
Correct method of use
RX-D25 only |
Remote control |
|
|
|
signal sensor |
These speakers do not have magnetic shielding. Do not place them near televisions, personal computers or other devices easily influenced by magnetism.
RX-D25
RX-D21
2
Transmission About 7 meters in front window
of the signal sensor
Operation notes
•Do not place obstacles between the remote control signal sensor and the remote control unit.
•Do not expose the remote control signal sensor to direct sunlight or to the bright light of fluorescent light.
•Take care to keep the remote control signal sensor and end of the remote control unit free from dust.
To prevent damage
•Never place heavy items on it.
•Do not disassemble or reconstruct it.
•Do not spill water or other liquids into it.
RQT6744
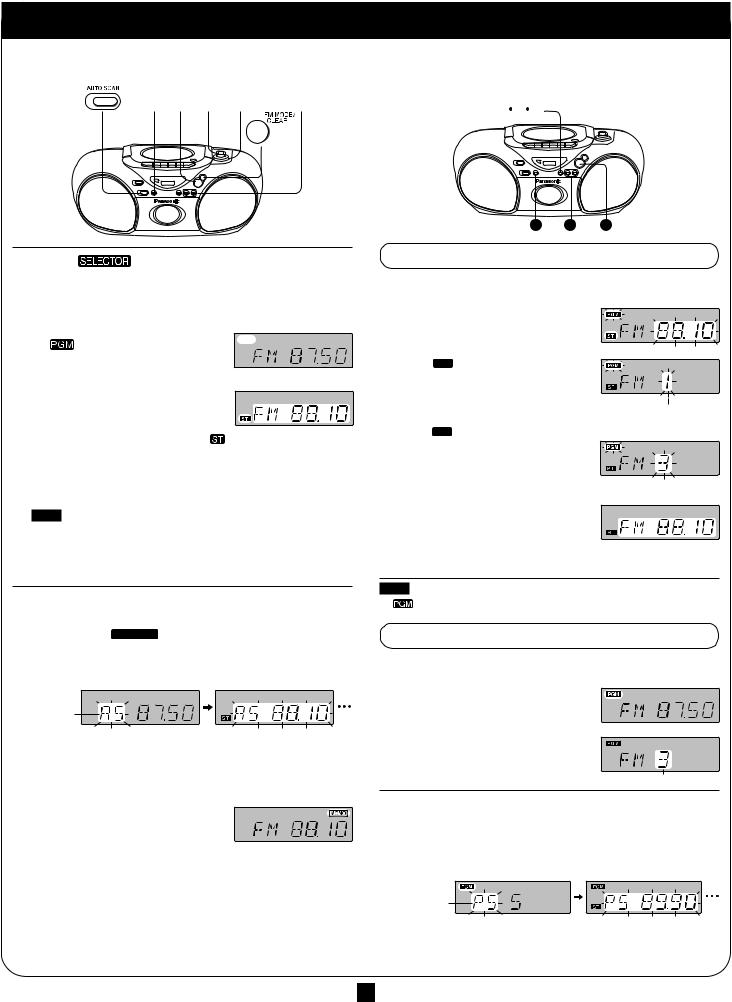
The Radio
Normal tuning |
|
|
|
Preset tuning |
||||||||
3 |
2 |
1 |
5 |
4 |
|
Preset the stations (twelve FM and twelve AM) to make tuning simpler. |
||||||
1 2 4 |
3 |
|
|
|||||||||
|
|
|
|
|
|
|
|
|
||||
|
|
|
|
|
|
|
|
|
|
|
|
|
|
|
|
|
|
|
|
|
|
|
|
|
|
|
|
|
|
|
|
|
|
|
|
|
|
|
|
|
|
|
|
|
|
|
|
|
|
|
|
2 3 1
1 |
Switch [ |
] to “TUNER”. |
|||
|
(Unit comes on.) |
|
|
|
|
2 |
Press [BAND] to select “FM” or “AM”. |
||||
3 |
(Omit this step if using the remote control) |
||||
|
If “ |
” is on the display, press |
|||
|
[TUNE MODE] to clear it off. |
|
|
||
4 |
Press [–/g] or [f/+] to |
|
|
||
|
tune to the desired station. |
|
|
||
|
The frequency changes one step |
|
|
||
|
each time a button is pressed. |
“ ” lights when an FM stereo |
|||
|
Automatic tuning |
|
broadcast is being received. |
||
|
|
|
|
||
Keep [–/g] or [f/+] depressed and release when the frequency display starts to change. A station with good reception is automatically selected and the process stops.
To stop automatic tuning, press [–/g] or [f/+] again.
Note
Automatic tuning may stop on a frequency where there is no station if there is interference. Press [–/g] and [f/+] to tune if this occurs.
5 Adjust the volume.
To use auto scan
You can search for a station by listening to all tuned-in stations for 8 seconds each.
Preparation: Switch [


 ] to “TUNER”.
1.Press [BAND] to select “FM” or “AM”.
2.Press [AUTO SCAN].
Auto scan starts.
Indicates auto scan
3. Press [AUTO SCAN] when you find the desired station.
Auto scan ends when it reaches the original frequency again.
To stop during the process, press [AUTO SCAN].
To improve reception
FM: Extend the whip antenna and adjust its direction.
AM: Adjust facing of the unit.
If noise is excessive in the FM stereo mode
Press [FM MODE]. (“ ” lights up.)
Sound will be produced in monaural, but this also reduces noise. Press the button again to cancel. (“ ” goes out.)
How to preset
Preparation: Tune to the desired station. (Do steps 1–4 on the left.)
1 Press [MEMORY].
2 While “
 ” and the frequency are flashing
Press [MEMORY].
Preset channel
3 While “
 ” and the preset channel are flashing
Press [–/g] or [f/+] to select the desired channel.
(Remote control: [4] or [3])
4 Press [MEMORY].
(This completes presetting.)
Repeat the above to preset other stations.
Note
If “ ” goes off during presetting, return to step 1.
To listen to preset channels
1 Press [BAND] to select “FM” or “AM”.
2 (Omit this step if using the remote control)
Press [TUNE MODE] to display “ ”.
”.
3 Press [–/g] or [f/+] to select
the desired channel (1–12).
(Remote control: [4] or [3])
Preset channel
To use preset scan
You can search for a station by listening to all preset channels for 8 seconds each.
1. Do steps 1 to 2 above.
For remote control, replace [– /g] or [f/+] described below with [4] or [3].
2. Press and hold [–/g] or [f/+] until “PS” appears on the display.
Indicates preset scan
3. Press [–/g] or [f/+] when you find the desired channel.
Preset scan ends after searching through each preset channel once. To stop during the process, press [–/g] or [f/+].
3
RQT6744
 Loading...