


Operating Instructions
Air Conditioner
Model No. |
|
Indoor Unit |
Outdoor Unit |
CS-CE9PKE |
CU-CE9PKE |
CS-CE12PKE |
CU-CE12PKE |
Operating Instructions |
2-9 |
|
Air Conditioner |
|
|
Thank you for purchasing this Panasonic Air conditioner. |
English |
|
Installation instructions attached. |
|
|
|
|
|
Before operating the unit, read these operating |
|
|
instructions thoroughly and keep them for future |
|
|
reference. |
|
|
Bruksanvisning |
10-17 |
|
Luftkonditionering |
|
Svenska |
Tack för att du har köpt Panasonic Värmepump. |
|
|
|
|
|
Installationsanvisningar bifogade. |
|
|
Innan du använder enheten, läs noga igenom denna |
|
|
bruksanvisning och spara den för framtida bruk. |
|
|
Bruksanvisninger |
18-25 |
|
Klimaanlegg |
|
|
Takk for at du har kjøpt et klimaanlegg fra Panasonic. |
Norsk |
|
Anvisninger om installasjon er lagt med. |
|
|
Les bruksanvisningen nøye før du bruker denne |
|
|
enheten, og oppbevar den for fremtidig bruk. |
|
|
Käyttöohjeet |
26-33 |
|
Ilmastointilaite |
|
|
Kiitos, että valitsit Panasonic ilmastointilaitteen. |
|
Suomi |
Asennusohjeet ovat liitteenä. |
|
|
|
|
|
Lue nämä käyttöohjeet huolellisesti ennen yksikön |
|
|
käyttämistä ja säilytä ne tulevaisuutta varten. |
|
|
Betjeningsvejledning |
34-41 |
|
Klimaanlæg |
|
|
Tak for dit valg af Panasonic Air Conditioner. |
|
Dansk |
Installationsvejledning vedlagt. |
|
|
|
|
|
Læs brugsanvisningen grundigt igennem før du benytter anlægget og gem den til fremtidig brug.
F569257
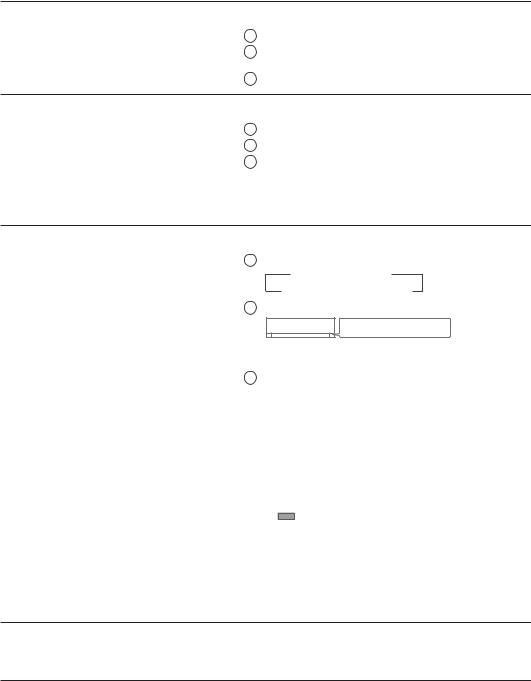
Quick guide
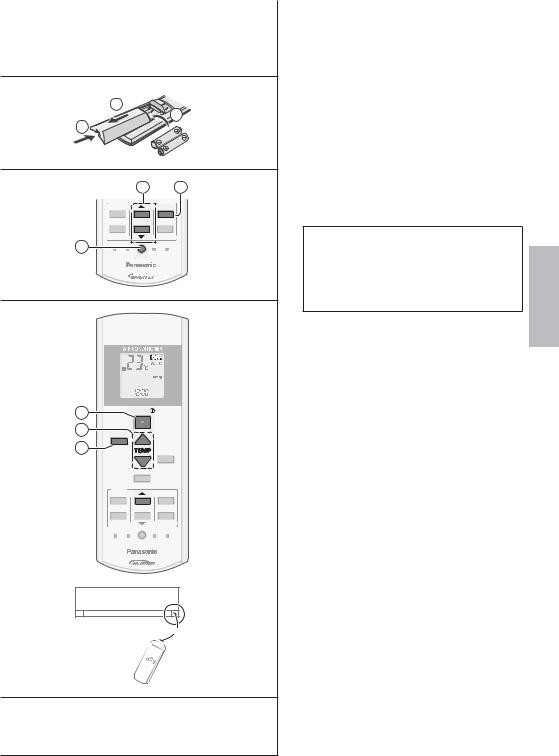
Inserting the batteries
1Pull out the back cover of remote control
2Insert AAA or R03 batteries (can be used ~ 1 year)
3Close the cover
Clock setting
1Press CLOCK
2Set the time
3Confirm
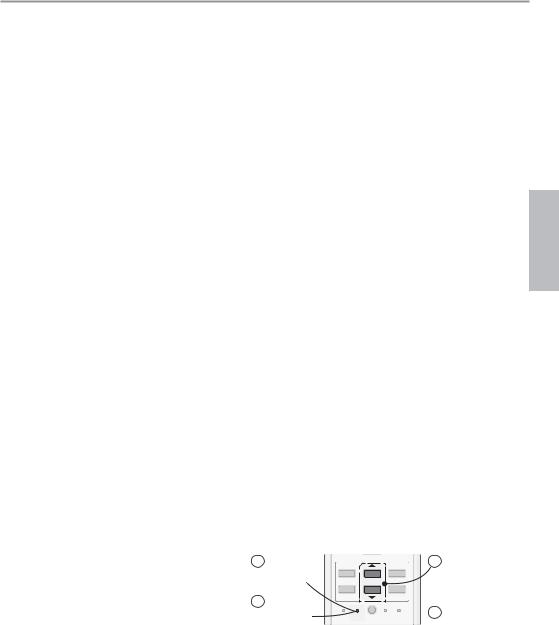
Basic operation
1 Select the desired mode
 HEAT
HEAT  COOL
COOL
AUTO FAN
FAN DRY
DRY 2 Start/stop the operation


 POWER/DEICE
•Please note that the OFF indication  is on to start.
3Select the desired temperature
•Selection range: 16 °C ~ 30 °C (Not applicable for FAN mode).
•Operating the unit within the recommended temperature may save energy.
HEAT : 20 °C ~ 24 °C. COOL: 26 °C ~ 28 °C.
DRY : 1 °C ~ 2 °C lower than room temperature.
•To dim or restore the unit’s indicator brightness, press  and hold for 5 seconds.
•Use remote control within 8 m from the remote control receiver of the indoor unit.
The illustrations in this manual are for explanation purposes only and may differ from the actual unit. They are subject to change without notice for future improvement.
2
1


 2
2
3 
|
2 |
3 |
TIMER |
|
|
ON |
|
SET |
1 |
2 |
3 |
OFF |
|
CANCEL |
1 |
|
AC RC |
SET CHECK CLOCK |
RESET |
|
AUTO |
FAN |
HEAT |
SPEED |
COOL |
AIR |
DRY |
SWING |
FAN |
|
|
|
2 |
|
3 |
|
1 |
AIR SWING |
FAN SPEED |
|
TIMER |
|
ON |
SET |
2 |
3 |
OFF |
CANCEL |
|
AC RC |
SET CHECK CLOCK |
RESET |
 8m
8m
Table of contents |
|
Safety precautions..................................... |
4-5 |
How to use................................................. |
6-7 |
Cleaning instructions .................................... |
8 |
Troubleshooting ........................................... |
9 |
Information.................................................. |
42 |
Accessories
•Remote control
•AAA or R03 batteries × 2
•Remote control holder
•Screws for remote control holder × 2
English
3
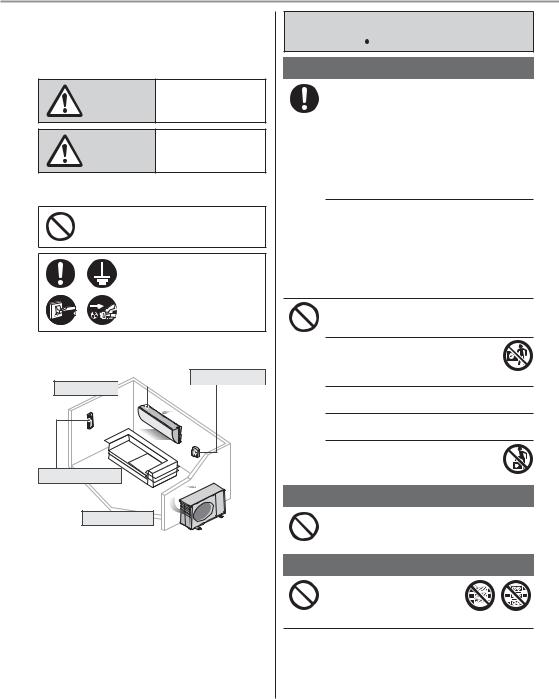
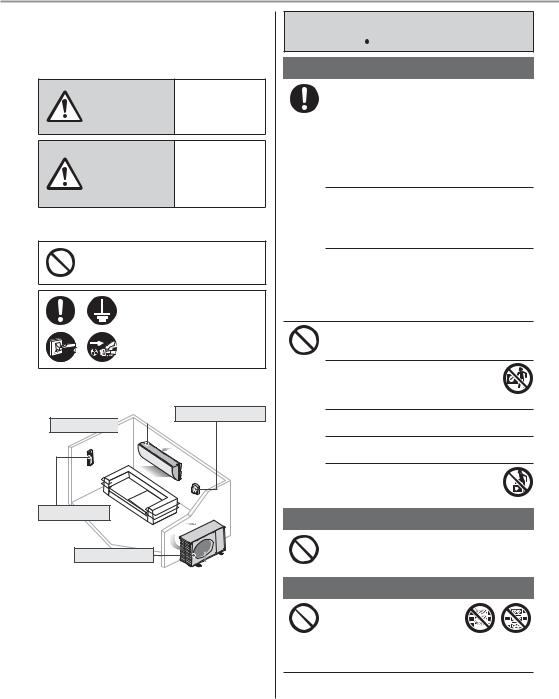
Safety precautions
To prevent personal injury, injury to others or property damage, please comply with the following: Incorrect operation due to failure to follow instructions below may cause harm or damage, the seriousness of which is classified as below:
This sign warns of WARNING death or serious
injury.
This sign warns of CAUTION injury or damage to
property.
The instructions to be followed are classified by the following symbols:
This symbol denotes an action that is PROHIBITED.
These symbols denote actions COMPULSORY.
Power supply Indoor unit 

Air inlet
 Air outlet
Remote control
Air inlet
Outdoor unit 

 Air outlet
 WARNING
Indoor unit and outdoor unit
This appliance can be used by children aged from 8 years and above and persons with reduced physical, sensory or mental capabilities or lack of experience and knowledge if they have been given supervision or instruction concerning use of the appliance in a safe way and understand the hazards involved. Children shall not play with the appliance. Cleaning and user maintenance shall not be made by children without supervision.
Please consult authorised dealer or specialist to clean the internal parts, repair, install, remove and reinstall the unit. Improper installation and handling will cause leakage, electric shock or fire.
Confirm with authorised dealer or specialist on usage of any specified refrigerant type.
Using refrigerant type other than the specified may cause product damage, burst and injury etc.
Do not install the unit in a potentially explosive or flammable atmosphere. Failure to do so could result in fire.
Do not insert your fingers or other objects into the air conditioner indoor or outdoor unit, rotating parts may cause injury.
Do not touch the outdoor unit during lightning, it may cause electric shock.
Do not expose yourself directly to cold air for a long period to avoid excess cooling.
Do not sit or step on the unit, you may fall down accidentally.
Remote control
Do not allow infants and small children to play with the remote control to prevent them from accidentally swallowing the batteries.
Power supply
Do not use a modified cord, joint cord, extension cord or unspecified cord to prevent overheating and fire.
4
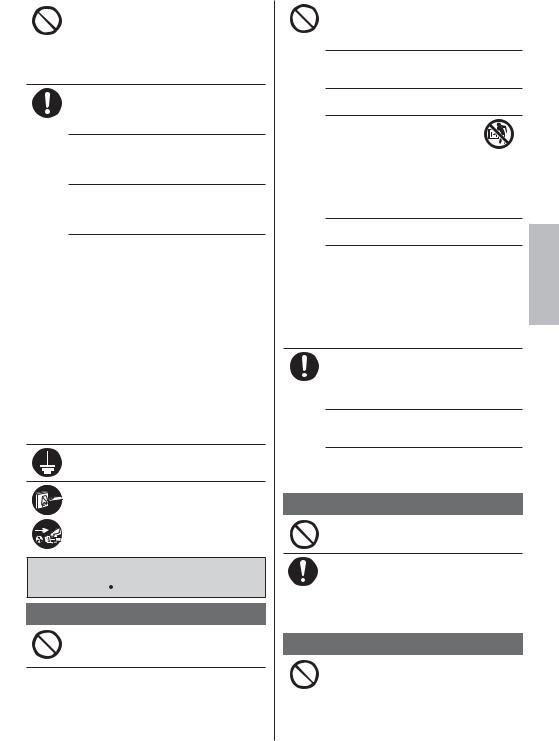
To prevent overheating, fire or electric shock:
•Do not share the same power outlet with other equipment.
•Do not operate with wet hands.
•Do not over bend the power supply cord.
•Do not operate or stop the unit by inserting or pulling out the power plug.
If the supply cord is damaged, it must be replaced by the manufacturer, service agent or similarly qualified persons in order to avoid a hazard.
It is strongly recommended to be installed with Earth Leakage Circuit Breaker (ELCB) or Residual Current Device (RCD) to prevent electric shock or fire.
To prevent overheating, fire or electric shock:
•Insert the power plug properly.
•Dust on the power plug should be periodically wiped with a dry cloth.
Stop using the product if any abnormality/ failure occurs and disconnect the power plug or turn off the power switch and breaker.
(Risk of smoke/fire/electric shock) Examples of abnormality/failure
•The ELCB trips frequently.
•Burning smell is observed.
•Abnormal noise or vibration of the unit is observed.
•Water leaks from the indoor unit.
•Power cord or plug becomes abnormally hot.
•Fan speed cannot be controlled.
•The unit stops running immediately even if it is switched on for operation.
•The fan does not stop even if the operation is stopped.
Contact your local dealer immediately for maintenance/repair.
This equipment must be earthed to prevent electrical shock or fire.
Prevent electric shock by switching off the
 power supply and unplug:
- Before cleaning or servicing,
- When extended non-use, or
- During abnormally strong lightning activity.
 CAUTION
Indoor unit and outdoor unit
Do not wash the indoor unit with water, benzine, thinner or scouring powder to avoid damage or corrosion at the unit.
Do not use for preservation of precise equipment, food, animals, plants, artwork or other objects. This may cause quality deterioration, etc.
Do not use any combustible equipment in front of the airflow outlet to avoid fire propagation.
Do not expose plants or pet directly to airflow to avoid injury, etc.
Do not touch the sharp aluminium |
precautions |
|
fin, sharp parts may cause injury. |
||
|
||
|
|
|
Do not switch ON the indoor unit when waxing |
|
|
the floor. After waxing, aerate the room |
|
|
properly before operating the unit. |
Safety |
|
to prevent damage to the unit. |
||
Do not install the unit in oily and smoky areas |
|
Do not dismantle the unit for cleaning purpose to avoid injury.
Do not step onto an unstable bench when |
English |
|
cleaning the unit to avoid injury. |
||
|
||
Do not place a vase or water container on the |
|
|
unit. Water may enter the unit and degrade |
|
|
the insulation. This may cause an electric |
|
|
shock. |
|
|
Do not open window or door for long time |
|
|
during COOL/DRY mode operation. |
|
Prevent water leakage by ensuring drainage pipe is:
-Connected properly,
-Kept clear of gutters and containers, or
-Not immersed in water
After a long period of use or use with any combustible equipment, aerate the room regularly.
After a long period of use, make sure the installation rack does not deteriorate to prevent the unit from falling down.
Remote control
Do not use rechargeable (Ni-Cd) batteries. It may damage the remote control.
To prevent malfunction or damage of the remote control:
•Remove the batteries if the unit is not going to be used for a long period of time.
•New batteries of the same type must be inserted following the polarity stated.
Power supply
Do not disconnect the plug by pulling the cord to prevent electric shock.
5

How to use
MODE
To select operation mode
HEAT - To enjoy warm air
• Unit takes a while to warm up. The POWER indicator blinks during this operation.
• Unit may stops warm air supply for deice. The
deice indicator ON during this operation. |
|
COOL - To enjoy cool air |
|
• To reduce power consumption during COOL |
Remote control |
mode, use curtains to screen off sunlight and |
|
outdoor heat. |
display |
DRY - To dehumidify the environment
•Unit operates at low fan speed to give a gentle cooling operation.
FAN - To circulate air in the room
AUTO - For your convenience |
|
|
• During operation mode selection the POWER |
|
|
indicator blinks. |
|
|
• Unit selects operation mode every 10 minutes |
|
|
according to setting temperature and room |
OFF/ON |
|
temperature. |
|
|
|
|
|
|
TEMP |
|
TIMER |
|
|
ON |
|
SET |
1 |
2 |
3 |
OFF |
|
CANCEL |
CHECK CLOCK |
|
|
Remote control receiver and indicator
 POWER/DEICE (Green/Blue)
 TIMER (Orange)
Press and hold for approximately
10 seconds to show temperature setting in °C or °F.
Press to restore the remote control to default setting.
Not used in normal operations.
To adjust horizontal airflow direction |
Auto OFF/ON |
button |
|
|
|
• Manually adjustable. |
|
Use when remote control is |
|
|
|
|||
|
|
|
misplaced or a malfunction |
|
|
|
|
||
|
|
|
occurs. Raise the front panel: |
|
|
|
|
• To use in AUTO mode, press |
|
|
|
|
the button once. |
|
|
|
|
• To use in COOL mode, press |
|
|
|
|
and hold the button until 1 beep |
|
|
|
|
is heard, then release. |
|
|
|
|
• To use in HEAT mode, press |
|
|
|
|
and hold the button until 1 beep |
|
|
|
|
is heard, then release. And |
|
|
|
|
press again until 2 beeps, then |
|
|
|
|
release. |
|
|
|
|
• Press the button again to turn |
|
|
|
|
||
|
|
|
off. |
|
6

AIR SWING To adjust vertical airflow
direction
(Remote control display)
•Keeps the room ventilated.
•In COOL/DRY mode, if AUTO is set, the louver swings up/down automatically.
•In HEAT mode, if AUTO is set, the horizontal louver is fixed at the predetermined position.
FAN SPEED
To select fan speed
(Remote control display)
•For AUTO, the indoor fan speed is automatically adjusted according to the operation mode.
•In HEAT mode, if manual fan speed caused discomfort, set the fan speed to AUTO or lower the fan speed.
To set the timer
2 sets of ON and OFF timers are available to turn ON or OFF the unit at different preset times.
|
1 |
2 |
3 |
|
|
TIMER |
|
|
|
|
ON |
|
SET |
|
|
1 |
2 |
3 |
|
|
OFF |
|
CANCEL |
|
1 |
Select ON or OFF |
Example: |
||
|
timer |
|
|
OFF at 22:00 |
|
• Each time pressed: |
OFF |
||
|
|
|
|
|
|
|
|
Cancel |
|
2 |
Set the time |
|
||
|
|
|
|
2 |
3 |
Confirm |
|
SET |
|


 TIMER
TIMER
• To cancel ON or OFF timer, press ON or OFF
to select respective 
 or
or 
 then press
  .
.
CANCEL
•If timer is cancelled manually or due to power failure, you can restore the timer again by
pressing ON or OFF to select respective 
 or
or 
 then press SET .
•The nearest timer setting will be displayed and will activate in sequence.
•When ON Timer is set, the unit may start earlier (up to 35 minutes) before the actual set time in order to achieve the desired temperature on time.
•Timer operation is based on the clock set in the remote control and repeats daily once set. For clock setting, please refer to Quick guide.
English How to use
Operation conditions
Use this air conditioner under the following temperature range.
Temperature (°C) |
|
Indoor |
Outdoor |
|
|
|||
DBT |
|
WBT |
DBT |
WBT |
DBT |
: Dry bulb temperature |
||
|
|
|
||||||
COOL |
Max. |
32 |
|
23 |
43 |
26 |
WBT |
: Wet bulb temperature |
Min. |
16 |
|
11 |
16 |
11 |
|
|
|
|
|
|
|
|||||
HEAT |
Max. |
30 |
|
- |
24 |
18 |
|
|
Min. |
16 |
|
- |
-15 |
-16 |
|
|
|
|
|
|
|
|||||
7

Cleaning instructions
To ensure optimal performance of the unit, cleaning has to be carried out at regular intervals. Dirty unit may cause malfunction and you may see error code “H99”. Please consult authorised dealer.
•Switch off the power supply and unplug before cleaning.
•Do not touch the aluminium fin, sharp parts may cause injury.
•Do not use benzine, thinner or scouring powder.
•Use only soap ( pH 7) or neutral household detergent.
•Do not use water hotter than 40 °C.
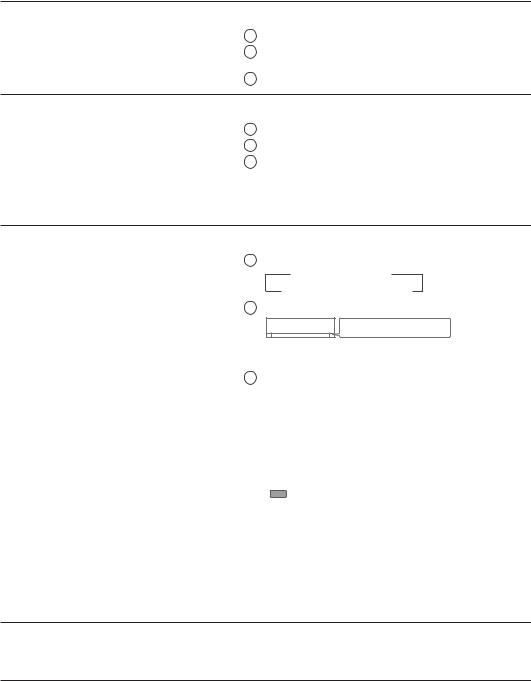
Indoor unit
Wipe the unit gently with a soft, dry cloth.
Front panel
Wash gently and dry.
Remove the front panel
2 Pull out
1 Raise
Close it securely
3Press both ends of the front panel
1Insert at both sides
2 Close down
Indoor unit |
|
Front panel |
Aluminium fin |
Air filters
Air filters
Every 2 weeks
• Wash/rinse the filters gently with water to avoid damage to the filter surface.
•Dry the filters thoroughly under shade, away from fire or direct sunlight.
•Replace any damaged filters.
Remove air filter |
|
Attach air filter |
||
|
|
|
|
|
|
|
|
|
|
Insert into the unit
For seasonal inspection after extended non-use
•Checking of remote control batteries.
•No obstruction at air inlet and air outlet vents.
•Use Auto OFF/ON button to select COOL/ HEAT operation. After 15 minutes of operation, it is normal to have the following temperature difference between air inlet and air outlet vents:
COOL: ≥8 °C 
 HEAT: ≥14 °C
For extended non-use
•Activate HEAT mode for 2~3 hours to remove moisture left in the internal parts thoroughly to prevent mould growth.
•Turn off the power supply and unplug.
•Remove the remote control batteries.
8
Troubleshooting
The following symptoms do not indicate malfunction.
|
Symptom |
Cause |
|
Mist emerges from indoor unit. |
• Condensation effect due to cooling process. |
Water flowing sound during operation. |
• Refrigerant flow inside the unit. |
|
The room has a peculiar odour. |
• This may be due to damp smell emitted by the wall, |
|
|
|
carpet, furniture or clothing. |
|
Indoor fan stops occasionally during automatic |
• This helps to remove the surrounding odour. |
fan speed setting. |
|
|
Airflow continues even after operation has |
• Extraction of remaining heat from the indoor unit |
|
stopped. |
(maximum 30 seconds). |
|
Operation is delayed a few minutes after |
• The delay is a protection to the unit’s compressor. |
|
restarting. |
|
|
Outdoor unit emits water/steam. |
• Condensation or evaporation occurs on pipes. |
|
TIMER indicator is always on. |
• The timer setting repeats daily once set. |
|
During deice operation, louver is closed. |
• The AIR SWING is set to AUTO. |
|
Indoor fan stops occasionally during heating |
• To avoid unintended cooling effect. |
|
operation. |
|
|
POWER indicator blinks before the unit is |
• This is a preliminary step in preparation for the |
|
switched on. |
operation when the ON timer has been set. |
|
Cracking sound during operation. |
• Changes of temperature caused the expansion/ |
|
|
|
contraction of the unit. |
Check the following before calling for servicing. |
||
|
Symptom |
Check |
|
Operation in HEAT/COOL mode is not working |
• Set the temperature correctly. |
efficiently. |
• Close all doors and windows. |
|
|
|
• Clean or replace the filters. |
|
|
• Clear any obstruction at the air inlet and air outlet vents. |
|
Noisy during operation. |
• Check if the unit has been installed at an incline. |
|
|
• Close the front panel properly. |
|
Remote control does not work. |
• Insert the batteries correctly. |
(Display is dim or transmission signal is weak.) |
• Replace weak batteries. |
|
The unit does not work. |
• Check if the circuit breaker is tripped. |
|
|
|
• Check if timers have been set. |
|
The unit does not receive the signal from the |
• Make sure the receiver is not obstructed. |
remote control. |
• Certain fluorescent lights may interfere with signal |
|
|
|
transmitter. Please consult authorised dealer. |
English Cleaning instructions / Troubleshooting
NON SERVICEABLE CRITERIAS
TURN OFF POWER SUPPLY AND UNPLUG then please consult authorised dealer under the following conditions:
•Abnormal noise during operation.
•Water/foreign particles have entered the remote control.
•Water leaks from Indoor unit.
•Circuit breaker switches off frequently.
•Power cord becomes unnaturally warm.
•Switches or buttons are not functioning properly.
The unit stops and the TIMER indicator blinks.
Use remote control to retrieve error code.
1 Press for |
ON |
|
SET |
|
|
TIMER |
|
|
|
5 seconds |
1 |
2 |
3 |
|
|
||||
3 Press for |
OFF |
|
CANCEL |
|
|
|
AC RC |
||
5 seconds |
SET CHECK CLOCK |
RESET |
||
to quit |
||||
|
|
|
||
checking |
|
|
|
|
2Press until you hear beep sound, then write down the error code
4Turn the unit off and reveal the error code to authorised dealer
•For certain errors, you may restart the unit for limited operation with 4 beeps when operation starts.
9
Snabbguide
Sätta i batterier
1Dra loss bakstycket på fjärrkontrollen
2Sätt i batterier av typen AAA eller R03 (kan användas ~ 1 år)
3Stäng locket
Klockinställning
1Tryck ner CLOCK
2Ställa in tiden
3Bekräfta
Grundläggande användning
1 Välj önskat läge
 HEAT
HEAT  COOL
COOL
AUTO FAN
FAN DRY
DRY 2 Starta/stoppa


 POWER/DEICE
•Notera att OFF-indikeringen  är på till att börja med.
3Välj önskad temperatur
•Valområde: 16 °C ~ 30 °C (Ej tillgängligt i läget FAN).
•Du kan spara energi om enheten används inom den rekommenderade temperaturen. HEAT : 20 °C ~ 24 °C.
COOL : 26 °C ~ 28 °C.
DRY : 1 °C ~ 2 °C lägre än rumstemperatur.
•Håll  intryckt under 5 sekunder för att dämpa eller återställa ljusstyrkan på indikeringen.
•Fjärrkontrollen måste befinna sig inom 8 m från inomhusdelens mottagare.
Bilderna i denna skötselanvisning är endast illustrativa och kan därför skilja sig från den faktiska modellen. Förändringar kan göras utan föregående meddelande angående framtida förbättringar.
10
1


 2
2
3 
|
2 |
3 |
TIMER |
|
|
ON |
|
SET |
1 |
2 |
3 |
OFF |
|
CANCEL |
1 |
|
AC RC |
SET CHECK CLOCK |
RESET |
|
AUTO |
FAN |
HEAT |
SPEED |
COOL |
AIR |
DRY |
SWING |
FAN |
|
|
|
2 |
|
3 |
|
1 |
AIR SWING |
FAN SPEED |
|
TIMER |
|
ON |
SET |
2 |
3 |
OFF |
CANCEL |
|
AC RC |
SET CHECK CLOCK |
RESET |
 8m
8m
Innehållsförteckning |
|
Säkerhetsföreskrifter ............................. |
12-13 |
Hur den används ................................... |
14-15 |
Rengöringsinstruktioner.............................. |
16 |
Problemlösning .......................................... |
17 |
Information.................................................. |
42 |
Tillbehör
•Fjärrkontroll
•AAA eller R03 batterier × 2
•Hållare för fjärrkontroll
•Skruvar för fjärrkontrollens hållare × 2
Svenska
11
Säkerhetsföreskrifter
För att förhindra personskada, skada på andra eller skada på egendom bör följande utföras: Felaktig användning orsakad av att skötselanvisningen inte följts kan leda till skador, nedan klassas deras allvar:
Denna symbol
VARNING varnar för dödsfara eller
allvarliga skador.
Denna symbol varnar för
FÖRSIKTIGHET personskada eller skada på egendom.
Instruktioner klassificeras med följande symboler:
Denna symbol betecknar en handling som är FÖRBJUDEN.
Dessa symboler betecknar handlingar som är NÖDVÄNDIGA.
Strömförsörjning
Inomhusdel 
Luftintag
Utblåsning |
|
Fjärrkontroll |
|
Luftintag |
|
Utomhusdelen |
Utblåsning |
|
 VARNING
Inomhusoch utomhusenhet
Den här apparaten kan användas av barn från åtta år och uppåt och personer med fysiska eller mentala hinder eller med brist på erfarenhet och kunskap, förutsatt att de har fått övervakning eller instruktioner angående användning
av apparaten på ett säkert sätt och förstår riskerna som medföljer. Barn bör inte leka med apparaten. Rengörning och användarunderhåll ska inte utföras av barn utan övervakning.
Kontakta en auktoriserad återförsäljare eller specialist för att rengöra de interna delarna, reparera, installera, avlägsna eller återinstallera enheten. Felaktig installation kan leda till läckage, elektriska stötar eller eldsvåda.
Kontrollera med en auktoriserad återförsäljare eller specialist för användning av ett godkänt köldmedia.
Att använda ett köldmedia annat än det som är specificerat kan ge upphov till skada på produkten, bristning och skada, etc.
Installera inte enheten i en potentiellt explosiv eller lättantändlig miljö. Underlåtenhet i detta kan resultera i skada till följd av eldsvåda.
För inte in dina fingrar eller andra föremål i luftkonditionerarens inomhuseller utomhusenhet, eftersom roterande delar kan orsaka personskada.
Rör inte utomhusenheten under blixtoväder, då det kan orsaka elstöt.
Utsätt dig inte för direkt kalluft under en längre tid för att undvika för kraftig nedkylning.
Sitt inte och ställ dig inte på enheten, eftersom du då kan trilla och skada dig.
Fjärrkontroll
Låt inte små barn leka med fjärrkontrollen för att förhindra att de av olyckshändelse råkar svälja batterierna.
Strömförsörjning
Använd inte modifierad sladd, förgreningssladd, förlängningssladd eller ospecificerad sladd för att undvika överhettning och eldsvåda.
12

För att förhindra överhettning, eldsvåda eller elchock:
•Dela inte det använda uttaget med annan utrustning.
•Manövrera inte enheten med våta händer.
•Böj inte elsladden för mycket.
•Manövrera inte enheten genom att dra ut eller sätta i elkontakten.
Om nätsladden blir skadad, måste den, för att farliga situationer ska undvikas, bytas ut av tillverkaren, servicepersonal eller en person med motsvarande kompetens.
Denna utrustning rekommenderas starkt att installeras med Jordfelsbrytare (ELCB, Earth
Leakage Circuit Breaker) eller Skyddsenhet för Restström (RCD, Residual Current Device) för att undvika elstöt eller eldsvåda.
För att förhindra överhettning, eldsvåda eller elchock:
•Sätt i elkontakten på rätt sätt.
•Damm på elkontakten skall torkas av med jämna mellanrum med en torr trasa.
Sluta använda produkten om något onormalt/ fel uppträder och koppla ur strömkontakten eller stäng av med strömväxlaren och brytaren.
(Risk för rök/eld/elstöt) Exempel på vad som
är onormalt/fel
•Jordfelsbrytaren (ELCB:n) löser ofta ut.
•Det luktar bränt.
•Onormala störljud eller vibrationer hos enheten.
•Vatten läcker från inomhusenheten.
•Strömsladden eller -kontakten blir onormalt het.
•Fläkthastigheten kan inte kontrolleras.
•Enheten stoppar direkt även om den satts på för drift.
•Fläkten stoppar inte även om driften
stoppas.
Kontakta omedelbart din lokala återförsäljare för underhåll/reparation.
Denna utrustning måste jordas för att undvika elstöt eller eldsvåda.
Förhindra elskador genom att stänga av
 strömmen och koppla ur:
- Innan rengöring eller underhållsarbete,
- Vid långvarig avstängning, eller
- Vid kraftigt åskväder.
 FÖRSIKTIGHET
Inomhusoch utomhusenhet
Tvätta inte inomhusdelen med vatten, bensin, thinner eller skurpulver för att undvika skada eller korrosion på enheten.
Använd inte för förvaring av finkänslig utrustning, mat, djur, växter, konstverk eller andra föremål. Detta kan orsaka kvalitetsförsämring, etc.
Använd inte antändbar utrustning framför luftflödesutgången för att undvika spridning av eldsvåda.
Utsätt inte växter eller husdjur för direkt luftflöde för att undvika skador på dem, etc.
Rör inte den vassa aluminiumflänsen, eftersom vassa delar kan orsaka personskada.
Sätt inte på inomhusenheten till ON då du vaxar golvet. Efter vaxning, vädra rummet ordentligt innan du använder enheten.
Installera inte enheten på oljiga eller rökiga platser för att förhindra skador på enheten.
|
elchock. |
Säkerhetsföreskrifter |
|
|
Montera inte isär enheten för rengöring för att |
|
|
|
undvika personskador. |
|
|
|
Stå inte på en ostadig bänk när du rengör för |
|
|
|
att undvika personskador. |
|
|
|
Ställ inte vaser eller behållare med vatten på |
|
|
|
enheten. Vatten kan tränga in i enheten och |
|
|
|
försämra isoleringen. Detta kan orsaka |
|
|
|
|
|
|
|
Ha inte dörr eller fönster öppna för länge |
|
|
|
|||
|
under drift i läget COOL/DRY. |
|
|
|
Förhindra vattenläckage genom att se till att |
Svenska |
|
|
- Fritt från rännor och behållare, eller |
||
|
dräneringsröret är: |
|
|
|
- Rätt anslutet, |
|
|
|
- Inte nersänkt i vatten |
|
|
|
Efter en längre tids användning eller |
|
|
|
användning med någon bränsledriven |
|
|
|
utrustning, lufta rummet regelbundet. |
|
|
|
Efter en längre tids användning, se till så att |
|
|
|
monteringskonsolen inte är försvagad för att |
|
|
|
undvika att enheten faller ner. |
|
|
|
|
||
Fjärrkontroll |
|
|
|
|
Använd inte uppladdningsbara batterier |
|
|
|
(Ni-Cd) till fjärrkontrollen. Det kan skada |
|
|
|
fjärrkontrollen. |
|
|
För att förhindra tekniska fel eller skador på fjärrkontrollen:
•Ta ur batterierna ur fjärrkontrollen om värmepumpen inte skall användas under en längre tid.
•Nya batterier av samma sort måste sättas i enligt polaritetsmarkeringen.
Strömförsörjning
Håll i nätkontakten – inte nätsladden – och dra, för att koppla ur enheten för att förhindra elchock.
13

Hur den används
MODE
Välja funktionsläge
HEAT - För att få varm luft
•Det tar en stund för enheten att värmas upp. POWER-signalen blinkar under den här funktionen.
•Enheten kanske stoppar varmluftstillförseln för avisningen. Avisningsindikatorn är PÅ under denna funktion.
COOL - För att få kall luft
•För att hålla nere energiförbrukningen i läget COOL, bör gardinerna dras för i syfte att avskärma solljus och utomhusvärme.
DRY - För att avfukta din omgivning
•Enheten arbetar med låg fläkthastighet för att ge en mild nedkylning.
FAN - För att få luften att cirkulera i rummet AUTO - För enklare användning
•Under val av driftläge blinkar POWER-signalen.
•Enheten väljer driftläge var 10 minut beroende på omgivningstemperatur och rumstemperatur.
Fjärrkontrollens display
OFF/ON
TEMP
TIMER |
|
|
|
|
|
|
|
|
|
|
|
|
||||||
|
|
|
|
|
|
|
|
|
|
|
|
|
|
|
|
|
||
ON |
|
|
|
|
|
SET |
||||||||||||
|
|
|
|
|
|
|
|
|
|
|
|
|
|
|
|
|
|
|
|
|
|
|
|
|
|
|
|
|
|
|
|
|
|
|
|
|
|
|
|
|
|
|
|
|
|
|
|
|
|
|
|
|||||
|
|
|
1 |
|
|
|
|
|
2 |
|
3 |
|
|
|||||
|
|
|
|
|
|
|
|
|
|
|
|
|
|
|
|
|
|
|
OFF |
|
|
|
|
CANCEL |
|||||||||||||
CHECK CLOCK
Fjärrkontrollmottagare och indikering
 POWER/DEICE (Grön/Blå)
 TIMER (Orange)
Tryck och håll nere i ungefär 10 sekunder för att visa temperaturinställningen i °C eller °F.
Tryck för att återställa fjärrkontrollen till standardinställning.
Används ej i normal drift.
För att ställa in den horisontella luftriktningen
• Manuellt justerbar.
Auto-knapp OFF/ON
Används då fjärrkontrollen tappats bort eller fungerar felaktigt. Lyft frontpanelen:
• Tryck på knappen en gång för att använda AUTO-läget.
•För att använda COOL-läget ska knappen hållas intryckt tills ett pip hörs, och släpp knappen sedan.
•Om du vill använda enheten i HEAT-läge håller du ned knappen tills 1 pip hörs och släpper den sedan. Tryck sedan på den igen tills 2 pip hörs och släpp den.
•Tryck på knappen igen för att stänga av.
14
 Loading...